

Vastly underused and never to be underestimated, using Masks and Mattes is the key to successful compositing. This chapter presents tips on tried-and-true techniques and also on some of the great new adds like the Auto Trace feature. Hide parts of footage you don’t like or use the luminance channel of a layer to affect the alpha channel of another layer.
You can create masks in AE or import them from programs like Photoshop and Illustrator. Masks can be used as motion paths and can be applied to effects with position data. We’ll show you how to manage one or multiple masks per layer efficiently and effortlessly (well, almost effortlessly).
Using Mattes means faster compositing. You’ll get effects that you just can’t achieve any other way.
Masks and Mattes rock!

To create a mask:
![]() Select any layer, or create a new layer by pressing Cmd+Y (Ctrl+Y).
Select any layer, or create a new layer by pressing Cmd+Y (Ctrl+Y).
![]() Click on the Pen Tool in the Tools Palette.
Click on the Pen Tool in the Tools Palette.
![]() Click anywhere in the composition window to make a vertex point.
Click anywhere in the composition window to make a vertex point.
![]() Continue clicking to add points.
Continue clicking to add points.
![]() Return to the first point you made to close the mask. You’ll see a circle icon appear next to your Pen Tool to indicate you are closing the mask.
Return to the first point you made to close the mask. You’ll see a circle icon appear next to your Pen Tool to indicate you are closing the mask.

When you click quickly on a layer and make a vertex, you make a corner point vertex. If you click and drag one way or another, the vertex point becomes a smooth point, otherwise known as a Bezier Vertex Point. Bezier vertexes have direction handles that you can tweak while drawing or after you’ve closed your masks.
• You can change a vertex from point to smooth (or vise versa) by using the Convert Vertex Tool, which is located beneath the Pen Tool in the Tools Palette.
• You can also press G on the keyboard to toggle between the Pen, Add Vertex, Delete Vertex, or Convert Vertex Tools.
• Hold down the Option+Cmd (Alt+Ctrl) keys to change the Selection Tool into the Convert Vertex Tool.
• Be careful not to have all your points selected because you will convert them all.
• Hold down the Cmd key (Ctrl) over a vertex point to turn the Selection Tool in a Remove Vertex Tool.
• Hold down the Cmd key (Ctrl) anywhere else on the mask to change the Selection Tool to the Add Vertex Tool.
• Option+Click (Alt+Click) to select all points in a mask.
• To invert a mask, press Cmd+Shift+I (Ctrl+Shift+I).
• For a new mask, press Cmd+Shift+N (Ctrl+Shift+N).

RotoBezier vertexes visually resemble Bezier vertexes because they are curved but RotoBezier vertexes differ in that they don’t have handles you can access and manipulate. The RotoBezier option automatically calculates curved segments for you.
You may find it easier to draw a mask, and then convert it to RotoBezier afterward. There might be a shift in shape if you do so however. You can also change a RotoBezier mask into a Bezier mask, which will not cause any change to the mask shape. RotoBezier vertexes are easier to use while rotoscoping because you don’t have to worry about direction handles.
• To draw a RotoBezier mask, click the Pen Tool from the Tools Palette and click RotoBezier. Click and draw in the composition window.
• To convert a mask to a RotoBezier Mask, select the mask in the layer or composition window and choose>Layer>Mask>RotoBezier. You could also select the mask and context click for the flyout menu; choose the RotoBezier option from there.

Open masks are paths that can be used for several purposes.
They can be used for effects that employ masks like Path Text, Audio Waveform, Audio Spectrum, Stroke, or Vegas.Open masks can be used for effects that have positional attributes like Lens Flare, Spherize, most distort effects.
And open masks can also be used as motion paths.
Most of the time, you’ll want to make sure your masks are closed.
• To make sure your mask is closed, select a mask and choose Layer>Mask>Closed.
• You can also select your mask in the composition window and Context click (Right click or Control click) to make sure “closed” has a checkmark by it.
Quick Elliptical or Rectangular Masks
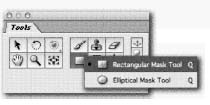
You know you need a mask, and you’d be perfectly happy if it were centered on your layer. Great! Lets save some time.
![]() Select a layer where you’d like to apply a mask.
Select a layer where you’d like to apply a mask.
![]() Double-click on either the Rectangular or Elliptical Mask Tool in the Tools Palette to apply an oval or square mask that fits the layer.
Double-click on either the Rectangular or Elliptical Mask Tool in the Tools Palette to apply an oval or square mask that fits the layer.
![]() Modify the mask, or use it as is.
Modify the mask, or use it as is.

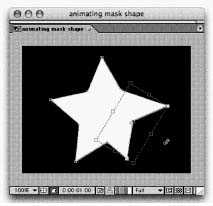
So your mask needs to adjust over time. Don’t most things in life? Not a problem. After Effects offers several functions for keyframing your masks. Let’s get started by clicking the triangle by the Masks to open up the mask properties.
• Click the Mask Shape stopwatch to set a shape keyframe. You can also press Shift+Option+M (Shift+Alt+M) to set an initial keyframe on a selected mask
• Advance in the Timeline and modify your vertexes to make a new shape keyframe.
• Make the workspace as long as your shape mask animation and RAM preview to see After Effects interpolate the shape transformation.
• When modifying a Bezier handle, you will affect both the incoming and outgoing curves. To access one handle at a time, use the Convert Vertex Tool, and drag one of the handles. You can also hold down the Option key (Alt) to do the same.
• If you want to rejoin your handles, use the Convert Vertex Tool to convert the vertex to linear, then back to Bezier again.

So you need to tweak the mask? The easiest way we find is with the Free Transform command.
• To scale or rotate a mask, select the mask then choose Layer>Mask>Free Transform Points or press Cmd+T (Ctrl+T). If the mask is not highlighted, these shortcuts will not work.
• Remember that scaling and rotating occur around the anchor point of the mask. Click and drag on the anchor point to move it.
• Placing your curser over one of the corners will turn it into a rotate symbol. Hold the shift key to constrain rotation to 45 percent increments.
• To disable the preview while you rotate or scale, hold down the option key while you transform.
• To scale a side, place your curser over one of the center bounding box points.
• To scale the entire mask, place your curser over one of the corners, slightly further away than where you mouse to invoke rotation. Hold the shift key to constrain the mask’s proportion.
• Use Free Transform Points to move a mask, and hold the shift key to constrain movement to the X or Y axis.
• Cmd+Drag (Ctrl+Drag) to scale around anchor point; add the Shift key to keep it proportional.
• Return or ESC (Enter) to Exit Free Transform Mask.
Free Transform is great for global change, but it can also be applied to selected vertices of a mask, or even selected vertices of more than one mask.
![]() Select any vertices you want to transform. You can shift-click multiple vertices.
Select any vertices you want to transform. You can shift-click multiple vertices.
![]() Double click to Free Transform Points or press Cmd+T (Ctrl+T).
Double click to Free Transform Points or press Cmd+T (Ctrl+T).
![]() Press Enter or ESC to apply.
Press Enter or ESC to apply.

Not handy with a brush? Not crazy about rotoscoping with the Paint Effects? You can do great rotoscoping with masks (although it’s tedious.)
• For complex areas, split up the job into a few masks rather than trying to animate one intricate mask.
• If you’re going to be adding or deleting vertices you should go to Preferences>General>Persevere Constant Vertex Count When Editing Masks and turn it off. If you delete a point, you will only be affecting that mask shape keyframe, whereas if you leave Preserve Count it on, After Effects will delete that point throughout your layer.
• You should try to maintain your vertex count though. Deleting or adding points to a mask can cause unpredictable interpolation, and can adversely affect motion blur for the mask.
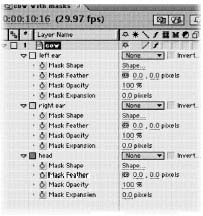
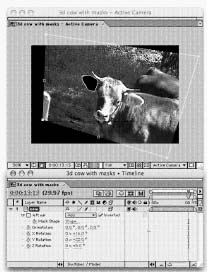
Like anything in life, it’s possible to have too much of a good thing. If you use multiple masks, a little organization can save you a lot of time.
• Name masks by selecting the mask number, hitting return, type a name and hit return again.
• You can change the default yellow color of masks by clicking on the color square by the mask name and selecting any other color. When you change mask color you can visually identify which masks are doing what over time in the composition window.
• Change the order of the masks by selecting and dragging them up or down in the Timeline or by selecting a mask and hitting Cmd+[ (that’s a left bracket) or Cmd+] (and that is a right bracket) (Ctrl+[ or Ctrl+]) to move down or up a position.
• You can select all the vertices of a mask by selecting the mask name in the layer/source window.
• Delete vertex points by selecting the individual points and clicking the delete key.
Accessing Mask Properties Quickly
Doesn’t feel fast enough? Here are a few power tips to get you working with your masks in a jiffy.
| To view all mask properties in theTimelhe | MM |
| Mask Shape in theTimeline | M |
| Mask Feather in theTimeline | F |
| Mask Opacity in theTimeline | TT |
| Mask Shape Dialog Box | Cmd+Shift+M (Ctrl+Shift+M) |
| Mask Feather Dialog Box | Cmd+Shift+F (Ctrl+Shift+F) |

Sometimes you can be your own worst enemy. Using a lot of masks can be troublesome as they can get in your way and be unintentionally modified. If a mask is “locked in,” consider locking it down.
![]() Twirl down a layer to reveal all of your masks.
Twirl down a layer to reveal all of your masks.
![]() In the A/V features column, you can lock an individual mask to prevent changes.
In the A/V features column, you can lock an individual mask to prevent changes.
To hide those masks, choose Layer>Mask>Hide Locked Masks to hide the vertices in the Comp Window. You will still see the results of the locked masks, but cannot make accidental changes.
Each mask with mask shape keyframes can have motion blur. To apply Motion Blur:
![]() Select one or more masks
Select one or more masks
![]() Choose Layer> Masks>Motion Blur and choose one of the Options:
Choose Layer> Masks>Motion Blur and choose one of the Options:
• Same as Layer,-to control the masks blur using the Motion Blur button.
• On-to render the mask blur even if the Motion Blur button for the layer is not selected.
• Off-to apply no motion blur to the mask.
• Click the Enable Motion Blur button in the Timeline window to view the blur.
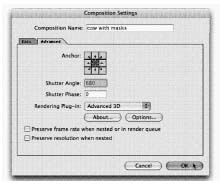
The amount of blur is based on the shutter angle of the composition. To change the amount, go to Compositior>Cornposition Settings. In the Advanced Tab, change the Shutter Angle. The input values are 0-720, and higher numbers create more blur.
Showdown: Layer vs. Comp Window

New to AE 6 is the ability to draw and manipulate masks in the composition window. What does the layer window have that the composition window doesn’t (and vice versa)?
• In the composition window, you can choose to view masks, or not, by clicking the Toggle View Masks button (which is the third button in, on the bottom left side.)
• It’s easier to work on masks in the layer window because you can select your target masks by using the target pop-up menu in the layer window, or in the middle bottom of the window. This way you can choose to edit a mask already on the layer or select Target None to draw a new mask.
You’ll find that you’ll use both the composition window and layer window while using masks. Use the following shortcuts to get from the layer window to the comp window quickly.
• To switch from the Layer Window to the Comp Window, click the comp window icon in the layer window (lower right button) or click the comp window icon on the Timeline (upper right below comp marker button).
• To switch from the Comp Window to the Layer Window, double click in the Comp Window or select a layer in the timeline and press Return on your Keyboard. You can also double click on any layer in the Timeline to open its Layer Window.
• If your windows are still tabbed, click the Comp Window or Layer Window tabs.

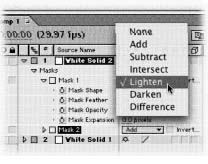
Every mask in After Effects has a mode. Select your layer and hit M on your keyboard to show masks. The Mask mode is visible in the switches column.
• The default mask mode is Add, it means the new mask combines with the previous mask on the layer.
• Masks work based on their placement in the timeline so the subtract will subtract the selected area from all masks above it.
• Intersect adds the mask to all masks above it but will only display the area at which all masks intersect.
• Difference adds a mask to all masks above it and displays all masked areas except the areas where masks intersect.
• Use None when using a mask-based effect. A mask set to None will not affect the transparency of a layer.
To further enhance a mask, vary the opacity of each mask.
• With Add and Intersect, the opacity of all intersecting masks is added together.
• With Lighten, the mask with the highest opacity is used, so opacity doesn’t build up.
• With Darken, where multiple masks intersect, the highest transparency value is used, so transparency doesn’t build up.
• Keep in mind, you can’t animate mask modes.

When you mask an area, you are telling After Effects that you want to show the bit you selected while hiding the rest of the layer. You can invert any mask by checking the invert box in the Switches Column. This will hide the area you masked and show the rest of the layer. Like mask modes, you can’t animate or change an inverted mask without changing its state for the length of the composition.
Any 3D layer in After Effects can have a mask. Only the layer has 3D properties, however, so you cannot draw a mask on the Z axis. You can draw the mask, then rotate the layer on the Z axis though.
Collapsing Transformations can complicate masks on 3D layers. It’s best to leave the collapse switch off.
You can draw a path in Illustrator and paste it directly as a mask in AE. This is handy as you can draw complicated or fun shapes more easily in Illustrator. You can also harness several of Illustrator’s built-in shapes, or convert symbols into shapes for use.
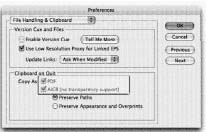
![]() In your Illustrator Files Handling & Clipboard preference, make sure you select the AICB option. Go to Illustrator>Preferences>Files Handling & Clipboard>Copy As AICB>Preserve Paths
In your Illustrator Files Handling & Clipboard preference, make sure you select the AICB option. Go to Illustrator>Preferences>Files Handling & Clipboard>Copy As AICB>Preserve Paths
![]() Create a path in Illustrator, select it, and copy it by choosing Edit>Copy or Cmd+C (Ctrl+C).
Create a path in Illustrator, select it, and copy it by choosing Edit>Copy or Cmd+C (Ctrl+C).
![]() Select a layer in After Effects and paste the path into the layer window or composition window by choosing EdiDPaste or Cmd+V (Ctrl+V).
Select a layer in After Effects and paste the path into the layer window or composition window by choosing EdiDPaste or Cmd+V (Ctrl+V).
You don’t have to save your Illustrator file, but you might want to if you care to access the original path later.

Paths from Photoshop can also be pasted directly into AE as well.
![]() In Photoshop, select the Pen Tool and draw either a closed or open path.
In Photoshop, select the Pen Tool and draw either a closed or open path.
![]() Switch to the Path Selection Tool to select the whole path.
Switch to the Path Selection Tool to select the whole path.
![]() Copy it (choose EdiDCopy) or press Cmd+C (Ctrl+C).
Copy it (choose EdiDCopy) or press Cmd+C (Ctrl+C).
![]() Select a layer in After Effects and paste and chose EdiDPaste or press Cmd+V (Ctrl+V).
Select a layer in After Effects and paste and chose EdiDPaste or press Cmd+V (Ctrl+V).
![]() Paste the path into the layer window or composition window.
Paste the path into the layer window or composition window.
The Custom Shape Tool in Photoshop is a great way to draw vector shapes. You can copy and paste them into AE like freehand paths.
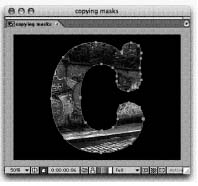
It’s possible to create type as masks as well.
![]() In Illustrator, type a letter in a large point size, then go to Type>Create Outlines.
In Illustrator, type a letter in a large point size, then go to Type>Create Outlines.
![]() Select the path, copy it, and paste it into AE.
Select the path, copy it, and paste it into AE.
![]() Turn on the stopwatch for mask shape.
Turn on the stopwatch for mask shape.
![]() Go back into Illustrator and type a different letter and do the same, but this time, in AE move about a few frames down in the Timeline before pasting your type.
Go back into Illustrator and type a different letter and do the same, but this time, in AE move about a few frames down in the Timeline before pasting your type.
![]() Make sure you have Mask Shape selected in the Timeline. AE automatically makes another mask shape keyframe.
Make sure you have Mask Shape selected in the Timeline. AE automatically makes another mask shape keyframe.
![]() Do a RAM Preview, and see AE morph from one letter to another!
Do a RAM Preview, and see AE morph from one letter to another!
Watch out for letters with negative areas as they will paste as more than one mask. Try animating the opacity of the new masks to sync with your morph. You also may want to give Smart Mask Interpolation a try.

Need to animate complicated motion paths or have an object move around your client’s logo? You can paste Illustrator and Photoshop masks as motion paths in much the same way you can paste them as masks.
![]() In Illustrator or Photoshop, draw a path and copy it.
In Illustrator or Photoshop, draw a path and copy it.
![]() In After Effects select a layer and hit P to bring up the Position Transform property.
In After Effects select a layer and hit P to bring up the Position Transform property.
![]() Paste the path.
Paste the path.
Paths can also be pasted into other spatial properties like Anchor Point or any effect that has keyframeable spatial properties. Make sure to select the property either in the layer name or source name column. Try this with a simple arc path and paste the path into the Lens Flare>Flare Center property.
The keyframes in the motion path will automatically be set to rove in time to create a constant velocity along the path. You can adjust the default duration of two seconds by dragging the first or last keyframe to a new point in time.
Besides Illustrator paths, you can also paste paths from Photoshop and After Effects itself
Smart Mask Interpolation (Pro)

If you’re animating Mask Shape and not getting quite the results you want, it’s time for a new tool. Select your mask shape keyframes and go to Window>Smart Mask Interpolation.
Mask shapes tend not to animate smoothly. Smart Mask Interpolation creates intermediate keyframes based on the settings you choose to create smoother mask shape transformations. You can modify settings in the submenu (click on the arrow on the top right of the palette).
By default After Effects matches the first vertex. A good thing to do if you’re still not getting a smooth animation is to line-up the first vertex of a path. (Thanks to Trish and Chris Meyers for this tip). Choose your first mask shape keyframe, and notice that one of the vertices is slightly bigger than the others. This is the first vertex. Move to the second keyframe and notice it’s the first vertex
Choose a vertex that more closely resembles the first mask shape’s first vertex and choose Layer>Mask>Set First Vertex to designate a new first vertex.
The simplified default settings in Smart Mask Interpolation are decent, and should improve interpolation. Modifying the settings yourself can help but ultimately the best thing is to use two mask shapes that are somewhat similar.
Once you have a motion path, you can use the Pen tool to add keyframes.
![]() Select a layer with a motion path.
Select a layer with a motion path.
![]() Choose the Pen Tool from the Tools Palette.
Choose the Pen Tool from the Tools Palette.
![]() Click on the path to add keyframes.
Click on the path to add keyframes.
![]() Chose the Selection Tool from the Tools Palette or hold down the Cmd Key (Ctrl) to change the Pen Tool to the Selection Tool, and move these new keyframes to new positions.
Chose the Selection Tool from the Tools Palette or hold down the Cmd Key (Ctrl) to change the Pen Tool to the Selection Tool, and move these new keyframes to new positions.
When you add keyframes to a motion path by using the Pen Tool you may want to rove the resulting keyframes in time to maintain constant velocity.

Pasting Masks as paths has become much more complex in AE6. After drawing your path (in Photoshop, Illustrator, or AE) and copying it to the clipboard, paste it onto the appropriate layer. It will sometimes paste as a Mask, not a path (even if you select the word Position before pasting it). The solution:
![]() With the layer selected, type M and select the Mask Shape property.
With the layer selected, type M and select the Mask Shape property.
![]() Cut to the clipboard by pressing Cmd+x (Ctrl+x).
Cut to the clipboard by pressing Cmd+x (Ctrl+x).
![]() Select the Position property and paste by pressing Cmd+V (Ctrl+V)Cmd+v (Ctrl+v).
Select the Position property and paste by pressing Cmd+V (Ctrl+V)Cmd+v (Ctrl+v).

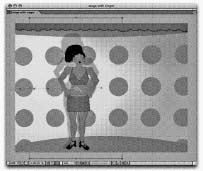
Mattes can be still or motion layers. Create your own mattes in Photoshop. Go to File>New>and choose a resolution of the layer you want to affect.
In both alpha channel mattes and luminance mattes, darker (black) pixels will be transparent and lighter (white) pixels will be opaque. Intermediate shades will produce partial transparency. For soft edges on a matte, use a diffuse brush, run the Gaussian Blur filter, or feather your edges.

We hope you like using masks because certain effects rely heavily on them.
Standard Version:
• PathText
• Audio Waveform
• Audio Spectrum
• Stroke Fill (closed paths only)
• Smear (closed paths only)
Pro Version:
• Reshape (closed paths only)
• Vegas
• Inner Outer Key (closed paths only)
• Particle Playground can also use a mask shape to define effect boundaries
Certain effects have positional attributes into which path data can be pasted
• Lens Flare
• Spherize
• Most distort effects
Need to keep your masks stable but pan your layer? Select a masked layer and choose the Pan Behind Tool from the Tools Palette or press Y. Make sure you are in the composition window and click inside the masked area to move the displayed information.
Notice the masks have moved in the layer window, but not in the comp window. You have actually completed two steps in one by changing the position of your layer and the shape of your masks.
Contain Yourself (Track Mattes)
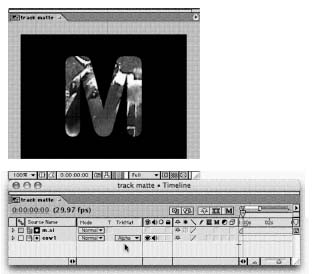
Ever found yourself needing boundaries? We don’t mean rules or a schedule to follow, but rather graphical walls to contain an element. Perhaps you want to take footage of an ocean and have it show through letters, or you want the shape of a client’s logo to contain a data stream. That’s what track mattes are for.
![]() Be sure that you see modes in your timeline (if not click the Switches/Modes button at the bottom of the window).
Be sure that you see modes in your timeline (if not click the Switches/Modes button at the bottom of the window).
![]() Position the two layers in your timeline so the matte layer (the one that cuts) is directly above the fill layer. Be sure there are no gaps between the fill and matte layers.
Position the two layers in your timeline so the matte layer (the one that cuts) is directly above the fill layer. Be sure there are no gaps between the fill and matte layers.
![]() In the TrkMat drop down menu, pick one of the following methods to define transparency.
In the TrkMat drop down menu, pick one of the following methods to define transparency.
• Alpha Matte. Areas with 100 percent alpha channel are opaque.
• Alpha Inverted Matte. Areas with 0 percent alpha channel are opaque.
• Luma Matte. Areas with 100 percent luminance pixels are opaque.
• Luma Inverted Matte. Areas with 100 percent luminance pixels are opaque.
When the track feature is turned on, the matte layer’s visibility is disabled. You can turn it back on,but that usually defeats the purpose. You still have the ability to manipulate and resize the layer, and its transformations will carry through to the matte.
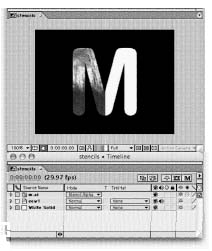
Do you need to use a layer’s alpha channel to cut a hole in the layer below? Easy, right? Use a track matte. But that only works on the layer immediately below. If you have multiple layers to affect, choose to use Stencil or Silhouette mode.
![]() Active the Modes panel in the Timeline window
Active the Modes panel in the Timeline window
![]() Click on the mode list and choose one of the following.
Click on the mode list and choose one of the following.
• Choose Stencil Alpha to create a stencil using the top layer’s alpha channel. This will make all areas of the lower layers transparent except where the object above used to be opaque
• Choose Silhouette Alpha to create a silhouette using the layer’s alpha channel. This will cut a transparent hole where the top layer was opaque.
Don’t have an alpha channel? You can also create Stencils and Silhouettes based on the top layer’s luma values.

Mattes are great, but learn to control them.
• If the track matte layer is taking up precious room in the Timeline, you may want to hide this layer. Press the Shy button for the layer, and turn on the Shy button for the composition.
• If you animate the position, rotation, or anchor point of the affected layer, parent your layers so the track matte layer follows its mate.
• Apply a levels filter to the track matte layer to boost contrast or to animate the opacity of the matte.
• You can also use nested compositions as track mattes!