
Chapter 4. Importing Media
The first step to starting an actual project is getting your media into Adobe Premiere Pro. No matter what kind of project you’re doing, if you can’t import media, you’re stuck. Of course, not everything will come in the way you expect it. So, it’s essential that you know how to modify clips. Adobe Premiere Pro also doesn’t work alone: It’s crucial that you understand the real “superpowers” of the suite. You can draw assets from the rest of the Adobe Creative suite, including Adobe After Effects, Adobe Photoshop, and even Adobe Audition.
In this chapter, you’ll learn about importing files and the effect it will have on your system. You’ll also learn how to bring in audio and even how to record your own narration tracks.

Importing Files into Adobe Premiere Pro
Overall, Adobe Premiere Pro behaves the way most other editorial systems do. It provides a link from the original media to a pointer that lives inside your project. After you’ve imported media files, moving them outside the application can break links.
You can import into Adobe Premiere Pro in three ways:
• Standard importing by choosing File > Import
• The Media Browser panel
• Adobe Bridge
Adobe Premiere Pro Likes Most Formats
![]()
You’ll find that Adobe Premiere Pro can handle pretty much any file format you can throw at it. This is especially true for formats that other edtiorial systems balk at, such as DVD VOBs, FLV, and WMV files. Don’t ever be afraid to import a file to see if a clip can be used.
We prefer the latter two. But whichever way you use Adobe Premiere Pro, it will create a link to your media, whether the media consists of videos, stills, or audio files (or even a dynamic project from one of the other Adobe Creative Suite apps, such as Adobe After Effects).
Materials from the Chapter
![]()
All of the media from Chapter 4 was encoded with the Cineform codec. You can download the free Neo Player at http://estore.cineform.com/NeoPlayer.aspx to use the media.
Standard Importing
Standard importing is probably the most straightforward type of importing you can do, and you’ve been doing it for years. To import any file, choose File > Import. If you prefer to use keyboard shortcuts, press Command+I (Ctrl+I) to open the standard Import dialog (FIGURE 4.1).
Figure 4.1. The Standard OS X Import dialog; note the search box in the upper-right corner.

Let’s import a clip to see this process.
- Choose File > Open, navigate to Chapter Files > Chapter_04_Media > [Version Number], and open the project Ch04_Start.prproj.
This is is an empty project that’s set up for the media in use.
- Choose File > Import.
- Navigate to the Chapter_04_Media > Media folder on your local drive.
Super Fast Imports

Which is the fastest way to import? That’s easy. Just double-click in an empty area of the Project panel to bring up the Import dialog.
Drag-and-Drop Import

Technically, you can drag and drop to import using the default OS file browser—the Finder in Mac OS and Windows Explorer in Windows. If you open a file window in your OS on top of Adobe Premiere Pro, you can drag and drop directly to the browser. This drag-and-drop interoperability is fairly wide and flexible beyond just a file browser. It even works with some other management software, like iTunes and iPhoto.
Grab and Switch Live
If you “grab” a file or files in your file manager while the mouse button is down, you can “switch” (Command+Tab on Mac [Alt+Tab in Windows]) to Adobe Premiere Pro and drop the files directly into the browser.
- Select the first clip (MVI_0152.MOV) and click the Import button.
- Click the New Bin button at the bottom of the Project panel or press Command+/ (Ctrl+/).
- Name the bin Imported and drag the clip into the new bin.
- Repeat these steps for the four other clips that start with MVI.
Using the Media Browser
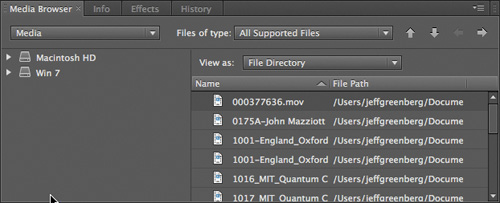
Our favorite import method, by far, is the Media Browser (FIGURE 4.2). Its flexibility makes it superior to the standard file system import. Not only does it display the files in a straight list, but it also adjusts the view using the metadata. Being able to see this metadata makes it far easier to select from long lists of files or shots.
Figure 4.2. The Media Browser has the capability to display clips and cards from popular formats like P2 and XDCAM.
The Common Media Folder
![]()
We have a standard template we like to use for all new projects. It’s a series of folders that you can use to get and stay organized at the desktop level. In this video, you’ll explore the Common Media Folder approach to media management.
By default, you’ll find the Media Browser in the lower-left corner (if your workspace is set to Editing). You can also quickly access it by pressing Shift+8. Because it’s a dedicated panel in Adobe Premiere Pro, you can save it to a specific workspace or move it around so it lives in a different part of the interface.
To improve playback and lessen the load on the CPU, some formats—particularly the more compressed HD formats—will need indexing and caching. As you import these files, Adobe Premiere Pro takes a moment and builds an internal index to lessen stress on the system.
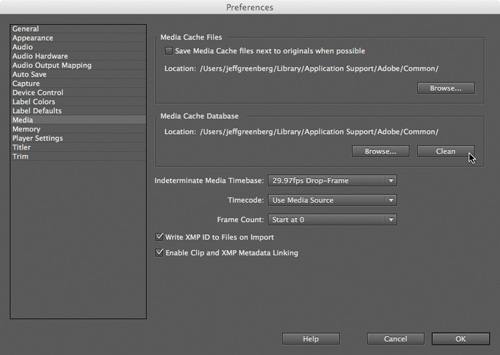
Configure the settings for the media cache by choosing Preferences > Media.
Cache files are generally small. You have the option to move them (as mentioned in Chapter 3) to live with the actual media. The main advantage of this would be to offload these files from the internal hard drive. The disadvantage is that they’re system based, not project based; there’s no way to communicate to a different system that the cache files are with the original media.
The Media Cache Database shouldn’t ever be moved. But on a regular basis, it should be cleaned (FIGURE 4.3). How frequently you do that depends on your facility. If you’re a news organization, you probably ought to clean this on a monthly basis at the minimum.
Figure 4.3. It’s suggested that you clean the Media Cache Database on a regular basis.
Projects Too!
![]()
Yes, Adobe Premiere Pro projects and After Effects projects can be imported as well. Adobe Premiere Pro only permits one project to be open at a time. If you want to access a second project, you can import it.
The major benefits of the Media Browser include:
• Auto sensing of camera data—AVCHD, Canon XF, P2, RED, Sony HDV, and XDCAM (EX and HD).
• Narrowing the display to a specific file type, such as JPEG, TIFF, XML, AAF, and more.
• Viewing and customizing the display of metadata.
• Spanned clips appear as a single element.
Once open, you’ll find that the Media Browser is not significantly different than browsing using the OS. You can navigate through the folders on the left side and use the up, down, left, and right arrows in the upper-right corner.
Camera media
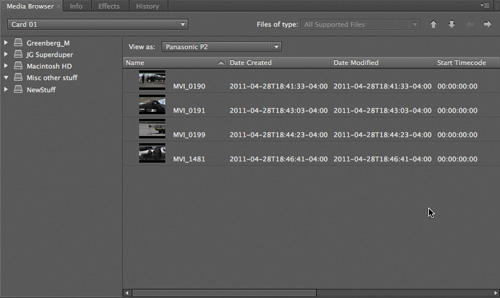
Adobe Premiere Pro’s Media Browser (FIGURE 4.4) automatically recognizes camera media, meaning that if you navigate into a directory of XDCAM, P2, or Red files (amongst others), it will auto recognize the footage. This makes it easy to use and adjust metadata from the field.
Figure 4.4. P2 card import in the Media Browser.
Open Without Opening
![]()
You can open any clip in the Source Monitor without actually importing it into Adobe Premiere Pro. If you do, choose to directly edit it to your Timeline, and it’ll automatically be added to the project.
When Is It OK to Cheat?
![]()
Although we’re advocating staying organized, both within and outside of Adobe Premiere Pro, there are “rush” workflows, like news workflows, where the amount of total time is measured in minutes from start to finish. It’s OK to be sloppy under these conditions.
Let’s use the Media Browser to import the rest of the clips on the P2 card.
- Start with the same project from the preceding exercise.
- Click in the Media Browser or press Shift+8.
- Press the grave accent (`) key to display the Media Browser in full screen.
- Choose Chapter_04_Media > Media > Card 01.
- Select the four clips, and choose File > Import from Media Browser.
- Press the grave accent (`) key to return the Media Browser back to normal size.
- Click the Project panel to make it active, and create a bin called From Media Browser.
- Move all the clips into that bin.
Manually Sift
![]()
Sometimes you’ll be looking in a folder that contains both media and other files. When this happens, Adobe Premiere Pro will automatically assume the files are camera media, ignoring other elements you might want. You’ll need to manually switch the folder view back to a standard file listing to see those files.
Narrowing file types
Being organized in the editorial process is a key skill, both within and outside of Adobe Premiere Pro. Yet, sometimes you’ll find yourself scanning a long list of files for a specific format (FIGURE 4.5). An easy way to reduce the number of files you’re looking at is to limit the file types to the specific format you need.
Figure 4.5. Not only can you limit the files to a specific format, but you can also select multiple formats, such as stills, which makes finding just the stills in a directory quick and painless.

Customizing the Metadata in the Media Browser
Having all the metadata information is ideal, especially if you work with XDCAM or P2, where you can set information like scene number and ratings while you’re out in the field. But metadata isn’t very valuable unless you can access it. Fortunately, the Media Browser permits that. Adobe Premiere Pro maintains a custom directory view for each format.
Here’s how to access the different Directory Viewers.
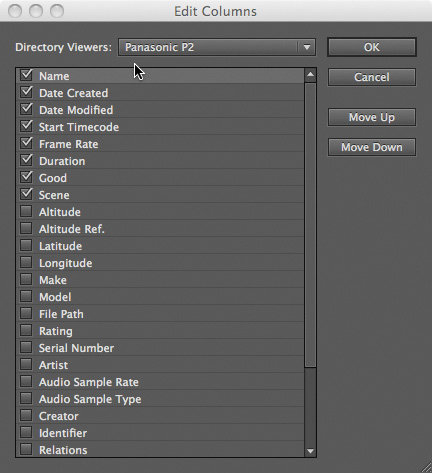
- In the top right of the Media Browser panel, click the panel menu and choose Edit Columns.
- Select a Directory Viewer to customize, such as P2 (FIGURE 4.6).
Figure 4.6. Remember that each Directory Viewer is unique; customizing P2 doesn’t customize XDCAM (or any of the others).
- Add or remove columns by selecting them relevant to your needs.
- Use the Move Up or Move Down buttons to rearrange the order of columns.
- Click OK to store your column settings.
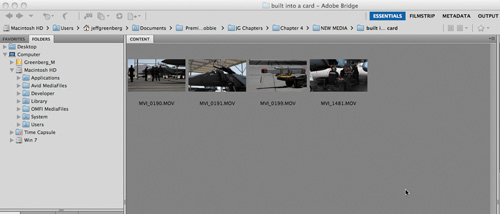
Adobe Bridge
Most people encounter Adobe Bridge (FIGURE 4.7) via Adobe Photoshop. In case you’ve never used it, it’s a dynamic media browser—think of it as a file browser on steroids. It’s a media browser that is optimized (right now) mostly for still photography, but has loads of power for video users.
Figure 4.7. Adobe Bridge is a versatile program in its own right. Notice Filtering on the left side and Video Metadata on the right side.

You can manually open Adobe Bridge by clicking its application icon. You can also choose File > Browse in Bridge to automatically launch Adobe Bridge and point it to the same directory that the Media Browser is viewing.
What’s Wrong with Adobe Bridge?
![]()
The only downside to Adobe Bridge is that it doesn’t recognize all formats. It handles images and QuickTime files just fine, but it doesn’t recognize file-based cameras or image sequences. For those formats, use the Media Browser.
Adobe Bridge has a few killer features you should know about. They are optional uses but are very powerful in and out of the video workflow, acting as a significant replacement for your native OS file system. The two features we’ll focus on are adding metadata and rating clips with stars, along with Batch Renaming and Building a collection (on the accompanying DVD).
Adding metadata with Adobe Bridge
Metadata is additional data about the actual video in the shot. It could include information like the frame size of the shot or the scene number. With stills, metadata can include all sorts of common EXIF data, such as aperture, location (if the camera has a GPS chip), and camera model or lens.
What Is EXIF?
![]()
The EXchangeable Image File (EXIF) format specifies additional data for stills and audio but unfortunately not video.
You’ve imported material earlier in this chapter. By adding the metadata to the Quick-Time files, you’ll be able to contrast your existing imported files by importing the same files after you’ve added metadata. The choice to add metadata offers additional organizational ability in Adobe Premiere Pro, such as being able to sort on information like shot type. Because the metadata stays with the clips, the media will be easier to organize in the future if you bring the clips into a new project.
- Continue working with Ch04_Start.prproj.
- Launch Adobe Bridge by choosing File > Browse in Bridge.
- Navigate to the Chapter_04_Media > Media folder (FIGURE 4.8).
Figure 4.8. The Folder tab in the top left of Adobe Bridge permits navigation similar to your native OS file system.
Before and After Comparision
We’ll modify the metadata and reimport the same clip as earlier in this chapter. If you didn’t complete the earlier sections, it’s not an issue: You just won’t be able to compare the new import, which has extra metadata, with the old imports.
- Select all the MVI video clips.
- Click the pencil next to the Scene descriptor (FIGURE 4.9) under Video in the Metadata panel.
Figure 4.9. Customizing the Scene metadata. You can change any field that has a pencil next to it.

- Add the scene number 15.
After the metadata has been added to the clips, they’re permanently modified.
Closer To Truth
![]()
Some screen shots and footage for this chapter are from the PBS series Closer To Truth; Cosmos, Consciousness, God. © The Kuhn Foundation. Robert Lawrence Kuhn: creator, executive producer, writer and host. Peter Getzels: producer and director. Find out more about the series by visiting www.closertotruth.com.
Rating clips in Adobe Bridge
If you’re working with QuickTime-based media, you can quickly apply star ratings to your clips (FIGURE 4.10). This makes it easier to make qualitative judgements.
Figure 4.10. Rating clips makes it easy to find the best clips.

In Adobe Bridge, make sure you’re using the Essentials workpsace.
- Select a clip by clicking it. It loads into a player in the upper-right corner. You can use standard controls to play back the video and listen to audio.
- Choose Label and select one of the star ratings.
You can rate the image between 0 and 5 stars. A useful shortcut in Adobe Bridge is to press Command+5 (Ctrl+5) for a five star clip. You can use the numbers 0–4 to apply other stars as well.
Building a Collection in Adobe Bridge
![]()
In this video you’ll learn how to use ratings and keywords. You can then have Adobe Bridge build collections to help you locate footage quickly. This video shows you how to sift, sort, and then move the data at the desktop level or into an Adobe Premiere Pro bin for organization. You can even create dynamic Smart Collections that will automatically gather footage that meets your key criteria.
Some editors with QuickTime-based clips use Adobe Bridge as a preprocessing tool. This lets them (or a client/producer) quickly rate material before it’s brought into Adobe Premiere Pro. This metadata is also embedded with the clips when you bring them into a different project.
Viewing metadata from Adobe Bridge
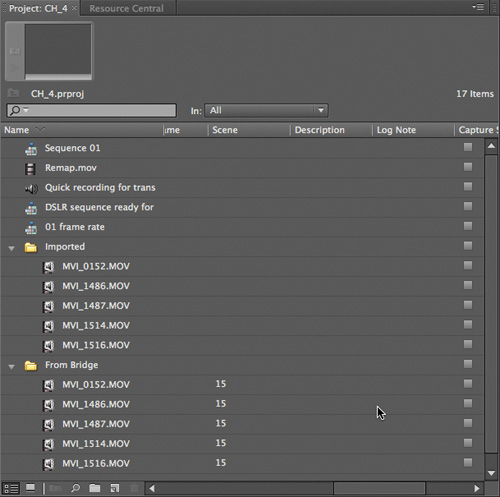
You’ve now imported the clips in two ways: once before the Scene metadata was added and once after. Both clips exist in the same project. Let’s make a quick comparison of this information.
- In Adobe Bridge, select the five clips that you just added metadata to.
- Choose File > Open or press Command+O (Ctrl+O). The clips should now be imported into the Project panel in Adobe Premiere Pro.
- Create a bin called From Bridge, and move all the clips into that bin.
- Click the Project panel to open it or press Shift+1.
- Press the grave accent (`) key to view the Project panel full screen.
- Click the disclosure traingle to open the From Media Browser folder and the From Bridge folder.
You should see the same clips in both folders except for the one clip in the Imported folder.
- Scroll to the right until you see the Scene column.
Note that the items in the From Media Browser bin do not have the Scene number, yet the ones that were imported from Bridge do. The only reason the newer clips have this data is that they were imported after you added the data in Adobe Bridge (FIGURE 4.11). If you were to import them now via the Import command or via the Media Browser, the new import would also have this metadata.
Figure 4.11. Note the differences in the Project panel between the two lists of identical files. Adobe Premiere Pro can only display metadata that was embedded in a file prior to its import.
- Choose the Metadata Display option from the Project panel menu.
- Using the search field, type in a rating.
- Select the check box to add the field and click OK.
You can now scroll to see the star ratings.
- To rearrange the order of columns, just hold down the Option (Alt) key and drag the columns left or right in the Project panel.
Batch Renaming Clips in Adobe Bridge
![]()
In this video you’ll learn how to use Batch Rename to quickly add the date and time to a series of clips, providing each with a unique name. You can even preserve the original filename in the clips so you can cross-reference your archived media from the shoot. The Batch Rename command is particularly useful for cameras like DSLRs that don’t assign unique clip names.
Tape-based Workflows
For decades, videotape was the format for most individuals choosing to edit. The original tapes could be stored on a shelf and be available for recapture if they were ever needed in the future.
The downside of using videotape has always been the cost of the consumables—videotape—along with the restiction that acquisition was forced to be real time (compared to tapeless, which can be faster than real time).
For more information on tape-based workflows, see Appendix C, “Capturing from Tape-based Formats,” on the DVD.
Tapeless Workflows
It used to be that most of the media you dealt with was recorded on tape. The beauty of tape-based formats is that there is a raw tape that can be stored and retrieved as needed. However, most videographers are going tapeless (FIGURE 4.12). The advantage of being able to acquire footage faster than real time is the killer feature.
Figure 4.12. A Panasonic P2 card.

What makes Adobe Premiere Pro particularly amazing is its ability to work with tapeless formats without any transcoding or rewrapping. Yes, you’ll need a robust system, and yes, a system with the GPU-based Mercury Playback Engine is the key component here for system performance. The ease of the workflow on your system to handle media natively means that you don’t need to waste time; you can start editing immediately.
When to Transcode?
![]()
Some workflows still require transcoding with Adobe Premiere Pro. These mainly include scenarios where you want to hand off your edited material and a project to another system, such as Apple Final Cut Pro or Avid Media Composer. These workflows are discussed in the appendixes of this book on the DVD.
Mounting the Card
To load the tapeless media onto your system, you’ll need the appropriate card reader or drive. For many formats, this will mean an approved hardware device from the manufacturer (such as a P2 card reader or XDCAM drive; FIGURE 4.13). In other cases you may be able to use a generic third-party device (such as a CF card reader). Some cameras and hard drive recorders will require you to hook up the actual device to transfer the media. In any workflow, be sure that you attach the device to the fastest port and connection protocol supported by your machine.
Figure 4.13. A Sony XDCAM deck reads XDCAM media.

Creating a Clone and a Copy
Although it’s possible to work directly from a card or field disk, it isn’t a permanent solution. Because tapeless media is expensive, you’ll probably want to reuse it! Therefore, you need to make sure the content on your tapeless media is archived. The footage coming in from tapeless sources should be moved to at least two locations (not on the same drive).
Storing your media can actually be done by using two separate but related methods:
• Transfer the media. Whether it’s by unwrapping or simply copying the footage contained on a tapeless media device, the first step in archiving is to make sure that you have a “live” version of the footage.
• Back up the media. After footage has been transferred from the tapeless media, the next step is to create a backup of the tapeless media on your computer. In the world of tape this process is akin to putting tape back on the shelf after you’ve captured it.
In a Hurry? Don’t Forget to Back Up
![]()
If you’re in a rapid turnaround environment (such as news), you may choose to edit directly from the tapeless media. Just remember that neither the Import command nor the Media Browser actually copies the footage to your drive. Before you hand the cards back to a videographer (or erase them), be sure to use the Project Manager to copy the used media to one of your media drives.
When you make a copy of your media, it’s not enough to just drag and drop files. In most cases it’s crucial to maintain the file structure of the original tapeless media when copying to a backup device and your media drive. If you discard the metadata and folder structure on the card, you can lose important information and face challenges when importing spanned clips.
We’re big fans of cloning the disks. These clones are bit for bit verified copies of the originals. You’ll find this capability built into Apple’s Disk Utility tool, which allows you to create a disk image (.dmg) file. Unfortunately, Windows 7 doesn’t offer the same built-in feature.
If you want a cross-platform tool that’s incredibly robust, be sure to check out ShotPut Pro from Imagine Products (www.imagineproducts.com/ShotPut.html). ShotPut Pro allows you to automate copying of tapeless media to up to three separate locations. It also has a great set of tools for verifying copies and creating additional backups to optical formats, and has workflow tools like the capability to reformat tapeless media rather than having to do it in camera.
Spanned Clips
Some formats (such as P2 and XDCAM) will create multiple spanned clips to represent a single video file. A spanned clip divides the material into separate files to keep the length of any one file under a threshold (such as 4 GB). Although spanned clips are physically stored as separate files, they should be handled by Adobe Premiere Pro as a single clip.
Here are some important tips concerning spanned clips:
• Select only one clip. The key to importing spanned clips is to only select one of the clips in the span. If you select more than one spanned clip, you will end up importing duplicate copies of the media.
• Keep the XML. The reason you cloned the entire card was to retain all of the metadata. Without this data, spanned clips typically cannot be reassembled.
• Jumped cards. If the clip spans two P2 or XDCAM cards, it’s important to copy the entire directory for both cards to your drive. The copies should be at the same level in a media folder.
• Favor the Media Browser. The most reliable way to import spanned clips is with the Media Browser. However, you can also use the Import command (File > Import) in most cases.
The RED One camera has been quite a revolution in filmmaking. The camera and the images it produces rival what’s possible with physical 35mm film. Adobe Premiere Pro has also announced support for the RED EPIC camera, HDR RED, and 5K footage (just visit labs.adobe.com).
The unique part of the Adobe and RED partnership is the focus on a truly native raw workflow. This means that the footage stays as close as possible to what was shot on set or in the field. You never need to transcode the footage (which essentially “bakes” the color and exposure into the clips). This lets you freely adjust the look and feel of your footage all the way through post.
The following RED R3D file permutations are supported:
• 2K
• 3K
• 4K
• 4K HD
• 5K (plug-in from labs.adobe.com)
• 16×9
• 2×1
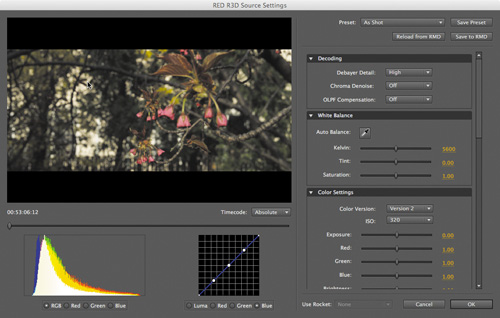
The RED R3D Source Settings dialog (FIGURE 4.14) offers extensive controls over RED footage. You can change color settings, create your own presets, and even modify multiple clips at once. The Source Settings permit you to adjust the RED footage prior to any other adjustments (such as applying the Three-Way Color Corrector) in Adobe Premiere Pro.
Figure 4.14. The RED R3D Source Settings dialog allows for adjustments on the curve, to the ISO and more. A very short RED clip is available with the Chapter 4 media for you to experiment with, courtesy of Yan Shvalb of DigitalFilmCreators.com and Lertavu.com.
Supported File Types
Clients throw everything at us. It’s rare that they understand that certain formats aren’t optimized for video editing. In their heads, video is video, photos are photos, and audio is audio regardless of where it came from.
Get ProRes
![]()
Apple’s ProRes codec (decoder only) can be downloaded from Apple’s Web site (just search the Downloads section). We also recommend getting QuickTime 7 (and to pay for the Pro install, which contains extra features) at www.apple.com/quicktime/download.
It’s always best to work with the least compressed file type, with the XDCAM files instead of the Flash file that was posted to the Web, and with the TIFF rather than the JPEG from your client’s smartphone. Realistically, we don’t always get these choices. Fortunately, Adobe Premiere Pro handles almost everything.
Install the Avid Codecs
![]()
Avid’s DNxHD codecs are available for free download at www.avid.com/support/codecs. This makes working with Avid projects and media far easier.
The full list of supported formats can be found at http://adobe.ly/supportedformats.
For all supported formats, remember that they’re imports, not captured footage. Adobe Premiere Pro merely links to them. If you move them (or eject the card), you’ll no longer have access to the footage (it’ll then be offline). You need to copy or clone the desired media to your media folder at the operating system level.
Footage Files
Adobe prides itself on keeping up with the latest changes in camera technology in Adobe Premiere Pro. As such, you’ll often see “dot” updates available that add support for new cameras. The full list of supported formats can be found at www.adobe.com/products/premiere/native-tapeless-workflows.html. These formats can be read by Adobe Premiere Pro, providing access to their metadata. Some manufacturers provide drivers to mount their material on your system. Some also have their own players or utilities that allow you to examine the footage, assign card names, and adjust metadata. We strongly suggest that you visit your manufacturer’s Web page and stay abreast of the latest information for your camera.
A Swiss Army Knife
![]()
Adobe Premiere Pro can also handle formats that were never meant for editing. You may find Adobe Premiere Pro’s capability to handle diverse files like WMV, DVD Video Objects (VOBs), and Flash Video useful. They’re distribution formats—small files with tremendous compression. But sometimes they’re all the client has.
The major tapeless formats supported by Adobe Premiere Pro include:
• Any DSLR camera that shoots H.264 directly into QuickTime
• Panasonic P2
• RED ONE, RED EPIC, and the RED Mysterium X
• XDCAM, XDCAM EX, XDCAM HD 50
• Sony HDV (when shot on removable media)
• AVCHD cameras
• Canon XF
• AVC-Intra Frame (50/100 Mbs)
Getting Footage from a Final Cut Pro User
![]()
If you get footage from a Final Cut Pro user, make sure it uses the ProRes codec. When it comes to formats like XDCAM and DVCPRO-HD, Final Cut Pro rewraps the material into a QuickTime movie with its own codec. These codecs may not be available on a system that doesn’t have Final Cut Pro installed. One potential workaround is to install the licensed version of QuickTime Pro, which improves communication and can make some codecs work in Adobe Premiere Pro. You can also check out Cailbrated Software, which sells codecs that can directly access XDCAM, P2, and other codecs (www.calibratedsoftware.com/products.asp).
Graphics Files
Adobe Photoshop is a graphics tool used by 98 percent of all video editors. Fortunately, Adobe has also integrated a lot of Photoshop’s image handling features into Adobe Premiere Pro. You can import most formats, including JPEG, TIFF, PNG, and PSD files.
Edit Original
![]()
Nearly every format supported has the option to open it in its native application. For example, to send a graphic back to Photoshop, just right-click and choose Edit Original or press Command+E (Ctrl+E).
Here are a few key points to keep in mind when importing graphics into Adobe Premiere Pro:
• PDF files won’t work. Perhaps it’s because PDF files span multiple pages that they won’t work. It’s a concept that just doesn’t make any sense in the video world. You can open a PDF in Photoshop and crop or extract images.
• Develop DNG/Camera Raw files. You should process any raw still images using Adobe Lightroom or Photoshop. We recommend developing and saving 16-bit TIFF files.
• Stick to RGB. Make sure your graphics are in RGB mode. In Photoshop choose Image > Mode > RGB. In Adobe Illustrator choose File > Document Color Mode > RGB. CMYK and even Grayscale will cause weird color shifts or even incompatibility. Keep in mind that Illustrator files will be flattened.
Codec Packs Warnings
![]()
If you’re a Windows user and you want to use a codec pack, be forewarned. Be very, very careful about installing any codecs not from professional video manufacturers (such as the K-Lite Codec pack). Depending on how they instruct Windows to work, Adobe Premiere Pro and other video tools may no longer correctly play back.
• Go big if you want. Unlike other editing tools, which limit their graphics to 4000 × 4000 pixels, you’ll have greater range in Adobe Premiere Pro. The maximum still or movie image frame size that can be imported is 256 megapixels. There’s also a maximum dimension of 32,768 pixels in either direction. Of course, do keep in mind that bigger images use more RAM and need faster disk speeds to display.
Understanding Bits per Channel
![]()
Video professionals describe how many steps per channel as bit depth. Most video has 8-bits per channel (2^8 = 256), which equals 256-steps per channel. Because there are three color channels on a computer (Red, Green, and Blue), they yield millions of colors. Some video formats support 10- and even 12-bits per channel. If you’re working with still images or rendered computer graphics, they can be brought in at 16-bits per channel.
Photoshop (PSD) files
One of the best features that illustrates how well the Adobe family communicate is the ability to import a layered Photoshop file into Adobe Premiere Pro (a workflow we explore in Chapter 12). When you import a layered Photoshop file, the dialog in FIGURE 4.15 appears. Here you have four choices; each gives you a slightly different result:
Understand the Creative Suite Graphics Workflow
![]()
If you want to fully understand how to use the Adobe Creative Suite to build video graphics, we can recommend a great book: Motion Graphics with Adobe Creative Suite 5 Studio Techniques (Adobe Press, 2010) explores Photoshop, Illustrator, After Effects, and Adobe Premiere Pro.
Figure 4.15. The Photoshop Import dialog. Good naming conventions in Photoshop equals ease of knowing what to import to Adobe Premiere Pro.
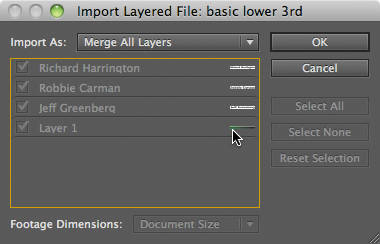
• Merge All layers. This option brings in a single file and merges the layers based on what was visible when the file was saved in Photoshop. The new file will occupy one track in your Timeline panel.
• Merged Layers. This option allows you to bring in a single merged file. You can choose which layers you want to be visible. The new file also occupies only a single track.
• Individual Layers. This option lets you bring in each layer as an individual file. You can choose which layers you want to import.
• Sequence. This option is similar to the Individual Layers option. The difference is that you get a sequence that matches the Photoshop file’s appearance. This makes it easy to animate layers with keyframes (see Chapter 12). You can place the sequence as a nested item inside another sequence.
What Works from Photohop?
![]()
We find that layer masks, adjustment layers, opacity, clipping paths, vector masks, and layer effects come across. Most blending modes do, but some don’t. All in all, it’s the best compatibility we’ve seen in an editorial tool.
If at any point you want to force a graphic to update in Photoshop (such as to adjust exposure or use the Clone Stamp tool to remove something), it’s easy. Select the clip in your sequence or Project panel and choose Edit > Edit in Photoshop.
The Adobe Photoshop to Adobe Premiere Pro Workflow
![]()
In this video you’ll learn how to create a Photoshop file from within Adobe Premiere Pro. You’ll also learn how to use the Camera Raw module to develop a photo from a DSLR. We’ll even explore advanced options like the Lens Correction filter, Content-aware Fill, and the Content-aware Scale command to selectively resize a photo.
Illustrator (AI) files
Unlike Photoshop, Illustrator stores most graphics as mathematical vectors. The benefit is infinite scaling to size for specific applications, like printing or when working with vectors in After Effects. No matter how much a vector file is scaled up or down, the graphic remains crisp in Illustrator (or After Effects).
When you import a vector graphic from Illustrator into Adobe Premiere Pro, it will rasterize (be converted to pixels). If you scale it larger, the image will become pixelized. An Illustrator file comes across only as a “flattened” item—all the layers are combined.
If you intend on scaling up the graphics more than 125 percent, it’s best to open them in Illustrator and adjust the scale there. Simply choose Edit > Edit Original from within Adobe Premiere Pro to open the vector file. When you’re finished, close the file and save your changes. The linked file will update within Adobe Premiere Pro.
The Adobe Illustrator to Adobe Premiere Pro Workflow
![]()
In this video you’ll learn how to scale elements in Illustrator. You’ll also learn how to use the video-oriented document presets and to adjust the artboard area so that the finished work is visible in Adobe Premiere Pro.
Audio Files
Pretty much every audio format you’ll encounter will work in Adobe Premiere Pro. You can toss in MP3, AAC (mp4), WAV, and AIFF. With that said, it is far better to work with uncompressed audio files. Otherwise, you’ll be forcing your system to work harder than necessary, which can lead to dropped frames and drifting sync during playback.
The best way to lessen the stress on your computer’s CPU is to transcode. It’s generally discouraged to waste computing power on dynamically converting audio that can quickly be converted into an uncompressed file. You can transcode audio from either Adobe Premiere Pro or Adobe Media Encoder.
Transcoding Audio in Adobe Media Encoder
![]()
In this video you’ll learn how to build a Watch Folder to convert any MP3 files to uncompressed audio with the Adobe Media Encoder.
Here’s how to transcode in Adobe Premiere Pro.
- Choose File > Import, navigate to Chapter Files > Chapter Files > Chapter_04_Media > Media, and import the MP3 file Quick Recording for Transcoding.
- Select the file Quick Recording for Transcoding in the Project panel.
- Choose File > Export > Media.
- In the Export Settings panel (FIGURE 4.16), choose Audio Interchange File Format (AIFF) from the Format menu. Alternately, you can also choose Waveform Audio File (WAV).
Figure 4.16. The Export Settings panel. Normally, with audio, we choose 48 kHz for the sample rate (tradtionally, 44 kHz was an early digital setting).

For AIFF there is only one preset choice. If you’re using a Windows system, traditionally, you might choose the Waveform (WAV) audio file from the Format menu instead of AIFF.
- Choose a location in which to save the file (such as your media drive) and click Export. The file is transcoded to the specified location.
- Choose File > Import and navigate to the recently exported file to reimport it into Adobe Premiere Pro.
Sometimes you’ll need a scratch track until a professional voiceover artist can do a read. And sometimes you have to be that voiceover artist. Either way, Adobe Premiere Pro is set up to record directly to the Timeline, allowing you to quickly and easily record your own voice.
Let’s try recording an audio scratch track. You’ll need a microphone attached or built in to your computer.
- In the Ch04_Start project, open the sequence called DSLR Sequence ready for audio recording.
This sequence already has both a mono and a stereo audio track, which should work with whatever microphone is attached to your system. We’ll be using the mono track in the instructions.
- Choose Window > Workspace > Audio to change your workspace.
- In the Audio Mixer panel, click the microphone to target Audio 1 to record in the Audio Mixer panel (FIGURE 4.17).
Figure 4.17. Audio Mixer panel. Notice the microphone to arm a track and the red Record button at the bottom.
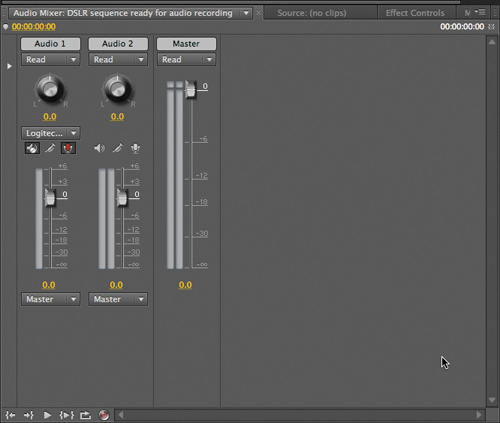
If you have more than one audio input device, you’ll see a menu of choices that allows you to select the appropriate audio input.
- Solo the track you’re going to record to. It’s usually confusing to hear any other audio.
- Click the red Record button to arm the Audio Mixer for recording.
- Click the Play button in the Audio Mixer tool panel.
- Speak into the microphone and record 10 or so seconds of audio.
- Click the red Record button to stop. The recorded audio file will end up in your project and in the targeted track for your sequence.
Modifying Clips
Sooner or later, footage will be captured incorrectly, imported wrong, or just plain need modification. There will be lots of times when you’ll need to break the rules (such as when dealing with overcranked footage). This section explains exactly how to make important changes to how your footage plays back and is used.
Change Early
![]()
You can only change the audio channels for imported items before the clip has been added to a sequence.
Adjusting Audio Channels
As you learned in Chapter 3, Adobe Premiere Pro has what you may be used to—mono tracks. But equally important, it also has stereo tracks and 5.1 tracks. A stereo track is a single track where you’d put a stereo clip, or music.
You may be familiar with other editorial tools that use a pair of tracks to handle stereo (usually a pair of mono tracks). A cool feature of Adobe Premiere Pro is that you’re able to handle the audio easier because it’s a single unit.
Switching stereo (or 5.1 clips) to mono
Of course, what can happen accidentally is that a clip is detected or captured as stereo. To fix it, all you have to do is choose Clip > Modify > Audio Channels and change the track format to Mono (FIGURE 4.18). You’ll then have two discrete tracks with individual gain and panning abilities.
Figure 4.18. Choose Clip > Modify > Audio Channels to change the audio information. Just remember that if the audio clip is being used in a Timeline, Adobe Premiere Pro won’t let you change it!
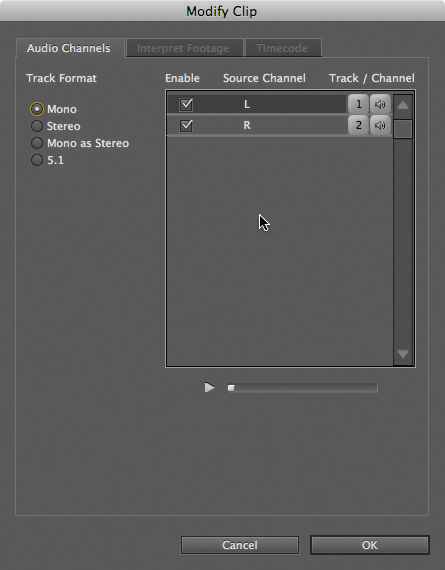
Switching mono clips to stereo
You may be in a situation that’s opposite of the previous scenario: A clip you’re using has two discrete channels and you want them to behave like a stero clip. Not a problem; just choose Clip > Modify > Audio Channels and change the track format to Stereo.
Forcing stereo or mono on import
When you import audio, Adobe Premiere Pro automatically assigns the type of audio. This happens based on the Audio Preferences. You can resolve 99 percent of improper audio imports by setting Adobe Premiere Pro’s Preferences correctly.
- Choose Premiere Pro > Preferences > Audio (Mac OS) or Edit > Preferences > Audio (Windows).
- Set the audio to the proper type—Mono or Stereo—depending on how you want Adobe Premiere Pro to interepret your audio.
In situations in which you are bringing in music or used a stereo microphone, set the preference to Stereo.
In situations in which you’re bringing in audio with multiple mono tracks, such as an interview where each person has a microphone, set this preference to Mono.
Interpreting Footage
There are some very good reasons for interpreting your footage. They include graphic files or footage that is missing a flag for pixel aspect ratio correction or correctly removing extra frames from 24p material.
Of course, anytime you monkey with the way that Adobe Premiere Pro interprets the footage (FIGURE 4.19), you’re taking the chance that your footage might not look right. Choose the wrong setting and your alpha channel may be reversed or a video file won’t play back due to an incorrect frame rate.
Figure 4.19. The Interpret Footage dialog allows you to modfiy the way Adobe Premiere Pro handles your clips. Be careful; there is no easy reset.
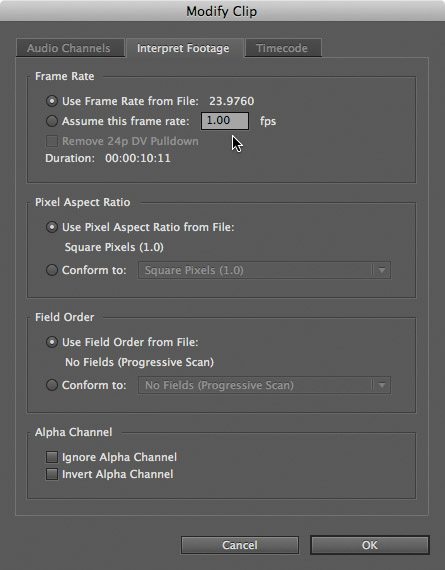
But sometimes you’ll have to tweak these settings, if, for whatever reason, they were interpreted incorrectly.
For this exercise, we’ll use a new project file. Choose File > Open, navigate to Chapter Files > Chapter_04_Media > [Version Number], and open the project Ch04_Importing.Media.prproj.
Assigning a frame rate
The footage frame rate is set in the camera, but the sequence frame rate is set by you when you create it. You can of course cut footage of differing frame rates together into the same sequence, and Adobe Premiere Pro will automatically blend the frames so the proper speed is maintained.
But what if that’s not what you want? Perhaps you shot footage at 60 frames per second to conform it to play back at 30 frames per second. This technique only works with cameras that have a high frame rate (like 720p60 cameras). Otherwise, your best bet is to choose Clip > Speed/Duration to change the speed of the clip, which is mentioned in Chapter 7. With this technique, you’ll get a nice, slow-motion effect.
Let’s slow down a clip that has been shot at 60 frames per second.
- Open the sequence 01 Frame Rate.
- Play back the footage and observe the speed of the biker.
- Choose Clip > Modify > Interpret Footage (FIGURE 4.20).
Figure 4.20. The Interpret Footage dialog with the speed changed to 29.97.

- Select the “Assume this frame rate” option and enter 29.97 frames per second.
- Click OK.
- Drag the right edge of the clip to extend the shot.
- Watch your sequence to see the impact of the frame rate change.
Interpreting pixel aspect ratio
There are headaches and then there are Headaches. When your files have the wrong pixel aspect ratio, they will look distorted. Computers have square pixels; the height and width are the same. Video pixels are often non-square; that is to say, they have a different width than height. Being able to interpret non-square pixels correctly is a technical necessity because so many cameras can shoot multiple sizes and frame rates (while preserving affordable recording options).
You’ll see non-square pixel aspect ratios most often in standard definition files. Both widescreen (16×9) and “normal” (4×3) video files have the same number of pixels. It’s the shape of the pixels that makes the difference. The 16×9 pixels are wider (and hence fill out the television frame).
The pixel aspect ratio information is stored in the raw media file. When interpreted incorrectly, it looks like FIGURE 4.21.
Figure 4.21. Both clips are the same video. The pixel aspect ratio of the one in the Source Monitor (left) is incorrectly interpreted, whereas the shot in the Program Monitor (right) is correct.

Let’s fix a clip that’s incorrectly flagged as square pixels.
- Open the sequence 02 PAR. The sequence contains two clips. The green clip is being interpreted correctly as having a widescreen DV pixel aspect ratio. The Red clip is not.
- Play the sequence and compare the frame sizes.
- In the Footage – Incorrect bin select the clip PAR.mov.
- Choose Clip > Modify > Interpret Footage.
- Click the Pixel Aspect Ratio Conform To button and choose the D1/DV NTSC Widescreen 16:9 (1.2121) option.
- Click OK. The footage conforms to the correct pixel aspect ratio and fills the frame.
- Watch your sequence to see the impact of the change.
Hip to Be Square
![]()
A good rule of thumb is that if the file is 1920×1080 or 1280×720, it is full HD and should be square pixels. Every other sizing (1440×1080, 1280×1080, 960×720) should have a pixel aspect ratio other than square.
Field order
Video can be recorded in fields, usually 1/60 or 1/50 of a second apart. They’re stored together as a single frame. The term for this is interlacing. Although interlacing is a depreciating technology, you’ll still encounter it.
Should Adobe Premiere Pro store the field order (and retrieve it) as the first field, the top field? Or should the field order be retrieved by the second field (lower field) first? Some cameras shoot progressive where both fields are shot at the same time and stored together to make up a frame.
Generally, unless you’re shooting progressive, high definition is generally upper field first. Video is generally lower field for standard definition. If you see “tearing” or “sawtooths” when you play back the video, that’s usually a sign of a field problem. It’s easiest to see when the video is output on a broadcast monitor. Another way to view symptoms of field problems is to blow up the footage to 100 or 200 percent (FIGURE 4.22).
Figure 4.22. At 200 percent blowup, the field tearing is visible for the clip in the Record Monitor on the right. This tearing is an artifact of improper interpretation. The correctly interpreted shot on the left, in the Source Monitor, looks correct.

Let’s fix a clip that’s incorrectly flagged with the wrong field order.
- Open the sequence 03 PAR. The sequence contains two clips. The green clip is being interpreted correctly as having an upper field first; the second is reversed field order.
- Click the panel menu in the upper-right corner of the Program Monitor panel and make sure the Display Both Fields option is selected.
- Play the sequence and compare the field orders.
It is easiest to see wrong field order on an interlaced display. If you only have a computer monitor or laptop screen, it may be difficult to see the problem.
- In the Footage – Incorrect bin select the clip Field_Order.mov.
- Choose Clip > Modify > Interpret Footage.
- Select the Field Order Conform radio button and choose the Lower Field First option.
- Click OK. The footage conforms to the correct field order.
- Watch your sequence to see the impact of the change.
Alpha channels
Alpha channels determine the visibility of parts of a clip. However, transparency can be confusing due to how the term alpha channel is used. The term alpha channel is used when it’s on a clip, but when you view only the alpha channel, it’s typically called a matte.
Two alpha channel settings are available in Adobe Premiere Pro:
• Ignore. This option disables the alpha channel (meaning no transparency).
• Invert. This option can be used if the transparency is reversed; you’ll see the background, not the foreground (FIGURE 4.23).
Figure 4.23. When the alpha channel is reversed, as in this example (a figure is animated on a gold background), you see the background, not the element.

Let’s fix a clip that has its alpha channel incorrectly inverted.
- Open the sequence 04 Alpha.
The sequence contains two clips. The green clip is being interpreted correctly, but the red clip has the transparency reversed.
- Play the sequence and compare the alpha channels.
- In the Footage – Incorrect bin select the clip Alpha.mov.
- Choose Clip > Modify > Interpret Footage.
- Select the Alpha Channel option and deselect the Invert Alpha Channel option.
- Click OK. The footage shows the correct areas of transparency.
- Watch your sequence to see the impact of the change.
Straight vs. Premultiplied Alpha
![]()
If your footage has slight glows or color shift at its edges, it may be that the alpha channel is not correctly set (it’ll be obvious when it’s skewed). Unfortunately, Adobe Premiere Pro lacks the ability to modify the interpretation rules. When the alpha channel interpretation is incorrect, your best bet is to bring the footage over to After Effects where it can be repaired.
Modifying Timecode
Modifying the timecode means the clip will no longer line up with the original media it was sourced from, making it nearly impossible to retransfer or recapture. So, be careful when you do this.
However, you might want to modify timecode for a couple of reasons: to sync by timecode or to assign timecode to a clip like a DSLR clip or an audio track meant to be used in multicamera editing.
To modify the timecode, follow these steps.
- Select any clip in the Project panel.
- Choose Clip > Modify > Timecode.
- Enter the new timecode, and then select Set at Beginning or Set at Current Frame (FIGURE 4.24).
Figure 4.24. The Timecode adjustment window. Be aware that when you modify the timecode, you may be causing a mismatch if you ever need to relink to the nonmodified original source.
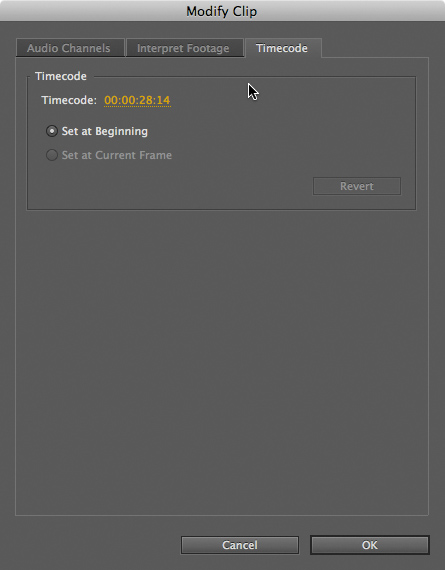
- Click OK to make your adjustment.
An Introduction to Dynamic Link
The principal goal with Dynamic Link is to minimize time lost from rendering or exporting. The beauty of Dynamic Link is that you can pass elements between applications in the Creative Suite and minimize your need to create extra media and renders. The functionality exists between several applications but behaves a little differently depending on the pair of apps being used. Dynamic Link is currently supported by the following Adobe products:
• After Effects
• Audition
• Encore
• Media Encoder
Linking to and from Adobe After Effects
There are several ways to integrate Adobe Premiere Pro and After Effects to easily exchange projects in both directions. This seamless ability to exchange files is driven by the role each application serves. After Effects provides Adobe Premiere Pro with advanced titling, compositing, and special effects. Adobe Premiere Pro adds robust audio controls and video capture to After Effects. Here are a few workflows worth trying.
An Easy Moving Day
![]()
Do you need to exchange files between Adobe Premiere Pro and After Effects? After Effects also supports a folder/bin structure on import from the file system. Adobe Premiere Pro doesn’t. If you need to import and retain the folder struture of your OS, import into After Effects; it will keep the folder structure intact. Then simply copy and paste assets from one Project panel to the other. (This isn’t a dynamic link.)
You can work with After Effects in three general ways:
• Replace with After Effects Composition. You can select clips in a sequence and then choose File > Adobe Dynamic Link > Replace with After Effects Composition. The clips are exchanged with After Effects, and a new linked composition is created. We explore this workflow in Chapter 12.
• New After Effects Composition. If you need a blank canvas (e.g., to create an animated title), you can choose File > Adobe Dynamic Link > New After Effects Composition. An empty composition will open in After Effects. Save your content in After Effects when you’re done, and the Adobe Premiere Pro link will update the content in your project or sequence. We explore this workflow in Chapter 13.
• Import After Effects Composition. In Adobe Premiere Pro you can choose File > Adobe Dynamic Link > Import After Effects Composition to bring an After Effects composition into an Adobe Premiere Pro project. Once added, the After Effects composition will look and behave like any other clip. If you make changes in After Effects, they’ll automatically update in the Adobe Premiere Pro sequence.
You can work with Adobe Premiere Pro material in After Effects in two ways:
• New Premiere Pro Sequence. This creates an empty “clip” in After Effects. You can switch to Adobe Premiere Pro and add multiple files and even tracks into the sequence. When you switch back to Adobe Premiere Pro, you can treat the clip as a single video file. Any updates in Adobe Premiere Pro will appear in After Effects as well.
• Import Premiere Pro Sequence. In After Effects, you can choose File > Adobe Dynamic Link > Import Premiere Pro Sequence. This allows you to use a sequence as a single layer in your After Effects composition without having to render or export. If you make any changes in Adobe Premiere Pro, they will be automatically reflected in your After Effects comps.
Linking to and from Adobe Encore
As you finish your work, one common distribution format is disc, either DVD or Blu-ray. You can take any sequence and send it to Encore. Simply choose File > Adobe Dynamic Link > Send to Encore. This method allows you to pass a sequence to DVD, Blu-ray, or Flash authoring without having to render it first.
Build Flash Too!
![]()
Adobe Encore not only creates DVDs and Blu-ray Discs, but it can also rebuild the entire structure as Flash Video, which is perfect if you need to post interactive material to the Web and don’t have any programming knowledge!
Encore will open and let you choose the kind of disc you’d like to make (FIGURE 4.25) as well as what sort of default transcoding you should do. Encore will also recognize chapter markers from the Adobe Premiere Pro sequence, which allows for more precise chapter markers. Similarly, you can dynamically link an After Effects composition to an Encore project.
Figure 4.25. In the Encore New Project window you can choose the type of disc you’d like to build as well as the basics for transcoding.

Linking to and from Adobe Audition
Starting with Adobe Production CS5.5, Adobe Audition is included in the suite. Audition permits adjustment fixes of single audio clips as well as sending all the tracks of a sequence to Audition for multitrack mixing:
• To send a single clip. Select a clip in either the browser or in a sequence. Choose Edit > Edit in Adobe Audtion > Clip. The clip will be replaced by an extracted audio clip.
• To send the entire sequence. Select a sequence or even just one clip on a sequence (FIGURE 4.26). Choose Edit > Edit in Adobe Audition > Sequence. A single video clip can be created for reference. Your audio tracks will be sent over with tracks intact for mixing and repair. When finished, you can send the audio back to Adobe Premiere Pro. This workflow is covered in depth in Chapter 11.
Figure 4.26. In the Edit in Adobe Audition dialog you can choose to add handles, keyframe information, and quite a bit more when sending a full sequence to Adobe Audtition.

Adobe Media Encoder
The Adobe Media Encoder allows you to import Adobe Premiere Pro or After Effects compositions (along with copy and paste). The Media Encoder engine can handle the job of rendering, even if you’re working in a different project in either tool.
Next Steps
Now that you’ve managed to get hundreds of different footage types into Adobe Premiere Pro, you need to do your due diligence as an editor and “get organized.” In the next chapter we discuss adding and customizing bins, and analyzing clips for Face Detection and speech recognition (with or without scripts attached). In addition, we’ll review best practices to help your edits run smoothly.
Dynamic Link Doesn’t Mean Import
Adobe Dynamic Link exists only for specific workflows, but it’s important to remember that you can use it only for special purposes. The goal of Dynamic Link is to allow content to update easily (such as a video track in Encore after changes are made in Adobe Premiere Pro) or to make it easier to exchange files (such as between Adobe Premiere Pro and After Effects).
Besides Dynamic Link, you can almost always import files from one application to another and retain editability. For example:
• Photoshop and Illustrator graphics can be easily modified by choosing Edit > Edit Original in After Effects.
• Although Adobe Premiere Pro can’t access raw camera formats, After Effects can. If you open a raw file in After Effects and save the project, you can dynamically link to the project in Adobe Premiere Pro.
Be sure to fully explore the documentation with each application to learn even more ways to use Dynamic Link. Plus, in the world of Adobe, it never hurts to just try importing a project file and see what happens.
TABLE 4.1 contains the available relationships between applications in the Creative Suite.
Table 4.1. Relationships Between the Tools in the Creative Suite
