
Chapter 5. Organizing Media
Editors are given the task of sifting through too much footage in too little time. Toss in the challenge of making difficult delivery dates, and you’ll soon see the cracks in the foundation. The greatest secret for success is to be organized and stay organized. Developing this discipline means that you can find footage when you need it, today and in the future.
There’s only one thing worse than coming back to a project that’s six months (or six years) old and wondering what is all this stuff and who did this? It’s realizing that the person who did it was you.
In this chapter, we’ll show you how to minimize this frustration, show you the power of working in the Project panel, and show you how to look at and find footage in the most effective manner.

Understanding the Project Panel
The Project panel holds all your media (captures and imports), any synthetics (like titles), and sequences. It’s the heart of your project; it has a record of every clip being used within a project (FIGURE 5.1).
Figure 5.1. A well-organized project makes it easy to handle any amount of footage.

There are several ways to navigate the Project panel quickly:
• When you want to select an element (clip, sequence, bin), all you have to do is click the icon. Clicking on the name tells Adobe Premiere Pro that you want to edit the name.
• If you want to quickly switch between Icon and List view in the Project panel, just press Shift+ or click the List view or Icon view buttons at the bottom of the panel.
• To change the size of your thumbnail icons, press Shift+]. There are three different sizes from which to choose.
• To get around the Project panel, you can use the keyboard. The up and down arrow keys permit movement up and down the Project panel. The left and right arrow keys twirl open/twirl closed bins when in List view.
• When working in List view, you can see several columns for the different fields. These fields contain important metadata about your clips. Some are prefilled with information like duration and pixel aspect ratio. Other fields, such as Description and Log Note, can be filled in by an editor to hold important details. To quickly switch fields, press the Tab key to go forward or Shift+Tab to cycle backward.
Open/Close Everything
![]()
If you add the Option (Alt) key and manually click to twirl open/closed a bin, they’ll all open (or close).
• If you want to sort by a property (such as Duration or Name), just click the column heading. Click it a second time to toggle and reverse the sorting order. You can also drag columns to rearrange them left to right.
Smart Sorting
![]()
There are some quick sorting options that might not occur to you: Sort by Media Duration to find the longest clips. Try a Sort by Tape Name to get a listing of all the media based on which tape it came from. Try a Sort by Media Start to get a list of the order in which the footage was shot.
• If an item is selected, a thumbnail appears in the preview area at the top of the Project panel. You can click the Play button or press the spacebar to view the thumbnail in full motion. It will also show any details about a clip, such as the duration of a clip, if it’s video or audio, and the frame rate/size of the clip (FIGURE 5.2).
Figure 5.2. The information on this QuickTime movie indicates it’s a 720p clip.

• If a clip is in the Source Monitor, Timeline panel, or Project panel, you can select it and choose File > Get Properties For > Selection to see additional information on a clip. You can also press Shift+Command+H (Shift+Ctrl+H) to see that information.
• Along the bottom row of the Project panel are a series of icons that are mostly shortcuts for elements like searching and creating new bins, sequences, or synthetics.
• In the upper-right corner (like most of the panels in Adobe Premiere Pro) is a panel menu, which contains commands that allow you to customize that panel, as well as other crucial customizations and shortcuts.
Make Room to Organize
![]()
Be sure to try out the Meta-logging Workspace (Window > Workspace> Metalogging) to arrange your panels for media-management tasks. You can also press the grave accent (`) key with your cursor over the Project panel to make it temporarily larger.
Searching for Clips
The primary reason and use for all the metadata is finding a clip when you need it. Being able to access a clip quickly when you have tens, hundreds, or even thousands of clips is part of an editor’s skill. Adobe Premiere Pro offers two types of controls to sort through your material: filtering and finding.
Filter View
When you filter your view, Adobe Premiere Pro reduces the number of clips it displays. The process is as simple as typing in the Find box near the top of the Project panel (FIGURE 5.3). Just enter a name (or other metadata) for the clip(s) you’re looking for.
Figure 5.3. Click the magnifying glass to see a list of recent searches.

Closer To Truth
![]()
Some screen shots and footage for this chapter are from the PBS series Closer To Truth; Cosmos, Consciousness, God. © The Kuhn Foundation. Robert Lawrence Kuhn: creator, executive producer, writer and host; Peter Getzels: producer and director. Find out more about the series by visiting www.closertotruth.com.
Based on what you type in the Find box, the Project panel will display only the clip information that matches your criteria. You can even have the Project panel search the transcript data (if there’s a script attached to the shot).
Let’s explore the filtering process.
- Launch Adobe Premiere Pro.
- Choose File > Open, navigate to Chapter Files > Chapter_05_Media > [Version Number], and open the project Ch05_Organizing_Media.prproj.
Although the project is pretty organized, we’ll use a filtered view to quickly locate clips. In this case, let’s find all the interview shots of David Gross.
Select the Find Box

Anytime you’re working in the Project panel, press Shift+F to select the Find box.
- In the Find box start to type David.
As you type, the area below the text field starts to show you have many clips that match that keyword (currently in all the data).
- Scroll through and look at the other data. Notice that you can still sort with this filtered view.
- When you’re finished, clear the filtered view by clicking the X in the filter area.
Where Did My Clips Go?
![]()
If the Project panel shows (filtered) next to the name of your project and you can’t see your clips, it means that there’s some text in the Find box. Clear the text and your clips should reappear.
Find Command
If you’d like to perform a more advanced search, simply invoke the Find command by pressing Command+F (Ctrl+F) or clicking the magnifying glass icon at the bottom of the Project panel. This command opens the Find dialog (FIGURE 5.4), which permits searches in the Project panel. This technique shares the same concept as using a Find command in a word processor or spreadsheet. By specifying identifiable criteria, you can find elements that match.
Figure 5.4. Each time you click the Find button, the next clip that matches the search criteria is found.
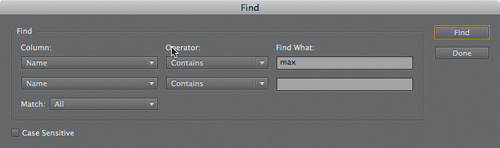
- In the Find dialog, select the name of the columns to search from the Name menus under Column.
Although it’s not as quick as the Find box, the Find menu command has the extra ability to do searches based on the “AND” condition as well as searches based on the “OR” condition. To search via the “OR” condition, change the Match menu from All to Any.
- Choose the appropriate operation (such as Contains or Starts with) from the menus under Operator.
- Enter text to describe what you want to find in the specified columns in their respective Find What fields.
For example:
• Find ALL the clips named David that have Close Up in the Description field.
• Find all the clips named Princeton or Wilson to find footage that occurred at both those locations.
- If you’re searching for two criteria simultaneously, be sure to specify the relationship between the two searches.
The Match menu allows you to switch the search from “all the criteria—this AND that” to “any of the search criteria—this OR that.”
- Click Find to start the search.
- Click Find again to go to the next result. Click as many times as needed.
- When you’ve found what you’re looking for, click the Done button.
The History of Bins
![]()
The term bin goes back to actual film editing. A bin was essentially a trash can with wheels and a rack at the top with nails. You’d hang your film from the nails. As you cut up the film, you’d store the pieces in these bins—one per scene to stay organized.
Working with Bins
As an experienced editor, you’re used to using bins to organize the files in your project. Adobe Premiere Pro behaves in the same way as other nonlinear editing (NLE) tools because it lets you use bins to collect and hold elements (clips, stills, sequences, and other bins) in whatever structure you find useful.
Nested Bins
![]()
If you press the keyboard shortcut or click the New Bin icon twice, that will nest a new bin inside the prior bin automatically. You can also drag a bin inside another to create a nested organization structure.
Change the Opening Methods
![]()
Adobe Premiere Pro allows you to customize all three methods of opening a bin. Open the Preferences dialog and choose General. The Bins section lets you adjust the modifier key behaviors for opening bins.
Creating Bins
Having multiple bins is a good thing. It goes back to the idea that you should be (and stay) organized. You can add as many bins as you need to your project. You can create a new bin in four ways:
• Choose File > New > Bin.
• Right-click in the Project panel and choose New Bin.
• Click the New Bin icon at the bottom of the Project panel.
• Press Command+/ (Ctrl+/).
Opening Bins
When you open a bin, you have a few choices. You can open it in its own stand-alone window, open it as a separate tab in the Project panel, or open it in place:
• Open in New Window. Simply double-click a bin to open it in a new window. This is a separate window that can be docked or moved anywhere onscreen.
• Open New Tab. Hold down the Option (Alt) key when double-clicking to open the bin in a new tab in the Project panel.
• Open in Place. Hold down the Command (Ctrl) key when double-clicking to open the bin in place. When you do this, it navigates the view inside the bin (hiding the rest of the project). By clicking on the project name or the folder at the top of the window, you can navigate out of the bin (FIGURE 5.5).
Figure 5.5. The Exteriors bin has been opened in place. By clicking on the folder with the up arrow, you can move upwards and back to the rest of the project.

Recommended Standard Bins
We use certain bins in nearly every project. In Chapter 3 we showed you how to build a default project. In our default project, which we duplicate, these bins are premade and ready to go.
A Safer Backup
![]()
Instead of “versioning” your project by choosing Save As, choose Save as Copy to create a duplicate of the project but continue working in the project with the existing name.
Some common bins you’ll likely need:
• Sequences. You might choose to create separate sequences for different parts of your work. When working on narrative productions, it’s common to have a sequence (and bin) per scene. When working in documentary/industrial productions, it’s common to have at least one bin per section that you’re working on.
• Old sequences. We recommend duplicating your active sequence twice a day. The reason is that you’ll get a “super” undo to deal with major changes in direction by the client or producer.
• Outputs. Every time we output a digital file or tape, we duplicate the sequence and specify all the information about who the sequence is going to. Make sure you add the date (and possibly color code) to the sequence to make it easy to identify the project when the client calls with questions.
• Imports. We differentiate imported stills, video, and audio from camera material (which is also imported). We’ll usually split the variety of noncamera-based imports into separate nested Audio, Video, and Still bins. You could also create additional folders like Music and SFX.
• Selects. We recommend that you duplicate your favorite shots and then move them into a bin (or series of bins) based on content. This makes it easier to find your shots in a way that’s similar to your thought process.
• Interviews. Aside from a single interview bin, try adding a bin for each person interviewed.
• Raw footage from tapes/cards. We recommend one bin per tape or card. Instead of dragging out clips, copy them into your Selects folders. This virtual copy takes up no extra space and will let you search the bins based on media cards or tapes in a linear fashion based on time of day or shooting order.
Customizing Bin and Clip Views
Once you have bins for all your media, you’ll need to be able to view your media in a dynamic fashion. It’s valuable to be able to survey your footage (and easy) when each shot is represented by an icon.
Sometimes it’s useful to be able to view metadata of a shot, such as when you need to determine which camera the shot came from. Occasionally, you’ll want to add to the metadata, such as including a description of the shot.
To begin learning what you can do, let’s start by changing the view you’re looking at.
Changing Views
Two different views are available for a bin: List and Icon view. Most editors work in List view the majority of the time, because they can see more clips on the screen at once. However, the Icon view also offers some benefits, such as enabling you to quickly sift through a large number of photos or to rearrange photos for storyboarding.
Don’t Forget the Panel Menu
![]()
The Project panel menu in the upper right provides some unique menu choices that aren’t found anywhere else. This menu can change the size of the icons and turn all thumbnails off or on.
To switch between List and Icon view, you can click the buttons found in the lower-left corner of the Project panel (FIGURE 5.6). You can also switch between the two views by pressing Command+Page Up (Ctrl+Page Up) for List view and Command+Page Down (Ctrl+Page Down) for Icon view.
Figure 5.6. The Project panel in Icon view with the icon switch highlighted by the cursor.

List view
The List view is where most editors eat, breathe, and live on a project. It’s a straightforward list with the most important ingredient, the name of the clip, listed at the left. The reason that this view is the most useful has to do with the amount of material that can be displayed as well as the sorting options mentioned earlier in the chapter.
It’s possible to display a list and still view thumbnails of the shots (FIGURE 5.7). Use the Project panel menu to customize icon size and the display. Click the Project panel menu, choose Thumbnails, and deselect the Off option. You can also use the same path to change their size.
Figure 5.7. The project being displayed in List view with thumbnails on.

Icon view
Although Icon view is less used, it is still quite useful. If you need to visually organize material within a bin, many editors prefer to view accurate thumbnails. This is particularly true when working with B-roll material that has been tightly logged or subclipped.
The benefits of Icon view include the following:
• It’s the foundation of editing via storyboard (see Chapter 7).
• It’s a great way to become familiar with footage that you haven’t viewed before.
• Many file-based cameras (still or video) produce clip names that are a series of numbers. Icon view is a perfect way to see what the clips are without changing their camera-assigned names.
• Viewing by icon means you’re able to see the clip without loading it into the Source Monitor (FIGURE 5.8).
Figure 5.8. The Exteriors > Cal Tech bin in Icon view set to Large icons. Notice how easy it is to distinguish between wide shots and close-ups.

Viewing Thumbnails
Whether you’re using Icon view or List view with thumbnails enabled, you’ll see a representative frame for the clip. Sometimes this thumbnail may not be very useful because it can contain nonrepresentative information.
You can easily change a clip thumbnail’s display:
- Select a clip in the Project panel.
- At the top of the Project panel, click the Play button or drag the play slider on the thumbnail viewer until the frame you want to use is displayed.
- Click the Set Poster Frame button (the small camera icon) (FIGURE 5.9).
Figure 5.9. Changing the poster frame changes a clip’s thumbnail everywhere.

You can also set the poster frame by right-clicking the thumbnail viewer when it is stopped on the desired frame and choosing Set Poster Frame.
Assigning a Label Color
Adobe Premiere Pro automatically assigns colors of the different elements based on their type when imported. At its most basic level, this means you can look in a bin or at a Timeline and know what each element is (TABLE 5.1).
Table 5.1. Default Label Assignments

Here’s how to change a label color.
- Make sure the Project panel is set to List view.
- Select one or more items and choose Edit > Label.
If only a single item is selected, you can right-click on the Label in the Label column and assign a different color.
The use of Label groups makes it easy to select similar items as well. This is a useful way to add metadata or arrange a category of clips.
- Select an item that represents the label or category you want in your Project panel.
- Choose Edit > Label > Select Label Group.
All of the similar items are now selected in the Project panel.
How the Select Label Group Command Works
![]()
Selecting the Label group only works for visible items (items whose bin is open). Do you have a bin with lots of stills that you want to move? That’s a perfect time to use the Select Label Group command.
Feel Like a Different Label Color?
![]()
To change the actual color or the way that Adobe Premiere Pro auto selects media, choose Preferences > Label Colors and Preferences > Label Defaults.
Creating Subclips
Back in the days of tape, it was very easy for editors or assistants to split up a long tape with accurate logging before the tape was captured. These days it’s not uncommon to get a clip that’s 20 minutes long.
These long clips are difficult to navigate with a mouse—even the smallest movement is tens of seconds. Likely, a long clip doesn’t just have a single shot but multiple shots and takes. It would make your life and the project less complicated if you could divide it into pieces (FIGURE 5.10).
Figure 5.10. It’d be nice to be able to break up long clips into just those sections that were important. The arrows are pointing to only the moments where the interviewee responded to questions.

That’s what a subclip is—a section of a clip with its own unique In and Out points. It can also have its own custom name (which can refer to the original media). The use of subclips is essential because it improves your project organization by splitting larger clips into smaller clips.
Here’s how to make a subclip.
- Select a clip.
- Mark an In point to define the start of the subclip.
- Mark an Out point to define where the subclip ends.
- Choose Clip > Make Subclip.
A new subclip will appear in the Project panel. Note that it has a different icon compared to a regular clip (FIGURE 5.11).
Figure 5.11. The subclip icon looks like an icon with an In and Out point.

- Give the clip a more descriptive name in the Project panel.
When to Subclip
Subclipping is a smart practice. A general rule is to start subclipping when a clip is longer than one minute. Of course, you might still take the time to subclip shorter clips because you can speed up the editing process when you need to audition takes and find B-roll quickly.
Subclip by Dragging
![]()
Make an In and Out point in the Source panel. You can then Command-drag (Ctrl-drag) by clicking on the video in the Source panel and dragging to a bin or the Project panel. You’ll create a subclip between the In and Out points of the loaded clip.
Here are some situations in which subclipping is ideal:
• Divide interviews into just the interviewee’s responses.
• Separate different takes in an actor’s performance.
• Break continuous camera movements into individual elements.
• Split long B-roll shots into smaller clips so it’s easier to avoid using the same shot multiple times in a project.
The Logic of Subclips
Skilled editors know that subclips are the key to efficient project organization. By taking the time to better organize long clips, the best takes, B-roll, and sound bites won’t get lost in a bin.
Subclips link to the original piece of media. They take up no extra room in a project. Whether a master clip or a subclip, they both point to the same media.
The other major concept to keep in mind about subclips is that they’re initially limited to the length you created them.
Here are some rules you should know about subclipping:
• Subclips can’t be trimmed beyond the initial In and Out points unless you modify the subclip (FIGURE 5.12).
Figure 5.12. Notice the warning at the bottom of the Edit Subclip dialog. Your options to modify a subclip that’s already in use are limited.

Effective Subclipping

If the mechanics of subclipping in Adobe Premiere Pro are still a little foggy to you, check out this video to see how to create and work with subclips.
• To modify a subclip, select the subclip and choose Clip > Edit Subclip. If a subclip is on the Timeline, you can’t make it shorter than the original subclip.
• Subclips refer to the original clip unless you make them a Master clip, which makes the subclip completely separate from the original.
• To turn a subclip into a Master clip, select the subclip and choose Clip > Edit Subclip. Select the Convert to Master Clip check box and click OK.
Get Organized with Metadata
Technically, labels and columns are just a type of metadata. They’re fields of data that describe a clip. Descriptions, such as the type of audio or video, the height, and the frames per seconds, are also types of metadata. At its simplest, metadata is information about your file that describes the audio, video, and technical aspects of a clip.
Some cameras add their own metadata, such as the time of day for a shot or location via GPS. Some cameras allow you to add metadata in the field, such as a “good” rating, or user-assigned information like camera name or angle.
Adobe Premiere Pro permits you to see existing metadata based on broad category types. Even more valuable is that you can add your own metadata. You can easily view this information within the Project (in List view) or Metadata panel (FIGURE 5.13).
Figure 5.13. The Metadata panel, normally hidden when using the Editing workspace, can be displayed by choosing Window > Metadata.

Here’s how to change which metadata is displayed by default.
- Option (Alt) double-click the disclosure triangle next to the bins in the Chapter 5 project to open all the bins.
- Maximize the Project panel by mousing over it and pressing the grave accent (`) key to maximize the window to full screen.
- Locate the Panel Options menu at the top right of the panel, and choose Metadata Display.
- Twirl down the Premiere Pro Project Metadata category (FIGURE 5.14).
Figure 5.14. Numerous other pieces of Adobe Premiere Pro specific metadata are normally hidden.

- Select the Comment check box.
- Click OK.
- In the Project panel you now can scroll horizontally to see (and fill out!) the Comment column. Experiment and add some metadata about the clips.
EXIF Data
![]()
EXIF (Exchangeable Image File Format) data is a standard set of data that still cameras (particularly DSLRs) use. This fantastic information includes f-stop, type of lens used, and very camera-specific items, such as distance to subject.
Customizing headings in the Metadata display
To really maximize metadata, it’s crucial to know that you can add your own metadata based on your needs and based on your specific workflow. The Metadata display allows you to create your own fields for data, which will be visible in the Project panel.
You can add any sort of field you want or need by clicking on the Add Property button (FIGURE 5.15). Some properties that we’ve added in the past include:
Figure 5.15. The Metadata display with the cursor over the Add Property button. By clicking it, you can create your own custom metadata properties.
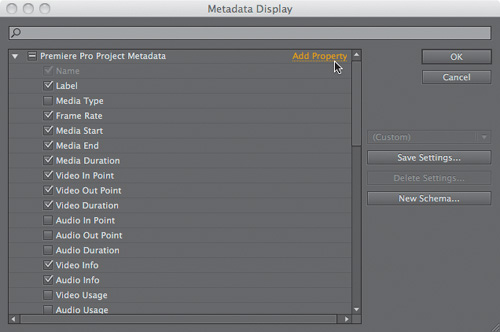
• Framing Composition. Identify the shot composition, such as CU, MS, WS.
• Speaker Name. Who’s talking? Also, get the correct spelling of the name of the person in the shot.
• Summary. Paraphrase the question or answer from each response in an interview.
• Take. For scripted pieces, be sure to identify the number of the performance (such as take 1, take 2, and so on).
Choosing the Right Property Type
![]()
Adobe Premiere Pro has several classes of metadata. Text is standard alphanumeric text that sorts A–Z. Integers are whole numbers. Real refers to fractional numbers (numbers with decimal places). Boolean displays a check box (on/off).
Let’s add the Frame Composition property to all the shots in the Exteriors bin. To make it easy, we’ll change the thumbnails so they’re visible and large.
- With the same project still open, twirl down the Exteriors bin. Then twirl down the Cal Tech, Mount Wilson, and Walking and Talking bins.
- In the Project panel menu in the upper right, choose Thumbnails > Off and deselect the check box.
This will make the icons visible for each clip. Optionally, you can make them larger.
- Click the Project panel menu and choose Metadata Display.
- Locate the yellow hyperlinked text labeled Add Property. Click the link to open the Add Property dialog (FIGURE 5.16).
Figure 5.16. By clicking the Add Property link, you can add your own custom metadata.

- Change the name to Frame Type.
- Change the Type menu from Integer to Text.
- Click OK to store the change.
- At the end of the Adobe Premiere Pro Project Metadata list is a new field called Frame Type.
- Click OK to add the field to the Project panel
- Drag the Frame Type column all the way to the left so it’s next to the Name column.
- Go to the Frame Type Column and fill in the shot types (FIGURE 5.17).
Figure 5.17. Common frame types are WS (wide shot), MS (medium shot), and CU (close-up).

Saving Schema
So far you’ve learned how metadata can help you get organized, whether it’s the ability to show or hide metadata fields or the option to add metadata that is unique for your needs. The final step to using metadata is to control it through the use of categories.
Store Metadata Templates
![]()
Clicking the Save Settings button in the Metadata display gives you the ability to save specific views of metadata as active or inactive. Use this button to create views to quickly help you display only the data you need to see.
Adobe Premiere Pro offers you the ability to create a separate metadata category called a schema. This is a custom category of metadata based on your needs. If your work requires a range of proprietary metadata, such as an internal cataloging system, a schema permits you to have a custom grouping of your custom metadata.
To build your own schema, do the following:
- Click the Project panel menu and choose Metadata Display.
- Click the New Schema button to create your own category (FIGURE 5.18).
Figure 5.18. Creating a new schema can be done in the Metadata display.

- Enter a descriptive name and click OK.
- Click the Add Property hyperlinked text to open the Add Property dialog.
- Create custom properties and be sure to specify their types.
The steps are identical to how you created the Frame Type property previously.
Using the Metadata Panel
Separate from the Project panel is the Metadata panel. This panel is devoted to showing all the metadata for whichever clip (or clips) is selected. This panel makes it possible to add or adjust and view metadata beyond what’s visible in the Project panel, and because it needs more screen real estate, it has its own separate panel (see the sidebar “Getting Organized with a Second Monitor”).
To open the Metadata panel, choose Window > Metadata (FIGURE 5.19). You can also access the Metalogging workspace by choosing Window > Workspace > Metalogging (FIGURE 5.20).
Figure 5.19. The Metadata panel displays all the data Adobe Premiere Pro has about a clip.

Figure 5.20. The Metalogging workspace switches the primary focus of Adobe Premiere Pro to viewing and modifying metadata.

Getting Organized with a Second Monitor
Originally, editing system screens were such low resolution that it was necessary to have two screens to get work done. Organization took place on one screen, and the other was used for the editorial interface.
Even though screens are getting wider, we’re still huge fans of using two screens (FIGURE 5.21).
Figure 5.21. Two monitors really make handling of medium and long-form projects easier with the additional real estate.

To increase the available screen space, use multiple monitors. When you work with multiple monitors, the application window appears on one monitor, and you place floating windows on the second monitor. Monitor configurations are stored in the workspace.
To make any panel into a floating window, choose Undock Panel from the panel menu. To make any frame into a floating window, choose Undock Frame from the panel menu.
With all this metadata, the second screen is devoted to both our Project panel and the Metadata panel. The extra real estate really eases handling the amount of information and organization in our projects.
Here are some important details when using the Metadata panel:
• You can choose any one element and view its metadata.
• You can select multiple items to view or modify several elements simultaneously.
• You’ll often need to view and modify multiple clips, especially in long-form projects. Be sure to use the Metalogging workspace to see all of your media organization and metadata tools at once.
• When the Metadata panel is visible, you’re able to work in both the Project panel and/or the Metadata panel to access and modify your metadata information.
Organizing Clips with Content Analysis
It seems like more and more media is being pushed at editors. This is caused by the convenience of tapeless media as well as the lower cost of field-production equipment. To combat this steady rise in shot ratio (the amount of footage shot versus the amount used), you’ll find two analysis methods to make finding the right clip faster: Face Detection and Speech search.
Face Detection
Face Detection is an amazing technology that looks through your clips and sets a flag (yes or no) if a clip has a face in it, allowing you to quickly narrow down your clips. It’s possible to filter a project for just clips with faces. This can be done using the Find box or by displaying a column in the Project panel.
This technology (like Speech recognition in the next section) relies on Adobe Media Encoder to do the analysis in the background, giving you the ability to scan shots or bins of shots (FIGURE 5.22). This analysis can be run on all supported media types, including still images. You can also analyze merged clips in Adobe Premiere Pro CS5.5 if at least one of the component clips contains video.
Figure 5.22. Analyzing clips in Adobe Premiere Pro gives you two options: Face Detection and Speech transcription.

Face Detection is a separate analysis from Speech recognition and offers three quality choices—High, Medium, and Low. Each corresponds to the amount of time necessary for the analysis. We find that Medium quality analysis is a decent compromise of quality versus time needed.
Let’s analyze the entire project to identify every shot that contains a face. Performing Face Detection analysis is easy.
- With the same project open as in the previous exercises, select all the bins in the project.
- Choose Clip > Analyze Content or right-click on one of the selected items and choose Analyze Content.
The Analyze Content dialog appears.
- Select the Face Detection option.
- Choose a quality setting. You can choose from High, Medium, or Low quality (High gives the most accurate results, but Low is much faster).
For this example, choose Medium (Faster) and click OK.
- Adobe Media Encoder will launch and start processing faces (FIGURE 5.23).
Figure 5.23. Adobe Media Encoder is used for compression (see Chapter 15) and analysis.

Resource Management
Remember that Adobe Premiere Pro shares RAM with After Effects, Media Encoder, and Encore. It will use as much of the free RAM as is available if you’re not using one of these applications. If an application is idle, it’s best to quit the application to free up resources.
A green check mark appears in the Status column after a clip has been successfully analyzed.
- You can switch back to Adobe Premiere Pro while Adobe Media Encoder processes in the background.
After Adobe Media Encoder is finished, you can quickly identify faces.
- Choose Edit > Find Faces (or click the magnifying glass in the Find box and choose Find Faces) (FIGURE 5.24).
Figure 5.24. By choosing the Filter bar’s Find Faces feature, it’s easy to narrow down a project to just those shots with faces.

You should now see a list of only the shots that have a face.
- To clear the Find Faces filter, click the X on the right side of the Find box.
The Project panel will then display all clips.
Speech Analysis
Speech search performs speech recognition on a clip. Like Face Detection, you have the ability to send any clip over to Adobe Media Encoder. Here the footage is analyzed with speech recognition algorithms. You can attach the transcript as is or use a written transcript to create additional metadata embedded inside the clip. After the metadata is attached, you’ll have the ability to search for specific text in the speech.
Where’s the Metadata?
![]()
If you perform Speech analysis or Face Detection, the metadata is added to the media file. This means the data will stick with the clip even as it moves between projects and users.
Go High or Go Home
![]()
Given that Adobe Premiere Pro performs speech recognition with no per speaker training, we feel that the only Quality choice worth using is High.
Speech recognition technology is a bit of a mixed bag. It works very well on some subjects (especially those who speak clearly and enunciate). It doesn’t work as well for those who tend to slur their words or speak with strong accents. A poor microphone or bad audio recording can also complicate its results.
Let’s analyze the speech of a clip.
- Select the clip 0007B- John Leslie_Mt. Wilson Observatory_Leslie-4.mov in the Interviews > John Leslie bin.
- Choose Clip > Analyze Content (FIGURE 5.25).
Figure 5.25. Because the speaker comes from the U.K., it may be better to use the U.K. version of English to account for the subject’s accent.

- Deselect Face Detection and select the Speech analysis option.
- Choose English – U.S. for the Language and set the Quality to High.
- Click OK.
Adobe Media Encoder will launch (if it’s not already open) and will analyze the speaker’s voice. When the clip is finished, switch back to Adobe Premiere Pro. You can continue to edit while Speech analysis is running. The metadata will be added as each clip completes the analysis process.
- In Adobe Premiere Pro choose Window > Metadata to open the Metadata panel.
- Select the clip again in the Project panel.
- In the Metadata panel, under the Speech Analysis area, you can see the results of the speech recognition analysis (FIGURE 5.26).
Figure 5.26. The Speech Analysis panel permits marking In and Out points and direct editing from the text. It did OK, but not great. In a later section we’ll show you how to refine the results.
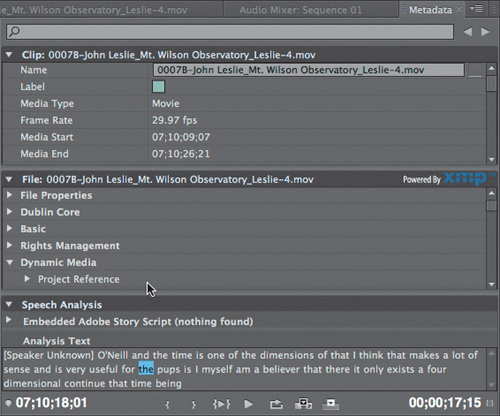
Although the text isn’t perfect, we’ll show you how to refine accuracy with a transcript. The rough transcript is usually good enough to spot a sound bite or talking point. You can click a word to cue the sound bite and move the current-time indicator.
Follow the Bouncing Ball
![]()
Arrange the Metadata panel so you can see the Source panel at the same time. Now when you play back a clip that’s had Speech analysis performed, each word becomes highlighted as the clip plays. You can also click a word to cue up text.
After analysis is performed, speech is visible in the Metadata panel. You can also click on a word to edit it to improve the accuracy of the transcript.
Speech Search
![]()
After you have performed Speech recognition on your interviews, you can then use the Find box to specifically filter for a given word spoken by a speaker. With this feature, you can quickly filter through your project, finding clips with specific phrases that you’re looking for.
Improving accuracy with a transcript
The Speech transcription can be markedly improved by referencing a document of what was actually said. For interviews, the ideal item to use to help the quality of the recognition is a transcript. Often, corporate and documentary productions have interviews transcribed. This helps with scriptwriting and can help an editor to quickly find a sound bite from an interview.
If You Don’t Have Transcripts
![]()
You can try giving Adobe Premiere Pro a document that has difficult words or phrases (often referred to as a “phraseology”) to improve recognition.
Transcripts are usually generated by exporting an MP3 audio file, which can be sent to a transcription service. The service will return a text document with each speaker separated. To take advantage of this document, you need to link to a text file (.txt) in the Analyze Content dialog.
Try and Try Again
![]()
If you’re working with transcripts and you don’t want to wait for them to analyze speech, you can perform Adobe Premiere Pro’s Speech recognition twice: right away when you first get the clip(s), and then rerun the analysis after you’ve received the transcript.
Let’s use a transcript to get decent recognition from a speaker with a difficult accent.
- Continue working with the current project.
- Locate the clip 0257A-Juan Maldacena_Princeton_Maldacena-4.mov, and load it into the Source panel. You’ll find it in the Interviews > Juan Maldacena bin.
- Click Play to listen to the clip; you’ll notice a strong accent.
- In the bin select the shot 0257A-Juan Maldacena_Princeton_Maldacena-4.mov, and choose Clip > Analyze Content.
- Select the option for Speech analysis.
- Set the Language to English-U.S. and the Quality to High (Slower).
- In the Script portion of the dialog, in the Reference Script menu, choose to Add a reference script (FIGURE 5.27).
Figure 5.27. You can add the same transcript to multiple clips. There’s no need to edit the transcript file to be specific for the clip it’s attached to.

- Choose File > Open, navigate to Chapter Files > Chapter_05_Media > Media and choose the text file Transcript 0257a Juan Maldacena.
- Because this is a transcript, in the Import Script dialog, select the Script Text Matches Recorded Dialogue check box (FIGURE 5.28) and click OK.
Figure 5.28. Always check the text to see if it matches the shot.

Improving Speech Analysis with a Text File

Check out this video for more on using Speech recognition and then adding a “phrasionary” to improve recognition.
- Click OK to start Adobe Media Encoder’s speech recognition.
- When it finishes, play the clip with the Metadata panel visible and compare how the interviewee’s speech compares with the speech analysis.
A reference script, list of talking points, or key phrases can improve translation, too. Just be sure not to select the Script Text Matches Recorded Dialogue check box.
The Adobe Story Workflow
![]()
Check out this video to learn the essentials of integrating Adobe Story with Adobe Premiere Pro.
Improving accuracy with a script
For narrative scripts, Adobe Story is a screenwriting application that tightly integrates with the Creative Suite. You can choose to create an entirely new script or just to process a script created in other software, such as Final Draft or Microsoft Word. When a script is used, a slightly different workflow occurs.
The actual script should be processed with Adobe Story. It can then be attached to the footage. Here are some rules about using Adobe Story for improved recognition:
• Scripts must be generated in Adobe Story. You can import an existing file from other scriptwriting software or a text file. You can also create entirely new scripts.
• For best results, assign scene numbers to the script.
• Adobe Premiere Pro must have the Scene Metadata filled out with matching scene information for a clip.
• A script is attached by selecting a clip and choosing File > Adobe Story > Attach Script File.
Scripts created with other tools must go through Adobe Story first, so they can be saved in the .astx format.
Part of the CS Live services, Adobe Story is an online service that helps create scripts and outlines that directly integrate with Adobe Premiere Pro. There is also an offline component through Adobe Air to allow the features to be used when an Internet connection isn’t available (FIGURE 5.29). Your scripts and changes will automatically sync when an Internet connection is active.
Figure 5.29. Adobe Story offers efficient scriptwriting tools both online and offline.

The following features make screenwriting easier:
• Multicolumn scripts for parallel descriptions or storyboards
• Auto-completion tools for elements like character names and dialogue
• Collaborative screenwriting with track and review changes
• iOS access of scripts
• Custom and standard breakdown reports for production
• The ability to import from Final Draft, Microsoft Word, Movie Magic Screenwriter, and other industry-standard software tools
• The ability to export to PDF, XML, CSV, TXT, Microsoft Word, or Movie Magic Scheduling
• The ability to insert graphics into your script for a storyboard
• The attachment of a script to your media after a shoot for improved speech analysis
Next Steps
Now that you’re comfortable with the Project panel and metadata, you’re ready to hone the essential editing skills. In the next chapter we’ll discuss editing and how to load footage into the Source Monitor. Then we’ll make In and Out points, selecting the footage we consider important. We’ll also explain how to get that footage into the Timeline to make further edits.