
Chapter 10. Color Correction and Grading
A project is not done until it’s finished is an old adage in postproduction. Finishing in postproduction has various meanings, but most pros agree that it means color correction and grading as well as mixing and sound design. In this chapter you’ll start your exploration of finishing by exploring color correction and grading in Adobe Premiere Pro as well as the Creative Suite.

Using Video Scopes
Before we get into the fine details of color correction and grading, let’s first look at using video scopes. If you’ve been editing for a while and have performed some color correction, you likely have some experience using video scopes (but you might be a little foggy about exactly how to use them).
Closer To Truth
![]()
Some screen shots and footage for this chapter are from the PBS series Closer To Truth; Cosmos, Consciousness, God. © The Kuhn Foundation. Robert Lawrence Kuhn: creator, executive producer, writer and host. Peter Getzels: producer and director. Find out more about the series by visiting www.closertotruth.com.
Video scopes measure the video signal in some way (much like a thermometer reads temperature). For example, in Adobe Premiere Pro, using the YC Waveform scope you can easily measure the lightness or luma in a particular clip to see if a shot is too bright, is too dark, or has poor contrast. Adobe Premiere Pro has several different scopes that you can use to evaluate the video signal in different ways.
Now, you might be thinking that you know what looks good so why do you need to use scopes? Well, simply put, your eyes lie. Many factors, such as your environment, how much sleep you got the night before, or even your stress level, can influence what your eyes are telling you when color correcting.
Video scopes, on the other hand, don’t lie. They give you an analytical snapshot of what’s really going on with a particular clip when it comes to contrast and color. In this section we’ll break down the different scopes you’ll use to color correct and grade your projects so you’ll know exactly what’s going on with your footage.
Accessing Scopes and the Color Correction Workspace
Here’s how to access video scopes in Adobe Premiere Pro:
• Source Monitor. Click the Output button at the bottom right of the Source Monitor. Choose an appropriate scope or combination of scopes (FIGURE 10.1).
Figure 10.1. By clicking the Output button in the Source, Program, and Reference Monitors (top), you can choose from the menu that appears (bottom) to display different scopes or video in each monitor.

• Program Monitor. Click the Output button at the bottom right of the Program Monitor. Choose an appropriate scope or combination of scopes.
• Reference Monitor. Choose Window > Reference Monitor, and then load a scope or a combination of scopes by clicking the Output button at the bottom right of the window.
Another option for viewing the scopes is to switch to the Color Correction workspace (FIGURE 10.2) by choosing Window > Workspace > Color Correction. After loading the Color Correction workspace, you’ll notice that the interface has shifted around a bit. In the lower-right corner (using the default Color Correction workspace) is the Reference Monitor; from here you can load the video scopes. You can change the default scopes displayed by right-clicking and choosing Display Mode or clicking the Output button at the bottom of the Reference Monitor. As discussed in Chapter 1, you can create a custom workspace and position the scopes where you see fit along with other panels.
Figure 10.2. The Color Correction workspace optimizes the layout of Adobe Premiere Pro for color correction and grading tasks.

It’s important to note that when scopes are used in the Reference Monitor, they will not update in real time when you click Play on a sequence. The scopes will only update in the Reference Monitor if you scrub through the mini timeline on the Reference Monitor (or if you scrub the Program Monitor’s timeline when ganged). This limitation makes it impossible to see scopes that reference the sequence during live playback while at the same time watching playback of the sequence in the Program Monitor. However, note that if you load scopes in the Program Monitor, they will update in real time, but then you can’t see video playing in the Program Monitor. We hope this catch-22 will be updated in the future. In the meantime, we recommend using a broadcast-quality monitor to view your sequence if possible. You’ll be able to watch both live video and your scopes in real time.
Composite Video Option from the Output Button
![]()
To switch back to video after selecting a scope option, click the Output button again and choose Composite Video. You can then view the clip loaded into the Source Monitor or the frame underneath the playhead in the Program Monitor or Reference Monitor (if the Reference Monitor is ganged to the Program Monitor).
Scope Essentials
When you start to look at all your scopes, it can feel a bit like looking at the control panels of a 747. Keep in mind that each scope uses a scale. This scale is called a graticule; each sets a range of values that a scope measures.
The video signal is displayed on each scale as a collection of pixels known as the trace (FIGURE 10.3). On some scopes, such as the YC Waveform, RGB Parade, and YCbCr Parade, the trace actually mimics the picture onscreen from left to right. So if there was a bright window on the left side of the screen, you’d expect to see trace on the YC Waveform that matches the brightness of the window on the left side of the YC Waveform. Other scopes (like the Vectorscope) don’t actually mimic the picture, but instead give you an overall representation of what’s happening in the clip.
Figure 10.3. Trace is displayed on a scale (graticule) on the RGB Parade.

The Importance of a Physical Reference Monitor
![]()
Due to variances in computer monitors, try to avoid using your computer monitor to judge contrast and color when correcting footage. Instead, you should use a calibrated external video monitor (also called a reference monitor) that is capable of reproducing the color space and black/white levels of video.
YC Waveform
The YC Waveform (FIGURE 10.4) is the principal scope you’ll use to measure lightness or luma (the Y or grayscale part) in a clip. It also allows you to measure the intensity or lightness of the chroma (the C part).
Figure 10.4. The YC Waveform allows you to easily measure luma levels in a clip. Trace towards the top of the scope represents lighter pixels; trace towards the bottom represents darker pixels. Trace in the middle of the scope represents midtones.

Reading a YC Waveform (FIGURE 10.5) is easy once you understand how it works. The scale that the scope measures is from black at the bottom to white at the top or from dark to light. In technical terms this is -20 IRE to 120 IRE (Institute of Radio Engineers) where 0 IRE represents black and 100 IRE represents white. Values below 0 IRE or above 100 IRE are known as super blacks and super whites. Generally speaking, signal below or above these values is illegal for broadcast. These signals are reserved to provide headroom when shooting and are also used for special purposes like luma-keying graphics.
Figure 10.5. The YC Waveform mimics the actual picture from left to right.

Adobe Premiere Pro has a few different configurable options for the YC Waveform:
• You can change the intensity of the trace that is displayed, making it easier to view based on your preference. Simply drag the intensity slider at the top of the panel as needed to match your preference.
• You can change the setup (reference black level) that the scope uses. For analog video in NTSC countries, black is represented as 7.5 IRE. However, there is no setup in digital video, so the vast majority of people should make sure this option is deselected to get an accurate representation of black in the footage.
• You can choose to display a chroma trace by selecting the Chroma check box (shown overlaid on the luma or Y trace in blue). This is useful for seeing the intensity of the color in footage, which can sometimes make footage illegal for broadcast.
Saturation on the Waveform in Final Cut Pro
![]()
If you’ve used a composite waveform scope or utilized the Saturation parameter of the Waveform scope in Final Cut Pro, the chroma option on the YC Waveform provides the same functionality.
Contrast Ratio on the YC Waveform
![]()
The YC Waveform displays the video signal from black to white; therefore, it’s the perfect tool to allow you to judge the contrast ratio of a clip. When trace is closely bunched together, it indicates a low-contrast ratio. Trace that is spread out across the entire scale on the YC Waveform indicates a high-contrast ratio.
Vectorscope
The Vectorscope measures hue and saturation for a particular clip. It’s most often used to analyze overall color casts and saturation in a clip. The Vectorscope doesn’t mimic the actual picture, but instead maps hue and saturation on different “vectors” (FIGURE 10.6). The angle that the trace is displayed around the Vectorscope represents hue. Around the Vectorscope you’ll see different targets representing primary video colors—red, green, blue—and secondary video colors—yellow, magenta, and cyan. So if someone in a scene is wearing a red shirt, you’d expect to see some of the trace pushed towards the red target.
Figure 10.6. The Vectorscope trace shows the hue and saturation in the signal.

The center of the scope is white (or no color). The trace distance from the center of the scope represents saturation. So using the previous example in which the subject is wearing a red shirt and the shirt is very saturated, you’d expect to see the trace pointed towards red and towards the outer boundaries of the scope.
Another point of reference on the Vectorscope is the line that intersects the yellow and red targets. This line is known as the flesh tone line (technically it’s called the +I bar). Flesh tones, regardless of race, should generally fall somewhere on or near this line.
To match your preference, you can adjust the intensity of the trace. You set the scope to match up to 75% or 100% color bars using the Percentage menu. For most cases, having the Percentage menu set to 75% (which Adobe Premiere Pro defaults to) is the correct option. When set to 75%, the outside targets become the reference for “safe” saturation levels (the inside targets would be safe for 100% color bars). Any trace past these targets (closer to the edge of the scope) may be illegal for broadcast.
RGB Parade
The RGB Parade is similar to the YC Waveform scope, but instead of measuring luma and chroma it breaks down the video signal into the lightness of the Red, Green, and Blue channels (FIGURE 10.7). The best way to use the RGB Parade is to view the overall color balance in a clip. If the blue trace is elevated over the red and green traces, you know that you have an overall blue color cast in the clip.
Figure 10.7. Similar to the YC Waveform, the RGB Parade shows luma levels from black to white but breaks down the signal into RGB components. The only option available for the RGB Parade is to adjust the intensity of the trace with the Intensity control.

Because the RGB Parade traces are displayed on a scale like the YC Waveform, you can also see where in the tonal range a color cast is occurring. For example, if the RGB traces are mostly the same but the top of the red trace is elevated over the green and blue traces, you can infer that there is a red color cast in the highlights of the clip. How?
Just like the scale on the YC Waveform, the RGB Parade goes from black to white or dark to light. The bottom of the scale represents black, the top represents white, and everything in between represents midtone values.
So with the red trace elevated over the green and blue traces but only at the top (towards the brighter/whiter portions of the clip), you know that the color cast occurs in the highlights.
YCbCr Parade
A specialty scope that’s often used to calibrate video tape decks, the YCbCr Parade is useful when comparing levels of the video signal (FIGURE 10.8). Most digital video uses a color space referred to as YCbCr where Y is the luma component and Cb (Luma minus blue) and Cr (Luma minus red) are known as the color difference channels.
Figure 10.8. The YCbCr Parade displays the signal in its Luma and Chroma channels.
Here’s how to read this scope:
• Y or Luma is displayed as the leftmost waveform. The Y trace is displayed vertically from black to white or dark to light (0 to 100 IRE) and is identical to the YC Waveform.
• The middle trace is the Cb (Luma minus blue trace).
• The far right is Cr (Luma minus red).
Combination views
Often, when color correcting and grading footage, you’ll want to view more than one scope at a time to get a more comprehensive view of color and contrast in a clip. At anytime you can view multiple scopes (FIGURE 10.9) by clicking the Output button at the bottom of the Reference Monitor, Program Monitor, or Source Monitor and choosing one of the combination views.
Figure 10.9. Using combination views like this one (Vectorscope, YC Waveform, RGB Parade) can be a great way to get an all-inclusive look at the video signal.

The Scopes in Action
![]()
Do you want to see the scopes in action on actual footage? Check out this video for more detail about the practical application of using the scopes.
More About the Reference Monitor
Besides being a home to video scopes, the Reference Monitor is a valuable tool in any color correction workflow. By disabling the Gang to Program Monitor button (FIGURE 10.10) at the bottom of the Reference Monitor, you can scrub the mini timeline of the Reference Monitor to a particular frame and then set the playhead of the sequence (and thus the Program Monitor) to a different frame. This makes color correction more efficient in a couple of ways:
• Comparing frames visually. By placing the playheads of the Reference and Program Monitors on different frames, you can visually compare shots. This is particularly useful when matching different angles of the same subject—specifically, comparing skin tone and other memory colors (colors our brains recognize, like skin tone, skies, grass) between shots .
• Comparing scopes. As mentioned earlier, your eyes lie! By parking the playhead of the Reference Monitor on one shot and the Program Monitor on another, you can then switch each monitor to display scopes, which when you need to be exact about matching shots, lets you compare scopes of each shot to make sure each shot matches perfectly.
Figure 10.10. By disabling the Gang to Program Monitor button you can easily compare video as well as scopes of two different locations in your sequence.

Ganging the Reference Monitor and Program Monitor
![]()
By ganging the Reference Monitor to the Program Monitor (with the Gang to Program Monitor button), both monitors will update as you scrub through a sequence. This is great for when you want to see the same frame in each monitor or display scopes in the Reference Monitor for a particular frame while watching video in the Program Monitor.
Getting to Know Adobe Premiere Pro’s Color and Exposure Effects
Most of Adobe Premiere Pro’s color correction and grading capabilities are found in the Color Correction folder in the Video Effects bin; however, a few are also found elsewhere, like in the Adjust bin or the Image Control bin. At first glance you might think, whoa, there are a lot of separate effects. This is true: But many of the effects are very specific in what they do. Keep in mind that there is quite a bit of overlap in their feature sets.
Accelerated Effects
![]()
Although we discuss many of Adobe Premiere Pro’s effects for color correction in this section, keep in mind that some of these effects are accelerated for modern systems using graphics card CUDA acceleration. You can filter effects for acceleration by clicking the Accelerated Effects button under the search field in the Effects panel.
In this section we’ll explore the essential color correction and grading effects available in Adobe Premiere Pro. We’ll also provide some situations in which each filter is best to use. Not every effect will be covered; just the ones we find most useful.
Don’t Let Your Ego Get in the Way of the Help Menu
![]()
Remember that you can get information on each effect’s parameters by viewing the user documentation. Just choose Help > Adobe Premiere Pro Help and enter the effect name into the search field.
Auto Color, Auto Contrast, and Auto Levels
If you are in a rush, let Auto Color, Auto Contrast, and Auto Levels effects help you out. Found in the Adjust bin, these auto effects can make short work of problem clips. Auto Color automatically adjusts contrast and color in a clip. Auto Contrast tweaks the overall contrast of a clip, and Auto Levels corrects highlights and shadows (and potential color casts in each) by adjusting the individual RGB channels. Additionally, the temporal smoothing option (found in all three) allows these effects to not vary greatly from frame to frame. Just keep in mind that every clip is different: In some cases the auto effects might work great, but in other situations they might not produce great results.
Find That Effect
![]()
Need an effect fast? You can type its name into the search field of the Effects panel.
Levels
Levels is a very granular effect found in the Adjust bin within video effects that allows you to adjust RGB, black/white input and output levels, and RGB midtone (gamma) levels. Additionally, you can control black, midtone (gamma), and white levels for each channel.
Shadow/Highlight
![]()
Another great effect to use to treat exposure and contrast in a clip is Shadow/Highlight. Choose Video Effects > Adjust to access this effect. The effect allows you to adjust shadows and higlights independently. The auto settings do a pretty amazing job, but for more control, click the More Options triangle to control tonal width and clipping, and even color correct your adjustments.
Luma Corrector
The Luma Corrector effect is extremely useful for situations in which you need to affect the contrast of a clip. The cool part is that you can treat the entire clip (lightening or darkening it overall) or use the tonal range controls to treat only shadows, midtones, and highlights. In addition, using the Tonal Range Definition parameter, you can actually define the shadows, midtones, or highlights of the clip. Using the Secondary Color Correction controls, you can adjust the lightness of targeted areas.
FCP’s Color Corrector and Color Corrector 3-Way
![]()
If you’re accustomed to using Final Cut Pro’s Color Corrector or Color Corrector 3-Way, you’ll find using Adobe Premiere Pro’s Fast Color Corrector and Three-Way Color Corrector very familiar.
Fast Color Corrector
The Fast Color Corrector allows you to adjust not only contrast (using the input and output level controls), but also overall color balance and saturation in a clip using the Hue Balance and Angle controls (the color wheel). A good way to think of the Fast Color Corrector is as a one-way or overall color corrector.
Going Old School
![]()
If you’ve ever done any color correction on an analog system or with the TBC controls on an analog deck, you may want to check out the Proc Amp effect, which gives you brightness, contrast, and hue and saturation controls.
Unlike the Three-Way Color Corrector with which you can adjust hue and magnitude of a hue across three areas of tonal range influence (shadows, midtones, and highlights), the Fast Color Corrector affects the entire clip. You can also make large hue shifts by using the Hue Angle parameter (or by rotating the outer wheel on the color wheel). This effect is a good tool to use as a quick fix for color casts. Additional controls in the Fast Color Corrector include auto controls for black, white, and overall contrast, as well as a white balance color picker, which allows you to quickly choose a portion of a clip that is white to ensure proper white balance.
What About Broadcast Safe?
![]()
If you’re working on a project intended for broadcast, there are standards that set legal levels for luma and chroma (lightness and color). In the Color Correction bin you’ll notice two effects: Broadcast Colors and Video Limiter. We’ll talk about these effects and how to best use them in Chapter 14, “Quality Control and Archiving.”
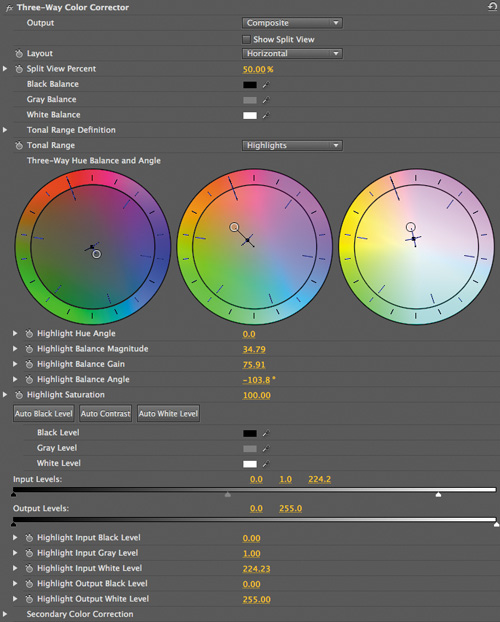
Three-Way Color Corrector
The Three-Way Color Corrector is the workhorse of Adobe Premiere Pro’s color correction effects. You’ll probably use the Three-Way Color Corrector (FIGURE 10.11) more than any of the other color effects. The Three-Way Color Corrector gives you three controls for adjusting hue and magnitude of that hue across three distinct (but slightly overlapping) areas of the tonal range—shadows, midtones, and highlights.
Figure 10.11. The Three-Way Color Corrector is a full-featured color correction effect that splits color correction into three areas of influence in the tonal range—shadows, midtones, and highlights.
RGB Color Corrector
![]()
The RGB Color Corrector provides much of the same control as the Fast and Three-Way Color Correctors. By using the Gamma, Pedestal, and Gain controls, you can adjust overall contrast in a clip or fix underexposed and overexposed clips. By using the RGB controls, you can also adjust gamma, pedestal, and gain for each of the primary color channels. This gives you a ton of control for adjusting the overall color balance in a clip.
With this control, you can easily fix color casts that might appear only in the shadows, midtones, or highlights, or in a combination of all three areas of the tonal range. The Three-Way Color Corrector also provides color pickers for Black, Gray, and White balance, making it easy to get the correct blacks, grays, and whites without having to manually adjust the controls. In addition, by using the controls in the Secondary Color Correction section of the effect, you can target corrections to a specific part of the clip.
Luma Curve
If you’ve used Curves in other applications (like Adobe Photoshop), you’ll be right at home making contrast corrections with the Luma Curve. The idea behind Curves is simple: The entire tonal range is mapped along the curve left to right, black to white, or dark to light. By clicking on the curve, you add a control point at that part of the tonal range.
With the Luma Curve, if you add a control point and drag up, you’ll effectively lighten that part of the tonal range. Add a control point and drag down to darken that part of the tonal range. The Luma Curve is an effective tool for fine-tuning contrast corrections made with other color correction effects or for correcting a shot on the whole. The Luma Curve also has a Secondary Color Correction section where you can target luma corrections to a specific part of a clip.
RGB Curves
The RGB Curves (FIGURE 10.12) operate in the same way as their Luma Curve cousin. But instead of one curve there are four curves: Master, Red, Green, and Blue. The Master Curve is similar to the Luma Curve. The color curves obviously affect that particular color.
Figure 10.12. The RGB Curves give you very granular control on a clip by having the entire tonal range mapped to each curve.

With the RGB Curves, it’s important to remember that when you add a control point and drag it up or down, you’re essentially adding or subtracting that color at that part of the tonal range. Why subtract color?
When you add a control point and drag down on one of the RGB Curves, you’re removing that color but adding in color from the opposite side of the color wheel. An easy way to visualize this is by looking at the Vectorscope. When you subtract red, you add cyan; subtract green, you add magenta; and subtract blue, you add yellow. The RGB Curves are a fantastic way to tweak color corrections made with other color effects or to provide lots of granular control for making color corrections with a stand-alone tool. The RGB Curves effect has a section for Secondary Correction, allowing you to target a specific part of a clip.
Leave Color
Although you can use the secondary controls in other effects, the Leave Color effect is a simple way to achieve very stylized results. The effect allows you to choose the color you want to leave in the clip by using an eyedropper. You can then adjust how much of the other colors in the clip are desaturated by using the Amount to Decolor parameter. You can tweak the effect by using the Tolerance, Edge Softness, and Match Colors parameters. This type of look has been popular over the years in films like Schindler’s List and Pleasantville, and in numerous commercials.
Change Color
Essentially, the Change Color effect lets you target a specific color by using the Color to Change parameter and keys that color in the clip. Then, by using the Hue, Lightness, and Saturation Transform parameters, you can change the hue of the selection, how light it is, and how saturated the selection is. By using the Matching Tolerance, Matching Softness, and Match Colors parameters, you can tailor your selection to target just the part of the clip you want. This effect is useful for tackling subjects like gray skies or faded grass.
Change to Color
Does an actor in your clip have a red shirt on, but the producer wants it to be blue? No problem! The Change to Color effect allows you to quickly select a color by using the From parameter and change it to another color by using the To parameter. By using the Change, Change By, and Tolerance parameters, you can tweak exactly how the color is changed. By using the Softness parameter, you can soften the edges of the selection so you don’t get any ringing edges.
In the literal sense color correction means just that—correction. So if a shot is too dark, you’d correct it. If colors are too saturated, you’d correct that problem as well. So when referring to color correction, to many people, it means to simply fix contrast and color problems with clips.
Grading on the other hand often refers to the stylization of a shot or a whole project to create a “look” (FIGURE 10.13). Many famous examples of this exist in films, from Traffic and The Matrix to more modern looks like those in Transformers, The Book of Eli, and others. In these examples shots were graded to fit into a specific story line, to elicit a certain emotional feel, or quite often to simply create what the director wanted.
Figure 10.13. The original clip (left) was flat and nonengaging. The graded clip (right) uses multiple corrections to create a stylized “look.”

A catchall phrase that we all really like to use is color enhancement. The word enhancement simplifies the description of the process by including the more mundane fixes as well as the stylistic approach that many projects use.
Primary Color Corrections
Color correction is generally broken down into two main areas: primary correction and secondary correction. Let’s first take a look at primary correction. A good way to think about primary color corrections is to think of them as corrections that affect the entire picture. For example, if you had a shot that was very dark and you wanted to lighten the entire clip, that would be a primary correction. Similarly, if you were to adjust the overall saturation of a clip or give the clip an overall warm look, you’d be performing a primary color correction. In this section we’ll fix some common issues using primary color corrections.
Media in This Chapter Uses the H.264 Codec
![]()
The media for the exercise files in this chapter use the H.264 codec. We chose the H.264 codec to conserve space on the DVD for extras like training videos. Even though the codec is 8-bit and uses a 4:2:0 chroma subsampling ratio, you should still be able to get good results when correcting the footage in this chapter’s exercises.
Exposure Problems
It’s a fact of life that at some time you’ll produce or receive underexposed footage. Shooting at night or in a dark concert venue can cause underexposure problems. Underexposed footage can also be the result of the aperture on the camera not being adjusted. Like its overexposed counterpart, underexposed footage can be tough to work with. The trouble with underexposed footage is that lightening a clip can often introduce excessive video noise, so you may have to employ a third-party noise reduction effect or use tools in Adobe After Effects to remove that noise.
Static vs. Motion Grading
![]()
As you begin to color correct and grade footage, it’s important not to just park the playhead on a single frame or clip to judge your corrections. Most clips change in some way for the duration of the clip, so it’s essential that you play back a clip and make corrections based on the clip in motion. Keep in mind that in some clips you may need to keyframe a color correction effect to compensate for changes in exposure and color.
Likewise, colorists will tell you that overexposed footage is also a tough pill to swallow. Depending on how overexposed the shot is, highlight detail can be lost and in general the clip will look washed out. Sometimes extremely overexposed clips aren’t worth using. However, you can fix many overexposed clips quite easily.
Three-Way Color Corrector in Depth
![]()
Check out this video to learn more about the Three-Way Color Corrector. The most full-featured of Adobe Premiere Pro’s Color Correction effects is comprehensive, but in this video we break it down in more depth so you can utilize it for even your most difficult shots.
Before we actually correct a couple of clips with exposure issues, let’s use the scopes to verify some underexposed and overexposed footage.
- Navigate to Chapter Files > Chapter_10_Media > [Version Number] and open the project Ch10_under_overexposed.prproj (it’s a simple project with only two video clips). Choose Window > Workspace > Color Correction.
Sequence Settings for Color Correction

For best results when color correcting or grading, be sure to choose Sequence > Sequence Settings and select Maximum Bit Depth and Maximum Render Quality. These settings ensure that your color corrected footage looks its best and give you more leverage while making corrections but at the cost of longer render times. All of the sequences in this chapter’s exercise files have these settings enabled.
- Examine the two clips in the Timeline. One has an obvious underexposure and the other is overexposed. However, it’s always best to double-check this by viewing the scopes.
- In the Reference Monitor right-click and choose Display Options > YC Waveform. Make sure the options for Setup and Chroma are disabled at the top of the scope. As stated earlier, there is no setup in digital video.
- Park the current-time indicator on the first clip. Notice that the trace on the YC Waveform only goes from about 0 IRE to about 40–45 IRE. This indicates a dark clip (trace bunched towards the bottom of the waveform indicates a dark clip) (FIGURE 10.14).
Figure 10.14. The dark nature of this clip is verified by looking at the YC Waveform.

- Move the current-time indicator to the second clip in the sequence.
The trace is elevated on the scale with some of it over 100 IRE, and then it bottoms out around 25 IRE. This elevated trace indicates that the clip is overexposed and is contributing to the general washed-out nature of the clip (FIGURE 10.15).
Figure 10.15. The overexposed nature of this clip is verified by looking at the YC Waveform.

Fixing underexposed footage
An effective way to repair underexposed footage is to use a Curves adjustment. For this first clip we’ll use the Luma Curve effect.
- Select the first clip in the sequence.
- Type Luma Curve into the search box of the Effects panel and drag it onto the first clip on the sequence.
- Click the Effect Controls panel.
Remember that the Luma Curve maps the tonal range from left to right and black to white. Clicking on the curve adds a control point to effectively remap luma values along the tonal range.
- Add a control point in the upper 75 percent (towards the top) of the curve. Drag up slightly until the top of the trace on the YC Waveform is about 60 IRE. It’s an evening shot so it’s OK if it’s still on the darker side.
- Click to add a control point about midway on the curve and drag up to lighten the midtones of the clip. Drag up until the middle part of the trace is between 30 and 40 IRE.
On the YC Waveform the trace has moved up the scale considerably. However, the clip now has a slightly washed-out look.
Rendering Color Effects

Although Adobe Premiere Pro’s Mercury Playback Engine does some amazing things, you’ll sometimes need to render a clip or work area to achieve real-time playback and/or full-quality playback. This is especially true when you’ve combined several different effects.
- To fix the washed-out picture, add another control point in the lower 25 percent of the curve and drag down slightly to restore some shadow detail.
- Toggle the effect on and off by clicking the effect visibility button next to the name of the effect in the Effect Controls panel or use the Split view controls to compare before and after. When you’re satisfied with the results, select the Timeline and click Play to watch the corrected clip (FIGURE 10.16).
Figure 10.16. The original clip (left), Luma Curve (center), and the corrected clip (right).

Fixing overexposed footage
Fixing an overexposed clip is a similar procedure to fixing underexposed footage. Although you could fix the second clip in this sequence with the Luma Curve (or any number of other color effects), let’s use the Luma Corrector effect.
- Select the second clip in the sequence.
- Locate the Luma Corrector effect and drag it to the second clip in the sequence.
- With the second clip in the sequence selected, switch to the Effect Controls panel.
On the YC Waveform, the trace above 100 IRE has automatically been clipped. So just by adding this effect, the clip is now technically legal for broadcast, but there is more work to do.
Footage and the Printed Page
As you flip through the rest of this chapter just note that the problems and corrections in figures may look slightly different than when working with the footage in the exercise files due to the different ways the printed book (or ebook) and video show color and contrast.
- Make sure the Tonal Range parameter is set to Master, and then adjust the Pedestal parameter until the bottom of the trace is just touching 0 IRE. We used a value of -.21
This ensures that parts of the clip (like the subject’s black jacket) will be shown as black. The Pedestal parameter performs an offset to the signal and in this case darkens the entire clip.
- Using the Gain parameter, drag to the right until the top of the trace is right at 100 IRE. We used a value of 1.26 The Gain parameter affects lighter pixels (highlights) more than midtones and shadows. Raising this parameter to 100 IRE is OK because a bright window is behind the subject.
Expanding Contrast
Often, clips are not underexposed or overexposed but just lack “punch.” By expanding the contrast ratio in a clip, you can greatly improve a clip’s look. While looking at the YC Waveform, try to expand contrast so that part of the trace is touching 0 IRE or black. As a result, black objects onscreen are shown as black and trace (depending on the desired brightness of the clip) moves toward 100 IRE.
- Adjust the Gamma parameter up slightly (we used a value of 1.04) so the subject’s jacket doesn’t look crushed.
Notice that the bottom of the trace has moved away from 0 IRE. This is due to the overlapping nature of the controls on the tonal range. In this case it works well because it gives the black jacket a little more detail. With color correction, you’ll often need to go between controls adjusting parameters a few times to get the right look in the shot.
- Toggle the effect on and off. You should clearly see the results of the correction. The corrected clip doesn’t look overexposed and has clearly defined blacks without looking washed out.
- Select the Timeline and click Play to view the corrected clip (FIGURE 10.17).
Figure 10.17. The original clip (left), Luma Corrector (center), and the corrected clip (right).

Fixing Color Casts
Let’s face it, color casts happen. Most are due to improper white balance or a strong light somewhere in the room. Fixing color casts is at the heart of color correction. Before you can fix a color cast, you need to know how to identify one. Fortunately, you have the scopes to help you!
- Navigate to Chapter Files > Chapter_10_Media > [Version Number] and open the project Ch10_colorcast.prproj. The sequence contains a clip with an obvious blue color cast.
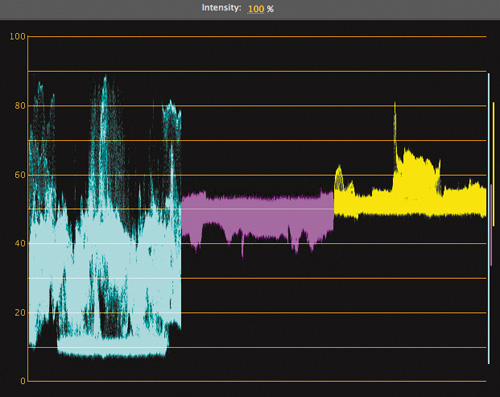
- In the Reference Monitor load the Vectorscope (if the Reference Monitor is not visible, choose Window > Reference Monitor or switch to the Color Correction workspace if you’re not already using it) to see the hues in the video signal. You should notice (just like your eyes told you) a strong push of trace towards blue (FIGURE 10.18).
Figure 10.18. The color cast in the clip is verified on the Vectorscope with a large push of trace towards the blue target.

- Right-click on the Vectorscope and choose Display Mode > RGB Parade.
In this clip you’ll notice that the blue trace is well elevated above the other traces (particularly towards the middle to the top of the scale). From this scope you can tell that most of the color cast is happening in the midtones and highlights of the clip (FIGURE 10.19).
Figure 10.19. The RGB Parade shows overall color balance in a clip. Elevated trace in the Blue channel towards the top of the Parade shows an imbalance mainly in the midtones and highlights. Remember that trace towards the top of the scale represents lighter signal.

Before fixing a color cast
You know that a color cast is happening mainly in the midtones and highlights from the previous steps, but there are two more important factors to be aware of prior to attempting any type of correction:
• Make a contrast correction first. As you change contrast, you potentially change where in the tonal range a color cast is actually occurring.
• To neutralize any color cast, you must add in color from the opposite side of the color spectrum (the opposite side of the color wheel) at a particular part of the tonal range. This example shows a blue color cast in the midtones and highlights. You’d neutralize it by adding in yellow to the midtones and highlights controls of the color correction effect in use.
Fixing contrast first
For this clip you’ll use the Three-Way Color Corrector because it gives you the most control over correcting the different tonal ranges present in the clip. The goal is to have a balanced clip (where traces on the RGB Parade are all equal). In the real world, however, this is next to impossible, because there is no such thing as a truly neutral clip.
- Apply the Three-Way Color Corrector effect to the clip in the sequence.
- Select the clip in the sequence, and then click the Effect Controls panel.
- Right-click in the Reference Monitor (it should currently be showing the RGB Parade) and choose Display Mode > YC Waveform. Double-check that you don’t have Setup selected on the YC Waveform, because there is no setup in digital video.
- In the Effect Controls panel make sure the Tonal Range parameter is set to Master.
- Use the Input Levels slider for the darker portions of the clip (the small triangle on the left of the Input Levels graph). Drag right and adjust the contrast in the clip until part of the trace on the YC Waveform is touching 0 IRE.
Notice that the highlights are already touching 100 IRE, so you shouldn’t need to adjust the contrast any further.
Tackling color
Now that the contrast is under control, let’s fix the color cast in this clip.
- Switch the Reference Monitor to RGB Parade. Because the RGB Parade shows the relative color balance between the color channels, you can use the scope as a guide for creating a balanced clip. A clip that is in balance will have all three channels (RGB) in relative balance with each other across the different parts of the tonal range.
- With the Tonal Range parameter still set to Master, use the Hue Balance and Angle control (the large color wheel) and drag the small circle (called the Balance Magnitude control) towards yellow/orange.
- Use the Balance Gain slider (the horizontal bar attached to the Balance Magnitude control) and gently drag towards the outer part of the handle.
You should notice that the trace on the RGB Parade is now in more balance.
The clip is starting to look better but still looks a bit off. You can correct color casts with the Tonal Range set to Master (essentially transforming the Three-Way Color Corrector into the Fast Color Corrector), but switching the Tonal Range back to any of the other options will give you three color wheels in which to adjust color balance between shadows, midtones, and highlights.
You’re probably wondering why we didn’t tell you to just use the three color wheels to balance the image in the first place. You could certainly do that: But often for extreme color casts like the one found in this clip, it’s easiest to switch the Tonal Range to Master to neutralize the color cast in a broad stroke, and then fine-tune your correction using the separate controls for shadows, midtones, and highlights.
- Switch the Tonal Range parameter back to one of the other choices, other than Master, to get three color wheels. Using the highlights wheel, drag towards yellow/orange.
You should be trying to get the top of the traces on the RGB Parade as even as possible.
- Use the midtones wheel and drag towards yellow/orange to balance out the trace on the RGB Parade for the midtones. Again, you’re trying to get the middle part of the traces to look the same.
Copying Corrections
In many projects a shot will appear multiple times (such as an interview). Instead of reinventing the (color) wheel and correcting the clip from scratch each time, simply copy the effect for a corrected clip. Just right-click on the effect from the corrected clip and choose Copy. Then load the new clip into the Source Monitor and paste the effect on the Effect Controls panel of the new clip. Additionally, you can right-click on the effect in the Effects panel and save it as a preset, which you can then recall for other similar clips in a project.
- Repeat this procedure using the shadows wheel to try to get the bottom of the trace on the RGB Parade even and in balance (FIGURE 10.20).
Figure 10.20. Using the three color wheels for shadows, midtones, and highlights, you can fine-tune a color correction for different parts of the tonal range.

The color should look pretty good, and the trace for each channel should now be in good balance. Open a Vectorscope and notice that the large amount of trace that was pushed towards blue is no longer there (indicating that you neutralized the color cast) (FIGURE 10.21). Play back the clip on the sequence to check out your work. Continue to adjust the Three-Way Color Corrector as needed.
Figure 10.21. The original and corrected clip with corresponding RGB Parades and Vectorscopes.

Magic Bullet Colorista
![]()
Looking for even more sophisticated color correction tools? Be sure to check out Magic Bullet Colorista from Red Giant Software. You can find out more by visiting www.redgiantsoftware.com.
Secondary Color Corrections
As mentioned earlier, primary color corrections affect an entire clip, whereas secondary color corrections affect only part of the clip. Let’s say you had a clip that looked pretty good, but after primary correction, the skin tones of the actors were still a little red. You could, with secondary correction, target only the skin tones, leaving other parts of the clip unaffected. Additionally, secondary correction is useful when shots of the same subject are intercut from different cameras or when the same shots are used in different scenes and skin tones don’t match.
Ignore the Skin? That’s a Sin
![]()
One of the most important details to match while grading is skin tone because our minds process skin as a memory color. This means that people know what skin tone should like.
Using secondary color correction, matching skin tone is pretty straightforward. Let’s first open a project and get set up to make a secondary correction.
- Navigate to Chapter Files > Chapter_10_Media > [Version Number] and open the project Ch10_skintone.prproj. Then choose Window > Workspace > Color Correction.
In the open sequence is a clip that looks OK and is pretty well-balanced, but the subject’s face is slightly red. Look at the Vectorscope in the Reference Monitor and note that there is a bit of trace pushed towards the red target, indicating the skin tone is pushed that way as well. Ideally, skin tone on the Vectorscope will fall on or near the flesh tone line, which is the line that intersects the yellow and red targets (FIGURE 10.22).
Figure 10.22. The Vectorscope shows the subject’s red skin tone. A large amount of trace is pushed towards the red target. Skin tone should fall on the line that intersects the yellow and red targets.

- Select the clip in the sequence.
The Effect Controls panel shows that a Three-Way Color Corrector is already applied to this clip. This effect was used to perform primary color correction (a slight contrast correction) on the clip; however, the person’s face is still pretty red.
- Add another Three-Way Color Corrector to the clip. You’ll use this second Three-Way Color Corrector to perform a secondary correction targeting the subject’s face.
Correcting Skies

Correcting and grading skies is a task you’ll often do to fix flat skies or to add a layer of style to a clip. Check out this video to see how we color correct and grade skies
- In the Effect Controls panel at the bottom of the second Three-Way Color Corrector click the triangle to expand the Secondary Color Correction properties.
- Next to the Center parameter click the first eyedropper. This eyedropper allows you to sample the subject’s face (we clicked on the subject’s cheek). The other two eyedroppers add to the selection (+) or subtract from the selection (-). Although it looks like nothing really happened, something actually did.
- At the top of the effect (the second Three-Way Color Corrector you added) change the Output to Mask.
The Program Monitor contains a white on black image. The white is the subject’s face. With this view, you want to have everything you want to correct (the face and skin tone) to be white and everything else to be black (FIGURE 10.23).
Figure 10.23. With the Output of the second Three-Way Color Corrector set to Mask in the Program Monitor, you can see a white and black image. The white portion denotes the part of the clip that has been selected or targeted for the secondary correction. This mask needs further refinement.

Memory Colors
![]()
Grass is green and skies are blue, right? When performing primary and secondary color correction, keep in mind that some colors (the combo of hue and saturation) are known as memory colors. Over the years our minds have developed a keen sense of what certain objects like grass, skies, and skin tone look like. Always pay careful attention to memory colors when grading.
To match skin tone, you could click again on the face with the + eyedropper, but it’s far easier to use the Hue, Saturation, and Luma (also known as HSL) controls to fine-tune the selection.
- Click the triangle next to Hue, Saturation, and Luma.
These graphs (also called qualifiers) show the color spectrum (hue), saturation (less saturation on the left; more saturation on the right), and luma (black on the left; white on the right). The two square blocks in the middle bar of each graph let you control the “range” of the selection for hue, saturation, and luma. The two outer triangles let you feather or soften the selection.
- Adjust each qualifier until you’ve selected all of the face (the white part).
Remember that you can see your selection in the Program Monitor (FIGURE 10.24). Don’t worry if you get a little of the background in the selection or the hot spot on the subject’s head is not completely white. This shouldn’t be noticeable in the final shot.
Figure 10.24. Using the HSL qualifiers you can refine the selection to better target the subject’s skin tone. Adjust the qualifiers until you have as much skin tone as possible selected.

Vignettes or Shapes
Common among dedicated color correction applications are the vignettes, or shapes, tools. You can use vignettes to isolate a particular part of a clip. For example, you could use a circle vignette around a subject’s face to lighten it. Although you can manually build vignettes in Adobe Premiere Pro by duplicating a clip and using a garbage matte, or using the title tool After Effects has a full complement of masking capabilities that are easier to use.
- When you’re happy with your selection, use the Soften parameter to blur the selection a bit (this helps with ringing edges). A value between 4 and 5 should work well.
- Go back up to the Output parameter and change it from Mask to Composite. In the Program Monitor, notice that you’re once again looking at the clip.
Now that you’ve made the selection you need to make the correction.
- Use the midtones color wheel in the middle of the effect and drag the handle down towards yellow/green (to neutralize a color cast, you add in color from the opposite side of the color wheel). On the highlights color wheel also drag down towards yellow/green a touch.
- Check the Vectorscope in the Reference Monitor. Using the flesh tone line as a guide, adjust the midtones and highlights until there is trace falling near or on the line (FIGURE 10.25).
Figure 10.25. Remember that the flesh tone line is a guide, not an absolute rule. Use your eyes and best judgment to determine what looks good.

Secondary Correction for Special Effects

Check out this video to learn more about using Adobe Premiere Pro’s Leave Color effect to create a very stylized look where everything in a clip is desaturated except for one color.
- Switch the Tonal Range control to Master.
- Using the Input Levels control, drag the leftmost point slightly to the left to lighten the subject’s face a touch.
- Toggle the effect on and off to see the result of the secondary correction. Then play back the sequence and check your results; tweak the correction as you see fit (FIGURE 10.26).
Figure 10.26. The original and corrected shots.

Using After Effects and Photoshop to Correct
Although the tools in Adobe Premiere Pro are quite effective for most color correction and grading tasks, you don’t have to stop there. If you are using the Production Premium or Master Collection of Creative Suite, you have two great options. Adobe Photoshop Extended offers a comprehensive suite of image correction tools. Plus, you can easily turn to After Effects for versatile masking tools and advanced effects.
Grading in After Effects
![]()
To see how you can use After Effects to color correct and color grade, check out this video.
Sending a Clip to After Effects
After Effects has secured its place as one of the preeminent motion graphics and compositing applications in the world. Both Adobe Premiere Pro and After Effects share many user interface elements as well as commands. Several features make it worthwhile to send a clip to After Effects to be corrected and graded:
• Color Finesse. After Effects includes Color Finesse—a dedicated color correction plug-in that gives you ample control to color correct and grade your project, especially when shots are part of a motion graphics workflow.
• Color Stabilizer. The Color Stabilizer effect samples the color values of a reference frame and then adjusts the colors of other frames so they remain consistent. This works well for sources shot under flickering light and can also compensate for flicker inherent to speed effects, time-lapse, and stop-motion footage.
• Black & White. If you need to create custom grayscale or duotone looks, this effect is the perfect solution. You can use the color channels to weight the grayscale conversion.
• Vibrance. If you need to selectively adjust the saturation in a clip, the Vibrance effect is very useful. Colors that are less saturated in the original image are affected with greater magnitude than those that are already saturated in the original image. This effect is ideal for boosting blue skies and green vegetation. It even offers an option to protect skin tones to keep skin looking natural.
• Remove Grain. If your footage has a lot of grain or noise, color correction can make it worse. Fortunately, After Effects offers a handy effect to smooth out the problem areas.
• Adjustment layers. You can apply effects to nondestructive adjustment layers. The effects can then be masked using a variety of tools, including brush strokes, a free-form Bezier Pen tool, and a robust paint engine.
But Wait, There’s More
![]()
There’s lots more to Dyanmic Link. You can import entire Adobe Premiere Pro projects into After Effects as both layered compositions or linked video tracks. You can even copy and paste clips between applications. Be sure to explore this versatile relationship.
Exporting a clip to After Effects is simple thanks to Dynamic Link.
- Select the clip(s) in your Timeline.
- Choose File > Adobe Dynamic Link > Replace with After Effects Composition.
A new After Effects composition is added to your Timeline and Project panel.
Creative Suite Workflow
If you’d like to learn more about workflows available between Adobe Premiere Pro, After Effects, and Photoshop Extended, check out Motion Graphics with Adobe Creative Suite 5 Studio Techniques (Adobe Press, 2010).
- You are automatically switched to After Effects. Name the project and click Save.
Store the project with your Adobe Premiere Pro project file so that your media path structure is easy to preserve. Any additional clips sent to After Effects from your current Adobe Premiere Pro project will automatically join this linked After Effects project.
- Modify your footage as needed in After Effects.
- Save your After Effects project file to capture your changes.
- Switch back to Adobe Premiere Pro and your project is updated.
To update a linked After Effects composition, just press Command+E (Ctrl+E) to invoke the Edit Original command.
Correcting a Clip with Photoshop Extended
You might think of Photoshop as, well, a photo editing program. Although most think of Photoshop as mainly geared toward photography and graphic design, it also excels at working with video (which really is just a bunch of stills played back quickly). If you’re comfortable with Photoshop or want to use some of its exceptional tools, it’s easy to send a clip to Photoshop Extended. Depending on what you’re trying to do, you have a few options:
• If you know you want to take advantage of Photoshop’s toolset prior to using a clip in Adobe Premiere Pro, you can simply open it in Photoshop.
• You can matchframe a clip in your Timeline to find it in the Project panel. You can then right-click on the clip and choose Reveal in Bridge. One more right-click and you can choose it in Adobe Bridge and then choose to open the clip in Photoshop Extended.
• If you’re already working with a clip in Adobe Premiere Pro, select the media in either the Project panel or on a sequence and choose File > Export > Media. Save the file to the desired location, and then open the file in Photoshop.
Adobe Photoshop Extended Can Fix It
![]()
To see how you can use Photoshop Extended to color correct and color grade, watch this video. You’ll also learn how to save or render your clips for use in Adobe Premiere Pro.
Get the Most from Photoshop
![]()
If you’d like to explore the many ways in which Photoshop can help you with your video projects, check out the book Photoshop for Video (Peachpit, 2010) as well as the podcast of the same name.
After you’re done editing the clip, you’ll need to export your changes from Photoshop, reimport the clip into Adobe Premiere Pro, and then reedit the clip into your sequence.
Next Steps
Now that you have the basics of color correction and grading down in Adobe Premiere Pro, you can move on to the next stage in finalizing a project. Up next we’ll take a look at finishing audio mixing and audio repair. After all, as the saying goes, audio is half the picture!