
Chapter 8. Timeline Operations
Once you start assembling clips in a row, you will undoubtedly need to make changes. It might be because an irksome client or a producer can’t make a decision. Or it could be due to a change in direction for the story or a new interview that suddenly needs to be integrated. For whatever reason, you need to be in total control of the Timeline panel.
In this chapter we’ll explore many ways for making selections in the Timeline—whether you need to select part of a clip or several clips. You’ll also learn several techniques for moving clips around a sequence, including the use of the clipboard and special commands like Lift and Extract. In addition, we’ll help you smooth out your cuts with the proper use of video and audio transitions.
Let’s put that Timeline to work.
Selecting Clips
Several editor tasks, such as applying effects and transitions, and even moving clips, all have the same starting point. Before you can perform any action that affects a clip as a whole, you need to properly select the clip. Several selection tools are available to you in the Tools panel, and you need to know which ones to use in specific circumstances.
Install the Free Cineform Codec
![]()
This chapter uses media with the Cineform codec. You can download the free Neo Player at http://estore.cineform.com/NeoPlayer.aspx to use the media.
For this lesson, we’ll use some of the same media files from Chapter 6 but use a new starting project file. Additional media is also in the Chapter 8 folder. Be sure to copy the media files and the new project file to your computer. You will likely need to reconnect media when you open the project.
For this section, we’ll use a practice project. It contains simple clips that are lettered in order. This will make it easy to see the different tools and test their uses.
- Launch Adobe Premiere Pro.
- Choose File > Open, navigate to Chapter Files > Chapter_08_Media > [Version Number], and open the project Ch08_Timeline_Operations.prproj.
- Open the Sequences bin and load the sequence 01 Select.
We’ll use this sequence to practice selections.
Selecting a Clip
The easiest method of selection is just a single clip, and the best tool to use is the Selection tool. The quickest way to access the tool is by pressing its shortcut, V (think of the shape as matching the tip of the arrow for the tool). Simply click the middle of an individual clip to select it (FIGURE 8.1).
Figure 8.1. Be sure to avoid clicking on an edge of a clip or the Selection tool will switch to the Ripple Edit tool.

Even if you don’t have the Selection tool active, you can often select single clips. Clicking in the middle of a clip with the Ripple Edit tool or Rolling Edit tool will also select the clip. The same holds true for the Rate Stretch tool. In fact, if you click with the Slip or Slide tools, you can also make a selection (just be careful not to drag, or you’ll adjust the visible contents of the clip).
Selecting a Range of Clips
Another common scenario is the need to select several clips. This may be driven by the use of a common effect or the need to quickly move a section of your video to another location. Either way, Adobe Premiere Pro offers a few ways to select a range of clips.
You can do any of the following to select multiple clips:
• Click in an empty area of the sequence (under the time ruler), and then drag to create a selection. A rectangular marquee appears that lets you select any part of the clips that you’d like to select (FIGURE 8.2).
Figure 8.2. The Selection tool switches to a Marquee Selection tool if you click and drag in an empty area of the Timeline panel.

• To add additional clips, hold down the Shift key. You can Shift-drag with the marquee to add any additional clips to the selection.
• To remove items from the selection, just Shift-click on previously selected items.
Selecting All the Clips on a Track
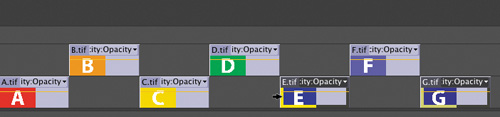
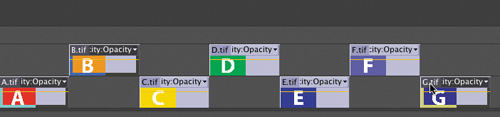
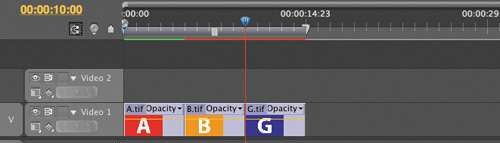
Adobe Premiere Pro offers a special tool to select clips based on their track level. The Track Select tool (A) selects all of the clips on a single track that are forward of the click point. In other words you can select all of the clips on a track by clicking on the first clip in the Timeline (FIGURE 8.3). If you want to isolate a selection, just click on a later clip (FIGURE 8.4), and the selection will be made from that clip forward.
Figure 8.3. The Track Select tool uses the keyboard shortcut A, which you can think of as Select All for that track.

Figure 8.4. By clicking later in a Timeline, you can select all the clips from that point forward.
Select All Clips on All Tracks
![]()
A quick way to select all the clips on all video tracks is to Shift-click with the Track Select tool. This forces the tool to choose all clips on all tracks from that point forward.
Selecting Non-contiguous Clips
Sometimes you’ll need the ability to select clips on multiple tracks in different positions or track levels. We find this particularly useful when applying preset color corrections based on subject or to select multiple audio tracks for filtering. To select multiple clips, use the standard Selection tool (V), and then Shift-click to select items as needed (FIGURE 8.5).
Figure 8.5. Keep holding down the Shift key as you click to add more clips to your selection.
Selecting Audio or Video Only
You may find the need to independently select the audio or video in a clip. Common scenarios include replacing sync sound material as well as unlinking audio to reposition it for drift or delay. You may also want to remove the audio from an edited clip entirely if the background sound is too distracting.
Select Audio or Video by Track
![]()
The Option (Alt) key modifier also works with the Track Select tool. When you click, you can select all of the clips in a track independently.
Let’s try it out.
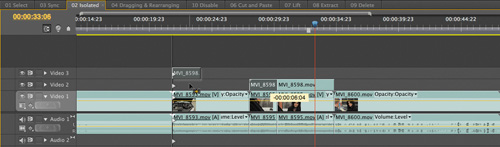
- Open the Sequences bin and load the sequence 02 Isolated.
- Choose the Selection tool (V).
- Hold down the Option (Alt) key and click on an item to make a selection (FIGURE 8.6). By holding down the Option (Alt) key, you temporarily unlink audio from video.
Figure 8.6. Using the Option (Alt) key modifier lets you isolate audio or video selections without unlinking clips.

Splitting a Clip
If you want to split a clip into two clips, you’ll find a few ways to do this in Adobe Premiere Pro. Splitting a clip is useful if you want to remove part of an audio or video track while leaving other parts behind. It also works well when you want to split a sound bite to rearrange its order.
The Effect of Splitting
![]()
When you use the Razor tool to split a clip into two clips, it creates a new and separate instance of the clip in the Timeline. The two new clips are both full versions with handles intact that connect to the original media. Each clip will have different In and Out points, however.
Continue to work with the 02 Isolated sequence, and try these techniques to split a clip:
• Use the Razor tool (C) to split a single or linked clip. Wherever you click on the clip will be its split point (FIGURE 8.7).
Figure 8.7. The Razor tool will work on clips or linked clips (unless a track is locked).

• To split only the audio or video portion of a linked clip, Option-click (Alt-click) with the Razor tool.
• To split all tracks, Shift-click with the Razor tool. This works regardless of track selection (but does respect locked tracks) (FIGURE 8.8).
Figure 8.8. The Razor tool can split several tracks with the Shift key. The benefit here is that you do not need to select tracks to split them (but you may lock tracks that you don’t want affected).

Don’t Split for Effects
![]()
You’ll discover in Chapter 12 that all effects offer keyframes. This means you can change the effect’s properties over time. Do not split a clip just to modify its effects.
Unlink Several
![]()
In Adobe Premiere Pro CS5.5 you can choose to unlink video and audio from multiple clips. Just select the clips and choose Clip > Unlink.
• If you want to control which tracks are split, use the Add Edit command (formerly called Razor All Tracks in CS5 and earlier). Just click on the headers for the targeted tracks, and then choose Sequence > Add Edit. You can also press Command+K (Ctrl+K).
• If you want to add an edit regardless of track selection, just press Command+Shift+K (Ctrl+Shift+K) to perform the Add Edit To All Tracks command.
Linking and Unlinking Clips
After you add a video clip to a sequence, the clip’s audio and video will route to different tracks. By default, there is a link between the audio and video pieces so that when you select or drag one, the other follows. In this case the audio/video pair is called a linked clip.
If you want to break this link, you can unlink the two parts. There are reasons for unlinking—for instance, when you want to fix drift in an audio track or create a split edit.
Let’s try unlinking and linking:
- Open the sequence 03 Sync and choose the Selection tool.
- Click on the video clip in the Timeline and choose Clip > Unlink (FIGURE 8.9).
Figure 8.9. When a clip is unlinked, you’ll notice that the [V] and [A] track labels disappear from the clip. Also, the name of the clip is no longer underlined.

- Drag the audio a few seconds to the right.
- Play back the clip. The audio is very far out of sync.
- Select both the audio and video clips by Shift-clicking.
- Choose Clip > Link.
The clips are relinked, and you can easily see how much an item may have slipped out of sync (FIGURE 8.10).
Figure 8.10. The numbers on the clips on the right indicate how far out of sync the audio and video tracks are.

When to Link

If you’ve created a sound bed of several sound effects, you can link them together. You may also have synced sound that gets added to a video clip. Both of these are good uses for manually linking.
- Right-click on the numbers that appear at the In point of the clip in the Timeline panel, and choose a sync method (FIGURE 8.11):
• Move Into Sync. This method shifts the selected portion in time to regain sync. The move disregards adjacent clips and can result in overwritten media.
• Slip Into Sync. This method slips the media content to restore sync. It preserves the clip’s In and Out points in the Timeline. This method requires adequate handles of unused media to slip.
Figure 8.11. The original media is out of sync (left). It can be moved into position (center) or slipped into sync (right).

Moving Clips
Like a musical composer, you’ll often need to shift the notes and bars around (except in your case they are sound bites and B-roll). A big part of editing is experimenting with the order of clips and how they juxtapose with footage. Adobe Premiere Pro lets you place clips into any order you need; you can also change the order of clips in the Timeline in many ways.
Dragging Clips
As you drag clips in the Timeline, you should pay careful attention to the translucent rectangle that represents the clip’s duration (FIGURE 8.12). This image will help you place the clip. A small window near the rectangle also displays a positive or negative number to show forward or backward movement in the Timeline. You can use the sequence 04 Dragging & Rearranging to practice these techniques.
Figure 8.12. The small numbers are a useful way to judge position when dragging a clip.
A Better Drag
![]()
To see how to take control when dragging, be sure to watch this video tutorial.
Here are a few important notes to keep in mind when dragging a clip:
• The default method when dragging is an Overwrite (Overlay) edit.
• Hold down the Command (Ctrl) key when dragging to perform an Insert edit.
• You can drag a clip vertically to a new audio or video track. Leave the Snap option turned on to help keep the track aligned to its original horizontal position (FIGURE 8.13).
Figure 8.13. Using the Snap option will keep clips precisely aligned when dragging.

• To unlink an audio and video clip when dragging, Option+drag (Alt+drag) the audio or video track. The video and audio will lose sync. You can release the modifier key and drag the clip into place (FIGURE 8.14).
Figure 8.14. Releasing sync lets you adjust natural sound independent of B-roll.

Move with the Keypad
![]()
If you have a full-size keypad, you can use the numeric section for quick movement. Just select a clip in your Timeline, make sure the Num Lock is on, and then press the plus (+) key and a number to indicate the number of frames you want to move. Press Return (Enter) to move the clip. You can also use the minus (-) key to move a negative position.
• You can move both the audio and video with one operation. After dragging the video portions of a clip into place, press and hold the Shift key. Continue holding the Shift key and drag downward past the dividing bar to position the audio clip. Release both the mouse and Shift key when the items are correctly positioned (FIGURE 8.15).
Figure 8.15. After dragging the item into place (left), hold down the Shift key and drag downward (center) to reposition the audio clip (right).

• Watch video tutorial #22 to learn two additional dragging techniques.
Rearranging Clips in a Sequence
When dragging clips, it’s possible to avoid gaps using a Rearrange edit. This command is similar to both an Extract and Insert edit in that clips are moved and overwritten, yet they are swapped and positioned into a new order at the same time. Many editors refer to this as a Swap edit.
- Open or continue working with the sequence 04 Dragging & Rearranging.
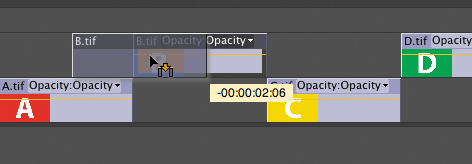
- Select the second clip (B) in the Timeline.
- Drag the clip to the left and press and hold down the Command+Option (Ctrl+Alt) keys. The Rearrange icon appears (FIGURE 8.16).
Figure 8.16. A Rearrange edit is useful for repositioning clips quickly.

- Release the clip to perform an Insert edit that shifts clips in the destination tracks only. The clips are now swapped.
Using the Clipboard
Although its use may feel more like you are working with a word processor instead of an analog tape deck, using the clipboard is still a relevant technique. Often overlooked for their simplicity, there is still a lot of power when it comes to the Copy and Cut commands.
Copying
The Copy command lets you duplicate a selection and repeat it in your Timeline. If you’re using multiple clips, the relative spacing (both horizontal spacing in time and vertical spacing in tracks) of clips is maintained. The copied clips can be pasted to a new position or track based on the current-time indicator and track selection targets.
Let’s give it a try and create a layered effect with blending modes.
- Open the sequence 05 Copy and Paste.
- Option-click (Alt-click) on the video portion of the clip to select just the video track.
- Choose Edit > Copy or press Command+C (Ctrl+C).
- Move the current-time indicator to the start of the clip (FIGURE 8.17).
Figure 8.17. Carefully position the current-time indicator to control the pasting of clips.

- Use the track selection targets to untarget V1 and A1. Instead, aim the pasting to track V2 (FIGURE 8.18).
Figure 8.18. The track targets control where the footage is pasted.

- Choose Edit > Paste or press Command+V (Ctrl+V) to add the footage into your sequence.
Paste Insert
If you’d like to create an Insert edit with the clipboard’s contents, simply choose Edit > Paste Insert. The current-time indicator will be treated as the In point, and the clips will be added at the targeted tracks.
- Select the top video clip in your Timeline.
- In the Effects panel, type blur into the search field to locate the Gaussian Blur effect (FIGURE 8.19).
Figure 8.19. The search field in the Effects panel is a useful way to quickly find effects.

- Drag the Gaussian Blur filter onto track V2.
- Double-click the video clip on V2 to load it into the Source Monitor panel.
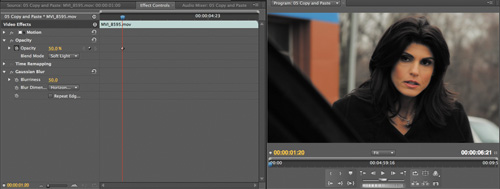
- Click the Effect Controls tab. Twirl down the controls for the Gaussian Blur effect and set the Blurriness to 50 pixels (FIGURE 8.20).
Figure 8.20. We will fully explore the controls for effects in Chapter 12.

- Set Opacity to 50%. Twirl down the Opacity controls and set the Blend Mode to Soft Light (FIGURE 8.21).
Figure 8.21. The technique of blending a blurred copy of footage with itself is often used to create a “film look.”
Cutting
The Cut command is similar in function to the Copy command. Simply select one or more clips and choose Edit > Cut or press Command+X (Ctrl+X) to move the clip to your clipboard. The key difference between Cut and Copy is that the Cut command leaves an empty space between the clips when executed (FIGURE 8.22).
Figure 8.22. The Cut command preserves the relative spacing between the clips. It is similar to the Lift command, which we’ll cover in the next section.

Extracting and Deleting Segments
A good editor knows that editing is more often about taking away the right parts rather than just adding pieces together. You may need to discard some frames that distract the viewer’s eye or expunge the “umms” and “ahhs” from a sound bite to add a few IQ points. It’s important that you know the many ways to remove media from a sequence because each has certain benefits that will impact your workflow.
Need to Find a Clip in Your Project?
![]()
If you need a quick way to locate a clip inside a bin, just right-click on a clip in your Timeline and choose Reveal In Project.
Lift
The Lift operation lets you remove or lift the selected frames from your sequence. Left behind will be a visible gap in the Timeline (as determined by the In and Out points you’ve set). The benefit of the Lift command is that the removed frames are placed on your clipboard so they can be added back into your sequence. This last step is optional, because many prefer to simply leave a visible gap to alert them to a need for B-roll or coverage.
- In the Timeline or Program Monitor panel, mark a range for lifting using In and Out points.
You can use the practice sequence 07 Lift, which already has points set.
- Use the track selection buttons (the headers of tracks) in the Timeline to specify which tracks should be subject to the Lift command (FIGURE 8.23).
Figure 8.23. Be sure to be precise when marking a range for lifting.

- Click the Lift button in the Program Monitor (FIGURE 8.24).
Figure 8.24. You can also press the keyboard shortcut semicolon (;) to perform a Lift.

The frames are lifted and placed on your system’s clipboard. Adding the material back into the sequence is an optional step.
- Click the header of the track for which you want to paste the lifted frames.
- Move the current-time indicator to specify where you want the lifted frames to begin.
- Choose Edit > Paste or press Command+V (Ctrl+V) to add the frames back into your sequence.
Extract
The Extract command is similar to the Lift command except it leaves no gap where the selected frames once lived. Instead, a ripple delete occurs (where the clip is removed and the gap is closed). You set In and Out points just like the Lift command to select the frames. We find the Extract command to be most useful when tightening up interview clips because unwanted bites can be removed and the sequence runtime adjusts downward.
- In the Timeline or Program Monitor panel, mark a range for extracting using In and Out points.
You can use the practice sequence 08 Extract, which already has points set.
- Use the track selection buttons (the headers of tracks) in the Timeline to specify which tracks should be subject to the Extract command (FIGURE 8.25).
Figure 8.25. You need to use targeting to specify which tracks to extract as well as sync locks to indicate which tracks to move clips to when the Extract command is executed.

- Click the Sync Lock boxes in the headers of all of the tracks that you want to be shifted when the Extract button is clicked. This will force the gaps to close for all sync locked tracks.
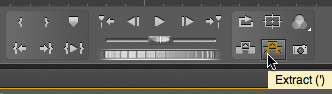
- Click the Extract button in the Program Monitor (FIGURE 8.26).
Figure 8.26. You can also press the keyboard shortcut apostrophe (‘) to perform an Extract.
The frames are extracted and placed on your system’s clipboard (FIGURE 8.27). Adding the material back into the sequence is an optional step.
Figure 8.27. The Extract command’s selection is determined by using In and Out points in conjunction with targeted tracks.
- Click the header of the track into which you want to paste the extracted frames.
- Move the current-time indicator to specify where you want the extracted frames to begin.
- Choose Edit > Paste to add the frames back into your sequence.
Delete and Ripple Delete
Although it should go without saying, if you just want to remove a clip, it’s simple. Select one or more clips in the sequence with the Selection tool or a marquee and press the Delete key. This works just fine when you’ve clearly selected clips. Unlike Lift and Extract, which use In and Out points, the Delete and Ripple Delete commands use the Selection tool. If you want to merely delete part of a clip, use the Lift command (but do not paste the material back into the sequence).
Similar to the Delete command is Ripple Delete, which also removes tracks, but it will close the gap as well. All unlocked tracks will shift according to the amount of material you’ve selected for deletion. If you want to prevent an item from moving, lock the track (or turn off Sync Locks).
Here’s how to perform a ripple delete:
- In the sequence, select the clip or clips you want to delete.
- Choose Edit > Ripple Delete.
You can also press Option+Delete (Alt+Delete) to perform the command.
Deleting gaps in a track
If you have gaps in your Timeline that you’d like to close up, that’s simple too. You can use the Ripple Delete command as well to remove unintended gaps.
In a Timeline, do one of the following:
• Right-click the gap between two clips, and choose Ripple Delete (FIGURE 8.28).
Figure 8.28. The Ripple Delete command is an effective way to close a gap in a sequence.

• Select the gap between two clips, and choose Edit > Ripple Delete.
• Select the gap between two clips, and press Delete.
Deleting all clips on a track
If you’d like to delete all of the clips on a given track, you just need to make an accurate selection. This method will remove all media, but still leave the track behind.
- Choose the Track Select tool (A) from the Tools panel.
- Choose one of the following options:
• To delete both the audio and video for linked clips, click the first clip in the track. You’ll only need to click the video or audio part of the clip to make a selection.
• To delete only part of a track’s clips (not the linked counterparts) is pretty straightforward. Just Option-click (Alt-click) in the Timeline to select just that track’s clips.
- Press the Delete key or choose Edit > Delete.
Deleting a track
If you decide that you do not need an entire track, you can delete it and all of its contents. This is a useful way to clean up a sequence of unused audio and video tracks.
- Open the sequence 09 Delete.
This sequence has several empty audio tracks
- Right-click on one of the audio tracks and choose Delete Tracks.
A new dialog opens with precise controls.
- Select the Delete Audio Tracks option and choose All Empty Tracks (FIGURE 8.29).
Figure 8.29. Several options are available within the Delete Tracks dialog for precise control.

- Click OK to clean up your Timeline.
All empty tracks are removed (except for one audio track, which is a required element of a sequence).
Disabling a Clip
As you start to stack your Timeline, there will be times when disabling is a better option than deleting. For example, you may have multiple B-roll shots laid in for a producer to review. By disabling tracks, you can see options without having to keep multiple versions of the sequence. A similar technique is useful when you want to audition multiple music tracks for an edit or to swap out scratch narration with final takes.
Define Disabled?
![]()
When a clip has been disabled, it will not appear in the Program Monitor or in an exported video file. You can still edit and reposition the clip, but you must enable it to see or hear its contents.
Here’s how to disable a track.
- Select one or more clips in your sequence. You can use the sequence 10 Disable to compare the before and after state of the effect.
- Choose Clip > Enable or right-click on a clip in the Timeline panel.
A check mark next to the Enable command indicates that the clip is enabled. If a clip has been disabled, it will appear dimmed in the Timeline panel.
Adding Transitions
A wise man once said, “If you can’t solve it, dissolve it.” Although that may seem a little trite, the use of transitions can be important to an editor. The proper use of wipes and dissolves can smooth the transition of time and space for two video clips. You can also use audio dissolves to help clean up edits or smooth over sound beds.
The Most Versatile Transition
![]()
In this video you’ll learn how to create custom transitions using the Gradient Wipe transition and Adobe Photoshop.
The key to using transitions, however, is (and will always be) restraint. We do not subscribe to the belief that transitions are like sprinkles to pour all over your editing ice cream sundae. The number one transition you’ll use most often is a cut, followed by cross dissolves and a Dip to Color transition.
Edit Points and Handles
If you plan on using transitions, you need to understand the concept of handles. When you create an edit, you’ve ideally been using In and Out points to define your shots. The handle between a clip’s Media Start time and In point is called the head material, and the handle between a clip’s Out point and Media End time is called the tail material (FIGURE 8.30).
Figure 8.30. A video clip with handles. The ghosted area in the Timeline simulates the handle area and would not be visible normally.

A Media Start
B Handle
C In point
D Out point
E Handle
F Media End
The unused portions of the clips provide an overlap area for transitions to occur (FIGURE 8.31). For example, if you apply a two-second, cross-dissolve transition centered between two video clips, you’d need a one-second handle on both clips.
Copy and Paste Transitions
![]()
You can copy a transition by selecting it in a sequence and choosing Edit > Copy. Then move the current-time indicator to an edit point where you want the transition, and choose Edit > Paste.
Figure 8.31. If you select a transition, you can view it in the Effect Controls tab (nested in the Program Monitor panel). This makes it easier to see how the handle areas overlap.

If you apply a transition to a clip that doesn’t have enough frames as handle, the transition appears but has diagonal warning bars through it (FIGURE 8.32). In this case, Adobe Premiere Pro is extending the handles using repeated head or tail frames (essentially creating a freeze-frame mid-transition).
Figure 8.32. The striped area of the transition indicates that frames are being repeated during the transition. You can shorten the transition, slip the shot, or accept the repeated image (which is not usually desirable).
Adding Video Transitions
Adobe Premiere Pro offers two types of video transitions. One category of transitions is found in the Video Effects group in the Effects panel. These are meant to be applied to an entire clip and can be used to reveal the footage (typically between its In and Out points). The more traditional style of transitions is found in the Video Transitions group. These are organized into six categories based on style (FIGURE 8.33).
Figure 8.33. Category folders make it easier to find just the transition you are looking for.

Applying a single-sided transition
If you have a single clip on its own (such as the first or last clip in a sequence), you can apply a single-sided transition. This type of effect will transition the video clip to or from black or can be used to reveal a video clip or graphic on a lower track in the Timeline panel.
Apply a Transition to All Clips
![]()
If you want to find a similar way to apply a transition to all clips between the In and Out points, you won’t have to look far. With the Selection tool, Option-drag (Alt-drag) to select the audio or video clips that you want to affect. Then choose Sequence > Apply Default Transition to Selection. The command only works with double-sided transitions, however.
Quickly Replace a Transition
![]()
You can drag a new video or audio transition from the Effects panel on top of an existing transition in your sequence. This will preserve the alignment and duration of the transition, and is a great way to swap out transitions or experiment.
Let’s give it a try.
- Open the sequence 11 Transitions.
This sequence has three video clips inserted. The clips do have adequate handles for transitions.
- In the Effects panel, find the Cross Dissolve effect.
You can use the search field to locate it by name or open up folders of presets.
- Drag the effect onto the start of the first video clip. You can only set the effect to Start at Cut for the first clip (FIGURE 8.34).
Figure 8.34. The Start at Cut icon indicates that this is a single-sided transition.

- Drag the effect onto the end of the last video clip. You can only set the effect to End at Cut for the last clip (FIGURE 8.35).
Figure 8.35. The End at Cut icon looks slightly different than the Start at Cut icon. It clearly shows that the Cross Dissolve transition will fade out the clip without extending the duration of the last clip.

- To preview the added transitions, play back the sequence.
Applying a transition between two clips
A common use of some transitions is to create an animated change between two clips. These transitions are used for stylistic effects in certain editing genres. You’ll find a targeted collection of approximately 20 transitions to choose from (most of them are fairly restrained).
Looking for More Transitions?
![]()
Adobe offers a Web page with links to several options to extend the power of Adobe Premiere Pro. Just visit www.adobe.com/products/premiere/extend.html and click the Plug-ins tab.
- Continue working with the sequence 11 Transitions.
You’ll now add two interior transitions between clips 1 and 2 and 2 and 3.
- In the Effects panel, find the Dip to White effect.
You can use the search field to locate it by name or open up folders of presets.
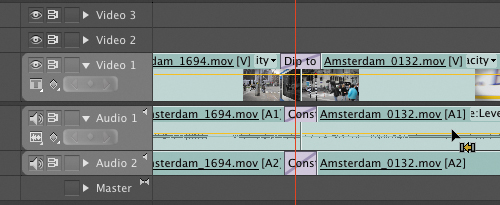
- Drag the effect onto the edit point between clips 1 and 2 (FIGURE 8.36).
Figure 8.36. Depending on where you drag, the effect can be set to end at cut (left), centered at cut (center), or start at cut (right). You can also drag the transition to freely place it for a custom start point.

Place the transition so it is centered at cut.
Customizing Default Transitions

In this video you’ll learn how to apply default video and audio transitions. You’ll also learn to customize which transition is used as well as its properties.
- Drag the Dip to White transition onto the edit point between clips 2 and 3.
The only option you have here is to start at cut because there is not enough handle for the incoming clip (the third in the Timeline). Let’s apply the effect, and then we’ll modify the clip to make it work in the next section (FIGURE 8.37).
Figure 8.37. The transition could only be placed to start at the edit point. Although your options are initially limited without proper handles, you can modify the effect afterwards to achieve the desired results.

Force a Single-sided Transition
![]()
If you want a transition to be singlesided (even when it is applied between two clips) Command-drag (Ctrl-drag) it into place. You can make one clip fade out while the adjacent one cuts in.
Modifying transitions with the Effect Controls panel
After you’ve applied an effect, you can take precise control over how it performs using the Effect Controls panel. Some transitions will have more choices than others, but there are some typical controls. The major benefit of the Effect Controls panel is that clips are displayed in an A-roll/B-roll format. This makes it easy to adjust the positioning of an effect or even to trim sources.
Let’s modify a transition.
Take Total Control of Transitions
![]()
The Effect Controls panel offers several options. In this video you’ll learn to build custom effects and control their speed, position, and properties.
- To start, double-click on the Dip to White transition you just added to the previous sequence.
The Effect Controls panel opens with the transition loaded (FIGURE 8.38).
Figure 8.38. Depending on the transition applied, some fields may appear empty or be hidden. Most of the controls are fairly easy to use, however.
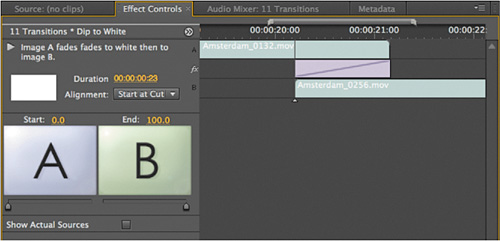
- Select the Show Actual Sources option to view frames from the actual clips. This makes it easier to judge changes you make to the transition’s source clips.
- Click the Alignment menu and switch it to Center at Cut to match the earlier Dip to White effect (FIGURE 8.39).
Figure 8.39. You can force an effect to change its alignment, even if there are not proper handles.

The transitions icon switches to show the new position. The striped bars in the transition indicate that frames are being repeated within the effect. This means that a freeze frame is being used for the incoming clip. This can be resolved using basic trim tools right in the Effect Controls panel.
- Click the Play the Transition button to play back the transition in the panel (FIGURE 8.40).
Figure 8.40. Playing back an effect in real time is important before you start to modify its properties.

In this case (because of the transition through a color), it’s hard to notice the repeated frames.
- Click the duration field and enter 2:00 for a two-second duration effect.
Play back the transition and judge its effectiveness.
- If you want to resolve the repeated frames, there are a few methods you can use:
• You can drag the transition in the Timeline panel or the Effect Controls panel to change its alignment to a custom start (FIGURE 8.41). As you drag, you’ll see the striped bars appear or disappear indicating a change in how frames are being repeated.
Figure 8.41. Dragging the transition lets you create a custom alignment to refine the timing and placement of the transition.

• You can click in the middle of the transition and drag its position to perform a rolling edit (FIGURE 8.42). This changes where the edit happens in the actual sequence.
Figure 8.42. You’ll explore the Ripple and Roll commands in greater detail in the next chapter.

• You can click and drag the handles of the incoming or outgoing clips in the Effect Controls panel. In this case you can lengthen or shorten the clip (which affects the handles). This type of edit is typically referred to as a single-sided trim, and it will result in items shifting in your Timeline (FIGURE 8.43). You can also drag the transition’s handles to change its duration.
Figure 8.43. Through a series of drags, you can trim the clips to fix insufficient handles in a transition.

A The outgoing clip is a few frames short.
B Dragging the clip until the stripes are removed creates a trim and resolves the repeated frames.
C The incoming clip is several frames short, and many frames are being repeated.
D Dragging to the left trims the clip and resolves the handle issue.
- When you’re finished tweaking, play back the effect.
Adding Audio Transitions
The use of audio crossfades is a useful way to smooth out an audio track. Whether it’s resolving an abrupt upcut between two sound bites or the slow fade in of a natural sound bed, transitions are essential to a good mix. There are three audio transitions to choose from:
• Constant Gain. The Constant Gain crossfade, as its name implies, transitions audio by using constant gain (volume) between the clips. Although often useful, this type of crossfade can sometimes sound very sudden as the outgoing clip fades out and the incoming clip then fades in at an equal gain. The Contant Gain crossfade is most useful in situations where you do not want much blending between two clips but rather more of a dip out and in between the clips.
• Constant Power. The default audio transition in Adobe Premiere Pro creates a smooth, gradual transition between two audio clips. The Constant Power crossfade is probably the crossfade you’re most accustomed to in other editing applications. Similar to how video dissolves work, when applied, the outgoing clip at first slowly fades out and then fades out at a faster rate towards the end of the clip. On the incoming clip, the opposite occurs. Audio level increases quickly at the start of the incoming clip and slower towards the end of the transition. This crossfade is useful in most situations where you want blending between clips.
• Exponential Fade. Similar to the Constant Power crossfade, the Exponential Fade transitions audio in a smooth manner. The way it works is that it uses a logarithmic curve to fade out and fade up audio. This results in very good natural blending between audio clips. Some editors prefer the Exponential Fade transition when performing a single-sided transition (such as fading in a clip from silence).
Creating a crossfade
Let’s try creating a crossfade.
- Continue working with the sequence 11 Transitions.
You’ll now add four audio transitions between the clips to smooth out the audio track.
Need More Audio Control?
You can always use the Pen tool and a clip’s audio volume keyframe graph to manually adjust the mix for a clip.
- In the Effects panel, find the Exponential Fade crossfade transition.
You can use the search field to locate it by name or open up folders of presets.
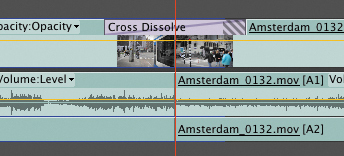
- Drag the transition onto the first edit point.
Repeat for the second audio track (FIGURE 8.44).
Figure 8.44. When dragging transitions, you’ll need to apply them to each track separately.

- You can double-click a transition to load it into the Effect Controls panel. (FIGURE 8.45).
Figure 8.45. You can easily change the duration of a transition as well as its placement in the Effect Controls panel. You can enter a new number or drag the handle to change duration.

Missing the Page Up and Page Down Keys?
![]()
If you’re using a laptop, which lacks an extended keypad, consider mapping those commands to Option+down arrow and Option+up arrow. Although most Windows machines have those keys, you can still use the Keyboard Shortcuts option and remap the commands to Alt+down arrow and Alt+up arrow.
Using the Apply Audio Transition command
If you want to quickly apply an audio transition, you have two ways to do so. The effect applied will be the default audio transition. If you haven’t changed it, this will be the Constant Power crossfade with a one-second duration.
- Move the current-time indicator to an edit point.
- Make sure the tracks you want to affect are targeted.
- Press Shift+Command+D (Shift+Ctrl+D) to apply the default audio transition (FIGURE 8.46).
Figure 8.46. By using targeted tracks and the Apply Audio Transition command, you can quickly add crossfades. This is much faster than dragging and dropping from the Effects panel.
- You can press the Page Down or Page Up keys to quickly move to the next edit point.
- Repeat adding transitions for the next three edit points.
- Watch your sequence to see and hear the result of the transitions you’ve applied.
Next Steps
In this chapter you were introduced to many ways to move clips around your Timeline. The next chapter is a natural progression because it tackles trimming. Experienced editors have come to rely on trimming to quickly shift their edit points. Whether you’re trying to edit to music or just want to finesse the rhythm of the edit, trimming is an essential skill that separates the true editors from the assemblers.