
Chapter 3. Setting Up a Project
It is said that every journey begins with a single step. Postproduction is no different. Taking that first step blindly can lead to headaches and pain—no matter how good your footage or nonlinear editing (NLE) application.
One dollar spent correctly in preproduction (including the consultation of postproduction staff) can save upwards of $100. It’s crucial that you choose an appropriate starting point. This generally means setting up an Adobe Premiere Pro project with the correct preset, but you may need to create a custom starting point as well.
Often, your workflow repeats the same steps with similar formats. In this chapter you’ll learn to set up a new project and how to turn that setup into a template. You’ll explore the details of creating sequences and sequence presets, and learn how to modify an existing project.

The New Project Panel
When you launch Adobe Premiere Pro from your Dock or Start menu (as opposed to double-clicking an existing project), you’ll see the Welcome screen. This screen displays the five most recent projects you’ve opened. It also gives you the ability to start a new project, open an existing project, or just get help (FIGURE 3.1). Click the New Project icon to switch to the New Project dialog.
Figure 3.1. Starting a new project is just a click away. The most recent project list is also a quick way to open a recent project.

Watch Out for That Close Button!
![]()
If you click the Close button in the project window, you’ll exit Adobe Premiere Pro.
The New Project dialog offers several choices for your project (FIGURE 3.2). You need to make specific choices as to how video and audio details are displayed as well as what format (if any) to capture from. You can also specify where you’d like to store your capture and preview files. It’s crucial to stay organized from the beginning of a project.
Figure 3.2. This is the first window you’ll see when you start a project. Don’t forget to name your project! Untitled is a terrible name.

Video/Audio Display Format
The Video Display Format and Audio Display Format offer different choices but several similar functions. Both control how Adobe Premiere Pro displays the counting method for video and audio.
Closer To truth
![]()
Some screen shots and footage for this chapter are from the PBS series Closer To Truth; Cosmos, Consciousness, God. © The Kuhn Foundation. Robert Lawrence Kuhn: creator, executive producer, writer and host. Peter Getzels: producer and director. Find out more about the series by visiting www.closertotruth.com.
Your options for Video Display Format include:
• Timecode. This option varies based on your sequence frame rate.
• Feet + Frames 16mm or 35mm. The 16mm and 35mm film options are for working with film-based projects.
• Frames. Animators tend to think in frames, because they constantly have to break down time into regular increments to create actions (such as a character moving). If you were an animator and wanted a ball to bounce over 4 seconds, you’d find that it’s much harder to divide 4:00 seconds (at 30 fps) by 6, than 120 frames (the equivalent of 4 seconds counting by frames).
Your options for Audio Display Format include:
• Audio Samples. Sound can be displayed in samples the way they’re captured, such as 48 kHz (48000 samples per second).
• Milliseconds. Sound can also be measured in time—in millionths of seconds.
Change Your Display Method
![]()
If it ever becomes necessary, you can change the way Adobe Premiere Pro displays the video and audio information. Just choose Sequence > Sequence Settings and choose the desired display method.
Capture Format Settings
When you choose to capture (as opposed to import), you must have a physical connection between your computer and a tape deck or camera. By default, Adobe Premiere Pro supports the use of the FireWire port on your computer (FIGURE 3.3). This allows for two types of capture, either DV or HDV. You can also add a third-party capture card to allow additional connection options, such as SDI, HD-SDI, HDMI, or component video.
Figure 3.3. FireWire connects cameras and decks to systems.

Don’t Get Near the Edge
![]()
Try not to capture any footage near the beginning of your tape or near a break of the controltrack/timecode. In Prosumer cameras, when the camera is turned on/off, the timecode resets.
Video Rendering and Playback
It’s likely if you’re coming from using another NLE that you’re expecting to see something here about renders. At a certain level, the Video and Audio Previews can act like render files.
The Mercury Playback Engine handles the need (or lack thereof) for renders a bit differently than you’re used to. When possible, renders may not be necessary, but this depends on your hardware. If you have the proper video card and use effects that are optimized for the Mercury Playback Engine, a render file won’t be necessary for real-time playback. Again, this very much depends on the graphics card you use—the GPU. Even without an optimal video card, you gain benefits from the Mercury Playback Engine (as a software-only accelerator).
Although the Device Control settings are found in the Preferences panel, they work hand in hand with your Capture settings. For optimal deck or camera performance, be sure to check to see how Adobe Premiere Pro is handling the connected hardware (FIGURE 3.4).
Figure 3.4. The Devices menu contains the type of connections to Adobe Premiere Pro if you’re using a hardware card.

Decks and cameras need a bit more time for tape to get up to speed and be useable. Change the pre-roll to at least 4 seconds, preferably 6. HDV suffers because it’s storing Long GOP MPEG-2 files on a tape, which are more difficult to capture. By making the pre-roll longer, Adobe Premiere Pro will have a chance to get a more stable stream from the tape.
You can attain better communication with your deck or camera by adjusting the Device Control options to specify your actual deck or camera (FIGURE 3.5). If your deck or camera is not listed, try the Generic setting.
Figure 3.5. Deck control is vital for capture and for recapture in the future.

Project Files
Towards the bottom of the General panel in the New Project dialog is an area where you save the project and name the project.
Keep Your Boot Drive Clean
![]()
You might feel comfortable storing your project files on your desktop, but we strongly advise against keeping your media on the startup or main hard drive of your computer.
Be sure to specify a unique name for your project file. To choose a destination in which to store it, just click the Browse button. You can also click the menu next to Location to see a list of recently used locations.
Wherever your project is stored, Adobe Premiere Pro will also create interchange folders for working between different applications in the Creative Suite along with Auto Save folders. We recommend targeting a specific folder (ideally on a dedicated media drive) rather than your desktop to keep all these files together.
Imports Are Not Captured!
![]()
Imports are not moved into the captured video folder. This makes handling of file-based workflows a bit more complicated. Typically, footage from tapeless media will be transferred or transcoded to another drive and from there imported into Adobe Premiere Pro. Adobe Premiere Pro doesn’t move this media to its scratch disk location. Also, keep in mind that in tapeless workflows you’ll often end up with the camera original files (often as a disk image) and transferred or transcoded media on disk, essentially taking up double the amount of storage space.
Scratch Disks
Also in the New Project dialog is a very important tab called Scratch Disks. As you work in Adobe Premiere Pro, it will create media. In some cases, that media can include captured video or audio. In all cases Adobe Premiere Pro will generate Video and Audio Previews that speed up how clips load and cache, as well as the display of audio waveforms.
Where should you store your project? Where should you store your media? Well, there are two general philosophies about how to handle media:
• Project-based setup. All media and the project file are saved in the same place—in a dedicated project folder.
• System-based setup. Media is saved to one central location, and the project file is saved to another.
Using a project-based setup
By default, Adobe Premiere Pro will keep any created media together with the project file you create (FIGURE 3.6). Because this means that all files end up living in the same location, this makes locating files fairly simple. You can find all your render files and previews in one location (only imports and file-based media will need to be handled manually to specify where they’ll live on your system).
Figure 3.6. Your project plus all created media stored in one location makes your files easy to find. Just choose your media drives!

Target Additional Drives When Possible
![]()
Ideally, your project assets and render files should exist on your media drives. Only in a pinch (such as in the field) should you store them on a laptop drive.
Differences in NLE Storage
It turns out that various manufacturers take some very different approaches in how media is stored. Here’s a quick summary to help you spot pitfalls in your workflow or correct some of the assumptions you might hold:
• Adobe Premiere Pro. With Adobe Premiere Pro, the default is to store the media with your project file. This simplifies backing up and moving projects. Because all the captured video and audio live in the same place as the media, it makes the essential media functions (like copying) fairly straightforward. Because the media storage is set on a per-project basis, the media and project always live together. The only loose items you need to “wrangle” are imports (keep in mind that files in file-based cameras are considered imports).
• Apple Final Cut Pro. When using Final Cut Pro, you can choose to target scratch disks to store media. When acquiring footage from file-based or tape-based cameras, all files are stored in the capture scratch. The biggest struggle with this is that you still have to corral all of your imports.
• Avid Media Composer. Avid is the most restrictive of the three applications (this isn’t necessarily a good or bad thing). It keeps the projects (usually) in your shared folder on your main system and creates an Avid Media Files folder on each drive at its root. All media is stored here and catalogued in the database. Any files (especially stills) imported into Avid are reduced to video-sized resolutions.
Using a system-based setup
Some editors feel more comfortable knowing that all their media is stored in a single location. If you choose to store your Capture folders and Preview folders in a different location than your project, we suggest creating a folder named Adobe Media and storing it on the root of an external drive or on a dedicated media drive or array on your system.
File-based Media? Two Times Is Better!
![]()
Every hard drive will eventually fail! In fact, the manufacturer provides the average fail time right on the side of the box! If you’re in the field using a file-based camera, it’s worth duplicating the media right there, just in case a drive dies.
Creating Your Project Template
Regardless of how you handle your media, you can still save time by creating a project template. You likely have only a few formats you regularly work with, so if you take the time to set up and then save the project, that setup can become an ideal starting point for future projects. To be clear, we’re not talking about creating sequence presets; we’ll talk about doing that in the section “Creating Custom Sequence Settings” later in this chapter. Let’s set up a project template.
- Configure a project in a way you like to work. Adjust the settings described in this chapter to match your needs.
- Choose File > Save and name the project with a logical name (such as XDCAM 1080 24P).
- Add any extra elements to the project to make your workflow easier.
For example, you can include frequently used music, sound effects, client graphics, and stock footage that you need for a client or show.
- Instead of creating a new project each time, you can just duplicate the project template file. You’ll then have a perfect starting point for future projects—no configuring necessary!
Creating a Sequence
After setting up a new project and clicking OK, you’ll then be prompted to create a new default sequence in the New Sequence dialog. The dialog contains a long list with several categories (FIGURE 3.7). At first, the choices might seem a little intimidating, especially when you’re not sure of what kind of footage you have or what the final output will be. So which sequence preset should you choose? Read on.
Figure 3.7. Although it seems like there is a multitude of choices, it really comes down to a frame size and frame rate. Selecting a matching preset for your footage helps Adobe Premiere Pro perform optimally.
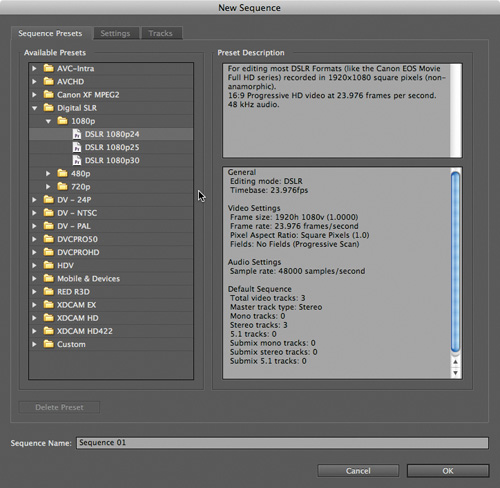
Choosing the Correct Preset
The Sequence Preset panel enables you to set up the specific format settings, previews, and the kind of video and audio tracks that will be created by default. Presets are available for virtually every camera format and size. In addition, the Sequence Preset panel gives you the ability to create sequences targeted to specific devices like mobile phones and iPods.
I Don’t Know Which Preset to Choose
![]()
If you don’t know which preset to choose, don’t panic. Just create the project. You can right-click any clip and choose New Sequence from Clip, building a clip that matches your footage.
Sequence presets can be a bit overwhelming at first because there are just so many choices available. The key is to understand what type of footage you have and use a preset (or build one) optimized to the kind of video you’re handling.
If you’re not sure which sequence preset to choose after creating a project, another way to create the correct sequence type is to drag an individual piece of footage onto the New Item icon (which looks like a pad of paper) at the bottom of the Project panel (FIGURE 3.8). You can also do this when you work in Adobe After Effects. Adobe Premiere Pro automatically builds the correct sequence based on the selected piece of footage.
Figure 3.8. Dragging and dropping footage onto the New Item icon is a good way to match a sequence to a clip. Always make sure to double-check the sequence settings after you do this.

The makeup of sequence presets
There is another way to think about how to choose a preset. Any given sequence can be defined by four properties:
• The mode is a combination of frame size, pixel aspect ratio, field dominance, audio sample rate, and preview codec that Adobe Premiere Pro should use to edit.
• The frame size includes which pixel aspect ratio to use (square or non-square).
• The audio sample rate includes common rates, such as 48000 Hz.
• Video Preview files, which are the kind of preview files built, may act in some cases like render files.
Customizing Sequence Settings for Fast Renders
![]()
In this movie you’ll learn how to adjust sequence settings in order to speed up rendering fast previews when offline editing.
If you’re used to other NLE systems, you’ll notice that one significant property is missing. A codec isn’t part of the list. Adobe Premiere Pro handles the footage through the Mercury Playback Engine regardless of footage type. This allows for seamlessly mixing codecs within the same Timeline with little to no performance hit.
Third-party sequence presets
As you expand the functionality of your edit system, your sequence presets list will increase. When you add a third-party capture card, extra presets will be available just for that card. It’s important to note that you will lose the extra performance of an accelerated graphics (CUDA) card when you have Adobe Premiere Pro utilize the third-party card.
The selection process
Choosing a specific sequence preset is straightforward. We recommend knowing the primary type of footage used in the sequence, because this is a quick way of correctly configuring settings (FIGURE 3.9) like frame size and pixel aspect ratio.
Figure 3.9. Most DSLR shooters work at 1080.

To choose a format from the presets:
- Select the type of footage used most in the sequence (or the one you want to master to). For example, XDCAM HD, DVCPROHD, or RED R3D.
Twirl down the category folder for the selected format.
- Select the frame size for the format. You may also need to choose whether the footage is progressive or interlaced.
Twirl down the frame size folder for the selected size.
- Select the frame rate for the primary sources.
- Enter a name for your first sequence and click OK.
A new sequence is added to the Project panel.
Flow with the Most Plentiful Format
![]()
Generally, common sense will dictate that you choose a sequence preset that corresponds to the format that most of your footage will be in.
Creating Custom Sequence Settings
Beyond presets lies the ability to modify the defaults or even create entirely new presets from scratch. This ability becomes very useful when building your own custom settings. Not everyone will need to, but not everyone works with just a singular format.
You can make very detailed choices about how Adobe Premiere Pro will handle formats as well as controls for the preview files.
The Settings (General) and Tracks tab in the New Sequence panel allow you to customize any of the presets, as well as save a preset for future use. You can even choose the default number of audio and video tracks for new sequences.
Customization makes sense in a few scenarios:
• When working with a news-sensitive editorial where changing the Video Preview format can speed up output
• When working with Final Cut Pro captured media using the ProRes codec family
• When working with nonstandard video sizes, such as Digital Signage
Settings (General) tab
In the Settings tab is where all of your horsepower lies. In CS5.5 the Settings tab is in the New Sequence window (it’s called General in CS5) (FIGURE 3.10). Here you can build almost any sort of sequence you need, from turning the second display into a playback monitor to creating unique custom composition sizes. Let’s look at the options in the Settings tab:
Figure 3.10. The Settings tab is divided into four areas: Editing mode, Video settings, Audio settings, and Video Previews.

• Editing mode. You can adjust two elements in this option. The first element is the actual editing mode, which refers to exactly what kind of methods Adobe Premiere Pro will use to handle your footage. You’ll see existing listings for DSLR, RED, XDCAM, and so on—essentially all the major video formats. This choice dictates how Adobe Premiere Pro handles Video Previews. The second element, Timebase, lets you choose a standard frame rate (several nonstandard rates for multimedia and digital signage are also offered).
Custom Is an Open Book
![]()
If you want to build a custom preset from scratch, choose the Custom Editing mode. You’ll then be able to specify almost every adjustment on the Settings tab. However, a custom setting can also hinder the performance of your system. With a custom setting, it’s best to start by using settings that almost match your desired configuration. This feature was called “Desktop” in CS5.
TABLE 3.1 contains a comprehensive list of the presets for the Editing mode in the Settings tab. Because RED and Custom Editing modes must be flexible enough for multiple formats, any settings prior to switching to RED or Custom will propagate into the Video, Audio, and Video Preview areas (for example, if you select 720p and then Custom, it’ll have 720p settings).
Table 3.1. A Guide to Editing Modes

The Playback Settings button allows you to have real-time playback occur on an external device, such as a second screen. You can also access advanced controls (FIGURE 3.11) for cameras, decks, and third-party hardware cards.
Figure 3.11. Do you want to use your second display for monitoring? Adjust the Realtime Playback option to use your second monitor.

• Video. Depending on the preset you’ve selected, you may find several of the choices here grayed out because their values are often determined by the preset chosen.
Start with a Preset
![]()
When customizing a setting, it’s best to start with one of the Adobe system presets and adjust it as needed. If you adjust options like fields or pixel aspect ratio incorrectly, you may struggle to get your footage to play back correctly.
Generally, frame sizes and fields are linked to specific formats and frame rates (especially if you’re shooting interlaced or progressive video). All HD is Upper field first; if you’re shooting progressive video, both fields are displayed simultaneously.
Frame size can be any size, but most of the time you’ll want to choose a size that matches the kind of video you’ll be working with.
Some notes about video formats:
• Frame size and pixel aspect ratio are interrelated. All full HD (1080+720) and computers utilize square pixels.
• A number of compressed HD formats, 1440 × 1080, 1280 × 1080, 960 × 720, all require non-square pixels. These “thin raster” sizes require a non-square pixel, like standard definition video.
• Standard definition video, both NTSC and PAL, has two sizes: a 4:3 pixel and a widescreen 16:9 or anamorphic pixel.
• Fields are relevant to the source. You’re labeling your sequence so Adobe Premiere Pro can accurately handle the mixing of different formats.
Forget Rendering
![]()
Between the Mercury Playback Engine and fractional resolution playback, it’s possible to have a real-time response, especially if your system is optimized for the Mercury Playback Engine with the proper video card.
Advantages with 32-bit Processing
![]()
Adding effects that are 32-bit provide a marked advantage when processing. Other effects are 8-bits per channel. When you mix the two, Adobe Premiere Pro handles each in their appropriate bit depth.
• Audio. For most formats, the audio is set correctly at 48000 Hz. Some DV formats only work at 32000 Hz. One day in the future you may potentially be working at higher sampling rates, such as 96000 Hz.
• Video Previews. One of the ways Adobe Premiere Pro is significantly different than other tools is in the way it previews or renders footage. Footage is pushed through the Mercury Playback Engine. When you export a file, you can choose whether or not to utilize the existing previews (great for speed) or discard them and have Adobe Media Encoder encode them in the background. More about this in Chapter 15.
At the bottom of the Video window are two check boxes for Video Previews that require a bit of extra explanation:
• Maximum Bit Depth. Adobe Premiere Pro handles video in 8-bit depth, unless you select this check box. It’s crucial to select this option in 10-bit (and beyond) formats like RED, Alexa, and HDCAM SR. By processing the extra bit depth, Adobe Premiere Pro will handle all of the video data in 32-bits per channel.
• Maximum Render Quality. Maximum Quality maintains sharpness when you’re doing upconverts (from SD To HD) or downconverts (from HD to SD). Be careful with its use; it requires more memory (especially to render).
Setting initial tracks
Next to the Settings (General) tab is the Tracks tab where you can configure video and audio tracks for the new sequence. You’ll find that you almost always need a set number of tracks to get your work done, which you can easily configure using the Tracks tab (FIGURE 3.12). We like to work with at least three to four video tracks. Usually, key footage, such as interviews, are on video track one, B-roll on track two, titles on track four, and at least one track is left open to move footage around in.
Figure 3.12. Choose the default amount of tracks you need. You can add and remove tracks, but it’s best to choose the optimum number you’ll normally use.

Tape-based Workflows
![]()
If you’re working with a tape-based workflow, your render settings do count in regards to output. If you build a custom sequence, you have the option of adjusting your Video Previews to a higher quality codec (or even uncompressed). This allows you to render instead of just previewing as you work. For time-sensitive output, such as news workflows, this is an optimal way to work.
Audio is a bit more complex, and the default settings can drive you crazy. Depending on what sequence type you start with, the default may be stereo tracks or mono tracks. For our type of work, a minimum of four mono tracks and two stereo tracks is the least we can get by with. Remember that you can always insert or delete tracks (both above and below) in an open Timeline.
The Master setting controls what Adobe Premiere Pro will actually output. If you intend to route specific tracks (or submixes) to specific videotape audio tracks, choose 16 channels.
Stereo Tracks Aren’t Two Mono Tracks
![]()
Often, editors are confused by what a stereo track is. It’s a single element that has two pieces—like a piece of music. It’s not two elements, one panned left and one panned right.
The Master track outputs from the menu are as follows:
• Mono. All audio output will be a single channel regardless of how many speakers are attached.
• Stereo. Everything output will be Left/Right. This is the most common format for output.
• 5.1. With the right audio setup, this output is commonly known as surround sound.
• 16 Channels. This output choice is usually meant for routing specific outputs to specific tape tracks for videotape output. It is used for providing a tape, such as a “split master.”
Another very specific, but powerful, track choice here is the ability to create submixes. If you’ve ever had to output a split audio master, submixes are your friends. They allow you to send specific tracks to the submix for output. Submixes are discussed in detail in Chapter 11.
Setting Sequence Start Time
You can choose to set the start time of a sequence to any starting timecode. Although this has become less critical in the days of digital output, it is still crucial when outputting to tape. A sign of a professional (for ease of other people in the production pipeline) was to have the first frame of your work on the 1:00:00:00 mark rather than the zero mark. Bars and tone often start at 58:30:00 or 59:30:00 minutes, with slates and countdowns preceding the one hour mark, where the show begins.
Here’s how to change the starting timecode.
- Open your sequence so it is loaded in the Timeline panel.
- Right-click on the tab of the sequence and choose Start Time (FIGURE 3.13).
Figure 3.13. Choose an appropriate start time, which would be 59:30:00 if you need to have bars plus a slate before your output.

- Enter a start time for the sequence and click OK.
If you’ve customized a preset, it’s a smart choice to save the preset so you can quickly reuse it again in the future (FIGURE 3.14). This will accelerate your workflow because each time you will be at a starting point of your own choice by using a preset that you’ve saved and is specific to your needs rather than one of the stock presets. For example, this would be particularly useful if you always need a set number of tracks. Combine this with creating your own custom project template as discussed earlier in the chapter, and you have every future project already prepared exactly to fit your needs.
Figure 3.14. Custom presets make your work easier.
Here’s an example of optimizing a custom preset in Adobe Premiere Pro to work with a DSLR camera, utilizing a second screen as a playback monitor and then saving your settings as a preset. You’ll need two screens attached to your system for this to work.
- Start with a new sequence. We chose DSLR 1080p 24 because it’s a popular way to shoot DSLR video.
- On the Settings tab, click Playback Settings.
- Adjust the Realtime Playback so the External Device is set to your second screen.
- Click the Tracks tab.
- Adjust it for 4 video tracks, 4 mono tracks, and 2 stereo tracks.
- Click the Save Preset button.
- Name the preset Two Screen DSLR and enter this description: Two screens optimized for DSLR playback on a second monitor.
Modifying an Existing Project’s Settings
After you’ve properly configured a project, you’d like to think that it will be smooth sailing. The truth is that there will be times when you’ve already started the project and you need to make minor adjustments. The process of modifying existing settings is very similar to the project setup steps.
It’s important to be aware of which settings you can change. To change settings for an existing sequence, choose Project > Project Settings. You’ll then have a number of options you can alter, which we’ll describe in detail in the following sections. Note that both General and Scratch Disks open the same dialog, but depending on the option you choose, a different tab will be selected.
General Tab
If you need to switch the display format of the video from timecode to frames or switch the audio settings from samples to milliseconds, you’ll adjust those timings in the General tab. It’s also where you can adjust the action- and title-safe areas. You can also switch the Mercury Playback Engine from utilizing a GPU (if you have one) to a software-only system (FIGURE 3.15).
Figure 3.15. Do you have a card that uses the Mercury Playback Engine? Try switching its mode on the menu and then check your computer’s processor load to see how well your system works without the acceleration.

Scratch Disks
Scratch disks fill up. That’s the downside to all the video you’re creating (often with less discretion than in the past because drives have gotten cheaper). Every time you render and every time you capture (but not import), you create media.
Future Media Creation
![]()
Changing your Scratch Disks settings won’t modify any existing media files. Only future media creation is impacted. Changing this setting mid project is mildly hazardous; it could leave you with media in two or more locations.
If this happens in the middle of a project, you might have to make a tough decision, which is whether to store the newly captured media and previews somewhere else on your system (FIGURE 3.16). This won’t change where the existing media is, only where new media is stored.
Figure 3.16. There are two setups, project-based (as shown here) where the media lives with the project, and system-based where you always target a specific drive, as mentioned earlier in the chapter.

Importing Existing Projects
So you need to import your work from a different NLE. Experienced editors know that NLE systems are tools (not religions!). It is very common to have multiple editing systems and even platforms within the same facility.
Not every show starts (or finishes) in Adobe Premiere Pro. Video and film are collaborative processes. You may receive from your client a simple log file or edit decision list (EDL) that you need to import from an older editing system. Or your client might have worked with Final Cut Pro or Avid Media Composer to assemble a rough cut, and you want to import that work rather than rebuild it.
Adobe Premiere Pro allows you to access all this information, even when there’s nothing beyond a simple shot list saved as a CSV file.
Importing a Batch List
Batch lists are simply that—a list of shots you need to capture. They may have been created by a few different methods, such as a text processor, an export from a piece of logging software, or an Excel spreadsheet. As long as they’re saved as a CSV or Tabbed Delimited file (FIGURE 3.17), you can import them into Adobe Premiere Pro.
Figure 3.17. Loads of applications can create a CSV file; even Microsoft Excel can create a batch list.

- Create an Adobe Premiere Pro project. Format doesn’t matter.
- Click the Project panel.
- Choose Project > Import Batch List.
- Choose File > Open, navigate to Chapter Files > Chapter_03_Media > Media and open the file called CH03 Batch List Import.csv.
New clips are added to your project.
- Set the following options in the Batch List Settings dialog to match the footage (FIGURE 3.18):
Width = 1920
Height = 1080
Timebase = 23.976 fps
Pixel Aspect Ratio = Square Pixels
Audio Sample Rate = 48000 Hz
Figure 3.18. It’s crucial to correctly set the batch settings for the footage. If you have different types of footage, use separate batch lists.

- Reconnect or recapture the footage as needed. In this case, the files will link to the media in Chapter 6. Select the newly created bin, right-click, and choose Link Media, or click the Project menu and choose Link Media.
If the files are from tape-based sources, choose File > Batch Capture.
You can also relink to the media clips by selecting the offline clips in the bin. Right-click on one of the clips and choose Link Media, or click the Project menu and choose Link Media. Then navigate to a drive with the captured or transferred footage.
Importing an EDL
It’s getting less and less common to ever touch an EDL. Once upon a time, EDLs were the way to exchange timelines between an offline NLE and a tape-to-tape suite.
Nowadays, they’re the lowest common denominator to get a sequence from one editorial tool to another, usually because they have no other level of compatibility. It’s only a sequence, not a project or bins, just a single sequence.
When they are used, they’re almost always a last resort because they are often troublesome and problematic. Typically, you can have only one track of video and four tracks of audio in an EDL. If your Timeline has more than that, you’ll have to export (and therefore import on your target system) the separate EDLs and assemble them manually.
The only flavor of EDL that Adobe Premiere Pro recognizes is the CMX 3600—an early and basic implementation of this concept. XML (eXtensible Markup Language) and AAF (Advanced Authoring Format) are the grandchildren of EDLs.
Let’s try the simple EDL we prepared for you.
- Choose File > Import
- Select a valid EDL. Choose File > Open, navigate to Chapter Files > Chapter_03_Media > Media and open the file Doctor Rough.edl.
- Select the appropriate timebase. In this case it’s 24p (23.976) (FIGURE 3.19).
Figure 3.19. EDLs are limited to a single frame rate.

XML Defined

Like HTML (HyperText Markup Language), XML can have tags around information. It is a popular format for exchanging complex data between applications and even manufacturers.
- Select a matching sequence type. For this example, use Digital SLR, 1080p24.
- Reconnect or recapture the footage as needed. In this exercise the files will link to the media in Chapter 6. Select the newly created bin, right-click, and choose Link Media, or click the Project menu and choose Link Media.
AAF Defined

Like XML, AAF is a neutral conversion format meant to transfer data between editorial (and compositing) systems.
If the files are from tape-based sources, choose File > Batch Capture.
MXF Defined

MXF (Materials eXchange Format) is a container/architecture in a similar vein to QuickTime that stores media. Although it’s used for Avid media files, it’s also used for XDCAM, P2, and several other camera formats. Knowing you have an MXF file isn’t enough; you need to know the flavor/codec and structure of the media.
You can also relink to the media clips by selecting the offline clips in the bin. Right-click on one of the clips and choose Link Media, or click the Project menu and choose Link Media. Navigate to a drive with the captured or transferred footage.
Importing Final Cut Pro Projects
For whatever reason—cost, convenience, familiarity—someone you’re working with is bound to be using Apple’s Final Cut Pro. Thanks to XML, Adobe Premiere Pro is able to transfer a project from Final Cut Pro. Alternately, by reversing the process, you can export an XML file from Adobe Premiere Pro and import the XML into Final Cut Pro.
By using XML, you can go back and forth to and from Final Cut Pro. It should be no great surprise that not every effect or transition is going to come across. Major items, such as clips and sequences, are successfully translated with the proper metadata.
Importing a Final Cut Pro Project
![]()
Learn how to exchange data from Apple Final Cut Pro to Adobe Premiere Pro in this movie.
The basic process is to export an XML file, open the XML file in Adobe Premiere Pro, and then link back to the QuickTime files—or the reverse to go to Final Cut Pro from Adobe Premiere Pro.
You’ll find full details and gotchas in Appendix D, “Working With Final Cut Pro.”
Importing Avid projects
Thanks to AAF, Adobe Premiere Pro is able to import sequences from Media Composer as well as export sequences to Media Composer.
Importing an Avid Project
![]()
Learn how to exchange data from Avid Media Composer to Adobe Premiere Pro in this movie.
Basic edits and some transitions come across, but only for a single sequence. You can’t transfer the entire project.
The basic process is to export an AAF project from Avid, import the AAF into Adobe Premiere Pro, and then relink or recapture your media. To go to Avid, you export the AAF and then link back to your media.
You’ll find full details and gotchas in Appendix E, “Working With Avid Media Composer.”
Next Steps
Now that you have your project set up (and set up for future projects), it’s time to get footage into your system. Whether you are using a tape or tapeless workflow or capture cards, you need to know how to best get footage into Adobe Premiere Pro and work with the rest of the suite. In the next chapter, we’ll talk about capturing and importing along with the basics of dynamic linking between different applications in the Adobe Production Suite.