
Appendix D. Working with Final Cut Pro
With over a million users, Final Cut Pro has clearly made its mark on the editorial ecosystem.
Thanks to XML, Adobe Premiere Pro is able to transfer a project to or from Final Cut Pro. In fact, Adobe is able to retain more back and forth information than any other manufacturer when it comes to moving projects and media.
Knowing what issues might develop when you’re trying to transfer work between these two tools will help you best plan your workflow.
Adobe Premiere Pro/Final Cut Pro Interoperability
By using XML, you can send projects and media to and from Final Cut Pro. Major items, such as clips and sequences, come across with the proper metadata. Most effects do not. It should be no great surprise that everything isn’t going to make the trip.
Test First
![]()
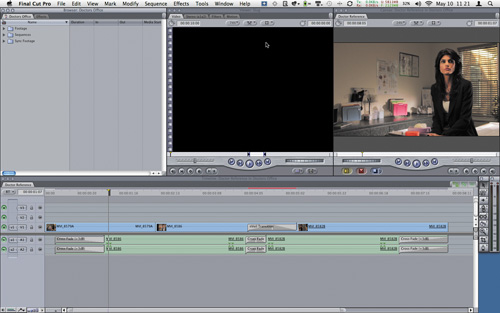
As with any workflow choice, please test this workflow first with a small project that is representative of your needs. It pains us when clients build a long-form project and pull their hair out over an issue that should have been tested on the first day of production.
The transition between applications can happen in either direction (to or from Adobe Premiere Pro as well). It should be noted that it works best early in the editorial process when sequences are mostly straight cuts with few effects. As the editing process moves towards finishing and adding effects, more and more work will have to be rebuilt after a transfer.
Exporting an XML File from Final Cut Pro
Before you can bring a Final Cut Pro project into Adobe Premiere Pro, you’ll need the project’s XML file. This will require you or a member of the postproduction pipeline to have access to a version of Final Cut Pro that can open the project. The media for the project does not have to be online or available if you plan to recapture or relink to it later.
XML Defined
![]()
Like HTML (HyperText Markup Language), XML (Extensible Markup Language) can have tags around information. It is a popular format for exchanging complex data between applications and even manufacturers.
- Open the existing project in Final Cut Pro.
- Choose one of the following:
• With nothing selected, you can export the entire project.
• If you select specific items, only those will be included in the XML file.
- Choose File > Export > XML.
In the XML dialog you’ll see a report of how many bins, clips, and sequences are selected.
- Choose the Apple XML Interchange Format, version 4 option for maximum compatibility (FIGURE D.1).
Figure D.1. Each XML version communicates more information in the XML file. Version 4 is one version behind the current one and is perfect for our uses.

- Save the XML file in an easy-to-find location (such as with your project).
Importing a Final Cut Pro XML File into Adobe Premiere Pro
Once you have a valid Final Cut Pro XML file, all that remains is to import it. Adobe Premiere Pro will be able to read most of the information in the XML file.
- Launch Adobe Premiere Pro.
- Create a new project.
- Select the Project panel.
- Choose File > Import.
- Navigate to the XML file and click Import.
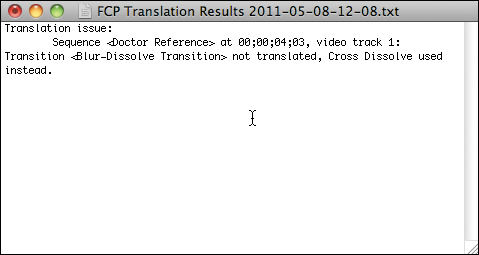
After the file imports, Adobe Premiere Pro will attempt to automatically link to all the clips. Any problems in the XML translation will be reported in a file called FCP Translation Results (FIGURE D.2).
Figure D.2. The FCP Translation Results file is a log of any errors or substitutions with timecode indications of location.
Exporting an XML File from Adobe Premiere Pro
Exporting an Adobe Premiere Pro project is identical in concept to exporting from Final Cut Pro. Select elements in the Adobe Premiere Pro project, or deselect all the elements to send the entire project to Final Cut Pro.
- Open the existing project in Adobe Premiere Pro.
- Choose one of the following:
• With nothing selected, you can export the entire project.
• If you select specific items, only those will be included in the XML file.
- Choose File > Export > Final Cut Pro XML.
- Save the XML file in an easy-to-find location (such as with your project).
Adobe Premiere Pro will also create a text file with the XML called FCP Translation Report that is a log of any errors or substitutions in the XML file.
Importing an XML File into Final Cut Pro
Once you have exported the Final Cut Pro XML file, all that remains is to import it into Final Cut Pro. This process is very fast, because the file contains only data (not media) that is being processed.
- Launch Final Cut Pro.
- Create a new project.
- Select the Browser.
- Choose File > Import > XML.
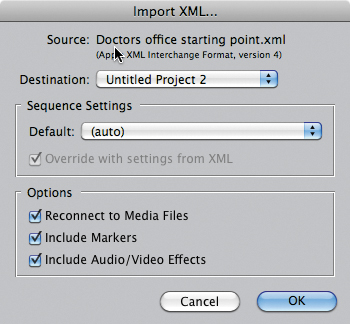
- Navigate to the XML file and click Import (FIGURE D.3).
Figure D.3. Final Cut Pro’s Import XML dialog gives you the ability to choose a specific project destination if you have multiple projects open.
Once the file imports, Final Cut Pro will attempt to automatically link to all the clips.
Media Considerations
We feel strongly that you should be very careful as you move cross-platform. There are tricky spots handling AVIs on the Macintosh and QuickTime files on a Windows PC. Although both file types work, they have the potential to cause problems. It’s best to make sure you have QuickTime Pro on both machines as well as any proprietary codecs that are used in the project (if possible).
QuickTime/AVI
The support for AVI formats on the Macintosh is not as robust as QuickTime. If you’ll be working cross-platform between a Windows 7 system and a Macintosh, you should test your workflow to make sure you won’t run into issues. Generally, we find that QuickTime is an easier containter to deal with than AVI.
ProRes
QuickTime 7 and later have the ProRes codecs available cross-platform for decoding only. It’s possible to view a QuickTime movie on Windows 7 that is utilizing the ProRes QuickTime codecs. Here’s how:
• On a Mac, you’ll need a copy of Final Cut Studio or Logic Studio installed to unlock ProRes encoding.
• On a Windows machine there is no solution from Apple to encode ProRes (only decode). Three products from Telestream (Vantage, FlipFactory, and Episode Engine) enable ProRes within a Windows workflow.
Where to Find QuickTime
![]()
Apple always has a link to the QuickTime downloader at www.apple.com/quicktime.
What Does Come Across?
![]()
A useful article on importing files to Adobe Premiere Pro from Final Cut Pro is at http://adobe.ly/FCP_XML.
XDCAM/P2
The workflow horror stories we’ve heard with the XDCAM and P2 formats are almost always the same: They’ve been captured on a Final Cut Pro system, which means they’re wrapped in QuickTime.
Keep It Basic
![]()
We strongly suggest that if you intend to rely on this workflow between Adobe Premiere Pro and Final Cut Pro, you focus on keeping the sequences fairly straightforward: Keep cuts, dissolves, and basic audio adjustments in a sequence, and limit yourself to the 3 Way Color Corrector and the Motion tab.
Because these two codecs are licensed from their respective companies (Sony and Panasonic), it’s possible that they need to be externally purchased to work on a system that does not have a license for their use in QuickTime. If you are in this position, Calibrated Software (www.calibratedsoftware.com) offers plug-ins so media can be handled either without wrapping in QuickTime or as a codec that works in QuickTime.
Translations
Of course, the real question is, what comes across? If you can manage to use only the effects and transitions that work, the translation process is much smoother. Motion tab settings (such as Center, Crop, Scale, Opacity) all map directly to Adobe Premiere Pro’s intrinsic effects on a clip. And they do include keyframes. The same is true in reverse.
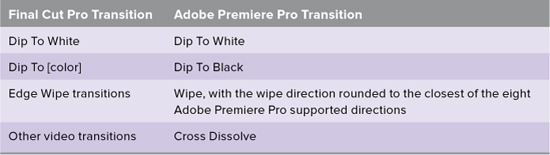
Transitions will be your first major headache. What about dissolves? Sure, they come across fine. But that page peel or third-party transition? Well, not so much.
Transitions
Straight cuts are the bread and butter of editing. Page peels and star wipes, unfortunately, won’t work—and you shouldn’t be using them anyway, right? TABLE D.1 provides you with a list of transitions that we know work.
Table D.1. Conversion from/to Final Cut Pro Video Transitions
Effects
Effects are a bit more forgiving than transitions, but not by much. The most crucial effect (in our opinion), the 3 Way Color Corrector, comes across. Much like the transitions, most of the effects won’t translate. The effects listed in TABLE D.2 currently work.
Table D.2. Conversion from/to Final Cut Pro Video Effects

Audio Effects
Audio effects, such as Pan and Gain, come across—even with keyframes. But most of the audio filters don’t. The standard audio transitions (Cross Fade +0 and +3) come across with different names, but all others are lost. If you stick to the audio effects listed in TABLE D.3, you’ll have some level of compatibility.
Table D.3. Conversion from/to Final Cut Pro Audio Effects and Transitions

Composite Modes
Composite modes—the blending of two clips based on a formula using the mathematical pixel values of two clips—generally work except for two (technically three) modes:
• The Subtract mode is not supported.
• The Travel Mattes, both Luma and Alpha, are not supported.
• Add changes its name (but not its function) to Linear Dodge (Add).
• Premiere Pro has several modes that Final Cut Pro does not.
Final Cut Pro Multiclips
You can also exchange multicamera data between Final Cut Pro and Adobe Premiere Pro. The process will vary depending on if you have collapsed or uncollapsed multiclips in Final Cut Pro. Multiclips come across to Adobe Premiere Pro with a couple of caveats:
• Uncollapsed multiclips may have up to four angles.
• Collapsed multiclips come across as regular clips.