
Chapter 11. Audio Mixing and Repair
As an editor, you’re often focused on the video side of a project, making sure that clips work well together and a good story is being told. However, many editors (we’ve been guilty of this from time to time) simply don’t pay enough attention to their audio tracks. Audio that is mixed well and is free of problems like noise can really improve the overall project.
Unlike video where viewers are more apt to chalk up technical issues as stylistic choices, when it comes to audio, viewers are pretty attuned to problems. Fortunately, Adobe Premiere Pro as well as the new addition to the Creative Suite, Adobe Audition, can help you get your audio to sound its best. In this chapter we’ll leverage many of Adobe Premiere Pro and Audition’s tools so you can utilize them in your own work.

Setting Up the Interface to Work with Audio
Before you start working with audio in Adobe Premiere Pro, it’s important to set up the interface to work with audio. Sure, you can work with audio regardless of how the panels are arranged, but taking an extra moment or two to configure your workspace will allow you to work quicker and more efficiently. Let’s take a look at changing a few items when working with audio.
Closer To Truth
![]()
Some screen shots and footage for this chapter are from the PBS series Closer To Truth; Cosmos, Consciousness, God. © The Kuhn Foundation. Robert Lawrence Kuhn: creator, executive producer, writer and host. Peter Getzels: producer and director. Find out more about the series by visiting www.closertotruth.com.
The Audio Workspace
As with other tasks, such as editing and color correction, Adobe Premiere Pro has a workspace dedicated to working with audio. To access the Audio workspace, simply choose Window > Workspace > Audio. In the main window you can also click the Workspace menu and choose the Audio workspace.
- Launch Adobe Premiere Pro.
- Choose File > Open, navigate to Chapter Files > Chapter_11_Media > [Version Number], and open the project Ch11_audiosetup.prproj.
- In the upper-right corner, click the Workspace menu and choose Audio.
When you choose the Audio workspace, a few panels will shift around a bit, but most important, the Source Monitor and Program Monitor panels will become a whole lot bigger (FIGURE 11.1). The Audio Mixer comes into view as well. You’ll also have a lot more room to display the Audio Mixer, which is useful if you have several tracks to view. With the Audio Mixer selected, you may find it helpful to press the grave accent (`) key to toggle into full screen, especially if you have a lot of tracks.
Figure 11.1. The Audio workspace optimizes the screen to work with audio.

- With this project open, keep exploring and adjusting the audio interface to suit your needs.
Where Are the Audio Master Meters?
![]()
When switching to the Audio workspace, the Audio Master Meters seem to disappear. Just choose Window > Audio Master Meters to bring them back. You can position the meters anywhere you want or dock them to any existing panel so that they’re always in view.
Need to Change the Master Track?
![]()
After you’ve created a sequence, its Master Track is locked. If you need to make a change, the best option is to create a new sequence that matches all of the settings for the current sequence except for the Master Track option. You can then copy and paste to move items from one sequence to another.
Master Track Output
As discussed in Chapter 3, the time to properly configure audio for your sequence is when you first create it. At the creation point, you have the ability to choose the type and number of tracks for a sequence. In addition, you can set up the master output. It’s important to think ahead whenever possible; in other words, know your output when you start the edit.
Let’s review how to set the Master Track output:
- Continue working with the same project as in the previous exercise.
- Press Command+N (Ctrl+N) to create a new sequence.
- Click the Tracks tab and then click the Master menu in the Audio section.
Here are the Master Track types you can choose from:
• Mono Master. When a sequence is set to Mono, all audio will be output as a single channel. Although not often used, this is an option for some projects, such as those targeting low-bandwidth Web delivery.
• Stereo Master. The default and most common master audio setup, audio will be output in stereo. Individual tracks can be panned within the Stereo sound field.
• 5.1 Master. If you want to mix in surround, setting up a sequence to 5.1 master is the choice you want to make. When using 5.1 as a master, you can pan Mono and Stereo tracks anywhere in the 5.1 sound field, as well as adjust center channel percentage and LFE (low-frequency effect—that is, subwoofer) volume of those tracks.
• 16 Channel Master. The 16 Channel Master option (FIGURE 11.2) is a good choice for master audio setup when you need to be very specific about track assignments to a given output channel—for instance, when going back to a broadcast tape format. For example, if all dialogue needs to go back to a tape on channel 3, you can assign dialogue channels to channel 3 and so on. Submixes can also be assigned to any of the 16 channels. Keep in mind that although SDI connections can handle 16 channels of audio, most tape formats are limited to 4, 8, or 12 channels of audio.
Figure 11.2. The Master Track of a sequence that uses the 16 Channel Master option. Note that there are 16 individual audio meters for the output channel, but only eight are actually in use in this figure.
- For this exercise, choose a 16 Channel Master Track and name the new sequence 16 Channel Audio. Then click OK to create a new sequence.
Monitoring Audio Levels with the Audio Mixer
When you switched to the Audio workspace, the Audio Mixer panel became a dominant fixture. Within it you’ll find multiple audio meters, which will help you monitor your audio levels. There are a two ways to monitor audio levels in the Audio Mixer:
• Individual tracks in the Audio Mixer. With the Audio Mixer open, you can view levels for each track in a sequence (FIGURE 11.3). Depending on how you have set up your tracks, meters can appear as Mono, Stereo, or 5.1
Figure 11.3. No matter the track type, you’ll see audio meters for each track in the Audio Mixer. Pictured are Mono, Stereo, and 5.1 tracks.

• Master audio output levels in the Audio Mixer. To the right of all the individual tracks is the Master Audio Meter. Depending on how your sequence is set up, the Master Audio Meter will show Mono, Stereo, 5.1, or 16 channels of output.
Working Hot
![]()
Although the -10 dBFS rule for peak levels for broadcast has been a golden rule for some time, “working hot,” or mixing levels at a higher level for broadcast, is a growing trend. Many broadcasters are OK with peak levels of -6 to -3 dBFS. Be sure to consult the broadcaster you’re working with to make sure these “hot” levels are acceptable.
Adjusting Audio Levels on a Sequence
One of the main tenets of audio mixing is adjusting levels between various pieces of audio so that they “mix” well together. For example, you don’t want to drown out an important bite from an interview with music that is too loud. You can adjust audio levels in Adobe Premiere Pro in a few different places, but because you’ll probably spend lots of time in the Timeline panel, let’s start by adjusting audio levels there.
No Waveforms?
![]()
If audio waveforms are not being displayed, be sure to click the Set Display Style button on the track. Just choose the option to Show Waveform.
Showing Audio Waveforms
When you start to work with a lot of audio, you’ll quickly discover that simply seeing a clip on a sequence is not very useful. When you’re trying to find a specific bite or keyframe volume in a specific section of a clip, it’s very difficult to do that just by looking at a block on a sequence.
Adjust Audio Channels Default Track Format
![]()
If you want to adjust how Adobe Premiere Pro handles audio channels from imported media, choose Preferences > Audio > Audio Channels, click the Default Track Format menu, and choose between Use File, Mono, Stereo, Mono As Stereo, and 5.1. Choosing Mono, for example, will treat a clip with a Mono pair as two Mono tracks, just like Final Cut Pro and Avid.
By default, Adobe Premiere Pro shows you audio as blocks, just like other clips. But there are a couple of things you can do so that your audio clips will display audio waveforms. Let’s check how you can view audio waveforms in Adobe Premiere Pro on the Timeline.
- With Adobe Premiere Pro running, choose File > Open, navigate to Chapter Files > Chapter_11_Media > [Version Number], and open the project Ch11_audioonsequence.prproj. This project has a few sequences in it that we’ll use to practice working with audio on a sequence.
- Open the sequence called Audio On A Sequence. This is a rough cut sequence from the PBS Show Closer To Truth. Cosmos. Consciousness. God.
- On each audio track is a small triangle called Collapse-Expand Track next to the name of the track (FIGURE 11.4).
Figure 11.4. Clicking the Collapse-Expand Track triangle lets you quickly view audio waveforms for a given audio track.

Click on the triangle next to the first track called VO to expand the track. When a track is expanded, you’ll be able to see audio waveforms on a clip. On the audio waveforms is a yellow line that you can use to adjust clip volume (the line displayed is viewable because the default view on audio tracks is to display clip keyframes).
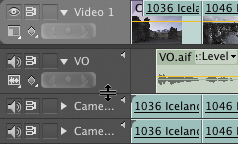
- Resize the track to make it easier to view the waveform for that track (FIGURE 11.5). Place your cursor on the dividing line between the VO track and the track called Camera Audio 1 in the track controls area to resize the VO track.
Figure 11.5. By placing your cursor between expanded audio tracks, you can easily resize a track so the waveforms are easier to view.
Resizing Multiple Audio Tracks at Once
![]()
Do you want to adjust the size of the waveforms for multiple tracks? Make sure the disclosure triangle is open for all the tracks you want to resize. Then hold down the Shift key as you drag to resize.
Adjusting Overall Clip Levels
While looking at audio waveforms for your audio clips, you can control the volume of those clips by adjusting the yellow line that is overlaid on each audio waveform.
- Continue working with the sequence Audio On A Sequence.
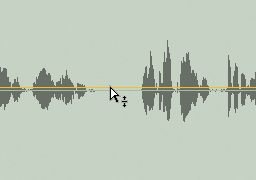
- Place the cursor over the yellow line on the expanded waveform on the first track called VO and on the first VO bite. The cursor will change to a white cursor with two small up and down arrows next to it.
- Click and drag up and down to adjust the overall volume of the clip. As you do, a small yellow box appears informing you of how much you’re adjusting the clip levels by (FIGURE 11.6).
Figure 11.6. You can easily make volume changes on the Timeline by dragging the yellow line on each audio clip.
- Adjust this clip until its volume as been raised slightly by 2 dB.
- For the rest of the clips in the sequence, feel free to experiment by adjusting audio levels up (2 dB for the VO clips) or down to suit your taste.
Keyframing Volume Changes
Although you use static volume changes on a clip all the time, at other times you’ll need to dynamically change volume over time. One of the easiest ways to control volume is within keyframes.
- With the same sequence open as in the previous exercise, let’s create an audio fade up on the music clip on this sequence by using keyframes. Make sure you’ve expanded the Stereo music track.
Drag and Drop for iTunes

If you use iTunes to organize your music libraries and sound effects, you might not know that you can simply drag files from iTunes directly into the Project panel to begin working with them.
- Select the Pen tool (P).
- Similar to adjusting overall volume, simply place your cursor over the yellow level line on the clip. The Pen tool changes a bit and shows a plus sign next to it. If you are using CS5, you’ll need to hold down the Command (Ctrl) key.
- Click to add a keyframe at the very start of the clip.
Gearing Down on Changes
One problem you might find frustrating as you start to adjust audio levels is that it’s difficult to be precise. However, “gearing down” can help. By holding down the Option (Alt) key, you’ll make adjustments up or down an audio level much slower.
- Add a second keyframe a little later in the clip. To make any volume change, you need two or more keyframes.
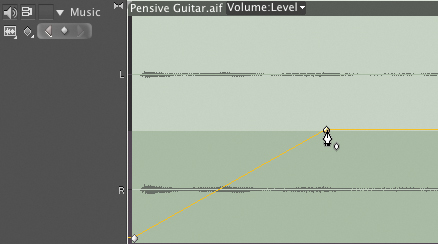
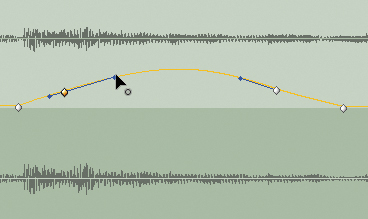
- After you’ve made the keyframes, place the cursor over the first keyframe to adjust its value. For this first keyframe, drag down until the value of the keyframe (as shown in the small yellow box) shows infinity; the second keyframe should be set to 0 dB, which it should be already when you added the second keyframe in the previous step (FIGURE 11.7).
Figure 11.7. Adding keyframes to a clip allows you to dynamically adjust volume level on a clip. For a volume change to happen, you’ll need two or more keyframes on a clip.
- Feel free to add additional keyframes to adjust audio levels on this clip and the other clips in this sequence. You can keyframe the music to create rises and dips so that the voice and music play off one another. Also, you can add slight fades to the beginning and end of each bite on the VO track.
Smoothing Volume Between Keyframes
One of the features we love in Adobe’s products in general, but especially in Adobe Premiere Pro, is the smoothing and transformations possible between keyframes. Audio keyframes in Adobe Premiere Pro are no different. You can add Bezier handles to audio level keyframes so that you can smooth a transition between two keyframes (FIGURE 11.8).
- With the same project open as in the previous exercises, open the sequence called Smoothing Keyframes. This is a duplicate of the previous sequence you were working with, but keyframes are already applied to the clips.
- Make sure either the Pen or Selection tool is active.
- Place the cursor over an existing keyframe on any of the clips and hold down the Command (Ctrl) key.
When you do, the cursor changes to a triangle-shaped tool (called the Convert Vertex tool).
- Click on an existing keyframe. Bezier handles will appear on the keyframe .
Only keyframes that exist between two other keyframes will have Bezier handles on both sides. Keyframes with another keyframe on only one side or the other will have Bezier handles only on the side with the adjacent keyframe.
- Drag a handle to adjust the velocity of the curve.
- Experiment with adding Bezier handles and adjust them to taste. Be sure to listen to the audio betweeen adjustments to hear the differences.
Figure 11.8. By adding keyframes to an audio clip, you can then adjust the transition between keyframes by adding Bezier handles.
Importance of Smoothing Keyframes
![]()
While linear audio keyframes (a straight line between keyframes) are used all the time, for more organic fade ups and fade downs consider using Bezier handles on keyframes. By smoothing keyframes with Bezier handles you can achieve more natural volume changes.
Track vs. Clip Keyframes
Because we are talking about keyframes, we need to make an important distinction that is unique to Adobe Premiere Pro. You need to understand the difference between Track keyframes and Clip keyframes:
• Clip keyframes. In the previous exercises, you created Clip keyframe(s). Clip keyframes exist independently from other clips and have no interaction with the Audio Mixer.
• Track keyframes. The use of Track keyframes lets you affect several clips at once. These keyframes control all of the clips on one track in the sequence. Additionally, any Track keyframes that you make on a sequence will appear as automations in the Audio Mixer. Likewise, any automations that you create in the Audio Mixer will appear as Track keyframes on a sequence.
Keep Your Music Mix
![]()
When mixing music, try sticking with Track keyframes instead of Clip keyframes to create your swells and fades. If you keyframe the track this way, you’ll find that it’s easier to make updates and audition different music tracks because all of the keyframes still exist and still remain with the track instead of a clip.
- With the same project open as in the previous exercises, open the sequence Track Keyframes. This is the same sequence as in the previous exercise but without any keyframes. This time you’ll adjust audio levels with Track keyframes.
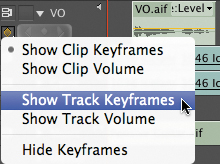
- Expand all tracks, and then click the Show Keyframes button in the track header area for any track. Choose Show Track Keyframes (FIGURE 11.9).
Figure 11.9. Choosing to display Track keyframes allows you to make keyframe adjustments to the entire track. These keyframes are also tied to Audio Mixer automations.
A yellow line now runs through the entire audio track.
- Select the Pen tool. You can add Track keyframes just like you added Clip keyframes by using the Pen tool.
There are three additional types of Track keyframes you can use.
- In the upper-left corner of the track is a floating gray box called the Effect menu. Click to choose a keyframe type (FIGURE 11.10).
• Track > Volume. You can use keyframes to control the overall mix of an entire track.
• Track > Mute You can use keyframes to keyframe silence or muting through the entire track.
• Panner > Balance. You can use keyframes to adjust the panning of a track to a particular speaker or to center audio tracks.
Figure 11.10. After enabling Track keyframes, you can keyframe several parameters.

- On this sequence keyframe, the music tracks fade up in between audio bites and fade back out after the audio bites. Repeat this throughout the entire sequence.
Using the Audio Mixer
Using the audio controls in the Timeline is a quick and easy way to adjust audio on a clip or to a track, but sometimes you’ll need a lot more control. That’s where the Audio Mixer panel comes in. The Audio Mixer gives you a ton of control when working with audio. In this section we’ll explore the Audio Mixer so that you can then use it to make your audio sound its best.
Overview of the Audio Mixer
We have to hand to it to Adobe, the Audio Mixer in Adobe Premiere Pro far exceeds that of other audio mixers found in other NLEs. Maybe this is because it very closely mimics traditional hardware mixers or because it’s very flexible, allowing you to easily work with multiple types of tracks. In fact, you can use submix tracks as well as add effect inserts and record very complex automations.
Before we dive into the details of using the Audio Mixer, let’s take a quick tour of its features so you can get acquainted with this versatile tool (FIGURE 11.11).
Figure 11.11. Adobe Premiere Pro’s Audio Mixer allows you to quickly adjust audio level, pan, create effect inserts, track sends, and assign output tracks.

With Adobe Premiere Pro open, choose File > Open, navigate to Chapter Files > Chapter_11_Media > [Version Number], and open the project Ch11_audiomixer.prproj. This project has a few sequences (based on the same sequence you’ve been working with) that you’ll use to explore the Audio Mixer. To begin, make sure the sequence called Exploring the Audio Mixer (Stereo Master) is open.
Track names and Automation Mode menu
Each track in your sequence, regardless of whether it’s a Mono track, Stereo track, 5.1, or submix track, is organized into a channel strip. At the top of each channel strip is a text box for the name of the track. The name defaults to the Audio 1, 2, 3, naming structure. Click in this box to give the track a custom name. For example, you might rename a track to call it VO.
Below the name of the track is the Automation Mode menu, which includes the Read, Write, Touch, and Latch modes. We’ll explore these options later in this chapter. These modes let you choose how automations are written or updated.
Effect inserts
Click the triangle under the Automation Mode menu on the left side of the mixer. Clicking this reveals an LCD-like panel. In the uppermost section you can insert effects on a channel, and in the lowermost section you can tweak effect parameters when an effect is selected (FIGURE 11.12).
Figure 11.12. The effect inserts section of the Audio Mixer allows you to insert effects and bypass or adjust parameters of a given effect.

A Effect menu. The top section of this display allows you to easily apply audio effects in sequence to one other on a given channel. With 24 effects to choose from, you can quickly eliminate errors and imperfections in a track.
B Effect Bypass button. If you need to disable an effect (without removing it), use the Bypass button.
C Control knob. You can adjust controls for an effect with a knob similar to that on a mixing board.
D Effect Properties menu. With this menu, you can switch to view different properties for the effect. You can only see one property at a time. The control knob updates for each property.
Control Supersized
![]()
It can be a little annoying to have to tweak an effect added to an insert on the Audio Mixer by using the effect Control knob and toggling through the different parameters in the Effect Properties menu. Instead, simply double-click on an effect in the insert section of the Audio Mixer to bring up the VST Editor, which allows you to tweak effect parameters in a floating window. Just note that not all effects are compatible with the VST Editor.
Channel sends
Directly below the effects section, you can choose to send or route a track somewhere else. Most commonly, this would be used to send a track to a submix. If you set up your sequence with existing submixes, you can choose an existing submix to send to, or by clicking on one of the five available sends for a track, you can create a new Mono, Stereo, or 5.1 submix (FIGURE 11.13).
Figure 11.13. The channel send section in the Audio Mixer allows you to route a channel to another place on the Audio Mixer, such as a submix.
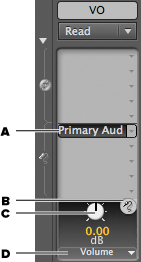
A Send Assignment menu. You can assign a track to the Master as well as create submixes for Mono, Stereo, or 5.1 tracks.
B Send Mute button. Much like using the Effects Bypass button, you can disable the patch using the Send Mute button.
C Control knob. You can adjust controls for a property with a knob similar to that on a mixing board.
D Send Properties menu. You can control the volume of how much of the track is being sent, as well as adjust the pan of the send by selecting pan in the menu and then using the Control knob.
Pan controls
If you’re working with Mono or Stereo tracks and a Stereo Master output, you’ll find a traditional pan control to pan audio left or right, or somewhere in between. If your master output is set to 5.1, you’ll find a surround panner with additional controls for adjusting center channel percentage and LFE (low-frequency effect) level. In addition, if your master output is set to 16 channel, you won’t find a panner but rather a menu to assign that channel to a specific output channel.
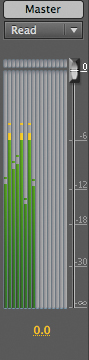
The Master Track
![]()
For all intents and purposes, the Master Track in the Audio Mixer acts just like a normal track when it comes to meters and the volume fader. However, you can’t assign effects or sends to the Master Track. But you can keyframe it!
Toggle between the other sequences in this project, 5.1 Master and 16 Channel Master (we omitted Mono Master because it’s not commonly used), to see the panner differences between tracks with these master settings (FIGURE 11.14).
Figure 11.14. Depending on your master output setting, the panner controls for tracks will differ.

A Stereo Master
B 5.1 Master
C Channel Master
Submixes or Output?
![]()
What is the difference between sending a track to a submix versus assigning the track output? Well, with submixes, you can control the level of the track sent to the submix, which allows you to (for creative reasons) control what is feeding the submix. Submixes are often used for audio effects work.
Mute, Solo, and Record Controls
Switch back to the sequence Exploring the Audio Mixer (Stereo Master) if you switched to one of the other sequences.
The next set of controls you’ll encounter is the Mute, Solo, and Record controls. It should be obvious how these controls work, but put simply, the Mute button mutes audio for that channel while it’s active. The Solo button mutes all other tracks except the one(s) you’ve soloed. The Record button allows you to record audio, such as voiceover, directly to a track via supported hardware. See Chapter 4 for how to record a voiceover directly in Adobe Premiere Pro.
Volume fader
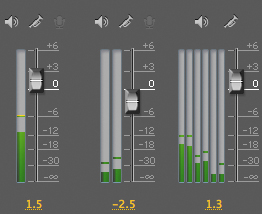
Below the Mute, Solo, and Record controls is a volume fader for each track and submix. Depending on the type of track you’re working with (Mono, Stereo, or 5.1) in the fader section, you’ll also be presented with an audio meter(s) for that track (FIGURE 11.15). If you’re more of an exacting type, below the fader you can numerically set a volume level. Also below the fader section, you can choose to set the output of the channel to a specific submix or to the master output using the Track Output Assignment menu.
Figure 11.15. Depending on the track type, each channel strip will display audio meters for a given track. Additionally, the Master Audio Track will display meters based on your master output type.
Additional controls
In the lower-left corner of the mixer are additional controls, including navigation controls, a loop control, and a Record button (FIGURE 11.16). With a recording enabled for a track, clicking the Record button and beginning playback will allow you to record audio to a track (e.g., voiceovers).
Figure 11.16. The additional controls at the bottom of the Audio Mixer allow you to control overall playback and recording for enabled tracks.
![]()
In the upper-right and upper-left corners of the Audio Mixer, you’ll find timecode fields. In the field on the upper left you can see your current timecode in the sequence, and you can use this field to navigate to a specific point in time. In the upper right you can see the duration of the sequence.
Understanding Automation Modes
Now that you know how to manipulate and keyframe audio on a sequence, and you’ve learned about the anatomy of the Audio Mixer, let’s explore one of the most useful features of the Audio Mixer—automation modes.
Put simply, the Audio Mixer automation modes enable you to record and then update parameters of the Audio Mixer, such as volume, pan, effects, and sends.
We’ll examine all the automation modes in the following sections, but first choose File > Open, navigate to Chapter Files > Chapter_11_Media > [Version Number], and open the project Ch11_mixerautomation.prproj. This project contains the same sequence you’ve been using, but you’ll use it again to delve into the four automation modes.
Audio Automation Modes in Action
![]()
The automation modes in the Audio Mixer panel are useful tools to quickly mix tracks. In this video you’ll explore the differences between the four modes.
Write
With the sequence open from the project Ch11_mixerautomation.prproj, click Play. In this sequence you’ll notice that the music is competing quite heavily with the voiceover. You might be tempted to keyframe the music clip using Clip keyframes around the voiceover bites, which is OK, but let’s fix this sequence with the Audio Mixer (thus creating Track keyframes). We’ll first use the Write automation mode to “record” volume changes. Keep in mind that the technique that follows would work for pan, effect, and even send volume parameters.
- Click the Audio Mixer panel and locate the Stereo music track, which is track 5.
- Set track 5 using the Automation Mode menu to Write (FIGURE 11.17).
Figure 11.17. The Write automation mode allows you to “write” automation data or keyframes to a track.
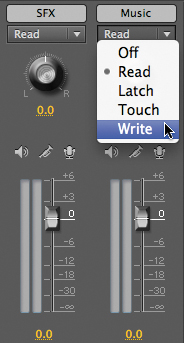
- Move the current-time indicator to the beginning of the sequence.
- Start playback of the sequence; when the music hits breaks in the voiceover, drag the fader for the Stereo music track up to increase its volume. After the break, drag the fader back down to decrease the volume for the track. The breaks in the voiceover are short, so just try to be as accurate as possible.
Repeat this process for the entire sequence, lowering the volume where the voiceover occurs and raising the volume after the voiceover.
After writing automation data and stopping playback, notice that the automation mode for that channel changes to Touch. This is normal behavior because it allows you to then update the automation data for that track. See the “Touch” section later in this chapter to understand that mode. To see the automation you created on the Timeline, click the Show Keyframes button and choose to show Track Keyframes.
Read
The Read mode automation behaves as its name implies; it reads previously recorded or “written” automation.
- Click the Audio Mixer panel and place the Stereo music track into Read by choosing that option in the Automation Mode menu.
- Start playback of the sequence.
Notice that the fader for the Stereo track in the mixer now follows the automation that you created in the previous exercise.
A cool aspect of the Read mode is that if you attempt to make changes to a parameter in the Audio Mixer, you can’t because of the previously written automation.
Latch
The name of the Latch automation move probably doesn’t make a lot of sense if you’re not an audio engineer. However, Latch is a very useful automation mode. Latch respects existing automation until you actually make a change to a parameter in the Audio Mixer panel.
When you change a parameter in the Audio Mixer, the change will then continue overwriting existing automations. Latch is a useful mode when you want to make a change to an audio section on which you’ve made an automation mistake while in Write mode, and you don’t care about overwriting existing automation after the update to a parameter.
- Click the Audio Mixer panel.
- Set the automation mode for the Stereo music track to Latch mode.
- Move the current-time indicator to the start of the sequence and begin playback.
- When you reach the section where you previously raised the music, move the fader to adjust the volume for that track.
- Don’t make any additional changes and continue playback. Notice that the new levels you made overwrite the previous Write automation on the rest of the track when you stop playback and listen again.
Touch
The Touch automation mode is similar to the Latch mode in that it respects existing automations until you make a change. But unlike the Latch automation mode, after you make a change, the Audio Mixer will automatically adjust parameters back to previously written automation data instead of continuing on with the change that you’ve made.
- Click the Audio Mixer panel.
- Set the automation mode for the Stereo music track to Touch mode.
- Move the current-time indicator to the start of the sequence and begin playback.
- When you reach the section where you previously raised the music, move the fader to adjust the volume for the track.
- If you continue playback without additional changes, you’ll notice that at the point you made a change, the change takes effect. But after the change, the automation resumes previously made changes (keyframes) (FIGURE 11.18).
Figure 11.18. The Touch automation mode allows you to quickly update existing automations. But after you’re done, the automation continues to use previously created keyframes. Original automation data (left); with Touch on, only the fade up automation was affected after the change (right); the original automation continues.

- Feel free to experiment with the different automation modes on the rest of the tracks on this sequence.
Fine-tuning Automations
If you find the process of updating automations in the mixer to be a bit clunky, have no fear. After recording automations with the mixer, you can show Track keyframes on the track you’re working with. Your automations will appear as keyframes. You can then click on a keyframe and further refine it as you see fit. Also, if you have too many automation keyframes, you can thin them out by choosing Preferences > Audio > Automation Keyframe Optimization.
Submixes and Bussing
When setting up a sequence, you can also create submix tracks. These special track types serve as an intermediate step between audio tracks and the Master Track. Essentially, you can group multiple audio tracks together into a new track and apply controls and effects.
There are several uses of submixes:
• Assign once. When we discussed 16 Channel Master audio, we noted that you can assign individual tracks to a given output. Well, instead of having to assign multiple tracks individually, you can route them to a submix. For example, you might have a submix called Music and Effects. You’d route all of your music and effect tracks to that submix, and then assign the output to the channel of your choosing when going back to tape.
• Controlling volume as a group. Individual tracks can be routed to a submix by using the submix control volume knob; you can then control the volume of a group of tracks all at once. In addition, you can also control pan in the same way. When you route an individual track to a submix, you can control the volume and pan of that track to the submix.
• Keyframing. Submix tracks, like regular tracks, can have volume and effect keyframes. So, instead of having to keyframe individual tracks, you can keyframe as a group.
• Effects. A very popular use of submixes is to use effects like compression and reverb on a submix. Instead of having to apply effects to individual tracks, you can apply an effect to the submix track.
The act of sending a channel to a submix is also known as bussing. Let’s look at how submixes and bussing (sending one track somewhere else) works in the Audio Mixer.
- With Adobe Premiere Pro open, choose File > Open, navigate to Chapter Files > Chapter_11_Media > [Version Number], and open the project Ch11_submixes.prproj.
This is the same sequence you’ve been working with but with a 16 Channel Master output. The first track is a voiceover track, the second and third tracks are camera audio, track four is a Stereo sound effects track, and track five is a Stereo music track.
How Many Submixes?
How many submixes should you set up a sequence with? You don’t need to decide up front. At any time, you can add a submix track to an existing sequence. Typically, the number of submixes we create will match the number of outputs we need when going back to tape, or we’ll create logical submixes based on the types of tracks we have, for example, voice, music, and sound effects.
The sequence has a basic mix that uses Clip keyframes, but we actually want to create a few submixes so that this project will be properly set up to output to four separate channels on a tape (often called a split master).
- Right-click in the track header area on any of the audio tracks and choose Add Tracks. In the dialog that appears, be sure not to add any additional video or audio tracks, but add an additional Stereo submix track.
- If it’s not already active, click the Audio Mixer panel. Notice the Stereo submix in the mixer. Click on the name section of the submix and name this submix Stereo Mix.
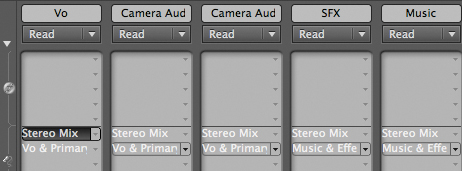
- Repeat the process from step 2, but this time create two Mono submixes (FIGURE 11.19). After you’ve created them, name the first one VO & Primary Audio and the other Music & Effects.
Figure 11.19. When you add tracks to an existing sequence, you also have the ability to add Mono, Stereo, or 5.1 submixes.

- Click the disclosure triangle on the left side of the mixer to reveal the effects and sends area for each track (the LCD-like panel). On the first track, click in the middle section on the first send (denoted by the down triangle) and then choose the submix Stereo Mix for channels 1–5.
- For channels 1–3 click on the second send and choose the VO & Primary Audio. In tracks 4 and 5, click on the second send and choose the Music & Effects submix (FIGURE 11.20).
Figure 11.20. By using sends on a track, you have the ability to route tracks to submixes, which can be (as in this case) used for proper audio output back to tape formats and workflows that support and require split masters.
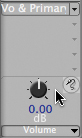
- Because you added the sends in the Send Properties area, you can control the volume of the send (FIGURE 11.21). It defaults to infinity, so change this value to 0 dB on all the sends using the Control knob. You’ll have to select each send first and then change its send volume in the Send Properties area. You can also click the Send Properites menu and adjust pan of the send, which is useful for adjusting Stereo positioning.
Figure 11.21. After adding a send in the Send Properties area, with the send selected, you can adjust the send volume by clicking the Send Properties menu and adjusting pan.
- Right-click on each send and confirm that the send is set to pre-fader. In combination with a send value of 0 dB (no change) and a pre-fader setting, any adjustment you make to a track fader or muting will not affect the volume of the channel going to a particular send. Instead, that volume is controlled by the volume Control knob on a particular send.
- To ensure that each of the submixes is being output to the correct channel, make sure that the Track Output Assignment at the bottom of each submix displays Master. Then, for the Stereo Mix submix, click on the Direct Output to make sure that assignments are going to track 1 for the left channel of the Stereo submix and track 2 for the right channel. On the VO & Primary Audio submix, choose channel 3 for the Direct Output Assignment; for the Music & Effects submix, choose channel 4. Depending on how your hardware is set up for audio monitoring, you may not actually be able to hear outputs for channels 3 and 4.
- Currently, the Track Output Assignment menus for channels 1–5 are set to Master and the Direct Output button is set to a specific output channel, but so are the submixes, which is a problem. This is creating an “additive” effect, essentially adding false volume to the master output. To fix this, either mute tracks 1–5 or drag the volume faders down to infinity. Because the sends are set up to pre-fader, muting or dragging the faders to infinity won’t have any effect on the submix sends; because the Direct Outputs are set up correctly for the submixes, you won’t have the issue of adding additional volume to the master output.
- Play back the sequence. You can see how the various output and send assignments work with the submixes and then ultimately with the output channels. Feel free to mix this project further.
Track Keyframes Are Disabled
![]()
In this exercise when we muted or brought the track faders to infinity for tracks 1-5 it is important to note that any track keyframes that we created either through the mixer or on a sequence will be disabled because the sends are set up as pre-fader. Clip keyframes will continue to act as normal. When using submixes as we did in this exercise, therefore, you should use clip keyframes to adjust audio levels. You can also keyframe submixes in the mixer or on a sequence using track keyframes.
Using Audio Effects
As with video, Adobe Premiere Pro has a plethora of effects for working with audio. These effects range from those that allow you to repair or “fix” the audio in some way to those that allow you to control audio dynamics. For example, you might apply compression to an audio track to control its peak volume. Other effects allow you to create “special” effects. For example, if you have recorded voiceover, you might add a touch of reverb to give the voiceover a feeling of space.
Two Ways of Adding Audio Effects
If you’ve used other NLEs, like Final Cut Pro, you’re probably used to applying audio effects to individual clips, which you can also do in Adobe Premiere Pro. But two features we love in Adobe Premiere Pro are the ability to add track-based effects and the ability to add effects to submixes. Let’s take a look at adding audio effects.
Track Versus Clip Effects
![]()
If you’re an Avid editor, you’ll feel right at home with the way that Adobe Premiere Pro can apply effects to an audio clip or an entire track.
Clip-based effects
Adding a clip-based effect is simple. Browse the audio effects in the Effects panel until you find one you want to use. Then just drag it from the Effects panel onto a clip. To adjust properties for an effect, select the clip, and then click the Effect Controls panel (FIGURE 11.22).
Figure 11.22. Clip-based audio effects parameters are adjustable in the Effect Controls panel (left) as well as on a sequence when the Show Clip Keyframes option is selected (right).

Additionally, after an effect has been applied, try selecting the Show Clip Keyframes option. Click the Show Keyframes button in the track header area and select Show Clip Keyframes. Then click the gray box in the corner of the clip to view properties of the effect. You’ll then be able to keyframe an effect’s parameters directly in the sequence.
Track-based effects
By utilizing the effect inserts in the Audio Mixer, you can also apply audio effects but on the track level. What’s even cooler is that you can create a submix, essentially, multiple tracks mixed into one. You can send tracks to a submix, and then add an effect to all of them at once.
For example, you might route all VO & Primary audio tracks to a submix. You could then apply a compressor (or limiter) to that submix to limit all dialogue to a certain level. Keep in mind that if you add an effect to a track, the options for that particular effect will be available in the Effect Properties section of the channel in the Audio Mixer (FIGURE 11.23). Additionally, you can keyframe effects on the Timeline when the Show Track Keyframes option is selected.
Figure 11.23. You can adjust track effect parameters in the Audio Mixer (left) or on a sequence when the Show Track Keyframes option is selected (right).

Using Audio Effects to Repair Audio
As with video, bad audio happens. You might have a noisy clip or a clip in which a voice sounds thin. Regardless, Adobe Premiere Pro has several effects that you can utilize to repair audio so that it sounds its best. We recommend using the following effects:
• DeNoiser. This effect automatically detects noise. You can then fine-tune how much noise is reduced.
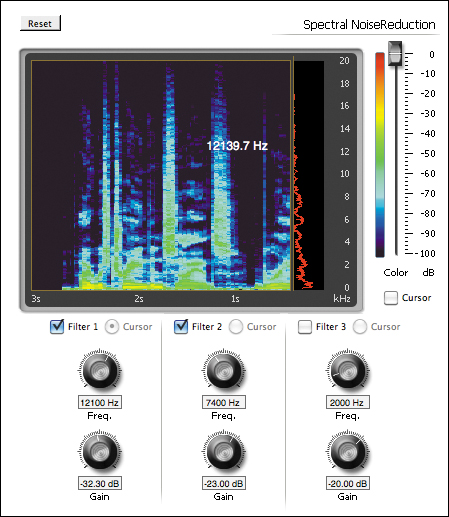
• Spectral NoiseReduction. This is one of our favorite effects for reducing buzzing sounds. This effect essentially uses three notch filters at frequencies you specify to remove noise (FIGURE 11.24).
Figure 11.24. The Spectral NoiseReduction effect is very useful for removing noise like buzzing in the audio signal.
• DeHummer. This effect is perfect for eliminating line hum from 50/60 Hz power cycles.
• DeEsser. This effect is ideal for decreasing high-frequency sibilance sounds like S and T sounds, because nothing is more annoying than those sounds.
• DeCrackler. This effect is perfect for reducing a lot of “crackle” type sounds, like mic rub, bad audio connections, and even repetitive sounds like raindrops on a roof.
Try Out a Few
![]()
Feel free to explore some of the effects in the next few sections on your own by opening the project Ch11_audioeffects.prproj, which is in the Chapter_11_Media folder. This project has several clips with some of these effects already in use (as both clip and track [insert] effects). Others need help with things like noise reduction.
Using Audio Effects to Adjust Dynamics and Equalization
When you’re working with audio, one of your main tasks will be to smooth it out so that voices, music, and other sounds flow with each other. This is most often done with equalization (EQ). Additionally, you’ll often need to make sure that audio is at the same level or doesn’t exceed a certain level. A few of Adobe Premiere Pro’s audio effects are perfectly suited for the task:
• EQ. Essentially, this is a three-way EQ but with an additional mid-frequency control. Use this effect to adjust EQ and smooth out clips on a sequence.
• Parametric EQ. This effect allows you to target a specific frequency and either boost it or cut it. Use this effect to cut a particular frequency, like a high-frequency noise or hum.
• Bass. The Bass effect lets you boost or cut frequencies from 200 Hz and lower. Use this effect to give a little more “oomph” to a voice, or in multiple speaker environments, cut the bass of a “fuller” sounding speaker to match the other speaker.
• Treble. Use the Treble effect to add clarity to voices or to cut shrill sounds.
• Multiband Compressor. Hands down, Multiband Compressor is one of the most useful audio effects in Adobe Premiere Pro. You can think of a compressor as an automatic “turner downer.” When audio reaches a certain level, the compressor will kick in and “turn down” the level of the audio.
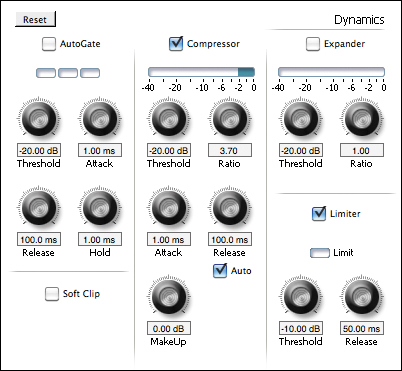
• Dynamics. The Dynamics effect has a Compressor; AutoGate (which creates silence if audio falls below a certain level); Expander, which is like the AutoGate but a little more natural; and a Limiter, which allows you to create an absolute ceiling for audio levels (FIGURE 11.25).
Figure 11.25. The full-featured Dynamics effect allows you to apply compression, gate, expansion, and limiting in one effect. For us, it’s a go-to effect.
Using Audio Effects for Special Effects
As an editor, you probably don’t think twice about creating a video effect that gives the video a certain style or a special effect. When it comes to audio, there are certain times and certain effects that you can use to create special effects. Here are just a few:
• Low & High Pass. As their names imply, these two effects let either low frequencies pass or be heard while eliminating higher frequencies, or let high frequencies pass while eliminating lower frequencies.
• Flanger, Phaser, and Chorus. You might think of these effects more for music recording when attempting to achieve very stylized effects, but these effects can give you some very cool options.
• Reverb. Reverb gives audio some “space” by attempting to emulate the natural reflections that happen as audio bounces around a real room.
Working with Adobe Audition
You probably think of Adobe Premiere Pro as an editorial application, which it is, but it happens to have some quality audio tools as well. With that said, there are times when you’ll want to lean on a dedicated audio application. For example:
• When you have detailed and complex audio work to do
• When you need to make severe repairs to audio clips
• When you retime audio to change pitch or speed
• When you perform complex mixing
It just so happens that the Creative Suite now includes Adobe Audition (new to the Mac for the first time). Adobe Audition is a full-featured audio postproduction application that is suited to deal with even the most complex of audio issues. In this section we’ll take a look at how Adobe Premiere Pro and Audition interact, as well as a couple ways to utilize Audition in your workflow.
What About Other Audio Applications?
![]()
Although we strongly urge you to check out Adobe Audition, the fact is that you might use another audio application or have to interact with another person who uses another audio program, like ProTools. In those situations you can export your audio as an OMF or AAF file. With your sequence selected, choose File > Export > OMF or AAF. Just be sure to find out the best settings your recipient wants you to use for those formats.
Sending Audio from Adobe Premiere Pro to Audition
Before you can utilize the power of Adobe Audition, you need to actually get a clip or sequence into Audition. Depending on what you’re trying to do, there are several ways of transferring clips to Audition. Let’s take a look at a couple of ways.
Sending individual clips
If you need to send an individual clip to Audition, you’re only a right-click away. With a clip selected, right-click and choose Edit Clip in Adobe Audition. The Render and Replace dialog appears. This dialog will help you render and then replace the audio on your sequence with extracted audio that is sent to Audition.
The Project panel will then contain the new extracted audio clips. In addition to right-clicking, you can also select a clip in your sequence or Project panel and choose Edit > Edit in Adobe Audition > Clip.
Sending entire sequences
Although you’ll need to send individual clips to Audition from time to time, the most exciting workflows involve sending an entire sequence to Audition. By sending an entire sequence from Adobe Premiere Pro to Audition, you can leverage many of the advanced audio toolsets that Audition offers.
With a sequence selected either in the Timeline panel or Project panel, choose Edit > Edit in Adobe Audition > Sequence or right-click on the sequence in the Project panel and choose the same option. You’ll be presented with a dialog that allows you to configure several options before sending the sequence to Audition (FIGURE 11.26). We’ll explore these options in the following exercise.
Figure 11.26. When exporting a sequence to Audition, there are some choices you need to make for different properties of the export.

Let’s practice sending a sequence from Adobe Premiere Pro to Audition. We’ll use this sequence for the exercises later in this chapter while we’re working in Audition.
- With Adobe Premiere Pro open, choose File > Open, navigate to Chapter Files > Chapter_11_Media > [Version Number], and open the project Ch11_audition.prproj. The open sequence has two clips with problematic audio. The sequence is not meant to be cohesive but rather contains two clips that need help.
- With the open sequence selected in the Timeline panel, choose Edit > Edit in Adobe Audition > Sequence.
- In the Edit in Adobe Audition dialog, you can leave the name of the sequence at the default (Figure 11.26).
- In the Path section, click Browse and navigate to a location of your choice. Just keep in mind that not only is the Audition project file saved to that location but also additional files like previews and extracted audio. We find it best to often create a new folder within our project folder and choose that as the location.
- In the Selection menu, you can choose to send the entire sequence or only your active work area. In this case, choose the entire sequence. When using handles, Adobe Premiere Pro will send only the material that you actually used.
- Specify that you want to add 0 seconds of handles. Due to the need to fit media on the DVD, these clips don’t have handles. But in your own projects, you can add handles.
- Select the Export Preview Video option to export a video preview, which is useful when mixing and sound designing to picture.
Tick Tock—Exporting Preview Video to Audition
If you decide to export video to Audition, just keep in mind that depending on the length of your project, it can take some time to actually render the video, so plan accordingly.
- Deselect Render Audio Clip Effects.
When exporting to Audition, any effects on your audio clips will be “baked in” when this option is selected. Deselecting this option is a better choice, because you can re-create effects in Audition and you’ll have more flexibility once in Audition. However, if you’re sure of the audio effects you’ve created in Adobe Premiere Pro, you can leave this option selected.
- Select Send Clip Volume Keyframe Metadata to send any volume keyframes you’ve created on clips in Adobe Premiere Pro to Audition. Once in Audition, you can further refine these keyframes.
- Select the Open in Adobe Audition option to automatically open Audition and the project when you click OK in the dialog.
- Click OK to send the sequence to Audition.
Because you selected the option to Export Preview Video, it will take a moment for Audition to open.
In the next few sections, we’ll explain a few different ways to utilize Audition with Adobe Premiere Pro. Although these exercises will provide you with a peek into some of Audition’s features, by no means do they show all or even a fraction of what Audition is capable of.
Noise Reduction
Nothing is as annoying as an audio clip that has excess noise in it. Extraneous noise can come from an HVAC unit, tape hiss, or even be ambient noise. Regardless, you’ll often want to reduce noise in a clip so audio is more comprehensible and clear.
- Open the Audition project that you created in the previous exercise (if it’s not already open). If you didn’t send a project to Audition from Adobe Premiere Pro, go back to the previous exercise and do so.
- When you send a project to Audition from Adobe Premiere Pro, the default workspace is set to Edit Audio to Video and the Multitrack Editor is open.
Zooming in Audition
When you need to fine-tune a selection, you’ll find it useful to zoom in to the audio waveform. The easiest way to do this is to position the current-time indicator near the area you want to zoom in to and use the equals (=) and minus (–) keys to zoom in and out of the current-time indicator position. Additionally, you can use the other zoom options at the bottom of the Waveform Editor.
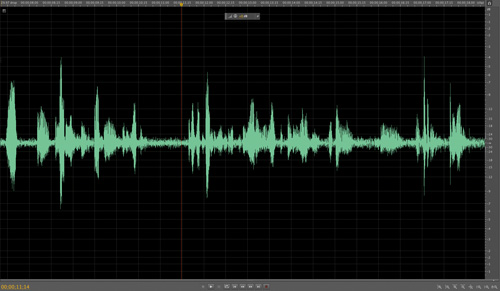
- Select the first clip, and then in the toolbar at the top of the interface, click the Waveform button to switch to the Waveform Editor (FIGURE 11.27).
Figure 11.27. By enabling the Waveform Editor, you’ll get a close-up view of a selected clip.
You’re presented with a large waveform of the first clip. You need to select part of the clip that is noisy to define the noise; then you can reduce that noise.
- Play back the clip again and notice that right after the phrase “work in...” is a section where the subject isn’t talking, but there is clearly noise. Using the Time Selection tool (the I bar tool in the toolbar), click and drag to highlight the section of noise you just identified.
- With the selection active, choose Effects > Noise Reduction/Restoration > Capture Noise Print. You can also press Shift+P. You may be presented with a dialog informing you that the noise print will be captured; if so, click OK to acknowledge the message.
- You’ve defined the noise, so click anywhere in the waveform to deselect the selection you’ve made, and then choose Edit > Select > Select All to select the entire clip.
- Return to the Effects menu and choose Noise Reduction/Restoration > Noise Reduction (process). You can also press Shift+Command+P (Shift+Ctrl+ P).
- A new dialog opens (FIGURE 11.28).
Figure 11.28. The Noise Reduction dialog contains many parameters that allow you to quickly reduce noise in an audio clip.

From here you can use the Noise Reduction and Reduce By sliders to remove noise from the clip. One option you’ll find particularly useful is to select the Output Noise Only check box. Selecting this option allows you to hear only the noise you’re removing, which is helpful so you don’t remove audio you want to keep. Be sure to deselect this option before commiting to the noise reduction. At the bottom of the dialog, you can also Play/Stop the audio as well as loop the clip, so you can refine your adjustments as you’re playing back.
Spectral View

If you want to visually see where noise is located in the frequency range, then use the Spectral View. The easiest way to access this view is by dragging the gray bar underneath the waveform in the Waveform Editor.
- If you want to be very detailed when performing noise reduction, you can set control points in the noise graph to dial out noise at a specific frequency. Noise is represented on the graph as a scattered set of points. The closer together and bunched the points are, the more noise (either high frequency in yellow or low frequency in red) at a particular frequency. Volume of the noise is measured on the Y axis; the more points towards the top of the graph, the louder the noise floor at that frequency. Looking at the graph, low frequencies are on the left, mid frequencies are in the middle, and higher frequencies are on the right. By adding a control point and dragging up at a particular frequency, you effectively reduce noise at the frequency; dragging down lessens the noise reduction.
EQ After Noise Reduction
After performing noise reduction, your audio might sound a bit thin or a bit hollow. An audio pro’s trick is to apply EQ after noise reduction to tweak the results.
- Additionally, by clicking the triangle next to the Advanced section, you can further refine the noise reduction. Be sure to try the Spectral Decay Rate if your audio sounds too much like you’re listening to a “telephone call from underwater.”
- After you’re satisfied with the amount of noise reduction, click the Apply button in the lower-right corner. Figure 11.28 shows how we reduced the noise in this clip. Use this as a guide, but feel free to tweak the noise reduction to your taste.
You may have noticed in the Noise Reduction/Restoration category that there is another type of noise reduction called Adaptive Noise Reduction. What’s the difference?
The normal noise reduction is a processed effect. It cannot be placed in an Effects signal chain on the Effects Rack panel, which can be critical if you want to feed the result of one effect to another. In our testing we’ve found adaptive noise reduction to be very good at removing background sounds, such as wind noise, whereas the regular noise reduction effect is very good at removing constant noises like HVAC sounds and other hisses and hums.
Healing Audio
![]()
We get it, you’re an editor. So why listen to your audio when you can see your audio and fix it? Check out this video to learn more about the spectral view in Audition and learn more about the Spot Healing brush.
Amplitude Reduction
You’ve probably listened to a clip at one point and thought it sounded great; then, all of a sudden, a consonant sound such as P or B causes a giant “plosive” at the start of a word. In the past, making this type of fix was, well, a pain. Using Audition, you can easily make the fix.
- With the same project open from the previous exercise (the one you created when you sent an Adobe Premiere Pro project to Audition), click the Multitrack button to get back to the track layout of the Adobe Premiere Pro project.
- Navigate to the second clip in the sequence. Select the clip and then click the Waveform button at the top left of the interface.
- Play back the clip by pressing the spacebar, and notice midway through the clip that there is a large plosive on the word “pleasure.” Let’s fix this.
- Place the current-time indicator near the plosive (you can see the plosive because of its large amplitude on the waveform in that area). Using the = key, zoom in to the current-time indicator.
- Using the Time Selection tool, click and drag to highlight the part of the waveform where the plosive is.
- When you highlight the waveform, that section will be highlighted in white. At the top of the highlighted section, you’ll see a control, which you can use to adjust the level of the selected waveform (FIGURE 11.29). Using this control, change the level to a value of -24 db. As you make your adjustment, the waveform redraws itself.
Figure 11.29. By highlighting a section of a waveform, you can quickly reduce its amplitude by adjusting the level of the selection. While making the adjustment, the waveform will be redrawn. Before the adjustment, notice the spike in the waveform (left); after reducing the amplitude of the “plosive” (right).

- Click in the waveform outside of the selected area and play back the clip. The plosive has been essentially eliminated.
You can use this technique for other fixes, such as lav microphone rub and other audio “hits.”
Getting Audio Back to Adobe Premiere Pro
We’ve only touched the surface of what Audition can do; therefore, we urge you to check out Audition to perform sophisticated mixes and sound design in your projects. However, if you’ve sent an individual clip or a sequence to Audition, you’ll probably want to get it back to Adobe Premiere Pro.
Return an individual clip
If you sent an individual clip to Audition after making fixes or processing it in some way, all you need to do is simply save the clip in Audition. The changes will link back to Adobe Premiere Pro.
Return a sequence
If you’ve sent an entire sequence to Audition, to get the updated Audition sequence back to Adobe Premiere Pro, choose Multitrack > Export to Adobe Premiere Pro. A dialog opens (FIGURE 11.30), allowing you to name the new sequence that will be created in Adobe Premiere Pro.
Figure 11.30. When exporting an Audition project back to Adobe Premiere Pro, you can configure several options for the export.

You’ll also be asked where to save the exported XML of the sequence and to specify the sample rate of the new clips. In addition, you have several options: You can export each track individually (a stem), export each submix (bus) individually, or create a Mono, Stereo, or 5.1 mixdown of the project. Often, we find that exporting individual stems is the best choice. In addition, you can choose to automatically open Adobe Premiere Pro when you click Export.
Matching Audio Levels
![]()
Be sure to check out Chapter 14 for techniques on using Adobe Audition to match audio levels between clips.
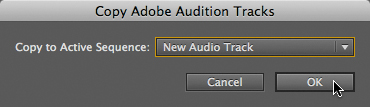
When Adobe Premiere Pro opens, you have the option to copy the Audition tracks to an existing track on the active sequence or create a new track (FIGURE 11.31). Just keep in mind that a new bin will be created with the suffix (AU tracks). Inside this bin is a sequence that contains all of your audio tracks from Audition. This sequence can be useful if you made a mistake placing tracks when exporting them back to Adobe Premiere Pro. Also, after adding the new track(s) to your sequence, you should disable the original audio tracks so you don’t hear the fixes along with the original audio.
Figure 11.31. After exporting an Audition project to Adobe Premiere Pro, you can choose to add the new audio to existing or new tracks on the active sequence.
Retiming Audio with Audition
![]()
If you need to retime audio while maintaining pitch, check out this video. You’ll learn how to retime audio with Adobe Audition.
Next Steps
As you continue your journey to produce high-quality finished video, you’ll move on to video effects. In the next chapter we’ll explore essential effects within Adobe Premiere Pro. You’ll also use the Dynamic Link command to send video clips to Adobe After Effects for advanced tasks like image stabilization and rotoscoping.