
Chapter 14. Quality Control and Archiving
So you’ve edited your project, color corrected it, and mixed it. You’re done right? Well, not exactly. You’ll obviously need to publish the project in some way, whether it’s to DVD, Blu-ray, the Web, or even to tape (all are discussed in the next chapter).
However, there is a step that many people miss that is vitally important to the success of any project—quality control (QC). The QC process is meant to ensure that your project is technically correct and to eliminate mistakes that can creep in towards the end of a project.
In addition to finalizing the project in this chapter, we’ll also tackle media management from a project closeout perspective. You’ll find that Adobe Premiere Pro offers a robust Project Manager, which can make consolidating and copying media a snap. Because you’ll often need to bundle all the project files for archiving or handing off to another post professional, we think you’ll find these management skills useful as well.

Eliminating Mistakes
It’s a dreadful feeling when a client, or even worse, a broadcaster calls to say that there is a problem with a project. Sure, content issues, rights clearances, and other issues happen all the time; however, some mistakes like black holes and flash frames are just downright embarrassing! In this section we’ll explore how you can use Adobe Premiere Pro to avoid some small but preventable mistakes.
Closer To Truth
![]()
Some screen shots and footage for this chapter are from the PBS series Closer To Truth; Cosmos, Consciousness, God. © The Kuhn Foundation. Robert Lawrence Kuhn: creator, executive producer, writer and host. Peter Getzels: producer and director. Find out more about the series by visiting www.closertotruth.com.
Checking for Gaps and Flash Frames
In the course of a complex edit, it’s quite common to have small gaps (or flash frames) appear in a sequence. Most often, these minor mistakes occur as a result of editors not paying attention as they drag a clip into a sequence and imprecisely place it next to an adjacent clip. Likewise, they can also occur during the editorial process as you move clips around and trim clips (especially if you’re using assets from tape-based sources that were loosely logged).
Regardless of the reason, locating a gap or flash frame is easy using Adobe Premiere Pro: In your final sequence choose Sequence > Go to Gap. This menu (FIGURE 14.1) offers four choices. The first two, Next in Sequence and Previous in Sequence, allow you to find gaps to the right or left of the current-time indicator, covering all the tracks in the sequence.
Figure 14.1. The Go to Gap menu offers several different ways to find gaps in a sequence.

The next two options, Next in Track and Previous in Track, use currently targeted tracks (both audio and video) to locate gaps and in flash frames on a particular track or combination of tracks.
Although there are no default shortcuts for any of the Go to Gap functions, you can choose the Adobe Premiere Pro Keyboard Shortcuts option (Windows: Edit > Keyboard Customization; Mac (CS5): Edit > Keyboard Customization; Mac (CS5.5): Premiere Pro > Keyboard Shortcuts). You can then search or locate the next and previous sequence and track commands (they’re located in the Sequence category of Shortcuts). From there you can map your own keyboard shortcuts to those functions.
Once you’ve found a gap or flash frame, follow these steps.
- Select the gap by clicking on the gap in the sequence (FIGURE 14.2).
Figure 14.2. To select a gap, just click on it. You can also mark a gap once it’s located with In and Out points to perform an extract edit.
- Press the Delete key to perform a ripple edit to close the gap. Keep in mind that if you select a gap in an audio track or a video track and have Sync Lock on with a corresponding audio or video track, Adobe Premiere Pro will attempt to move the linked part of the clip as well. However, if another clip in your audio or video tracks is in the way, you’ll be unable to close the gap. You can disable this behavior by turning off Sync Lock for those tracks, but closing the gap may result in clips that are out of sync with each other.
Trim to Close a Gap

When you close a gap by deleting it, you change the overall duration of your sequence and potentially move audio and other tracks like graphics out of sync with each other. Another way to close a gap is to trim the clip on one side of the gap to close the hole.
- If you prefer to use In and Out points to mark the sequence, you can also select the gap and then use the slash (/) key or choose Markers > Mark Selection to mark In and Out points around the gap.
X Marks the Spot

If you’re a Final Cut Pro editor, you’re probably used to using the x key to mark an edit or gap. In Adobe Premiere Pro, when a clip is selected, the slash (/) key performs the same function.
- In the Program Monitor, click the Extract button or press the apostrophe (’) key to use the Extract keyboard shortcut. This will remove the gap and slide everything on the right of the gap to the left, closing the gap.
Keep in mind that when you mark a gap, the gap will be marked for all selected tracks. You can click on the track header for a track to select it—to take part in the Extract operation—or to deselect it. But be careful: When you unlink tracks, you can potentially move audio and other tracks out of sync with one another.
Looking for Repeated Shots
Throughout the course of a project, you’ll use numerous shots. Often, you’ll have a long original clip that you’ll slice into dozens of smaller clips. Although this is perfectly normal, some editors and producers absolutely refuse to use the same clip multiple times in a sequence. In Adobe Premiere Pro you can easily find the number of times that a clip is used in a sequence.
- From the Project panel, choose the panel submenu and then choose Metadata Display.
- In the Metadata Display dialog (FIGURE 14.3) you’ll see a ton of metadata that you can customize and display in the Project panel. The first category is Premiere Pro Project Metadata. Click the disclosure triangle next to Premiere Pro Project Metadata to open this category.
Figure 14.3. The Metadata Display dialog allows you to customize metadata that is displayed in the Project panel. The default category, Premiere Pro Project Metadata, has most of the options you’ll need for an Adobe Premiere Pro project.

- About halfway down the list, select the check boxes next to Video Usage and Audio Usage, and then click OK. (You can also save your settings for any metadata that you add or modify as a custom setting by clicking the Save Settings button.)
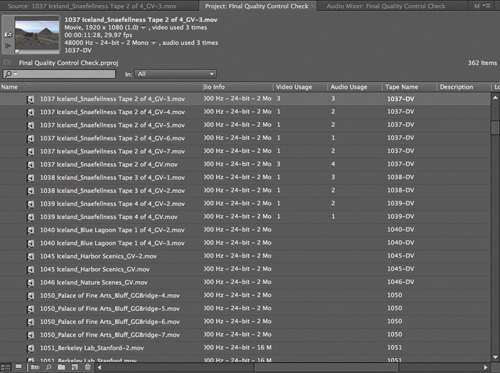
- In the Project panel, scroll to the right to reveal the Video and Audio Usage columns. If you’ve used a particular clip multiple times, the counts will appear in these columns. Just keep in mind that this tally takes into account all sequences you have in a project (FIGURE 14.4).
Figure 14.4. The Video and Audio Usage columns show whether or not and the number of times a clip has been used in a sequence in an Adobe Premiere Pro project.
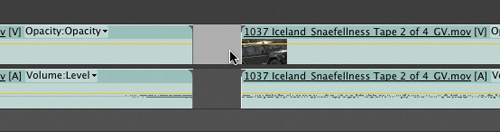
- When you select a clip in the Project panel, you can see where it is used in your project. Simply click the clip usage triangle next to the thumbnail and inside the clip information area at the top of the Project panel for either video or audio. For these triangles to appear, the clip must be used in a sequence (FIGURE 14.5).
Figure 14.5. The clip usage triangle at the top of the Project panel lets you see what sequences clips are used on. You can reveal usage for both audio and video using separate buttons.

You might be thinking that it doesn’t really matter how many times a particular clip is being used in a sequence but rather whether the same part of a clip is being used multiple times. After all, you may have a 20-minute source clip that you’ve used different parts of multiple times in a sequence. The Video and Audio Usage columns simply show the number of times the clip has been used but do not account for which parts (i.e., the exact parts) have been used. This missing but desired feature is known as Dupe Detection. Dupe Detection allows you to see which parts of a clip are duplicated throughout a sequence. Unfortunately, Adobe Premiere Pro does not offer Dupe Detection. Our hope is that this useful feature finds its way into future versions of the software.
However, by using subclips (as discussed in Chapter 5), you can create smaller portions of particular bites or portions of action. Then, using the Video and Audio Usage columns, you can determine if a particular subclip is being used multiple times in the sequence. Although this more manual method is not Dupe Detection, it does enable you to be a little more exact about usage than using just the Video and Audio Usage columns with a source clip.
Broadcast Legalization
A couple of thoughts may come to mind when you hear the phrase broadcast legalization. You might first ask: What the heck is that? Then you might mistakenly decide to skip this section because you think the phrase has something to do with working for broadcast outlets.
Tech Specs
![]()
It’s always a good idea to check with a broadcaster about its specific standards for video and audio. Although some variance exists between broadcasters (or distributors; i.e., for DVD and Blu-ray), you’ll find that many broadcasters base their standards on the PBS Redbook standard. You can find the current version of this standard at www.pbs.org/producers/TOS-1-2010-Submission-to-PBS.pdf.
Well, simply put, broadcast legalization refers to techniques that are used to adhere to technical specifications for video and audio. Although each broadcaster has its own standards, there are some general rules that you need to adhere to as a content producer.
If you’re thinking that broadcast legalization doesn’t matter because you’re not doing any broadcast work, well, that’s a common misconception. By adhering to broadcast specs, you can actually make your footage look and sound its best. By keeping your final project within spec, you’ll ensure that processes like dubs, duplication, and Web distribution go smoothly.
In this section we’ll explore some of the particulars of video and audio legalization.
Video Legalization
Video legalization might seem like an intimidating task, but it’s very straightforward. Because you’re an experienced editor, chances are you’ll be comfortable legalizing your video. But even if you’re new to the subject, you can easily ensure that your footage is legal video by using a few techniques and utilizing a couple of Adobe Premiere Pro’s effects.
Legalizing manually
The process of legalizing video begins with color correction and grading (see Chapter 10). In fact, one of the main goals of color correction is to ensure legality. So, when color correcting and grading footage, you’re manually legalizing your video. We’ll discuss a few effects in Adobe Premiere Pro to help you legalize footage, but it’s always best not to depend on those effects. Try to manually legalize your footage first, and then use the legalization effects to legalize any stray pixels that you may have missed.
As discussed in Chapter 10, your eyes lie; therefore, it’s crucial that you use the scopes to assist you in ensuring your video is legal. Here are a few guidelines to help you do that:
• Luma levels. On the YC Waveform make sure that no part of the trace is above 100 IRE or below 0 IRE. For most broadcasters, trace above or below these levels is illegal for broadcast. Almost all of Adobe Premiere Pro’s color correction effects allow you to adjust luma levels to ensure broadcast legality.
• Saturation. Using the Vectorscope as a guide, ensure that no part of the trace extends beyond the outer edges of the Vectorscope. Remember that the distance from the center to the edge of the graticule on the Vectorscope measures saturation of a particular hue. A more conservative approach that is safer for the standards many broadcasters use is to use the hue targets around the Vectorscope as a guide. In tandem with the Vectorscope, you can also measure saturation across the tonal range by choosing the YC Waveform and enabling the Chroma option (FIGURE 14.6). Like luma trace on the YC Waveform, with the Chroma option enabled, the blue trace (chroma) that is overlaid on the luma trace should not exceed 100 IRE or go below 0 IRE (for conservative broadcasters; some may allow you to go higher or lower). Using a combination of primary and secondary corrections via Adobe Premiere Pro’s color effects like the Fast Color Corrector or Three-Way Color Corrector, you can guarantee that your footage meets saturation legality.
Figure 14.6. By selecting the Chroma option on the YC Waveform, you can see saturation across the tonal range, making it effortless to determine if you need to desaturate highlights, shadows, or overall saturation.

Viewing Saturation on the Waveform Scope
![]()
If you right-click on the Waveform Monitor in Final Cut Pro, you can choose to show saturation. This is the same functionality you get by choosing the Chroma option for the YC Waveform in Adobe Premiere Pro.
• RGB levels. It’s important to also check RGB levels using the RGB Parade. Like measuring luma on the YC Waveform, trace above or below 100 IRE or below 0 IRE on the RGB Parade is considered illegal. Unfortunately, in Adobe Premiere Pro the RGB Parade doesn’t make this task easy because it clips RGB values at 100 and 0 IRE. Even with this limitation in mind, you can still judge RGB levels. If you see trace that is excessively clustered at 100 or 0 IRE, there’s a good chance that your RGB levels are illegal. Most of Adobe Premiere Pro’s color correction effects allow you to legalize RGB levels through contrast and saturation adjustments. For particularly stubborn clips, you can also use secondary correction to manually legalize RGB levels.
External Scopes and RGB Legality
![]()
Many external scope setups also have specific tools for measuring RGB gamut legality. Diamond Display (patented by Tektronix) and the Harris/Videotek eye pattern are two useful scopes for measuring RGB legality in combination with the RGB Parade.
Using the Broadcast Colors effect
The Broadcast Colors effect is a simple effect for ensuring that your colors (hue and saturation) are legal (FIGURE 14.7). Although the Video Limiter effect (which we’ll discuss next) is more full featured because it allows for legalization of both luma and chroma for quick fixes to color only, you can use the Broadcast Colors effect to make sure your footage has legal colors.
Figure 14.7. The Broadcast Colors effect allows you to quickly legalize colors in a clip.

To use the Broadcast Colors effect, drag it from the Effects panel to a clip or a nested sequence.
Once you’ve applied the effect, you can then adjust several parameters:
• Broadcast Locale. To match the standard for your project, choose either NTSC or PAL.
• How To Make Color Safe. This parameter provides two options for making colors safe: Reduce Luminance darkens pixels to legalize them; Reduce Saturation reduces the saturation of illegal pixels. Generally speaking, reducing saturation will more noticeably alter the clip than reducing luminance. For clips that are very saturated, we find that reducing saturation produces the best results. But for general safety and a less noticeable effect on the clip, reducing luminance works well.
• Maximum Signal Amplitude (IRE). A good way to think of this control is as a threshold to which pixels that have an IRE value above this setting will be legalized according to the How To Make Color Safe parameter. Enter a value of 100 IRE to ensure the broadest legality.
Broadcast Safe in Final Cut Pro
![]()
If you rely on the Broadcast Safe filter in Final Cut Pro, the Video Limiter effect will feel similar. The one exception is that the Video Limiter effect doesn’t have specific parameters for RGB legality.
Using the Video Limiter effect
Although the Broadcast Colors effect works well for legalizing colors, it provides no control over legalizing illegal luma levels. That’s why we almost always turn to the Video Limiter effect (FIGURE 14.8). We feel it provides the most control over limiting the signal.
Figure 14.8. The Video Limiter effect provides a robust set of controls for legalizing both chroma and luma in the signal.

To use the Video Limiter effect, drag it from the Effects panel onto a clip or nested sequence.
To control the effect, you can adjust several parameters:
• Show Split View. Sets the Program monitor to a split view, which allows you to compare the corrected clip to the original clip. This is particularly useful if you want to show a client the difference between versions. You can use the Layout and Split View Percent controls to adjust the split between the original clip and the effected clip.
• Reduction Axis. Sets limits for Luma Only, Chroma Only, both Chroma and Luma, or you can use the Smart Limit option to let Adobe Premiere Pro choose the best portion of the signal to reduce. Just keep in mind that depending on which option you choose, there will be different options for setting minimum and maximum levels.
• Luma Min. Sets the minimum level for luma in the signal. This option is available if you choose Luma Only or Chroma and Luma in the Reduction Axis menu. The default value of 0% (digital percentage and IRE; although technically different, they are essentially the same thing) is the proper choice.
• Luma Max. Sets the maximum allowable luma level in the signal. Like Luma Min, this option is available if you choose Luma Only or Chroma and Luma in the Reduction Axis menu. The default value of 100% is generally correct, although some broadcasters may allow slightly higher values.
• Chroma Min. Sets the minimum allowable chroma level in the signal. This option is available if the Reduction Axis is set to Chroma Only or Chroma and Luma. The default value of -30% is pretty liberal. We find a value of -10% to 0% to be in line with most broadcasters.
• Chroma Max. Sets the maximum allowable chroma level in the signal. Like Chroma Min, this option is only available if the Reduction Axis is set to Chroma Only or Chroma and Luma. The default value of 130% is pretty generous. A value of 100% offers the broadest legality across broadcasters; however, some broadcasters may allow for higher levels.
Hardware Legalization
![]()
If you’re working in a tape-based workflow, you may want to consider using a hardware legalizer. These external devices sit in the middle of the signal chain between your Adobe Premiere Pro workstation and a video deck. Hardware legalizers are very accurate, and they provide real-time processing.
• Signal Min. Sets the minimum level for brightness and saturation. This option is only available if you choose the Smart Limit option in the Reduction Axis parameter. The default value of -30% is rather low. We find a value of -10% to 0% to have the broadest compatibility with most broadcasters.
• Signal Max. Sets the maximum level for brightness and saturation. This option is only available if you choose the Smart Limit option in the Reduction Axis parameter. The default value of 130% is a little dangerous (as far as legality is concerned). A value of 100% offers the broadest legality across broadcasters; however, some broadcasters may allow for higher levels.
• Reduction Method. Adjusts the effect based on the preceding parameters as to how legalization will occur. You can choose from Highlights Compression, Midtones Compression, Shadows Compression, or Highlights and Shadows Compression. The default option, Compress All, works well in most situations.
• Tonal Range Definition. Sets the ranges and softness for the three areas of the tonal range (shadows, midtones, highlights).
Audio Legalization
Equally as important as video legalization is audio legalization. As the old adage goes audio is half of the picture. No doubt you’ve been annoyed from time to time when watching something with overmodulated audio or audio that is too quiet. Well, when it comes to legalizing audio, different broadcasters have different “rules,” but knowing a few simple techniques can help you achieve legal audio.
Achieving proper levels
Perhaps the biggest factor to achieving legal audio is to get your levels correct. Levels are measured on Adobe Premiere Pro’s audio meters in the Audio Mixer for each track in a sequence as well as the Master audio track, which is also viewable on the mixer or by calling up those meters at anytime by choosing Window > Audio Master Meters (FIGURE 14.9).
Figure 14.9. The audio meters (both in the Audio Mixer and the stand-alone version) are your principal tool for measuring audio levels for a given track or for an entire project.

dB or dBFS
![]()
When working with audio in modern systems, you’ll often see audio levels expressed as dBFS or Decibels Relative to Full Scale. This scale is used to measure digital audio. Although dB is a scientific measurement of volume, in audio circles when measuring volume, dB is an analog measurement. What makes things more confusing is that many applications use dB as a generic term, even though technically the proper use should be dBFS.
It’s up to you to decide how to mix your tracks in any given sequence, but your overall master (levels) are what’s really important. Depending on your application, different levels are considered legal:
• Before setting your audio levels, you should consider the reference tone for the project, which is the tone that you hear underneath color bars. The color bars represent various colors that will be seen in the rest of the project. The reference tone is used to represent average levels for the rest of the project. For broadcast work, a reference tone of -20 dBFS is the most common level. For nonbroadcast work, -12 dBFS is common.
• For projects destined for broadcast, peak audio levels should not exceed -10 dBFS. Keep in mind that specific broadcasters may have different requirements. In our experience this is a typical requirement from most broadcasters.
• If your project is not destined for broadcast, such as a film festival, DVD, or Blu-ray Disc, broadcast peak levels will be pretty low. Peaks for nonbroadcast work should be between -6 and -3 dBFS. However, when levels hit 0 dBFS in digital audio, noticeable distortion is possible.
Pushing It
![]()
Over the past few years, we’ve noticed that some broadcasters are allowing content producers to “push it” when it comes to levels. This is especially true when it comes to spots. It’s not uncommon for audio levels for spots to push -6 dBFS or even -3 dBFS for peaks for commercials these days.
Normalization, compression, and limiting
One of your biggest challenges when legalizing audio in Adobe Premiere Pro will be mixing audio to the same overall level. We’ll discuss one way to do this in the next section (“Loudness”). But in the course of an average project, you’ll want a quick and easy way to make audio the same volume while protecting your peak volumes. Peak volume means not having any audio exceed the peak limit for your project (-10, -6 dBFS, etc.). Adobe Premiere Pro offers a few methods that allow you to quickly adjust all audio levels to achieve the same level while protecting for peaks.
The first method is called normalization. In Adobe Premiere Pro you can normalize or adjust audio in two ways so that all audio peaks are the same:
• Normalize Max Peak To / Normalize All Peaks To. Select clips you want to normalize in the Project panel or in a sequence, and then choose Clip > Audio Options > Audio Gain. In the dialog that opens (FIGURE 14.10) choose Normalize Max Peak To or Normalize All Peaks To. These functions operate differently depending on if you’re normalizing a single clip or multiple clips. With the dialog set to Normalize Max Peak To, let’s say you’re normalizing a clip with a peak of -10 dB.
Figure 14.10. The Audio Gain dialog provides several options for affecting the gain of a clip, including two options for normalizing.

If you enter a value of -6 dB, the clip will be normalized so that +4 dB of gain is applied and peaks hit -6 dB. If you choose this option with multiple clips, the clip with the highest peak will be adjusted to the value you enter, whereas other clips (with lower peak levels) will be adjusted by the same relative amount but not to the exact level you entered.
The Normalize All Peaks To option operates in the same way as Max Peak for a single clip; however, for normalizing multiple clips, all peaks will be set to the value you enter, not in a relative amount as with the Max Peak option.
• Normalize Master Track. We find the Normalize Master Track option more useful than normalizing individual clips. To normalize the master track, select the sequence you want to normalize and choose Sequence > Normalize Master Track. In the dialog that opens, enter the dB value that you want the loudest peak to be (for example -6dB). The loudest sound will be at that value, and the other peaks will automatically adjust upwards or downwards to meet the specified value.
Normalization is a good technique to rely on, but it can occasionally cause results you didn’t expect because there are often extreme ranges of volume in a clip.
Another method for balancing audio is compression. A good way to think about a compressor is as an automatic “turner downer.” A compressor automatically reduces levels that get too high which allows you to achieve consistent audio levels. Compressors can also be used to raise audio levels and generally to “flatten” dynamic range.
After normalizing and compressing audio to ensure that levels don’t go beyond a specified level, you can use limiting. Think of limiting as a hard ceiling that a signal can’t pass through.
In Adobe Premiere Pro you can find compression options in two places but the limiting option in one:
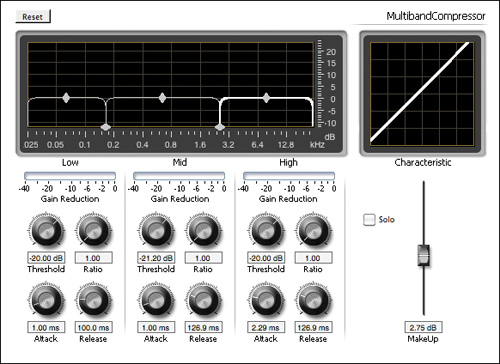
• Multiband Compressor. Found in the Audio Effects bin, this effect allows you to apply compression across three different frequency ranges (lows, mids, and highs; you can even adjust those ranges). As a result, you can apply varying levels of compression to different frequencies. The effect allows for more granular control while compressing the signal (FIGURE 14.11).
Figure 14.11. The Multiband Compressor is a flexible tool for balancing audio across different frequency ranges.
Normalizing, Compression, and Limiting in Action
![]()
Check out this video to see the methods of normalizing, compression, and limiting at work on real-world problematic clips.
• Dynamics. Also found in the Audio Effects bin, this effect is actually four effects in one. The AutoGate silences the audio signal if the levels fall below a threshold that you set. This is useful for eliminating background noise—for example, when someone isn’t talking. The Compressor applies compression to the signal. The Expander acts in a similar way to the AutoGate but generally has a “softer,” less noticeable effect. The Limiter allows you to set a ceiling for maximum level in a clip (FIGURE 14.12). Because Dynamics combines many useful options in one, you should strongly consider it as an essential part of your QC workflow.
Figure 14.12. The Dynamics effect provides a great deal of control over the audio signal.

Loudness
An important part of audio legalization is loudness. How is loudness different from volume? Simply put, loudness is perceptual volume. Have you ever noticed that different clips that look the same on an audio meter seem to have different volumes? That’s loudness. Depending on the frequency of the audio file, you might perceive different loudness.
Measuring Loudness
![]()
If you go to any professional broadcast audio house, the mixers there will tell you they rely on the Dolby LM100 Loudness Meter. This external device is the gold standard for measuring loudness. The LM 100 features are now also available as a software plug-in for compatible systems.
It’s very difficult to use audio meters and your ears to achieve proper loudness within a project. Fortunately, the Adobe Creative Suite provides tools to help you achieve legal loudness levels.
To adjust for loudness, use the following procedure.
- Navigate to Chapter Files > Chapter_14_Media > [Version Number] and open the project Ch14_loudness.prproj. This project consists of two clips from the same interview, but the audio doesn’t match and the perceived loudness between the two clips is much different.
- Select one of the audio files (they’re stereo pairs), right-click, and choose Edit Clip in Adobe Audition. This step replaces the original audio with extracted audio that is sent to Audition. The extracted audio by default is saved to the same file path as the project.
Audition launches, and the audio clips appear in the Files panel.
- Switch back to Adobe Premiere Pro and repeat step 2 for the other clip. You must send clips one at a time so that Audition retains a one-to-one relationship with the original files.
Audition launches, and the second audio clip appears in the Files panel.
- Choose Effects > Match Volume. A new floating panel appears.
- Drag the two audio files from the Files panel to the Match Volume panel where it says “Drag and drop files from the Files panel.”
After the files have been added, expand the columns on the Match Volume panel to see what the current Loudness, Perceived Loudness, Total RMS, and Peak values are. Note these values, because after processing, they will change.
- Click the Settings button in the lower-left corner of the Match Volume panel. The Match To menu offers several options on how to match these files, including to match by RMS, Peak Volume, Loudness, and Perceived Loudness. Select Perceived Loudness. Although all of these options do a decent job of matching the files, Perceived Loudness takes into account a listener’s perception of relative loudness (FIGURE 14.13).
Figure 14.13. The Match Volume panel in Audition allows for several different ways to match volume between clips.

- Adjust the value of the Loudness parameter to -20 dB because the clips in this project will be used in a show for broadcast.
- Select the option to Use Limiting. For this exercise, the default settings for Lookahead and Release Time are fine as is.
- To match the volume, click the Match Volume button. Depending on your workflow, you could also use the Batch Process button to save the files with custom prefixes, overwrite existing files, save to a new location, or change the format of the audio file (FIGURE 14.14). However, you don’t need to do that for this exercise.
Figure 14.14. By clicking the Batch Process button in the Match Volume panel, you have total control over saving the processed audio, including changing the file format if needed.

After Matching you’ll be able to see in the Match Volume panel that the audio files have been matched as closely as possible for perceived loudness.
What Volume to Match To?

If you use Audition to match volume and loudness, you’ll need to choose dB values that match your project. As discussed earlier in this chapter, for most broadcast projects, levels range from -20 dBFS to -10 dBFS and for nonbroadcast projects from -12 dBFS to -6/-3 dBFS.
- Choose File > Save All. Then switch back to Adobe Premiere Pro. Notice that the audio clips in the sequence have been replaced with the extracted audio you sent to Audition (you can also see these new clips in the Project panel). Play back the sequence. Note that the clips now match better because the perceived loudness of the clips was taken into account.
Sending an Entire Sequence to Audition
Sometimes you’ll want to work on an entire sequence in Audition. Fortunately, Adobe Premiere Pro provides a great workflow for getting an entire sequence, including video, into Audition for more refined audio work.
- In the Project panel, right-click on a sequence, and then choose Edit in Adobe Audition > Sequence to send an entire sequence to Audition.
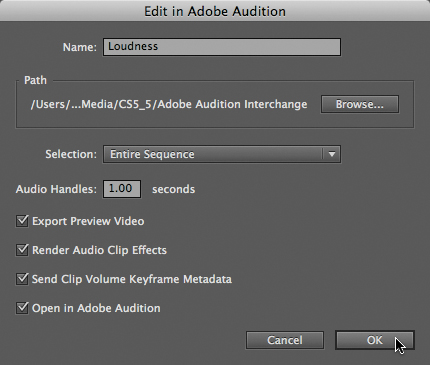
- In the dialog that opens (FIGURE 14.15) choose a name for the new Audition project and a file path to save files (it defaults to the same file path as the project you’re working on but in a subfolder called Adobe Audition Interchange). You can send an entire sequence or just a work area. You also have the ability to choose several additional options, such as adding handles, exporting video along with the audio, and including volume keyframe information if you want to render audio effects. In addition, you have the option of automatically opening Audition.
Figure 14.15. When exporting a sequence to Adobe Audition, you have several options for how to export that sequence, including the ability to export video and add handles.
- When you’re done working on your audio project, you have options to choose from to get the project back into Adobe Premiere Pro. First, you can export a mix or submix of the entire project. Second, from the Audition Multitrack menu, you can choose Export to Premiere Pro to send the project back to Adobe Premiere Pro. For more details on this workflow, be sure to go back and check out Chapter 11, “Audio Mixing and Repair.”
Practical Media Management
Media management is part of any project, but media management takes on more importance towards the end of a project when you need to remove unused media or archive a project. In this section we’ll explain how to use the Project Manager to easily eliminate unused media by creating a trimmed project and copying a project from one location to another.
Using CS Review for Final Approval
![]()
CS Review is a robust tool for facilitating review with and approval from clients. In the finishing stages of any project, it’s very important to get final approval from your client. Check out this video to learn how to use CS Review.
Removing Unused Media
It happens to the best of us: A project becomes bloated with unused clips and media that you have no intention of using. Taking the time to remove unused media streamlines a project and makes it a breeze to find assets.
Media for This Section Uses the Cineform Codec
![]()
Although we’ve mainly been using H.264 media throughout this book, this section uses media encoded with the Cineform Codec because the Project Manager in Adobe Premiere Pro will not trim H.264 media. Cineform has a free decoder that works on a Mac and Windows that you can access by visiting http://estore.cineform.com/neoplayer.aspx.
To remove media, you have a few choices; just note that the first three options that follow do not actually remove media from disk but merely remove asset references from a project:
• Select an item in the Project panel and press the Delete key. Just keep in mind that after removing media from a project, the source files remain on the disk.
• Sort the Project panel by Video Usage or Audio Usage (if these columns are not displayed, from the Project panel menu choose Metadata Display > Premiere Pro Project Metadata and enable those two columns). If a file is not being used, simply select it and press the Delete key. Again, keep in mind that the source file will remain on disk but will be removed from the project.
• Choose Project > Remove Unused. This automated command removes all unused media in a project. Note that used media is media that is being used in any sequence within the project, not just the open sequence. As with the previously mentioned methods, media will remain on the disk.
Streamlining
![]()
If you use sequences to help organize your selects, the Remove Unused Media command is even more useful. All sequences in a project are evaluated, not just your final sequence.
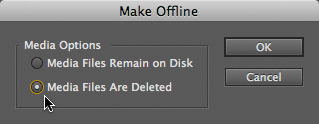
• If you’re serious about removing media from a project as well as from disk, you can right-click on a clip and choose Make Offline. Making a clip offline breaks the link the project has to the media file and leaves an offline clip in your Project panel and any sequence that uses that clip. After choosing Make Offline, you’ll be presented with a dialog (FIGURE 14.16) that asks you if you want the Media Files to remain on disk or delete them. Note that if you delete them, they will be removed, and any other project that references them will also have those clips appear as offline. After making a clip offline, you can remove the offline reference by simply deleting it from the Project panel.
Figure 14.16. Be careful when choosing to make a clip offline. If you remove the clip from disk, it will be permanently deleted and other projects that reference that clip will have it appear offline in those projects as well.
Using the Project Manager
The principal way to media manage a project in Adobe Premiere Pro is to use the Project Manager (FIGURE 14.17). The Project Manager helps you to accomplish two main tasks:
• Create New Trimmed Project. This option allows you to create a new project based on the sequences and the media those sequences use, discarding other media.
• Collect Files and Copy to New Location. This option allows you to copy consolidated sequences to a new location.
Figure 14.17. The Project Manager in Adobe Premiere Pro is the principal tool you use to move media and trim files for media management purposes.

To invoke the Project Manager, choose Project > Project Manager.
Creating a trimmed project
A common use of the Project Manager is to trim a project, which is often referred to as trimming the “fat.” This means you can quickly clean up a project by getting rid of media not used in a project as well as getting rid of media not used by a clip in the sequence. For example, let’s say you have five clips that are not used in a sequence in Adobe Premiere Pro, and you have 50 clips in a sequence. The clips that are being used in the sequence are all from source clips that are 5–10 minutes long; however, each clip in the sequence is only a few seconds in length. Using the Project Manager, you can delete the unused clips while trimming the clips in the sequence so that only the media used (you have the option of using handles) remains.
Adobe After Effects Projects and Dynamic Link
![]()
If you use Dynamic Link to work with After Effects, be aware that the Project Manager in Adobe Premiere Pro doesn’t copy or collect After Effects compositions that are used in an Adobe Premiere Pro project. Clips in a project that dynamically link to an After Effects project will appear offline in a new project after you’ve used the Adobe Premiere Pro Project Manager to collect a project. You can use the Collect Files command in After Effects, and then after you’ve managed your Adobe Premiere Pro project, relink manually to the After Effects project.
- Navigate to Chapter Files > Chapter_14_Media > [Version Number] and open the project Ch14_trimmedproject.prproj.
This is an interview segment from the PBS series Closer to Truth: Cosmos Consciousness God. It’s been color corrected and mixed, so you don’t need the surplus of extra handles that are present in each clip. But you do want to create an archived version (with smaller handles) of the segment for potential use in later episodes.
- After the project has opened, choose Project > Project Manager to open the Project Manager window.
- At the top of the window in the Source section, choose the sequence(s) you want to manage. This project has only one sequence.
- In the Resulting Project section, choose Create New Trimmed Project.
- Choose the unused clips you want to exclude. The Exclude Unused Clips option removes unused clips from the resulting project. For this exercise, you can leave this option deselected because there are no extraneous clips.
- In the Options section, select Include Handles. We find that adding 15–30 frames is a good number because it allows you to make further edits in the resulting project or to create transitions. For this project, enter 15 frames (FIGURE 14.18).
Figure 14.18. Adding handles to a trimmed project is a good idea in case you need to further massage edits or add transitions later on.
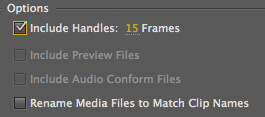
- Also in the Options section, you can select Rename Media Files to Match Clip Names. This option renames the new media files that will be created to match the clip names used in the project. This is useful if you’ve renamed clips in the Project panel and want to retain those names. For this project, you can leave this option deselected.
- In the Project Destination section, click Browse to choose a location for the new project as well as for the new media that will be created from the trim operation.
- In the Disk Space section, you’ll see the amount of Disk Space Available, the Original Project Size, and the Resulting Project Size, which is based on the options you selected previously. After making changes to any of the Project Manager options, click the Calculate button to update the resulting project size. Notice that this project has been trimmed.
Creating Offline Clips
Using the Project Manager, select the Make Offline option to make the new project that the Project Manager creates have offline clips. This option is useful if you intend to capture “offline” media again in its “online” or full resolution. This works best for tape-based clips, but you can also reconnect tapeless sources to a transcoded or camera original version as well.
- Click OK to create a new trimmed project. You may be prompted to save the current project. Click OK to continue.
- After processing has finished, you can navigate to the location where you saved the new project. The folder will have the same name as the original project but with Trimmed as a prefix. Inside this folder is the new project file and associated media for the project.
Collecting a project
Often, you’ll want to move a project from place to place. For example, you might want to collect a project so you can hand it off to another editor or even to another facility. In addition, you may want to move a completed project to some sort of archive device, such as a backup hard drive or storage system. By using the Collect Files and Copy to New Location function in the Project Manager, this process is easy.
Some Formats Cannot Be Trimmed
![]()
If you’ll be trimming a project, just be aware that some formats, like H.264 and HDV, cannot be trimmed. This limitation is due to the frame structure of these formats. While shooting, be sure to avoid unnecessarily long takes.
- Navigate to Chapter Files > Chapter_14_Media > [Version Number] and open the project Ch14_collectproject.prproj.
This project is an interview segment that you need to hand off to another team member for color correction and audio mixing—a perfect use of collecting a project.
Trimming a Project with Multicamera Sequences
If your project contains multicamera sequences, Adobe Premiere Pro won’t trim the source footage for those sequences.
- Render the entire project by choosing Sequence > Render Entire Work Area. Then choose Project > Project Manager. The Project Manager window opens.
By rendering this project when you collect it, you can also move all rendered files along with the media that you process. Note that if you adjusted your work area before starting this exercise, you may need to adjust it to account for all the clips in the sequence.
- At the top of the Project Manager window in the Source section, choose the sequence(s) you want to manage. This project has only one sequence
- In the Resulting Project section, choose Collect Files and Copy to New Location.
- For this exercise, deselect Exclude Unused Clips. This option is OK when you know that you don’t need unused clips, but if you’re trying to make a duplicate of a project, you may want to deselect this option so the resulting project has all the clips of the current project.
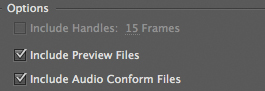
- In the Options section, choose Preview Files and Audio Conform files. If you don’t choose these options, effects will have to be rerendered and audio files conformed again to the project. Choosing these options results in more disk space being used for the resulting project and media; however, effects won’t have to be rerendered, nor will audio need to be conformed to the project (FIGURE 14.19).
Figure 14.19. The options to include Preview and Audio Conform Files is useful when passing off a project to someone else using Premiere Pro as they won’t have to rerender or conform audio files.
- Deselect the Rename Media Files to Match Clip Names option for this exercise. This option renames files used in the project to the name of the clip used in the project (as named in the Project panel).
- In the Project Destination section, choose a location for the resulting project and processed media. If you have another drive on your system, choose that drive as the location.
- Click OK to collect all the files and copy them to a new location. You may be prompted to save the current project. Click OK to continue.
- After processing has finished, navigate to the location where you saved the new project. The folder will have the same name as the original project but with Copied as a prefix. Inside this folder is the new project file, associated media, and preview/cache files (FIGURE 14.20). You can now hand off this folder to another team member for the additional color correction and audio work that the segment needs.
Figure 14.20. The folder you choose as the destination folder for the Project Manager will contain a new project file, media used for the project, and preview and cache files.

Next Steps
Now that you’ve taken your final finishing steps, your work is nearly done. Up next you’ll learn about the last part of most projects—outputting and publishing projects to tape, the Web, and optical media.