
Chapter 15. Publish Your Video
Your edit is done, and it’s time to publish your project. You need to get your finished sequence out of Adobe Premiere Pro and distributed to a plethora of deliverables, like tape, the Web, DVD, and Blu-ray, and even to portable devices like iPads and mobile phones.
In this chapter, you’ll learn how Adobe Premiere Pro in conjunction with Adobe Media Encoder can speed up your workflow and allow you to be ultra efficient when it comes time to publish your project.
Exporting a Master Copy
Years ago, a master copy of a project almost always meant a master videotape. This tape was the definitive output of the entire project, and as such, it was often cloned to ensure nothing happened to it before it was put on a shelf for long-term storage.
Media for This Chapter Uses the Cineform Codec
![]()
The media used in the exercise files for this chapter use the Cineform codec. You can get a free version of the Cineform codec (decoder) for your operating system (Mac or Windows) by visiting http://estore.cineform.com/neoplayer.aspx.
Although this practice still happens in the digital world, it’s become far less common. In fact, outputting to tape can often be a hindrance (and costly). More and more projects need to have what we call a master copy. A master copy is simply a self-contained digital file of the entire show at its highest resolution and best quality. Once created, you can then use that file to produce other types of outputs and have the ability to archive it.
Closer To Truth
![]()
Some screen shots and footage for this chapter are from the PBS series Closer To Truth; Cosmos, Consciousness, God. © The Kuhn Foundation. Robert Lawrence Kuhn: creator, executive producer, writer and host. Peter Getzels: producer and director. Find out more about the series by visiting www.closertotruth.com.
Matching Sequence Settings
When creating a master copy of a project, you’ll generally want the resulting, self-contained digital file to use the same settings (frame size, frame rate, and codec) as your sequence. The cool thing is when you export from Adobe Premiere Pro, you can match sequence settings, which makes it simple to create a file that matches your edit. No guesswork is involved as long as you chose your original sequence settings correctly. Let’s take a look at how this works.
- Navigate to Chapter Files > Chapter_15_Media > [Version Number], and open the project Ch15_matchchangesequence.prproj. This is a small project with a scene from the PBS Series Closer To Truth: Cosmos Consciousness God.
- With the sequence selected, either in the Project panel or Timeline panel, choose File > Export > Media or press Command+M (Ctrl+M). The Export Settings dialog opens. It may look a little dense, but we’ll break down the interface later in this chapter in the “Meet Adobe Media Encoder” section.
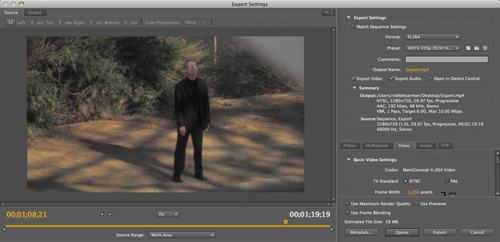
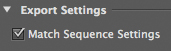
- In the Export Settings dialog in the Export Settings area select Match Sequence Settings (FIGURE 15.1). Click on the Output Name (the orange text), and name the file Match Sequence Settings.mov. Save the file to a location of your choice.
Figure 15.1. The Match Sequence Settings option in the Export Settings dialog allows you to use the same settings as your sequence for an export.
- Click on the Video and Audio panels midway down on the right side of the Export Settings dialog. You’ll notice that all options are grayed out because you’ve chosen to match sequence settings. On the Video panel the video codec matches the sequence settings for this project (frame size, frame rate, and codec). The Audio panel also matches the sequence.
- At the bottom of the Export Settings dialog on the right side select the Use Maximum Render Quality option.
- Click the Export button at the bottom of the Export Settings dialog to export the sequence. The resulting file is a digital clone of the sequence.
Choosing Another Codec
Nothing says that you have to match sequence settings when creating a master copy of a project (even though in most situations that’s a good choice). You can also export a master copy to a higher-quality mastering codec. For example, you might export a project that uses XDCAM encoded material to the high-quality Cineform codec. In this exercise you’ll export a file that uses a different codec than the media used in the sequence.
- With the same project open as in the previous exercise, with the sequence selected, choose File > Export > Media or press Command+M (Ctrl+M).
Lossless Output

One advantage of the Animation codec is that it’s lossless. Compared to lossy codecs, which throw away data in a variety of ways, lossless codecs preserve all data. Another lossless codec that we sometimes use is the PNG codec, which is mainly used for still imagery but often for video too. Feel free to substitute the PNG codec for Animation in this exercise; for all other parameters use the same settings.
- In the Export Settings dialog in the Export Settings area, choose QuickTime as the Format, click the Output Name (the orange text), and then name the file Different Codec.mov. Save the file to a location of your choice.
- Click the Video tab, which is about halfway down on the right side of the Export Settings dialog.
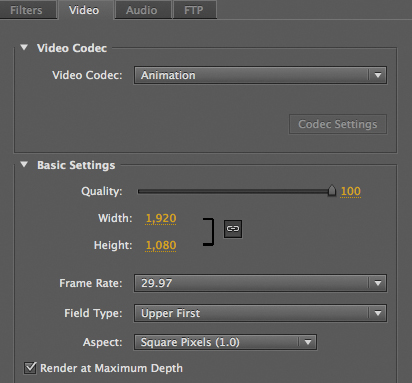
In the Video Codec menu choose Animation. Although this codec is 8-bit only and will create rather large files, it’s pretty much a universal codec. Ensure that in the Basic Settings section the Quality slider is set to high, the frame size is 1920 × 1080, the frame rate is 29.97, the Field Type is Upper First, and the Aspect is Square Pixels. You can also select the option to Render at Maximum Depth (FIGURE 15.2).
Figure 15.2. Options on the Video tab allow you to custom configure your export. In this case we manually matched sequence settings but changed the codec to the Animation codec.
KTOOLS
If you have to output in a different aspect ratio (16 × 9 to 4 × 3, for example) one thing that can be tricky is ensuring that text and action elements are inside the 4 × 3 action and title safe zones. In the Chapter 15 media folder we’ve included a subfolder named CS5_KTOOLS, which comes from our friend Tim Kolb. Inside you’ll find a number of overlays (PSDs) that you can use as guides to ensure 4 × 3 action and title safety, as well as a few gradients you can use with blend modes to create custom vignettes.
- Click the Audio tab and choose Uncompressed for the Audio codec. In the Basic Audio Settings section choose 48000 Hz as the sample rate, Stereo for Channels, and 16-bit for Sample Type.
Animation Won’t Play Back
Don’t be surprised if you can’t play back more than a few seconds of a video using the Animation codec. Although the quality is outstanding, you need a top performance RAID to handle the playback.
- At the bottom of the Export Settings dialog on the right side select the Use Maximum Render Quality option.
- Click the Export button at the bottom of the Export Settings dialog to export the sequence.
Outputting to Tape
Even in this digital age, tape still has its place. In fact, even though it seems like tapeless workflows are standard (which for many they are), tapeless delivery, especially to broadcasters, is still in its infancy. Most major broadcasters still require master tapes on formats like HDCAM SR, HDCAM, D5, or DVCPRO HD.
Even with deliverables in mind, tape does have a unique advantage. Tape allows for an easy way to archive a project. Granted you don’t have the plethora of files on a drive or LTO backup; instead, you have a single tape that is the final version of a project.
Preparing a Project for Tape Output
Playing out to tape requires your project to play back flawlessly with no dropped frames. As such, you need the perfect equilibrium of the right hardware and the right settings. Prior to exporting a project back to tape, it’s important to ensure that your project is properly set up. The following sections mention a few details to check.
Device Control settings
Open the Adobe Premiere Pro Preferences and choose Device Control. In the Devices menu choose the appropriate type of Device Control for your deck or I/O device (FIGURE 15.3). Keep in mind that if you have third-party I/O devices from companies like Blackmagic or AJA, they’ll have their own settings. Depending on the Device Control option you choose, additional controls may be available. By clicking the Options button, you can configure Device Control to the specific deck or camera you’re using.
Figure 15.3. Using the Device Control preference, you can configure how Adobe Premiere Pro will control a tape deck. Using the default DV/HDV option, you can click the Options button to tailor the Device Control settings.

Creating Mixdowns
![]()
Many editors find it far easier to create submixes and mixdowns of specific tracks going back to tape. Check out this video to learn how to create submixes and mixdowns in Adobe Premiere Pro.
No Multitrack Audio on DV and HDV Devices
![]()
It’s important to note that DV and HDV devices support only two tracks of audio. Professional formats like Sony HDCAM SR can support up to 12 discrete tracks. If you’re going back to DV or HDV tape, Adobe Premiere Pro’s default Stereo Master setup is all you need; you don’t have to worry about setting up discrete tracks.
Audio channel assignments
Broadcasters often require specific assignments of audio on a master tape. For example, a stereo mix of the show on channels 1 and 2, the mix minus narration on channel 3, and only music and effects on channel 4. Of course, there are lots of variations on these assignments depending on the broadcaster and what type of needs it has.
If you need to output with specific audio assignments (other than default stereo output), when creating a new sequence, choose the 16-channel option for master audio setup. Then, using the Audio Mixer, you can assign each audio track in your sequence to a specific output. Unfortunately, Adobe Premiere Pro doesn’t allow you to change the master output setup for an existing sequence, so you may need to create a new sequence that is set up correctly, paste existing media into that sequence, and assign the correct outputs.
Leader and run out
If your tape will be delivered to a broadcaster, it’s important to place certain elements at the start of the show. The most common items include bars and tone, a slate describing the program, and possibly a countdown before the show begins (FIGURE 15.4). Additionally, many broadcasters require that after the program, you include run out (or black) and silence for 60 seconds. You can create all of these elements from within Adobe Premiere Pro by clicking the New Item button at the bottom of the Project panel and choosing bars and tone, title, universal counting leader, and black video.
Figure 15.4. A sequence with leader information (bars and tone, slate, and countdown) is placed on the sequence.

Starting timecode
It’s nearly a universal standard that a program on tape starts at 01:00:00;00 or one hour. Leader information precedes this. By default, like most edit applications, Adobe Premiere Pro starts its timecode at one hour. To accommodate for leader information, you’ll need to change this.
Drop vs. Non-drop Timecode
![]()
If you’re using a sequence with a standard broadcast frame rate, when you create that sequence, you have the option of setting the sequence timecode to drop or non-drop timecode. Tape deliverables for broadcasters almost always use drop frame timecode. Between the seconds and frame values in timecode, a colon (:) represents non-drop, whereas a semicolon (;) represents drop frame.
A common standard is to have bars and tone start at 00:58:30;00 and last for one minute. At 00:59:40;00 a slate should appear, and from 00:59:50;00–00:59:58;00, a countdown (often displayed simultaneously with the slate) should appear. At 00:59:58;00, you should hear audio called a 2-pop, which is used to check sync.
To change the starting timecode of a sequence, click the Timeline panel menu and then select Start Time. Enter 00:58:30;00 as the starting timecode. When you do this, if your sequence was previously set to start at 01:00:00;00, it will now start at 00:58:30;00, so you will probably have to shift your actual program down on the sequence to 01:00:00;00 (remember that most programs start on tape right at one hour). Sliding your program down to start at one hour will also give you enough room to insert leader information, such as bars and tone, slate, and a countdown.
Some Decks Can’t Be Preset
![]()
If the deck you’re using doesn’t support setting starting timecode directly on the deck, the process gets a little tricky. Adobe Premiere Pro doesn’t allow for the blacking or stripping of tape through the application. When going back to tape like this, you’re essentially doing what’s called a crash record. Timecode on the tape will generally start at 00:00:00;00. Just be sure to start recording a little farther into the tape because most decks need a little bit of pre-roll before they can start recording.
Preparing a Tape
For your sequence to go back onto a tape at the correct point, it’s necessary for the tape to have timecode that matches your sequence on the tape. To do this, timecode only is recorded onto the tape in a process known as stripping or blacking a tape.
Depending on the deck, this can be easy to do. Many professional decks or cameras allow you to set a starting timecode for recording. After setting the timecode, you simply let the recording proceed without any signal going to the deck. This will record black and silence throughout the entire tape, but most important, a continuous timecode track is recorded. If you’re in a rush, you don’t actually have to record timecode throughout the entire tape but simply through where you’ll start your project on the tape. If you use this quick procedure, it’s important that the deck be set up to regenerate timecode. Just keep in mind that if bars and tone start at 00:58:30;00, you’ll probably want timecode on the tape to start at 00:58:00;00.
The RS-422 Device Control Advantage
![]()
Wherever possible, it’s wise to use a deck and I/O device with support for RS-422 Device Control. This serial connection allows you to control a deck with exact frame accuracy, unlike other Device Control protocols like FireWire. RS-422 is most often found on professional-level tape decks.
Exporting to Tape
It’s taken a little labor to get to this point, but you’ve nearly reached the finish line. Now that you have the essentials of getting a project ready and tape blacked, you can proceed to the next step—the actual export.
- With a sequence selected in either the Project panel or Timeline panel, choose File > Export > Tape.
- In the dialog that opens are several options (FIGURE 15.5). In the Device Control section you can choose to:
• Activate the recording device.
• Assemble (start) at a specific timecode.
• Delay recording by a user-defined number of frames. This is useful to offset for any delay between your computer and the device so that the output is frame accurate.
• Enter frames a pre-roll amount, which is necessary for some decks to get the tape mechanism up to speed.
Figure 15.5. Prior to exporting to tape, a dialog appears providing you with some control over the export, including setting an assemble timecode (starting point) and aborting export on dropped frames.
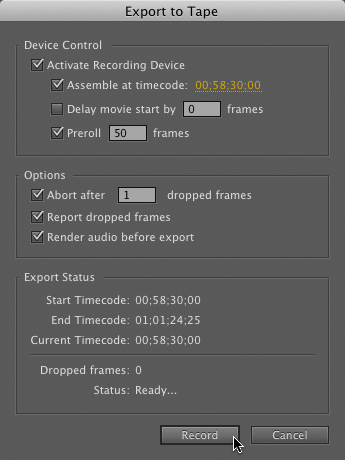
- In the Options area, you can choose to abort the export to tape if a certain number of frames is dropped. Typically, we set this to 1 because all dropped frames are undesirable when going to tape!
You can also have Adobe Premiere Pro report if there were dropped frames on export.
- Select “Render audio before export.”
This is usually a valuable option to enable because sequences with complex audio can sometimes cause an export to drop frames.
- In the Export Status area you can see the starting and end timecode of your sequence, as well as the current timecode of your playhead. If you want to export only a small section of a sequence, mark In and Out points on the sequence prior to exporting to tape.
Monitor the Right Source
While exporting to tape, it’s important to view a monitor directly attached to the video deck, as well as to monitor audio directly from the deck. This is the best way to ensure that the video signal is exporting to the deck correctly and that audio is in sync.
- Click Record to begin the export.
If you’ve chosen “Render audio before export,” a Rendering dialog appears showing you the progress of that render. Additionally, if your sequence contains media that needs to be rendered, Adobe Premiere Pro will render the sequence before the export to tape begins (FIGURE 15.6).
Figure 15.6. Before Adobe Premiere Pro can export to tape, it will automatically render audio (if that option was selected) and video as needed.

Meet Adobe Media Encoder
At the heart of any output or publishing workflow that uses Adobe Premiere Pro is the Adobe Media Encoder. You’ll find that it is a versatile transcoding and compression tool. You can leverage it to transcode to another editing codec and create files for the Web, DVD, Blu-ray, and even mobile devices. We’ve found the application to be incredibly fast because it is 64-bit and able to use multiple processors.
Watch Folders
![]()
One handy feature when using Adobe Media Encoder is Watch Folders. When files are placed into a Watch Folder, Adobe Media Encoder can automatically fire off a series of exports. Check out this video to learn more about Watch Folders.
You can utilize Adobe Media Encoder in two ways:
• Directly from Adobe Premiere Pro. By choosing File > Export > Media, you’ll be presented with the Export Settings dialog (FIGURE 15.7). This is essentially the same interface as the stand-alone version of Adobe Media Encoder.
Figure 15.7. The Export Settings dialog is where you can configure exports to various formats using Adobe presets or presets that you create.

• As a stand-alone application. Because Adobe Media Encoder is an application, it can therefore be run as a stand-alone program (FIGURE 15.8). You can drop several items into the Adobe Media Encoder, including self-contained files, source clips, and even entire Adobe Premiere Pro or Adobe After Effects project files. With the CS5.5 version, you can even utilize the Watch Folder functionality to automatically start encodes when files are dropped into a selected folder.
Figure 15.8. Adobe Media Encoder can be run as a stand-alone application, which is useful if you want to encode files without having to use Adobe Premiere Pro. However, you can also add Adobe Premiere Pro and Adobe After Effects projects, and select a sequence or composition to encode.

Duplicate a Sequence Before Exporting
![]()
If you suffer from an organizational, obsessive compulsive disease like us, you may want to duplicate the sequence you’re working on before exporting. If you name the duplicate Sequence_Export_Date, and then continue to work on the sequence, you’ll always have a version that matches your export.
Accessing Adobe Media Encoder from Adobe Premiere Pro
As with many features in the Creative Suite, Adobe has put a ton of work and development into streamlining workflow. You can access the power of Adobe Media Encoder directly from within an Adobe Premiere Pro project. Here’s how:
• Individual clips. With an individual clip selected in the Project panel, choose File > Export > Media or press Command+M (Ctrl+M) to export that clip into the format and preset of your choosing. You can also export the entire clip or set a custom range by setting In and Out points.
• Sequences. During the review or delivery stages, you’ll often need to export a part of a, or an entire, sequence. With the Timeline panel selected or the sequence selected in the Project panel, choose File > Export > Media. You can also drag multiple sequences from the Adobe Premiere Pro Project panel into the Adobe Media Encoder application window.
Exporting Multiple Clips
![]()
If you want to export multiple clips from Adobe Premiere Pro, you’ll need to export them one by one. When the Export Settings dialog opens, click the Queue button at the bottom of the window. This will add the clip to the Adobe Media Encoder Queue. Repeat the process until all the clips you want to export are in the Queue. You can customize the clip export settings in the Export Settings dialog or within the Adobe Media Encoder application.
Overview of the Export Settings Dialog
After choosing to export a clip or a sequence from Adobe Premiere Pro, the Export Settings dialog will open (Figure 15.7). In this dialog you can customize your export settings, including setting the format, codec, frame size, and frame rate, as well as other options.
The dialog can seem a little intimidating at first, but it’s actually straightforward once you get the lay of the land. In this section we’ll deconstruct the Export Settings dialog so you can have total control over your export.
Source and Output panels
Starting in the upper-left corner of the Export Settings dialog are two panels: Source and Output.
Test First, Compress Second
![]()
If you want to get your hands dirty and experiment with different settings to test your footage, it’s a great idea to send a 30–60 second sample through Adobe Media Encoder rather than your whole project. This way when you “hit” the right setting, you’ll have saved yourself quite a bit of time.
The Source panel (FIGURE 15.9) allows you to see your original clip or sequence in the center of the panel. Above the preview are cropping controls, which come in handy if you have horizontal or vertical blanking in the clip that you’re trying to eliminate or you’re trying to fit a specific aspect ratio.
Figure 15.9. The Source panel in the Export Settings dialog allows you to scrub and watch the clip or sequence you’ll be encoding, set custom In and Out points, and crop footage for export.
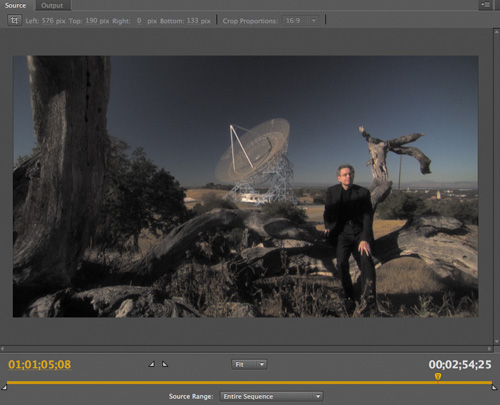
Below the preview is a mini timeline that you can use to scrub through a clip or sequence, as well as see source timecode and duration. You can customize duration by setting In and Out points by pressing I and O on the keyboard or using the In and Out buttons. In the Source Range menu, you can set the range (duration) for the entire clip, entire sequence, current work area in the sequence, or a custom range (which you customize by using In and Out points).
The Output panel (FIGURE 15.10) shows you a preview based on your settings, including any cropping you may have performed. As you make adjustments to any settings in the Export Settings dialog, it’s often a good idea to switch to the Output panel to see the result of your settings, particularly if you do any cropping. Just keep in mind that when it comes to compression artifacts, what you see in the Output panel is an approximation.
Figure 15.10. Using the Output panel is good way to check the results of any cropping or sizing you may have done.

Export Settings
The Export Settings section (FIGURE 15.11) on the upper-right side of the Export Settings dialog offers you several options to control your export. Here they are in detail:
• Format. The Format option allows you to choose the format you want the resulting file to be. From QuickTime to Flash, you’ll find lots of options here. Keep in mind that Adobe supports more and more formats as time goes on, so this list will continue to grow.
• Preset. Depending on the format you’ve chosen, Adobe has provided presets for common scenarios. Presets are great starting points, but you may want to tweak them further (the preset is changed to custom when it’s modified). The cool thing is that after tweaking settings using the buttons next to the Preset menu, you can save a custom preset or even import a preset if another team member has created one. If you no longer require a preset, you can click the trash can icon to delete a preset.
• Comments. If you create your own preset, you should add comments about the preset so it makes more sense next time you need to use it. We often enter the frame size, frame rate, and quality information into the Comments field for custom settings.
• Output Name. The output name defaults to the current name of the clip or sequence that you’re exporting. By clicking on the orange text of the name of the file, you can specify a new name as well as change the location where the file will be saved.
• Export Video and Audio. Using these two check boxes, you can export video only or audio only, or with both boxes checked, the resulting file will have both audio and video. Just keep in mind that if you choose a format that doesn’t support video (or vice versa), like a WAV audio file, you won’t have the option to export video.
• Open in Device Central. If you choose a mobile format (like MPEG-4 or H.264), you’ll have the additional option of opening the resulting file in Adobe Device Central to preview and control how the file will be displayed on mobile phones and other devices (we talk more about Device Central in the “3GPP for Other Mobile Devices” sidebar and a video later in this chapter). This application is a wonderland of information because it’s constantly updated with the latest specs for thousands of mobile devices.
• Summary. If you toggle the triangle next to the Summary section, you’ll be presented with information about your source as well as your output settings. The Output section will dynamically change as you make changes on the panels below.
Figure 15.11. The Export Settings area gives you control over the format your sequence or file will use, the ability to use a preset or create one, the ability to include audio or video in the export, and the ability to choose the name of the exported file and where it will be saved.

Filters export settings
Below the Export Settings section you’ll find a number of tabs depending on the format you’ve chosen. First is the Filters Export Settings tab. Although you might have expected lots of different filters to choose from, you actually have only one choice—Gaussian Blur. By using a slight amount of Gaussian Blur you can even out noise in footage. This allows a compressor to be more efficient and ultimately allows for smaller files. Just be careful not to add blur if you’re creating a master copy of a sequence or using another high-quality codec.
Where’s the Deinterlace Filter?
![]()
If you choose a format that’s progressive and you add an interlaced source, the clip is automatically deinterlaced. There is no need to look for a filter.
Multiplexer export settings
If you’ve chosen a format like an MPEG-based format (such as MPEG-2 for DVD or H.264 for Blu-ray), the Multiplexer export settings tab will appear. Multiplexing controls how the audio and video streams are merged into one. The options here will vary slightly depending on the exact format you’ve chosen. We recommend sticking with the default settings for most presets, or you may create a file that’s incompatible with its intended playback device.
Noise and Compression
![]()
Noise makes a compressors job much more difficult and less efficient as it wastes time trying to encode the noise which ultimately creates a larger file. You can help the compressor by adding a touch of blur on an export. This will “trick” the compressor by evening out noise in the footage allowing it compress in a more efficient manner. Just keep in mind this will soften your footage slightly so be sure to check the results to see if they’re acceptable.
Video export settings
The Video export settings tab (FIGURE 15.12) is where you’ll probably spend most of your time in the Export Settings dialog. It’s here that you control options like codec and frame size. Depending on the format you choose, this panel and its options will change dynamically. Too many options are provided to cover them all here, but we show you how to use several options in the video tutorials later in this chapter.
Figure 15.12. The Video export settings tab lets you customize options like frame size, frame rate, and codec, and depending on the format selected, additional format-specific options.

Audio export settings
Like its video cousin, the Audio export settings tab allows you to customize audio settings. Also like the Video export settings tab, depending on the format you’ve chosen, you’ll have different options to choose from. For example, if you are creating an H.264 file for use on a Blu-ray Disc, you can choose to have your audio encoded as Dolby Digital or PCM (uncompressed) audio.
FTP settings
One of our favorite features in the Export Settings dialog and Adobe Media Encoder is the built-in FTP functionality. Instead of having to depend on a third-party FTP tool, file transfer controls are available directly from the FTP Settings tab so you can export a file to an FTP site. This comes in handy for us all the time because we produce a lot of Web video. Having an encoded file go directly to an FTP site saves a bunch of time versus manually having to upload the file after the compression stage.
Additional Options
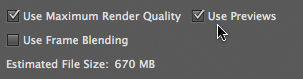
There are a few more options that are worth your time. Towards the bottom of the right side of the Export Settings dialog are several additional controls (FIGURE 15.13):
• Use Maximum Render Quality. With this option selected, you’ll get the highest-quality file, but be warned; it greatly slows down encoding and definitely requires a high-performance system with a large amount of RAM.
• Use Previews. This option is only available if you’re encoding sequences from Adobe Premiere Pro. If you’ve already rendered part of your entire sequence (effects, motion settings, etc.), you can utilize those renders in the resulting output. This greatly speeds up encoding times. However, don’t use this option for final output as it uses low quality previews. It’s a good choice for test renders and quick outputs.
• Use Frame Blending. If your source footage doesn’t match your output frame rate, you can toggle on Frame Blending to blend frames for smoother motion. This option significantly adds to the render time but is very useful when converting frame rates.
Figure 15.13. The additional options at the bottom of the Export Settings dialog can improve the quality (Use Maximum Render Quality) and speed (Use Previews) of an export.
More About Metadata
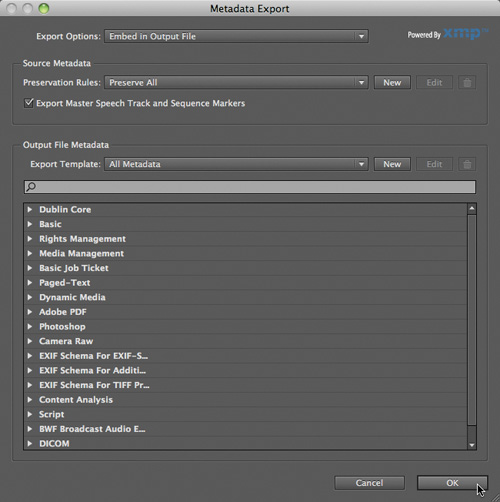
Metadata (or data about data) is an essential way to include additional information about a clip or sequence. Metadata can include copyright information for a file, program information that helps a viewer browse content, or event material for search engines. In the Export Settings dialog, by clicking the Metadata button at the bottom, you can customize metadata to an amazing degree. Several options are available in the resulting dialog (FIGURE 15.14). Let’s look at a few:
• Export Options. Using the menu in this option, you can embed metadata in the output file (this is subject to support by other applications), create a sidecar file (an .xmp file with the metadata info), embed and create a sidecar file, or choose not to include metadata.
• Source Metadata. Using the menu in this option, you can preserve all existing metadata in the exported file or exclude all. In addition, by clicking the New button next to the menu, you can create your own rule for what metadata should be included or excluded. You can also include the master speech track and sequence markers as metadata, which can aid other programs as well as possibly allowing search engines to better index the resulting file if it’s on the Web.
• Output File Metadata. In this section you can edit any of the existing metadata fields for a given category. You can search for specific metadata fields, and you also have the ability to create a metadata template that only uses the metadata sets and fields that you use most often. Just note that blank metadata fields are not included in the resulting output.
Figure 15.14. The Metadata Export dialog allows you to customize metadata (including altering existing metadata) for the exported file.
Exporting Files
After you’re done setting up your export, the next obvious step is to export the file. All you need to do is click the Export button. When you do, a dialog appears showing you the progress of the export along with an estimated completion time.
Another option that you have when exporting files is to add the file to the Adobe Media Encoder Queue (FIGURE 15.15). By choosing this option, you can send multiple clips and/or sequences to the Adobe Media Encoder Queue (Adobe Media Encoder will open). From the Queue you can further refine your settings. The benefit of this workflow is that you can load up several items and then walk away while your machine works. In fact, you can even keep working and let the encoding run in the background.
Figure 15.15. By clicking the Queue button in the Export Settings dialog in Adobe Premiere Pro, you can access the Adobe Media Encoder Queue. Adding files to the Queue is useful for when you need to export multiple formats at the same time.

Creating Flash Content
As a format, Adobe Flash has become ubiquitous on the Web, as well as for media-rich presentations and mobile devices. Because Flash is an Adobe product, creating Flash encoded video and audio is very easy using the Export Settings dialog in Adobe Premiere Pro (or by using the almost identical Adobe Media Encoder). In this section we’ll show you how to create Flash video files in Adobe Premiere Pro.
Choosing Between FLV and F4V
The first choice you’ll need to make after deciding to create Flash content is what type of Flash video you want to use. When creating Flash content, you have two choices: FLV or F4V. FLV and F4V are both container formats, meaning that they can contain video and audio of various sizes, frame rates, and even codecs. Here is a quick comparison of the two formats:
• FLV (Flash Video). This is the original Flash standard. In many ways it has been replaced with the newer F4V container. The file does offer the unique benefit of an alpha channel, which is helpful when compositing keyed video or graphics into an interactive Flash project.
• F4V. The main advantages of F4V are better streaming and metadata support. It also supports the newer codec H.264. This is a popular format for true video content on the Web, but it does require a relatively new version of the Flash plug-in for Web browsers.
Exercise Files for Exporting
![]()
If you’d like to export to FLV, F4V, DVD/Blu-ray, and H.264, feel free to use the project Ch15_export. prproj, which is located in Chapter Files > Chapter_15_Media > [Version Number].
For most of you attempting to create Flash content, F4V is the best option. But always check with your clients about their exact needs.
Using FLV and F4V Presets
By exporting content to FLV or F4V, you can create Flash-compatible files easily. Like all of the format options available in the Export Settings dialog, there are a number of FLV and F4V presets to choose from when creating flash content. Let’s take a look at using a Flash preset.
- With a sequence or clip selected, either in the Project panel or Timeline panel, choose File > Export Media. The Export Settings dialog appears.
Learn More About Flash Video

To learn more about interactive Flash Video, be sure to check out the book Flash for After Effects, After Effects for Flash (Adobe Press, 2009).
- In the Export Settings section, click the Format menu and choose either FLV or F4V (we prefer F4V in most cases). If you’re using the CS5 version of Adobe Media Encoder, FLV and F4V are grouped together.
Importing and Saving Flash Cue Points
You can easily embed Flash Cue Points while encoding an FLV or F4V file, but you can also import Flash Cue Points by clicking the Import Cue Points button above the Cue Points area. In addition, you can save cue points as an XML file for handoff to a Flash programmer by clicking the Save Cue Points button, which is also located above the Cue Points area.
- In the Preset menu choose the setting that best matches your needs.
You can of course customize a chosen preset to better fit your needs. Be sure to check out Video #51 for more information on customizing an FLV or F4V preset.
If you choose FLV or F4V, you can create Flash Cue Points. There are two types of Flash Cue Points. Navigation Cue Points can be used as a way to let viewers navigate to that part of the video, similar to a chapter marker on a DVD. Event Cue Points trigger an ActionScript so that something else happens in a Flash presentation. For example, when the video hits an Event cue point, you could have another Web browser window open up with content that is germane to the video content.
Creating FLV and F4V Presets

Check out this video for more information on creating a custom FLV and F4V preset and using Flash Cue Points.
- Under the video preview on the left side of the Export Settings dialog, you can add Flash Cue Points (FIGURE 15.16). Navigate to the part of the video you want to add the cue point to, and then click the plus button above the Cue Points area. After you’ve added a cue point, in the Type column select the type of cue point you desire (Navigation or Event).
Figure 15.16. When exporting FLV or F4V files, you have the ability to embed Flash Cue Points in the file, which can aid in user navigation or trigger action scripts (written by a Flash programmer) from the cue points.

- After you’ve selected a preset and optionally added Flash Cue Points, click the Export button at the bottom of the Export Settings dialog to export your sequence or clip.
Creating H.264 Content for Devices and Web Delivery
Video and audio are increasingly mobile. Chances are, if you’re like most people, you consume content on the Web every day. You probably also use a device like an iPod or mobile phone to watch content. In this section we look at using presets available from Adobe to create content tailored to different devices, as well as the Web.
Using H.264 Presets for Devices
If you’re anything like us, your life is full of devices like iPads and Droid phones, TiVos, and more. Fortunately, creating files suitable for devices like these is easy thanks to a number of presets available from Adobe, as well as tight integration with Adobe Device Central. Let’s look at exporting an H.264 file for a device.
- With a sequence or clip selected, either in the Project panel or Timeline panel, choose File > Export Media. The Export Settings dialog appears.
Using H.264 Presets for Vimeo and YouTube
The video sharing sites Vimeo and YouTube have become so popular that we’d bet you probably view content from these sites every day. Although Vimeo and YouTube can take most files and recompress them to H.264 files, the compression schemes they use can degrade video quality. In most circumstances it’s best to give those Web sites a high-quality H.264 file to use.
- In the Export Settings section, click the Format menu and choose H.264.
- In the Preset menu choose the preset that matches the device you’re trying to export to (FIGURE 15.17).
Figure 15.17. When you choose H.264 as a format, the Preset menu contains many presets, such as those for Vimeo, YouTube, and Apple TV devices.

Creating H.264 Presets

Be sure to check out this video for more information on how to customize H.264 presets for devices and for the Web and sharing sites like YouTube and Vimeo.
Although you can customize settings for a preset by using the panels in the middle of the Export Settings dialog, we recommend caution here when creating content for devices. Most portable media players and phones have very strict rules on data rate and other options. Deviating from the preset can create incompatible files. Be sure to check out Video #52 for more information about customizing H.264 presets for devices.
- After you’ve selected a preset, click the Export button at the bottom of the Export Settings dialog to export your sequence or clip.
Many devices, such as mobile phones, use a standard called 3GPP (Third Generation Partnership Project) for mobile video and audio. If you choose H.264 as the format to encode your project with, you’ll notice several 3GPP presets to choose from in the list of presets.
Like other presets, you can customize settings. But here is the cool part: Adobe Creative Suite Production Premium includes an application called Adobe Device Central. Using Device Central, you can preview (FIGURE 15.18) how video content will be displayed on various mobile devices. You can even simulate how the video will look on the screen.
Figure 15.18. Adobe Device Central allows you to preview how audio and video will be presented on a mobile device like a phone. If your content will end up on a mobile phone, consider Device Central an essential part of your output workflow.

If you choose a 3GPP preset under the Output Name and next to the options to Export Video and Export Audio, there is an option to Open in Device Central. By selecting this option, Adobe Device Central will automatically open after encoding of the file is complete. From there you can choose a mobile device, preview, and customize how content will be displayed on that device.
Just keep in mind that Device Central is not just for 3GPP files. You can preview how your H.264 file will look on other devices like an Apple iPad. If you want, you can also send a video file to After Effects where you can accommodate for nonstandard cropping due to unusual screen sizes on many phones.
Using H.264 Presets for General Web Delivery
When posting files to our own Web sites and blogs, we’re big fans of using H.264. This modern codec produces super high-quality results at relatively small file sizes. The key here is to experiment and try pushing the data rate down as much as possible. Let’s use an H.264 preset for general Web delivery.
- With a sequence or clip selected, choose File > Export > Media. The Export Settings dialog appears.
- In the Export Settings section click the Format menu and choose H.264.
- In the Preset menu choose any of the HDTV or NTSC/PAL presets that are appropriate for your project.
Using Device Central

Check out this video to learn more about utilizing Device Central to help you preview files on different mobile devices.
- As with other presets, you can customize settings to tailor the video and audio for a specific need. Our recommendations are to try lowering the data rate and even shrinking the window size to reduce delivery sizes. Remember that you can preview how your file will look in the Output panel in the Export Settings dialog.
- After you’ve selected a preset, click the Export button at the bottom of the Export Settings dialog to export your sequence or clip.
Publishing to DVD and Blu-ray
Let’s face it, DVD delivery as a final distribution method and for exchange of cuts has become as common as VHS tape back in the day. The relative high-quality of a DVD along with the interactivity and additional playback options (surround sound audio, subtitles, etc.) make it a very attractive choice for publishing your project. The one downside of DVD is that it’s standard definition.
AVCHD Discs
![]()
It is possible to place AVCHD encoded video onto standard DVD discs to play back HD material. This does require a supported set top player.
Enter Blu-ray. Although Blu-ray’s start as a distribution format was initially slow, it’s quickly becoming the format of choice for content producers and postproduction professionals. The best part? Content can be encoded at HD resolution.
It’s outside of the scope of this book to cover the authoring in full using applications like Adobe Encore. But you can encode video and audio for DVD and Blu-ray by using Adobe Premiere Pro and Adobe Media Encoder. In the sections that follow you’ll learn about using presets for DVD and Blu-ray.
Blu-ray Burners
![]()
To author a Blu-ray Disc, you’ll need a Blu-ray burner. Many Windows machines come with Blu-ray burning capabilities, but sadly, Mac computers do not have built-in Blu-ray burners. If you don’t have an internal Blu-ray burner on your machine, you can install one or get an external unit. We highly recommend the burners sold by Other World Computing (OWC). Check out OWC on the Web at www.macsales.com.
Using MPEG-2 Presets for DVD
As with other formats, Adobe has provided presets for DVD encoding directly through the Export Settings dialog in Adobe Premiere Pro, as well as in the stand-alone Adobe Media Encoder application. The Adobe Media Encoder uses the popular Main Concept encoder for MPEG-2 and is well regarded by professional compressionists. Here’s how to use these presets.
- With a sequence selected in Adobe Premiere Pro, either in the Project panel or Timeline panel, choose File > Export > Media.
- In the Export Settings area of the dialog, click the Format menu and choose MPEG2-DVD.
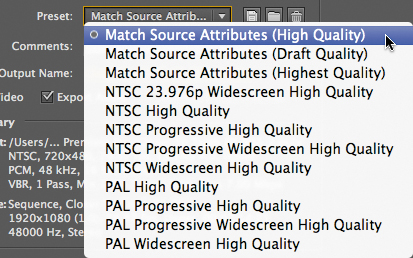
- In the Preset menu the default choice is Match Source Attributes (High Quality). Notice that there are other Match Source options here too with different quality levels (FIGURE 15.19). Choosing one of these presets is a good choice because a lot of the guesswork over quality, frame rate, field order, and pixel aspect ratio are automatically chosen for you. If you need to fit more content onto a disc, consider one of the lower-quality settings.
Figure 15.19. Adobe includes quite a few useful presets for creating files compatible with DVD authoring that vary the quality of the output file depending on your needs.
Creating an MPEG-2 Preset for DVD

Using presets can only get you so far. Check out this video for more information about creating your own custom preset for DVD-compatible files.
You can also choose from any of the other NTSC or PAL presets. Keep in mind that by choosing one of these presets, all the quality controls and other settings available on the tabs towards the bottom of the dialog change.
- After choosing a preset, you can of course tweak settings using the tabs and controls in the Export Settings dialog. Be sure to check out Video #54 for more about creating a custom preset.
- After you’ve selected a preset, click the Export button at the bottom of the Export Settings dialog to export your sequence or clip.
Choosing Between MPEG-2 and H.264 for Blu-ray
If you’ll be publishing your project to a Blu-ray Disc, you have two choices as to how the video will be encoded: MPEG-2 or H.264. Like its DVD predecessor, Blu-ray strives to be somewhat backward compatible with support for MPEG-2 (DVDs support both MPEG-2 and the older MPEG-1).
With that said, when creating a Blu-ray Disc, in almost every scenario H.264 is a better choice. Generally, H.264 encoded media will be of better quality compared to MPEG-2 at the same bitrate. In addition, because H.264 is a more efficient codec, you’ll actually be able to fit more content on a disc given the same bitrate between encoding standards. However, one downside of encoding footage as H.264 is processing time. We’ve found that it can take quite a bit more time to encode H.264 for Blu-ray compared to MPEG-2 for Blu-ray.
Even though we’re big fans of H.264 encoded media for Blu-ray, the choice is ultimately yours. Try encoding media using both standards to evaluate which you prefer in terms of quality and size.
Using an H.264 Preset for Blu-ray
If you’ll be publishing your project to Blu-ray, you’ll most likely use the H.264 for Blu-ray format. As with other formats, Adobe has provided a number of presets that you can use to create H.264 files that will work on a Blu-ray Disc. Let’s take a look at using an H.264 preset for Blu-ray.
- With a sequence or clip selected, choose File > Export > Media.
- In the Export Settings area of the dialog, click the Format menu and choose H.264 Blu-ray.
Creating an H.264 Preset for Blu-ray

Check out this video to learn how to create a custom H.264 preset to create files suitable for Blu-ray.
- In the Preset menu the default choice is Match Source Attributes (High Quality). We find that choosing a Match Source Attributes preset is a good choice in most situations.
- You can also choose from any of the other presets (FIGURE 15.20) that best match your source. Just keep in mind that the 1440 × 1080 presets are geared to sources like HDV and XDCAM that use a non-square pixel aspect ratio.
Figure 15.20. When working with sources that use non-square pixel aspect ratios, Adobe has provided several Blu-ray presets to work with these sources.

DVD and Blu-ray Authoring with Adobe Encore

Check out this video to learn the essentials of authoring interactivity for a DVD and Blu-ray Disc using Adobe Encore.
- After choosing a preset, you can of course tweak settings using the tabs and controls in the Export Settings dialog. Be sure to check out Video #55 to learn more about creating an H.264 for Blu-ray preset.
- After you’ve selected a preset, click the Export button at the bottom of the Export Settings dialog to export your sequence or clip.
Exporting Additional File Types
A lot of one-person shops exist, but when it comes to postproduction, for many, it’s a collaborative affair. Quite often you’ll need to exchange files and projects with different people to keep the post pipeline moving forward. Whether it’s a colorist, an audio mixer, or another editor on a different platform, you’ll often need to send others files that they can work with. Fortunately, Adobe Premiere Pro is up to the task.
Edit Decision List (EDL)
Edit Decision Lists (EDLs) are a common yet antiquated way of exchanging information between different platforms. Originally designed in the days of linear video editing, EDLs are still typically used to exchange information between edit systems, to provide a list of edits from a master file or tape to another creative, and even to provide a network (for legal purposes) the ability to go back and find a source tape due to a legal challenge for a particular show. Exporting an EDL is easy using Adobe Premiere Pro.
- With a sequence selected, choose File > Export > EDL.
- In the dialog that opens (FIGURE 15.21) you can name the EDL as well as choose from several additional options for formatting the EDL, such as selecting the starting timecode and which tracks to export.
Figure 15.21. When you export an EDL, you can customize the settings for the EDL. Be sure to check with the recipient of the EDL to make sure your settings are compatible with the application that person is using.

Just keep in mind that it’s always a good idea to check with your client or broadcaster for the correct formatting of the EDL. There are several options, and they vary greatly (especially for older hardware systems).
Open Media Framework (OMF)
Open Media Framework (OMF) has become the standard way of exchanging audio information between systems. Most often, OMF is used to send the audio from a project to a dedicated Audio Mixer. A good way to understand OMF is to compare it to a Zip file. Usually, when you export an OMF, a single file of all your audio tracks is created. Then, when the Audio Mixer opens the OMF in a dedicated audio system, all of the tracks open just as they were in your Adobe Premiere Pro project. To export an OMF file, follow these steps.
- With a sequence selected, choose File > Export > OMF.
- In the dialog that opens (FIGURE 15.22) you can name the OMF as well as assign a sample rate and bitrate.
Figure 15.22. OMF is a standard exchange format file type. When you export an OMF, a dialog allows you to configure the settings the OMF will use.
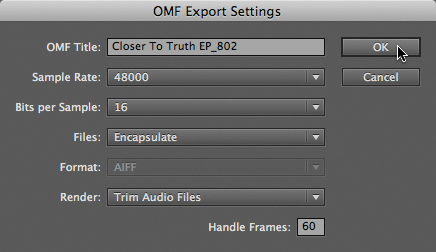
You can also encapsulate (include all media in a single file) or export audio as separate files. Most often, files are encapsulated. In addition, you can use the complete audio files or trim files so only what you’re using on the sequence is included in the OMF. If you choose to trim files, you can include handles. We recommend that you include 1–2 seconds of handles.
As with other exchange formats, always check with the recipient of the handoff to make sure settings are compatible with that person’s application.
Advanced Authoring Format (AAF)
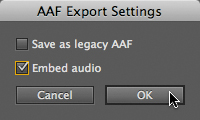
AAF, like XML, EDL, and OMF, is another way of exchanging project information and media between applications. The cool thing about AAF is that it is a relatively modern exchange format and therefore supports several features that other exchange files don’t. Choose File > Export > AAF to export an AAF of a selected sequence. In the dialog that appears (FIGURE 15.23) you can save the AAF as a legacy file, which is compatible with more systems, as well as embed audio into the AAF.
Figure 15.23. When exporting an AAF file, you have a couple of options as to how to configure the AAF. Be sure to check with the recipient of the handoff to see if that person prefers embedded audio in the AAF.
You can then import the AAF into a compatible application. Many professional video and audio applications support AAF including Avid and ProTools systems. So AAF can be a good format to use to exchange audio and video with users of those systems.
Final Cut Pro XML
Final Cut Pro has established itself as a popular postproduction editorial tool. Rather than create a closed ecosystem, Adobe has embraced that fact and has provided a versatile option for exchanging projects with editors using Final Cut Pro, and even iMovie!
Final Cut Pro X
![]()
Final Cut Pro X handles XML differently then previous versions of Final Cut Pro. Adobe had consistently updated its tools to ensure compatibility with Final Cut Pro. Be sure to check out adobe.com for new details as they emerge.
By using XML, you can easily export a sequence for use in Final Cut Pro. To do so, select a sequence and choose File > Export > Final Cut Pro XML. Then choose the location to which you want to save the XML file. Final Cut Pro editors will then need to import the XML file into their project. In fact, other tools, such as PluralEyes for audio syncing and editing tools from Grass Valley, also rely on Final Cut Pro XML to exchange data.
Next Steps
The DVD for this book contains several PDF appendixes of extra content we wanted to share. We encourage you to check out these PDFs for added information on how to get more out of Adobe Premiere Pro and the Creative Suite. As with other software packages, it’s through your own exploration of the application that you really start to gain mastery of it. If you hit some speed bumps along the way, notice a missing feature, or see a feature you’d like to see improved, Adobe is listening. You can submit feedback to Adobe from within Adobe Premiere Pro by choosing Help > Adobe Product Improvement Program.
While writing this book, we’ve had a lot of fun exploring this fantastic application, and we encourage you to keep looking for new ways to get your job done!