
Appendix A. Multicamera Editing
Today, people are shooting with more than one camera, and there are lots of reasons for this. It might be to create a talk show or television series. Perhaps it’s a time-saving technique to make it easier to keep cutaways in sync. Or, it might be to show what’s happening across the stage in a concert film.
Fortunately, Adobe Premiere Pro supports multicamera editing. The process is very much like the live switching that occurs in mobile studios and newsrooms. The end result is a video that closely mirrors the live television experience where all angles are in perfect sync.

Music and performance by The Nadas: www.thenadas.com.
The Multicamera Process
If you decide to edit multicamera material, the workflow is very standardized. Footage is ideally shot in synchronicity using a slate that provides a sync point. Alternatively, jammed timecode can also be used. Once you have your footage loaded into Adobe Premiere Pro, there are really only six stages to complete.
- Determine the sync point. You need to find a common sync point between all of your clips.
- Add clips to a sequence. The media can come from almost any camera that Adobe Premiere Pro can recognize. You’ll add clips and align them in the Timeline.
- Synchronize clips. Clips can be aligned precisely in the Timeline based on multiple criteria. You can use timecode or points marked inside the clips.
- Create the multicamera target sequence. The process of creating a multicamera sequence involves nesting the angles first.
- Record the multicamera edits. A special panel called the Multi-Camera Monitor lets you switch between camera angles.
- Adjust and refine edits. Once the edit is roughed out, you can refine the sequence with standard editing and trim commands.
Determine the Sync Points
Depending on how your footage was shot, there are many ways it can be synced. In a perfect world (or at least one with a sizeable production budget) the clips could be synced based on shared timecode. Other options include the use of a clapboard or an electronic slate. You can also use markers placed on an easy-to-spot area to identify sound or a keyword.
- Launch Adobe Premiere Pro.
- Choose File > Open, navigate to Chapter Files > Appendix_A_Media > [Version Number], and open the project Multicam_Start.prproj.
- Load your first angle (Camera 1) into the Source Monitor panel.
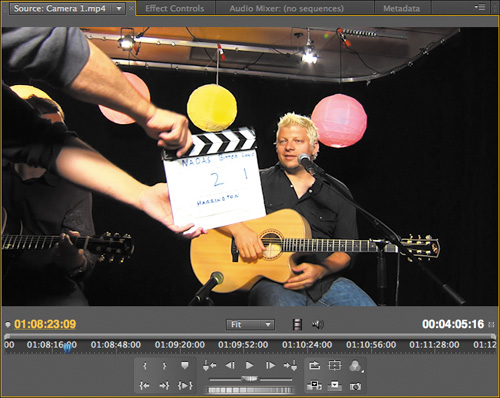
- Watch the clip and look for a sync point.
In this clip, it is the close of the clapboard (FIGURE A.1).
Figure A.1. The use of a film slate is a classic syncing tool that works well for multicamera shoots. Music and video courtesy of The Nadas (www.TheNadas.com) and Authentic Records (www.AuthenticRecordsOnline.com).
Music and performance by The Nadas: www.thenadas.com.
- Place the current-time indicator on the sync point.
If your sync point is audio, click the Output button and switch to the Audio Waveform view.
- Choose Marker > Clip Marker > Set Other Numbered. Enter 1 for the first marker, and click OK (FIGURE A.2).
Figure A.2. You can assign any number of markers that you want, which allows for syncing several angles in the same sequence.

- Repeat the preceding steps for all other angles. Use the same number for all clip markers (in this case, 1).
Add Clips to a Sequence
When editing multicamera sources in Adobe Premiere Pro, you can combine any type of media. Unlike other editing applications, you do not need to have the same footage for each angle. You can mix frame rates, frame sizes, and even codecs if needed. With that said, the best multicamera shoots attempt to match cameras as closely as possible.
Four Is the Magic Number
![]()
Video and audio clips located above track four will not be used for multicamera editing. The best solution we can recommend when tackling more than four angles is to utilize multiple sequences to create nested clips, and then combine them into a new sequence.
The clips must be loaded into a sequence. The only restriction in Adobe Premiere Pro when it comes to multicamera editing is that it’s limited to four angles. Although this is more than adequate for most projects, it is important to realize this potential barrier. You can also place more than one clip on a track if you have multiple clips for an angle (such as a concert film where each song may be its own clip).
- Choose File > New > Sequence. Choose a sequence preset that matches your primary editing format. You can also drag a clip onto the New Item icon to create a sequence that matches the settings of your first clip (FIGURE A.3).
Figure A.3. Dragging a clip onto the New Item icon is the fastest way to create a new sequence that matches all settings of the dragged clip.

- Name the sequence Aligned so it’s easy to keep track of.
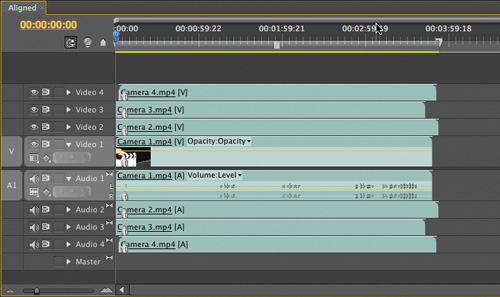
- Place angle 1 on track 1 for both the audio and video.
- Continue adding angles 2, 3, and 4 to their respective tracks (FIGURE A.4).
Figure A.4. When you run out of tracks, just drag to the empty area above the last track. Adobe Premiere Pro will automatically make a new track.

Synchronize Clips
The marker method is the second-easiest method for syncing (after matching timecode). It is easiest to add markers before a clip in the Timeline panel. If you’ve already added a clip, double-click it to load it into the Source Monitor panel. This will allow you to quickly hear just the audio for the individual track (without having to disable and mute several layers).
A Useful Sync Utility
![]()
If you need to sync layers frequently, PluralEyes from Singular Software (www.singularsoftware.com) is immensely useful. It can analyze the audio on multiple tracks and then align the video clips.
- Click in the Timeline panel.
- Choose Edit > Select All or press Command+A (Ctrl+A).
Syncing Overwrites

If you have multiple clips in each track, leave an initial gap. The reason is that the Synchronize command will perform an Overwrite edit.
- Target one track (by clicking its header) to specify which track others should align to.
Clips on the nontargeted tracks may be trimmed by the synchronize process.
- Choose Clip > Synchronize (FIGURE A.5), and then select one of the following options:
• Clip Start. Synchronizes clips based on their In points in a sequence.
• Clip End. Synchronizes clips based on their Out points in a sequence.
• Timecode. Synchronizes clips to the specified, matching timecode. You can also select the Ignore Hours option of you’ve used the Hours field as a camera designator.
• Numbered Clip Marker. Uses the numbered markers that have been added to the clip.
Figure A.5. For this exercise, select the Numbered Clip Marker option and then choose to use Marker 1 from the Marker menu.

- Click OK to sync the clips (FIGURE A.6).
Figure A.6. Some of the synced clips’ initial frames may be trimmed when you sync. If you need to avoid this, leave empty space before and after the clips in a sequence.
Create the Multicamera Target Sequence
Now that the clips are aligned, it’s time to nest the four tracks into a nested sequence. Nesting will collapse the video and audio to a single track.
- Select the sequence called Aligned in the Project panel, and drag the selected sequence onto the New Item icon to create a new sequence with the multicamera clips nested inside (FIGURE A.7).
Figure A.7. Similar to the way you can drag clips, dragging a sequence onto the New Item icon also works.
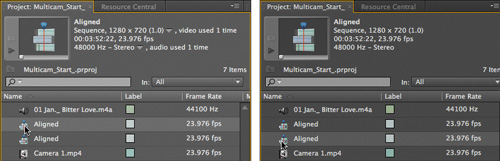
The new sequence has the same name. You can tell which one is nested by looking at the Usage indicators at the top of the Project panel (FIGURE A.8).
Figure A.8. The item on the left is the nested item; it shows that it’s been used one time. The screen on the right shows the new target sequence selected (which must be renamed).
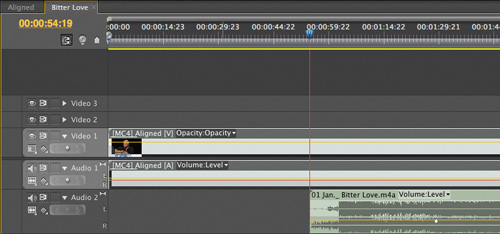
- Rename the newly created sequence (not the nested one). In this case, call the sequence Bitter Love, which is the name of the song performed by The Nadas (www.thenadas.com).
- Select the video and audio tracks in the nested sequence and choose Clip > Multi-Camera > Enable.
- Move the current-time indicator to around the 50:00 mark in the Timeline panel. Listen closely for the first beep. The start of the song should be at 55:00.
You may need to turn up the volume of your speakers or boost the volume of the nested track to hear the first note. The song is preceded by three beeps to count the musicians into the track.
- Load the clip 01 Jan._ Bitter Love.m4a.
- Edit the professional recording into the Timeline panel so it syncs with the temp track (FIGURE A.9). You can also look for the start of the musicians playing to help as a visual cue.
Figure A.9. After you’ve placed the music, try listening to both tracks first, and then isolate the professional recording by disabling Audio 1 track.
Music and performance by The Nadas: www.thenadas.com.
You may need to nudge the audio clip a few frames left or right to properly sync it. You can easily hear the sync by playing back your Timeline. The 2:00:00 mark is a good place to check sync.
- When you’re satisfied, disable Audio 1 so you only hear the professionally recorded song on Audio 2.
- Lower the volume on the music track to appropriate levels for video.
- Save your project to capture your progress.
If you need to check your progress or catch up, you can open the file Multicam_Synced.prproj.
Record the Multicamera Edits
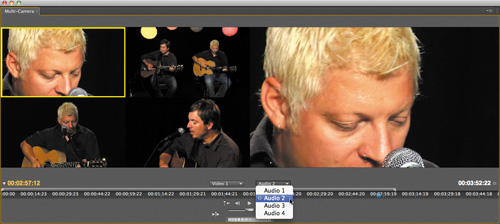
To edit your multicamera angles, you’ll use the Multi-Camera Monitor panel. This panel lets you play back the footage from each camera angle at the same time. It also provides a preview of how the final edited sequence will appear.
- Open the Multi-Camera Monitor panel by choosing Window > Multi-Camera Monitor.
- In the Multi-Camera Monitor, click the down-pointing triangle next to Video 1 to open the Select Video Track menu. Be sure to select Video 1.
Click the Select Audio Track menu and choose Audio 2 (FIGURE A.10).
Figure A.10. The Select Video Track and Select Audio Track menus let you specify where edits should occur.
- Resize the Multi-Camera Monitor by dragging a corner or an edge of the panel so it’s easy to see all the angles.
Enable recording
Once you have properly configured the interface, you can use the Multi-Camera Monitor panel to record your edits. These preview edits are made in the small window but will be converted into edits in the actual Timeline panel.
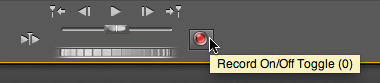
- Click the Record On/Off Toggle button in the Multi-Camera Monitor panel (FIGURE A.11).
Figure A.11. The Multi-Camera Monitor includes standard playback and transport controls (as well as corresponding keyboard shortcuts).
- Click the subpanel menu in the Multi-Camera Monitor panel (FIGURE A.12).
Figure A.12. The submenu of any panel is always located in the upper-right corner, and it controls features related to a panel’s function.

You can choose Audio Follows Video or leave this option deselected to use the audio from the source sequence. For this sequence, leave the option deselected.
- Move the current-time indicator to the start of the song.
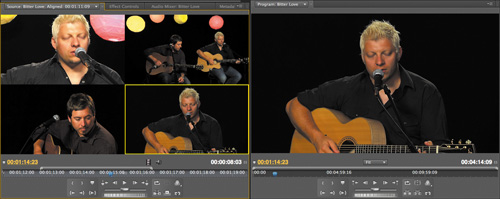
- Click on the wide shot to select the two-shot of the musicians (FIGURE A.13).
Figure A.13. The yellow border indicates that a shot is selected but that a recording is not in motion.
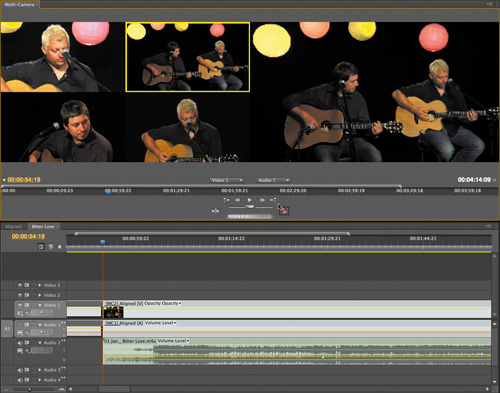
Music and performance by The Nadas: www.thenadas.com.
- Click the Playback button in the Multi-Camera Monitor panel. All four of the video angles start to play.
- Click the small footage preview in the Multi-Camera Monitor panel to select the angle you want active.
The point at which you click is registered as the edit point to switch angles. The red border indicates which angle is the active camera.
- Continue switching between the multiple angles until you reach the end of the song. You can use the keyboard shortcuts 1, 2, 3, and 4 to switch angles.
- When you’re done recording, click the Stop or Record button to turn off recording.
Rerecord multicamera edits
If you are unhappy with the recording, you can choose Edit > Undo. This will remove all of the edits in a single step. More likely, however, is that you might want to switch an angle that you’ve already recorded.
- If you want to make a second pass, you can reopen the Multi-Camera Monitor panel and click the Record button.
- When you’re ready, click the Play button.
- The angles will continue to switch and show a yellow border, indicating a preview.
- You can click the small thumbnail to rerecord an additional angle into your sequence. All edits made at this point will overwrite existing edits in the sequence.
- Click the Stop button when you’re finished.
You can stop at any time, and any existing edits in the sequence to the right of the current-time indicator will be preserved.
Adjust and Refine Edits
After you’ve finished the “rough” edit, you’re left with a standard sequence. At this point, you can easily swap footage between angles or trim using standard tools as needed.
- Close the Multi-Camera Monitor panel.
- Position the current-time indicator on the edit you want to swap.
- Double-click on the clip in the Timeline panel beneath the current-time indicator to load it into the Source Monitor panel (FIGURE A.14).
Figure A.14. The yellow border indicates the current angle.
Music and performance by The Nadas: www.thenadas.com.
- Click the preview angle that you want to use to switch the angle used.
- Use any of the standard editing tools to ripple or trim as needed.
Extend Previous Edit to Playhead (E) and Extend Next Edit to Playhead (Shift+E) are very useful shortcuts when cutting music-driven sequences.
- Add any transitions as desired to finish the edit.