
Chapter 12. Essential Effects
If you talk to ten editors and ask them for their top ten effects, you’ll likely end up with a 75-item list. The reason is because there are a lot of strong opinions as well as varied needs that drive the use of effects by video editors. Depending on the genre you edit, effects can range from simple blurring to more elaborate effects, such as complex keying and compositing.
Fortunately, Adobe is well known for its visual effects capabilities. Adobe Premiere Pro has a versatile effects engine. Making tasks even easier is the close relationship between Adobe Premiere Pro and Adobe After Effects. In this chapter you’ll learn some of the most commonly requested effects you’ll be expected to generate.

The Role of Effects
Ultimately, you want to make postproduction run as smoothly as possible, minimizing delays and unexpected costs. Adobe Premiere Pro is known for its speed thanks to the Mercury Playback Engine. Fortunately, a well-tuned system will add speed boosts to other applications in the Creative Suite as well. As an editor, you know there are important workflow considerations when it comes to approaching effects:
• Solo or team? If you are the only postproduction person on the project, you have a lot of flexibility to determine your own workflow. If you’re part of a team, you’ll need to balance your needs with others on the project.
• Pure Adobe workflow? Thanks to technologies like Dynamic Link and the Edit Original command, you have many more workflow options. Because you can seamlessly jump back and forth between After Effects and Adobe Premiere Pro, you can integrate effects throughout the editing process.
• Third-party tools? Certain effects may be critical to your finished project. Although Adobe Premiere Pro and After Effects have a great deal of similar effects, there is hardly feature parity. Your workflow may be impacted by requirements for third-party filters and effects.
Effects in Adobe Premiere Pro
When it comes to video affects, the choices in Adobe Premiere Pro can be a bit overwhelming. You’ll find more than 100 effects built into the application with far more available via third-party plug-ins. It’s important to have a clear understanding of how Adobe Premiere Pro treats the use of effects.
Additional Control
![]()
You may find it easier to modify the Fixed (also called intrinsic) effects using dedicated panels like the Program Monitor, Timeline panel, and Audio Mixer. These panels offer precise controls, large interfaces, and visual feedback for adjusted properties.
Fixed effects
Every clip that you edit into e sequence already has certain Fixed effects preapplied. Fixed effects can be thought of as controls for the standard geometric, opacity, and audio properties that every clip should have. All Fixed effects can be modified using the Effect Controls panel.
Here are the default effects (FIGURE 12.1) that are preapplied to clips in the Timeline:
• Motion. The Motion effect allows you to animate, rotate, and scale a clip. You can also use advanced Anti-flicker controls to decrease shimmering edges for an animated object.
• Opacity. The Opacity effect lets you control how opaque or transparent a clip is. Additionally, you can access multipurpose blending modes to create special effects and real-time composites.
Blending Modes = Designer’s Secret
![]()
Motion graphics designers use blending modes all the time to create attractive effects as well as useful composites. The best thing about them is that Adobe Premiere Pro can use them in real time. There’s no need to render to see results, so be sure to try them.
• Time Remapping. This property lets you slow down, speed up, or reverse playback, or even freeze a frame. We explored its uses in Chapter 7, “Additional Editing Skills.”
What’s the Chain?
![]()
Any Fixed effects are applied after standard effects are added (those in the Effects tab). You can reorder standard effects by dragging them up or down in the list, but you can’t reorder Fixed effects. This can cause problems because effects might be scaled after another effect is applied.
• Volume. If an edited clip has audio, the Volume effect is automatically applied. You can use the effect to control the volume for the individual clip.
Figure 12.1. The Fixed effects are applied to each clip. For video, these control the Geometry and Speed aspects of the selected clip.

Effects browser
With more than 100 effects, there’s quite a bit to choose from in the Video Effects group. To start, effects are grouped into 16 standard categories (third-party effects may add more choices). These categories group the effects into logical tasks such as Color Correction, Keying, and Time. This makes it easier to choose which ones you want to apply.
Need to Break the Chain?
![]()
You can’t reorder Fixed effects, but you can bypass them and use other effects that are similar. For example, you can use the Transform effect instead of the Motion effect or the Alpha Adjust effect instead of the Opacity effect. Although these effects are not identical, they are a very close match and behave similarly. You may choose to use them when you need to reorder effects that perform these actions.
No Effects Menu?
![]()
Unlike Final Cut Pro, there’s no Effects menu to browse. We recommend keeping the Effects panel open. You can also press Shift+7 to quickly select it.
Copy and Paste Attributes
![]()
Have an effect you like? Just right-click on a clip and choose Copy. You can now select another clip (or range of clips) and right-click again. This time choose Paste Attributes to apply just the effects.
To search for an effect, you can simply type its name into the Search field in the Effects panel. You can also twirl open a category folder to see its contents. As you work through the options, you’ll notice several icons next to many of the effect names (FIGURE 12.2). Knowing what these icons represent will influence which effects you choose:
• GPU-accelerated effects. These effects can take advantage of a certified graphics card to accelerate rendering. Thanks to CUDA and the Mercury Playback Engine, these effects often offer real-time performance and only need rendering on final export.
• High-bit-depth effects. Certain effects support a higher bit depth than traditional video effects (which only offer the standard 8-bits per channel video). These effects are best suited for video shot with 10- or 12-bits per channel codecs (such as RED or ARRI) or to maintain greater image fidelity when multiple effects are applied. Additionally, 16-bit photos or After Effects files rendered in 16- or 32-bits per channel color space can take advantage of high-bit-depth effects. Make sure your sequence has the Maximum Bit Depth video-rendering option selected in the New Sequence or Sequence Settings dialog.
Figure 12.2. The icons denote the special functions of each effect. The first icon is GPU acceleration, the next indicates that an effect supports 32-bits per space, and the last means an effect is optimized for processing YUV video without shifting color.

Stay True to 32
![]()
When using 32-bit effects, try to stick with all 32-bit effects in the chain for maximum quality. If you mix and match, the effects will have to switch back to 8-bit space to process, which reduces the fidelity.
• YUV effects. For most effects that rely heavily on color, Adobe Premiere Pro offers YUV-enabled effects filters. Effects in Adobe Premiere Pro process in the RGB space, which can make adjusting exposure and color difficult. The YUV effects break down the video into a Y (or luminance) channel and two channels for color info (without brightness). These filters make it easy to adjust contrast and exposure without shifting color.
When Is YUV Not YUV?
![]()
It turns out that the YUV effects don’t actually work in YUV. Instead, they function in the more accurately named YCbCr color space. The YUV naming is simpler to say and is frequently used (although technically inaccurate).
Using effects presets
If you create a custom setting effects filter that you like, you can save it as a preset. You can also save a combination of multiple effects. If your effect uses keyframes (such as an animated blur), those will also be stored with the preset. This can significantly improve speed and consistency.
Get Organized
![]()
You can create new bins by clicking the New Custom Bin button at the bottom of the Effects panel. Nest bins together and use descriptive names to create a collection of organized presets.
One of the most common uses for presets are in color correction tasks where a preset is saved for an instance of a subject. Presets can come in handy for stylized looks and special effects as well.
You’ll find a collection of built-in presets in the Presets bin (FIGURE 12.3). If you twirl open the folder, you’ll find numerous nested folders. These contain effects that are ready to use. To use a preset, just drag it onto a clip in the Timeline. You can also select multiple clips in the Timeline to affect several clips at once.
Figure 12.3. Be sure to twirl open each effect preset category to fully explore the many choices available.

You need to follow a few rules to apply presets:
• If no clips are selected in the Timeline, only the targeted clip is affected when you drag and drop the preset.
• If a selection is made but you drop the preset on a nonselected clip, the targeted clip and any linked track items become selected (whereas the originals are deselected). The preset is only applied to the targeted clip (and linked track items).
• If there are clips selected in the Timeline and the targeted clip is part of the selection, the preset will affect all of the selected clips when you drop it on.
Saving effects presets
Although there is a good assortment of effect presets to choose from, you’ll ultimately want to create your own. This process is easy and creates a preset file that you can easily move between computers. The process comes down to selecting exactly what you want.
- Select a clip in the Timeline panel that has one or more effects with customized settings that you want to store as a preset.
- Switch to the Effect Controls panel. Select one or more effects that you want to store by Command-clicking (Ctrl-clicking) (FIGURE 12.4).
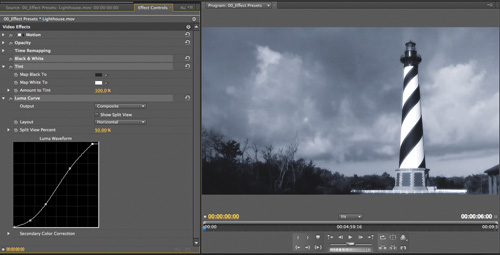
Figure 12.4. A custom color grade was created here for a high-contrast duotone with a cool blue tint. This can be stored as a preset for future use.
- Click the Effect Controls panel submenu and choose Save Preset (FIGURE 12.5).
Figure 12.5. To store a preset, click the submenu in the upper-right corner of the Effect Controls panel and choose Save Preset.

- Give the preset a descriptive name.
A Better Drag

If you drag an effect preset to the Effect Controls panel, you’ll have better control over standard effects. You can precisely position the presets within the processing order (hierarchy) as needed.
- Choose one of the following preset types to specify how Adobe Premiere Pro should handle keyframes in a preset:
• Scale. Proportionally scales the source keyframes to the length of the target clip. Any existing keyframes on the original clip are deleted.
• Anchor to In Point. Preserves the position of the first keyframe as well as the relationship of other keyframes in a clip. Other keyframes are added to the clip relative to its In point.
• Anchor to Out Point. Preserves the position of the last keyframe as well as the relationship of other keyframes in a clip. Other keyframes are added to the clip relative to its Out point.
- Click OK to store the effected clip and keyframes as a new preset (FIGURE 12.6).
Figure 12.6. Be sure to give the effect a unique name and accurate description. When you mouse over the preset in the Effects panel, the description will display as a tooltip.

Removing effects
If you change your mind about an effect, it’s easy to remove. You can get rid of them one at a time, or take a more aggressive approach and remove them from several clips.
To remove an individual effect:
- Select a clip in the Timeline panel.
- In the Effect Controls panel, select the effect you want to remove.
If you want to select multiple effects, hold down the Command (Ctrl) key as you click.
- Press the Delete or Backspace key.
You can also remove all effects from one or more clips at once:
- Select one or multiple clips in the Timeline panel.
- Choose Clip > Remove Effects, or right-click a clip in the Timeline panel and choose Remove Effects.
The Remove Effects dialog opens (FIGURE 12.7).
Figure 12.7. Think about which effects you want to remove. You can remove all added video or audio effects as well as the Fixed (or Intrinsic) effects.
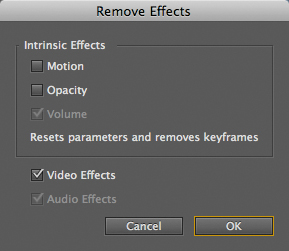
- Select the type of effects you want to remove and click OK. You can remove Intrinsic (Fixed) effects, which include Motion and Opacity, as well as any applied video effects.
All standard effects are removed, and Motion and Opacity can be reset to their default values.
Applying Effects in After Effects
As good as effects are in Adobe Premiere Pro, there’s no denying that After Effects is a powerful companion (hey, the word “effects” is in its name). Video editors and motion graphics artists have long relied on After Effects for its versatile compositing, robust keying, and footage enhancement effects. Thanks to the close relationship between Adobe Premiere Pro and After Effects, you can seamlessly integrate the two tools much more easily than any other editing platform.
Dynamic Link revisited
We’ve mentioned Dynamic Link a few times already in this book. It’s not that we like repeating ourselves, we just want to burn the term into your brain. Dynamic Link is revolutionary and will totally change how you approach working with media throughout the postproduction process.
Before Dynamic Link, you needed to render and export media to hand it off between two applications. This used disk space inefficiently and was very time-consuming. If you wanted to change an original asset, you needed to render and export it again. This resulted in many versions of assets to keep track of as well as all sorts of file-management challenges.
When you use Adobe Premiere Pro as part of the Production Premium or Master Collection, you gain the ability to create dynamic links between After Effects, Adobe Premiere Pro, and Adobe Encore (FIGURE 12.8). When working with After Effects, you will frequently send selected clips from Adobe Premiere Pro into After Effects as a composition or nested composition. The original clips in your Timeline are replaced with a dynamically linked After Effects composition.
Figure 12.8. Dynamically linked assets appear in the Project panel with unique icons and label colors to make them easier to identify.

Dynamic Link can join Adobe Premiere Pro and After Effects together in three ways. The first method lets you send clips from Adobe Premiere Pro to a new After Effects composition:
- In an open sequence, select the clips you want in an After Effects composition.
- Right-click any of the selected clips.
- Choose Replace With After Effects Composition.
A new composition is created and inherits the sequence settings from Adobe Premiere Pro.
The second method allows you to create a new, empty After Effects composition within your Adobe Premiere Pro project. This is useful when you need to create generated media, such as a background or title treatment.
- In Adobe Premiere Pro choose File > Adobe Dynamic Link > New After Effects Composition.
- If the After Effects Save As dialog appears, enter a name and location for the After Effects project, and click Save.
If After Effects is already running, it creates a composition in the current project. The new composition is named based on the Adobe Premiere Pro project name, followed by Linked Comp [#].
The third way to use Dynamic Link is to link to an existing composition that’s already been created in After Effects. This will ensure that you always have the latest version in your sequence that reflects any changes made in After Effects.
Here are several ways to create this link:
• In Adobe Premiere Pro choose File > Adobe Dynamic Link > Import After Effects Composition. Navigate to and select an After Effects project file (.aep), and then choose one or more compositions to import.
• Drag one or more compositions from the After Effects Project panel to the Adobe Premiere Pro Project panel.
• Drag an After Effects project file into the Adobe Premiere Pro Project panel. If the project has multiple compositions, the Import Composition dialog opens. Select the compositions you want to link.
Browsing After Effects animation presets
To get you started, After Effects offers several useful animation presets for treating footage as well as generating motion graphics content. To make tasks easy, After Effects lets you browse presets in the Effects & Presets panel. At the very top of the list is the Animation Presets folder. You can interact with these presets in a few ways:
• Open each folder. Twirl open the folder to view several categories. You’ll find a variety of options, including Backgrounds, Special Effects, Text Animations, and Transitions. To view the contents of a folder, just click the disclosure triangle next to a folder.
• Use the Search field. You can also enter a keyword into the Search field at the top of the panel to quickly find effects based on their name. If you want to save a search for easy recall, just Shift-click on its name. You can then click the magnifying glass to call up a list of saved searches.
• Browse with Adobe Bridge. If you’d prefer to visually browse the presets, you can turn to Adobe Bridge (FIGURE 12.9). Click the submenu in the upper-right corner of the Effects & Presets panel, and choose Browse Presets. Adobe Bridge launches, and you can navigate through folders to see icons for each preset. Click an icon to see a preview of the effect. If you double-click a preset, you will switch back to After Effects and the preset will be applied to the selected layer.
Figure 12.9. Browsing presets is easy with Adobe Bridge. It lets you view animated previews of each preset.

What Makes a Preset Tick?
![]()
If you want to see the controls that are being animated with an effect preset, simply press U or UU to reveal only the animated or modified layer properties. By seeing only the controls that are being used, it is easy to tweak the effect.
Applying effects and animation presets
It wouldn’t be After Effects if there weren’t multiple roads to the same destination. There are several ways to apply animation presets to your footage. In addition to the aforementioned Effects & Presets panel, here are a few more useful ways to get the job done:
• To apply an effect or animation preset to one or more layers, select the layers in the Timeline. You can then double-click the effect or animation preset in the Effects & Presets panel.
• To apply a recently used animation preset, select the layers in the Timeline. Choose Animation > Recent Animation Presets, and then choose the animation preset from the list.
• To reuse the most recently applied effect, select the layers and then press Command+Option+Shift+E (Ctrl+Alt+Shift+E).
• You can also copy effects from one layer to another. Select the effects in the Timeline panel or the Effect Controls panel, and choose Edit > Copy. You can then select the target layers and choose Edit > Paste.
Want More Presets?
![]()
You can browse and download several presets from the Adobe Web site by visiting www.adobe.com/go/learn_ae_cs3additionalanimationpresets. Most of the ones posted are free. This is also an excellent way to explore the larger After Effects community.
Saving After Effects presets
Using effect combinations designed by others is certainly useful, but nothing beats making your own (except saving time by storing your own creations for future use). After Effects makes it simple to store several properties into a preset (including animation).
- Select any combination of properties for a layer. These can include animation properties, like Position and Scale, or property groups, like Paint and Transform. You can also select any effects in either the Timeline or the Effect Controls panel.
- Choose Animation > Save Animation Preset.
- Name the preset and specify a location for the file.
- Click Save.
Where to Store Presets?
![]()
If you want an animation preset to appear in the Effects & Presets panel, it must be saved in the Presets folder. This folder is located in the Applications/Adobe After Effects CS5.5 folder on a Mac. For a Windows PC, navigate to Program FilesAdobeAdobe After Effects CS5.5Support Files. The correct location should be chosen by default when you save the preset.
Removing effects
To remove an effect is simple. You can click to select it in either the Timeline or Effect Properties panel. You can then press the Delete key to remove the effect. If you want to simply reset the effect’s controls, click the Reset hyperlinked text next to the effect’s name.
Don’t See Your New Presets?
![]()
If you’ve copied in new presets or saved your own, they may not show up in the Effects & Presets panel. Click the submenu in the Effects & Presets panel and choose Refresh List.
Understanding Keyframes
The concept of keyframing is very similar to you as an editor who’s used effects. The term has its roots in traditional animation where the lead artist would draw the keyframes (or major poses), and assistant animators would animate the frames in between (a process often called tweening). These days, you’re the master who sets the major keyframes and the computer does the rest of the work as it interpolates values in between the keyframes you set.
Adding Keyframes
The process of keyframing is very similar between Adobe Premiere Pro and After Effects. You’ll use keyframes to control most properties, including motion, audio, and effects. The decisions you need to make before you animate are to determine the desired result and the duration for the effect.
Removing Keyframes
![]()
To remove a keyframe, you can click on a keyframe and then press the Delete key. You can also remove all keyframes for a layer by turning off the layer stopwatch.
Let’s explore the animation process in Adobe Premiere Pro (but it’s virtually identical in After Effects):
- Place the current-time indicator at a point in the Timeline where you’d like the effect to begin.
- Double-click a clip to load it into the Source panel, and then click the Effect Controls tab.
- Click the stopwatch icon next to a property’s name (FIGURE 12.10).
Figure 12.10. When you turn on a stopwatch, an initial keyframe is added for the property (which you can modify by typing a new value or dragging to scrub its value).

Navigating Keyframes

You can easily move between keyframes using the two arrows located next to a property’s name. Just click the left arrow to go to the previous keyframe and the right arrow to go to the next keyframe. In After Effects you can also press the J and K keys to perform the same function.
- Move the current-time indicator to a new point in the Timeline.
- Change the values for any property whose stopwatch is enabled. A new keyframe is added.
After Effects Auto Keyframes
If you’re working in After Effects, you’ll find that it offers an Auto Keyframe mode. Simply click the large stopwatch at the top of the Timeline panel. When activated, new keyframes will be automatically added for a property when it’s modified. You will either love or hate this feature.
- The in-between values are automatically interpreted for you by Adobe Premiere Pro (or After Effects).
The method used for interpolation will vary based on the keyframe style chosen (more on this next).
Keyframe Interpolation
The concept of keyframes makes sense to most editors, but there is still more to explore. One of the greatest untapped controls when animating is the use of keyframe interpolation. You’ll find five different methods in Adobe Premiere Pro and After Effects that control the interpolation process. Changing the method used can create a very different animation.
Control Handles
![]()
To view the control handles for a keyframe, you need to view a value graph. In Adobe Premiere Pro twirl down the effect’s property using the disclosure triangle next to an effect’s name (make sure the Timeline view is displayed on the right). In After Effects you select the property, and then click the Graph Editor button in the Timeline.
The easiest way to access interpolation methods is to right-click on a keyframe. In Adobe Premiere Pro you’ll see all five listed (some effects offer both spatial and temporal categories). In After Effects choose Keyframe Interpolation to access a floating window for advanced controls.
Keyframes have five styles (FIGURE 12.11):
• Linear interpolation. The default method of keyframe interpolation is linear. This method creates a uniform rate of change between keyframes. It often looks a bit mechanical because the software calculates in-between values for each keyframe pair while the other keyframes in use in the Timeline are ignored. When using linear keyframes, changes begin instantly at the first keyframe and continue to the next keyframe at a constant speed. At the second keyframe, the rate of change switches instantly to the rate between it and the third keyframe.
• Bezier interpolation. If you want the most control over keyframe interpolation, choose the Bezier interpolation method. This option provides manual controls so you can adjust the shape of the value graph or motion path segments on either side of the keyframe. If you use Bezier interpolation for all keyframes in a layer, you’ll have a smooth transition between keyframes.
Adding Ease
![]()
If you want to create inertia (such as a ramp up effect for speed), try using Ease. Right-click on a keyframe, and choose from a variety of options. In Adobe Premiere Pro you can choose Ease In or Ease Out (for approaching and leaving a keyframe, respectively). In After Effects you can choose Keyframe Interpolation where you’ll find the additional option of Easy Ease, which applies resistance in both directions of movement.
• Auto Bezier interpolation. The Auto Bezier option attempts to create a smooth rate of change through a keyframe and will automatically update as you change values. This option works best for spatial keyframes that define position but can be used for other values as well.
• Continuous Bezier interpolation. This option is similar to the Auto Bezier option, but it provides some manual controls. The motion or value path will have smooth transitions, but you can adjust the shape of the Bezier curve on either side of the keyframe with a control handle.
• Hold interpolation. The Hold style is an additional interpolation method that is only available for temporal (time-based) properties. This style of keyframe allows a keyframe to hold its value across time without a gradual transition. This is useful if you want to create staccato-type movements or make an object suddenly disappear. When used, the value of the first keyframe will hold until the next hold keyframe is encountered, and then the value will instantly change.
Figure 12.11. Keyframes can be identified by their shape: (from left to right) Linear, Bezier, Auto Bezier, Continuous Bezier, and Hold Interpolation.
![]()
Interpolation Illustrated
![]()
To see how each interpolation method works (as well as get an overview of Ease), be sure to watch this video.
Selected Effects
With the combined power of Adobe Premiere Pro and After Effects, you literally have hundreds of effects at your disposal (add third-party plug-ins and you could say an infinite number of effects). Entire books could be (and have been) written about effects. However, we’ll shine the spotlight on five essential effects that we use to keep clients happy. By looking at the possibilities, you’ll have a better appreciation for the options that lie ahead.
The Effects Handbook
![]()
Instead of wasting pages to cover every effect, we’ll point you to an excellent reference—the Help menu (we know you’ve been led to believe that true geeks don’t open the Help menu). To access the good stuff, just press F1. In After Effects you can even choose Help > Effect Reference to jump right to documentation on every effect in After Effects.
To bring these effects to life, we’ve provided a sample project. You can copy the project folder to your internal hard drive. Navigate to Chapter Files > Chapter_12_Media > [Version Number] and open the project Ch12_Effects.prproj.
Image Stabilization and Rolling Shutter Reduction
With the release of After Effects 5.5, Adobe introduced an entirely new method for stabilizing footage that can also be useful to video editors. The Warp Stabilizer can remove jitter caused by camera movement. The effect is very useful because it can remove unstable parallax-type movements (where images appear to shift on planes). An extra benefit for those shooting with CMOS-type sensors (such as those on DSLR cameras) is the ability to compensate for the rolling shutter, which can lead to an optical bending of material that has strong vertical lines.
Stabilize in a Jiffy
![]()
For a detailed workflow showing the Warp Stabilizer, be sure to watch this video tutorial.
Maximum Quality
![]()
If you want maximum stabilization quality, you can choose the Detailed Analysis option under the Advanced category. This makes the Analysis phase do extra work to find elements to track. This option is much slower than others but produces superior results.
Let’s put the effect to use.
- Select one or more clips in an Adobe Premiere Pro Timeline that you want to stabilize.
For this exercise, you can use the sequence 01_Stabilize in the file Ch12_Effects.prproj. Use one or both shots.
- Right-click on the shot you want to fix, and choose Replace with After Effects composition.
Send the shot to After Effects via Dynamic Link as you learned earlier in this chapter.
Faster Stabilization

If you’ve ever used Smooth-Cam in Final Cut Pro, it can be a lengthy process, because the effect must analyze the entire source file from first frame to last. The Warp Stabilizer effect on the other hand limits itself to analyzing only the frames in use.
- Switch to After Effects, and select the clip you want to stabilize in the corresponding composition you created with Dynamic Link.
- Choose Animation > Stabilize Motion.
The Warp Stabilizer effect is applied to the layer. The footage is immediately analyzed between its In and Out points (FIGURE 12.12).
Figure 12.12. The analysis process takes two steps, and you’ll see a banner across the footage as it’s being analyzed. You can also see a progress update in the Effect Controls panel. While the analysis is in progress, you can keep working in the project.

- You can enhance the effect with several useful Stabilization method options, including these three:
• Result. You can choose Smooth Motion to retain the general camera movement (albeit stabilized), or choose No Motion to attempt to remove all camera movement.
• Smoothness. You can use this option to specify how much of the original camera movement should be retained for Smooth Motion. Use a higher value for maximum smoothness.
• Method. You can use the four methods available. The two most powerful, because they warp and process the image more heavily, are Perspective and Subspace Warp. If either method creates too much distortion, you can try switching to Position, Scale, and Rotation, or just Position.
How Much Is the Stabilizer Working?
If you want to see just how much the stabilizer is doing, set the Framing to Stabilize Only. This will show you black around the edges of the frame. If the motion looks unnatural, you can always adjust the Smoothness settings.
- You can also control how the borders are drawn for the effect. With the Framing menu, you can choose to simply stabilize the shot. You can also tell After Effects to automatically scale or even synthesize new edge content.
- If you see vertical distortion or warping in the shot, select the Rolling Shutter Ripple option under the Advanced category (FIGURE 12.13).
Figure 12.13. To use the Advanced options, you need to use either the Subspace Warp or Perspective method for Stabilization. Be sure to experiment with both methods because the choice may vary based on your source footage.

If the stabilization problem is still not solved, select the Detailed Analysis option, and choose the Enhanced Reduction method to avoid warping.
- Use the RAM preview option to preview the effect as needed.
- When you’re satisfied, choose File > Save to capture your changes.
- Switch back to Adobe Premiere Pro to continue working with your now stabilized footage.
Timecode Burn-in
Many editors find it useful to apply a Timecode effect to clips when making stringouts for review by team members or clients. Some will apply the effect to individual clips (such as for reviewing performance takes or interviews). Other times, you can nest a sequence or apply it to the entire duration of a sequence. Both ways allow others to precisely refer to timecode to pinpoint scenes. You can control the display Position, Size, and Opacity, or the Timecode display as well as its format and source.
Got Several Angles?
![]()
If you’re using multiple angles, be sure to use the Label Text option in the Timecode effect. You can identify the camera angle for multicamera shoots for Camera 1 through Camera 9.
- Select the first clip in your Adobe Premiere Pro sequence that you want to apply the Timecode effect to.
For this exercise, you can use the sequence 02_Timecode in the file Ch12_Effects.prproj.
- Choose a Timecode Source. The Media option is usually best because you can read the actual timecode in the clip. You can also generate media using the Clip option based on the start of the clip or specify a starting frame with the Generate and Offset options for media that lacks timecode.
- Adjust the Position and Size for the effect (FIGURE 12.14).
Figure 12.14. If you’ll be posting to the Web, be sure to increase the size of the burn-in so it’s more readable as the video is shrunk down.

It’s a good idea to move the timecode window so it is not blocking critical action in the scene or obscuring any graphics.
- Select the Field Symbol check box to show if the footage is progressive or to show which field is displayed.
- Choose a Format to display. SMPTE timecode is the standard, but you can also show frame numbers or feet and frames for 35mm or 16mm film.
- Choose the Time Display option for your source. Be sure to match the frame rate of your footage.
Vector Keying in Adobe Premiere Pro
After Effects gets a lot of attention for its compositing abilities, but you’ll find a very good keyer in Adobe Premiere Pro. The Ultra Key effect is a GPU-accelerated chromakey effect. You can use it as a placeholder key when working out the timing of effects. You can also use it as a final key in many situations right inside the editing Timeline. Ultra is particularly effective when keying heavily compressed footage such as DV, HDV, and H.264.
What’s My Key?
![]()
By switching the Output menu to Alpha Channel, you can easily see any problem areas with the matte. Look for areas with lots of specks in them or gray patches to indicate rough transparency spots. Just switch back to Composite when you’re finished cleaning up.
- Select the first clip in your Adobe Premiere Pro sequence that you want to key. This clip should usually fall on V2 or higher in the Timeline.
For this exercise, you can use the sequence 03_Keying in the file Ch12_Effects.prproj.
- Apply the Ultra Key effect to the clip on V2.
- In the Timeline, move the current-time indicator over a frame that contains the color you’d like to key.
- Double-click the keyed clip and switch to the Effect Controls panel. You can now control the effect with the Output and Setting menus.
- Click the eyedropper and select a key color (FIGURE 12.15).
Figure 12.15. Be sure to select an area close to the subject you are trying to key to ensure a cleaner key along the edges.

- You can tweak several other parameters. Twirl down all of the categories to see your control properties. The following are the most essential to get a good key:
• Transparency. The default value is 45, but subtle tweaks can affect the transparency of the source layer over the background.
• Highlight. The Highlight transparency can also be controlled separately. This is useful for areas that contain specular highlights (such as transparent objects like glass). The default value is 50.
• Shadow. You can use the Shadow control to correct any dark areas that have become inadvertently transparent due to color spill. The default value is 50.0 (which does not affect the image).
• Tolerance. To remove keying artifacts or spill with skin tones and shadows, adjust the Tolerance property.
• Choke. The Choke property shrinks the alpha channel matte by eroding its edges. The default value is zero, and you can increase in small amounts as needed.
• Soften. You can blur the edge of the matte with a Box Blur filter. The default value is 0. A little goes a long way here.
• Contrast. After blurring the matte, you can actually restore additional contrast into the edge. This two-step combo can help remove artifacts while still preserving some crispness to the edge (FIGURE 12.16).
Figure 12.16. Keying is a gentle balance of crisp edges that still retain a natural blur for fast movement.

• Spill Suppression. Although multiple properties to remove color spill in the image are available, the most useful are Spill and Range. Make small adjustments at a time as needed.
Pedestal Down
![]()
The higher the quality of your source image, the lower you can set the Pedestal value in the Ultra Keyer. Use Pedestal to filter out noise in the image, but be sure to not overdo it.
A Better Composite
![]()
You can use the Color Correction properties in the Ultra Keyer to create a better balance between the foreground and background image. Use the Hue, Saturation, and Luminance sliders to match color and luma values for a more realistic effect.
Chromakeying in After Effects
![]()
You’ll find an award-winning keying plug-in called Keylight in After Effects. The effect performs a color key and removes any color spill. Learn how to use it in this video tutorial.
Camera Lens Blur Effect
It seems these days that everyone loves Bokeh blur. Perhaps it’s the DSLR revolution or the rise in popularity of cameras from manufacturers like RED and ARRI. Shallow depth of field is hot, but of course images aren’t always shot this way.
What About Lens Blur?
![]()
The Camera Lens Blur effect replaces the very slow Lens Blur effect. The new effect works in 32-bits-per-channel space and is much faster than the original. The old Lens Blur effect has been deprecated but will be used when opening legacy (CS5 and earlier) projects.
Fortunately, After Effects lets you create realistic camera blurring that adds subtle highlights and natural blurring. This effect can be used on its own or combined with the Roto Brush for enhanced depth of field with interviews (more on that in the next section).
Let’s send a clip from Adobe Premiere Pro to After Effects to adjust its blurring.
- Select the first clip in your Adobe Premiere Pro sequence that you want to blur.
For this exercise, you can use the sequence 04_Lens Blur in the file Ch12_Effects.prproj.
- Right-click on the shot you want to fix, and choose Replace with After Effects composition.
Send the shot to After Effects via Dynamic Link as you learned earlier in this chapter.
- Switch to After Effects, and select the clip you want to blur in the corresponding composition you created with Dynamic Link.
- Choose Effect > Blur > Camera Lens Blur in CS 5.5 or Effect > Blur > Lens Blur in CS5.
- Adjust the following properties to get the desired blurring (FIGURE 12.17). These are the essential controls for the Camera Lens Blur effect (but the Lens Blur effect controls are similar):
• Blur Radius. Use the radius to control the size of the blur.
• Iris Properties. Use this property to control the shape of the blur, which is especially visible when you push the blur to create a Bokeh effect, because this is the shape of the actual “blobs” that are created. Additionally, the Roundness property can soften the shapes, and the Aspect Ratio can stretch them. You can also use the Diffraction Fringe to create a halo that shows light wrapping.
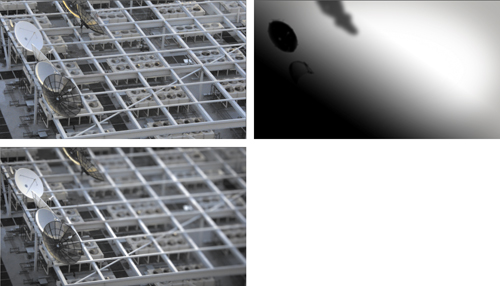
• Blur Map. Use the Blur Map to set a layer to signify the depth of field (FIGURE 12.18). By using a gradient layer, you can create a gradual falloff. This layer can also be created using Adobe Photoshop. Place the layer below the footage in your composition, and select it using the Layer menu. You can set the Blur Focal Distance to control where pixels are in focus. You can also Invert the layer to reverse its direction.
Figure 12.17. The Camera Lens Blur effect is a great way to stylize background plates from chromakey effects. You can also animate the blur as a rack focus.

Figure 12.18. The original footage (top left) is mapped using a grayscale Blur Map (top right). The end result shows greater control over depth-of-field blurring (bottom).
Blur Map In Action
To see how you can use a Blur Map, open the file Ch12_Blur_Map.aep in the Chapter_12_Media folder.
• Highlight. You can add specular highlights as needed to the bright areas of the footage. Increase the Gain to boost the brightness. To set which areas bloom, lower the Threshold value. You can also use Saturation to boost the original colors in the shot.
Best Blur Possible
To get the highest-quality blurs (especially Bokeh highlights), be sure to set your project to 32 bpc and use a linear workspace.
• Edge Behavior. Be sure to select the Repeat Edge Pixels check box so you don’t see a gap around the outside edges.
• Use Linear Working Space. This option forces the effect so it behaves as if the project was using a linearized workspace. This increases the realistic properties of the effect.
Enhanced Depth of Field (with the Roto Brush)
In many situations the background of an interview can be distracting. It might be too bright or too in focus. It might also be an unwanted person walking through the scene or perhaps an ill-placed C-stand. Traditionally, these sorts of problems could be solved with rotoscoping—a challenging process of separating a foreground object from the background using animated masks or brush strokes.
Behold the Roto Brush
![]()
For a detailed workflow showing the Roto Brush, be sure to watch this video tutorial.
With After Effects CS5, Adobe changed the task forever with the invention of the Roto Brush. The Roto Brush requires only a few strokes; thereafter, the tool can calculate transparency. You merely need to indicate to After Effects the foreground and background. After Effects can then intelligently propagate your strokes throughout the entire clip.
Roto Brush ≠ Animatte
![]()
Avid editors may be used to Animatte for extracting a moving subject in Avid. Although it is similar in concept, the Roto Brush tool requires much less work. Thanks to edge detection and the ability to track motion, you’ll find jobs go much quicker with the Roto Brush.
The Roto Brush is a multifaceted tool with several options. Here are a few suggestions for an efficient workflow:
- Find a good frame. Double-click a clip to open the layer. Drag the current-time indicator so you can see that the desired subject is fully in the frame. Try to minimize overlap (FIGURE 12.19). This frame is called the base frame.
Figure 12.19. Make sure that your subject is clearly in the frame with as little cut off by the edges as possible.

Footage courtesy of the National Foundation for Credit Counseling (www.DebtAdvice.org)
- Add your first stroke. Activate the Roto Brush tool (its icon is a paintbrush and person silhouette in the Tools panel). You can also press Option+W (Alt+W). Drag down the center of the object to create the first stroke (FIGURE 12.20). When you release the mouse, After Effects takes a moment to update the first stroke. A magenta outline appears to signify the foreground object (FIGURE 12.21).
Figure 12.20. Use a large brush to quickly paint the initial stroke.

Figure 12.21. The Roto Brush typically produces a fairly accurate edge on the first try.

Don’t Skimp When Using Roto Brush
Your layers must be in Full Quality mode for After Effects to make accurate strokes.
- Add a background stroke. Define the background to let After Effects know what information to discard. You can Option-drag (Alt-drag) to create a background stroke (FIGURE 12.22).
Figure 12.22. Red strokes define the area to be subtracted.

- Add more strokes. Keep drawing foreground and background strokes until an accurate selection is made. Try to make the segmentation on the base frame as accurate as possible. It serves as a guide for all the other frames, so getting it right is important (FIGURE 12.23). Try to use as few strokes as possible to reduce render time.
Figure 12.23. Take the time to get a good edge. You’ll further refine it with the Refine Matte properties in a moment.
- Fix more frames. Press the Page Down key to move forward a frame (you can also use the 1 and 2 keys on the main keyboard to go backward or forward a frame). After Effects will keep building the Roto Brush effect using motion tracking, optical flow, and other techniques to propagate the information between frames. As needed, use more strokes to refine the matte as you move through time.
Dial It In
As you refine your strokes for the Roto Brush, switch to a smaller brush.
- Define the range. The Roto Brush effect is only applied for part of the clip (20 frames forward and 20 frames backward). This is indicated by small arrows that appear in the span bar. As you add more corrective strokes, the effect’s duration expands. You can also drag the range in the span bar to increase it (FIGURE 12.24). You may need to create new spans for parts of the clip that are significantly different.
Figure 12.24. By default, the Roto Brush effect only lasts for 40 frames. Be sure to define the proper range for your shot.

- Refine the matte. The Roto Brush effect offers a Refine Matte option (FIGURE 12.25). You can have After Effects compensate for motion blur (for faster-moving objects) as well as decontaminate colors at the edges. Press Option+5 (Alt+5) to toggle the alpha boundary and view your results.
Figure 12.25. Adjusting properties like Smooth, Feather, and Refine Matte can clean up your edges. Viewing the frame over the transparency grid can make it easier to see your edges. (Just click the Toggle Transparency Grid button at the bottom of the viewer.)

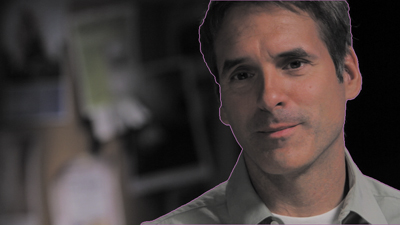
When you’re finished with the Roto Brush, click the tab to switch back to your desired composition. There are several things you can do with the rotoscoped extracted clip. You can place the clip over a new background or into a graphic sequence. You might also want to modify the original background by desaturating or blurring it to give more precedence to the subject (FIGURE 12.26).
Figure 12.26. The left image shows the original footage, whereas the right has been further processed. The background was further darkened and defocused to minimize distraction from the subject.

Cut the Chatter
![]()
The Reduce Chatter option can minimize erratic changes from frame to frame. A higher value includes more frames in the calculation of edges.
Next Steps
Now that you understand how to use keyframes and effects, you’re ready to continue the finishing process. In the next chapter we’ll explore the titling process. You’ll learn how to use Adobe Premiere Pro, After Effects, and Photoshop to create lower-thirds and animated titles.