
Chapter 1. The Adobe Workflow
The job of the modern-day video editor has evolved into a wide range of responsibilities. Very seldom are we given the task of just cutting a piece. Often, we are asked to tweak the audio, or fix that dark shot, or animate that graphic. Because of this expanding job description, we own a lot of software. Most editors these days must have at least a rudimentary understanding of Adobe Photoshop for processing images and a basic understanding of Adobe Illustrator to deal with logos and artwork. And the editors that are working the most know their way around the Timeline in Adobe After Effects as well.
The purpose of this book is not to teach you how to edit (we expect you’re already skilled at that). Rather, our goal is to help you through some of the obstacles and speed bumps of transitioning to (or adding) Adobe Premiere Pro to your repertoire. We’ll bring you up to speed quickly as well as explain the philosophy behind an efficient workflow.

Meet Adobe Premiere Pro
Whether you’re coming to Adobe Premiere Pro with experience in Apple Final Cut Pro, one of the Avid packages, or perhaps Sony Vegas, you’ll see many familiar elements that are standard in modern nonlinear editing (FIGURE 1.1).
Figure 1.1. With Adobe Premiere Pro CS5.5, Adobe has streamlined the editing interface so all core functions are in the Editing workspace. You can access other features through the Window menu by choosing a specific workspace or a panel.

Our advice is that you come in with an open mind. Adobe Premiere Pro will seem both familiar and foreign, depending on the task at hand. Many of us have had to learn multiple edit packages in the past. Although you may find change (especially under a deadline) a bit stressful, remember that this is an opportunity to discover new ways to save time and enjoy editing. We’ve found that it takes a few weeks to get comfortable and perhaps a few months to become truly fluent.
Interface Philosophy
If you’ve ever changed from one edit system to another, you’ll recall that at first it feels like you’ve walked into your home to find all the furniture rearranged. Initially, you’re a little disoriented, but you can quickly learn to deal with the situation. Sure, you can move things back to where you like them, but you might just discover that you like some of the changes a bit better.
As you dive into Adobe Premiere Pro, you’ll soon realize that there is very little you need to learn to get a basic project out the door. Here is what you need to know:
• Media management. Getting media into your system is a primary concern, whether that means capturing from a tape source or importing digital media from any of the solid-state systems. Adobe Premiere Pro’s support for native editing makes this task far easier than many competing systems.
• Timeline operations. Manipulating footage is the next task. You’ll need to move files around, cut clips apart, and delete unused sections. If you can do that much, you’re basically editing. Anything you learn beyond that just makes you more efficient. Many of the same keyboard shortcuts exist between editing apps (such as J-K-L keyboard shortcuts), and Adobe Premiere Pro offers a fully customizable keyboard so you can remap commands to the keys you already use.
• Output. Outputting a completed edit for final delivery concludes the process. Adobe offers more choices than any other nonlinear editing package we’ve worked with because this is an area in which it is a market leader.
If you can perform these three tasks, you can pretty much edit. So, take a deep breath and relax; we have lots of cool things to show you. By understanding the essentials, you can prioritize what else you need to learn and identify what will make you faster, better, and more efficient.
Final Cut Pro Interface
![]()
Adobe Premiere Pro behaves much the same way Final Cut Pro does when you launch it. The difference is that Final Cut Pro is a series of windows that have been carefully positioned to cover one another. As you move elements around in Final Cut Pro, the user interface can quickly become disorganized.
Interface Tour
After you launch Adobe Premiere Pro, you’ll notice that it fills the entire screen. This approach keeps all the windows docked into an Application frame and makes it easier to keep your workspace organized. While in Adobe Premiere Pro, the screen is essentially one large window that is divided into a series of interconnected frames (FIGURE 1.2).
Figure 1.2. You can switch between workspaces to quickly reconfigure the interface layout. In clockwise order starting from the upper left are the Audio, Color Correction, and Editing workspaces.

Footage courtesy of the National Foundation for Credit Counseling (www.DebtAdvice.org)
Select Panels Using the Keyboard
![]()
You can quickly switch which panel is active using the keyboard. To activate panels in rotation to the right, press Ctrl+Shift+>. To select panels in reverse order, press Ctrl+Shift+<.
You’ll find that all Adobe applications use the Application frame approach, so switching between applications is straightforward. Adobe applications minimize distractions to keep you on task.
Whether you like floating windows or docked panels is a moot point. You can easily switch between both methods as you choose.
To undock a panel:
- Click on a tab to select the desired panel.
- Locate the submenu for that panel in the upper-right corner of the window. It is a small down-pointing arrow with four bars.
- Click the submenu and choose Undock Panel to free the individual tab. You can also choose Undock Frame to release the group of nested panels into a floating frame.
- Drag the frame to a new position on the screen. It can be left floating over other windows, or you can dock it with other windows.
Before you start to rearrange panels and windows, however, it’s best to familiarize yourself with the default interface arrangement. Like other edit systems, you’ll need a few standard views. These are located onscreen in a standard fashion (FIGURE 1.3). A quick tour of the major panels for the Editing workspace is included in the following sections, but we’ll explore all of these panels in greater detail throughout the book and DVD-ROM.
Figure 1.3. On the surface, the Adobe Premiere Pro user interface appears straightforward, but some customizable and useful features are also available.

Project panel (Shift+1)
The Project panel (FIGURE 1.4) provides a centralized location to organize and navigate your media. Its primary role is to enable you to view and organize your assets into bins. You can use the Filter field (magnifying glass near the top) to quickly sift and sort your assets. You’ll also find several controls across the bottom of the window to adjust how assets are displayed as well as create new media or content (such as color matte, bars and tone, and leader).
Figure 1.4. The Project panel is where you organize your sources.

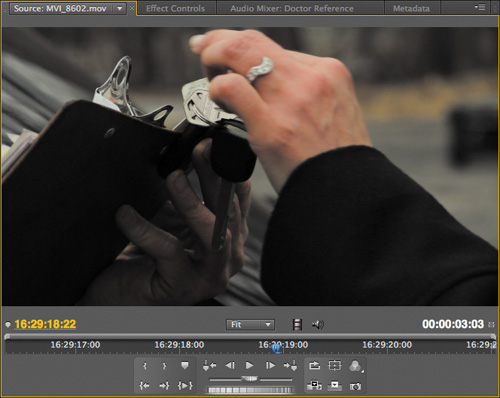
Source Monitor panel (Shift+2)
The Source panel (FIGURE 1.5) serves the same function as the Source Monitor did for linear editors. You use this panel to load your clips for real-time viewing, mark In and Out points, and shuttle using transport controls. Be sure to explore all the controls at the bottom of the window on both the Source panel and Program panel.
Figure 1.5. The Source panel is the best panel to use to view clips before editing. Note the Drag Video Only and Drag Audio Only icons above the transport controls.
Most of the controls will look familiar, but here are a few notable controls you should know about (FIGURE 1.6):
• Loop. Repeats the playback for a clip or sequence.
• Safe Margins. You can view guides to help you place text and graphics for maximum readability.
• Output. You can switch what information is displayed including audio, scopes, and alpha channel details.
• Export Frame. You can quickly export a still frame based on the Current Time Indicator.
Figure 1.6. The control sections of the Source and Program panels are nearly identical.

In the upper-right corner of each panel is a small icon that indicates a submenu. These menus allow you to control each panel. The context menu commands (FIGURE 1.7) will change depending on which panel you have selected.
Figure 1.7. Context menus are handy because they show only those controls you need for each panel.

Timeline panel (Shift+3)
A timeline is a timeline, right? Right. But in Adobe Premiere Pro you may see both stereo and mono audio tracks. Also, note the subtlety of the Track Targeting and Track Indicator artwork at the left side of the Timeline panel (FIGURE 1.8). If you are a “targetter,” this should make perfect sense; if you’re not, see Chapter 6, “Essential Editing Skills,” for more in-depth coverage.
Figure 1.8. The Timeline is very straightforward, but don’t be confused by the subtle gray highlights on the left end used for targeting.

Program Monitor panel (Shift+4)
Go Big
![]()
To see a panel in full-screen view, place your mouse over the desired panel. Then press the grave accent (`) key (sometimes called the tilde ~ key) located to the left of the number 1 key at the top of your keyboard. Press the key again to toggle back to normal view.
As in the Source panel, many of the controls at the bottom of the Program panel (FIGURE 1.9) are very powerful, so be sure to familiarize yourself with them. One unique element to the Program panel is the menu in the tabbed label that allows you to access all the opened timelines.
Figure 1.9. The Program Monitor panel shows you the contents of your sequence.

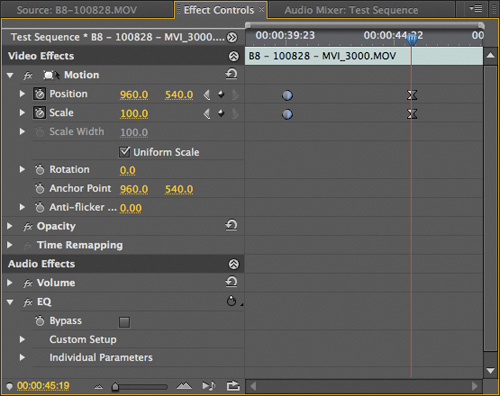
Effect Controls panel (Shift+5)
The Effect Controls panel (FIGURE 1.10) is not just for controlling effects (although it does that quite well). Every clip you add to the Timeline will automatically have three video effects (Motion, Opacity, and Time Remapping) and one audio effect (Volume) applied. You’ll use this panel to adjust the geometry, speed, and opacity of a clip as well as its audio parameters. When you start adding additional effects, either video or audio, those controls will be found in the Effect Controls panel as well.
Figure 1.10. The Effect Controls panel also contains controls for the geometry aspects of a clip, such as Position, Scale, and Rotation.
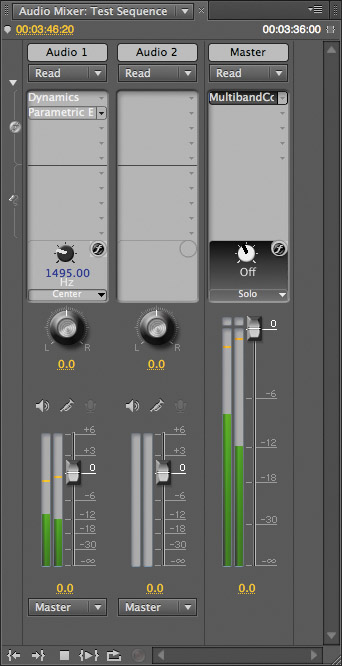
Audio Mixer panel (Shift+6)
The Audio Mixer panel (FIGURE 1.11) contains several useful controls. If you’ve ever experimented with ProTools or other digital audio workstations, you may be familiar with some of the controls in this panel. In addition to rudimentary record controls, you’ll find the automation modes Read, Latch, Touch, and Write for each channel as well as Channel Effect Inserts to add an effect to an entire track. Even programmable Effects Sends are available, and of course, all the controls are automatable.
Figure 1.11. The Audio Mixer includes Level controls, Pan and Master Output controls, as well as Channel Effects Inserts and Effects Sends via the disclosure triangle on the left side.
Effects panel (Shift+7)
The Effects panel (FIGURE 1.12) unlocks a myriad of corrective and stylizing effects for both audio and video. Even if you’re not “into effects,” you’ll still find this panel essential for color correction and audio restoration.
Figure 1.12. To quickly find an effect, you can type its name (or even a keyword) into the search field.
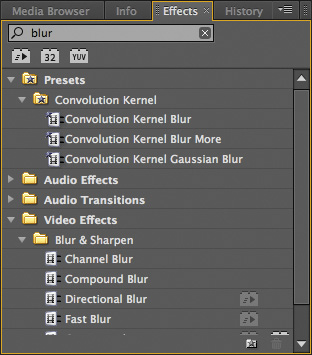
Although there is no menu system to access effects, you will find that the Effects panel offers some handy features. A search field allows you to quickly find the effect you are looking for, and the building block-style icons allow you to limit your effects to Accelerated Effects, 32-bit effects, and YUV effects (other third-party tools may also install buttons to enable quick filtering).
Media Browser panel (Shift+8)
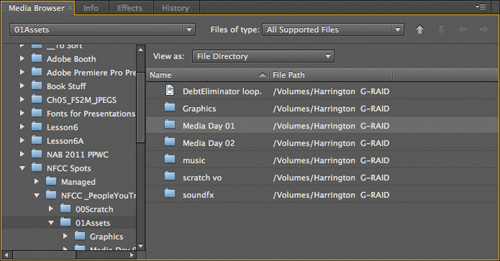
The Media Browser panel (FIGURE 1.13) offers one way to browse your hard drives and connected volumes. It is a fast way to access your file-based assets. The Media Browser allows you to import files natively from many of the leading media formats (RED, XDCAM, DVCPRO-HD, and DSLR). By importing a file through the Media Browser, it will automatically become a clip in the Project panel. Although the Import command often works, the Media Browser is generally the best way to ensure a proper import with all metadata. The Media Browser is also capable of correctly merging together spanned clips (long clips that get spread across two or more memory cards).
Figure 1.13. Be sure to expand the size of the Media Browser panel so you can see all of its features. Remember that you can press the grave accent (`) key to temporarily expand a window when the mouse pointer is over it.
Where’s My Effects Menu?
![]()
Unlike Final Cut Pro, there is no way to access effects from the menu system. You must choose effects from the Effects panel. If you miss being able to quickly search for effects in a menu as opposed to the twirl down bins of the Effects panel, try using the Find command at the top of the panel. You may find that this is actually a faster way to work.
Application Switcher on a Mac
![]()
Did you know that you can select a file in the Finder and then initiate the Application Switcher by holding down the Command key and pressing the Tab key until you have highlighted the application icon that you want to drop that file into. This is a valuable user tip that can greatly enhance your user experience.
Tools panel
As an experienced editor, you’ll find that all your standard editing tools are available in the Tools panel (FIGURE 1.14). For example, you’ll find tools like Track Selection, the Hand tool, and the Zoom tool for selecting and viewing Timeline elements. You’ll also find standard editing tools like Ripple Edit, Rolling Edit, and the Slip tool. All of these tools offer standard keyboard shortcuts (TABLE 1.1). They can also all be customized by choosing Premiere Pro > Keyboard Shortcuts (Edit > Keyboard Shortcuts) and then choosing Tools from the category menu.
Figure 1.14. If you have trouble learning the Tools panel shortcuts, you can remap them to any key. In fact, Adobe Premiere Pro even offers presets that match Final Cut Pro and Avid shortcuts.

Table 1.1. Default Shortcuts for Adobe Premiere Pro Tools Panel

Organizing Panels
![]()
In this video you’ll learn the ins and outs of how to organize your panels into new frames as well as float them onscreen.
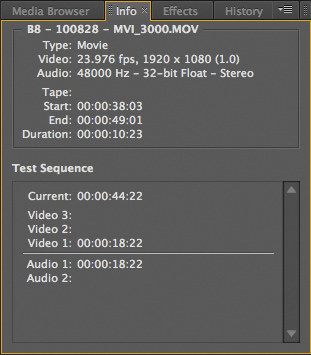
Info panel
The Info panel (FIGURE 1.15) provides a useful view into details of clips, graphics, or timelines. You can find out frame size and rate, audio bitrates, and In and Out points. The Info panel also displays the number of video and audio tracks in a sequence.
Figure 1.15. The Info panel is a great way to get detailed technical information about a clip.
History panel
The History panel (FIGURE 1.16) is a clever way to track your progress as you work. It is essentially a visual representation of the available Undos you have. Not only can you view the changes made to a clip, but you can also “go back in time” to any state along the way (up to 32 levels of Undo).
Figure 1.16. If you’ve used Adobe Photoshop, the concept of the History panel is identical.

Using Workspaces
Customizing workspaces is the best way to quickly change the look of your user interface. To get you started, Adobe Premiere Pro offers prebuilt workspaces (FIGURE 1.17) that inspire you to rethink your work environment.
Figure 1.17. You can change the active workspace in multiple ways. The easiest method is to click the menu in the upper-right corner of the user interface.

Mode-based Editing
![]()
If you’re an Avid editor, you’ll find that workspaces are similar to the modes you use in Avid. Choosing one will quickly reconfigure the user interface for the task at hand.
Here are three ways to access workspaces:
• Choose Window > Workspace and then select from the menu.
• Click the Workspace menu in the upper-right corner of the Application frame (cleverly enough it’s labeled Workspace).
• Press Option+Shift+1 (Alt+Shift+1) for the first workspace. You can use numbers for additional workspaces (they are numbered in alphanumeric order).
If you accidentally close something onscreen or your screen looks totally foreign, you can reset a workspace to its original state. You can also save your custom setups by clicking the Workspace menu in the upper left and choosing New Workspace.
Definitely explore workspaces because they are key to saving you time, and the built-in workspaces should encourage you to experiment with your own layouts.
Creative Suite Production Premium
One of the main reasons that editors are attracted to Adobe Premiere Pro is because of its tight integration with other Adobe software applications. In fact, most choose to purchase Adobe Premiere Pro as part of a suite.
Which Suite Is Right?
![]()
Adobe offers several Creative Suite editions from which to choose. For video professionals, the most common choice is the Adobe Creative Suite Production Premium. If you also need print and Web design applications, choose the Adobe Creative Suite Master Collection.
In the early days of bundled software packages, manufacturers did nothing more than shrink-wrap separate applications together or put them in one box. Other than getting a discount, you often faced great hurdles to get the applications to work well with each other. The Adobe Creative Suite, on the other hand, is a truly integrated suite:
• Applications can share code and resources, which makes for leaner installations and greater stability across applications.
• File formats are broadly compatible between applications. For example, you can use a layered Photoshop file in Adobe Premiere Pro as a source in your Timeline, in Adobe After Effects for a motion graphic, or as an interactive menu in Adobe Encore.
• Media can be sent via technology like Dynamic Link. You can hand off projects between Adobe applications through the postproduction process.
Because the Adobe Creative Suite Production Premium package is the best value for video professionals, it is the package on which we will focus. We’ll explore some of these applications in more depth as we move through specific tasks like titling, color correction, and audio restoration.
Adobe After Effects
After Effects is an industry-standard animation and compositing tool. The sheer number of projects that use this application is mind numbing—everything from the simplest lower-third name key to finishing major motion-picture effects shots. The integration between After Effects and Adobe Premiere Pro through Dynamic Link makes it extremely easy to share elements and assets between the two applications.
As an editor, you’ll turn to After Effects for a few core tasks:
• Advanced keying and compositing
• Animated type and motion graphics
• Advanced color grading
• Advanced retiming with optical flow
• Image stabilization
Adobe Photoshop Extended
![]()
Photoshop is the leading choice for editing raster graphics such as photos. In fact, 98 percent of all video editors use Photoshop as a regular part of their video postproduction workflow. The current version of Photoshop significantly extends its nondestructive editing capacities, allowing for even greater control.
The Extended version of Photoshop included in the Production Premium package adds several important features:
• Ability to edit video layers within Photoshop in much the same way you would a photo.
• Use of Dynamic Link with Adobe Premiere Pro to easily hand off video files for advanced color grading or repair.
• Ability to use 3D models that can be handed off to After Effects for advanced compositing or motion graphics tasks.
• Ability to create 3D text and shapes for use in Adobe Premiere Pro or After Effects using the Repoussé command.
We’ll explore creating titles in Photoshop in Chapter 13, “Creating Titles,” and working with footage layers in Photoshop in Chapter 10, “Color Correction and Grading.”
Adobe Illustrator
![]()
Illustrator was Adobe’s first application and was released in January of 1987, three years before Photoshop. It is the premier (no pun intended) vector-based image tool. You can infinitely scale vector graphics, and they often have very small file sizes.
CMYK Gotcha
![]()
Many vector files are set to the CMYK color space, which is used for professional printing. You can open a vector file in Illustrator and choose File > Document Color Mode > RGB and resave the file.
Not only can Illustrator files be embedded and placed into Photoshop files and After Effects compositions, but they can also be imported directly into Adobe Premiere Pro. As an editor, you’ll turn to Illustrator when you need to prepare a logo or other provided artwork for use in video.
Adobe Audition
The Adobe Creative Suite includes Adobe Audition to help improve your sound editing and repair workflow. Prior to Creative Suite 5.5, Audition was a PC-only product (and has moved in and out of the suite throughout its life).
What About Soundbooth?
![]()
If you are using CS4 or CS5, you don’t have Adobe Audition. Instead, Adobe Soundbooth attempts to simplify complex audio tasks. It too offers mixing abilities but is usually turned to for tasks like cleaning up audio problems and sound sweetening. It also offers access to musical scores, which you can customize to match the duration and pacing of your project.
Audition is an all-in-one multitrack toolset for professional audio production. You’ll use Audition to mix and record original audio on your computer. It also offers advanced controls for improving the audio in your Adobe Premiere Pro Timeline. We’ll explore Audition in detail in Chapter 11, “Audio Mixing and Repair.” You can also find at more at tv.adobe.com.
Adobe Encore
![]()
Although Adobe Encore originally was just a tool to create DVDs, it has evolved into a multiformat authoring tool. Encore offers a suite of tools that allows you to author video and photos for deployment as a DVD, Blu-ray Disc, and SWF file. Encore accepts video files as well as photos, music, and sound. It also uses Dynamic Link to reduce the amount of time you spend exporting and managing files across projects and applications. Markers can also translate smoothly between Adobe Premiere Pro and Encore for navigation and Web links.
Adobe Bridge
![]()
You will find that Adobe Bridge quickly becomes the center of a good Adobe Creative Suite workflow. It is a powerful media manager that provides centralized access to all your creative assets.
Get Adobe Bridge Savvy
![]()
Many editors do not use Adobe Bridge because they think of it more as a photographer’s tool. The truth is that it has some indispensable uses for the video professional as well. We’ll explore how it enables you to rename and organize files in Chapter 4, “Importing Media.”
Once you begin to see its versatility, you will use it more to:
• Visually manage your media
• Move, copy, and rename media files
• Create contact sheets or Web sites for client review
• Browse text animation presets for After Effects
• Preview footage and listen to audio files
• Read a multipage script without ever having to launch another application
Adobe Media Encoder
![]()
Adobe Media Encoder Is Fast
![]()
Chances are you already have a favorite encoding tool. But give the Adobe Media Encoder a chance. We find that it is far faster and more reliable than the competition. As a 64-bit application, it is able to take advantage of multiple processors and tons of RAM. It’s the fastest encoder in our toolbox.
Adobe Media Encoder is an extremely fast compression utility that supports several file types. Whether you need to publish to a disc or the web, it offers a wealth of output options. You can use it to:
• Transcode files between formats, such as Flash, QuickTime, and MPEG. If you are using Windows, Windows Media support is also added.
• Optimize files for delivery via Web or optical media (such as Blu-ray)
• Transcribe interviews through speech analysis
• Automate tasks using the watch folder
Other Tools
Although the Creative Suite consists of several traditional media creation tools that you’re accustomed to seeing from Adobe, there’s more to it. The Production Premium suite also includes some applications that you may not have even realized existed:
• Adobe Story. Creative pros can use Adobe Story as a collaborative script management and screenwriting tool. Its major benefit is that it allows you to begin controlling your project at the earliest stages. You can keep track of characters, locations, scene descriptions, and dialogue.
• Adobe OnLocation. Production professionals can use Adobe OnLocation (FIGURE 1.18), which is a robust, direct-to-disk recording, logging, and monitoring solution. Adobe OnLocation takes your Adobe Story scripts and helps you manage your media as it’s being captured, embedding appropriate metadata that will be useful throughout your edit.
Figure 1.18. OnLocation supports several kinds of cameras for live capture.
• Adobe Flash Professional. The tight integration of Adobe Premiere Pro and After Effects with Flash Professional allows you to easily edit, add effects, and encode your video for your online presentations in Flash. You can add significant interactivity to video and other rich features like open captions for the hearing impaired.
• Adobe Flash Catalyst. Flash Catalyst is a simplified but versatile Flash creation tool geared towards designers, allowing them to create intricate interactivity. Flash Catalyst allows you to use Photoshop and Illustrator files to create user interface elements, portfolios, training modules, and entertainment Web sites.
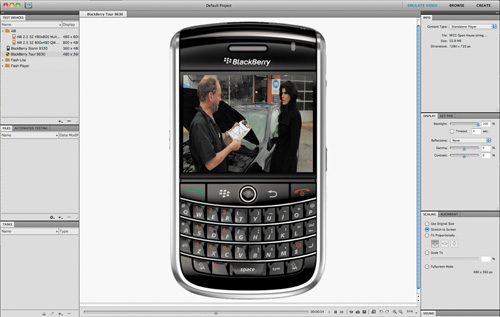
• Adobe Device Central. As mobile delivery becomes increasingly important, Adobe attempts to make the process easier. Device Central (FIGURE 1.19) is designed to simplify the production of content for mobile phones and consumer electronic devices. After a project is edited, you can test it on a virtual device (even simulating different viewing conditions and connection speeds).
Figure 1.19. Device Central makes the process of sizing video for portable media players and phones a breeze.
Editing Workflow
As would be expected, Adobe Premiere Pro offers you the ability to work in a variety of ways. Whether you are still capturing from tape or are importing tapeless acquisition formats, Adobe Premiere Pro allows you to seamlessly mix frame rates and formats on the same timeline with little to no performance hit. Adobe has also made it a priority to keep up with the latest in camera technology including RED, HDSLR, AVCHD, and more.
Native Editing Workflow
One of the big advantages of editing in Adobe Premiere Pro is native editing. Adobe Premiere Pro has the capability to natively ingest many digital acquisition formats without any special preparation. One of the easiest ways to do this is through the Media Browser (FIGURE 1.20).
Figure 1.20. The Media Browser is the simplest way to browse the contents of your hard drive.

Transcoding is the process of taking one file format and changing it to something with which your edit system can work. This is often done in another application like Apple Compressor, Adobe Media Encoder, third-party apps like MPEG Streamclip, or possibly a utility that comes with your camera.
If you are a Final Cut Pro user, you may be used to using the Log and Transfer command to ingest your media. Log and Transfer is a type of transcoding. But because you are transcoding inside the edit application, it doesn’t feel like you are doing any file conversion. However, don’t be fooled; Log and Transfer does take time. With Adobe Premiere Pro you can avoid this step and get to your edit faster.
Here are the native formats supported by Adobe Premiere Pro:
• AVC-Intra
• AVCHD
• Canon XF
• DV
• DVCPRO50
• DVCPROHD
• HDV
• MPEG-2 (including a DVD’s VIDEO-TS folder)
• Photo JPEG (as used by some DSLR cameras)
• RED R3D
• XDCAM EX
• XDCAM HD
• XDCAM HD 422
Many editors believe that you must transcode your media for color grading, but this is not accurate. The intermediate codecs that many are accustomed to using do not buy you any more dynamic range for color grading. Adobe Premiere Pro automatically upsamples media to 4:4:4 and 32-bit float upon import.
Transcoded Workflow
So why would you ever want to transcode your footage?
Let’s assume you want to cut in Adobe Premiere Pro, but you are working with other editors who are working in Final Cut Pro or Media Composer. This is a good example of a situation in which you may want to transcode your footage and export an XML for Final Cut Pro or AAF for Media Composer.
Or, let’s say you need to move between Adobe Premiere Pro and After Effects or Final Cut Pro and After Effects often. You would be taxing your system far less if you transcode to a format like Apple ProRes 422 or Cineform. Doing so may be an advantage, depending on how complicated your project is and how fast your system is.
Some editors will also favor certain codecs because they allow for tighter media management. If you are working with native tapeless formats, the Project Manager command essentially copies or moves clips but cannot trim them. This is especially true for many of the long GOP or MPEG type formats. For this reason, third-party codecs can be used to create shorter source files for archiving.
If you decide you want to work with transcoded files, using Adobe Media Encoder is the best way to convert your files. It’s easy to set up a watch folder to just drop in those files that you want to transcode. As soon as you place a file in the Watch Folder, the transcoding process begins. In no time, all your media will be in a format that you can share between CS5 and other apps. In Chapter 15, “Publish Your Video,” we’ll cover everything you need to know about the Adobe Media Encoder.
Captured Workflow
Adobe Premiere Pro offers a wide variety of capture solutions that help you get video and audio into your system in a more traditional fashion, that is, from tape. Many hardware options have been tested and approved: For more information about which devices, see the section “Monitoring and Capture Solutions” in Chapter 2, “Configuring Your Nonlinear Editor.”
Next Steps
In the next chapter we’ll discuss how to configure your system, including setting up your preferences and keyboard shortcuts. We’ll also explore additional recommended hardware (such as graphic and capture cards) to really make your system sing.