
Chapter 6. Essential Editing Skills
Up until this point, we’ve spent a great deal of time focusing on the organization part of editing. As an experienced editor, you know that properly configuring and organizing an edit is essential to a successful project. Of course, it’s not as much fun as actually editing video.
After all, you probably didn’t get into this business because you like organizing files into folders or knowing the finer points of how a video codec works. You want to create compelling stories—stories that entertain, inform, or even inspire! Without further ado, let’s get to the fun stuff, editing in Adobe Premiere Pro.

Footage courtesy of the National Foundation for Credit Counseling (www.DebtAdvice.org)
Using the Source Monitor
In the previous chapter, you mastered ways to organize your media and quickly locate clips (if you skipped Chapter 5, please go back and read it now). Although there are many ways to edit, most pros agree that using the Source Monitor offers far greater precision than any of the drag-and-drop methods. By accurately selecting which parts of a clip to use before the clip hits the Timeline, you’ll have less editing and clean up to do.
Source vs. Sequence Clips
![]()
It’s important to understand the relationship source clips have to sequences. Every time you add a source clip to a sequence, a new instance is created in the Timeline (called a sequence clip). You can edit the effects and properties of sequence clips individually with no effect on the original, source media file. In the Source menu, sequence clips and their affiliated sequences are identified.
Loading a Clip
To use the Source Monitor, you simply need to load a clip into it. However, there are multiple ways to have clips appear in the Source Monitor, depending on the task you’re choosing. Here are the two most relevant methods to load a single clip:
• Double-click a clip in the Project or Timeline panel.
• Drag a clip from the Project panel to the Source Monitor.
Long List of Sources
![]()
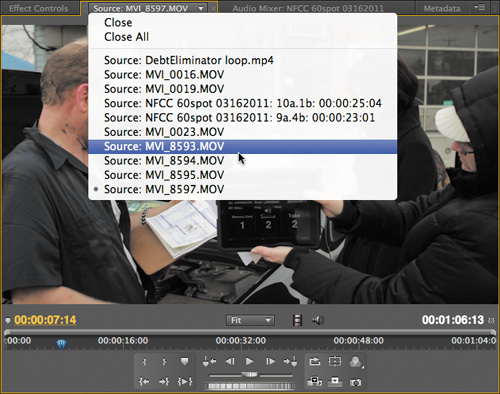
The Source menu can get so long that it extends to the bottom edge of your screen. At that point, the old items will drop off the list. If there are too many clips to sort through, just click the Source menu and choose Close All.
Once you’ve added a clip, the Source Monitor opens (FIGURE 6.1). Its name is also added to the Source menu. When you click the menu (FIGURE 6.2), you’ll see that clips are listed in the order in which you load them (with the newest clips at the bottom of the list).
Figure 6.1. The Source Monitor’s primary controls are located along its bottom edge.

Figure 6.2. The Source menu places the newest clips at the bottom of the list.
Install the Free Cineform Codec
![]()
This chapter uses media with the Cineform codec. You can download the free Neo Player at http://estore.cineform.com/NeoPlayer.aspx to use the media.
Let’s practice loading a clip:
- Launch Adobe Premiere Pro.
- Choose File > Open, navigate to Chapter Files > Chapter_06_Media > [Version Number], and open the project Ch06_Essential_Editing.prproj.
- Open the project bins and try loading individual clips into the Source Monitor.
You’ll find two bins called Card 01 and Card 02 nested in the Footage bin.
- Click the Source menu and switch to previously loaded clips.
Navigate the Source Menu with Keyboard Shortcuts
With a little customization, you can use keyboard shortcuts to navigate clips in the Source Monitor. This is a great way to quickly switch between loaded clips and activate sources.
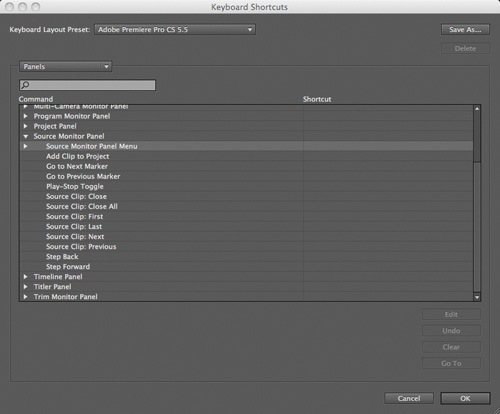
- Choose Premiere Pro > Keyboard Shortcuts (Edit > Keyboard Shortcuts). The Keyboard Shortcuts dialog opens.
- Choose Panels from the second menu.
- Click the disclosure triangle next to Source Monitor Panel to reveal the customizable commands for shortcuts for that panel.
- Click to set keyboard shortcuts for any of the commands that begin with Source Clip.
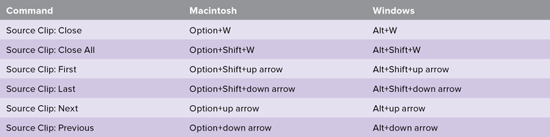
We suggest the mapping as indicated in the table.
- Click Save As and give your keyboard shortcut set a custom name.
- Click OK.
Loading Multiple Clips
You can quickly populate the Source Monitor with several clips. This is a useful way to stay organized, because you can load the next group of shots you intend to work with.
Let’s load several clips. You’ll continue to use the same project as before.
- Switch to the Project panel.
- Locate the bin called Footage. Open it and locate Card 01.
- Select multiple clips in the bin.
You can hold down the Shift key to select a range of clips or press the Command (Ctrl) key to select noncontiguous clips. You can also drag an entire folder at one time.
Controlling the Source Monitor

In this video you’ll learn how to load and control clips in the Source Monitor.
- Drag all of your selected clips into the Source Monitor.
All of the clips load into the Source Monitor, but only one is visible. The order in which clips load is based on the order you originally selected them. The last clip you choose will be active in the Source Monitor.
Source and Program Monitor Controls
The Source Monitor has many controls (FIGURE 6.3), including some that are unique to Adobe Premiere Pro. There is no “right” way to work with your footage. Rather, you can choose which features you’d like to use. Here are some of the most useful controls that you have to choose from when it comes to navigating through a clip:
Figure 6.3. Pay close attention to how the Source and Program Monitors differ. The most important differences lie in which information is displayed as timecode.

Footage courtesy of the National Foundation for Credit Counseling (www.DebtAdvice.org)
A Time ruler. The time ruler is useful for measuring where you are within a clip. The tick marks equate to the unit of time. You can switch measurement methods by Command-clicking (Ctrl-clicking) the current time display. You can also see the In and Out points for the clip (which can also be dragged and repositioned).
B Current-time indicator. The current-time indicator shows you the current frame in the monitor. Other applications (and even Premiere Pro CS5.5) may refer to this as the playhead.
C Viewing area bar. Adjusting the viewing area bar controls the level of detail you’ll see in the time ruler. You can drag the curved handles above each time ruler to change the scale. You can also drag the center of the bar to scroll through the time ruler.
D Current time display. The time display in the lower left of the video frame shows the timecode for the current-time indicator. The Source Monitor shows the time of the current clip, and the Program Monitor shows the sequence’s current time. To switch the display method, Command-click (Ctrl-click) the numbers.
E Duration display. The duration display in the lower right of the video frame shows the duration between the In and Out points set. When no In point is set, the start of the clip or the sequence is used. When no Out point is set, the Source Monitor uses the end of the clip, and the Program Monitor uses the end of the last clip in the sequence to calculate duration.
Playback Resolution
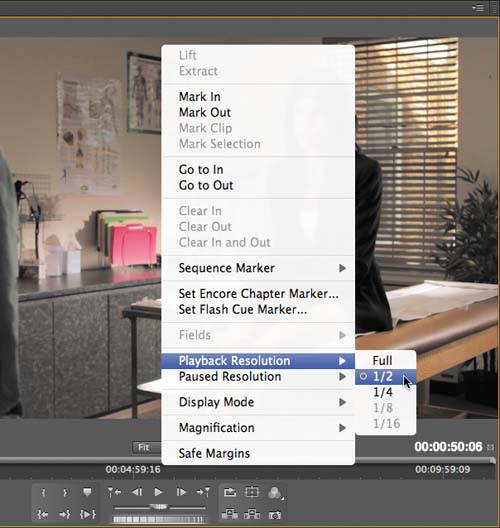
Playing back certain video formats can require a great deal of processing power. This is especially true for both highly compressed formats (such as DSLR) and high data-rate footage (such as R3D files). Fortunately, the Source and Program Monitors let you lower the Playback resolution (FIGURE 6.4).
Figure 6.4. If you are editing off an internal drive on a laptop, lowering the Playback resolution is an absolute must for HD footage.
Unlimited RT
![]()
Using a lower Playback resolution is very similar to using the Unlimited RT features in Final Cut Pro. You are decreasing the load on the system by reducing the Playback resolution during the creative editing stage.
Draft Mode
![]()
Using a lower Playback resolution is very similar to using Draft Quality or Best Performance in Avid’s Video Quality menu. You are decreasing the load on the system by reducing the Playback resolution during the creative editing stage.
50 Percent = 75 Percent
![]()
Setting the Playback resolution to half quality significantly lowers the load on your system. Half quality loads half the data for the width and half for the height (25 percent of the information). In other words, 75 percent of the overhead is reduced.
Which Resolution?
![]()
Not all Playback resolutions are available for all sequence types. Most standard definition sequences offer Full and ½. Many HD sequences allow for ¼ resolution.
Let’s change the Playback resolution for a sequence. You’ll continue to use the same project as before.
- Switch to the Project panel.
- Open the Bin Sequences and then Doctor.
- Locate the sequence called Doctor Rough. Double-click to load the sequence.
- Right-click the image in the Source Monitor or Program Monitor.
- Choose Playback Resolution and set the quality to ½.
- Click Play to view the change in performance and quality.
Pause Resolution
For both the Source and Program Monitors, you can also choose a separate Pause resolution display. This offers great control over your ability to monitor video. Many editors choose to set the Playback resolution to a lower setting (such as ½ or ¼) but will leave the Pause resolution set to Full.
False Errors
![]()
If you’re working with compressed footage, especially AVCHD and other H.264-codec-based media, you may see artifacts. These appear in the Source Monitor or Program Monitor when you lower the Playback resolution. When set below Full resolution, these formats have error correction turned off. The artifacts are not really there and will not appear in exported media.
Full-resolution display when paused makes it easier to check for critical areas like focus and edge detail. This extra level of information is also helpful when performing tasks like keying and color correction. Just keep in mind that scrubbing uses the Playback resolution, not the Pause resolution.
Viewing Fields
If you’re working with interlaced sources (such as SD or 1080i), you can choose how the Source Monitor and Program Monitor display fields (FIGURE 6.5). You can choose to see the first (upper) field, second (lower) field, or both fields to check interlacing. Just right-click in the Source or Program Monitor and choose the desired option. Note that this option is disabled for sequences that use a progressive preset.
Figure 6.5. Many users choose to only view a single field when viewing interlaced video on their computer displays.

Change Magnification
Chances are you’ll need to shrink the display size of a video clip to see it edge to edge in both the Source and Program Monitors. The most commonly used option is Fit, which scales the window so the entire clip is visible (FIGURE 6.6).
Figure 6.6. The Fit view lets you see your entire image in the Source or Program Monitor.

Which Scale?
![]()
The 100% scale option is the most visually accurate. The Fit option is most popular but is the least accurate because it often scales using decimal values. A better choice in many cases is 50%.
- Select either the Source or Program Monitor.
Make sure a video clip is displayed beneath the current-time indicator.
- Click the Scale Video menu and choose a desired size.
The Fit option is most common. For critical image analysis, consider viewing actual pixels at 100% (you’ll likely need to adjust the size of the panel to accommodate the picture). The scale of the Source Monitor is a percentage of the original media. The Program Monitor is a percentage of the sequence’s frame size.
- Expand the size of the panel as needed. In some cases, such as when working with animated movement, you may want to decrease the scale and increase the panel size. This will enlarge the pasteboard (the empty area around the video) and give you more room for keyframes and manipulating the image.
- Use the monitor’s scroll bars to adjust the visible area of a monitor. Scroll bars appear only when the image is too big for a monitor.
Changing Frames in the Program or Source Monitor
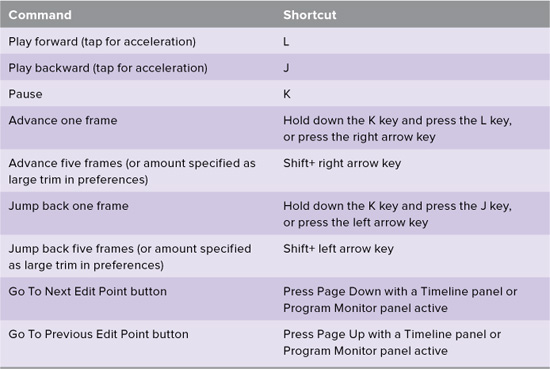
As a skilled editor, you know there are many ways to move around your media. Whether by clicking buttons or dragging with a mouse, the user interface provides obvious and familiar tools that match the conventions used by other nonlinear-editing (NLE) software packages. What’s less obvious is the many keyboard shortcuts available (FIGURE 6.7). TABLE 6.1 contains the default navigation keys (which can of course be modified with the Keyboard Shortcuts panel).
Figure 6.7. To help you learn keyboard shortcuts, you can get a color-coded keyboard with many of the shortcut keys labeled. This one is from Logickeyboard (www.logickeyboard.com).

Table 6.1. Default Navigation Shortcuts
Navigating the Timeline
Now that you’ve mastered clip navigation, it’s time to start putting things all together (literally). The Timeline panel should feel quite familiar to an experienced editor. There are a few subtle differences, however, that are worth exploring, as well as a powerful feature worth noting.
Opening a Sequence in a Timeline Panel
When you first launch Adobe Premiere Pro, the Timeline panel is visible (even if no sequence is loaded). A few important features are useful for additional control over sequences:
• Double-clicking a sequence is the fastest way to load it into the Timeline panel.
• You can open as many sequences as you like in the Timeline panel. If you have several open, a thin scroll bar appears at the top of the panel, which you can drag to navigate horizontally through the open tabs.
• You can drag a sequence tab and drop it into another docking area. This will create another Timeline panel that can have sequences added to it as well.
Modifying Tracks While Editing
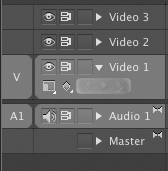
![]()
A quick way to modify tracks while editing is to simply right-click on an audio or video track in the targeted track headers. You can then choose to Add or Delete tracks, as well as indicate where the new tracks should be located.
Targeting Tracks
It’s essential that you target where you want an edit to occur in a sequence. It is possible to edit in new content as well as overwrite existing content with empty space as you make an edit. Precisely targeting tracks is essential (FIGURE 6.8).
Figure 6.8. You can edit media in your Timeline in several ways. Dragging (left) lets you drop the media into place. Pasting (center) lets you copy or cut media that’s in the Timeline and paste it into a new location (controlled by targeting tracks). Patching with the Source Monitor (right) is the most accurate method for editing.

The technique you choose will vary based on your editing approach:
• Dragging. If you prefer to edit by dragging clips, you can target tracks by simply dropping a clip where you want it. This method is the least accurate and can lead to clips ending up in unintended places.
Targeting Shortcuts
![]()
Most of the track targeting commands can have custom keyboard shortcuts assigned if you prefer using the Keyboard Shortcuts command.
• Pasting. If you choose to paste clips from one part of your sequence to another, you must specify target tracks first. You can select more than one target track using the track headers.
• Source Monitor. The most precise way to edit is with the Source Monitor. You can use both audio and video source track indicators as well as target where you want the edit. You can target multiple tracks at one time. For audio tracks, you do need to properly match mono sources to mono tracks and stereo to stereo.
In and Out Points
You’ll find that the In and Out points feature in Adobe Premiere Pro behaves similarly to other editing tools. The standard shortcuts of I and O can be used to mark an In and Out point, respectively. A few additional shortcuts and commands that are related to In and Out points are worth mentioning:
• Reposition In and Out points. If you hold the Option (Alt) key, you can drag the In/Out Grip (the textured area at the center of the shaded span between the In and Out points) to reposition the In and Out points simultaneously (FIGURE 6.9). This allows you to set a new range in the Program Monitor or Timeline panel without changing the duration marked. This technique is called slipping and is covered in depth in Chapter 9.
Figure 6.9. You must hold the Option (Alt) key to drag the In/Out Grip.

• Remove In and Out points. If you Option-click (Alt-click) the In or Out button, you’ll clear the In or Out point (FIGURE 6.10). We also recommend customizing your keyboard shortcuts so Option+I (Alt+I) and Option+O (Alt+O) clear the In and Out points.
Figure 6.10. When creating a three-point edit, you may need to clear a fourth mark from the Source or Program Monitor.

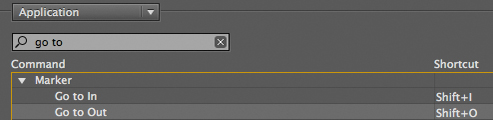
• Go to In and Out points. If you Shift-click the In or Out button, you’ll go to the In or Out point (FIGURE 6.11). We also recommend customizing your keyboard shortcuts so Shift+I and Shift+O go to the In and Out points.
Figure 6.11. Be sure to remap the Go to In and Go to Out commands to your keyboard for maximum speed.
Using Markers
The use of markers is likely a part of your editing approach already. Some editors use markers to quickly identify parts of a clip (such as action or a selected sound bite). Others use markers to position and align elements in a Timeline. Adobe Premiere Pro has a versatile marker system, one that even supports Web interaction.
Markers with Duration
![]()
Using the Duration property is a useful way to make a detailed comment about a particular clip. Markers with duration have a bar extending from the marker to show a time range.
Sequence markers
The Sequence marker is the most common type of marker you’ll use. When snapping is turned on, it is much easier to align elements through the use of markers.
To add a marker:
- Move the current-time indicator to the desired frame in the Timeline panel. You can also position the current-time indicator in the Program Monitor.
- Do one of the following:
• Click the Set Unnumbered Marker button in the Program Monitor or the Timeline panel (FIGURE 6.12).
Figure 6.12. Click the Set Unnumbered Marker button once to add a marker or double-click it to open a dialog for greater control.

• Double-click the Set Unnumbered Marker button to open the Marker dialog as you set it. This lets you add detailed comments as well as specify a duration for a marker.
• Choose Marker > Set Sequence Marker > Unnumbered.
• Press the asterisk key (*) on the numeric keypad to add a marker while a clip or sequence plays.
Clip Markers
Another kind of marker you can use is a Clip marker. Instead of adding a marker to the sequence, this marker is applied to a selected clip. Clip markers are useful for attaching notes to clips or creating points that can be used to align two or more clips.
- Select one or more clips in the Timeline. Alternately, you can load a clip into the Source Monitor panel.
- Position the current-time indicator where you want the marker to appear.
- Choose Marker > Clip Marker and select one of the marker types to add a standard or numbered marker.
Numbered markers
If you’d like to organize your markers a bit more, use numbered markers. You can use numbered markers for Sequence or Clip markers. Adobe Premiere Pro can automatically number markers, or you can choose to set the number manually. You can set unnumbered markers for both sequences and clips:
• Set Next Available Numbered. By choosing Marker > Sequence Marker > Set Next Available Numbered, you can add a numbered marker to the sequence. The numbers start at 0 and go up to 99. You can also add a marker to a clip by choosing Marker > Clip Marker > Set Next Available Numbered.
• Set Other Numbered. If you want to choose a marker number, choose Marker > Sequence Marker > Set Other Numbered. A dialog opens that lets you choose any number between 0 and 99. To add a specific marker to a clip, choose Marker > Clip Marker > Set Other Numbered. In fact, you can even assign the same marker more than once (which is a useful way to align clips).
Let’s try adding a marker to align two clips for a synced sound workflow (which is typical with DSLR video projects).
- Open the bin Sync Footage and double-click to load the sequence Sync Start. It contains two clips, a video file with a slate and an audio track recorded separately.
- Navigate through the video clip and locate the white flash of the slate. You can also listen to the reference audio to help spot the point. Position the current-time indicator where the slate flashes (FIGURE 6.13).
Figure 6.13. The iPad app DSLR Slate makes a useful digital slate. The white flash is one frame long and makes a great sync point. The slate also displays other useful data about the scene that can help when editing.

Footage courtesy of the National Foundation for Credit Counseling (www.DebtAdvice.org)
- Select the video clip on track 1, choose Marker > Clip Marker > Set Other Numbered, and add a marker with the number 1 (FIGURE 6.14).
Figure 6.14. Using marker numbers lets you create associations between multiple clips and tracks.

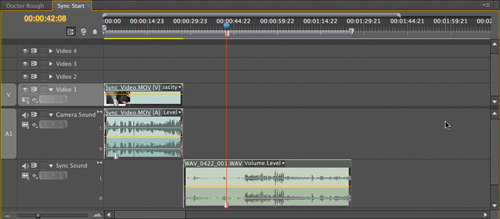
- Navigate through the synced audio track and listen for the slate. You may also see a spike in the waveform. Position the current-time indicator on the spike (FIGURE 6.15).
Figure 6.15. Listen closely for the beep of the slate or clap of the clapboard.

- Select the synced audio clip, choose Marker > Clip Marker > Set Other Numbered, and add a marker with the number 1.
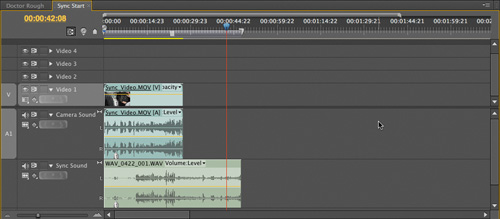
- Select the video and the audio tracks by Shift-clicking (FIGURE 6.16).
Figure 6.16. Select both tracks you want to sync in the Timeline panel.
Merge Clips Together

With Adobe Premiere Pro CS5.5 and later, you can also merge clips together. After syncing, delete the unwanted audio from the Timeline and leave just the video and newly synced sound. With the clips selected, choose Clip > Merge Clips. A new item is added to the bin, which can be renamed and organized in your project.
- Choose Clip > Synchronize > Numbered Markers.
- Choose the Numbered Clip Marker options and choose marker number 1.
- Click OK; the two clips are precisely aligned (FIGURE 6.17).
Figure 6.17. Aligning clips with markers is a very accurate way to synchronize clips.
- Disable the original audio track and listen to the synced sound and video track.
Interactive markers
You can also use markers to exchange information or add interactivity when outputting to certain file formats. In fact, you can place markers in an Adobe Premiere Pro Timeline and exchange them with Flash Video, DVD, or Blu-ray projects thanks to the tight integration of the Adobe Creative Suite. Simply double-click the marker button and choose the desired option (FIGURE 6.18).
Figure 6.18. Markers can add rich interactivity to DVD, Blu-ray, and Flash outputs.

Three interactive marker types are available. This style of authoring is typically done with Adobe Flash Professional or Adobe Flash Catalyst (both of which are included with the Master and Production Premium Creative Suite collections). You can also use Adobe Encore to create disc-based and Flash projects. The three interactive markers include:
• Encore Chapter Marker. If you’d like to add cue points or chapter markers for use in a DVD or Blu-ray project, add Encore Chapter Markers. These markers will come over when you exchange a sequence with Dynamic Link to Adobe Encore or compress the sequence using the Adobe Media Encoder.
• Web Link. Certain formats like Flash Video support the use of Web links. You can add a marker at a specific point in time to trigger the loading of a Web site into a targeted frame or window. In Adobe Premiere Pro you can precisely time the marker and specify its destination. This feature can also work with DVD and Blu-ray Discs on Web-enabled players and computers.
• Flash Cue Marker. You can add markers that can serve as navigation points for Flash authoring. These points can also act as triggers to load content into a frame.
Essential Editing Commands
The core functionality of editing in Adobe Premiere Pro should closely match your experience with other nonlinear-editing applications. You can make two primary types of edits once you’ve determined which clip you want to use and what portions you want to use (and where to place it):
Install the Free Cineform Codec
![]()
As mentioned earlier, this chapter uses media with the Cineform codec. Be sure to download the free Neo Player at http://estore.cineform.com/NeoPlayer.aspx to use the media.
• Overwrite (Overlay). The Overwrite edit (called Overlay prior to Adobe Premiere Pro CS 5.5) is the default editing method. Frames (or empty space) in the sequence are replaced with new frames.
• Insert. An Insert edit adds the clip to your sequence and shifts the existing material later in the sequence (to the right).
Although there are other specialty edits (such as replacing an edit) and many other ways to approach editing, these two commands encompass how you’ll work 99 percent of the time.
Overwrite Editing (Overlay)
The Overwrite edit is a fast way to quickly assemble your edit. The key with the Overwrite edit is to remember to accurately patch your tracks so the targeted tracks line up. If you’ve targeted a track for editing but have no source indicator patched (targeted), the empty track background will overwrite any media for the duration of the source clip. This type of edit can be useful (such as when you want to create a hole to fill later), or it can be destructive because you may unintentionally remove material from your sequence.
Insert and Overwrite in Action
![]()
In this video you’ll see how the Insert and Overwrite edit commands function.
Overlay = Overwrite
![]()
Earlier versions of Adobe Premiere Pro refer to an Overlay edit. In CS5.5, the term was renamed Overwrite, which is a closer match to industry conventions.
For this exercise, use the sequence Doctor Start and media in the bin Card 02 to practice. Because you are an experienced editor, we won’t walk you through a long exercise. Instead, we’ll use the media in the bins to cut a short scene.
Here’s how to create an Overwrite edit:
- Open a sequence with which you’d like to edit.
The sequence Doctor Start is properly set up with the right frame rate and frame size for the media in the Card 02 bin.
- Load a clip into the Source Monitor. Mark a duration that you’d like to use (FIGURE 6.19).
Figure 6.19. Be sure to precisely select the dialogue that you want to use.

Footage courtesy of the National Foundation for Credit Counseling (www.DebtAdvice.org)
Lock it Down

In this video you’ll learn the difference between track locks and sync locks, and how they’ll impact your Insert edits.
- Place the current-time indicator in the sequence where you’d like to add the media.
- Click to select the headers of the tracks where you want the Overwrite edit to occur (FIGURE 6.20).
Figure 6.20. Patching tracks requires precision. Make sure that you have accurately targeted both the source and destination tracks.
- Drag the source clip track indicators so they map to the headers of the tracks where you want to overwrite the media.
- In the Source Monitor, click the Overwrite button or press B (FIGURE 6.21).
Figure 6.21. Depending on which version of Adobe Premiere Pro you are using, this button may be labeled Overwrite or Overlay.

Add a Track While Adding a Clip
If you drag a clip from the Project panel or Source Monitor to the empty space above the topmost video track, a new video track will be added. For audio only files, simply drag to the empty area below the lowest track. The correct track type will be added based on the source clip.
The audio and video media are overwritten to the targeted tracks at the current-time indicator.
Insert Editing
The Insert edit is best used when you want to preserve previously edited content but need to make an addition. For example, you might need to add an extra sound bite or add a shot to a B-roll series. When you create an Insert edit, you need to pay close attention to your use of locks:
• If one or more tracks are locked, an Insert edit affects only clips in unlocked tracks. All media will move on the unlocked tracks.
• If you’d like to control which tracks are affected by an Insert edit, you can also use Sync Locks. Deselect Sync Locks for any tracks you want to leave unaffected.
Here’s how to create an Insert edit:
- Open a sequence with which you’d like to edit.
- Load a clip into the Source Monitor. Mark a duration that you’d like to use.
- Place the current-time indicator in the sequence where you’d like to insert the media.
Typically, this will be between two clips, but you can also split an existing clip.
How Do Locks and Targets Work?

If a track is either targeted or sync locked, an Insert edit will affect it. Only nontargeted tracks with Sync Lock disabled will be unaffected.
- Click to select the headers of the tracks where you want the Insert edit to occur.
- Drag the source clip track indicators so they map to the headers of the tracks where you want to overwrite the media.
- Select the Sync Lock boxes in the track headers for any tracks that you want to shift as part of the edit (FIGURE 6.22).
Figure 6.22. By default, all Sync Locks are enabled for a sequence.

- In the Source Monitor, click the Insert button or press V (FIGURE 6.23).
Figure 6.23. The Insert edit will ripple items in your sequence and is affected by both Sync Locks and which tracks are targeted.

The edit occurs. The audio and video of the source clip are added to the sequence. If a track has no source track indicator (or is targeted because its Sync Lock is enabled), an edit impacts that track’s contents. In this case an empty track background is inserted on the track at the current-time indicator for the duration of the source clip.
Quickly Lock
![]()
If you need to lock all the video or audio tracks, simply Shift-click a lock icon in the Timeline panel. It is in fact often faster to lock all tracks and then selectively unlock any tracks you don’t want to use.
Three-point Editing
Knowledgeable editors know that the most precise edit they can make is a three-point edit. Ultimately, the three-point edit is defined by using three marks in both the Timeline (or Program Monitor) and Source Monitor (FIGURE 6.24). You choose either two In points and one Out point or two Out points and one In point. There is no need to set a fourth point, because Adobe Premiere Pro can determine it for you.
Figure 6.24. An In and Out point have been set in the Source Monitor to indicate which footage will be used. An In point in the Timeline panel (or Program Monitor) shows where the newly added media will begin.

Footage courtesy of the National Foundation for Credit Counseling (www.DebtAdvice.org)
Backtiming Clips
![]()
A useful three-point editing technique is backtiming a clip. Mark an In and Out point for your source, and then use just an Out point in the Timeline. Adobe Premiere Pro will calculate where the new clip should start. This is useful if you want to place a B-roll just before a critical sound bite.
When setting the range for the edit, you’ll use an In and Out point. The most common choice is to set these points inside a source clip. However, there may be times when you want to define that range in the Timeline (such as if you have a sound bite to cover with B-roll).
You then must specify where you want the third point to be. Again, this can be on either the source or program side. Most find it easiest to place the In point to define where a clip should start. You can also use just an Out point to specify where a clip should end.
The Danger of Dragging Clips
![]()
We are not known for frequently soapboxing on a particular topic, but for this we’ll make an exception. DO NOT drag and drop media into your Timeline when you need a precise edit. Taking the time to master a three-point edit ensures that you’ve accurately chosen both source frames and a destination. Dragging and dropping on the other hand leads to a disorganized Timeline and can easily lead to unwanted gaps and flash frames.
Here’s how to use a three-point edit:
- Open a sequence with which you’d like to edit.
- Load a clip into the Source Monitor. Mark a duration that you’d like to use.
- Click to select the headers of the tracks where you want the Insert or Overwrite edit to occur.
Video Only or Audio Only Edits While Dragging
If you really like dragging and dropping, you can take more control. When a clip is loaded into the Source Monitor, two small icons (next to the Zoom level menu) represent Video and Audio. By dragging just one icon (instead of the whole clip), you can select just video or audio for an edit.
- Drag the source clip track indicators so they map to the headers of the tracks where you want to overwrite the media.
- In the Source and Program Monitors, use any combination of three In and Out points.
- Click either the Insert or Overwrite button in the Source Monitor.
The edit is made.
Next Steps
Now that you’ve regained your confidence in the Timeline, it’s time to take even more control. The next chapter explores several additional controls for editing. You’ll learn to create four-point edits, retime clips, spot edits with waveforms, and replace clips. You’ll also gain additional control over creating sequences using specialized editing commands like Automate to Sequence and storyboard editing.