Project 9
Monster Mashup
Mix-and-match toys take a variety of forms, from Mr. Potato Head to paper dolls. Now, you can create a virtual mix-and-match toy in the form of a monster generator called Monster Mashup.
Monster Mashup invites you to paint a collection of crazy monster parts — hair, faces, bodies, and feet — and then code an interface that allows a player to mix and match parts to create a new monster. You’ll program drop-down lists and buttons to assign parts based on player choices, and build a Mashup button that randomly mashes parts together!
Brainstorm
Around Halloween, kids love coding Monster Mashup. But at other times of the year, they produce a wide variety of other mix-and-match toys. What are some options you can dream up?
- Potato people parts, similar to Mr. Potato Head
- Sports smashup featuring jumbled-up sports attire
- Fashionista diva dress-up doll
- School lunch smorgasbord (entrée, side, beverage, dessert)
- Celebrity family (mixed-up moms, dads, and kids)

Programs written for entertainment purposes take many forms, including games and toys. Games typically feature a goal the player strives to attain and some criteria for winning, while toys usually have no specific goal and are intended more for exploratory play.
Start a New Project
Begin creating your Monster Mashup toy by starting a new project as follows:
 Start MicroWorlds EX.
- From the yellow MicroWorlds EX startup screen, select Free Mode.
A new project opens.
- From the menu bar, choose File⇒New Project Size⇒MicroWorlds Small.
 Feel free to create your project by using any size. Projects featuring many monster-part choices may require a larger workspace, so consider using a larger project size. Smaller spaces work well for smaller monsters, and require less resizing of the drawing area when creating parts in the Shape Editor.
Color the Background and Add a Title
Give the background a solid color and add a title for your toy as follows:
- In the Command Center, type the command setbg "violet (or any other color) and click Enter (Windows) or Return (Mac). Remember to place the quotation marks in front of the color name, but not after.
The command setbg "colorname sets the background color. In this case, the background color changes to violet.
 From the toolbar, click the Create a Text Box button and then move into the workspace and create a medium rectangle for the text box; type the name of your toy — Monster Mashup — in the white area of the text box.
- Select the text inside the text box. From the menu bar, select the Text menu and then use the menu options to format the text.
In the example, I used the Haunt font. See Project 1 for details on formatting text.
- Right-click (Windows) or Ctrl-click (Mac) in the white area of the text box and select Transparent from the pop-up menu.
- Drag the title into a position where it will be out of the way from other toy components.
For example, drag the title to the lower-right area of the workspace.
When you start to create an object, your mouse appears as a finger pointer. If you change your mind about creating the object, you’ll want to switch back to the arrow pointer. Do so by clicking in the Command Center or clicking the Arrow Pointer button on the toolbar.
Create and Name Turtles for Different Monster Parts
Follow these steps to create four turtles — for the monster’s hair, face, body, and feet — and then name each turtle for the monster part it will become:
 From the toolbar, click the Create a Turtle button. Then in the workspace, click to hatch a turtle.
- Repeat Step 1 three more times to create a total of four turtles.
- Drag each turtle on the workspace to create a vertical lineup similar to Figure 9-1.
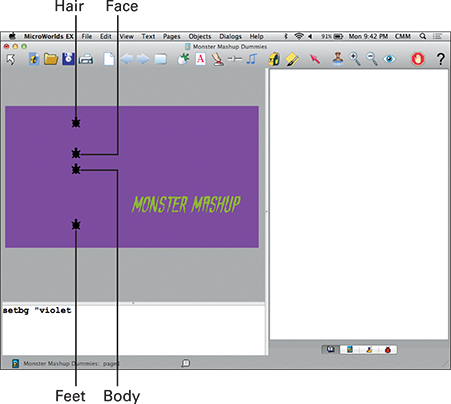
Figure 9-1
- The turtle near the top of the workspace will be the monster head. Right-click (Windows) or Ctrl-click (Mac) on the top turtle and select Open Backpack from the pop-up menu.
- On the State tab of the turtle backpack, click the Edit button.
The turtle Name dialog box opens, as shown in Figure 9-2.

Figure 9-2
- In the Name text box, type hairturtle for the turtle name and then click OK.
- On the State tab, enter 60 in the Size field.
The backpack now appears as shown in Figure 9-3. Note that other attributes on the State tab, such as your Xcor and Ycor, will probably differ from the figure.
- Close the turtle backpack.
- Repeat Steps 4–7 to name and size each of the remaining turtles as follows:
- Second turtle: Name: faceturtle; Size: 60
- Third turtle: Name: bodyturtle; Size: 40
- Fourth turtle: Name: feetturtle; Size: 60
Note that you may need to make additional size adjustments later to make all the body parts fit together.

Figure 9-3
As your computer programs become more complex, it’s a good idea to name all the turtles, shapes, and other elements. This helps you keep better track of everything in your code. Naming a turtle something like feetturtle — not just feet — lets you know that the element is a turtle when examining your code.
Create and Name Hair and Face Shapes
Follow these steps to create hair and face shapes for your monster:
 Click the project Shapes tab (located in the lower-right corner of the window).
- On the project Shapes tab, double-click a shape spot.
The Shape Editor opens. The default shape size is 40 pixels by 40 pixels. This is a good size for the hair and face parts, so leave the size as is.
- In the Shape Editor, in the empty white text box, use the drawing tools to create a hairstyle as shown in Figure 9-4.
- At the top of the Shape Editor, type a name, such as greenhair, for the shape. Then click OK.
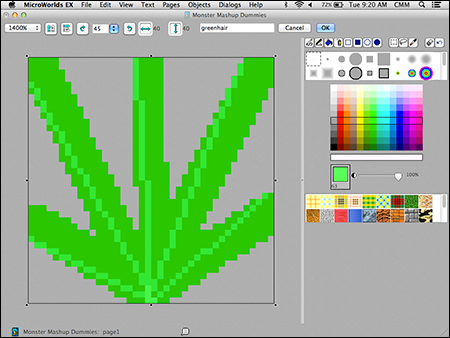
Figure 9-4
The shape appears in the Shapes pane.
- Repeat Steps 2–4 to create three more hairstyles for your monster.
The hair shapes for the example — named greenhair, goldhair, bluehair, and orangehair — now look something like Figure 9-5 in the Shapes pane.
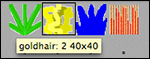
Figure 9-5
- Click a hair shape on the project Shapes tab and then move into the workspace and click the hairturtle.
The turtle now wears the shape.
- Repeat Steps 2–4 to create four faces for your monster. Type a name for each shape (for example, happyface, madface, worryface, and sadface).
The face shapes for the example now look like Figure 9-6 in the Shapes pane.

Figure 9-6
- Click a face shape on the Shapes tab and then move into the workspace and click the faceturtle.
The turtle now wears the shape.
If you accidentally click somewhere other than the turtle, the face shape will appear on the background — simply right-click (Windows) or Ctrl-click (Mac) the shape and select Remove from the pop-up menu to remove it.
Create and Name Body Shapes
Follow these steps to create body shapes for your monster:
- On the project Shapes pane, double-click a shape spot.
The Shape Editor opens. The default shape size is 40 pixels by 40 pixels. This size is too small for body shapes and needs to be increased.
- From the top-left drop-down menu, select a zoom size of 200%. Then drag and adjust the sizing dots on each side of the shape until the width is 250 pixels and the height is 250 pixels.
Now there is sufficient room to draw a monster body.
- In the Shape Editor, use the drawing tools to create a body.
- At the top of the Shape Editor, type a name, such as bluebody, for the shape (see Figure 9-7). Click OK.
The shape appears in the Shapes pane.

Figure 9-7
- Repeat Steps 1–4 to create three more bodies for your monster.
The body shapes for the example — named bluebody, greenbody, orangebody, and pinkbody — now look something like Figure 9-8 in the Shapes pane.

Figure 9-8
- Click one of the body shapes on the Shapes pane and then move into the workspace and click the bodyturtle.
The turtle now wears the shape.
- The body probably covers the face and needs to be moved behind the faceturtle. Right-click (Windows) or Ctrl-click (Mac) the bodyturtle and select Send to Back from the pop-up menu.
The body should now be positioned behind the face.
Turtle shapes may overlap each other depending on the size of the shapes and the coordinates of the turtles. To move a turtle to the front, right-click (Windows) or Ctrl-click (Mac) the turtle and select Bring to Front from the pop-up menu. To move a turtle to the back, right-click (Windows) or Ctrl-click (Mac) the turtle and select Send to Back.
Create and Name Feet Shapes
Follow these steps to create feet shapes for your monster:
- Continue working on the project Shapes pane.
- Double-click a shape spot.
The Shape Editor opens. The default shape size is 40 pixels by 40 pixels. This size is too small for feet shapes and needs to be increased.
- Change the zoom to 500 percent. Then drag and adjust the sizing dots on each side of the shape until the width is 120 pixels and the height is 60 pixels.
Now the dimensions are just right for creating a set of monster feet.
- In the Shape Editor, use the drawing tools to create a set of feet.
- At the top of the Shape Editor, type a name, such as creepyfeet, for the shape (see Figure 9-9). Then click OK.

Figure 9-9
The shape appears in the Shapes pane.
- Repeat Steps 2–5 to create three more sets of feet for your monster.
The feet shapes for the example — creepyfeet, slipperfeet, birdfeet, and duckfeet — now look something like Figure 9-10 in the Shapes pane.

Figure 9-10
- Click one of the feet shapes on the project Shapes pane and then move into the workspace and click the feetturtle.
The turtle now wears the shape.
If the size of a monster part requires adjustments, it is more efficient to make them by increasing or decreasing the size of the turtle, not the shape. In this way, you need only to make a change to a single turtle, not several shapes. Just open the turtle backpack and type a new number for the turtle size on the State tab.
Make Drop-Down Lists for Each Part
A user playing your Monster Mashup toy needs a way to select a shape for each body part. A drop-down list allows the user to see all the shape choices and then choose one. Make a drop-down list for each monster part as follows:
- From the menu bar, choose Objects⇒New Drop Down.
A drop-down dialog box appears.
- In the Name field, type the name of the list, such as hairdrop.
- In the Label field, type the name of the first shape in the collection, such as orangehair. Click Add (Windows) or Insert (Mac) to add the shape name to the list.
- Repeat Step 3 to add three more labels — greenhair, goldhair, and bluehair — to the list (see Figure 9-11).

Figure 9-11
You can make additional adjustments to your drop-down list using the buttons in the Drop Down dialog box:- To remove a label, select it and click Delete.
- To adjust the order of the labels, click any label and click Up or Down.
- To choose which label shows when the drop-down list appears in the workspace, click that label.
- To show a blank space when the drop-down list appears in the workspace, click Empty (Windows) or Unselect (Mac).
- Leave the Visible option checked and the Show Name option unchecked.
- Click OK to finish making the drop-down list.
The drop-down list (shown in Figure 9-12) is added to the workspace.
Check that the drop-down list names the shapes correctly by clicking the selection arrows on the right side of the drop-down list (see Figure 9-13).

Figure 9-12
- Drag the drop-down list to position it on your toy.

Figure 9-13
 At this point, the shape on the monster might not match the shape showing in the drop-down list. That’s because the function of the drop-down list is to show the choices for the monster part, not to change the shape. For each part, you will create a procedure and button to change the shape to a choice from the drop-down list.
Code Selection Procedures for the Drop-Down Lists and Make Buttons
A procedure and button allow the user to apply a monster part choice made from a drop-down list. These procedures are selecthair, selectface, selectbody, and selectfeet. You will write each procedure and then make a button to execute the procedure. Follow these steps:
 Open the project Procedures pane.
- Type the following selecthair procedure:
to selecthair
if hairdrop = 1 [hairturtle, setsh "greenhair]
if hairdrop = 2 [hairturtle, setsh "goldhair]
if hairdrop = 3 [hairturtle, setsh "bluehair]
if hairdrop = 4 [hairturtle, setsh "orangehair]
endHere’s how the procedure works:
- If the first shape, greenhair, in the Hair drop-down list is selected (if hairdrop = 1), the greenhair shape is applied to the hairturtle.
- If the second shape, goldhair, in the Hair drop-down list is selected (if hairdrop = 2), the goldhair shape is applied to the hairturtle.
- If the third shape, bluehair, in the Hair drop-down list is selected (if hairdrop = 3), the bluehair shape is applied to the hairturtle.
- If the fourth shape, orangehair, in the Hair drop-down list is selected (if hairdrop = 4), the orangehair shape is applied to the hairturtle.
An if-then conditional is written for each shape in the drop-down list. There are four hair shapes in the hairdrop, so there are four conditionals in the selecthair procedure.
 Next, you need to create a button that executes the selecthair procedure. On the toolbar, click the Create a Button button.
- In the Button dialog box, fill in the following information:
- Label: Type the name of the body part (Hair, for example) in the Label field.
- Instruction: Type the name of the procedure that puts the selected shape on the monster (for example, selecthair).
- Do It: Select the Once radio button.
- Visible: Leave this check box selected.
The dialog box for the example looks like Figure 9-14.
- Click OK to close the Button dialog box.
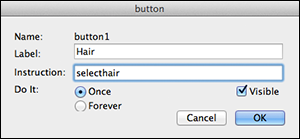
Figure 9-14
The Hair button is added to the workspace of the toy.
- Drag the button to position it next to its drop-down list.
When the player clicks the Hair button, the selecthair procedure is executed. The hair shape selected at the hairlist drop-down list is applied to the hairturtle.
- Follow the same pattern in Step 2 to create procedures for selectface, selectbody, and selectfeet. (See Figure 9-15.)
Here is the code for the selectface procedure:
to selectface
if facedrop = 1 [faceturtle, setsh "happyface]
if facedrop = 2 [faceturtle, setsh "madface]
if facedrop = 3 [faceturtle, setsh "worryface]
if facedrop = 4 [faceturtle, setsh "sadface]
endHere is the code for the selectbody procedure:
to selectbody
if bodydrop = 1 [bodyturtle, setsh "orangebody]
if bodydrop = 2 [bodyturtle, setsh "greenbody]
if bodydrop = 3 [bodyturtle, setsh "bluebody]
if bodydrop = 4 [bodyturtle, setsh "pinkbody]
endHere is the code for the selectfeet procedure:
to selectfeet
if feetdrop = 1 [feetturtle, setsh "creepyfeet]
if feetdrop = 2 [feetturtle, setsh "slipperfeet]
if feetdrop = 3 [feetturtle, setsh "birdfeet]
if feetdrop = 4 [feetturtle, setsh "duckfeet]
end - Follow the same pattern in Steps 3–6 to create buttons to execute the procedures for the selectface, selectbody, and selectfeet procedures that you created in Step 7.
Here is a complete list of all objects and instructions you create for Monster Mashup:
 The example shows four options for each body part, but you can use more or fewer parts. Just be sure to adjust your drop-down lists and selection procedures to match the number of shapes you create for each part. Carefully match the order of shapes in the drop-down list with the order of shapes in the selection procedure. Also, be cautious to match the spelling of the shape name to its spelling in the procedure to minimize errors and reduce troubleshooting time.
Conditional statements, including the IF-THEN commands used in Monster Mashup are critical to any toy or game you code. See Projects 7 and 8 for additional details on working with IF-THEN commands.

Figure 9-15
Code a Procedure and Add a Button for the Monster Mashup
A mashup procedure and button allow the user the wild and crazy option of randomly selecting all four monster parts at one time. In the Procedures pane, create the mashup procedure and button as follows:
- Type the following mashup procedure:
to mashup
hairturtle, setsh pick [greenhair goldhair bluehair orangehair]
faceturtle, setsh pick [happyface madface worryface sadface]
bodyturtle, setsh pick [orangebody greenbody bluebody pinkbody]
feetturtle, setsh pick [creepyfeet slipperfeet birdfeet duckfeet]
endThe pick command randomly picks an item from the shapes listed inside the square brackets. The setsh command then applies that shape to the turtle identified at the beginning of the command line.
- Next, you need to create a Mashup button to execute the mashup procedure. From the toolbar, click the Create a Button button.
- In the Button dialog box, fill in the fields as follows (see Figure 9-16):
- Label: Type Mashup in the Label field.
- Instruction: Type mashup in the Instruction field.
- Do It: Select the Once radio button.
- Visible: Select this check box to leave the button visible.
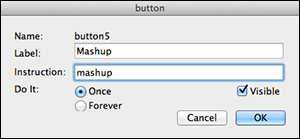
Figure 9-16
- Click OK to close the Button dialog box.
The Mashup button is added to the workspace.
- Drag the Mashup button to reposition it to where you want it.
Note that you can delete the setbg "violet command in the Command Center.
You can delete commands executed in the Command Center after your program is complete. Examples include initial setup commands, such as setting the initial heading of turtle objects or setting the background color. The purpose of deleting these commands is simply to tidy up your finished project.
Save, Test, and Debug
![]() Click the Save Project button on the toolbar to save your toy. Test all the buttons to ensure it runs the way you want.
Click the Save Project button on the toolbar to save your toy. Test all the buttons to ensure it runs the way you want.
Troubleshoot and fix bugs until the toy looks just the way you want.