Project 1
Art Toy
Coding the Art Toy introduces you to MicroWorlds EX primitives, which are built-in commands including setting background and turtle (object) colors; putting the turtle pen up and pen down; setting the pen size; moving the turtle forward and backward; and turning the turtle left and right. It also introduces the home and clean primitives.
In this project, you’ll code your first procedures — new commands you create by putting together primitives in new ways, many using the repeat command. As you build Art Toy, you’ll craft a user interface by making a text box title and buttons, as well as tinker with setting your buttons to execute once versus forever. The fun is in creating your own toy, and then playing with it. Now you’re coding!
Brainstorm
All projects can be adapted to appear in new ways to the user or player. Many times, by using different graphics with the same computer code, you can create projects or games that look very different.
You can create a few different looks for Art Toy, but mostly, this project gives the end user, the person who will be playing with your art toy, a chance to make things look differently because that person uses your buttons to make their own art.
In future projects, you will have many chances to brainstorm cool new ways to change the look of your user interface. For now, get coding by following these simple steps.
Start a New Project
Begin creating your Art Toy by starting a new project as follows:
 Start MicroWorlds EX.
- On the yellow MicroWorlds EX startup screen, select Free Mode.
A new project opens.
- From the menu bar, choose File⇒New Project Size⇒Full Screen 640 x 480.
This is the next-to-the-largest project size available and provides plenty of space for creating your Art Toy. Other project size options consist of MicroWorlds Small, MicroWorlds Standard, Web Player, and Full Screen 800 x 600.
 You must set the project size at the outset of a new project. You cannot resize projects later.
Add a Title to the Toy
The region in which your toy appears is the workspace. Add a title to the workspace as follows:
 On the toolbar, click the Create a Text Box button (shown in the margin). Move into the workspace.
The cursor becomes a white pen.
- Drag the mouse anywhere on the workspace to draw a medium-sized rectangle, creating the text box.
A text box called text1 appears in the workspace.
- Click inside the text box. Type a title — Art Toy — in the white area of the text box, as shown in Figure 1-1.
- Use the mouse to select (highlight) the text inside the text box, as shown in Figure 1-1.
The text can now be formatted. Note that the Windows menu options for formatting text may vary slightly from Mac menu options described here.
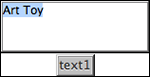
Figure 1-1
- From the menu bar, choose Text⇒Font and choose a font from the pop-up menu of fonts.
- Choose Text⇒Size to choose a text size for your title.
- Choose Text⇒Style to choose a text style for your title from the pop-up menu.
Options consist of Plain, Bold, Italic, and Underline.
- Choose Text⇒Color.
A Colors dialog box appears, as shown in Figure 1-2.

Figure 1-2
- Move the slider, which is on the right, and click a color on the color wheel to choose a text color for your title. Click OK to apply the color to your text title.
- If needed, resize your text box to better fit the text you type inside it. Ctrl-click (Windows) or Command-click (Mac) outside the text box and drag over a side of the text box. Sizing dots appear — click and drag any of them to resize the text box.
- Right-click (Windows) or Ctrl-click (Mac) inside the title text box and select Transparent from the pop-up menu.
Making the text box transparent makes the text inside the box visible and the box itself invisible.
- Click your title text and drag it into a position in the workspace where you would like to place the title.
 You can edit text only when the text box is opaque (not transparent). To change a text box from transparent to opaque, right-click (Windows) or Ctrl-click (Mac) the text and select Opaque from the pop-up menu.
Add a Turtle
All programming languages have ways to create objects. Objects are usually the physical things that move around the computer screen — cars, birds, paintballs, and so on. Programming languages have different name for objects. In another programming language you may have heard of, GameSalad, an object is called an actor. In MicroWorlds EX, an object is called a turtle.

In certain programming languages, such as object-oriented programming languages (OOPs), objects can be physical things but can also be informational things — abstract entities that possess data and behave in certain ways in a program.
In your Art Toy, your turtle will do the drawing! He is an object that can move around the workspace in many ways. Also, the turtle carries a pen that is capable of drawing in a variety of colors and pen sizes.
Create a turtle for your Art Toy as follows:
 On the toolbar, click the Create a Turtle button.
- Move into the workspace and click.
A turtle hatches in your workspace.
You can drag the turtle and move it anywhere in the workspace. You can also click its snout and turn the turtle around in a circular motion to point in any direction.
Test Primitives in the Command Center
There are two types of commands in MicroWorlds EX:
- Primitives: These are built-in commands that already exist in the MicroWorlds EX vocabulary.
- Procedures: These are new commands you create by putting together primitives and other procedures you have already coded.
You can type any command, primitive, or procedure, at any time into the Command Center for the purpose of testing out the command. The Command Center is located just below the workspace, at the bottom of the MicroWorlds EX window (see Figure 1-3).
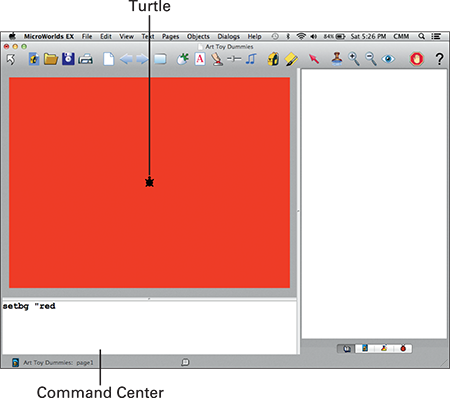
Figure 1-3
Try out a few of these primitives at the Command Center:
- setbg: This command sets the background color. In the Command Center, type setbg "red and then press Enter (Windows) or Return (Mac). This command sets the background color to red, as shown in Figure 1-3.
Now try setbg 15. The background is still red! That’s because MicroWorlds uses both names and numbers to represent colors. The color name red is the same as the color number 15.
Try a few more color names such as yellow, green, and violet. Also test a few more color numbers using any number from 0 to 139. You can type a new line of code each time, or replace the color you typed previously and then press Enter/Return.
Computer programming languages have their own syntax, which are the rules for how the language is communicated. The syntax includes grammar (where the words go, and in what order) as well as punctuation (where parentheses, brackets, commas, and quotes must be placed). In MicroWorlds EX, opening quotation marks are often used with names, but closing quotation marks are never used. Quotation marks are not used with numbers, except in special cases.
Most computer programming languages have a compiler, a separate program that checks your code for syntax errors before you can try executing your code. Compilers give you error messages to help you fix, or debug, your code. MicroWorlds EX has a built-in compiler that checks for errors as you code. Error messages appear in the Command Center — read them to see what changes you need to make to correct your code.
- setbg random: This command sets a random color for the background. In the Command Center, type setbg random 140 and then press Enter (Windows) or Return (Mac). This command sets the background color to a color number selected randomly from 0 to 139. Execute the command a few times to see many new colors appear.
Random number generation is often used in computer code. Randomness allows you to make actions in your computer code behave like actions in the real world: dogs run in crazy zig-zag motions, dice rolls result in different combinations, and some people get sick during flu season while others don’t. In MicroWorlds EX, random whole numbers are made from 0 up to one less than the number you provide. For example, the code random 6 results in one of these numbers: 0, 1, 2, 3, 4, or 5. The code random 140 results in one of these numbers: 0, 1, 2, 3 … all the way up to 139. Each number in the group is as likely to appear as any other number in the group.
- home: This command moves the turtle to the home position, which is the exact center of the workspace. To try out this command, drag the turtle to any location in the workspace. In the Command Center, type home and then press Enter (Windows) or Return (Mac). The turtle moves to the home position and points toward the top of the workspace.
Some commands, such as home, are standalone, while others require additional inputs, such as setbg 15 or setbg "red. The command setbg cannot be executed without providing an input indicating a color code or color.

In geometry, coordinates are used to describe the position of a point on a graph. MicroWorlds EX also uses coordinates. The west-east position of a turtle is its x-coordinate, or XCOR. The north-south position of a turtle is its y-coordinate, or YCOR. The exact center of the workspace is located where XCOR = 0 and YCOR = 0. Another way to write this in math is (0,0). This special position is called the origin.
- setc: This command sets the color of the turtle. In the Command Center, type setc "yellow and then press Enter (Windows) or Return (Mac). This command stands for set the turtle color to yellow. Try a few more colors such as pink, lime, cyan, and brown. The color of the turtle is the same as the color of its drawing pen.
- setc random: This command sets the turtle color to a random color. In the Command Center, type setc random 140 and then press Enter (Windows) or Return (Mac). This command stands for set the turtle color to a color number selected randomly from 0 to 139. Execute the command a few times to see the turtle turn many different colors. The color of the turtle is the same as the color of its drawing pen.
- fd or bk: These commands move the turtle forward or backward. In the Command Center, type fd 10 and then press Enter (Windows) or Return (Mac). This translates to move forward 10 steps. Now type fd 100 and note the difference. Then type fd 1000 and see what happens when it moves off one side of the workspace! The maximum value for forward and backward is 9999.
The opposite of moving forward is moving backward. Type bk 10 and then press Enter (Windows) or Return (Mac). This command translates to move backward 10 steps. Type some other distances and observe the change in the turtle’s position.
The MicroWorlds EX workspace is similar to a flat map of Earth. If a turtle walks off of one side of the workspace, it reappears on the opposite side of the workspace. - pd or pu: These commands set the turtle’s pen down or up. In the Command Center, type pd and then press Enter (Windows) or Return (Mac). This translates to pen down. It looks as if nothing happens! That’s because the turtle pen is below the center of the turtle — when he’s not moving, you can’t see whether his pen is up or down.
Try the forward and backward commands to see the turtle draw as it moves. The command pu stands for pen up, but don’t give the pen up command now; just leave the pen down.
- setpensize: This command sets the pen size. The pen size indicates the line width when the turtle moves with the pen down. The starting (or default) value is 1. Larger sizes make wider pen widths. In the Command Center, type setpensize 3 and then press Enter (Windows) or Return (Mac). This sets the pen size to the value 3. Try several values to create pen sizes of different widths. You can see the effect of changing the pen size only when the pen is down and the turtle is moving.
- rt or lt: These commands turn the turtle right or left. In the Command Center, type rt 90 and then press Enter (Windows) or Return (Mac). This translates to turn right 90 degrees. Now type lt 90 and press Enter/Return. This translates to turn left 90 degrees. Try other degree angles such as 45, 180, 270, and 360.
Circle measurements are made in units called degrees. There are 360 degrees in a circle. To make a turtle face the opposite direction from where it is currently facing, give the command rt 180 or lt 180.
Turtle turns are always made from the viewpoint of the turtle. If the turtle is facing north and you give the command rt 90, the turtle faces east. If you give the command rt 90 again, the turtle faces south. Give the command rt 90 a third time and the turtle now faces west.
- clean: This command clears any graphics from the workspace. In the Command Center, type clean and then press Enter (Windows) or Return (Mac). Notice that the background color remains. The turtle also remains and does not change its position.
To delete a turtle, right-click (Windows) or Ctrl-click (Mac) the turtle and select Delete from the pop-up menu.
To try out combination commands, type a short sequence of commands in the Command Center to explore the simple art you can create in the workspace. An example with six commands is shown in Figure 1-4.
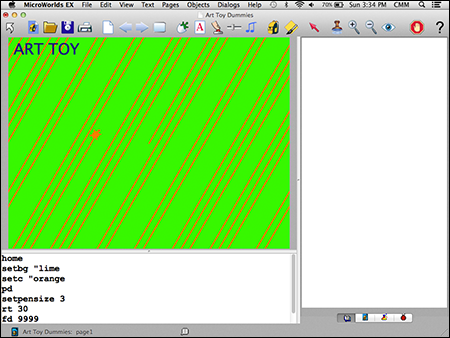
Figure 1-4
Create Buttons to Execute Primitives
The Command Center is a good place to test out commands as you develop a program. But users of your program don’t want to type in commands! Users want a simple way to operate your program.
You operate your television, phone, and computer through a graphical user interface (also called a GUI), which has buttons, pictures, menus, and other tools for communicating with each device. MicroWorlds EX provides ways for you to build your own GUI to make it easy for people to use your computer program.
Instead of asking a user to type in a command such as setbg "red to change the workspace of the Art Toy to the color red, you can make a button to do the work instead. To create a button, you provide two pieces of information: a label for the user, and an instruction for the computer.
Make a button to change the background color of the workspace as follows:
 From the toolbar, click the Create a Button button. Then click anywhere in the workspace.
- In the Button dialog box, fill in the following information (as shown in Figure 1-5):
- Label: Type Red Background in the Label text box. These are the words the user will see on the button.
- Instruction: Type setbg "red into the Instruction field. The command that you enter in the Instruction field — setbg "red — will be executed when the player clicks the button.
- Do It: Select the Once radio button. This means that the instruction will be executed one time when the button is clicked.
- Visible: Select this check box to leave the button visible on the screen.

Figure 1-5
- Click OK to close the Button dialog box.
The completed Red Background button (shown on the left in Figure 1-6) is added to the workspace.
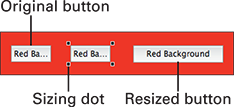
Figure 1-6
- The button doesn’t show all the words, so resize the button to show the entire label. Ctrl-click (Windows) or Command-click (Mac) the button. Sizing dots appear (Figure 1-6, center) — click and drag any of them to resize the text box (Figure 1-6, right).
- Position the completed button by dragging it to any location in the workspace.
- To make sure that people playing with your Art Toy don’t accidentally move your buttons or text boxes, right-click (Windows) or Ctrl-click (Mac) any button or text box and select Freeze from the pop-up menu to freeze it in place.
- Repeat Steps 1–6 to create buttons for all the primitives you have learned so far (as discussed in the preceding section).
Be creative by using any colors, distances, and turn angles you want! On some of the buttons, try setting the Do It radio button to Forever so that the button command executes over and over (until you click the button again to halt the execution, or click the Stop All button on the toolbar). Executing the button instructions forever will produce interesting effects for forward, backward, turn, and random instructions.
- Play with your toy to create a unique digital work of art.
Your Art Toy now looks something like Figure 1-7.
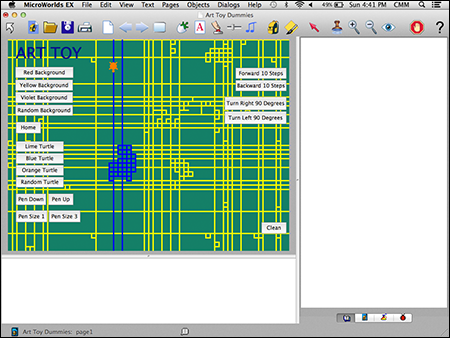
Figure 1-7
Write New Procedures in the Procedures Pane and Add Associated Buttons
A procedure is a new command you create from primitives and other procedures. Procedures are used as shortcuts to describe a long list of steps. For example, if you want the turtle to draw a square that is 30 steps on a side (with the pen already down), you could type the following into the Command Center; press Enter/Return after each line:
fd 30 rt 90
fd 30 rt 90
fd 30 rt 90
fd 30 rt 90
But if you want to draw many squares, it would be faster to give this collection of steps a new name: square.
In the following sections, you write a square procedure and then use that procedure to write a procedure called spirosquare. You will also create two buttons.
Write the square procedure and create a button
Write a procedure to create the new command as follows:
 Click the project Procedures tab (located in the lower-right corner of the MicroWorlds EX window) to open the project Procedures pane.
- Type the following code, as shown in Figure 1-8:
to square
fd 30 rt 90
fd 30 rt 90
fd 30 rt 90
fd 30 rt 90
end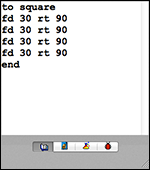
Figure 1-8
A new procedure starts with to followed by the name of the procedure, in this case, square. Do not use spaces in the name of the procedure. Always end the code for your new procedure with end. The end command must be on its own line, so be sure to press Return/Enter after typing it.
Procedure names may not have spaces. If you want to separate words in a procedure name, use the underscore symbol: wiggle_around. You can also use the dash symbol, but this is not recommended because the dash can be confused with a minus sign. - Test your new procedure by typing square in the Command Center to check whether it works as expected.
A common mistake among new programmers is leaving off the word to at the start of your procedure definition. If this occurs, the Command Center issues an error message like the one shown in Figure 1-9. If you see an error message, simply edit your procedure and test it again until it executes as expected.

Figure 1-9
- A key principle of writing computer code is keeping your code efficient, meaning as simple as possible. Because the square procedure is executing the same command (fd 30 rt 90) four times, a more efficient way to write the code is to use the repeat command. In the Procedure pane, edit your square procedure to appear as follows (see Figure 1-10):
to square
repeat 4 [fd 30 rt 90]
end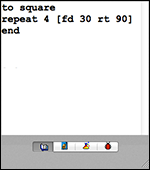
Figure 1-10
Notice that the primitive repeat is followed by a number showing how many repetitions to perform, and then the repeated phrase is placed inside square brackets: [fd 30 rt 90].
- Test your revised procedure by typing square in the Command Center to check that it works as expected. It may be helpful to drag the turtle to a new location first so that the new square isn’t drawn on top of the previously drawn square.
- Follow Steps 1–3 in the earlier section “Create Buttons to Execute Primitives” to create a button with the label Square and the instruction square.
- Drag the Square button to a position in the workspace where it doesn’t block the artwork the user will be making.
- Test the button a few times, moving the turtle to different locations as you draw squares (see Figure 1-11).
Use the clean command (or button, if you made one!) to erase drawings from the workspace if it becomes too crowded.
A square can be constructed using four right turns or four left turns, so the square procedure could just as easily have used an lt instead of an rt command!

Figure 1-11
Write the spirosquare procedure and create a button
Now that you have written a procedure to create a square command, you can use it anywhere in the current project — you can even use it in another procedure! When one procedure is used inside another procedure, we say it is nested. Try writing the following spirosquare procedure:
- In the Procedures pane, enter the following code (see Figure 1-12):
to spirosquare
repeat 8 [square rt 45]
end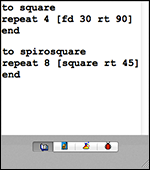
Figure 1-12
- Test your new procedure by typing spirosquare in the Command Center.
Figure 1-13 shows a time-lapse picture of spirosquare as it executes. Note that a new background color and turtle color are used for this drawing.
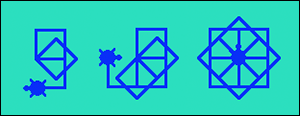
Figure 1-13
Here’s how the spirosquare procedure works: The to spirosquare command names the new procedure. Next, the turtle repeats the instructions inside the brackets a total of eight times (repeat 8). The instructions inside the brackets draw a square and then turn right 45 degrees (rt 45). The end primitive indicates the end of the procedure.
- Follow Steps 1–3 in the earlier section “Create Buttons to Execute Primitives” to create a button with the label Spiro Square and the instruction spirosquare.
Note that it is okay to use a space in the label of a button, just not in the instruction.
- Drag the Spiro Square button to a position near its companion button, Square. Test the button a few times to ensure it functions properly, moving the turtle to a new location after each test.
- When testing more complex procedures such as spirosquare, it is helpful to slow down the execution of the procedure to see more clearly how it operates. Control the speed of execution by clicking the project Processes tab (located in the lower-right corner of the MicroWorlds EX window).
The Processes pane appears, as shown in Figure 1-14. The top of the Processes pane shows three execution speeds: green (full speed), yellow (slow speed), and orange (very slow speed).

Figure 1-14
- Click the yellow or orange speed and then click the Spiro Square button to see the procedure executed in slow motion.
The Processes pane reports the execution of all parts of MicroWorlds EX as they happen.
- Try creating procedures to draw other polygons (closed shapes that don’t cross over themselves), such as an octagon and a circle. Write the code for each procedure in the project Procedures pane.
You use this basic code to write the procedures:
to procedure
repeat numbersides [fd sidelength rt turnangle]
endReplace procedure with the name of the new procedure. The repeat number should match the number of sides on the polygon. The fd command tells the length of a side. The rt command tells how much the turtle has to turn to draw the next side.
Here’s how to create an octagon:
to octagon
repeat 8 [fd 60 rt 45]
endAnd here’s one way to create a spiro octagon:
to spirooctagon
repeat 12 [octagon rt 30]
endAnother shape to try drawing is a circle. A circle is not a polygon because it has no flat sides. But the turtle can draw something that looks like a circle by making 360 sides and turning one degree between each side. Following is code for a circle:
to circle
repeat 360 [fd 2 rt 1]
endAnd here’s one way to create a spiro circle:
to spirocircle
repeat 20 [circle rt 18]
end - Test each procedure in the Command Center and then make a button for each procedure.
- Arrange the new buttons in the workspace to complete your Art Toy, as shown in Figure 1-15.
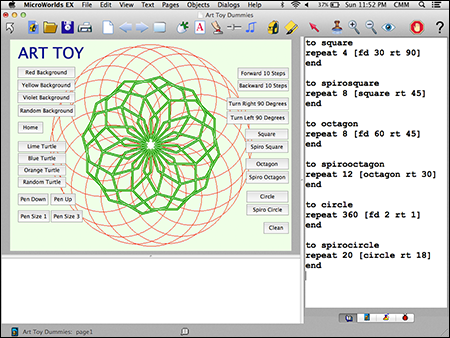
Figure 1-15
When arranging your buttons in any project, think carefully about the GUI. The user or player will expect buttons and other parts of the interface to be organized in an easy-to-understand layout. For the Art Toy, you may want to position all the buttons for setting colors and pen sizes on the left side of the workspace, and all of the buttons for drawing on the right side.
Procedures you create in a project exist only within that project — they can only be used in other projects if you copy and paste them into the new project.
Save, Test, and Debug
Choose File⇒Save Project from the menu bar to save your game. Your finished game should look similar to Figure 1-15.
Test each button in your toy to make sure it functions as you intend. If it doesn’t, look for error messages in the Command Center — they provide clues about how to correct your code. If you find a bug, meaning a problem with your code, look at each line of code carefully and check for misspelled primitives and missing quotes. Also check that new procedures you have written begin with to and end with end.
![]() If a button is executing Forever, you can always stop execution by clicking the Stop All button on the MicroWorlds EX toolbar.
If a button is executing Forever, you can always stop execution by clicking the Stop All button on the MicroWorlds EX toolbar.
Once finished, play with the Art Toy and ask friends to play with it, too!