Project 15
Traffic Dodge
What’s a desert frog to do when faced with racing cars, speeding motorcycles, and oh-so-slow camels? That’s what your player must contend with while crossing busy highways in Traffic Dodge!
In this project, you build your own Frogger-style game that includes levels. You build game pages — both Level 1 and Level 2. These are the pages where the player plays the game. Then you create a splash page — a page that introduces your game and gives a backstory.
The player controls the frog by using keyboard controls. If the jumping frog and a vehicle collide, the hit is announced, and the frog shape changes to appear squished. Also, the game has a variable that indicates lives remaining — each hit subtracts one life, and when the player runs out of lives, the game is over. Get jumping!
 In the classic version of Frogger, game play is more complicated: You must first dodge traffic, and then jump onto lily pads to avoid drowning in the raging river. Here, you need only worry about programming a game in which the frog must avoid getting squished by vehicles and other moving objects.
Brainstorm
Don’t feel limited to jumping a frog through obstacles. You can choose any "mark" to move through any obstacle:
- An iPod-wearing vocalist being bombarded with music notes as he attempts to reach his recording session unscathed
- A germ-evading, white-blood-cell trooper as it moves through the body (like in the movie Osmosis Jones)
- A student moving through busy hallways during passing period on her way to class
- A hover-taxi navigating high-speed air traffic to pick up and deliver a passenger (like from the movie The Fifth Element)
Start a New Project
Begin creating your Traffic Dodge game by starting a new project as follows:
 Start MicroWorlds EX.
- From the yellow MicroWorlds EX startup screen, select Free Mode.
A new project opens.
- From the menu bar, choose File⇒New Project Size⇒MicroWorlds Standard.
Paint and Name the Level 1 Game Page
The level 1 game page is where the player starts playing the game. Paint the level 1 game page and name it as follows:
 On the toolbar, click the Hide/Show Painting/Clipart button.
The Painting/Clipart palette opens.
 Use the Painting Tools to paint your own traffic scene (gray roads, terrain, and sidewalks) in the workspace.
Painting the background gray — not black — makes it easier to see the turtle objects (which are black) when you add them to the workspace.
Use the Painting Tools to paint your own traffic scene (gray roads, terrain, and sidewalks) in the workspace.
Painting the background gray — not black — makes it easier to see the turtle objects (which are black) when you add them to the workspace.- At the top of the workspace, paint a blue sky as the goal area for the frog.
Figure 15-1 shows what the traffic scene and sky look like in the example.
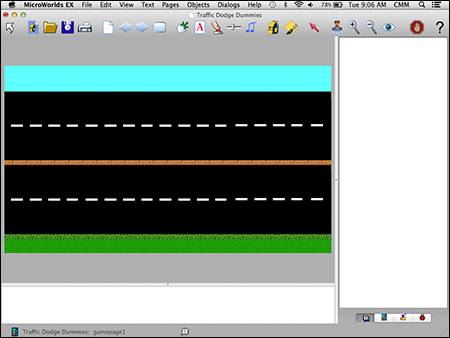
Figure 16-1
- Close the Painting/Clipart palette by clicking its X button.
- From the menu bar, choose Pages⇒Name Page.
- In the dialog box that appears, type gamepage1 in the Name field, as shown in Figure 15-2.
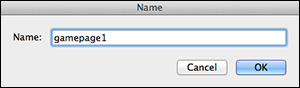
Figure 15-2
- Click OK to close the Name dialog box.
The name of the page now shows in the lower-left corner of the window (refer to Figure 15-1).
Create a Frog Character
The frog is the character that the player moves through the game. The frog character is a turtle object that wears one of two shapes: greenie or squished. Follow these steps to create the frog character:
 On the toolbar, click the Create a Turtle button. Move into the workspace and click to hatch a turtle.
- Open the turtle backpack: Right-click (Windows) or Ctrl-click (Mac) on the turtle and select Open Backpack. On the backpack State tab, click the Edit button.
- In the Name dialog box that appears, type frog in the Name field. Click OK to close the dialog box.
- Drag the frog turtle to a starting position near the bottom center edge of the workspace.
Now is a good time to find the coordinates of the frog turtle position … you’ll need them later! To find the coordinates, on the backpack State tab, note the Xcor and the Ycor — the (x,y) coordinates — of this position. Write them down. Click the X button to close the backpack of frog.

If the frog turtle is centered horizontally, its x-coordinate is 0, and it lies on the y-axis.
 Now you’re ready to paint some shapes! Click the project Shapes tab (located in the lower-right corner of the window).
- On the project Shapes pane, double-click a shape spot.
The Shape Editor opens.
- Use the drawing tools in the Shape Editor to draw your own frog shape.
The frog shape for the example is shown in Figure 15-3.

Figure 16-3
- Name the frog shape greenie (in the empty white field at the top of the Shape Editor; see Figure 15-3) and then click OK.
The Shape Editor closes, and the greenie frog shape appears in a spot on the project Shapes pane. This is the shape the frog turtle usually wears.
- Repeat Steps 6–8 to create a shape for the frog when it is hit. Name this frog shape squished.
The completed greenie and squished shapes now appear on the project Shapes tab, as shown in Figure 15-4.
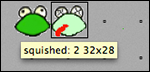
Figure 15-4
- Click the greenie shape on the project Shapes tab and then move into the workspace and click the turtle.
The turtle now wears the shape.
If you accidentally click somewhere other than the turtle, the frog shape will appear on the background — simply right-click (Windows) or Ctrl-click (Mac) the shape and select Remove from the pop-up menu to get rid of it.
Create Traffic Characters
Traffic characters are turtles wearing a variety of shapes and speeding along the roads. Follow these steps to create the traffic characters:
- On the toolbar, click the Create a Turtle button. Move into the workspace and click to hatch a turtle. Drag this traffic turtle into a lane.
- On the toolbar, click the Hide/Show Painting/Clipart button.
The Painting/Clipart palette opens.

 Look at the clip art in the Painting/Clipart palette by clicking the Singles button or the Animation button. Click on a vehicle shape (a car, a bus, or even an elephant!) and then move into the workspace and click on the traffic turtle.
The turtle now wears the vehicle shape.
- Close the Painting/Clipart palette by clicking its X button.
- Next, set the turtle heading so that the vehicle matches the direction in which the shape is pointing. Right-click (Windows) or Ctrl-click (Mac) on the traffic turtle and select Open Backpack from the pop-up menu.
- On the backpack State tab, type in a number for the Heading.
For east, the heading is 90. For west, the heading is 270. For the example, set the heading to 90, as shown in Figure 15-5.
Remember, a circle has 360 degrees. In MicroWorlds EX, north is 0 degrees, and measurement around the circle is in the clockwise direction.
- With the backpack still open, set the size of the vehicle. In the Size field, type in a number less than 40 to shrink the vehicle. Type in a number greater than 40 to grow the vehicle.
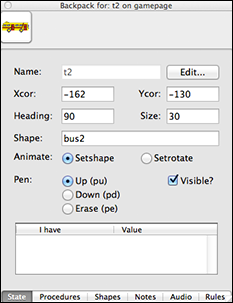
Figure 15-5
The default size of a turtle is 40. For the example, enter 30 for the size, as shown in Figure 15-5.
Click the vehicle shape thumbnail in the upper-left corner of the turtle backpack to apply a change and see the effect of the change. - Close the backpack.
- Make a few copies of your traffic turtle as follows. Right-click (Windows) or Ctrl-click (Mac) the traffic turtle and select Copy from the pop-up menu. Click on the background and select Paste from the pop-up menu.
A copy of your traffic turtle appears.
- Click Paste again to drop another traffic turtle on the background. Repeat three or four times to add several copies of traffic turtles to the lane.
- Click and drag the traffic turtles, one at a time, into positions that mimic vehicles in a lane. The spacing can be even or uneven, your choice!
- Repeat Steps 1–11 to create additional lanes of traffic.
Be sure to form lanes of traffic moving in both directions, and set the headings of the vehicles to match their directions of movement.
In Figure 15-6, you can see four lanes of traffic in Level 1 made up of elephants, motorcycles, race cars, and buses.
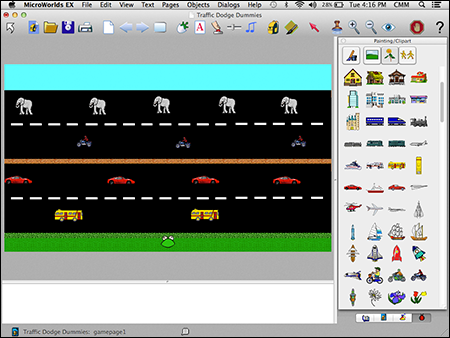
Figure 15-6
Freeze your frog turtle and your traffic turtles to prevent the player from clicking them and moving them during the game. Right-click (Windows) or Ctrl-click (Mac) each turtle and then select Freeze from the pop-up menu.
Make Traffic Move
Traffic moves through the lanes and gets in the way of the frog crossing safely. Turtle objects in a single lane should all move at the same rate of speed, but different lanes can move at different speeds. Make traffic move as follows:
- Open the backpack of one of the traffic turtles. On the backpack Rules tab, enter a speed value in the OnClick field and select the Forever radio button.
For example, set the speed value in the OnClick field to fd 10 wait 1.
- In the workspace, click the traffic turtle to click it on and see it move. Click the turtle again to click it off and stop its motion.
Try increasing or decreasing the value of fd or wait to see how it affects the speed of the turtle. Each has a different effect: fd controls the distance covered during each command execution, and wait controls the pause time during each execution.

The more objects there are moving in your game, the slower they move — just like real traffic!
 An easy way to stop a moving turtle — and the action of the entire workspace — is to click the Stop All button on the toolbar.
 - Close the traffic turtle backpack by clicking its X button.
- Repeat Steps 1–3 for each traffic turtle, setting different speeds for each lane of traffic.
A quick way to get a turtle moving is to right-click (Windows) or Ctrl-click (Mac) the turtle and select Animate from the pop-up menu. This automatically inserts the commands fd 5 wait 1 into the turtle’s OnClick field and sets it to execute Forever.
A shortcut for setting speeds for each traffic turtle is to set the speed of one turtle, and then copy and paste the turtle several times in the workspace or execute a clone command in the Command Center.
Create a Project Variable for Lives
Your game needs a way to show how many lives are left. Traffic Dodge begins with three lives, and each time the player's frog is hit by a traffic turtle, it loses a life. When the player has lost all three lives, the game is over.
In projects with a single page, you can just create a text box variable for lives. But the value of a text box variable exists on the page where it’s located. This means that you can’t carry over the value of a lives variable from a Level 1 page to a Level 2 page.
A project variable is a variable that exists everywhere in your game and whose value carries over from one page to another. To create a project variable that will be used to keep track of frog lives, enter the following command in the Command Center:
createprojectvar "livesremain
This command creates a new project variable with the name livesremain. The new project variable is visible on the Project pane, as shown in Figure 15-7.
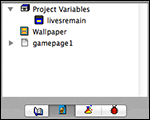
Figure 15-7
Show Lives Remaining
The livesremain project variable tracks how many lives the frog has left. To show this value to the player, create a text box and then show the livesremain value in the text box. Follow these steps:
 On the toolbar, click the Create a Text Box button and then click in the workspace to create a new text box.
This text box will be used to show how many lives remain.
- Right-click (Windows) or Ctrl-click (Mac) inside the text box and select Edit from the pop-up menu.
- In the Name field, enter lives to name the text box.
 Don’t set the text box to transparent — text boxes that show information that changes, such as variable values, must remain opaque.
 - When you’re finished, click OK.
- Reposition the text box in the upper-right corner of the screen.
The code for showing the value of the livesremain variable in the lives text box will be added later in the “Write a Play Procedure” section.
Create the Splash Page
A splash page is the first page players see when they open a game. It shows the title of the game and a colorful graphic with the main characters. The splash page usually explains the goal of the game and how to play. It may also show a short backstory that explains how the characters found themselves in the middle of the action.
Follow these steps to create the splash page:
- From the menu bar, choose Pages⇒New Page.
A new page appears.
- On the toolbar, click the Hide/Show Painting/Clipart button.
The Painting/Clipart palette opens.
 Click the Backgrounds button to show the available background images.
- Click on a background image you want to apply to your splash page. Then click in the workspace to drop the image on the page.
- Right-click (Windows) or Ctrl-click (Mac) the background image. From the pop-up menu, select Stamp Full Page.
The selected image is stamped to fill the entire background area.
- Close the Painting/Clipart palette by clicking its X button.
- From the menu bar, choose Pages⇒Name Page.
- In the dialog box that appears, type splashpage in the Name field.
- Click OK to close the page Name dialog box.
The name of the page — splashpage — now shows in the lower-left corner of the window.
- Use text boxes to add the game title, instructions, and a backstory to the splash page. (See Project 14 for details on adding text to the splash page.)
The title, instructions, and backstory for the example are shown in Figure 15-8.
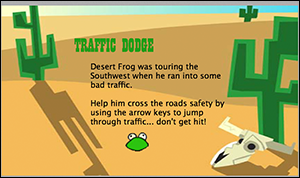
Figure 15-8
Write a Start Procedure
Your game will use a start procedure to move to the Level 1 game page, set the lives remaining project variable to a starting value, and then begin the game action.
![]() On the project Procedures pane, write this start procedure:
On the project Procedures pane, write this start procedure:
to start
gamepage1
setlivesremain 3
play
end
When the start procedure is executed, it moves to gamepage1. It then sets the value of the livesremain project variable to 3. Next, it runs the play procedure (which you will write later) to begin the game action.
Make a Start Button
After you've written the start procedure, MicroWorlds EX now recognizes it as a new command that you can use. Follow these steps to create a button on the splashpage to run the procedure:
 On the toolbar, click the Create a Button button. Then click anywhere in the workspace.
- In the Button dialog box, fill in the following fields:
- Label: Type Start in the Label field to name the button.
- Instruction: Type start, which is the procedure that will be executed when this button is clicked.
- Do It: Select the Once radio button.
- Visible: Select this check box to leave this button visible.
The dialog box for the example is shown in Figure 15-9.
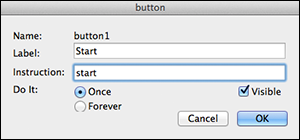
Figure 15-9
- Click OK to close the Button dialog box.
The Start button is added to the workspace of the splashpage.
- Drag the button to an out-of-the-way position in a corner of the workspace.
Figure 15-10 shows the completed splash page, start procedure, and Start button.

Figure 15-10
Move Between Pages and Add a Page Transition
One function of the Start button is moving from the splashpage to gamepage1. You can add a page transition to make the change from one page to another more eye-catching. Add a page transition as follows:

 On the toolbar, use the Previous Page and Next Page arrow buttons to move to the page where you want to add the transition.
Add the transition to the page you are going to.
On the toolbar, use the Previous Page and Next Page arrow buttons to move to the page where you want to add the transition.
Add the transition to the page you are going to.- From the menu bar, choose Pages⇒Transitions.
The Transitions dialog box appears, as shown in Figure 15-11.

Figure 15-11
- Click a transition and then click OK.
The transition is applied to the page. Test the transition by using the arrow keys to turn away from the page, and then turn back to the page.
Write a Play Procedure
A play procedure begins the game action by placing the correct shapes on all characters, positioning characters in their starting positions, and then setting all the characters in motion. Turn to gamepage1.
![]() On the project Procedures pane, write the following play procedure (see Figure 15-12):
On the project Procedures pane, write the following play procedure (see Figure 15-12):
to play
lives, ct pr livesremain
frog, setshape "greenie
frog, setpos [0 -190]
everyone [clickon]
end
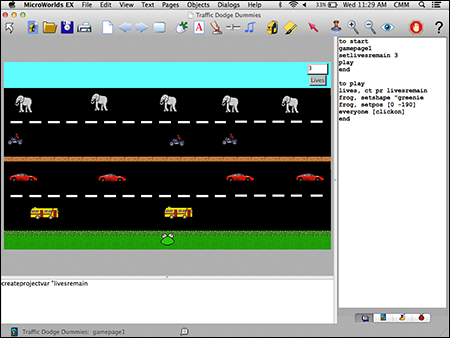
Figure 15-12
Replace [0 -190] with whatever Xcor and Ycor values you discovered in the earlier section “Create a Frog Character.”
When the play procedure is executed, it tells the lives text box to clear its text and then print the value of the livesremain project variable in the box. Next, the play procedure tells the frog turtle to set its shape (setshape) to "greenie. It then positions the frog turtle at its starting coordinates — the Xcor and Ycor you found earlier. Finally, it clicks on all the turtles on the current page, activating the motion commands in their OnClick fields (everyone [clickon]), setting the game in motion.
Write a Jump Procedure and Add It to the Frog
A jump procedure lets the player jump, or control, a game character by using the keyboard.
Other programming software, including Game Salad, uses built-in keyboard control commands. However, MicroWorlds EX enables you to learn and control the underlying details of keyboard control, a skill that will prove useful in more complex coding endeavors.
Writing the jump procedure
![]() On the project Procedures tab, write a jump procedure as follows:
On the project Procedures tab, write a jump procedure as follows:
For a Windows game:
to jump
let [key readchar]
if (ascii :key) = 37 [seth 270 fd 40]
if (ascii :key) = 38 [seth 0 fd 40]
if (ascii :key) = 39 [seth 90 fd 40]
if (ascii :key) = 40 [seth 180 fd 40]
end
For a Mac game:
to jump
let [key readchar]
if (ascii :key) = 28 [seth 270 fd 40]
if (ascii :key) = 30 [seth 0 fd 40]
if (ascii :key) = 29 [seth 90 fd 40]
if (ascii :key) = 31 [seth 180 fd 40]
end
The jump procedure reads the arrow key pressed on the keyboard by the player. It then points and moves the frog in the associated direction. Every arrow key is assigned a different compass direction so that the turtle points in the chosen direction and moves a small distance. (See Project 12 for details on writing a procedure for keyboard control of a character.)
Adding the jump procedure to the frog
Tell the frog turtle to use the jump procedure as follows:
- Right-click (Windows) or Ctrl-click (Mac) the frog turtle and select Open Backpack from the pop-up menu.
- On the backpack Rules tab, type jump in the OnClick field and select the Forever radio button.
After the play procedure player “clicks on” the frog, the player can use the keyboard arrows to jump it through the traffic.
Leave the frog’s backpack open.
Write a Hit Procedure and Add It to the Frog
A hit procedure lets the frog turtle know it has collided with a traffic turtle.
Writing the hit procedure
![]() On the project Procedures pane, type the following hit procedure:
On the project Procedures pane, type the following hit procedure:
to hit
frog, setshape "squished
wait 10
announce [SPLAT]
setlivesremain livesremain - 1
if livesremain = 0 [endgame]
play
end
When it's executed, the hit procedure checks for a collision between the frog and any other turtle. If a collision occurs, it sets the alternate shape of the frog (setshape "squished), waits briefly (wait 10), and then announces the collision (announce [SPLAT]). It then removes one life (setlivesremain livesremain - 1).
Next, the procedure checks to see if the player has lost all lives remaining (if livesremain = 0). If so, it runs the endgame procedure (which you’ll write later in this project); otherwise, it runs the play procedure to continue the gameplay.
Adding the hit procedure to the frog
Tell the frog turtle to use the hit procedure. On the backpack Rules tab, type hit in the OnTouching field. Now whenever the frog collides with a traffic turtle during the game, the hit procedure is executed.
A collision takes place when there is coordinate convergence between two turtles. This means that some part of a shape on one turtle touches some part of a shape on another turtle. When coordinate convergence occurs, it means the objects have collided.
Collisions are detected different ways in different programming languages. In MicroWorlds EX, collision detection is precise — actual touching of shapes takes place. GameMaker has precise collision detection and also non-precise collision detection (see Figure 15-13), in which only the bounding boxes of the shapes touch. In GameMaker, precise collision detection requires a lot more processing power than non-precise, and if you have a lot of objects moving around, this can really slow down the game. However, precise collision detection creates a more realistic gameplay experience for players because it more accurately depicts real-world physics.
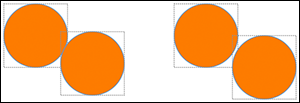
Figure 15-13
Write an End Game Procedure
An endgame procedure ends the game action when the frog has failed to cross the roadways in three attempts. In the Procedures pane, type the following endgame procedure:
to endgame
everyone [clickoff]
announce [GAME OVER]
splashpage
end
The endgame procedure is executed when the livesremain variable equals zero. The value of this variable is checked in the hit procedure, which you created in the earlier section, “Writing the hit procedure.”
endgame stops the motion of all characters (everyone [clickoff]) and then announces that the game is over (announce [GAME OVER]). Finally, it returns the player to the splash page (splashpage).
Write a Succeed Level 1 Procedure and Add It to the Frog
A succeed1 procedure lets the player know that the frog turtle made it safely through the traffic of gamepage1 to the target zone.
Write the succeed1 procedure
![]() On the project Procedures pane, write a succeed1 procedure as follows:
On the project Procedures pane, write a succeed1 procedure as follows:
to succeed1
everyone [clickoff]
wait 10
gamepage2
play
end
When it’s executed, the succeed1 procedure clicks off all objects on the page to halt the flow of traffic on Level 1. It then pauses briefly before moving to Level 2, gamepage2 (which you will make in “Lay Out and Code the Level 2 Game Page”). succeed1 then executes the play procedure to continue the game action.
Add the succeed1 procedure to the frog
Follow these steps to add the succeed1 procedure to the frog on Level 1:
- With the backpack of the frog turtle open on gamepage1, switch to the backpack Rules tab.
- Click the OnColor drop-down list and scroll to the color of the target zone in your game. (In this example, the sky color is cyan blue.)
- Type succeed1 in the OnColor field and set it to Once, as shown in Figure 15-14.

Figure 15-14
When the player moves the frog turtle into the Level 1 target zone during the game, the color that the frog touches matches its backpack OnColor. When this occurs, the OnColor command is activated. Here, the succeed1 procedure is executed, advancing the player to Level 2.
- Close the Level 1 frog’s backpack on gamepage1 by clicking its X button.
Lay Out and Code the Level 2 Game Page
Adding additional levels to Traffic Dodge is a snap! In this example you will add a Level 2, but note that you can add as many new levels as you want. The key tasks in adding a new level are duplicating the existing game page, creating a new succeed procedure, and adding the new procedure to the frog turtle’s backpack.
Create the level 2 game page
Follow these steps to create gamepage2:
- Move to gamepage1. Then from the menu bar, choose Pages⇒Duplicate Page.
The duplicate page appears in the workspace and is named page1.
- Rename the page. From the menu bar, choose Pages⇒Name Page and type gamepage2 in the dialog box.
This page is your Level 2 page.
- Edit traffic on Level 2. You may want to add additional obstacles, edit shapes, and edit speeds in order to add variety to this new level.
- Add a page transition that the player will see when moving from Level 1 to Level 2. (See the earlier section “Move Between Pages and Add a Page Transition.”)
Write the succeed2 procedure
![]() When a player successfully completes Level 2, the game is won! Write a succeed2 procedure on the project Procedures pane as follows:
When a player successfully completes Level 2, the game is won! Write a succeed2 procedure on the project Procedures pane as follows:
to succeed2
everyone [clickoff]
announce [YOU WIN!]
splashpage
end
When it’s executed, the succeed2 procedure halts traffic by clicking everyone off. It then announces that the player has won the game (announce [YOU WIN!]) and returns the player to the splashpage.
Add the succeed2 procedure to the frog
Follow these steps to add the succeed2 procedure to the frog on Level 2:
- Open the backpack of the frog turtle open on gamepage2, and switch to the backpack Rules tab.
- The OnColor drop-down list is already set to the target zone in your game. (In this example, the sky color is cyan blue.)
- Type succeed2 in the OnColor field and set it to Once.
When the player moves the frog turtle into the Level 2 target zone during the game, the color that the frog touches matches its backpack OnColor. When this occurs, the OnColor command is activated. Here, the succeed2 procedure is executed, informing the player that the game is won.
- Close the Level 1 frog’s backpack on gamepage1 by clicking its X button.
Save, Test, and Debug
Choose File⇒Save Project from the menu bar to save your game.
The completed Traffic Dodge game with all procedures is shown in Figure 15-15. The figure shows Level 2 (gamepage2) in the workspace. Also note that the createprojectvar command in the Command Center is now deleted.
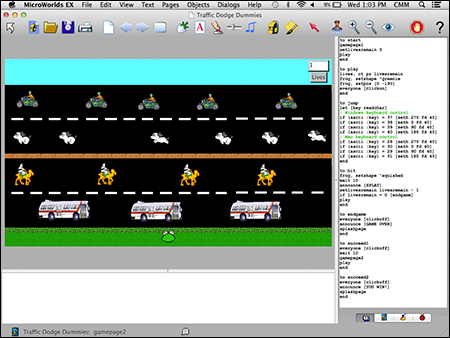
Figure 16-15
Test your game by playing it repeatedly. After you have worked out all the bugs, you can challenge friends to determine the Traffic Dodge champion!