Project 11
UFO Pilot
UFO Pilot is a side-scrolling game set in an asteroid field surrounding a distant planet. You’ll use real space photos from the web to create your graphics. Then you’ll write the code to let a player take on the role of a little alien piloting his UFO!
But now that you’re becoming a master coder, you’re not going to make this an easy game. You’ll write commands to simulate gravity so that the UFO constantly falls towards the planet. And you’ll build in single-key keyboard control so that the player can make his alien fire thrusters to counteract gravity. New coding concepts, including keyboard input, scoring, and mirrored motion apply here and in future programming!
Brainstorm
UFO Pilot is a side-scrolling style video game in the tradition of Flappy Bird. It can be adapted to a wide variety of formats including Defender (which includes shooting). Think about how you want to create your game:
- A ghost haunting a city as witches fly by on broomsticks
- A butterfly gliding through a rainforest full of flying insects
- Superman speeding through the air over rooftops and below toxic clouds
- A genie floating on a magic carpet, avoiding wild geese, meteor shower debris, and hostile missiles
Start a New Project
Start a new project for your UFO Pilot game as follows:
 Start MicroWorlds EX.
- From the yellow MicroWorlds EX startup screen, select Free Mode.
A new project opens.
- From the menu bar, choose File⇒New Project Size⇒MicroWorlds Standard.
Add a Space-Themed Background
Add a background for your UFO Pilot game that conveys a space theme. A great way to do this is to paste actual space and planet photos on your game background.
Follow these steps to create a space-themed background with images from the web:
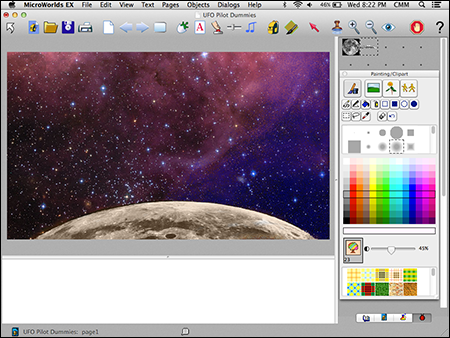
- In any web browser, navigate to the website of your favorite search engine. Search for space images to locate a background you like. One great source is the images category of the Hubble Space Telescope site (http://spacetelescope.org/), as shown in Figure 11-1. Go to the Images menu in the top-left corner and click any thumbnail image to open a full-size version of the image.

Courtesy of ESA/Hubble
Figure 11-1
 An easy alternative to using real space images for your game background is to use one of the many space backgrounds provided by MicroWorlds EX. Open the Hide/Show Painting/Clipart palette and click the Backgrounds button to show the backgrounds. Scroll down to locate the three space backgrounds, shown in Figure 11-2. Click the background image you want to apply to your game, and then click in the workspace to apply the background image. Right-click (Windows) or Ctrl-click (Mac) the background image and select Stamp Full Page. The image is stamped to fill the entire workspace.
Figure 11-2
- Copy a space background you like on the website by right-clicking (Windows) or Ctrl-clicking (Mac) the image and selecting Copy Image from the pop-up menu.
- Move to the MicroWorlds EX workspace and paste the background by right-clicking (Windows) or Ctrl-clicking (Mac) the image and selecting Paste from the pop-up menu.
- Right-click (Windows) or Ctrl-click (Mac) the pasted background image. From the pop-up menu, select Stamp or Stamp Full Page.
The image is stamped to fill the entire workspace.
- Return to the space images in your browser page. Now locate a moon or planet you like, for example in the Solar System category. Right-click (Windows) or Ctrl-click (Mac) the moon or planet image and select Copy Image from the pop-up menu.
 Return to MicroWorlds EX and click the project Shapes tab in the bottom-right corner to open the Shape pane. Right-click (Windows) or Ctrl-click (Mac) a shape spot and select Paste from the pop-up menu.
The moon or planet image is pasted into the shape spot, as shown in Figure 11-3.
Courtesy of ESA/Hubble
Figure 11-3
- Double-click the shape spot where you pasted the moon or planet.
The Shape Editor opens.
 Decrease the Zoom percentage, in the top-right corner, to view as much of the moon or planet as possible. Select the Lasso tool in the Shape Editor. Click and hold down the mouse button as you drag to select a small wedge at the top of the moon or planet, as shown in Figure 11-4. Release the mouse button when you finish enclosing the wedge.
- Choose Edit⇒Copy from the menu bar.
The wedge is now copied. (Note that MicroWorlds EX may change the lassoed shape to a rectangular shape, even though only the lassoed region is actually copied.)
- Click OK to close the Shape Editor.

Courtesy of ESA/Hubble
Figure 11-4
- Right-click (Windows) or Ctrl-click (Mac) an empty shape spot and select Paste from the pop-up menu.
The wedge now occupies a shape spot, as shown in Figure 11-5.

Courtesy of ESA/Hubble
Figure 11-5
- Click the wedge at the shape spot and then move into the workspace and click the background.
The wedge appears on the background.
- Drag the wedge near the bottom of the workspace.
- Pull the sizing dots to resize the wedge as needed.
- Right-click (Windows) or Ctrl-click (Mac) the wedge and select Stamp from the pop-up menu.
 On the toolbar, click the Hide/Show Painting/Clipart button.
The Painting/Clipart palette opens.
 Use the Painting Tools area of the palette to add additional colors or make modifications to your space background.
For example, use the Spray Can tool to spray additional white or blue stars across the background. Your completed background looks similar to Figure 11-6.
Images courtesy of ESA/Hubble
Figure 11-6
Create a UFO Character
The UFO character consists of a ship and an alien pilot. In this example, the alien ship is facing east. Create a UFO character for your game as follows:
 On the toolbar, click the Create a Turtle button. Move into the workspace and click to hatch a turtle. Position the turtle at the center of the workspace.
- Next, name the turtle that will be your UFO. Right-click (Windows) or Ctrl-click (Mac) the turtle and select Open Backpack from the pop-up menu.
- On the backpack State tab, click the Edit button beside the Name field. In the dialog box that appears, type ufo in the Name field, as shown in Figure 11-7. Click OK to close the dialog box.

Figure 11-7
 With the Painting/Clipart palette still open, click the Singles button. Locate the shape of an alien spaceship — the choices are located near the planets, as shown in Figure 11-8.
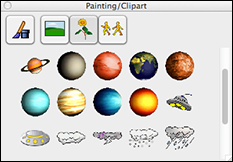
Figure 11-8
- Drag the alien spaceship shape into an empty shape spot next to the moon and wedge on the Shapes pane. Double-click the shape spot to open the Shape Editor where you can edit it, as shown in Figure 11-9.
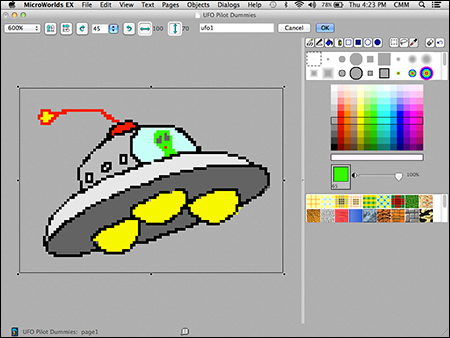
Figure 11-9
- Modify the spaceship shape as desired.
You may want to use the vertical mirror image buttons near the zoom selector in the upper-left corner to flip the ship in the direction of flight. You can use the paint tools to recolor the ship or draw a little alien pilot at the helm.
- When you’re finished, click OK.
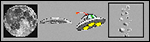
The edited alien spaceship shape now appears on the project Shapes tab, as shown in Figure 11-10.
Two left images courtesy of ESA/Hubble
Figure 11-10
- Move into the workspace and click the turtle. (In Windows, first click the shape at the shape spot and then click the turtle).
The ufo turtle now wears the alien spaceship shape.
If desired, change the size of the ufo turtle. The default size is 40, but you can make the UFO bigger or smaller by typing a new number in the Size field of the backpack State tab. When finished, close the ufo turtle backpack by clicking its X button.Don’t worry about the heading of the UFO — this will be set in other places in the game.
Create Asteroid Cluster Characters
Asteroid clusters are the obstacles through which the player’s UFO must navigate. Crash into an asteroid cluster and the mission is done! In this example, asteroid clusters appear to be moving west.
Creating asteroid cluster turtles
Create six asteroid cluster characters for your game as follows:
- On the toolbar, click the Create a Turtle button. Move into the workspace and click to hatch a turtle.
- Repeat Step 1 to create a total of six turtles for the asteroid clusters.
- Drag the six turtles so that three are lined up across the top of the workspace and three are lined up across the bottom of the workspace, as shown in Figure 11-11.
Note that the background in the figure has been made mostly transparent so that you can see the turtles more easily. The turtles should not be perfectly lined up — variation in position makes the game more interesting.

Figure 11-11
- Next, name the turtles that will be your asteroid clusters. For each turtle, right-click (Windows) or Ctrl-click (Mac) the turtle and select Open Backpack. On the backpack State tab, click the Edit button. In the dialog box that appears, type the name for each turtle:
- topcol1, topcol2, and topcol3 for the turtles that are the top columns
- botcol1, botcol2, and botcol3 for the turtles that are the bottom columns
Click OK to close the Name dialog box for each turtle.

Although it’s not required to name every turtle (object) or element in a project, it is easier to write and troubleshoot code with named objects. Give your objects simple, clear names, and give objects that are part of a group the same name followed by a number. Also, keep in mind that a turtle has a name, but the shape it wears has a different name.
- Set the heading of all asteroid column turtles so that they move west (refer to Figure 11-11). To do so, type 270 in the Heading field of each backpack State tab.
- If you want, adjust the size of the asteroid in the Size field on the State tab of each turtle backpack.
The default value in the Size field is 40. Making turtles slightly larger or smaller will make the asteroid field look more varied and realistic.
- When finished, close each asteroid column turtle backpack by clicking its X button.
Creating a cluster of asteroids for each turtle
Now, you need to create a cluster of asteroids in a column shape for each turtle. To do so, follow these steps:
- Double-click an open shape spot next to the alien spaceship shape.
The Shape Editor opens.
- Reduce the zoom to 500%. Then pull and adjust the sizing dots on each side of the shape until the width is 50 pixels and the height is 120 pixels.
Now there is sufficient room to paint!
- Use the paint tools and the gray colors and textures to draw asteroids of different shapes and sizes. When you’re finished, click OK.
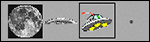
The asteroid column shape now appears on the Shapes tab, as shown in Figure 11-12.
Two left images courtesy of ESA/Hubble
Figure 11-12
- Move into the workspace and click the topcol1 turtle. (In Windows, first click the shape at the shape spot and then click the turtle.)
The topcol1 turtle now wears the cluster of asteroids column.
- Click on the asteroid shape again and then click on topcol2. Repeat for topcol3, botcol1, botcol2, and botcol3.
All asteroid turtles now wear the same shape (refer to the title figure at the beginning of the project).
An alternative strategy to “Create Asteroid Cluster Characters” is to complete one asteroid turtle in its entirely, and then copy and paste the asteroid turtle five times. Remember to name and size each asteroid turtle before proceeding.
When working with multiple turtles, it can be challenging to keep track of who’s who. Just use the arrow pointer to hover over a turtle, and its name will appear. Or, in an open turtle backpack, click the icon of the turtle in the upper-left corner of the backpack and the associated turtle will magnify in the workspace as if to say, “Here I am!”
Create a Score Variable
A score variable allows someone playing your game to keep track of how many asteroid columns they pass without crashing. Follow these steps to create a score variable for the game:
 On the toolbar, click the Create a Text Box button; move into the workspace and draw a small rectangle for the text box.
This text box will be used to show the value of a variable.
- Right-click (Windows) or Ctrl-click (Mac) inside the text box and select Edit from the pop-up menu.
- In the Text dialog box, fill in the following information (see Figure 11-13):
- Name: Name the text box score.
- Show Name: Select this check box.
- Visible: Select this check box.
- Transparent: Deselect this check box so the text box is opaque.
A text box used as a variable must remain opaque (not transparent) for the variable value to change.
- Single Line: Deselect this check box.
- Click OK.
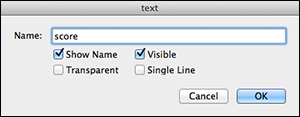
Figure 11-13
Write a Reset Procedure and Make a Button
A reset procedure sets the initial value of the score to zero and places the ufo at its starting position in the center of the workspace.
Write a reset procedure
Create a reset procedure as follows:
 Click the project Procedures tab (located in the lower-right corner of the window).
- Type the following reset procedure:
to reset
setscore 0
ufo, home
endHere’s how the reset procedure works:
- First, it sets the initial value of the score (setscore) to 0.
- Second, it gives the ufo the home command. home is a primitive that sets the position of a turtle to the coordinates (0, 0) and sets its heading to 0, pointing north.
During the game, you will change the heading of the ufo, so don’t worry about its heading right now. The shape of the UFO appears to be facing east, although the heading of its turtle will always be either north (seth 0) or south (seth 180).
Also, if desired, you can set the starting position of every asteroid cluster, although this is not necessary.
In a side-scrolling game, the main character never actually moves side-to-side — it only moves up and down (north and south). The other objects in the game move from side to side, creating the appearance that the main character is actually moving horizontally, even though it isn’t.
Create a Reset button
After you have written the reset procedure, MicroWorlds EX recognizes it as a new command that you can use. Create a button to run the procedure by following these steps:
 On the toolbar, click the Create a Button button. Then click the workspace anywhere.
- In the Button dialog box, fill in the following information, as shown in Figure 11-14:
- Label: Type Reset in the Label field to name the button.
- Instruction: Type reset in the Instruction field.
- Do It: Select the Once radio button.
- Visible: Select this check box so the button is visible.

Figure 11-14
- Click OK to close the Button dialog box.
The Reset button is added to the workspace.
- Drag the button to an out-of-the-way position in a corner of the workspace.
- Test the Reset button to makes sure it functions as expected.
Code Gravity and Collisions
See that moon at the bottom of the game? The gravitational pull of that celestial body on the UFO is making it extra difficult for the alien to pilot his way through the asteroid field. If the alien fails to navigate safely, he crashes into the asteroids!
Follow these steps to code the constant fall of the UFO towards the moon and code the crash between the UFO and asteroids:
- Right-click (Windows) or Ctrl-click (Mac) the ufo turtle and select Open Backpack from the pop-up menu.
- On the backpack Rules tab, type seth 180 fd 5 wait 1 in the OnClick field and set it to Forever, as shown in Figure 11-15.
When the ufo is clicked on via the clickon command (in the Go! button that you will create later), this command sequence causes the ufo to point south (seth 180) and move in that direction at a moderate speed (fd 5 wait 1) forever. This simulates the gravitational pull of the moon. In the next section, you code a keyboard command that lets the player counteract this gravitational pull by moving north.
Leave the backpack open for the next step.
- Next, you need to code the crash (collision) between the UFO and asteroids. On the backpack Rules tab, type announce [Crash!] stopall in the OnTouching field, as shown in Figure 11-15.
Here’s how this code works: If the UFO touches any asteroid turtle, the announce command shows whatever text you type between the square brackets. Then, stopall ceases program execution — the entire game stops.
- Close the ufo backpack.
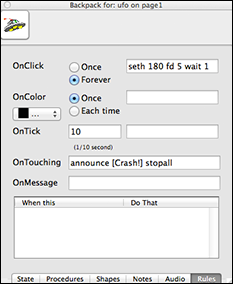
Figure 11-15
Write a Keyboard-Controlled Fly Procedure
This is your first project that includes a keyboard-controlled interface. It uses a single key on the keyboard — the up arrow key — to execute the fly procedure by the UFO. The fly procedure lets a player fire the thrusters on the UFO to oppose the pull of gravity from the moon.
![]() On the project Procedures tab (located in the lower-right corner of the window), write a fly procedure as follows:
On the project Procedures tab (located in the lower-right corner of the window), write a fly procedure as follows:
For a Windows game:
to fly
let [key readchar]
if (ascii :key) = 38 [seth 0 fd 20 wait 1]
end
For a Mac game:
to fly
let [key readchar]
if (ascii :key) = 30 [seth 0 fd 20 wait 1]
end
Simply put, the fly procedure reads the character of the key pressed by a player. If the key is the up arrow (ASCII code 38 in Windows, or ASCII code 30 on a Mac), the commands inside the square brackets are executed. Here, the example UFO has its heading set to north (seth 0) and then it moves in that direction 20 pixels (fd 20) with a wait of 1. You may need to tinker with the code to create the upward thrust you want.
Note that when the UFO turtle is clicked on, its OnClick commands constantly point and move it south. This fly procedure will be put into the Go! button, which you create later in this project.
See Project 12 for a more detailed explanation of how a keyboard-controlled procedure works.
If you plan to distribute your game on both Windows and Mac platforms, you can put both sets of ASCII keyboard commands into the fly procedure so that the game operates everywhere. Just type the if line of code for Windows, followed by the if line of code for the Mac on the next line.
Write a Scoring Procedure for Navigating Asteroids
As the player successfully navigates the UFO past each column of asteroids, a point is scored. Write a checkpass procedure to check for this successful passage.
![]() On the project Procedures pane, write the checkpass procedure as follows:
On the project Procedures pane, write the checkpass procedure as follows:
to checkpass
if xcor = 0 [setscore score + 1]
end
Think about what is happening in checkpass. Because the UFO never moves horizontally, its x-coordinate is always 0. So if a moving asteroid column has an xcor of 0 and hasn’t collided with the UFO, the score increases by 1 (setscore score + 1). Because checkpass is based on the motion of the asteroids relative to the UFO, it will be placed in the asteroid turtles.
Code the Motion of the Asteroids and Include the Scoring Procedure
The asteroids will move from east to west across the screen, barraging the little UFO and leaving only a small gap for the alien pilot to fly through. There are three columns of asteroids. Each column of asteroids has a top turtle and a bottom turtle; that’s why you named them topcol1 and botcol1; topcol2 and botcol2; and topcol3 and botcol3.
In the following steps, you code the top asteroid turtles to move across the screen and include the scoring procedure, and code the bottom asteroid turtles to move along with their partners at the top:
- First, you need to code the top asteroid turtles. Right-click (Windows) or Ctrl-click (Mac) the topcol1 turtle and select Open Backpack from the pop-up menu.
Note that all top asteroid turtles are already pointed in the direction they will travel and this direction never changes.
- On the backpack Rules tab, type fd 1 wait 0.1 checkpass in the OnClick field and set it to Forever, as shown in Figure 11-16.
After the top asteroid turtle is clicked on, this command sequence causes it to move forever one pixel at a time at a medium speed (fd 1 wait 0.1), and execute the checkpass procedure after each step. checkpass checks to see whether the asteroid turtle has an x-coordinate of 0, meaning if it is moving past the UFO; if it does, the player scores a point.
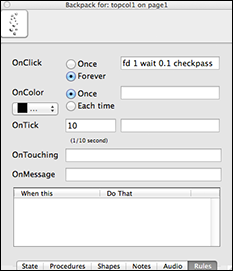
Figure 11-16
- Repeat Steps 1–2 for the topcol2 turtle and the topcol3 turtle.
Each top asteroid turtle will now move according to the same commands.
 Because each top asteroid turtle is only moving one pixel at a time, at some point it will have xcor = 0. If you adjust the speed of the asteroid, change only the wait time, not the forward distance. Otherwise, the asteroid may not have an xcor = 0 (for example, it may go from xcor = 1 to xcor = -1 or similar); if this happens, the score does not increase as it should.
 - Next, you code the bottom asteroid turtles. Right-click (Windows) or Ctrl-click (Mac) the botcol1 turtle and select Open Backpack from the pop-up menu.
Again, note that all bottom asteroid turtles are already pointed in the direction they will travel and this direction never changes.
- On the backpack Rules tab, type setx topcol1's "xcor in the OnClick field and set it to Forever, as shown in Figure 11-17.

Figure 11-17
After the bottom asteroid turtle is clicked on via the clickon command (in the Go! button, which you will create in the next section), this command sequence causes it to forever set its x-coordinate to match the x-coordinate of its partner top asteroid. This mirrored motion has the effect of making the top and bottom asteroid pair move together — they stay vertically aligned.
- Repeat Steps 4–5 for the botcol2 turtle, matching it with the motion of topcol2 (setx topcol2's "xcor). Then repeat these same steps for the botcol3 turtle, matching it with the motion of topcol3 (setx topcol3's "xcor).
Why not just make the bottom asteroids move like the top asteroids? Try coding it that way! Because the turtles execute their motion serially — one after another — you will notice a staggered effect in the motion, meaning that the asteroid columns don’t seem to move smoothly together. The serial effect is less pronounced with mirroring than with defined motion. If the turtles executed their motion in parallel — meaning simultaneously, or all at the same time — there would be no staggering. The more turtles, the worse the staggered effect.
Create a Go! Button to Start the Game
This is it, the final step! A Go! button starts the game. Create a Go! button as follows:
- On the toolbar, click the Create a Button button. Then click anywhere on the workspace.
- In the Button dialog box, fill in the following information, as shown in Figure 11-18:
- Label: Type Go! in the Label field.
- Instruction: Type everyone [clickon] ufo, fly in the Instruction field.
Here’s how the commands in the Instruction work. The everyone [clickon] command clicks all turtles on. For the asteroids, this means putting them in motion and checking to determine whether the score needs to be increased. For the UFO, that means making it constantly fall. Then, ufo, fly commands the ufo to execute the fly procedure — keyboard-controlled thrusters.
- Do It: Select the Forever radio button.
Because Go! is set to Forever, the execution of the clickon and the fly commands continues over and over until a collision occurs — at which point stopall ends the game.
- Visible: Select this check box to leave the button visible.
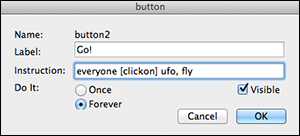
Figure 11-18
- Click OK to close the Button dialog box.
The Go! button is added to the workspace.
- Drag the button to a position near the Reset button and Score text box.
Freeze your UFO turtle and your asteroid turtles to prevent the player from clicking and moving them during the game.
Save, Test, and Debug
Choose File⇒Save Project from the menu bar to save your game. Your finished game should look similar to Figure 11-19. (Note: Some of the commands in the procedures wrap onto the following line. This is normal for long procedures. It does not indicate a line break, so be sure to type the code as shown in the project text.)
Test your game by clicking Reset and then Go! to start the action. Use the arrow key to pilot the UFO through the asteroid field. Invite friends to play and see who can earn the highest score! If you notice any bugs, go back and revise your code, and then retest the gameplay.

Two background images courtesy of ESA/Hubble
Figure 11-19