
4
Precise Focusing Techniques
THE ART OF FOCUSING
Shooting images that aren’t as sharp as they should be is an enormous problem for beginning and experienced photographers alike. Capturing truly sharp images is the result of using excellent lenses, employing superb shooting techniques, and pinpoint focusing.
Focusing strategies are so crucial and poorly understood that they deserve a detailed discussion all by themselves. From our experience in teaching many thousands of students in the field how to shoot excellent images, we see the many small mistakes they must correct to capture high quality images. Everyone shoots unsharp images at times, but there are numerous ways to significantly improve the odds of making truly sharp images.
YOUR FOCUSING GOAL
In wildlife photography, the main goal is to focus precisely on the eyes of the subject to make them as sharp as possible. In some ways, this makes wildlife photography easier than landscape or macro photography because everyone instantly knows where the pinpoint focus should lie. There are exceptions, though. Some birds have long beaks and some mammals have long noses. When these subjects look directly at the camera, focusing precisely on the eyes may cause the tip of the beak or nose to be too far out of focus because the depth of field isn’t adequate. In this case, use a smaller f-stop, f/11 over f/5.6, and focus between the tip of the beak or nose and the eyes. Hopefully, this makes everything acceptably sharp.
ADJUSTING THE CLARITY OF THE VIEWFINDER
Most cameras offer a dioptric adjustment knob that lets you adjust the clarity of the viewfinder to best suit your eyesight. Do this before anything else because you can’t determine when you have pinpoint focus unless you can see the subject clearly in the viewfinder. Adjusting the viewfinder clarity has nothing to do with focusing the lens directly. Rather, it simply lets you see the image in the viewfinder clearly, so you can see when the lens is well-focused.
Here’s an easy and precise way to adjust the viewfinder clarity. To avoid confusion, take the lens off the camera. Now point the camera at the sky or any bright area and look at any lines, such as AF points, that are etched in your focusing screen. Turn the dioptric adjustment knob until these lines are sharply focused. When you reach the point of greatest sharpness, the viewfinder is set for your vision. Always recheck the setting from time to time. It’s all too easy to accidently turn the dioptric adjustment knob on many cameras and your eyesight may change over time.
USE FILTERS ONLY WHEN NECESSARY
Avoid Protection Filters
Your lens maker puts plenty of expensive research, thought, and time into the making of your lens to optimize its performance. Any extra glass you add to the optical path can cause a slight to serious loss of sharpness. Putting a glass “protection filter” on the front of your lens is widely advised, but not by us. We never use “protection filters,” do not own any, and do not recommend them! The quality of the really cheap filters is so poor that image sharpness is seriously compromised.
We understand your passionate interest in protecting your expensive lenses. Instead of using protection filters, we hope you will be careful to avoid dropping or bumping your lenses. Always use the lens hood because it greatly reduces the chance of having rain drops splash on your lens. This creates a smudge when it dries and fuzziness in the image. The hood keeps objects that may scratch the glass away from it.

We seldom use polarizing filters to photograph wildlife. The polarizer costs two shutter speeds, so it is difficult to give those up. However, when photographing shiny animals like hippos and crocodiles, or animals in the water, the polarizer removes the glare and darkens the blue water behind this spur-winged plover. Notice the spurs emerging from the bends in the wings. Canon EOS 5D Mark II, 500mm f/4.0L lens, f/11 at 1/250, ISO 400, polarizer, Shutter-priority with a +2/3-stop exposure compensation.
Polarizing Filters
Because polarizing filters absorb 1.5 to 2 stops of light, this will cost the photographer about two shutter speeds. Since using high shutter speeds is so crucial to sharp images, often you must use higher ISOs (more noise) or larger apertures that offer less depth of field. We don’t use polarizers very much in wildlife photography because we don’t find them to be that helpful in most cases. However, they are useful and we strongly advise using them for shiny “critters” like hippos and crocodiles. Polarizers are effective for reducing glare on water and saturating colors when photographing aquatic animals and wading birds. If the shooting angle isn’t directly toward or away from the sun, the polarizer will nicely darken a blue sky. Animals against the darker sky look more dramatic.
Lens Speed
A camera’s autofocus system is the fastest and most accurate when it “sees” plenty of light. Of course, it is easier to autofocus in bright available light conditions. However, lens speed is another crucial factor. Serious amateur and professional wildlife photographers generally opt to use fast lenses such as a 300mm f/2.8, rather than a 300mm f/4, which is 1-stop slower. Although the f/2.8 lens is only one stop faster than the f/4.0 lens, the 300mm f/2.8 lens offers three valuable advantages:
1 Brighter viewfinder: The 300mm f/2.8 lens passes one more stop of light through the lens. The camera’s viewfinder is twice as bright. This gives the autofocus system more light to work with to achieve sharp focus. Autofocus may be faster and more accurate. If you must focus quickly, the details in the subject are brighter and easier to see, enabling you to find sharp focus faster.
2 Less depth of field: A lens with a f/2.8 maximum aperture shows less depth of field than f/4 when you view the subject in the viewfinder. When you manually focus, the subject appears to “snap” into focus with the shallower depth of field. This greatly improves your chances of sharply focusing the lens. Also, if you do shoot at f/2.8, the background, and foreground in some cases, will be more diffuse than if you use f/4.0.
3 Easier to use high shutter speeds: A fast lens lets you use higher shutter speeds more easily and often. If the optimum exposure is 1/125 second at f/4.0 at ISO 200, the fastest shutter speed you can use with a lens that has a maximum aperture of f/4.0 is 1/125 second, unless you increase the ISO. If you have a maximum aperture of f/2.8, you can open up the aperture to f/2.8 which adds one stop of light. To maintain the optimum exposure, change the shutter speed to a more advantageous 1/250 second.
DON’T NEEDLESSLY USE ACCESSORIES THAT COST YOU LIGHT
Common lens accessories that photographers use include polarizing filters, extension tubes, and teleconverters. All of these devices cost you light. Don’t use any of them unless you have an exceptionally good reason to do so. Some photographers put a teleconverter on their zoom lens, just in case they need to photograph something far away. If the subject you are photographing is nicely covered within the zoom range of the lens—without the teleconverter—take it off. It’s unhelpful to needlessly use a teleconverter because the light it absorbs hinders autofocusing. It also adds more glass to the optical path, and we all know that isn’t good for image sharpness. Obviously, if you truly need the teleconverter to increase the magnification, the polarizer to eliminate glare, the extension tube to focus closer, then go ahead and use them.
MANUAL FOCUSING TECHNIQUES
We tend to be suspicious of automation, especially in our photography equipment. Our careers began before autofocusing lenses were considered reliable. For more than 15 years, we relied exclusively on our ability to manually focus the lens to achieve sharp focus. Over time, the precision of autofocusing lenses has greatly improved while our eyesight has slowly declined. Eventually, we realized autofocus is more accurate and much faster than we are at manually focusing lenses. We now use autofocusing most of the time. If you are older than 40, it’s likely autofocusing will do a much better job than you do, even if you refuse to admit it. There is nothing to be gained by denying the aging factor. It’s best to adopt autofocus and learn to use it well.
However, no matter how good autofocusing is, there are times when you must use manual focus. Remember to set the viewfinder diopter for your vision, take your time, slowly rotate the focus mechanism back and forth until you arrive at the best focus, and hope for the best. Many use the focus indicator light in the viewfinder to help them, though we tend to ignore it and rely instead on how the focus appears in the viewfinder.
WHEN MANUAL FOCUS WORKS BEST
Placing the Depth of Field
Although modern autofocusing lenses are amazingly precise, at times they must be focused manually. Animals with long noses or beaks that are looking directly at you should be focused slightly in front of the face to let the depth of field cover everything better. It is easier to select this spot by manually focusing the lens. Do stop the lens down a bit more (from f/5.6 to f/11 for instance) to gain depth of field.
FOREGROUND OBSTACLES
Sometimes you must shoot through foreground vegetation to capture a fine image of a subject such as a lion or burrowing owl. Autofocus tends to focus on the nearest object—the grass—instead of the subject. When it is necessary to focus past foreground objects, manual focusing works best for most photographers. However, a new autofocusing feature of the Canon 7D, called Spot AF, now lets me handle this situation most of the time by combining Spot AF with back-button focusing.
LOW CONTRAST
Autofocusing mechanisms must “see” contrast to sharply focus the lens. Sometimes autofocus struggles to hit sharp focus on dense foggy days when the fog greatly reduces the contrast in the scene. If the camera “hunts” for focus, switch over to manual focus. However, a little known, but enormously powerful technique called back-button focusing still allows you to use autofocusing in the fog most of the time. We’ll discuss back-button focusing shortly.
HEAVY SNOWFALL
Autofocusing doesn’t work well in dense falling snow. The focusing mechanism “sees” the falling snow, causing the lens to focus back and forth as it detects snowflakes at different distances from the lens. Manual focusing is the best way to handle falling snow. We live in the mountains near Yellowstone National Park where snow falls and blankets the landscape from late October through early May. We get plenty of experience photographing in falling snow. Let’s look at some solutions.
Heavy snowfall creates a magical situation for wildlife photographers. Manual focusing does a fine job most of the time. But snow can be so thick that it makes manual focusing difficult. While leading a photo tour in Yellowstone National Park, we discovered the best way to manually focus the lens when the snow makes it difficult to see the subject well. Early one morning while leading a group, we found ourselves to be the first ones to discover a pack of gray wolves eating an elk on the other side of the Madison River. The animals were more than 50 yards away, so our group members used their longest telephoto lenses. Staying on the groomed road, they set up their 500mm lenses and tripods, metered to keep detail in the snow using ETTR, composed the wolf, and focused by turning on their live view. This let them view the image that will be recorded by the camera on the LCD monitor. Magnifying the face of the wolf in the live view image by 10x enabled us to easily focus manually on the eyes in the swirling snow. This strategy works beautifully. Always remember to use the magnified live view image in tough manual focusing situations.
TELECONVERTERS MAY PREVENT AUTOFOCUSING
Cameras typically require a specific lens speed for autofocus to work. Indeed, many cameras require a speed of at least f/8 and sometimes f/5.6. If the lens speed is any slower than f/8, such as f/11, the camera can’t autofocus. Almost all lenses are f/8 or faster, so this problem shouldn’t happen when you shoot with a lens without accessories. However, when tele-converters are used, the problem of losing autofocus becomes

The Grizzly Bear and Wolf Discovery Center in West Yellowstone, Montana, exhibits both species for public viewing and education. Since we live nearby, we visited the center during a blizzard. About six inches per hour fell as we photographed the captive grizzly bear in the dense snowfall. Manual focusing is required because the falling snow confuses autofocus. Fortunately, the snow does hide the obnoxious fences behind this magnificent bear. Nikon D3, Nikon 200-400mm f/4.0 lens, f/5.6 at 1/125 second, ISO 1600, and manual metering.
common. For instance, if you put a 2x teleconverter behind a 300mm f/5.6 lens, the lens now acts like a 600mm lens with a maximum aperture of f/11. The subject is suddenly much larger in the viewfinder. But the autofocus will not function with such a slow lens speed. This forces you to use manual focus.
TILT/SHIFT AND PERSPECTIVE CONTROL LENSES
These lenses do not offer autofocus because the lens is designed to tilt (bend) in the middle and to shift the image about the sensor. These moving parts of the lens make it difficult to build autofocusing into the lens. Therefore, careful manual focus is required to effectively use them and we use live view to help us.
AUTOFOCUSING TECHNIQUES
All of our Nikon and Canon cameras offer numerous autofocus options by using menu choices and/or custom functions. No doubt, your camera offers far more autofocus controls than you realize. Sadly, the vast majority of wildlife photographers fail to avail themselves of many wonderful autofocus controls. These controls could help them capture exquisite wildlife images more easily. Unfortunately, they either don’t know they exist, or fail to perceive their powerful benefits.
Let’s open up a wonderful toolbox of autofocus controls and strategies for you. Unfortunately, all cameras don’t offer the same autofocus tools. Even when tools from two or more camera makers do the same thing, often different names are used. This creates a dilemma. Do I write about autofocusing options that your camera may not have, or be called something else, or not? Or, do I show what is possible with a camera I use and encourage you to study your camera manual carefully to see if you have these likely options? We all agree the camera manual isn’t the most exciting instruction book to read. However, it is worthwhile to spend a lot of time studying it. Today, many books are written on specific camera models. These are far better than the brief and poorly illustrated instructions in the camera manual.
Perhaps the best way to cover autofocusing options is to generally describe those offered by the Canon 7D. It’s an intermediate level camera that is similar to those used by most nature photographers. I will briefly describe some options and point out where, when, and how these options are useful for capturing exciting wildlife images. I realize you probably aren’t shooting this camera, so take the time to look carefully at the autofocus controls offered by your camera to see if it has similar ones.
SETTING AUTOFOCUS
Read the instruction manual that comes with your lenses and cameras carefully to determine how to set manual focus and autofocus. The method depends on the system. For example, Canon has switches on the lens to set it to manual or autofocus. Nikon uses switches on the camera body to do the same.
THE FOCUS LIMITER
Some lenses allow you to limit the autofocus search range to speed up autofocusing. For example, the Canon 500mm f/4 lens offers three choices. The lens can be set to search between 4.5 meters to infinity, 4.5 meters to 10 meters, and 10 meters to infinity. Precise focus acquisition is speeded up if you know you don’t need the lens to look for focus at certain distances. For instance, if you are photographing geese flying overhead and you know nothing will be closer than 10 meters, selecting 10 meters to infinity as the focusing search range prevents the lens from trying to find focus closer than 10 meters, reducing the time it takes the lens to acquire precise focus on the more distant geese. Conversely, if all of your shots are closer than 10 meters, then setting 4.5 meters to 10 meters increases autofocusing speed. In most cases, I continue to use the full range of autofocus from 4.5 meters to infinity, since the back-button focusing method I use (to be covered shortly) largely eliminates the problem of the lens searching for focus at the wrong distance. However, having switches on the lens does create problems at times. When shooting on bean bags in Africa, the movement of the lens on the bean bag sometimes moves the switches which may cause missed opportunities. Duct taping the switches in place may be necessary to avoid the problem.
Many long macro lenses that are incredibly useful for photographing reptiles and amphibians have focus limiting switches, too. Check your lenses carefully to see if they do. if

Secretary birds nest on top of flat-topped trees. Our driver parked in the spot where the two birds were parallel to us. This helped us get both of them sharp with f/8 depth of field. I set the focusing distance limit switch on my 500mm lens to 10 meters to infinity. There is no point in wasting time and batteries by letting the lens focus to the minimum focusing distance of 4.5 meters when the subject will always be at least 10 meters away. EOS 5D Mark II, 500mm f/4 lens plus a 1.4x teleconverter, f/8 at 1/250 second, ISO 400, and manual exposure.
you discover your macro lens doesn’t focus as close as you think it should, or fails to focus to infinity, check the focus-limiting switch to see if it is set.
FOCUSING POINTS
If you look in your camera’s viewfinder, you should see many AF points that look like little square boxes. These are used to focus the lens and they may or may not be created equal. Usually, the center AF point is the most accurate one because it is designed to detect both vertical and horizontal lines of contrast. The outer AF points may only detect vertical or horizontal lines, but not both. The cross-type AF points are the most accurate. If you have a choice, use your most accurate AF point or points. Check your camera manual for more info on the focusing points.
FOCUSING POINT OPTIONS
19-Point AF Auto Select
This Canon 7D option is similar to most digital cameras. The number of AF points varies from model to model. Some have
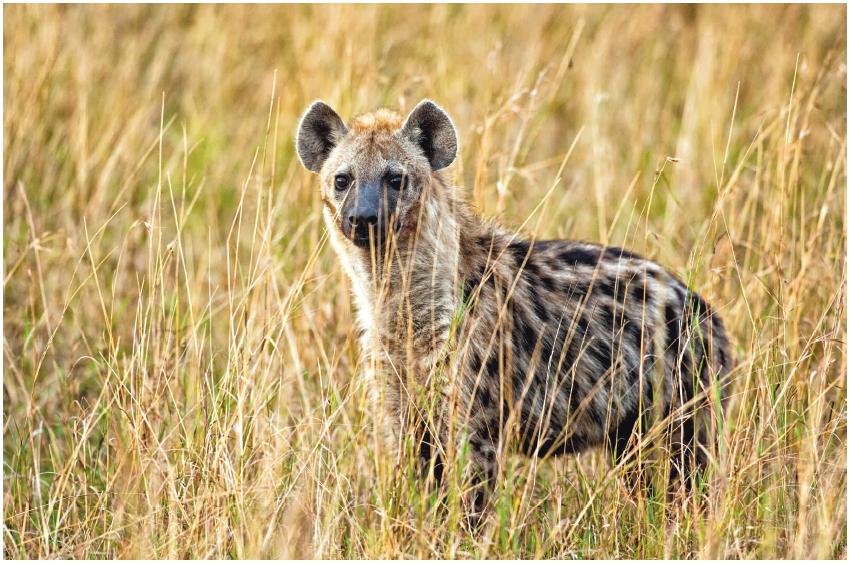
Never activate all of the AF points because the camera will fail to precisely focus on the optimum spot much of the time. In this case, the camera will focus the lens on the grass in front of the spotted hyena. Instead, point the center focusing point (the only one activated) at the forehead of the hyena and press the back-button focusing control in to make the camera focus the lens. When the hyena’s eyes are sharply focused, let up on the back- button focusing control to lock the focus. Adjust the composition to make a pleasing image and push the shutter button all the way down to shoot the image. Canon EOS 1Ds Mark II, 500mm f/4 lens, f/5.6 at 1/250 second, ISO 640, and manual exposure.
nine AF points while more expensive models offer 45 AF points. Check the camera manual to see how many AF points your camera offers. The idea is simple enough. Point the camera at the subject, press the shutter button down halfway, and the camera automatically selects one or more AF points to focus on. Then press the shutter button all the way down to shoot the picture.
This is probably the default setting on your camera. As a result, many photographers use this option and don’t consider other possibilities. It sounds exceptional—almost foolproof— but we never use it. How does the camera automatically know where you want the sharpest focus? Does it know you want the focus precisely on the face of the subject? Obviously, it doesn’t!
The most serious problem in using the multiple focusing point option is it tends to focus on the nearest object in the scene. Photograph a hyena peering through the grass and it will quickly and precisely focus on the grass in front of it. Even if you are shooting a full-frame image of a blue-footed booby, the multiple focusing points option will probably focus precisely on the shoulder that is two inches closer to the camera than the face where the sharpest focus should lie. This option does focus close to the desired spot most of the time, but that isn’t good enough for capturing truly sharp images. Unfortunately, the camera doesn’t know you want the face focused as sharply as possible. Therefore, while we do favor autofocus, we don’t let the camera decide what part of the image should be most sharply focused and do not recommend activating all of the AF points.
Single Point AF Manual Select
This option is simple enough, incredibly precise, and probably offered by your camera. We use it most of the time and you should, too. Look in the viewfinder and select the single AF point where the sharpest focus should be. All other AF points are inactive. If you are photographing a plump pine grosbeak perched in a tree, compose the image, select the AF point that coincides with the face of the bird, press the shutter button down halfway to make the lens focus, and then press it the rest of the way down to capture a fine image.
The key is to always select the AF point that coincides with the exact spot where you want the sharpest focus. It helps to learn how to select the AF point quickly. Most cameras offer multiple ways to select the AF point. Sometimes you must fuss with two buttons to do this and sometimes only one control selects the AF point. I prefer to use a single joystick button to select the active AF point. On the Canon 7D, I use custom function #1 in Group #4 to directly select the AF point using the Multi-controller button on the rear of the camera. This is the quickest way to select the desired AF point. Selecting the AF point rapidly is crucial, especially when photographing wildlife, because their face doesn’t stay in the same spot as the critter moves about. This makes it necessary to keep selecting new AF points to coincide with the animal’s face to keep it sharply focused.
Zone AF Manual Select
This is a new option for Canon, but has been found on Nikon cameras for quite some time. This option lets you select a small area of AF points in a given zone. With the Canon 7D, five zones can be selected. These choices include a group of AF points in the center of the viewfinder, on the left, right, top, and bottom.
Zone AF is effective if you know where the action will happen in the image. A few years ago, one of our favorite clients, Steve, was photographing at our hummingbird photography workshop. Being an elderly gentleman, Steve tended to doze off from time to time. The hummingbirds were frequently visiting a sugar water feeder right in front of him that was disguised with a flower. The flower occupied the right side of the image and the hummingbird always appeared on the left side. Steve is a Nikon shooter and set his camera to Zone AF. Then he activated only the AF points on the left side of the viewfinder. He attached a 20-foot cable release to his camera and sat in a comfortable chair 15 feet from the set-up in the warm morning sun. He composed the image a bit loose to avoid cutting off part of the hummingbird and planned to crop the image later. Relying on Zone AF to hit sharp focus on the hummingbird, he settled back into his comfortable chair and fell asleep during a lull in the hummingbird activity. As I walked past his station, I noticed he was sleeping when a male calliope hummingbird began its dazzling “buzzing” display in the perfect spot. I hollered “shoot” to Steve and he immediately tripped the camera without ever opening his eyes. A year later, this image won first prize in a National Wildlife magazine photo contest. Imagine shooting a major contest winning photograph with your eyes closed!
We don’t find a lot of uses for Zone AF, but do keep it in mind. Anytime a subject suddenly appears briefly at a known spot, and then moves on, Zone AF is useful. I was photographing

Red-naped sapsuckers nest in holes they drill into the aspen trees around our home. This nest was in the dense forest, but the background is a mountain three miles away. I set up a main and fill flash that was two stops weaker to light the bird. Once I arrived at the best f/stop to properly expose the woodpecker with the flash, I metered the distant background and slowed the shutter speed until it was nicely exposed, too. The woodpecker was lit entirely with flash and the background was all available light. Canon 5D Mark II, Canon 500mm f/4 lens, f/16 at 1/60 second, ISO 400, and manual metering for both flash and the natural light.
a red-naped sapsucker at the nest before I had Zone AF. Every 20 minutes, a woodpecker suddenly appeared at the nest cavity, fed its young in seconds, and flew off to find more food. There was precious little time to focus manually or select a single AF point that corresponded to the face. That’s a case where Zone AF is certainly worth a try.
Spot AF Manual Select
This new Canon option is similar to Single Point AF manual select, only it covers a much smaller area. Think of it as “dot” AF. The camera uses a tiny portion of a single AF point to focus on wherever it is pointed. It lets you focus precisely on a tiny spot. Unfortunately, Canon must feel it isn’t going to be that widely used because they make you activate it with custom function #6 in Group #3 with the Canon 7D. See how important it is to know what the custom functions offer?
You know what a stickler we are on focusing on the most important spot in an image. Since spot AF lets you focus on a tiny object, it is terrific for focusing right between the eyes of an owl, for instance. Spot AF is my favorite focusing point option by far. It is possible to focus right through the grass if there is a small spot where the grass isn’t concealing a portion of the animal’s face. Here’s how I use it. With spot AF selected, I point the manually selected AF point at a part of the face of an animal in the grass, then I push a button on the rear of the camera to make the lens focus (we’ll cover back-button focusing shortly). If the face of the animal looks sharp, I shoot the image. If it doesn’t, then the lens is focusing on the grass, so I try again. Usually, one to three attempts does it. If not, then I switch to manual focus.
AF Point Expansion Manual Select
This is a terrific focusing mode for photographing running animals and flying birds. It’s easy to keep a single AF point on a wandering African elephant, but far more difficult on a vulture plummeting out of the sky to feed on a lion kill. To keep the vulture in good focus overall, I select this option. I can still pick a single AF point to coincide with the position where I want the vulture to be in the image for compositional

Finding the remains of a hapless herbivore killed by lions is quite common in Kenya. We don’t photograph the gore, but do photograph the scavengers that arrive to eat the scraps. This Ruppell’s vulture plummets out of the heavens to feast on the remains, providing excellent fight photo opportunities. Nikon D2X, Nikon 200-400mm f/4 lens, f/6.3 at 1/640 second, ISO 200, and manual exposure.
purposes. However, this mode activates the neighboring AF points, too. If a part of the vulture coincides with any of these AF points, you’ll get the focus some place on the vulture which may be close enough, considering the tough circumstances.
This focusing point option of activating a small cluster of AF points works well for me. However, in my teens and early twenties, I was a competitive skeet shooter. I am lucky to be naturally skilled at tracking fast and erratically moving objects. Indeed, action is my favorite type of photography. Photographers who struggle with tracking moving subjects may do better by activating more AF points. Indeed, for many, using Zone AF in the middle of the image, or even activating all AF points may be the best answer. Your natural skills at tracking action will determine the focusing point option that best suits your natural abilities.
FOCUS MODES
Your DSLR offers at least two focusing modes and possibly more. The two most common ones include One-Shot AF (also conveniently known as single focus) and continuous focus (unhelpfully called AI Servo by Canon). Most photographers use both, depending on the situation. Here’s how they differ and when you might use one over the other.
SINGLE AUTOFOCUS
Single autofocus does not track a moving subject. Point the AF point(s) at a mule deer and gently push the shutter button down halfway. The lens focuses on whatever the active AF points coincide with in the viewfinder. Once focus is acquired, press the shutter button the rest of the way down to shoot the picture. It’s simple enough and does work well. Unfortunately, if the deer walks toward you slowly, the camera won’t adjust the focus to stay sharply focused on the magnificent animal if you keep the button pressed down halfway. You must fully let up on the button and then press it down again. Single autofocus does not offer focus tracking. But, this isn’t a problem if the subject remains still.
The single autofocus mode is designed to give priority to the focus (sometimes called focus-priority) on most cameras. This means if the active AF points aren’t on something that is in focus, the camera won’t let you shoot the image. This becomes a huge problem if you are in focus, but there isn’t any contrast where the active AF points are located. However, in most circumstances, single autofocus does work fine for subjects that aren’t moving. It’s no wonder single autofocus is wildly popular among most photographers—but not us. We never use the single autofocus mode. We’ll explain why shortly.
CONTINUOUS AUTOFOCUS
This mode constantly monitors and adjusts the focus when the distance between the lens and the subject changes. It doesn’t matter if the photographer is moving, the subject, or both are. The lens continually refocuses to keep whatever coincides with the active AF point (or points) in focus. In an atypical situation where you are moving and the subject is not, continuous autofocus helps a lot. Photographing penguins or a leopard seal resting on floating ice in Antarctica

Panning smoothly with these lesser flamingos while using a fast shutter speed is a wellknown way to capture sharp action images. However, for artistic reasons, sometimes it is best to reveal the motion in the subject. I used Aperture-priority to lock in f/22 and force the camera to use the slow shutter speed of 1/10 second to blur the flock. Canon EOS 20D, Canon 100–400mm lens, f/22 at 1/10 second, ISO 100, and Aperture-priority with minus 1/2-stop exposure compensation.
from a slowly drifting Zodiac (an inflatable boat) is an example. As long as the active AF points are on the subject, the camera will do its best to keep it in focus. Many cameras offer autofocus that predicts where the rapidly moving subject will be and adjusts the focus accordingly. This is often called “Predictive Autofocus.”
Predictive autofocus is easy to use. Put the active AF points on the subject, hold the shutter button down halfway, and the lens continually refocuses to keep the subject sharply focused. Of course, the faster the subject moves, the harder it is for the autofocus to keep up with it. Use continuous focus for all action images such as flying birds, running cheetahs, and bounding deer.
The big problem with continuous focus is continuous focus. That’s not a typo! If you are photographing a hawk soaring overhead, continuous focus does a terrific job until the AF points wander off the hawk and “see” a cloud, causing the camera to focus on the distant cloud. Clear blue sky shouldn’t

Back-button focusing solves the problem when a motionless subject suddenly moves steadily away. Set the camera to continuous focusing. When the wildebeest is still, focus on its face and then let up on the back-button focus control to lock the focus. When the wildebeest runs, press the back-button focusing control down, and hold it down, while you aim the AF point at the animal as you pan with it and press the shutter button all the way down. There isn’t time to switch between single focusing and continuous focusing by changing the focusing mode. Mastering the back-button focusing technique is the single most important skill you can learn to increase your percentage of well-focused images. Canon EOS-7D, 500mm f/4 lens, f/7.1 at 1/800 second, ISO 400, and Shutter-priority with a +1/3-stop exposure compensation.
As soon as this wildebeest began to run, I pressed the back-button focus button down— and held it down—while panning with the running animal and pressing the shutter button at the same time. Canon EOS-7D, 500mm f/4 lens, f/7.1 at 1/800 second, ISO 400, and Shutter-priority with a +1/3-stop exposure compensation.

be a problem, though, as the lack of contrast makes it difficult for the autofocus mechanism to “see” it.
Modern continuous focus that locks on to and even predicts the position of a moving subject is amazingly good. Some claim they can do it better with manual focus, but we sure can’t. One thing we know for certain is that autofocus does a better job than we do with manual focus in most circumstances. While we tend to be skeptical of anything automatic, we prefer to use autofocus whenever possible.
There is another difference between single focus and continuous focus. As we mentioned, single focus tends to be focus priority. If the object the active AF points are on isn’t in focus, the camera may not allow you to shoot an image. Continuous focus systems tend to be shooting priority. The camera will shoot the image even if the object where the active AF points are isn’t in focus. Be sure you understand these focus and shooting priority differences.
A HUGE FOCUSING PROBLEM
Imagine a handsome Canada goose confidently perched on top of a muskrat house. It isn’t moving much, so you decide to use single focusing. You point the middle AF point at its head, press the shutter button down halfway to focus on the head, continue to hold the shutter down halfway to keep the focus locked, recompose to make the goose look into the image, and finally press the shutter button all the way down to capture the image. That’s easy enough.
However, what happens when the Canada goose leaps into the air and steadily flaps toward you? A gorgeous mirror reflection appears in the quiet blue water during the take-off. Did you get the shot? Not likely. Since the camera is set to single focusing, as soon as the goose flies toward you, the focus is behind the bird because the goose is reducing the distance between it and you. You might try to quickly switch the camera from single focus to continuous focus to track the bird. However, if you are like us and everyone else we know, by the time you find the AF mode switch and change it, the goose is already gone. Is there a good solution to this problem of having to switch AF modes immediately—not a few seconds later? Absolutely! We began calling it “back-button focusing” 20 years ago to describe what it does. Regrettably, it seems all camera makers call it something else that isn’t terribly descriptive. Fortunately, the vast majority of today’s cameras—especially Nikon and Canon—do provide for back-button focusing. They just don’t go out of their way to tell you about it.
We use the back-button autofocusing technique about 90 percent of the time. It is easily the fastest and most precise way to use autofocus for the vast majority of wildlife photography. It solves many autofocus problems, including the Canada goose. Most workshop participants use cameras that offer back-button focusing, but are unaware of what it is and how to enable it. It isn’t a new feature, either. We commonly used it with our professional grade film cameras in the late 1980s.
Regrettably, the odds are many readers of this book have never heard of it. There is a good reason for that. It is rarely mentioned in photo magazines and books. Even your camera

Notice the AF-ON button and the two buttons to the right of it on the Canon EOS-7D. The addition of the AF-ON button is relatively new. Previously, cameras let you remove the autofocus control from the shutter button and reassign it to the button immediately to the right of the AF-ON button with a menu choice or by setting a custom function. We find the AF-ON button is a bit hard to reach, so we still use the other button if permitted. Indeed, on the Canon 7D, I have programmed both the AF-ON button and the middle button to serve the same purpose of controlling the autofocus using custom function #1 in Group #4.
manual virtually ignores it. I have yet to read a camera manual that calls it back-button focusing. All of the camera manuals we read don’t really call it anything that is terribly meaningful. I actually started to call it back-button focusing when I referred to it in my teaching programs around 1995. I began using this term because it is descriptive. Back-button focusing (some call it thumb focusing) is exactly what it sounds like. The autofocus control is removed from the shutter button and reassigned to a button on the back of the camera, usually located about an inch to the right of the viewfinder. Using this button, autofocus is now controlled with your right thumb. The shutter button turns the meter on and takes the picture when pressed all the way down, but it no longer has anything to do with autofocus. The shutter button and the focusing control are separated from each other. This delivers huge control benefits to the photographer.
Back-button focusing techniques will be explained soon enough. First, here’s some observations regarding back-button focusing and learning how to do it. We all have habits that are hard to break. Most photographers have a habit of pushing the shutter button to initiate autofocus. That can be a hard habit to break, but break it you must. Some photographers give up on back-button focusing rather quickly because they keep forgetting to push the rear button that controls it. You must stay with it longer to create a new habit. Eventually, controlling the autofocus by using your right thumb to press a button on the rear of the camera becomes automatic. Others give up on it because they don’t really perceive the many enormous benefits it offers, even when those benefits are carefully explained to them. It takes shooting many images in different situations before most photographers become comfortable with it. Only then do they really perceive its tremendous benefits for helping them to focus precisely, fast, and to successfully capture images that otherwise would elude them. Once you “get it,” you’ll wonder how you ever managed without it. Changing your shooting habits to back-button focusing is the single best focusing technique we can offer. The control it gives you is absolutely enormous! We hope you’ll make it a habit, too. The sharpness of your images will dramatically improve.
HOW DO YOU SET BACK-BUTTON FOCUSING?
That is a great question! Almost every Nikon and Canon camera has back-button focusing capability and most other brands do, too. Yet, we haven’t seen any camera maker call it back-button focusing in their manuals. Companies use terms for the control that give you no hint as to what it does. Canon offers many custom functions, one of which gives you the ability to set the camera to back-button focusing. Unfortunately, the custom function number that controls it varies among models, so I can’t tell you to go to custom function #4 and set option #2 for example. Nikon cameras offer the control using a menu selection. For example, if you have a Nikon camera with an AF-On button on the rear of the camera, you have back-button focusing for sure. You must go to the autofocus menu and, oddly enough, turn AF off. This deactivates autofocus from the shutter button, but it remains activated on the AF-On button.
You still must figure out if your camera offers back-button focusing (most do) and how to set it. Try reading your camera manual carefully and pay extra attention to all of the autofocus controls. You may find it on your own. Try contacting your camera maker, or an online forum that discusses your camera brand. Ask if anyone knows how to set your camera model (be sure to mention what model you have) to back-button focusing or thumb focusing. Tell them you want to control the autofocus on the back of the camera and remove it from the shutter button. Among a large group of photographers who frequent a forum, it’s likely someone knows what you are talking about and how to set it. If you attend our field workshops, with your camera in our hands, it’s easy for us to find your back-button focusing control. Barbara is brilliant at finding the control, even for cameras we seldom see such as Sony and Olympus.
BACK-BUTTON FOCUSING BENEFITS
The Camera Setup
Remove the autofocus from the shutter button and assign it to a button on the rear of your camera. Now set the autofocus mode to continuous autofocus and leave it there. You no longer need single autofocus because you always have it! Anytime you let up on the rear focusing button, the focus locks, just like single autofocus. To easily and immediately switch to continuous autofocus, push the back-button focus control down, and hold it down with your right thumb, while you shoot photographs
THE REMOTE RELEASE AND SELF-TIMER PROBLEM
Perhaps you are photographing a land iguana in the Galapagos Islands. In the soft overcast light, a tripod is used to capture the sharpest image possible. With the autofocus control on the shutter button, instead of the back-button control, point the active AF point at the eye of the iguana and push the shutter button down halfway to make the lens focus on the eye. Now let up on the button and recompose to prevent the iguana’s eye from being in the middle of the image. You also noticed the lizard’s leg is cut off when the eye is in the middle of the image. Tripping the shutter with your finger vibrates the camera a bit, causing a loss of sharpness. Since you are a quality conscious photographer who demands the ultimate
Galapagos land iguanas often hold perfectly still for long periods of time. This habit makes it easy to use a cable release to trip the shutter for sharper images. Nikon D3, Nikon 200–400mm f/4.0 lens at 300mm, f/8 at 1/125 second, ISO 200, and manual exposure.

image sharpness, it is essential you use a cable release, a remote infrared or radio release, or a 2-second self-timer delay to trip the camera. Any one of these three methods removes your pulsating body from the camera. Now trip the camera and view the image. Unfortunately, the iguana is now out of focus. What happened? Using the cable release, remote release, or the 2-second self-timer to trip the shutter causes the camera to refocus with most cameras. Why? When the camera is adjusted slightly to recompose the iguana, the active AF point settles over a spot on the background. The camera refocuses automatically on the background behind the iguana. This problem is easily solved by focusing on the eye and then turning the AF switch off. But, frequently turning the AF switch on and off becomes a nuisance factor and slows you down.
Back-button focusing eliminates this problem completely. Activate only the middle AF point, set the camera to backbutton focusing, and the AF mode to continuous. Point the middle AF point at the eye and push the button in on the rear of the camera that initiates autofocus. The camera focuses on the eye. Raise your thumb off the button to lock the focus instantly. Recompose the iguana and use any one of the three remote ways just mentioned to trip the camera. Shoot the image. The iguana is perfectly sharp, especially around the eye and your body doesn’t cause the camera to vibrate at all, producing a superbly sharp image. With practice, you will be able to back-button focus on the eye and recompose in a second or two. It really does become that easy.
Why is it best to set the camera to continuous focus, rather than single focus? After all, the iguana was perfectly still. Good question! As mentioned earlier, many cameras are focus priority in the single focus mode and shooting priority in the continuous focus mode. That’s a hint. If the camera is set to single focus and the active AF point isn’t on something in focus when you recompose the image, many cameras will not shoot the image, even though the eye of the iguana remains perfectly in focus. With the camera set to continuous focus, it will shoot the image because it is in shooting priority. This is a simple, but important concept. Be sure you understand it. In field workshops, when a student shouts, “my camera won’t fire,” we immediately check to see if the camera is set to single autofocus. Usually, that’s the problem.
THE PROBLEM WITH SWITCHING THE AF
Let’s assume you are photographing a wintering trumpeter swan in Yellowstone National Park during January. The swan is beautifully posed on a shallow spot in mid-river with a gorgeous mirror reflection. Since the swan is motionless, you use single autofocus. You point the middle autofocus point (the only one that is activated) at the head of the swan and press the shutter button down halfway to make the lens focus on the head. While holding the shutter button down halfway to lock the focus, you recompose and press the shutter button all the way down to make the picture. Single autofocus is a simple enough procedure, but what do you do if a low flying bald eagle frightens the swan? The swan erupts into flight, paddling its large feet on the surface of the river while sending water flying everywhere as it begins to gain momentum and altitude. Now you have a moving subject, but the camera isn’t set on continuous autofocus. Since the distance between the swan and the camera constantly changes, all of the images will be out of focus. Of course, many photographers attempt to quickly change from single autofocus to continuous autofocus. Even if you can make the change in a few seconds, it is already too late. The swan flies quickly away from you, offering only an unappealing rear-end shot.
The simple solution to this problem of having to quickly go from single focus to continuous focus and vice versa is backbutton focusing. This technique handles the situation perfectly. Leave the camera on continuous autofocus all of the time. When the swan is in the river, point the middle AF point at its head and push the button in on the rear of the camera to autofocus. When the lens focuses on the head, let up on the button, recompose, and shoot the image. If the swan suddenly takes flight, press the focusing button down, and hold it down. Quickly put the activated AF point on the swan as you pan with it and shoot away. The lens will constantly adjust focus as the distance from the swan to the camera changes. It literally takes only a split-second to go from single autofocus to continuous autofocus. To be specific, you really aren’t changing focusing modes. You are merely using continuous autofocus effectively for both action and still subjects. It does take a little effort to become confident with back-button focusing, but once you really get it, you’ll wonder how you ever shot images without it. It is an enormously powerful technique that everyone needs to add to their focusing strategies!
OUR FOCUSING STRATEGY
Barbara uses back-button autofocusing for all situations (the vast majority) where autofocusing works best. There are some lenses, such as tilt/shift lenses, where there is no autofocus capability. Autofocus doesn’t work well in snowstorms either. When shooting macro images, both of us use manual focus and enlarge the live view image to make manual focusing much easier and more precise.
I use back-button autofocusing for almost all wildlife photography, with the exceptions mentioned above, and one more. If I know I will be photographing action, and there is virtually no possibility of a still shot, I do switch the autofocus control from the back-button to the normal shutter button. It makes things a little easier for me. Using back-button focusing to photograph birds flying past or running mammals does require me to hold the back-button in, while simultaneously pressing the shutter button to shoot images. If the focusing control is on the shutter button, then it is only necessary to hold the shutter button down to have continuous autofocus and shoot images. However, if a running mammal suddenly stops, or a bird lands next to me, I will have problems focusing on the creature’s face with the autofocus on the shutter button and set to continuous autofocus. Unless I want the animal’s face in the center of the image, it is impossible to recompose, while keeping the autofocus locked on the subject’s face. As soon as I move the autofocus point away from the animal’s face, the lens refocuses on the wrong spot.
OTHER FOCUSING OPTIONS
Cameras offer more ways to use autofocus than most photographers relize. Often these highly useful specialized controls are hidden in custom functions or menu choices. Your images will improve considerably if you carefully explore all of the options offered by your camera. Sadly, it appears most photographers, including pros, don’t do this and miss out on wonderful tools that will easily improve their focusing precision. Unfortunately, these options vary from camera to camera. This makes it impossible to cover all of them in a book such as this.
At the risk of being too specific for one camera, I do wish to point out a few more autofocus capabilities offered by the Canon 7D. Perhaps your camera offers similar controls. If you are not even aware these focusing options are possible, you might not look for them. Let’s describe a few of these options to let you know what to look for.
USE THE BACK-BUTTON TO LOCK FOCUS
Many cameras that offer back-button focusing provide a way to designate a button on the back of the camera as a focus lock button. The AE Lock button that is slightly to the right of the AF-On button on the 7D can be set to AF-Off using custom function #1 in Group #4 with this camera. Why do you want to do that? Here’s a situation where I effectively use it. I love photographing hummingbirds in flight with natural light. Though it sounds impossible, it is easy to do. I modify a hummingbird feeder by taking the perches off of it to prevent them from landing. The hummingbirds still come to the sugar water feeder, but they must hover, as they normally do, to sip the sugar water. The incredibly active birds tend to sip a little, then pop up several inches above the feeder to look around, and return to the feeder. Every time they hover above the feeder, it offers the perfect opportunity to photograph them without the feeder appearing in the image. Since hummingbirds move rapidly, I use continuous autofocus, the highest shooting speed (images-per-second), and put the focus control on the shutter button. Now I don’t have to hold the back-button in while pressing the shutter button at the same time.

Rufous hummingbirds are easy to photograph in flight with natural light. Attract them to a fiat sugar water feeder and remove all plastic perches. Hummingbirds eagerly sip the sugar water and frequently hover a few inches above the feeder before returning to the feeder or flying away. Bright overcast light increases the iridescence in the feathers and the grass field behind the bird produces a pleasing out-of-focus nondistracting background. Canon EOS 1D Mark III, Canon 300mm f/4 lens, f/5.0 at 1/640, ISO 640 and manual exposure.
Here’s the reason I set the AE Lock button to AF-OFF. To the left and right of the hummingbird feeder, I put a photogenic twig for the hummingbirds to perch on. Usually, they simply hover about the feeder and dart away when they finish feeding. However, every once in a while, a hummingbird perches on the twig. With the camera set to continuous autofocus and controlled by the shutter button, I have a serious focusing problem when the hummingbird perches. I point the middle AF point at the face of the perched hummingbird, press the shutter button down halfway to initiate autofocus on its face, but notice the tail is chopped off by the poor framing. When I recompose to include the tail in the composition, the AF point now moves to the lower half of the hummingbird, causing the camera to refocus on the wrong spot. Now the face is no longer as sharp as it should be.
This problem disappears when the AE Lock button is set to AF-Off. Point the AF point at the face of the perched hummingbird, press the shutter button down halfway to focus on its face, now press the AE Lock button down and hold it down, recompose, and press the shutter button down all the way to shoot the image. The lens stays perfectly focused on

A conifer twig placed five inches in front of a single port hummingbird feeder enticed this male rufous hummingbird to perch on it. EOS 5D Mark II, Canon 300mm f/4 lens, 25mm extension tube, f/6.3 at 1/200 second, ISO 500, and manual exposure.
the face of the hummingbird. Remember, the AE Lock button must be held down while shooting the image with the shutter button. It does take a little practice to do this precisely and fast, but anyone can learn to do it quickly.
Another way to handle this problem is to select a single focusing point that happens to correspond with the face of the hummingbird when you have the composition you prefer. Hopefully, your camera provides an easy way to do this.
AI SERVO TRACKING SENSITIVITY
This useful autofocus control can be set with custom function #1 in Group #3 with the Canon 7D. Hopefully, your camera offers a similar control. If it doesn’t, write to your manufacturer and suggest they add tracking sensitivity to their cameras.
This control offers a choice of five settings from slow to fast. Like most photographers, when I first saw it, I assumed I wanted the sensitivity set to Fast. However, through experience and careful study of this feature, I believe most wildlife photographers will do better with it set to Slow. This custom function does not affect how fast the lens focuses on a rapidly moving subject, as you might assume. Instead, it affects how quickly the lens reacts to focusing on another object at a different distance.
Let’s illustrate what it does with an example. Photograph an eagle flying by with some clouds in the sky. Using continuous autofocus, you attempt to keep the middle AF point (the only
This drake ruddy duck slowly swam by me while I hid in a fioating blind. I used the fastest shooting speed possible (eight images per second) and the multi-controller button on the back of my camera to quickly change the AF point to coincide with the face of the duck. Canon EOS-7D, 500mm f/4.0L lens, f/11 at 1/800 second, ISO 640, and Shutter-priority with minus 1-stop exposure compensation.

one that is activated) on the head of the flying eagle as you pan with it. The camera continually adjusts the focus to keep the eagle’s head in focus. Of course, it is difficult to always keep the AF point on the eagle since its flight path may be erratic. If the AF point momentarily drifts off the eagle and overlaps a distant cloud, the camera instantly refocuses on the cloud and the eagle goes completely out of focus. If this custom function is set to Slow, the lens doesn’t immediately refocus on the cloud, but delays or slows its response, giving you time to move the AF point back to the eagle where it belongs.
I feel the Slow setting works best because most wildlife photographers tend to photograph a specific subject at a certain distance, rather than jumping from one subject to another at widely varying distances. Of course, this all depends on the situation. When I am photographing dancing greater prairie chickens on a lek in central Nebraska, chickens are dancing at various distances. If I use a 300mm lens, I have some chickens (hopefully) at just the right distance from me. Some birds will be too far away for the 300mm lens and others may be too close. Due to the fixed focal length of this lens, it’s unlikely I will jump from one bird to another at different distances. Therefore, I set the focusing response time to Slow. This keeps the lens from instantly autofocusing on the grass behind the bird if the activated AF point wanders off the bird a tiny bit. On the other hand, with a 75–300mm zoom lens, the ability to quickly change the focal length makes it possible to successfully photograph birds at widely varying distances. In this case, selecting the Fast choice is sensible.
CHOOSE MANUALLY SELECTED AF POINT FOR HORIZONTAL AND VERTICAL SHOTS
This is another incredibly useful focusing option that is enabled by selecting Option #1 in custom function #12 of Group #3 with the Canon 7D. Often, it doesn’t make sense to use only the middle AF point in the viewfinder. When you are panning with a swimming duck, you must use another AF point that coincides with the duck’s head as it paddles about in front of you. Frequently, to avoid cutting off a portion of the gorgeous mirror reflection of the duck, using an AF point above the middle of the image is necessary. Perhaps you selected an AF point above the middle and slightly to the left that coincides with the bird’s head as it swims from right to left in a horizontal image. If the bird turns toward you, you switch to a vertical composition. Now that AF point is left of center and low in the image. It isn’t anywhere near the duck’s head which forces you to switch to another AF point.
When this focusing orientation control is enabled, you are able to manually select an AF point that works for horizontal (landscape) compositions and a different AF point for vertical (portrait) compositions. When you change from one orientation to the other, the camera automatically switches to the AF point you selected for that orientation. It works like a charm! Hopefully, your camera offers this incredibly useful feature.
STUDY YOUR AUTOFOCUSING OPTIONS
The Canon 7D and the camera you use offer many auto-focusing options. It is worth your time to carefully go through each one to determine what options can help you capture exquisite wildlife images. Sadly, your camera manual isn’t as helpful as it should be. Often, features are poorly explained. Reasons for using various options are seldom offered. There are ways to find more information about an option you don’t totally understand. Send an email question to your camera manufacturer via their official website. Your camera maker wants you to be happy and successful. It is in their interest to provide good answers. You might try posting your question on a popular photo discussion forum. Whichever camera system you shoot, post on the camera forums for that system. You’ll likely get plenty of advice. Some advice is terrific and some is unhelpful. Don’t believe everything you read! Many popular cameras have entire books written about them. These can be a gold mine of great information and most are better than the official camera manual.
