
8
Electronic Flash
THE FEAR FACTOR
Many photographers are afraid to use flash. Many of you—as we did—learned photography years ago when flash was far less sophisticated and more difficult to use. Through-the-lens flash metering was in its infancy and flash manuals were poorly written. Using more than one flash at a time required the use of the intimidating guide number (GN) system or an expensive flash meter to arrive at the optimum exposure. Fortunately, this dismal situation has changed for the better. Dedicated flash is easy to use well. Metering for flash, along with combining it with available light, is simple and straightforward today.
Occasionally, some photographers say they don’t need flash to capture wildlife images. Their assumption is correct if they limit themselves to the times when available light does work well. We prefer to use splendid available light whenever possible. However, there are many times, especially in wildlife photography, where flash must be used to capture nicely illuminated images. Flash offers many advantages. It is powerful for its size, easy to control, reliable, predictable, always available, and emits a light with a known and consistent color. Think of it as a small “sun in the box” that easily solves many problems wildlife photographers encounter. I have used flash extensively over the past 40 years and started with using two or three flashes at once to photograph nesting birds. During this time in the mid-1970s, I had to use the Guide Number system to set proper exposure. Over the decades that followed, I figured out ways to use flash to solve many lighting problems. To keep things simple, I use different terms to separate these uses.
FLASH DEFINITIONS
FILL-FLASH
When available light is unfavorable, it is effective to use flash as a supplemental light to open up deep shadows. This
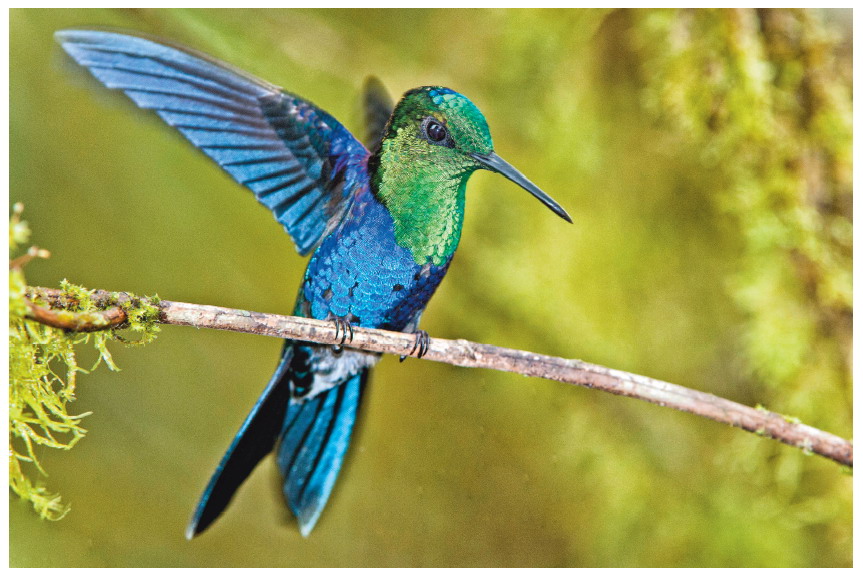
The green-crowned woodnymph dwells in the dark forests of the highlands in Ecuador. Barbara manually set the natural light exposure to be at least one stop underexposed and used a flash mounted above the camera with a bracket to properly expose the hummingbird. The flash helps tremendously in capturing sharp images and really brings out the color in this bird. Nikon D300, Nikon 200–400 f/4.0 lens, f/7.1 at 1/125 second, ISO 800, manual natural light exposure and automatic flash exposure with a +2/3-stop exposure compensation.
reduces contrast and narrows the dynamic range. Using fill-flash lets the sensor record detail in both the shadows and the highlights. Available light remains the dominant light source and flash is the minor or secondary light source.
MAIN FLASH
Flash is the primary or dominant light, and available light now serves as the fill-light. This technique is incredibly effective for photographing small birds and mammals in the forest when the available light is insufficient to permit fast enough shutter speeds to capture sharp images. Flash is used to properly light the subject while the available light exposure is set one or two stops underexposed. This strategy lets you stop the lens down more, use a faster shutter speed, or a combination of the two. It is incredibly effective for photographing hummingbirds perched in bushes.
We were thrilled when Jim Kenney hired us to help him photograph the swarms of hummingbirds that are attracted to the sugar water feeders at the Tandayapa Bird Lodge in the Ecuadorian highlands. Imagine having fourteen different species coming in at one time and sometimes getting to shoot 600 shots per hour. This iridescent sparkling violetear was one of the larger species at the lodge. Thanks Jim!! Canon EOS-1 D Mark III, Canon 300mm f/4.0 lens, f/20 at 1/250 second, ISO 200, and four Canon 580 II flashes set to 1/16 power.

BALANCED FLASH
There are times when dim light illuminates the subject, but the background is far more brightly lit with available light. Flash is used to light the subject without having any effect on the more distant background. The flash balances the light between the foreground and the background. Sometimes flash is used to light a dark background to reduce the contrast between the background and a brightly illuminated subject in the foreground. In each case, flash lights one portion of the image (either foreground or background) while available light illuminates the other.
FREEZE FLASH
Advanced flash units let you adjust the flash duration by permitting different power levels to be set. For example, the flash duration at full power might be 1/1000 second. If the flash power ratio control is set to 1/16 power, the flash duration shortens considerably to 1/8000 second or less. If the only light on a moving subject is from a flash at 1/16 power, the short flash duration “freezes” the motion of the subject. Using short flash durations is precisely how sharp flight images of bats and hummingbirds are captured. Many photographers call this “high-speed flash,” but we prefer to call it “freeze flash” to describe what it does.
FLASH BASICS
Flash is an electronic device that is usually powered with batteries, but some use AC power and others can use either. For most applications, rechargeable batteries work just fine. However, if you are photographing in a place that is close to AC power and your flash units have a way to plug into it, then use AC because the power never runs out. The flash has a storage device called a capacitor to store energy from the power source. When the camera is tripped, the shutter fully opens, and the capacitor releases the charge into a glass tube filled with xenon. The gas absorbs the energy and emits a brief flash when it ionizes. It takes a few to several seconds before the capacitor fully charges itself. This is called the recycle time. During this time, you can’t shoot another properly exposed image unless you are using the flash with a low power ratio. Using a flash with a short recycle time or having one where the output is reduced with a power ratio control is crucial when you wish to shoot images rapidly. As you read your flash instruction manual, you’ll notice the flash offers many options. It gives you plenty of control over how the light is emitted. Let’s cover many of these options when we need them in the forthcoming discussion. Much flash information is crucial to everyone while some is useful to only a few photographers. Flash is a massive topic. I could easily fill an entire book on flash techniques for nature photographers, but I won’t attempt that here. It is best to take it a little at a time and learn the most important uses first. When the basics are learned, then expand your skills into more advanced uses.
FLASH CHOICES
BUILT-IN FLASH
Your camera probably has a built-in (pop-up) flash on top of the camera. This is a good place to start learning how to use flash. The pop-up flash is controlled by the camera with through-the-lens metering and a flash compensation control located somewhere on the camera or in a menu. However, the pop-up flash location is convenient for the camera maker, but it is a lousy place to put the flash. On-camera flash produces garishly flat light because all shadows fall behind the subject. Therefore, on-camera flash is horrible as a main light, but it can be used nicely as a fill-light to open up the shadows produced by bright available light or another flash.
DEDICATED FLASH
Serious flash photography requires at least one or more flashes that are built by your camera’s manufacturer, though some third-party companies also offer dedicated flash units, too. These dedicated flashes are carefully made to communicate with the camera. Dedicated flash is especially good at mixing flash with available light, a technique that formerly was challenging to do back in the manual flash days.
Each camera maker offers one or more flashes to choose from. Typically, the biggest difference between them is price and power. Expensive flash units tend to be more powerful. They emit more light which lets you light subjects at greater distances, an important factor for wildlife photographers. However, less powerful flashes that are far less expensive work fine most of the time. This is especially true now that high ISOs produce such fine results. If you use Canon, consider the Canon 430EX II ($280) or the more powerful 580EX II ($420). The 430 EX II is two-thirds stop less powerful than the 580EX II. Both work well. For about $140 less, the 430EX II may be all you need. Nikon fans should choose between the SB-600 and SB-900. Both are gems! Barbara uses the SB-800 (now replaced with the SB-900) for her flash images. It works well for everything she wishes to photograph with it. Perhaps you could find some used SB-800s by searching the web to save money. Olympus, Sony, Sigma, and Pentax offer dedicated flashes for their cameras, too. Always consider using the camera makers’ proprietary flashes first! They are more likely to work flawlessly with your camera.
THIRD-PARTY FLASH MAKERS
Metz, Sunpak, Vivitar, and others build flashes that can be used with your camera. They customize their flash models to work with different camera systems. Automation is built-in to permit the camera to work seamlessly with the flash. Of course, it is possible that not all of the features or controls are available, especially if you use a new camera model that didn’t exist when the flash was designed. Still, it is best to look at flashes made by your camera maker first. Only if you don’t find what you want from the camera maker, or the price doesn’t fit your budget, should you consider independent flash companies.
DETERMINING THE FLASH EXPOSURE
DO YOU NEED A FLASH METER?
The camera’s internal flash metering circuits measure the light output from a dedicated flash. When the camera determines the exposure is appropriate, it turns the flash off. Therefore, with most flashes and cameras, you don’t need a flash meter any more. If the flash exposure requires adjusting, then use the flash compensation control that is found on the camera, sometimes on the flash, or both.
What if you wish to use a manual flash to save money or for some other reason? Do you need the flash meter now? Barbara and I run six flash photo stations simultaneously at our hummingbird photo workshops, and most are using non-dedicated flashes. Two Minolta hand-held flash meters that we used in the film days remain in our gadget bag. Are they needed today? No! Flash exposure with digital cameras is easy. Set up the flash (or flashes) and take a shot. Check the histogram. If the rightmost data is climbing the right wall of the histogram graph and the highlight alert is flashing, reduce the flash exposure until the rightmost data is barely touching the histogram’s right wall. If the rightmost data isn’t snuggled up to the right wall, then add light until it does. Most likely you don’t need a flash meter for wildlife photography. We certainly don’t.
EXPOSURE COMPENSATION
Available Light
Most photographers use an automatic exposure mode such as Program, Aperture-priority, or Shutter-priority much of the time. These modes let the camera determine a standard exposure. However, in many cases, the exposure isn’t optimum. You must check the histogram to make sure the rightmost data is close to the right wall of the histogram. If it isn’t, how do you adjust the exposure when using one of these exposure modes? If you are using Aperture-priority and set f/8, the camera might set 1/250 second with ISO 400. How do you add one stop of light? Opening up the f-stop to f/5.6 lets in one more stop of light through the aperture, but the camera automatically changes the shutter speed to 1/500 second to compensate for it. The exposure remains the same, though the f-stop and shutter speed have changed. This is the “Law of Exposure Reciprocity” at work. Since some exposures must be compensated, your camera conveniently provides an exposure compensation control somewhere on the camera. Usually it is indicated with a + /- icon, though some cameras (Canon, for example) use a dial to set it that isn’t labeled. Other cameras let you set it with a menu selection. In the previous example where we used 1/250 second at f/8, setting the camera to a + 1 exposure compensation changes the shutter speed to 1/125 second at f/8. Remember, Aperture-priority gives priority to the f-stop and varies the shutter speed. Obviously, Shutter-priority does the opposite.
Manual exposure users don’t need the available light exposure compensation control. They easily adjust the exposure by changing the f-stop, shutter speed, ISO, or a combination of all three while using the metering scale inside the viewfinder to guide them.

Your camera’s flash and natural light metering system are separate from each other. This means both can be on automatic, both on manual, or one on automatic and one on manual. Therefore, your camera offers a separate exposure compensation control for the flash and natural light metering system. Make sure you know where each control is on your camera. Notice the flash icon includes a zigzag line (think lightning bolt) to tell you it does not control the natural light exposure, but only the flash exposure. Some cameras do not use icons to label the controls. Consult your camera manual to find out where they are located.
ELECTRONIC FLASH
The available light exposure compensation control does not affect the flash exposure. Therefore, your camera has a second exposure compensation control for flash. It is normally indicated with a + /- icon along with a zigzag arrow. Use this one to adjust the flash portion of the exposure. Take a break right now and find both the available light and the flash compensation control on your camera. Look in your camera manual if you don’t see them right away. Some are hidden on dials with no icon to tell you where they are located. The flash compensation control might be buried in a menu list, too. It is critically important that you know where both the flash and the available light exposure compensation controls reside on your camera. The flash compensation control affects only the flash output and the available light compensation control only affects the available light.
OUR EXPOSURE METHOD
We meter with the histogram, but keep the highlight alert activated to help us detect overexposed portions of the image quickly. All of this is fully covered in Chapter 3, but let’s briefly review the fast and precise exposure strategy we use with wonderful results.
Whether you use an automatic or semi-automatic exposure mode, or manual exposure, always determine the best exposure with the histogram. Your goal is to expose the image to make the rightmost data of the histogram nearly touch the right edge or wall of the graph. Exposing this way preserves highlight detail by preventing overexposed highlights, allows the sensor to collect the greatest amount of picture data, and reduces noise. Typically, we shoot a quick image of the subject that includes the most important highlights where we wish to retain detail to get the initial histogram. Then we adjust the exposure with the exposure compensation controls, or manual controls, and shoot another image to make sure the brightest highlights that contain detail are barely touching the right wall of the histogram.
THE INVERSE SQUARE LAW
The intensity of light from a point source falling upon a subject is inversely proportional to the square of the distance from the source. That should clear it up! This law describes what

We detest the black background behind this male rufous hummingbird. In this example, the background flash failed to fire. Notice how the dark edges of the hummingbird disappear into the background, providing little brightness separation between the two. If the subject is nocturnal, such as a bat, then a black background does work. Otherwise, it is best to use a flash to light the background or use a slow shutter speed to allow available light to serve the same purpose. Canon EOS-1Ds Mark II, 300mm f/4.0 lens, f/18 at 1/250 second (sync speed), ISO 125, manual metering for both natural light and flash.
happens to light from a point source as it spreads out. If your camera is set to properly expose a subject that is 8 feet from a manual flash, what happens to the flash exposure when the subject is 16 feet away from the flash? The flash to subject distance doubles, but the light isn’t cut in half. Instead, only 1/4 of the light illuminates the subject. The distance doubles, but you lose two stops of light because the light is now spread over an area that is four times larger.
EXTENDING THE FLASH RANGE
Before explaining different ways to use flash, it’s important to learn some methods for making the flash throw more light on the subject. When flash is used outdoors, much of the light is lost when it spreads out as described by the Inverse Square Law. Unlike indoor flash photography where the walls and ceiling reflect part of the wayward light back to the subject, the outdoors has few reflecting surfaces near the subject. This makes flash weaker outdoors. Plus, many wildlife subjects are farther from the photographer which also reduces the amount of light from the flash that strikes the subject. Therefore, methods to increase the effective power of the flash are crucial in wildlife photography.
A flash has a maximum amount of light that it can emit at full power. This is expressed as a Guide Number (GN). For example, a flash that has a GN of 160 can emit more light than one with a GN of 110. It is one stop more powerful. This means it emits twice as much light. As you know, light can travel a long way if it is unimpeded. Think how far direct light from the sun travels to warm us on Earth. However, due to the Inverse Square Law which describes how light diminishes as it travels, the amount of light the flash can cast on the subject quickly diminishes. If the flash output permits f/16 at 10 feet, doubling the distance to 20 feet forces you to use f/8 instead. Doubling the flash to subject distance reduces the power of the flash by two stops. This means only 1/4 of the light that strikes the subject at 10 feet still lights it 20 feet away. This happens because the same quantity of light from the flash spreads out over an area four times as large. If you need the flash to be brighter on a distant subject, such as a robin 25 feet away, how do you increase the reach of the flash?
1 Increase the ISO: Increasing the ISO lets the camera amplify the electronic signal more. This produces a brighter image. Changing from ISO 200 to ISO 800 greatly increases the exposure. Remember, though, the amount of light from the flash striking the subject doesn’t change. The light signal is merely amplified by the camera’s sensor.
2 Open up the f-stop: Changing the f-stop from f/11 to f/8 allows twice as much light to pass through the aperture. This doubles the amount of light striking the sensor. If you find you are underexposed by one stop when the flash is firing its full charge, opening up the f-stop by one stop will solve the problem. If you need more light, then open up another stop to f/5.6. This increases the light by two stops, quadrupling the light striking the sensor.
3 Zoom the flash head: Many dedicated flashes offer a zoom function to match the field of view of the lens you are using. For instance, the

My Canon 580 II flash wasn’t strong enough to add light to this red squirrel when the camerawas set to f/11 at ISO 100. Therefore, I changed to ISO 200, opened up the aperture to f/7.1 and manually set the zoom on the flash to the longest focal length possible–105mm. This let me underexpose the natural light by a stop and properly expose the squirrel with ight from the flash. Canon EOS-1Ds, Canon 100-400mm, f/7.1 at 1/200 second, ISO 200, manual natural light exposure and automatic flash set to a +1-stop exposure compensation.
Canon 580 EX II flash offers zoom settings of 24, 28, 35, 50, 70, 80, and 105mm. Increasing the zoom setting from 50mm to 105mm concentrates the light emitted by the flash considerably, permitting it to light subjects farther away. Cameras with an attached dedicated flash often set the zoom automatically to match the focal length being used. Of course, this assumes the focal length is included in the zoom range. Obviously, if the zoom range on the flash covers 24mm to 105mm, it can’t match the field of view of a 17mm or 200mm lens. Instead, the flash will zoom to the closest possible focal length. It is possible to zoom the flash to the longest focal length and then use a lens with a shorter focal length. This lets you spotlight the subject amid its environment.
4 Use a flash extender: The longest zoom range available on a Canon 580 II flash is 105mm. That is insufficient if you use this flash with a 500mm lens. Only a portion of the light emitted by the flash strikes the subject. Since lenses longer than 105mm are commonly used for wildlife photography, it’s helpful to concentrate the flash beam more when using telephoto lenses. Is it possible? Fortunately, a number of
The flash extender attaches to the head of the flash and concentrates the light when it passes through a Fresnel lens. This lets you expose subjects with the flash that are much farther away than you normally could. The flash extender is incredibly useful when using telephoto lenses to photograph subjects that are many yards away. Every wildlife photographer can use projected flash from time to time for both fill-light and main light applications. To avoid the red-eye problem, use a flash bracket to move the flash several inches above the camera.

On a dark rainy day, I photographed this ruffed grouse in a cherry tree growing next to my deck. I underexposed the natural light portion of the exposure by about 1.3 stops of light. Then I used automatic flash to properly expose the grouse. The flash helped me capture a sharp image (short flash duration) and the light from the flash overpowers the blue color cast in the natural light to provide more pleasing colors. Using a flash extender was absolutely necessary to project the light far enough to light up the bird. Canon EOS-7D, 300mm f/4.0 lens, f/6.3 at 1/160 second, ISO 1250, manual natural light metering and automatic flash metering with zero exposure compensation.

flash modifiers are available that attach to the head of the flash. They use a Fresnel lens to concentrate the light. The light emitted from the flash passes through the Fresnel lens which greatly concentrates the light before it moves onward to the subject. These devices are simple to use and especially effective for lighting a distant subject. With a powerful flash and a Fresnel lens, it’s possible to light a subject 25 yards away or more.
5 Two companies that offer the flash extenders include www.kirkphoto.comwww.kirkphoto.com. for their Flash X-Tender and Walt Anderson’s Better Beamer.
6 Reduce the flash to subject distance: Placing the flash close to the subject works well if you know where it will be ahead of time. The lighting capability of the flash is determined by how far the flash is from the subject and not how far the camera is from the subject. This means the flash can be mounted on a flash stand or another support and placed near the subject. Now the camera can be much farther away. The flash is connected to the camera with a long dedicated flash cord, a simple PC cord and used manually, or a fancy wireless controller. By the way, a dedicated wireless controller is far more versatile and easier to use than a cord. We always use flash stands to put flashes closer to the subject when photographing nesting birds and hummingbirds feeding at our sugar-water photo stations.

Lilac-breasted rollers require a close approach even with a 400mm focal length. In this image, only available (natural) light is used. Notice the black shadows on the right side and bottom of the bird. Nikon D300, Nikon 200-400 f/4 lens at 400mm, f/10 at 1/250 second, ISO 200, Aperture-priority with a +2/3-stop exposure compensation.
7 Add Another Flash: If one flash doesn’t quite do it, adding a second identical flash near the first one will double the light output. This lets you stop the lens down one more stop or casts more light on a subject that is farther away.
FLASH TECHNIQUES
FILL-FLASH
Although the substantial benefits of photographing when the available light is most desirable are well known, there are times when you must use less than ideal light. Available light often has too much contrast. This problem is easily reduced or eliminated by using a flash to add light to the shadows. Essentially, the flash fills in the shadows, so it’s called fill-flash.
HOW TO USE FILL-FLASH
Mount the flash to the hot shoe of the camera or raise the pop-up built-in flash. We mentioned earlier that the top of the camera isn’t the best spot for flash, but it does work well for fill light because you are filling in the shadows that the camera

Barbara used a flash extender on her Nikon SB-800 flash to add some fill-light and reduce the contrast. She set -1.3 stops of flash compensation on her camera to open up the shadows without overpowering the available light.
“sees.” Available light is still the primary or main light. When fill-flash is used properly, soft shadows are preserved to reveal texture and suggest depth in the subject.
To begin, forget about the flash and keep it turned off. Determine the best available light exposure first. Use the available light exposure compensation dial to get the rightmost data of the histogram close to the right wall. Of course, if you are metering with the manual exposure mode, then turn the shutter speed or f-stop manually to adjust the exposure. Once the optimum available light exposure is achieved, look at the light in the image. Are the shadows too dark? Is the contrast too great? If it is, turn the flash on and set it to ‒1.3 stops as a starting point. Use the flash exposure compensation control to set this. Now, point the flash at the subject and shoot another image and check the shadows. The camera keeps the available light exposure and fires the flash. The camera monitors the flash exposure separately and turns the flash off when the exposure from the flash is still ‒1.3 stops underexposed. Now look at the shadows. Are they too dark, too light, or just right? If just right, then -1.3 stops of flash compensation did the job. If the shadows are too light, reduce the flash output more by setting -2 stops of compensation. If the shadows are too dark, try a stronger fill-flash by setting the flash compensation to ‒7 stops. There is no definite right answer as it is a matter of personal taste. You’ve heard of “salt-to-taste.” We call this “fill-to-taste.”
SYNC SPEED LIMITATIONS
Fill-flash is commonly used to open up shadows on the face of the subject. To isolate the face from the background, big apertures such as f/4 or f/5.6 are effective. Suppose the available light exposure is f/11 at 1/250 second. You wish to shoot with less depth of field to throw the background nicely out of focus and change the exposure to f/5.6 at 1/1000 second to accomplish this. Unfortunately, the flash will not work properly at this fast shutter speed because you are using a shutter speed faster than the X-sync speed of your camera
What Is the X-Sync Speed?
The camera uncovers the sensor by using two shutter curtains. When you shoot the image, the curtain covering the sensor opens, the flash fires, the sensor measures photons of light, and then a second curtain closes at the end of the exposure. This process happens at X-sync speed or any slower shutter speed. Most cameras have X-sync speeds in the 1/200 to 1/250 second range. Your camera manual will tell you precisely what the X-sync speed is for your camera. If the X-sync speed is 1/250 second, what happens if you shoot with a faster shutter speed? At 1/1000 second, for example, the first curtain begins to open up revealing the sensor underneath. However, due to the fast shutter speed, the second curtain can’t wait for the first curtain to complete its journey across the sensor. Instead, the second curtain gallops after the first curtain. Essentially, a rapidly moving slit travels across the sensor, exposing the photosites in the sensor as it goes. This is no problem for continuous available light, but flash is instantaneous. Only that portion of the sensor that is uncovered by the shutter curtains when the flash fires is exposed and the rest remains unexposed. Only a portion of the image receives the fill light from the flash. Therefore, to avoid uneven fill-flash on the subject, you must shoot at the X-sync speed of the camera or any slower shutter speed. You cannot use a faster shutter speed. Most cameras will not let you use a shutter speed faster than the X-sync speed as the camera will default to that speed. It’s worthwhile remembering you can use a slower shutter speed than the X-sync speed, though.
High-Speed Sync
Many cameras provide a way to use flash at shutter speeds that are faster than the X-sync speed, called “high-speed sync.” How does the camera do this? The shutter curtains still resemble a rapidly traveling slit at high shutter speeds, but the flash fires many small bursts of light in succession. As soon as one burst begins to dim, another is fired and this keeps up throughout the entire exposure. The numerous small bursts of light essentially act like continuous light. Of course, all of these bursts of light must be accomplished on a single charge of the capacitor because there isn’t time for it to recharge. In those situations where you wish to use flash at shutter speeds faster than the X-sync speed, high-speed sync does work well. Why not use it all of the time? Since the flash fires all of these bursts of light from a single charge in the capacitor, the effective reach of the flash is greatly reduced.

Mounting the flash in the camera’s hot shoe often causes the infamous “red-eye” problem where blood vessels in the eye reflect light from the flash and turn the eye bright red. That’s why a flash bracket is needed to place the flash several inches above the camera. In this case, though, the masked flowerpiercer at Guango Lodge does have red eyes naturally. Canon EOS-1D Mark III, Canon 300mm f/4.0L lens, f/7.1 at 1/60 second, ISO 800, manual natural light exposure and automatic flash exposure at +1/3-stop exposure compensation.
HOW TO USE MAIN FLASH
Main flash is the primary (dominant) light source. Available light is the fill light or secondary light source. Using main flash well is a hallmark of many exceptional photographers and stunning images. You must learn to master this easy use of flash.
This technique is incredibly useful when you must photograph an animal in dim light. Imagine photographing a hummingbird perching on a branch near a hummingbird feeder. The light is incredibly dull and weak due to the dense overhead canopy of branches and overcast skies. Even using ISO 800, the image still seems a bit muddy with dark shadows underneath the hummingbird and the slow shutter speed that must be used makes shooting sharp images a challenge.
Add a flash by mounting a single flash to the hot shoe of the camera. Better yet, mount a flash bracket that attaches to the camera or the quick release plate of a telephoto lens. This lets you place the flash above the camera to avoid the “red-eye” problem. Now determine the available light exposure for the hummingbird and the green leaves surrounding it. Set the exposure to make the available light one stop underexposed. Use the histogram to guide you. The rightmost histogram data should appear about one stop short of the right wall of the graph. We find it is easiest to use manual exposure and multi-segmented metering to do this. However, you could use Aperture-priority or Shutter-priority, along with the available light exposure compensation control to accomplish this as well. Now turn on the flash, set the flash exposure compensation to + 1 stop, and shoot a single image of the hummingbird. Check the rightmost data of the histogram to make sure it is touching the right wall of the histogram. If it is, all is well with the exposure. If the rightmost data climbs the right wall, then highlights might be clipped and overexposed. Reduce the flash exposure compensation a bit— perhaps to + 1/3 stop and shoot again. If the rightmost data

Until only recently, I foolishly ignored birds with a dull white sky behind them. Now I consider it a photo opportunity. This lilac-breasted roller stands out dramatically against the dark gray storm clouds. However, the clouds were actually very light gray in reality. I set the manual available light exposure to underexpose everything by 2 stops, darkening both the bird and the light clouds. Then I used automatic flash and set it to +1.3-stops of exposurecompensation to expose the roller nicely whilethe clouds remained dark. Canon EOS-5D Mark II, Canon 300mm f/4.0L lens, f/22 and 1/200 second, ISO 640, manual natural light exposure set to underexpose everything by minus 2-stops. The Canon 580 II flash was set to +1.3-stops of exposure compensation.
doesn’t touch the right wall, then add more flash compensation—such as + 1.7 stops. Make adjustments until the rightmost data is touching or nearly touching the right wall of the histogram. Use that combination of available light and flash exposure for the rest of the images you shoot of the hummingbird. Continue to monitor the histogram as you go. Changing available light levels or changes in flash output must be noticed and adjusted for in order to reliably capture well-exposed images.
Using flash as the main light and available light as the fill light in this manner solves many problems. First, the flash provides excellent illumination on the front of the hummingbird and minimizes contrast in the subject. Second, the light in a green forest on a cloudy day exhibits an ugly blue-green color-cast. Flash is a fairly neutral light source that approximates sunshine during the middle of the day. This light produces more natural colors in the hummingbird. Third, using the flash as the main light and setting the available light one stop underexposed lets you use a faster shutter speed. For example, if the proper available light exposure is 1/60 second at f/5.6 when using ISO 800, underexposing the available light by one stop lets you use 1/125 second. This faster shutter speed helps you capture sharp images, even when using a telephoto lens on a tripod. Fourth, the flash creates a small catchlight in the eye of the hummingbird, making it look more alive. Fifth, the flash duration is probably at least 1/800 of a second or shorter. This means the major portion of the exposure from the flash will create a sharp image. If the available light portion of the exposure is only slightly soft due to subject or camera movement, it might not be objectionable. However, lots of subject or camera movement during the available light portion of the exposure may create a ghost image which appears as a double image of the subject. The flash produces a sharp image and the available light creates a blurry secondary image.
FREEZE FLASH
Often a single flash is used as the sole illumination for a nocturnal subject like a mouse, owl, or bat. Since there isn’t enough available light to be recorded by the sensor, use the fastest shutter speed (X-sync speed) your camera offers with flash. Check the camera manual to determine the exact X-sync speed for your camera. Most cameras automatically set the X-sync speed if you mount the flash in the hot shoe of the camera, use a dedicated cord, or raise the pop-up flash. Raising the pop-up flash is another way to determine the X-sync speed. However, if you are using a standard PC cord, the camera doesn’t know you are using flash. This requires you to set the X-sync speed.
A single flash works best if you use a flash bracket to put the flash somewhat above the camera and to one side. This position helps to eliminate the dreaded and infamous “red-eye” look where light reflects off the red blood vessels in the eye, making the eyes bright red in the image. A second reason to do this is to create some small shadows in the subject. Shadows suggest depth in the image. On-camera flash tends to create unappealing flat lighting due to the lack of shadows.
Through-the-lens flash metering is ideal for most main flash applications. Use the flash compensation control to adjust the flash exposure. Once again, with a single main flash, judge the exposure by the rightmost data of the histogram. This data should touch the right wall of the histogram when shooting RAW images and fall a little short of the right wall when shooting JPEGs.
BALANCED FLASH
This powerful flash technique is used when you must photograph a creature in dim light that appears against a bright naturally illuminated background. It’s especially useful for birds nesting in the shade when the background is illuminated by sun or bright overcast. Often the available light on the bird is four to six stops darker than the background. We call it balanced flash because the dimly lit subject is being nicely illuminated with flash to make the amount of light similar or balanced with the bright light on the background.
DETERMINE THE AVAILABLE LIGHT EXPOSURE FIRST
Using balanced flash is easy if you break it down into small parts. First, forget about the flash. If the background—such as a sunlit meadow—is the bright portion of the image, determine the best exposure for only the background in the usual way. To review, set the ISO and the aperture you plan to use. Now meter the bright background and adjust the exposure manually by moving the shutter speed until the meter indicator aligns with the zero point on the exposure scale in the viewfinder. Shoot a picture and check the histogram to make sure you have the ideal exposure for the background. If the histogram isn’t right, adjust the shutter speed, and shoot again until you get the ideal exposure for the bright background. Don’t worry about the dark foreground. If you prefer to use an automatic exposure mode, select Aperture-priority and set the aperture to f/8 or f/11. Use your exposure compensation control for available light to get the optimum histogram to make the background nicely exposed. Of course, the foreground subject in the dim light will be silhouetted against the well-exposed background.
DETERMINE THE FLASH EXPOSURE FOR THEFOREGROUND
Let’s use automatic flash exposure for this example. Turn the flash on, point it at the subject, and shoot the image. Review the image on the LCD display to see if the subject is exposed nicely. Make sure no clipping occurs and no flashing highlights appear in the image. If the subject looks too dark, relative to the background, use some plus flash compensation to add light to the subject. If the subject is overexposed, then use less flash compensation to darken the subject. In this unique case, you really can’t judge the exposure of the subject by checking to see if the rightmost histogram data is touching the right wall because the available light exposure for the background already is doing that. If the subject looks good and there are no flashing highlights anywhere in the foreground, then you have arrived at a successful balanced flash exposure.
USING MULTIPLE FLASH
A single main flash tends to produce harsh light if available light isn’t allowed to contribute to the exposure. This happens because a single flash lights the portion of the subject it hits and the rest of the subject is hidden by deep shadows. Indeed, a single flash creates more contrast than bright sun because the sky on a sunny day serves as a fill light. Since contrast is a serious problem with a single off-camera flash, it may be necessary to use two or more flashes at the same time to pleasingly light wildlife subjects. Don’t worry, it isn’t difficult to do this. You’ll be an expert at it in no time.
We commonly use two flashes for woodpeckers nesting in our yard and birds at the seed feeder or water drip. Being able to use two or more flashes simultaneously is a necessary skill all wildlife photographers must acquire if they wish to take advantage of many opportunities where available light isn’t suitable.
FLASH SELECTION
Using dedicated flash is by far the best way to proceed for most flash applications. These flashes are made by your camera manufacturer and some third-party vendors. They are carefully designed to permit the camera and the flash to communicate with each other. This lets the camera control the flash easily, precisely, and efficiently. If you shoot Nikon, then buy Nikon flashes. Canon users should buy Canon flashes and so on. To reduce the chance of trouble, it’s wise to consider flash units made by your camera maker first. If they don’t make what you want, or in your price range, by all means consider independent flash companies.
Barbara uses Nikon SB-800s with her Nikon system. Nikon SB-900s are now available, but we see no need to upgrade. I use Canon 580 II flashes easily and efficiently. These flashes provide full compatibility with our Nikon and Canon camera systems, respectively. However, when our workshop clients photograph hummingbirds with three or four flashes at the same time, we use Sunpak 544 flashes on manual for our workshops because they accomplish the job well and are much less costly than our Nikon and Canon flashes. Since we use the Sunpak flashes manually for hummingbirds, we don’t need dedicated units.
A TWO-FLASH SETUP
It’s effective to use two flashes at the same time for small animals. One flash is the main (a.k.a. key) light and the second is the fill light. When photographing a nesting woodpecker, set up the main flash about 4 feet from the nest hole. The flash should be slightly higher than the camera and slightly to the right if the woodpecker is facing left when at the nest cavity. If the main flash is put on the left side of the camera, the tree could block some of the flash and cast a dreadful shadow on the woodpecker’s beak or head. The fill-flash should be about two stops weaker to open up the shadows produced by the main light and simulate available light. Put the fill-flash 8 feet from the nest hole and on the left side of the camera, but as close to the imaginary line connecting the lens with the nest cavity as possible. These distances assume the flash is powerful enough to properly light the woodpecker with the f-stop and ISO that has been selected and both flashes are identical in all respects. Doubling the flash to subject distance reduces the output of the fill-flash by two stops. This is the Inverse Square Law at work again. If you want the fill-flash to be only one stop weaker, simply multiply the flash to subject distance of the main flash (4 feet in this example) by 1.4. Putting the fill-flash 5.6 feet from the cavity (4 × 1.4 = 5.6 feet) makes it one stop weaker than the main flash. In this example, use the flashes set on manual. It also works if you are using automatic flash. There is a way to assign your flash units to different groups and use lighting ratios, but that is another entire chapter all by itself.
FIRING TWO OR MORE FLASHES AT THE SAME TIME
There are many ways to do this and each have their positive and negative aspects.
Slaves
An easy way to fire more than one flash simultaneously is to attach a small slave to each flash. Slaves are tiny photoelectric triggers that attach to the flash. Some slide into the hot shoe on the flash. Others attach to the flash with a short wire that plugs into both the slave and the PC terminal on the flash.
The slave fires the flash it is attached to whenever it detects a flash of light. This means continuous light—such as direct sunlight—doesn’t make the slave fire the flash. The slave only reacts to a quick burst of light.
In practice, slaves are inexpensive, usually reliable, and easy to use. However, any flash of light will trigger them. If another person fires a flash nearby, the slave will fire the flash it is attached to as well. Therefore, slaves are horrible if other flashes are going off in the immediate area. Slaves do need line-of-sight. If the slave doesn’t “see” the light from another flash, it won’t trigger the flash it is attached to. Fortunately, if a ceiling or wall is nearby, the light from the flash bouncing off these objects will trigger the slaved flash. Flashes are not dedicated to the camera when they are tripped with optical slaves, so you don’t have through-the-lens flash metering. Set the flash to the manual mode.
If you are using two flashes on manual at once, there are two ways to fire them with slaves. Attaching a slave to one flash is one way to do it. Now attach a 6–12-foot PC extension cord to the PC terminal on the camera and the second flash. If your flash doesn’t have a PC terminal, you can purchase a hot shoe to PC adapter for the flash. The adapter slides into the hot shoe and provides the required PC terminal. A second way to fire both flashes at the same time is to attach a slave to both of them. Now use your pop-up flash to trigger them. Set the flash exposure compensation to –2 on the camera to keep the pop-up flash from adding any light to the subject.
Wiring the Flashes Together
This is an effective way to trigger multiple flashes when using them manually. We usually do this to photograph birds and small mammals in the yard. If your camera has a PC terminal (not all do), then use PC extension cords that are 6–12 feet long to connect everything together. If you don’t have a PC terminal, purchase a PC adapter that attaches to the hot shoe of your camera. Unless you use dedicated wires (if available), you can only use your flashes manually because PC sync cords only send the signal to tell the flash to fire. There is no through-the-lens metering. Get a Hama three-way flash connector (or another brand) to complete the wiring system.
The three-way flash connector may be stocked by large camera stores that sell plenty of flash equipment. We use Hama (www.hama.de.) three-way flash connectors, but other brands exist. The three-way flash connector actually has four connectors, three female and one male, but only three flashes are wired to it. The fourth connector is used to wire the three-way flash connector to the camera with a PC extension cord that has a male connector on one end and a female connector on the other end. If you have trouble finding them, search the web for “three-way flash connector.”
Wiring the flashes together completely eliminates the problem of having other photographers accidently fire your flash units. Once you buy the correct PC wires and three-way flash connector, it’s simple to connect them with wires. The PC extension cords you need are not widely stocked for Canon flashes, so you may have to special order them at a large camera store or by calling B & H Photo in New York at (800) 947-9953. Most PC extension cords sold at local camera stores
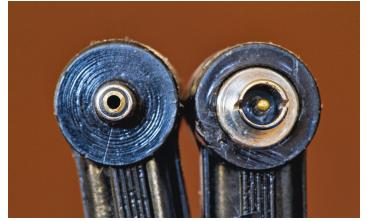
Wiring a single flash to the camera or multiple flashes together is fairly easy, inexpensive, and usually reliable. Save yourself a lot of trouble by learning to immediately recognize the female and male terminals. In this image, the female terminal (small hole in the middle of it) is on the left and the male terminal (pin in the middle of it) is on the right. Also check the sync terminals on your flash and camera if they have them. For example, the PC terminals on both my Canon 7D and the Canon 580 II flash are females. They require a male PC terminal to connect to them
have a male connection on one end of the cord and a female connection on the other end. The male end has a small pin in the middle of the connector that inserts into the central hole of the female end. To wire Canon flashes together with a three-way flash connector, you must have PC extension cords that have male connections on both ends!
Here’s what you need to wire three Canon 580 II flashes together:
- 3 approx. 8-foot PC extension cords that have male connectors on both ends;
- 1 8-foot PC extension cord with a female connector on one end and a male connector on the other;
- 1 three-way flash connector (this tiny device has three female connections and one male connection).
By the way, if you wish to wire four or five flashes together, attach two three-way flash connectors together. Now you have five female connections and a lone male connector.
Wire everything together by first taking the three PC extension cords with male connectors on both ends. Attach one end of each cord to the female PC connection terminal on the flash. Now attach the other end of the PC extension cord to the female connector on the three-way flash connector. Once all three flashes are wired directly to the three-way flash connector, take the fourth PC extension cord that has both a male and female end and attach the female end to the lone male connection on the three-way flash connector. Now attach the male end to the camera’s female PC terminal. All three flashes are now wired directly to the camera and will fire simultaneously when you fire the camera.
This system isn’t foolproof because there are so many connections. Sometimes you must twist the connections to make every flash fire. Solving connector problems can be touchy at times, but it does work reliably when you get it just right. Other photographers using flash do not affect your wired flash units. You don’t have to worry about line-of-sight problems that sometimes trouble wireless signals. However, you must be diligent about making sure all of the flashes continue to fire during your photo session. For any number of reasons, a flash may stop firing part way through the photo session. Be alert to this potential problem. We do wire our flashes together quite often with fairly good success.
Wireless Flash
This is by far the easiest way to use a single or multiple flash set-up. A good wireless system permits through-the-lens automatic metering, control over the power output of the flashes, and other features. Read your camera and flash manual to determine your options.
Most Nikon cameras offer built-in wireless flash control with their dedicated flash units. If your Nikon camera has a pop-up flash, you probably have wireless control, as long as you use modern Nikon flashes. Go into a menu in the camera to set the pop-up flash to the Commander mode. Then the external flash must be set to remote. If your Nikon camera doesn’t have a pop-up flash, you can buy a separate Nikon SU-800 Wireless Speedlight Commander Unit that inserts into the hot shoe of the camera body to acquire wireless control.
Canon has only recently built-in wireless flash control into their cameras, such as the EOS 7D and the EOS 60D. Both cameras send the wireless signal through the pop-up flash. Hopefully, all future Canon cameras will have wireless flash control built-in. Canon is well aware of the benefits of wireless flash. The Canon Speedlight Transmitter ST-E2 that attaches to the hot shoe of the camera has been available for years. The ST-E2 is the “master” flash controller. Set your Canon flash to “slave.” Now the camera can directly control the flash without wires.
Using wireless Nikon and Canon flash systems is our favorite way to use one or more flash units in our wildlife photography. Being able to avoid wires that get in the way, take time to attach, fail all too often when connected, and blow in the wind are enormous advantages. Wireless systems are exceptionally dependable. However, signals emitted by the master (commander) can be blocked, preventing one or more flashes from firing. Carefully check how you set up everything and test your flashes to make sure each and every one is firing. Most of the time, wireless flash works on the first try if everything is set properly.
Channels
While teaching a fall color workshop, three bright and eager students were working together to learn how to use their new Canon 580 II flash and the ST-E2 flash controller. I showed them how to set their Canon 580 II flash to slave and then walked around a bush to help another participant. Soon I heard all three students talking excitedly, so I quickly returned to them. As I walked into sight, I saw one student peering into the flash tube just as it fired a blinding burst of light directly into his eyes. They discovered that all three flashes fired any time one of them tripped their camera. Do you know the reason? Since all three of the students were using the identical wireless flash system, the signal from any ST-E2 flash controller fired every flash simultaneously. A wireless master unit will fire every slave flash that detects the signal, no matter if it is one flash or 50. For this reason, wireless flash systems provide channel choices. All three of the Canon 580 II flashes were set on channel one. The problem was solved by setting each Master/Slave combination to a different channel. If you find your wireless flash isn’t firing, always make sure both the flash and the controller are set to the same channel.
Radio Controls
Many companies, such as Pocket Wizard and Hahnel, build radio-controlled flash triggers. These are more expensive than flash triggers that use infrared signals. However, they are more reliable and work over much greater distances. Many serious flash photographers use these radio triggers with excellent success. However, as we have enjoyed such good success with infrared triggers, we have never felt a compelling reason to upgrade to radio triggers and spend a lot more money. I suspect future flashes will have built-in radio controls, which could make third-party ones unnecessary.
Radio control triggers come in two major types. Some are manual triggers and others provide for through-the-lens metering. Manual radio triggers tell the flash to fire, but don’t offer through-the-lens metering, flash exposure compensation, setting flash ratios, and other features. Only automatic radio flash triggers offer these features.
POWER RATIO CONSIDERATIONS
If you use manual flash, power ratios become enormously useful. With the flash set to manual, the camera sends a signal to the flash either wirelessly or through a wire to fire the flash. The flash fires the energy stored in the capacitor and then takes a few to several seconds, called the recycle time, to restore the energy in the capacitor to full power again. Alas, you can’t shoot another well-exposed image until it is fully recycled. Using the entire charge in the capacitor drains the batteries quicker, too.
Since most wildlife photographers use flash far from AC power, batteries must be used (or a portable generator). It is easy enough to have extra fully-charged batteries on hand to solve the power issue, but that doesn’t solve the recycle problem. We use fully-charged rechargeable AA batteries in our flashes. To avoid using the battery power faster than necessary, and to speed up the recycle time, we often set the power ratio on the flash to 1/4 or 1/8 power. If the flash is only a few feet away from the subject, this reduced light output is often more than adequate. We set our reduced power ratios on the flash directly, but many cameras, including some of ours, allow you to set it in the camera when using automatic flash.
HOW THE FLASH REDUCES THE OUTPUT
The method the flash uses to reduce its output is critically important in many wildlife photo situations. At full power, the flash duration is around 1/700 to 1/1000 second. This means the light from the flash only burns during this short period of time. If all of the light illuminating the subject is from the flash, and it is only on for 1/1000 second, essentially the effective shutter speed is 1/1000 second. This is true even if the camera’s X-sync speed is a relatively slow 1/200 second. If you set the flash to 1/4 power, the amount of time the flash emits light (flash duration) shortens to perhaps 1/4000 second and the recycle time is much quicker. Therefore, the reduced power ratio makes batteries last longer, shortens the recycle time, and freezes action better.
Power ratios are the key to freezing rapidly moving subjects such as bats and hummingbirds in flight. At the 1/16 power

Calliope hummingbirds are abundant at the Bull River Guest Ranch in British Columbia. The Nikon 200–400mm f/4 zoom lens and a minimum of three (we sometimes use up to six) Nikon SB 800 flash units comprise an excellent setup for freezing hummingbirds in flight. Nikon D3, 200–400mm f/4.0 lens, f/22 at 1/200 second, ISO 160, and four Nikon SB-800 flashes set to 1/16 power and zoomed out to 105mm.

The wings of this rufous hummingbird are easy to freeze by using flash at weak power ratios. No available light appears in this image. All of the light is from my Canon flashes that are only on for approximately 1/10,000 second. Even though the shutter speed is set to the fastest sync speed the camera offers–1/250 second–the effective shutter speed becomes the much shorter flash duration. Canon 1D Mark III, 300mm f/4.0L, f/16 at 1/250 second, ISO 125, manual metering. Four Canon 580 II flashes are used manually and set to 1/16 power.

This Lewis’s woodpecker was dimly illuminated in the shaded forest. However, the sky background is nicely lit up with sunlight. The available light exposure was set to slightly underexpose the blue sky. A +1-stop flash compensation was required to properly expose the bird and the nest tree. To summarize, the foreground is illuminated entirely with flash and the background is all available light. Mixing flash with available light is a crucial skill all good wildlife photographers must master and use frequently. Canon EOS-7D, Canon 500mm f/4.0L lens, f/14 at 1/200 second, ISO 200, manual metering with automatic flash set to a +1-stop exposure compensation.
ratio, many flashes have a flash duration less than 1/10,000 second. This easily freezes most action. We routinely use the 1/1 6 power ratio to freeze the rapidly beating wings of the hummingbirds we photograph in British Columbia, Idaho, and Ecuador. We would love to provide the details of how we do hummingbirds, but the information that must be covered is enough to fill a book all by itself.
DEVELOPING YOUR FLASH SKILLS: SUMMARY
Flash is incredibly useful, but it does take effort and time to fully master. You must learn the terms used in flash photography and become comfortable with the equipment. Learn where every setting is on your flash and what it does. When flash is used well, it doesn’t look like the typical obvious flash image with flat light on the subject and a black back your flash and what it does. When flash is used well, it doesn’t look like the ground. Used properly and creatively, flash lets you capture fine images that aren’t possible with available light only.
Accomplished flash users easily mix one or more flashes together and usually use available light for a portion of the exposure, too. It really isn’t that difficult to mix flash with available light if you remember the following key points.
1 The ISO affects both the flash and the available light exposure. Increasing the ISO amplifies the sensor signal and moves the histogram data to the right. Lowering the ISO reduces the exposure and histogram data moves to the left. This relationship assumes, of course, that the f-stop and shutter speed remain the same
2 Apertures affect both flash and the availabLe light exposure. As an example, stopping down from f/11 to f/22 subtracts two stops of light from the exposure. Of course, this assumes manual metering. Automatic exposure modes change the shutter speed to compensate for the change in aperture to maintain the original exposure
3 Shutter speeds affect only the available light exposure—not the flash. The typical flash at full power has a flash duration around 1/800 second. Since you are limited to the X-sync speed of the camera, typically 1/250 second, all of the light emitted from the flash hits the subject during a tiny portion of this 1/250 second shutter speed. Therefore, no matter what shutter speed you use between the longest one your camera offers (30 seconds perhaps) and the X-sync speed, all of the light emitted from the flash that strikes the subject is measured by the imaging sensor. Therefore, use the aperture or ISO to adjust the flash exposure. Use the shutter speed to control the available light. If you commit this to memory, it’s easy to mix flash and available light together to greatly improve the light in your images.
