
3
Exposure Strategies
The speed of the action is one of the main thrills in photographing wildlife. Birds and mammals often move and even disappear so abruptly and swiftly that the unprepared can be left empty-handed. The photographer soon appreciates that camera operating speed, shooting speed, and accuracy in both are all needed to take advantage of most wildlife shooting opportunities. Luckily, obtaining correct exposures in digital photography is rather easy. We’ll begin with some basic exposure information and some guidelines, and we’ll gradually move onto the exposure strategies that work exceedingly well for us.
EXPOSURE GUIDELINES
RAW IMAGES
The well-known rule for exposing RAW images is to expose as much as one can without overexposing important highlights. Those are the highlights in which we must preserve detail. This technique is often called, “Exposing to the Right,” or ETTR. We’ll learn later in the chapter about successfully balancing the desire for high exposure levels with the danger of losing detail in desired highlights.
JPEG IMAGES
Expose JPEG images by keeping the right-most data about 1/2 to 1 stop shy of the right edge of the histogram. Do not allow any overexposure in important highlights. It’s because JPEG images and RAW images represent differing amounts of data.
HOW NOT TO JUDGE EXPOSURE
USING THE CAMERA LCD MONITOR
It’s a very big mistake to evaluate your exposure by the brightness of the image on the LCD, and this improper use of the LCD may be the most common exposure blunder of all. Photographers who are new to digital and even experienced shooters too often succumb to the temptation of examining their images on the camera’s rear LCD to judge exposure. Don’t do it! Major exposure errors arise from this habit.
Several characteristics of the camera LCD monitor cause it to utterly fail as a means of judging exposure. Consider the available light. If one views an LCD on a bright day, the images will look dark, perhaps wrongly concluding that they are underexposed. On a darker day, the images will look bright and mislead the unwary photographer to think they may be overexposed.
Cameras generally have an internal control of LCD brightness to allow the user to set it for their own convenience. The unwary photographer may not realize the brightness setting
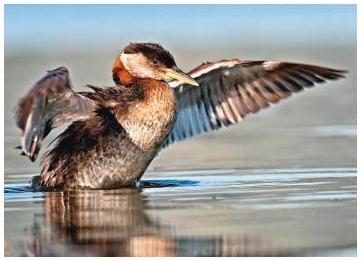
I slowly stalked this red-necked grebe while concealed in my floating blind. The grebe accepted my close approach and continued to feed and preen. Wildlife photography is particularly enjoyable when the subject is completely unaware of me and behaving naturally. Canon EOS 1D Mark III, 500mm f/4 lens , f/8 at 1/1000 second, ISO 400, and manual exposure.
is only arbitrary and unrelated to the images to be displayed. If you like a bright image monitor and set it high, and have set it so, all images will look bright. If it is set low, though, they will all look dark. Get the idea? Your laptop computer likely exhibits the same behavior.
So how then does one judge exposure?
THE WORST EXPOSURE OF ALL
This is the one that overexposes highlights in which you want to see detail because that detail will be forever lost. If we overexpose the image of a nice white swan with all its pretty and delicate feather detail, all of the detail in the overexposed feathers will be irretrievably lost. Our lovely white swan will just look like a plain white long-necked featureless cotton ball. Even extensive post-capture editing will never recover the lost feather detail.
We’d also like to avoid underexposure of the shadow areas of the image, but with technical limitations sometimes prohibiting both goals in one image, we practically always prefer to do the right thing with our highlights. Beyond preserving highlight detail, there are other benefits of good exposure. One example is image noise, those little intrusive specks of color that can creep into the shadow areas of an image. Noise is best minimized by ensuring proper highlight exposure. The optimum exposure allows the sensor to capture the greatest amount of information which helps to produce smoother gradations between colors and brightness in the final image.
WORKING WITH STOPS
From the earliest days of photography, practitioners have used the word “stops” in discussing exposure. You may well ask, “Exactly what is a stop?” Perhaps the term “stop” is best thought of as a measure of how camera settings affect exposure.
We generally refer to lens apertures as “f-stops.” For any shot, there’s a given amount of light available, and we set a certain f-stop to control how much of that light is used for the

This whooper swan was sleeping quietly on the ice a few feet from shore. Barbara slowly crawled closer to it. Because she was careful and gave the bird time to accept her, its only reaction was to open its eyes a bit more often to check on her. Nikon D3, Nikon 200–400 f/4 lens, f/16 at 1/250 second, ISO 400, and manual exposure.
exposure. Likewise, we refer to stops of shutter speed. The speed at which a mechanical shutter operates is an important camera setting that controls for how long, and thus how much, light is used to make the exposure. Lastly, we refer to ISO ratings in stops. The ISO rating (more about that later) is a measure of the camera’s sensitivity to light, that is, how the sensor responds to the light admitted, thus establishing the degree of exposure resulting from that light.
The crux of it all is that the term “stop” is the most widely used term to describe the effect of camera settings on exposure. Lens apertures are commonly designated by a series of stops. They’re called f-stops, and a common series used by many lenses is: f/2.8, f/4, f/5.6, f/8, f/11, f/16, f/22, and possibly f/32. The basis of those strange numbers will be explained shortly. For now though, it’s important to remember that any change of f-stop, from one to another in the series, causes the light for the exposure to be doubled or cut in half. As examples, an aperture of f/4 gives twice as much exposure as f/5. 6. And f/ 16 gives only half as much exposure as f/11. Note the counterintuitive fact that the larger the number, the smaller the aperture and vice versa. F/22 is a smaller aperture than f/16. Don’t worry—you’ll get used to it.
Going further with that thinking, if a 1-stop increase in aperture, say, from f/4.0 to f/2.8, causes twice as much light to fall on a sensor, then it follows that a 2-stop increase in aperture, as from f/11 to f/5.6, causes four times as much light to fall on the sensor. The next larger stop, f/4, results in twice as much light as the last stop, f/5.6, so there is eight times as
At a crane-feeding area in Japan, little did we expect white-tailed eagles to put on the best show as they maneuvered through the masses of flying birds to grab the fish that were tossed their way. Although the overcast sky is mostly white, we still like the pose and fine detail in the feathers of this aggressive bird. Nikon D3, Nikon 200–400mm f/4 lens at 400mm, f/5.6 at 1/500 second, ISO 500, and manual exposure.

much sensor light at f/4 as there was at the original f/11. It works the opposite way, too. A 2-stop reduction in aperture, say, from f/11 to f/22, will reduce the exposure to one-fourth of what it was.
Shutter speed is the measure of the length of time the shutter is open, allowing light to strike the digital sensor. The speeds are given in a series of “shutter-speed stops.” The number of shutter speeds offered by a specific camera, and the exact shutter speeds within the series, can vary from model to model, but are generally close to this: 30, 16, 8, 4, 2, 1, 1/2, 1/4, 1/8, 1/15, 1/30, 1/60, 1/125, 1/250, 1/500, 1/1000, 1/2000, 1/4000, and 1/8000. In this series, whole numbers are in seconds and fractional numbers are portions of seconds.
The above series of shutter speed stops can cause the push of a shutter button to result in a shutter opening for 30 full seconds down to an ultra speedy one eight-thousandth of a second. Here too, just like aperture f-stops, a one-stop change in shutter speed causes the light for the exposure to be doubled or cut in half. A 4-second shutter speed gives twice as much exposure as a 2-second shutter speed, and a 1/500-second shutter speed gives only half the exposure as a 1/250-second shutter speed. And just like lens apertures, a 2-stop change in shutter speed changes the light on the sensor by four times
These crowned cranes were hunting for insects. Since I hoped to make both birds sharp, I used ISO 400 to use f/9 for more depth of field. Canon EOS 5D Mark II, 500mm f/4 lens, f/9 at 1/400 second, ISO 400, Shutter-priority with a +2/3-stop exposure compensation.

and a 3-stop change in shutter speed changes the light on the sensor by eight times.
And now for ISO stops. The camera’s sensitivity to light, called ISO ratings, is designated by a series. A typical series for a modern DSLR is: 100, 200, 400, 800, 1600, and 3200. Some cameras offer smaller and larger choices, too. Here, however, we’re not talking about controlling the amount of light that enters the camera. Instead, we’re talking about controlling the camera’s response to that light. For our frolicking black-backed jackals, we control depth of field and action stopping by selecting an appropriate f-stop and shutter speed. The combination determines how much light is admitted to the camera when we push the shutter button. The ISO setting determines how much exposure is achieved by that light. For any specific amount of admitted light, higher ISO settings give greater exposure, and conversely. As in f-stops and shutter speeds, it’s convenient to think of ISO ratings in stops. Use higher ISO ratings, such as ISO 800, when it’s important to use a fast shutter speed to stop action. Summarizing, we properly think of the term “stop” as describing the effect of camera settings on the exposure.
In our discussions above, we gave examples of f-stops, shutter speed stops, and ISO stops. Many, if not most cameras, also provide in-between settings in fractions of a stop, either 1/2 stop or 1/3 stop. Usually the fraction is user-selectable. if using half-stops, the camera offers one additional shutter speed halfway between each of the major speeds of the series. The camera also allows one additional lens aperture halfway between each of the major apertures of the f-stop series. ISO ratings do not offer 1/2 stop settings, but some cameras do offer 1/3 stop ISO values. But if using 1/3 stops, then the f-stops, shutter speeds, and ISO ratings, would all have two
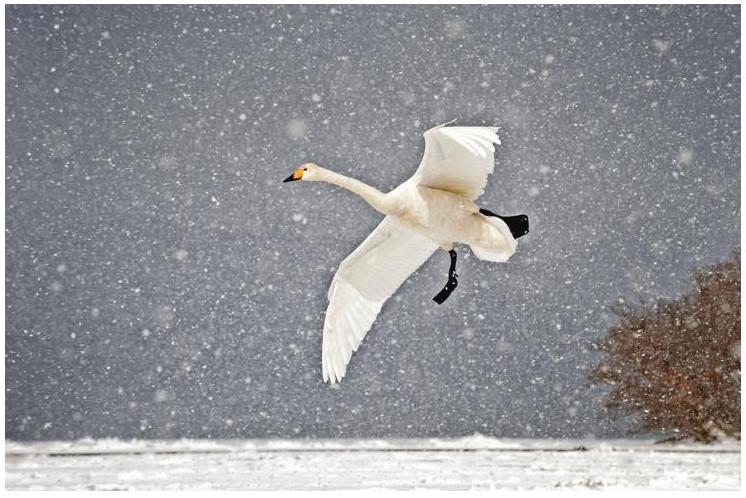
A snowstorm and bitterly cold temperatures descended on this northern Japanese lake, driving most of the swan viewers into the warm nearby shops. We struggled in the brutal wintry conditions and did the best we could to photograph flying swans in the blizzard conditions. Driving snow (and rain) always add a special appeal to wildlife images. Nikon D3, Nikon 200–400mm f/4 lens, f/5.6 at 1/800 second, ISO 500, and manual exposure.
additional settings between each of the major series numbers. For example, between ISO 100 and ISO 200, there are two intermediate settings that include ISO 125 and ISO 160.
SLOW OR FAST? SELECTING THE SHUTTER SPEED
What is the best shutter speed for a particular wildlife shot? Choosing the best shutter speeds depends on several factors. Below are some factors to consider.
• Do I need to stop action? If the subject is in motion, and I want to stop the action to get a sharp image, I must select a fast enough shutter speed to do so. This is true regardless of whether using a tripod or other support. I must consider how fast the subject is moving, how far away it is, and the angle at which it’s moving. Birds in flight typically require shutter speeds in excess of 1/1000 second to achieve a sharp image. By shooting with big apertures, such as f/4.0, and using ISO 800, it is possible to reach the 1/2000 second
Sometimes you get lucky! The motion of this running leopard was enhanced by using a slow shutter speed while panning with it. Barbara had no idea there was a leopard hiding on the porch of the warden’s home at Lake Nakuru until it suddenly emerged and bounded into the dense forest. She was quick enough to get it in the viewfinder, but had no time to adjust the exposure. This ghostly leopard image was achieved with a shutter speed of 1/3 second. Nikon D3, Nikon 80–400mm lens, f/6.3 at 1/3 second, ISO 200, and Aperture-priority with a +2/3-stop exposure compensation.

shutter speed which makes it quite easy to capture a sharp image of a flamingo flying by if you pan carefully with the subject and precisely focus on the bird.
• What if I don’t want to stop the action? Oftentimes, the motion of wildlife can be deliberately allowed to cause blur, sometimes to impart the idea of motion to the image, and sometimes for other artistic effect. If blur is desired, then slower shutter speeds are in order. A shutter speed of 1/15 second or so might be a good starting point, depending on subject speed, distance, angle of movement, and the desired amount of blur. Slow shutter speeds are effective for conveying the lightning fast movement of a leopard as it runs through an opening in the forest.
LARGE OR SMALL? SELECTING THE F-STOP
A while back, I said that we’d explain the relationship between the aperture of a lens and the associated f-stop. The term “aperture” describes the nearly round hole in an adjustable diaphragm within the lens. We change the size of the aperture by turning a dial on the camera. At whatever aperture area we select, there is a defined f-stop, and we generally refer to the aperture size by that term. The f-stop is calculated from the focal length of the lens and the diameter of its aperture. It goes like this:
f-stop = lens focal length divided by the diameter of the aperture
Here’s an example: Consider a 200mm lens with a maximum aperture that’s 50mm in diameter. The maximum f-stop = 200/50 = 4. It’s an f/4.0 lens.
For a given f-stop, the size of the aperture varies as the focal length of the lens changes. Thus, for any specific f-stop, such as f/16, shorter lenses have smaller apertures than longer lenses. However, all of these lenses pass the same amount of light when set to the same f-stop, even though the size of the aperture varies with the focal length.
THE LAW OF RECIPROCITY
The behavioral relationship between shutter speeds and f-stops is called a “reciprocal” relationship. Suppose it’s a clear and sunny day and we use the histogram to conclude a proper exposure of ISO 100, 1/100 second, and f/16. In this instance, we use manual exposure to avoid some serious autoexposure problems. Since we are photographing bald eagles snatching fish at Homer, Alaska, we want images of the eagles with their wings frozen in flight and we already know 1/100 second will not succeed and that we must use a much faster shutter speed. Suppose we increase the shutter speed by 3 stops, taking it to 1/800 second. Our majestic bald eagle just became a black eagle because now we are 3 stops underexposed. Now we must quickly adjust. We previously raised the shutter speed by 3 stops, so we open the lens by 3 f-stops, changing it from f/16 to f/5.6. Now, at 1/800 second and f/5.6, we’ve got our desired higher shutter speed and also have the correct exposure.
But, suppose that at f/5.6, we don’t have enough depth of field to adequately cover the eagle. Okay, we’ll use stops to make that change, too. If adequate depth of field would be at f/11, we close our aperture 2 stops, from f/5.6 to f/11. Again we suffer the dark bird blues. No problem. We just compensate by increasing the ISO by 2 stops, from ISO 100 to ISO 400. Now we have it all. We have our needed fast shutter speed, our needed depth of field, and a correct exposure. We went from ISO 100, 1/100 second, and f/16 to new settings of ISO 400, 1/800 second and f/11. And we needed no miserable messy math manipulations. We just clicked a few stops this way and a few stops that way and it was all so easy!
To summarize, the law of reciprocity tells us that a change in exposure of a certain amount of stops caused by one control, can be perfectly compensated by a reciprocal change of the same number of stops in another control. Open the lens a stop—increase shutter speed by a stop. Decrease shutter speed by 2 stops—reduce aperture by 2 stops. Change either one by 3 stops—change ISO by 3 stops. Reciprocity, and the use of stops, give us great flexibility in speedy and simple control. Reciprocity lets us select apertures, shutter speeds, and ISOs to get the depth of field and action stopping ability demanded by our subject.
Perhaps a small chart will illustrate this law of reciprocity better. Let us assume the optimum exposure is 1/250 second at f/11 with ISO 400. All of the following shutter speed and aperture combinations produce the same exposure if everything else (ISO and available light levels for example) remain the same.
| Shutter speed | f-stop |
| 1/2000 | f/4.0 |
| 1/1000 | f/5.6 |
| 1/500 | f/8.0 |
| 1/250 | f/11 |
| 1/125 | f/16 |
| 1/60 | f/22 |
| 1/30 | f/32 |
MORE ON ISO
The abbreviation “ISO” stands for “International Organization for Standardization,” a group that sets worldwide standards of many things to ensure there is a level playing field for us all. Standards help protect the public by establishing, for example, that when you set your Nikon D300s, your Canon 60D, or your Sony Cyber-Shot, all to the same ISO settings, the three cameras will each exhibit the same sensitivity to light.
A modern digital camera offers a wide range of ISO settings. The Canon 7D is a good example, having major ISO choices of 100, 200, 400, 800, 1600, 3200, and 6400. That’s seven major settings. However, in that camera, a precision-seeking photographer can easily select intermediate settings in 1/3- stop increments between the major stops. For example, between the major stops of 200 and 400, the user can select 250 or 320. When expanded that way, the camera provides for 19 selections of ISO, plus an important automatic setting cleverly called “Auto” and a supersensitive setting called “H,” which gives ISO 12,800. Not all cameras offer the intermediate stops, but it’s not a serious shortcoming.
We’re continuing to use the language of stops in our ISO discussion here because it’s always so convenient when discussing exposure. Note in the ISO discussions above, the setting called “Auto.” This setting instructs the camera to automatically determine, and set with no further user intervention, what the camera considers a proper ISO setting. It can be a handy feature when using the Shutter-priority exposure mode in dim light.
Also shown in the Canon 7D list of available ISO settings is the “expanded” H setting, which allows an ISO of 12,800. Indeed, the Nikon D3 offers expanded ISO ratings up to 25,600, and some later models have ISO selections even higher than that. Exposure control often needs compromises, though, and extreme ISOs are no exception. They are achieved by electronic amplification of the sensor data, and the higher the ISO setting, the more amplification. The more amplification, the more undesired image noise. In some circumstances these sky-high ISO settings can rescue a shot. The experienced wildlife shooter knows that many subjects are more active at dawn and dusk when the light is low. The spotted hyena sneaking through the underbrush a half-hour before a cloudy morning sunrise just might be recordable at an ISO 12,800 or a stop greater at ISO 25,600. While very high ISO settings can occasionally be a shooting lifesaver, my Canon, for example, protects me from inadvertent selection of its noisier ISO settings by requiring that I invoke it with a custom function selection.
We’ve mentioned before that a digital camera’s higher ISO ratings are achieved through electronic amplification of its “native” ISO. The native ISO is generally ISO 100 or ISO 200, depending on the camera, and because it requires no amplification, the native ISO produces the lowest noise in the image. As ISO settings are increased by amplification, we increasingly suffer the spurious light and dark specks called luminance noise, and the colored specks called chrominance noise. These noises vaguely resemble the grain effects we saw in film, and if severe, can mute our images and cause an apparent reduction in sharpness.
The additional noise of higher ISO settings may be an acceptable compromise when conditions require those ISOs to get a decent exposure. We try to always use our native ISOs and usually can in landscape and macro work. Generally, those
This captive mandarin duck swam repeatedly in front of me at the Sylvan Heights Waterfowl Park in North Carolina. Digital cameras are excellent at capturing the incredible variety of hues in the plumage. Photographing captive animals is a superb way to perfect your shooting skills. Canon EOS 5D Mark II, ISO 800, 1/500, f/6.3, 500mm, and manual exposure.

subjects are not moving and the light is reasonable, allowing our choices of apertures and a “who cares?” attitude about shutter speeds. Fast-moving birds and mammals are a different kettle of fish, however. One might need a higher shutter speed to arrest subject motion, to say nothing of the higher shutter speed occasionally needed to compensate for the magnification of the longer lenses commonly used. A 300mm lens, for example, will magnify camera vibration or other motion by about six times over that of the “normal” 50mm lens, and higher shutter speeds help tame the effects of that motion. When we compound high shutter speeds with a small aperture that we may need for adequate depth of field, often the only way to maintain a proper exposure is to raise the ISO considerably above its native setting. That may get us a little noise, but a slightly noisy picture is usually better than a totally fuzzy one.
THE CAMERA’S DIGITAL SENSOR
All digital cameras have a device called a “sensor” that converts the incoming light into electrical signals to be further processed. The sensor has millions of “photosites,” each one making up one element of the millions used in forming an image. Writers oftentimes will refer to the photosites as “pixels,” a word coined from the term “picture-element.” However, the data from several different colored photosites is generally combined to make each pixel of the resultant image, so there’s a distinct difference between a photosite and a pixel.If you wish to see a pixel, enlarge an image on your computer monitor until it breaks apart into little squares of color. The squares are pixels.
PHOTOSITES AND PIXELS
Think of the photosites that are packed into your sensor as millions of tiny color-filtered buckets that collect the light coming through the lens. Each bucket receives a certain amount of red light, green light, or blue light, according to its position in the sensor. The electronics of the photosites convert the light quantity into corresponding electrical signals. The electrical signals are then converted into their digital equivalents by an analog-to-digital converter (ADC). The ADC produces a digital representation of the pixel groupings with brightness levels from 0 to 255.
We mentioned above that the photosites are “color-filtered.” That means that each of the millions of sites has either a red, green, or blue filter over its top, and thus collects light only of that color. So, we can refer to red photosites, green photosites, and blue photosites, where each site generates the electrical signal proportional to the received amount of light of its particular color. Light of any color is some combination of the primary colors of red, green, and blue, so the output of all the sites can easily be combined by an onboard computer (a microprocessor) to produce a set of pixels forming an image of the gorgeously hued mandarin duck.
THE ALL-IMPORTANT HISTOGRAM
This incredibly important tool is a simple bar graph depicting certain characteristics of the exposure. Its display on the camera LCD is the fastest and most accurate means of ensuring optimum exposures. It’s well worth your time mastering and comprehending a full understanding of the histogram.
The histogram graph is an LCD display of data arranged in a manner that conveniently shows the distribution of dark tones and light tones in your image. This histogram graph makes your exposure easy to accurately and quickly evaluate once you understand exactly what it means. It’s a major benefit of digital photography. The camera derives histogram data from JPEG format data files. The data is taken directly from your JPEG images, but if you shoot RAW images, it’s taken from an embedded JPEG that’s a component of the RAW file.
This graph that is easily viewed on your camera’s LCD display shows you the relative brightness distribution of every photosite on your sensor. There are 256 possible brightness levels. A photosite that received little to no light has a brightness level of zero. A full saturated photosite has a brightness level of 255, the maximum possible value. Everything else falls somewhere in-between. The higher the vertical line, the more photosites that have that particular value.
NIX TO THE IDEAL HISTOGRAM
There is no “right” shape for a histogram. The shape of a histogram is wholly determined by the character of the specific image. New digital photographers often wrongly have a feeling that a “perfect” histogram should look like the classical symmetrical bell curve, but that’s dead wrong. It is true that one can tell something about an image from looking at the spread of tones represented by its histogram, but it’s absolutely false that there’s any such thing as an ideal histogram. Consider these examples: A “high-key” image having

We spotted 24 bears in late June during a 12-day personal photo trip to Jasper, Yoho, and Banff National Parks in the Canadian Rockies. This black bear calmly walked along the roadside, stopping here and there to eat the grass. The histogram shows this image has many dark tones with the large mass of data left of the center. However, the few brightest tones in this image do snuggle up to the right wall of the histogram showing it is a superb exposure. Nikon D3, Nikon 200–400mm f/4 lens, f/4.0 at 1/400 second, ISO 3200, and manual exposure.
ots of lighter tones (think white swan on a midday foggy lake), would have much greater area developed on the right side of the histogram (brighter tones) with less area developed on the left side. Conversely, a “low key” image full of darker tones (black bear) would have few pixels contributing to the right side of the histogram and most of the histogram area would be toward the left. Even if both images were perfectly exposed, neither would produce a symmetrical histogram. So, while there’s no “right” histogram that works for all images, I can use whatever histogram is produced to tell me something about the spread of tones in an image, and perhaps more important, I can easily tell whether the image is overexposed or underexposed. We’ll discuss that in more detail shortly.

The pounding rain forces this impala herd to bunch tightly together to protect themselves from wind, driving rain, and the big cats that may be hunting them. In this overall mid-tone subject, most of the histogram data appears near the middle left of the graph. Canon EOS 1 D Mark III, Canon 300mm f/4 lens, f/4.5 at 1/125 second, ISO 1000, and Shutter-priority with a +1 1/3-stops exposure compensation.
CLIPPING
“Clipping” is a term used to describe histogram data that is at the extreme left edge or the extreme right edge of the histogram graph. Remember that pure black pixels have a brightness = 0, and saturated pixels of any color, including pure white pixels, have a brightness = 255. Thus, if our histogram graph shows the presence of a significant quantity of “0 pixels” as evidenced by having definite vertical height at the extreme left edge of the graph, the recorded image has pure black areas without any detail. If the scene being imaged has pure black areas, then OK. But, if the scene has only dark areas that aren’t quite black, then we have underexposed those black areas to some degree, i.e., we have “clipped” the shadow areas. We should also remember that the camera’s inescapable electronic noise, while not actually generated by the darker areas of the image, is often evidenced by bright specks that are far more visible in the shadow areas of the image.
Some histogram graphs show a definite quantity of “255 pixels” by showing definite vertical height at the extreme right

Steller’s sea-eagles winter along the ocean beaches of northern Japan. We boarded a fishing boat to motor one mile out to the floating sea ice where they readily accept scraps of fish thrown by the boat crew. Due to all of the light tones in the bird and the ice, most of the histogram data appears on the right side. Canon EOS 1 D Mark III, Canon 500mm f/4.0L lens, f/8 at 1/200 second, ISO 1600, and manual exposure.
edge of the graph. If the histogram has significant vertical height at the right edge, then the recorded image has saturated pixels, image areas so bright that they have no detail. There are scenes with highlights of unimportant detail and it’s quite okay if those highlights are overexposed. Far more often, though, we wish to preserve highlight detail. There we avoid overexposure by always guarding against any “clipping” shown by vertical histogram development at the right edge of the LCD graph area. If the histogram shows clipping of important highlights, retake that picture at a lower exposure.
RE-PLACE THE HISTOGRAM
No, don’t replace the histogram—we need it. Just re-place it. If the histogram shows an unsatisfactory exposure, we correct the exposure and the different exposure will have moved the histogram. Suppose we had a clipped histogram shown by vertical development at one end of the graph or the other, or both. We don’t change the basic shape of the histogram, but we can move the histogram back and forth between the left and right graph edges by changing the exposure.
Assume a histogram shows underexposure by clipping on the left side of the graph. To move the entire histogram to the right, increase the exposure to get more bright tones in the image. Use a larger aperture, slower shutter speed, or higher ISO—any or all will work. Change one or more as dictated by the subject. If the image is overexposed, as revealed by clipping on the right side of the graph, we can reduce the exposure and move the histogram to the left, by reducing exposure. Use a smaller aperture (f/11 to f/16 for instance), faster shutter speed, or lower ISO—any or all will work. Here too, select the one best suited to the subject.
COMPENSATING THE EXPOSURE
Aperture-priority, Shutter-priority, Program, and manual are all exposure modes you may decide to use. We will cover these in more detail shortly. Changing the f-stop, shutter speed, or ISO only changes the exposure when using the manual metering mode. Changing the shutter speed, for instance, from 1/60 second to 1/250 second will reduce the exposure by two stops in the manual mode, but not in the others. The automatic exposure modes adjust the f-stop to compensate for a change in shutter speed and vice versa to maintain the identical exposure. Fortunately, all cameras have an exposure compensation control that permits changing the exposure to allow the histogram data to appear in different

The Nikon D3 histogram display shows both the luminance (averaging) histogram and separate histograms for each of the color channels. We always determine the optimum exposure by looking at the three color channel histograms. In this example with Barbara’s dog, Boo, notice the red color channel is just beginning to climb the right wall of the histogram. This is a fine exposure. Never judge the exposure by how the image looks on the back of the camera. Viewing conditions and the brightness level setting for the LCD display vary too much to be meaningful.
places on the chart. In the example above, setting the exposure compensation to -2 will reduce the exposure by two stops if using an automatic exposure mode.
DIFFERENT KINDS OF HISTOGRAMS
LUMINOUS HISTOGRAMS
The luminous histogram, also called the brightness histogram, derives its data from the image by considering all three primary pixel colors: red, green, and blue. Many a photographer successfully relies on the luminous histogram to confirm his exposure judgment, yet that histogram has a trap for the unwary. The luminous histogram takes data from all three color channels, but is “weighted” toward the green channel because our eyes are especially sensitive to green. By so doing, it gives more credence to the presence of green pixels than to the presence of red and blue pixels.
Consider a northern cardinal in his bright red feathers, sitting in a green tree. We push the shutter button and check the histogram. The histogram, heavily based on the green leaves, shows no overexposure. But when we study the image itself, the poor cardinal is a grossly overexposed red blob. All of the cardinal’s fine feather detail is lost and gone forever. Luckily, if the bird has not flown, we can reduce the exposure a stop or so and all will be well. When using the luminous (brightness) histogram, be on the lookout for images with strong color-casts, especially red (sunsets, etc.), and make sure the resulting luminous histogram remains one-half to one stop away from the right edge of the graph. Due to the averaging nature of the luminous histogram, photographing a subject where one color greatly predominates or the color of the light is heavily biased by a single color, such as the red light at sunset, or the blue light in open shade, you may seriously clip a color channel. However, when this data is averaged together, no clipping is shown by the histogram.
RGB HISTOGRAMS
Many cameras offer a second kind of histogram, called an “RGB or Color Channel histogram.” It’s actually three histograms displayed together: red, green, and blue. Each histogram graph represents only one color channel and shows the brightness of the red, green, and blue pixels individually. To determine the optimum exposure for nearly any type of image, merely note which color is most highly exposed (farthest to the right on the graph display) and while quite ignoring the other two channels, expose to make the rightmost channel’s histogram as far to the right of the graph as it can get without vertical development at the right edge of the graph. This RGB histogram eliminates the pitfalls of the luminous histogram. If your camera manual tells you it’s available, by all means activate it and use it.
Every year we teach hundreds of workshop and seminar students the many merits of using RGB histograms in their quest for perfect exposures. Indeed, the exposure for every image in this book was arrived at with the aid of the valuable RGB histogram.
EXPOSE TO THE RIGHT (ETTR)
A SIMPLE PROCEDURE FOR EXPOSURE OF RAW FILES
The ETTR exposure procedure is based on a simple concept and is widely practiced among serious photographers.
• Never judge exposure by the brightness of the image on the LCD panel.
• Always use the histogram to judge the exposure. Use the RGB histogram if available, and if not, use the luminous histogram.
• If using the RGB histogram, make exposure adjustments based on the extreme right edge of the color channel that has data farthest to the right.
• If using the luminous histogram, make exposure adjustments based on the very right edge of the histogram area. If a single primary color dominates the image or the light, keep the rightmost data about one-half to one stop from the right edge of the histogram to avoid overexposure.
• Adjust the exposure so that the right edge of the histogram area just kisses the right edge of the graph display, with little vertical development of the histogram on the right edge. Vertical development at the graph edge is often called “climbing or clipping” at the edge of the graph display.
A JUST AS SIMPLE PROCEDURE FOR EXPOSING JPEG FILES
For JPEG files, we recommend exposing slightly differently. Set the rightmost edge of the luminous histogram, or the rightmost edge of the farthest right channel of the RGB histogram, not at the right edge of the graph, but instead about a half-stop away. You can get there by determining the exposure that puts the JPEG histogram at the extreme right edge of the graph, and then reducing the exposure about a half-stop, or you can more precisely use the vertical grid lines on the typical histogram display to judge the exposure. The spacing of the grid lines differs from camera to camera, but Canon lines are about 1-stop apart, and Nikon lines are about 1.5- stops apart.
HOW DOES OVEREXPOSURE LOSE DETAIL?
Photographers speak of image highlights being “blown out” when they’re overexposed. What they are really talking about is the loss of highlight detail. Think of a “pure white” swan. We can see fine detail in the swan’s feathers only because the feathers are really not all the same tone of white. Some are a tiny bit darker than pure white. Some are a wee bit darker than that. It’s the differences in tonality between pixels and groups of pixels that give the detail.
Television “soap” hucksters notwithstanding, there is nothing whiter than white—at least not in photography. Assume my swan image has highlights with some white pixels and some slightly darker pixels. There is pleasing detail in the swan’s feathers. Suppose I expose another image a bit brighter. Too much more exposure, though, can raise the brightness of the colors in the darker pixels to the 255 level, making the darker pixels become white, but the already white ones sure can’t get any whiter. Now all the pixels are white, all have the same tonality, and I’ve completely lost the feather detail. As they say, I’ve blown out my highlights! You might even say my highlights have sung their swan song.
HIGHLIGHT ALERTS
Every digital camera we’ve ever seen, from the lowliest pointand-shoot to the fanciest DSLR, offers a highlight alert feature. Be sure to activate it because it allows a photographer to instantly see if any parts, and what parts of an image, are overexposed. Then the photographer can quickly make more informed decisions about exposure correction. Overexposed areas of an image conspicuously blink white and black, giving us the term “blinkies.” As handy as blinkies are, there’s a downside in that they show only overexposure and not underexposure. Consequently, blinkies should not be used alone, but as an aid to histogram interpretation. Between the two, perfect exposures are super-easy to repeatedly obtain.
METERING MODES
Most modern DSLR cameras offer three or more metering modes, or metering patterns. My Canon 7D and 5D Mark II offer modes called Evaluative, Center-Weighted, Partial, and Spot. Barbara’s Nikons use three, called Matrix, Center-Weighted, and Spot. Irrespective of the metering mode in use, when the camera has reached a conclusion on the correct exposure, the exposure information is presented to the photographer for input to the camera when a manual exposure mode is in use, and is presented directly to the camera controls when an automatic exposure mode is in use.
CANON’S EVALUATIVE METERING AND NIKON’S COLOR-MATRIX METERING
These are unarguably the most technically and operationally sophisticated metering modes in the history of photography and both Barbara and I use them exclusively. Their meter electronics measure brightness in several areas of the image. Several? Nikon’s D7000 measures brightness at an astonishing 2,016 locations within an image and actually measures the colors at all those places at the very same time!
After capturing the measurements, the camera’s onboard microcomputer compares them with exposure data stored in the camera’s data base, which had been derived from the manufacturer’s distillation of thousands of test images. The metering system calculates a recommended (sometimes called standard) exposure based on that comparison, and delivers it to the photographer or to the camera, as discussed above. Not only does a modern DSLR make enormous numbers of light measurements, make comparisons to thousands of reference images, make intricate mathematical calculations, and reach and deliver excellent exposure recommendations, but also does it all in only a few milliseconds!
The multi-segmented metering pattern is the best one to use in almost all situations. It normally gets you close to the ideal exposure, though usually not the most optimum. To get that, most of the time you must compensate the exposure a bit. Situations that are most likely to need adjustment include scenes that are predominately light or dark and those in high contrast light. We see no reason to use any of the other metering modes, though spot-metering can be useful for determining the dynamic range of a scene.
AUTOMATIC EXPOSURE MODES
Today’s cameras generally offer several automatic exposure modes and a manual exposure mode. Before we venture further, let us issue a warning: We’ve long ago lost count of the workshop and seminar attendees who confuse and thus misuse, the terms metering mode and exposure mode. Be sure that the difference is very clear to you—it’s important. Returning to the subject, most cameras have a manual exposure mode and also have automatic exposure modes such as Aperture-priority, Shutter-priority and Program. Some cameras also offer some specialized automatic modes such as landscape, portrait, flowers, and so on. Barbara and I feel that for our wildlife photography, and for yours, only Aperture-priority, Shutter-priority, manual, and Program are worth considering.
THE PROGRAM EXPOSURE MODE
The “P” on your camera’s dial doesn’t stand for “Professional.” It stands for, “this is a fully-programmed exposure mode and the camera will make all of your decisions for you although not necessarily very wisely.” If in spite of my typing my little fingers to the bone on this book, exposure destroys your composure, if you still can’t tell an f-stop from a bus stop, and you still can’t speak in “stops,” then Program may be the perfect mode for you. I do confess I use Program sometimes for special occasions. When friends and family visit and I drink a couple wine coolers too many, I sometimes use Program because it mercifully doesn’t need any input from me. Perhaps “P” should mean “Party Mode.”
In the Program exposure mode, the metering system uses your selected metering mode to automatically set the shutter speed and the aperture. Unfortunately, the camera makes assumptions that may not be at all valid. For example, the Program mode will increase your shutter speed when it detects the presence of a long lens, assuming (incorrectly, we hope!) that you’re hand-holding the camera. To compensate for the faster shutter speed, the camera then opens the aperture, thus perhaps undesirably reducing your depth of field. We definitely do not recommend this exposure mode for the serious shooters who want to be in charge photographically and exercise control over their camera.
Speaking of control, let’s explore the all too common misconception that a photographer using a camera in an automatic exposure mode somehow gets better exposures than a photographer using the same camera in its manual exposure mode. If any automatic exposure mode is used without photographer intervention, the image exposure will be identical, absolutely positively identical, to the same image made in the manual exposure mode without photographer intervention. If the photographer ought to intervene, and doesn’t, the results from both automatic and manual exposure modes will be equally poor pictures. And if the photographer is alert enough to properly intervene, the results from both automatic and manual exposure modes will be equally good pictures. We’ll explore the reasons for this statement shortly.
THE APERTURE-PRIORITY EXPOSURE MODE
This exposure mode does exactly what it sounds like. The shooter sets a desired f-stop, makes an exposure measurement, and based on the exposure measurement, the camera, respecting the priority of the aperture, selects and sets a shutter speed. If on the next shot, the light has changed (the sun is setting), the camera will still respect the selected aperture by setting a different shutter speed.
Aperture-priority, generally designated on a camera’s controls as “Av” or “A,” is probably the most widely used exposure mode of serious photographers. It’s very effective in rapidly changing light, when one wants to maintain a specific aperture. The constant aperture may be wanted to maintain a certain depth of field, a certain “sweet spot” in the particular lens, or perhaps the fastest available shutter speed.
Barbara prefers Aperture-priority for some of her wildlife work. She sets a large aperture in order to get a fast shutter speed, because she believes, as do all serious wildlife shooters, that a high shutter speed is crucial to obtain sharp images. This is especially true when using long lenses that bring the wildlife optically closer to the camera, but unfortunately magnify every little vibratory movement of that camera. The higher shutter speeds, with careful focusing and a stable camera support, will be a big help in ensuring sharp wildlife images.
None of the exposure modes are perfect and Aperture-priority is no exception. A common problem we’ve seen with workshop participants is that when beginning an early morning shoot in dim light, they set their apertures wide open to benefit from the sharpness of higher shutter speeds. As the sun gradually rises and the light gets brighter, the camera selected shutter speeds get faster and faster, sometimes faster than reasonably necessary. Students sometimes forget to react to the new light. Maybe in those circumstances it would be better to reduce the aperture a bit and benefit from the increased depth of field. After all, you really don’t need 1/2000 second to stop the action of a motionless red fox curled up in the snow, when you’re using a 300mm lens well supported by a tripod or bean bag. And if you want to keep the wider aperture to deliberately limit depth of field and help isolate the red fox from its background, you could still take advantage of the increase in light. Where you can tolerate a lower shutter speed, but want to maintain the aperture, just reduce the ISO an appropriate number of stops, and enjoy the better quality image realized from the lower shadow noise.
A far more serious problem can happen later in the day. Kenya’s famous tourist and photographer attraction, the Masai Mara game reserve, is bathed most afternoons in some very bright light indeed. You’ve set your camera to Aperture-priority and decide to use f/11 because you want extra depth of field. Your camera faithfully considers all of the light reflecting from the scene, and sets your shutter speed to 1/250 second. It’s a suitable shutter speed for the Defassa waterbuck standing in the marsh that you’re shooting. But, along comes sunset and the light is dropping fast. While you’re concentrating on the bat-eared fox that has just emerged from its den, the shutter speed automatically goes down and down and

This red fox became a regular visitor at our Idaho home for five consecutive winters. It happily accepted small dog treats from our hand. She is waiting patiently for us to offer her another tidbit. A tripod-mounted camera and a perfectly still fox let Barbara use a relatively slow shutter speed of 1/90 second. Nikon D70, Nikon 70-200mm lens, f/5.6 at 1/90 second, ISO 400, and manual metering.
down, maybe as low as 1/30 of a second. The bat-eared fox images continue to look great on your LCD panel, but when you look at them later, on the laptop in your luxury tent, they’re just not very sharp. Drat! Sharpness is everything and you’re very disappointed. As you lie in bed dozing off, you realize you must remember a million simple little things to shoot excellent images time after time. You resolve to watch your shutter speed more carefully.
Barbara uses the Aperture-priority exposure mode successfully because she constantly keeps a critical eye on her f-stops and shutter speeds. I, on the other hand, am not so fond of it. I’m just too occupied with the wildlife to want to break my concentration to worry about f-stops and shutter speeds. I much prefer to use the Shutter-priority exposure mode for some of my own wildlife shooting.
THE SHUTTER-PRIORITY EXPOSURE MODE
Once again, this exposure mode does exactly like it sounds. Select the shutter speed and the camera automatically adjusts the aperture to produce a standard
systems use “S” to indicate this exposure mode. Unhelpfully, Canon uses “Tv” (time value) to indicate Shutter-priority. I set the shutter speed and the camera, based on the metered light and the ISO I set, will automatically set the aperture. If the light changes, so will the aperture. I use this mode
Yellow-billed oxpeckers search large mammals to feed on insects that are attracted to them, benefitting both the bird and this African Cape buffalo. Depth of field (f/10) was favored to get the bird and the face of the buffalo as sharp as possible. I would have preferred the horizon line did not pass through the head of the buffalo, but I have no time to select another shooting spot. Canon EOS-7D, 500mm f/4.0L lens, f/10 at 1/200 second, ISO 400, Shutter-priority with a -1/3-stop exposure compensation due to the overall dark buffalo.

approximately 50 percent of the time for my wildlife work and manual metering for the rest. Shutter speed is usually crucial for stopping action in fast-moving animals, especially when using long lenses. I’m generally satisfied with a 1/320 second shutter speed when using long lenses on a good support, so I set my shutter speed there and let the camera set the aperture as it sees fit, based on the metered exposure and my ISO. Suppose I start out at 1/320 second and the camera sets f/8. As the light diminishes little by little later in the day, the camera gradually goes to f/5.6, then to f/4, then to f/2.8. Oops! My 500mm f/4.0 lens can’t do f/2.8, and remains at its maximum aperture of f/4.0. My images are badly under exposed. What now? Fortunately, I’ve been keeping my eye on everything, so now I just raise my ISO a stop or two and keep on shooting.
The example above illustrates a serious problem with Shutter-priority. Look back at our discussions of stops, and you’ll note that a common lens might offer a range of f-stops from f/2.8 to f/22. That’s a 7-stop range. Cameras with shutter speeds from 30 seconds to 1/8000 second have a 19-stop range. In Aperture-priority mode, at a fixed aperture, the camera can accommodate a huge 19-stop range of light and still get a good exposure. In my preferred Shutter-speed priority mode, at any fixed shutter speed the camera can accommodate only a 7- stop range of light. Some writers argue that this limitation points to Aperture-priority as the better mode. But watch out—that’s a very specious argument. Just because a camera in Aperture-priority mode can accommodate a 19-stop range of light doesn’t mean the photographer can. When I’m furiously photographing a spotted hyena in the fast-fading evening light, my camera may be blissfully happy in allowing my shutter speed to drop to 30 full seconds, but I’m sure not!
THE AUTO ISO
Most serious photographers like to be in full control of the picture-making process, so they usually avoid Auto ISO. Consider though a situation in which you set the camera to Shutter-priority. You’ve set the camera to the lowest shutter speed you think the subject will allow, say, for example, 1/125 second. And let’s say you’ve set the ISO at 200 and are using a 300/4.0 lens. Measuring the light, the camera responsively sets the aperture to f/8. As the light goes down, the aperture automatically opens, to f/5.6, then to f/4, and that’s the end of the line for aperture adjustment. The camera, not to be foiled by dim light underexposure, automatically increases the ISO to produce a good exposure. Yes, the increased ISO comes with some increase in image noise, but that increase may not be noticeable, and even if some noise does creep in at higher ISOs, it beats an unsharp picture or one grossly underexposed.
Barbara and I led a photo tour to the Galapagos Islands two weeks before writing this. We intensively photographed the unique Galapagos penguins and other wildlife from zodiacs bobbing in the ocean swells. To improve the odds of capturing sharp images of the penguins in the dim afternoon light hand-held—a very tough shooting situation indeed—we set Shutter-priority and selected a shutter speed of 1/1000 second. By using Auto ISO, the camera sets the aperture wide-open (f/4.0 with our lenses) and lets the ISO move up and down to produce a fine exposure. When you must lock in a fast shutter speed and keep the lens wide open, Auto ISO works incredibly well for adjusting to changing light. This technique is widely known among sports photographers, but little known to wildlife shutterbugs. This sad situation has got to change. At times, in certain situations, combining Shutter-priority with Auto ISO is enormously useful!
EXPOSURE COMPENSATION
A thorough understanding of exposure compensation is what separates the experienced photographer from the newcomer. There’s not much that’s more important to your photography than a good understanding of how an exposure meter works, why it needs intervention much of the time, and when and how the photographer must intervene to compensate for the meter’s shortcomings. Although we’re delving into meter behavior in this section on automatic exposure modes, do remember that the meter has exactly the same shortcomings when using the manual exposure mode and is equally in need of photographer intervention.
Let’s start by noting that we conventionally use reflected-light meters, meaning that these meters measure the amount of light reflected from our subject. The amount of reflected light depends on two factors. One, is the brightness of the available light, also called the incident light, that is falling on the subject. Two, is the percentage of that available light that bounces off the subject because of the subject’s reflectivity (also called subject reflectance).
The bright light of a sunny day can be falling on our subject, or the dimmer light of a cloudy day. So, the available light varies. Suppose we want to photograph black bears today and white mountain goats tomorrow. We recognize that white goats have a higher reflectivity than black bears. However, our light meter is unable to tell whether a metered scene is dark because it is a black bear in overcast light, or because it is the white goat in the very dim light of late evening. The converse is true, too. A scene that is metered as quite light might be the white goat in overcast light or might be the black bear in very bright sunlight. Yet, in order to provide proper exposure information—to make our black bears black and white goats white—the meter has to know.
Back at the camera factory, the poor overworked meter engineer has a conundrum. Is it the light, is it the subject, or is it both? But, the meter must know, so the engineer designs the meter to make a major assumption and it’s this assumption that’s so critically important for the photographer to understand and to remember with every shot:
The meter is designed to assume that all subjects are of medium reflectivity.
Medium reflectivity is the reflectivity of most of the world we live in, whatever that means. There’s been decades of controversy, but meter designers have largely accepted that our world in general reflects about 18 percent of the available light, so they design their meters to think that everything, absolutely everything, reflects 18 percent of the light that falls on it. The brainwashed meter “thinks” that the black bear reflects the same amount of light as the white goat. With that assumed, any measurement of the reflected light can easily be extrapolated into a measurement of the available light. Now we can do business! Sort of, anyway. What do we do about the fact that our bear really reflects only 7 percent of the available light and our goat really reflects 75 percent of the available light?
Using the assumption that all subjects have the same reflectivity, the meter is able to offer a result based presumptively on the available light. That assumption, however, results in meter readings that if slavishly followed, would make every subject mid-toned in the image. The meter makes everything mid-toned, but who wants a gray goat? Enter the photographer. Understanding his/her meter, the skilled photographer knows that he/she must not always rely on its data. Consider the subject and the metering mode, and then decide whether to modify the meter’s data and compensate the exposure.
The meter will properly expose a mid-toned subject, but when the subject is not mid-toned, exposure compensation is required and it boils down simply to a matter of how to do it, which way to do it, and how much to do it.
The how-to part depends on the camera and the exposure mode. Compensation in automatic exposure modes is usually done by entering the desired number of stops or partial stops into a “compensation” knob or into a menu setting. Compensation is generally done in the manual exposure mode by merely changing the aperture or the shutter speed (in some cases, the ISO) to provide the desired reading on the exposure meter scale.
Do you add light or subtract light? A polar bear walking on a bank of clean white snow will surely need some plus compensation. Will it need plus compensation if it is walking on a Hudson Bay shoreline of dark rocks? If you use the multi-segmented metering pattern as we strongly suggest, the metering mode considers both the light fur of the bear and the dark rocks. The tones of the white bear tend to cause underexposure, but the dark rocks tend to cancel out the influence of the white fur, but probably not perfectly. The best way to know how much compensation is needed is to shoot a quick image of the bear, check the rightmost data of the histogram, use the exposure compensation control to adjust the exposure, if necessary, and then shoot excellent exposures. Remember to expose your RAW or JPEG image according to the guidelines we have already spelled out. If the rightmost data on the histogram is one-stop short of the right edge, then use the exposure compensation control and set it to +1-stop for any automatic exposure mode or do it manually with manual exposure.
Let’s use a real-world example from four consecutive July mornings. I was wearing chest waders and slowly moving about a nearby marshy bay while hiding in my camouflaged floating blind. I shot more than 5,000 images of red-necked grebes, Forster’s terns, ruddy ducks, and yellow-headed blackbirds. Although I prefer manual exposure, I used Shutter-priority because the blind—which resembles what might be imagined as a floating muskrat condo—is a bit cramped and dark, making it difficult to see the information display panel
This bald eagle calmly perches on a deck railing eight feet away in Homer, Alaska. During February, eagles converge on Homer for hand-outs from eagle viewers and many tolerate a close approach. Barbara stopped down to f/18 to make its face as sharp as possible and focused slightly in front of the eyes to make its beak sharp, too. Nikon D3, Nikon 200-400mm f/4 lens, f/18 at 1/125 second, ISO 640, and manual exposure.

on top of the camera. If the light is ample, I like to use ISO 640 and a shutter speed of 1/1000 second to arrest the continuous camera movement created by ripples in the water. Often this ISO and shutter speed let me stop down to f/5.6 or f/8.0. I always use the Evaluative metering mode with my Canon digital cameras. Because the Evaluative metering mode considers everything in the viewfinder, I don’t dwell too much on whether the subject is the white Forster’s tern or the darker red-necked grebe. I simply set my exposure compensation dial to the zero (null) position and shoot the image. Then I immediately check the histogram to see where the rightmost data lies. If the data falls short of the right edge of the histogram, I add light by turning the exposure compensation dial to plus compensation and shoot another image to check it. If the rightmost data just touches the right edge of the histogram, then all is fine. If the rightmost data is climbing the right edge (clipping), then I subtract exposure with the exposure compensation control until everything is just right. In short, I compose the subject and shoot the image to get the histogram to determine the exposure.
In practice, don’t worry too much about the reflectance of the subject and its surroundings. For example, even though Forster’s tern has brilliant white feathers and you might think adding light is necessary, the dark vegetation and shadows around the tern are dark. The meter considers everything in the image and suggests a standard exposure. Since the tern was surrounded by mostly dark areas, setting a minus 2/3- stop compensation to keep detail in the whitest feathers was necessary. If one used a spot meter and metered only the whitest feathers, then a + 2 compensation may have been necessary. Truly, exposure is quite simple. Shoot a quick exposure to get the histogram and make an exposure compensation (if necessary) according to what the rightmost data of the histogram indicates. Be aware most cameras have two exposure compensation controls: one for flash, and another for natural light. Be sure to use the natural light one!
AUTOEXPOSURE PROBLEMS
Autoexposure modes can offer several valuable benefits for certain kinds of shooting. But, like the manual exposure mode, they are only as good as the shooter’s willingness to understand the exposure meter and properly use compensation. We rarely use autoexposure for macro or landscape work, but we do use it 50 percent of the time for wildlife photography. When we do use it, though, we always keep on guard for a few serious problems with its use.
CHANGES IN SUBJECT REFLECTANCE
A word of caution while you are busily filling the camera’s viewfinder frame with an immature bald eagle sitting on a snag in a dead tree. Immature bald eagles are generally dark with a few white feathers. The mostly dark bird causes the camera to overexpose a bit. You cleverly remember to compensate by using a bit of negative compensation to preserve detail in the few white feathers this young eagle has. You dial in a stop or so of minus compensation, take another shot, and confirm the new exposure by ensuring that the histogram area representing the white feathers is ETTR. No sooner have you acted, when papa eagle comes along, scares away the youngster, and sits on the same snag. Papa eagle is adorned with far more white in his neck and head feathers. Your meter sees the extra white and reduces the exposure. You forget to readjust your compensation. You get one very dark eagle. The moral of the story is that your must always monitor your histogram and adjust compensation, any time a changing subject introduces a change in reflectivity.
CHANGES IN BACKGROUND REFLECTANCE
Many animals rapidly move between dark backgrounds and light backgrounds, creating a serious challenge for autoexposure. You’re flat on your belly photographing a sandpiper on the beach. The feisty little bird is erratically flitting back and forth between the bright white dry sand and the dark wet sand. At every transition, your meter dutifully responds with an exposure change. But, do you really want a change? Most likely you don’t. You want the bird properly exposed, with the sand being a lower priority. Yet, wherever the bird runs, he’s in the same light and once having confirmed a good exposure with your histogram, you sure don’t want the auto-exposure system to keep changing it because of changing backgrounds.
Sandpipers on sand are but one tiny example of this problem. If you are fortunate enough to photograph a Steller’s sea eagle flying in a deep blue Japanese sky, then diving down so the background is a white ice floe, and then flying over a background of dark green seawater, you must contend with at least three radically different background reflectances. The meter offers three different exposures, but as long as the eagle is in the same light, you want the one exposure and only the one

This awesome Steller’s sea-eagle passed by the eagle viewing boat in northern Japan. By using a 500mm lens mounted on a Wimberley Sidekick and Kirk BH-1 Ballhead, I panned smoothly with it to capture a sharp image. Canon EOS 1 D Mark III, Canon 500mm f/4 lens, f/8 at 1/1000 second, ISO 400, and manual metering.
exposure, that results from ETTR with no blinkies on the white feathers. If the automatic exposure is set to properly expose the eagle against the blue sky, the camera will underexpose it against the white ice background and overexpose it against the dark ocean water. Manual exposure is the best answer here.
In the above examples and whenever faced with rapidly changing background reflectivity, autoexposure is not a good idea and may produce an exposure disaster. Use manual exposure to set the proper exposure for the available light and the subject, and let the lower priority background exposure wander around as necessary.
CHANGES IN COMPOSITION
Changes in composition that affect meter readings must be accompanied by changes in exposure compensation. You’re photographing a handsome all-white snowy egret that’s perched on a floating log in a Florida pond. The pond is filled with dark green vegetation and the egret fills about 40 percent of the frame. You’ve taken a meter reading, checked your histogram, added + 1/3- stop of compensation for ETTR with no clipping, and checked again. All is well, and you make a nice shot. You decide to move closer, or zoom in, for a tighter shot. The all-white bird now fills about 85 percent of the frame, displacing some of the darker vegetation. The meter acknowledges by reducing the exposure, as meters will do,
Gerenuks are graceful desert mammals commonly found in Kenya’s Samburu National Reserve. They are uniquely adapted for desert life because they obtain all of their water needs from the food they eat. They often stand on their hind legs to eat succulent leaves that other herbivores can’t reach. I used f/13 to maximize the sharpness of each animal in the group. Canon EOS 5D Mark II, 500mm f/4, f/13 at 1/250 second, ISO 400, and Shutter-priority with a minus 1/3-stop exposure compensation.

when it “sees” more light tones. If you’re not on your photographic toes, you forget to change the exposure compensation. By forgetting in the egret example above, you’d allow the histogram to move left, you’d lose valuable detail in your image highlights, and you’d pick up additional shadow area noise, resulting in a degraded picture. The opposite circumstances might even be more dangerous. When the white snowy egret is made smaller in the frame, and the dark pond larger, the obedient meter would tend to cause overexposure, thus “blowing out” the delicate egret feathers and ruining the image.
The moral of the story is those changes in composition that make a difference to meter readings must be recognized as necessitating changes in exposure compensation. In this case, too, manual metering is really more efficient. Once the optimum exposure is set by using ETTR, the manual exposure remains excellent, no matter how large or small the egret is in the frame.
SUMMARY OF AUTOEXPOSURE
Autoexposure can be a fast and accurate means of camera operation as long as you remember its major shortcoming—its propensity to change its exposure recommendations when you don’t want it to. It can make those unwanted changes when the subject changes, when the background changes, and when the composition changes.
The solution for those problematic changes is simple—just use the manual exposure mode. You manually adjust your exposure for the available light, the subject, the background, and the composition, to get an ideal histogram with no clipping. Then, as long as the amount of available light doesn’t change, your subject will be properly exposed.
Notice that I just said “as long as the light doesn’t change,” and therein lies the true value of an autoexposure mode. When the light is rapidly changing, such as when the sun is flitting in and out of the clouds, one oftentimes just can’t keep up manually, and autoexposure does come to the rescue. Both Aperture-priority and Shutter-priority are efficient if you must change the depth of field quickly. Perhaps a stately group of giraffes is approaching your safari vehicle. Your camera’s exposure is set to f/8 at 1/500 second. To get all of the giraffes as sharp as possible in the image, you set the aperture to f/ 16. If using Aperture-priority, simply set the aperture to f/ 16 and the camera automatically changes the shutter speed to 1/125 second. In the Shutter-priority exposure mode, lowering the shutter speed to 1/125 forces the camera to change the aperture automatically to f/ 16. Either way, you get two stops more depth of field. Let us not forget the enormous power of using Shutter-priority along with Auto ISO to handle low light situations where high shutter speeds must be maintained.
USING MANUAL EXPOSURE
First, we need to locate the one or more metering scales that are used to set the exposure. There will be a metering scale in the viewfinder, perhaps horizontally on the bottom or perhaps vertically on one of the sides. There may also be a metering scale presented on an LCD display, or on some cameras, even on 2 LCD displays. A metering scale will look something like this:
-3 .. -2 .. -1 .. 0 .. +1 .. +2 .. +3
In some cameras, the scale won’t go from -3-stops to +3- stops, but only from -2 to + 2. And depending on camera and user selection, the two intermediate dots each representing 1/3 stop may be replaced by one dot that represents 1/2 stop.
Let’s photograph an inquisitive Columbian ground squirrel in Jasper National Park. Use your evaluative or matrix metering mode and set the camera to manual exposure. The squirrel is eating dandelions and to freeze the movement of the squirrel and arrest any camera shake, you set a shutter speed of 1/320 second. Now adjust the aperture control until the exposure indicator mark centers by pointing at the “0” position on the scale. Don’t waste time trying to decide if the overall image (squirrel plus its surroundings) is brighter or darker than mid-tone. Just shoot the image and quickly check the histogram and take notice to see if any “blinkies” are present. If the histogram is exactly what you want, then go ahead and shoot more images. If the exposure is a little dark, according to the histogram, manually add light by opening up the aperture and shoot another image to check the histogram. If the image is overexposed, stop the lens down more to reduce the exposure. Use the ETTR guidelines we described earlier to shoot superb exposures time after time. Naturally, you confirm your exposure by using your histogram to ensure ETTR and no blinkies. That’s all there is to it! There is no extra exposure compensation setting to make, as you must when using autoexposure.
Be certain to watch for the following:

Columbian ground squirrels are curious and fun to photograph. I lay on the ground and spread the tripod legs widely to use a low shooting viewpoint. This position made me seem smaller to the squirrel and less threatening. This one quickly resumed picking and eating dandelions. Canon EOS 5D Mark II, 500mm f/4 lens, f/7.1 at 1/320 second, ISO 500, and manual exposure.
• If you’re metering an exposure that’s off-center by more than the maximum 2 or 3 stops than the scale presents, the indicator may be off the scale. In some cameras, the direction of that indicator is shown by a flashing signal or an arrow. If the indicator is on the underexposure side, add light with the aperture, shutter speed, or ISO to move the exposure mark back on the scale. Do the reverse if the indicator is on the overexposure side of the scale.
• Do remember the following: If the amount of available light changes, manually change your exposure!
KNOW YOUR HISTOGRAM
Look carefully at your camera’s histogram display. Other than the lines forming the right and left edges of the display, most cameras have three or four vertical lines in-between the edges. It’s quite handy in judging exposure changes, to know how many stops are represented by the spacing of those lines. Here’s how to tell: Shoot a white piece of paper in even light. With the entire subject having only one tonality, the histogram should be a narrow vertical line itself. Take several successive exposures, a third of a stop apart, and watch how the histogram moves across the display. My Canon cameras have four vertical lines between the left and right edges of the histogram display and they’re spaced about 1.2 stops apart, which I usually just consider as a rounded-off one stop. Barbara’s Nikons have three vertical lines spaced about 1.6 stops apart.
Knowing the histogram makes for speedy operation. Say you shoot an image with your Canon and your histogram’s rightmost data falls “one line” away from the right edge. You’ve learned that’s about 1.2 stops. You know that for ETTR, you must bring the histogram up close to, but not climbing, the right graph edge, so you immediately decide to add 1 stop. No complicated arithmetic here! Not only that, but you don’t even have to look in your viewfinder. If your camera is set to work in 1/3 stop increments, merely rotate your shutter speed control or your aperture control in the direction that adds light by 3 clicks and you’re there—just count three clicks.
REVERSING THE CONTROL DIALS
Another way to speed up your camera operation is to carefully check to see which way your controls work. To add light, do you turn your aperture control clockwise or counterclockwise? Do you increase shutter speed by turning the knob right or left? Do you have to fiddle with the knobs to find out? Sometimes the controls seem “backwards” because they are counterintuitive. Generally, most folks prefer to “add” or “increase” the exposure by turning a knob to the right (clockwise). After all, adding light moves the histogram data to the right and vice versa. Doesn’t it make more sense to turn the dials to the right to add light, too? Either way, if your camera controls seem backwards to you, explore whether there’s a custom function or menu choice allowing reversal of the control directions. Most Canon cameras have a custom function called “Dial Direction during Tv/Av.” Choose Option #1 to reverse the dial direction. Although unstated, it works in manual exposure, too. Many Nikons also do this via their menu choices. Indeed, some Nikons let you reverse the metering scale in the viewfinder so plus compensation is on the right and minus is on the left. To learn whether your controls can be reversed, study the manual, contact your camera maker, or ask this question on the Internet photo forums.
OUR METERING PREFERENCES
Our own metering techniques continue to evolve as we develop new strategies to solve the exposure problems we encountered in the field. New technologies, such as Auto ISO, suggest new metering methods. Certainly no metering method works for all people, or for all circumstances, so we do our best to clearly explain how we do things and the reasons for it. You can select the strategies that work best for you. Even Barbara and I occasionally differ on which exposure tool is best for a given situation.
BARBARA’S METERING METHODS
Aperture-Priority
Barbara uses Aperture-priority for much of her wildlife photography, when conditions involve changing light. She sets the aperture and lets the camera select the shutter speed necessary to obtain the standard exposure, that is, the metered exposure before she applies any compensation. She carefully checks her histogram and her highlights, just as we so strenuously recommend to all. Then she introduces any compensation necessary to make her histogram ideal and without blinkies in important highlights. Even with that perfect histogram, though, Barbara diligently remains aware of her shutter speed and her ISO, to ensure that changes in the light don’t make the shutter speed so slow that her image sharpness is at risk.
Manual Exposure
Manual exposure is certainly Barbara’s choice of exposure when shooting wildlife and the light is not rapidly changing or anytime the background is white ice or snow.
JOHN’S METERING METHODS
Shutter-Priority
When I choose to use an automatic exposure mode, I much prefer Shutter-priority in my wildlife work to ensure image sharpness is not degraded by unarrested subject motion or camera shake. Generally, I start with 1/320 second, as that freezes the movement of most animals and minimizes the problem of camera shake. The camera determines and sets the standard exposure. As always, I do enter whatever exposure compensation is needed to obtain that ideal histogram, the one obtained by ETTR and having no blinkies. While on the histogram soapbox once again, we both use the RGB histogram because of its greater accuracy compared to the luminance channel (brightness) histogram. If the light diminishes to the point where I need a larger f-stop than my lens offers, and I risk underexposure, I set my Canon’s Auto ISO feature to make it automatically and effectively come to the rescue.
Manual Exposure
I use the manual exposure mode for at least 60 percent of my wildlife photography and 99 percent for everything else. That said, most animals are not only black or only white—they generally offer a mid-toned or near mid-toned subject to meter, thus they’re reasonably good targets for automatic exposure, too. However, I’ve long perceived and recognized that manual exposure offers me a more convenient way of dealing with the occasionally changing photo situation like a dark brown bison walking past me in the newly fallen snow of a Yellowstone meadow. As the bison becomes larger in the image, manual exposure preserves the highlight detail in the snow. Any autoexposure mode quickly overexposes the snow, unless there is a way to lock the automatic exposure for as long as necessary. Most cameras don’t offer such a control, but some do.
CONCLUSION
This chapter has covered a large amount of details and strategies. Give yourself plenty of time to assimilate them. And perhaps the most important conclusion of all is to be truly diligent in using your histogram. Unrelenting careful use of the histogram and blinkies will eventually, but inevitably, make you an exposure expert. Exposure will no longer occupy very much of your mind when you’re shooting. Then, you can “take your wildlife photography to the next level” by concentrating on the light, the composition, and the image sharpness.
CHECK OUR WEBSITE
Many of the topics in this book are covered in far greater detail in articles posted on our website. Back-button focusing, manual metering strategies, and even an expanded version of this chapter is more thoroughly explained in these articles. They are free to read on: www.gerlachnaturephoto.com.
