
9
Getting Close to Wildlife
Getting within excellent photography range of wildlife can vary from incredibly easy to virtually impossible. Your ability to approach closely depends on many factors. Some species like pine grosbeaks and chickadees are unafraid of humans. Hawks and eagles are usually skittish and quick to flee. Location matters a lot, too. Bald eagles are not easy to get close to in northern Michigan, but on the spit in Homer, AK, some individuals are as easy to approach as pigeons in a city park. Time of the year matters since many birds and mammals are easier to get close to in winter when they are focused on eating and staying warm. Naturally, many animals are easy to approach—not that you should—when they are nesting. Occasionally, an individual of a normally nervous species accepts your presence for unknown reasons. Golden plovers tend to spook easily, but during the fall migration, we sometimes find an individual resting on a Lake Superior beach that ignores our presence. How you act around wildlife matters a great deal. Photographers who talk all of the time, bang things around, and continually make quick movements have an incredibly difficult time approaching wildlife. Once you master the mechanics of shooting fine images—exposure, focusing, light, composition—approaching wildlife closely enough to photograph is the major challenge you must continually solve.
USE CAPTIVE ANIMALS TO MASTER YOUR SHOOTING SKILLS
This book covers wildlife photography which assumes the animals are free to move about in their natural environment. Nevertheless, it’s
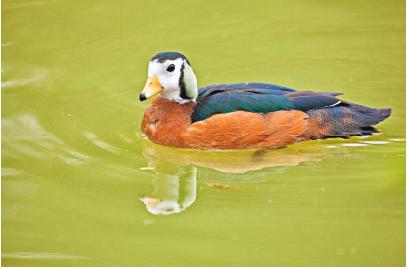
The African pygmy-goose is a captive resident of the Sylvan Heights Waterfowl Park in North Carolina. This superb facility hosts the largest collection of ducks in the world that is open to the public. It is a splendid place to capture many fine images and perfect your photo skills. Canon EOS 5D Mark II, Canon 500mm f/4.0L lens, f/5.6 at 1/800 second, ISO 640, and manual metering.

This Baikal teal is a gorgeous member of the teal family that is on display at the Sylvan Heights Waterfowl Park. Canon 5D Mark II, Canon 500mm f/4.0L lens, f/6.3 at 1/500 second, ISO 800, and manual metering.
difficult to learn how to quickly focus, expose, and compose wildlife images unless you photograph a lot. Therefore, it’s worthwhile to take advantage of the captive wildlife that you find at zoological parks. In the past, most zoo enclosures were not especially favorable for good photography due to fences and obvious man-made habitats with cement floors. Now many zoos display their animals in more natural-looking settings. Digital cameras handle the light at the typical zoo quite well. Zoos have plenty of buildings, tall trees, and bushes to landscape the facility and provide shade for the animals and human visitors. These obstacles block early morning and late evening sun, making it difficult to photograph the animals in golden sunshine. Once the sun rises high in the sky, the shadows created by bright sun and obstacles make it almost impossible for a single digital image to adequately record detail in both the sunlit highlights and the darkest shadows. This contrast is difficult to effectively conquer, though fill-flash (if permitted) can help. On cloudy days, the contrast problem largely disappears. However, water droplets in the clouds easily scatter much of the blue portion of the available light, producing a blue color-cast in images. If an abundance of green leaves are near the subject, an unwanted green color cast from the foliage adds to the mix. This dreadful blue-green colorcast is undesirable, but easily controlled by using Auto WB, a Custom WB, or shooting RAW images and adjusting the colors later in the RAW converter. Although clouds, bushes, trees, and buildings diminish the amount of available light, being able to use higher ISOs allows the use of faster shutter speeds for sharp images. Bright overcast days at the zoo are superb for digital capture and it is easy to shoot fine images of many captive animals.
SMALL ANIMALS
We haven’t photographed at zoological parks very often in the past, but plan to do more after our incredible experience at the Sylvan Heights Waterfowl Park (www.shwpark.com.) in North Carolina during April of 2011. This exquisite park showcases the largest public waterfowl collection in the world. They offer several display ponds with high nets over the top to keep the birds from flying away. Special gates allow you to go inside the display pond enclosures. Therefore, there are no wire fences between you and the waterfowl to shoot through. There are separate display ponds for North America, Eurasia, Africa, South America, and Australia. The corresponding pond for each continent displays a huge variety of waterfowl from that continent. Imagine having almost all species of North American ducks swimming closely in front of you during a short period of time. The same is true for each of the other display ponds for the other continents.
Having a keen interest in the waterfowl, it’s exciting to see and photograph living individuals of species we had only seen in field guides before. We already have tons of photo experience, but we did improve our camera skills by shooting 25,000 images during four full days at the park. Our digital cameras offer us some new controls over focusing and much better image quality at ISO 800 than previous models. We used manual metering, back-button focusing, and continuous autofocus. The multi-controller button on the back of my Canon camera worked perfectly to rapidly select a single AF point that coincided with the face of the swimming ducks. The Wimberley Sidekicks mounted on our Kirk BH-1 ball heads let us easily pan with the ducks as they paddled by. Our percentage of sharp images (precise focus on the face of the bird and crisp feather detail) is quite high—at least 50 percent— which is quite good, considering the ducks are constantly moving.
Anyone who intensely photographs the waterfowl at the park over a few days and shoots thousands of images there will certainly improve their camera handling techniques as well as capturing many fine images. You will get far more opportunities to photograph the waterfowl at this park in a few days than you will with wild waterfowl over many years. The skills you perfect photographing captive animals can now and forever be used to successfully photograph wild animals. However, if your images of captive animals are published, always tell the publisher they are captive. Images of captive animals are published all of the time, but it is highly unethical to pass off a captive animal as one done in the wild. Always disclose the animal is captive!
APPROACHING WILDLIFE
FIND HABITUATED WILDLIFE
Wildlife accustomed to humans being close to them are often referred to as “habituated wildlife.” They are commonly found where people tend to spend their time. Plenty of city and state parks host easily photographed squirrels, deer, Canada geese, robins, and other creatures. For example, during late winter, Santee Lakes near San Diego, CA, is known as a superb place to photograph wild ring-necked and wood ducks. Conveniently, the park even sells food to feed the birds. The ducks readily fly over to you and almost eat out of your hand. These are wild ducks that use the park as a wintering site. Over time, they learn people have food and will feed them. They readily approach photographers who feed them.
Many countries have national parks that have protected wildlife for decades. As a result, the wildlife in these parks are unafraid of people. Yellowstone National Park, where we live, is especially productive for wildlife photographers. Bison, mule deer, coyote, elk, bighorn sheep, yellow-bellied marmots, ground squirrels, pronghorn, and other animals are easy to photograph if you look for them in the proper habitat during

Santee Lakes is east of San Diego, CA, and it is a well-known spot to easily photograph some wintering waterfowl. Barbara is using bread to keep the birds close. Most of the ducks are ring-necked, but a few mallards and wood ducks have joined them. Canon EOS-5D Mark II, Canon 17-40mm lens at 40mm, f/13 at 1/200 second, ISO 400, and manual metering.

Many wild wood duck are habituated to people who feed them at Santee Lakes. This makes them easy to photograph well. We did not try to photograph this dandy drake wood duck until it was lit with golden late evening sunshine. The calm water improved the reflection details. Canon 5D Mark II, Canon 500mm f/4.0L lens, f/9 at 1/500 second, ISO 400, and manual metering.
the seasons when they are active. Marmots and ground squirrels hibernate during winter, for example. If you are lucky, it is possible to photograph black bears, grizzly bears, and wolves. In Yellowstone, though, it is illegal to approach any wildlife closer than 25 yards, and you must stay 100 yards away from bears and wolves for your protection and theirs.
Beaches are natural magnets for both people and wildlife. Many shorebirds, herons, egrets, gulls, terns, and other birds are attracted to beaches for resting or gathering food. Since people frequently stroll along the beach, beach-loving birds become accustomed to them. Often, they become ridiculously easy to approach without alarming them. Even boat launching sites and fish cleaning stations attract wildlife that quickly become habituated to us.
STALKING
Many animals are easily photographed if you carefully stalk them. Start by locating the subject from a distance and carefully plan your route for approaching the subject. Normally, it’s best to approach the subject from the direction where the light illuminates the subject best. This eliminates the need to

Columbian ground squirrels are both attractive and cooperative. This one along the Icefield Parkway on the way to Jasper National Park loved to pick wildflowers and then return to this spot to eat its prize. Canon EOS-5D Mark II, Canon 500mm f/4.0L lens, f/7.1 at 1/250 second, ISO 500, and manual exposure.
make movements to improve the light when you are in position to photograph the subject, reducing the risk of scaring it away. This isn’t always possible, though, as trees, fences, rocks, and water might block your route. Do the best you can.
Once you decide on your stalking route, start slowly and stay low to the ground. Bending over, or even crawling for the physically able and more motivated of us, makes you less scary to the subject. Since you appear to be smaller, the subject is less likely to flee. Never talk and keep other noises,
such as breaking sticks while walking, to a minimum. Predators rush in quickly to capture prey, so always move slowly. Never move your hands, arms, or turn your head quickly. If the subject begins to react to your approach, freeze, and let it settle down. If the subject begins to leave, let it go. If you quickly follow after it, the animal will probably think you are after it—you are—and will rapidly disappear.
Whenever possible, give yourself plenty of time to approach the subject. If it will photograph best during the last hour of the evening sun, start the approach an hour earlier. This strategy allows plenty of time to slowly approach the subject closely to photograph it successfully. If all goes as planned, the subject will be accustomed to you when the light is the most photogenic. Although mud, water, and plants might make it difficult, crawling slowly up to the subject is often the most effective way to stalk it. I stalk by crawling when the situation makes it possible because it works best and the low photography viewpoint creates compelling images as the foreground and background are rendered far out of focus.
Male sage grouse gather together in April on historic leks to display their dancing skills to hens who wander about the dancing ground deciding who will be the best suitor. They begin dancing at least one hour before sunrise, so it is important to be well hidden in a blind and remain quiet when they converge on the lek in front of you. Nikon D3, Nikon 200–400 f/4.0, f/8 at 1/250 second, ISO 400, and manual exposure.

Even better, if you can shoot up at the subject ever so slightly, that is an even more unusual and appealing viewpoint of a ground-dwelling animal.
Many photographers wear camouflage clothing for wildlife photography. Although I have camouflage clothing, I prefer to wear neutral brown, green, or gray colored clothes, especially when other people are present. Photographers who dress up in camouflage tend to draw undesirable attention to themselves. There is little reward in successfully stalking a great-blue heron, begin shooting images, and have it frightened away by another person running up to you to ask, “Are you a professional photographer?” Animals are quick to notice
anything unusual in their environment. Their life depends on it. Don’t assume camouflage clothing will make you invisible to them. Some wildlife photographers buy camouflage covers for their equipment. It does seem reasonable to cover a white Canon telephoto lens with a camouflage cover to make it less noticeable and less alarming to the subject. Even if covering the lens doesn’t alarm the subject less, at least the lens is protected better. These covers can be found at www.lenscoat.com.
BLINDS
We have designed and used many blinds (hides) over the decades. A camouflage blind hides you from wildlife quite effectively. Animals know the blind is there, but if they don’t see or hear you inside the blind, often they will approach closely enough to permit you to capture excellent images. If possible, it is always best to put the blind in place a day or two ahead of time to let the animals get used to it. For example, when photographing birds in our back yard, I erect the blind near the seed feeder or water lure and don’t try to do any photography from it for at least a day. In a day or two, most birds and backyard mammals accept the blind as a natural object and largely ignore it. Wind is an ever-present problem for blinds. Stake the blind down solidly to prevent it from being blown over.
The blind covering must be thick enough to make it impossible for the subject to see you move inside it. Animals are quick to react to unexpected motion and noise. Both must be avoided at all times. Of course, thick material can make it hot inside the blind. Wear clothes that make sense for the weather. We know some photographers who use blinds in hot desert temperatures who wear only shorts and use a bucket of water and sponge to stay cool.
Barbara and I especially enjoy using blinds in our wildlife photography. It’s fascinating to watch the behavior of wildlife that are unaware of us. It’s particularly fun when normally shy subjects, such as prairie chickens, approach the blind and dance while completely unaware that we are 10 feet away. However, photographing from blinds isn’t for everyone. If you prefer to continually move on, and not be anchored to one spot, immobile blinds are not for you.
When using a blind, always carefully consider where you put it. What will be the background? Is the background a nicely out-of-focus forest 40 yards behind the subject or a twiggy bush 2 feet behind it? The twiggy bush makes a horrible background as the branches create many distracting lines. Selecting a more diffuse background that is farther away from the subject is a better choice. Consider the light! Normally bright sun behind the subject or off to one side doesn’t work nearly as well as more frontal sunlight because the contrast is too severe. On the other hand, if the sun is diffused by clouds, then any direction can work well. Indeed, we often use the soft backlighting on an overcast day for wildlife photography. The backlight rims the subject slightly, yet the low contrast light nicely illuminates the side of the subject facing the camera.
TYPES OF BLINDS
BAG BLINDS
Barbara makes these simple blinds from a large piece of camouflage material that can completely cover one person, the tripod, and lens when they are standing up. The blind has no frame. Instead, your head holds it up and the material drapes down over you and your camera gear in an irregular fashion. Often we use a small chair to sit on while inside this blind. At the appropriate spot, Barbara sews a nurse’s sleeve into the blind with a drawstring on the end. This lets the lens protrude from the blind and the draw string securely fastens the nurse’s sleeve to the lens hood. This hides most of the lens and prevents the material from accidently covering the front of the lens. A viewing window (G x 8 inches in size) a few inches above the nurse’s sleeve is cut into the blind and covered with a thin mesh material. Now it is easy to see what is in front of us, yet the mesh covering prevents the animal from seeing us. Don’t make the mistake of thinking you can use your lens to see what is in front of you. It is far too difficult, especially with telephoto lenses, due to their narrow field of view.
The bag blind is lightweight, quick to use, easy to carry, and effectively blends in with the environment because it has no regular shape as it drapes down over the photographer. We use it when we are short of time or can’t set up a permanent blind because it might attract unwanted attention from other people. We typically use bag blinds when photographing dancing sage grouse, sharp-tailed grouse, and prairie chickens.
MANUFACTURED BLINDS
Many companies build blinds for hunters that work tremendously well for photography, too. These are effective any time you can safely set it up and leave it unattended for a while to allow animals to become accustomed to it. Most of our backyard animal photography is done with a blind that has a thick camouflage cover that attaches to a stiff wire frame to hold its shape. The blind is solidly staked down to the ground to keep the wind from blowing it over or sending it aloft.
The large stores that cater to hunters like Cabela’s, Bass Pro Shop, Sportsman’s Warehouse, and Gander Mountain sell

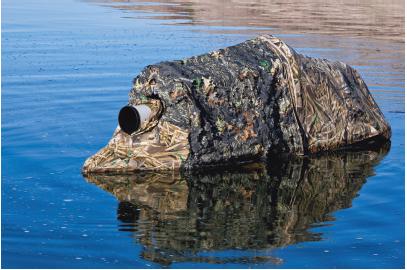
This is the blind we used at Bill Forbes’, “The Pond,” property south of Tucson, Arizona. Similar blinds can be purchased at any large store that caters to hunters. Canon EOS-5D Mark II, Canon 17–40/4 lens, f/20 at 1/160 second, ISO 320, and manual metering.
blinds that work perfectly for wildlife photography. I bought a Trekker T600B hunting blind from Cabela’s in Boise, ID, for a little more than $100. The blind sets up in seconds, offers a few zippered windows for your lens to poke through, and provides mesh windows for you to easily view the scene before you. Many loops are attached to the base of the blind to make it easy to stake it to the ground. Otherwise, the first 10 mph breeze turns it into a kite.
The zippered viewing windows are especially useful. Most photographers poke the lens out the window when photographing and zip up the window somewhat loosely around the lens. This means animals may see the lens move as you change from one composition to another. It’s best to move the lens s-l-o-w-l-y to avoid scaring the subject. The birds I was photographing last spring were especially flighty if the lens moved, so I tried another strategy for the first time that worked surprisingly well. The Trekker T600B hunting blind has large zippered windows and plenty of room inside it for a single photographer and their equipment. To avoid the lens movement problem, I unzipped the window entirely, moved the tripod away from the window until the lens no longer protruded from it, and photographed very effectively without scaring any birds. Since I had a large open window to shoot through, I could change my shooting angle without having the blind block the view. Although the window is wide open, the birds failed to see me inside the dark blind. Since the lens is entirely inside the blind, I could quickly move the lens up, down, left, or right without alarming the nervous birds. As long as I kept my movement to a minimum inside the blind and didn’t make any noise, the birds were completely unaware of me. Not all animals are afraid of a moving lens, though. In times past, I have had sharp-tailed grouse, spotted sandpipers, black-capped chickadees, and pine siskens perch on the lens hood. They remained on the lens even when I panned the lens.
This type of blind is easy and quick to set up, but not as quickly as the bag blind. It is most effective when it is possible to leave the blind in place for a day or two to let the subjects become accustomed to it. Unfortunately, any blind that is left unattended and discovered by other humans may be stolen. I have lost a few over the years to theft, so I only use blinds that will sometimes be unattended in my yard and in the nearby national forest where I know people seldom venture.
SCAFFOLDING
Both bag blinds and portable manufactured blinds work well on top of construction scaffolding. We own two sections of scaffolding and use it for photographing the nesting woodpeckers on our property and sometimes for birds that are attracted to our seed feeders. We recently used scaffolding to photograph both common flickers and Lewis’s woodpeckers with great success. Why do we sometimes use the scaffolding at seed feeders? We have a group of three spruce trees that are about 12 feet tall. If we put the seed feeder 3 feet above the ground and 4 feet in front of the trees, the birds will descend to eat the seeds. However, we aren’t interested in photographing the birds perched on the seed feeder. We want them perched on the spruce branches. While the birds will briefly perch on the branches right behind the feeder, they are quick to move to the seed feeder. Birds that perch near the top of the tree stay in one spot much longer than near the feeder. By using the scaffolding, we can photograph higher up and successfully photograph those birds that are calmly perched near the tops of the trees.
Each section of scaffolding raises you about 5 feet above the ground. Two sections used together, of course, get you 10 feet up. Plus, when sitting in a chair on top of the scaffolding platform, you gain another 3 feet of elevation. Therefore, two sections of scaffolding will get you to eye-level with a subject that is 13 feet above the ground. If you decide to use scaffolding, make sure you get four leveling feet for the scaffolding. These feet allow you to level the scaffolding on the typical sloping ground you find in wildlife photography. Two sections of scaffolding is the highest we go. Three or more sections become top-heavy and unstable. Wires are necessary to secure it if you use more than two sections. This is more work than we want and neither of us is especially fond of heights.
PERMANENT BLINDS
This can be a simple or elaborate structure that is built at a good photography spot and not meant to be moved. The first permanent blind I ever built was early in my nature photography career when I lived in a tiny cabin in the forest of northern Michigan. The back door of the cabin faced north and the background was a mixture of beech, maple, and conifer trees about 40 yards away. At the time, in the early 1980s, I was shooting film, so it was best to shoot north to allow the sunlight to light the front of the subject. Now that higher ISOs on digital cameras can be successfully used, the direction you photograph doesn’t matter as much, especially when using wonderful bright overcast light.
I built a small porch out of 2 x 4s and plywood. The blind was built flush with the cabin wall, had one door to give me access to the backyard, and a single window to let me photograph due north. Of course, I didn’t actually install a window. Instead, I covered the opening with a mesh camouflage material that let me easily view the entire backyard, but made it impossible for the birds to see me inside the dark porch. A small opening cut in the mesh fabric allowed the lens to poke through it. This blind worked fabulously well. I easily photographed evening grosbeaks, common redpolls, blue jays, hairy woodpeckers, downy woodpeckers, and pine grosbeaks that were attracted to the sunflower seeds and suet (beef fat) I provided. Birds typically visit in large masses at once. Most of the time few birds were present. At times, though, the feeders were crowded with birds of several species. By attaching the permanent blind to the back door of the cabin, I could remain inside the cabin typing my next photo article or editing images. However, I checked the bird activity in my backyard quite often. When the birds arrived, I quietly opened the back door to the cabin to enter the blind without scaring the birds. Since the lens was already mounted in the blind, I could immediately begin photographing the birds. When they moved on, I returned to my office work. Being able to enter your blind at any time without scaring the subjects is an incredibly effective way to photograph!
A word of warning. Some photographers use their home as a blind and photograph through the windows. I tried this a few

Here’s the view from the pit blind we used in South Texas at the Marten Refuge. When in the blind, we are able to shoot while sitting in a comfortable chair with a viewpoint only a few inches above the ground. The opposite side of the pond is carefully lined with rocks to offer mirror reflections of the birds that visit it. Seeds, meal worms, and fruit are hidden behind the logs to attract wildlife. Notice the green jay and chachalaca perched on the log. Canon EOS-1 Ds, 24–70mm lens at 30mm, f/11 at 1/30 second, ISO 250, and manual metering.
Green jays are common in Mexico, but barely make it across the US border near Brownsville, Texas. We especially enjoyed photographing it because it is colorful and a new species to us. Canon EOS-1 Ds Mark II, Canon 500mm f/4.0L, f/5.6 at 1/250 second, ISO 320, and manual metering.

times and the results were horrific. I ended up selecting all of the images and then hit delete. None of the images were as sharp as they should be. Window glass isn’t quality optical glass. For my professional needs, the images are too unsharp to be useful. If the sharpness is okay to you, then go ahead and shoot through windows. But, you lose a lot of quality. It’s always best to shoot through open windows. Naturally, take the screens out of the window ahead of time.
At our Idaho mountain home, we have one sliding window that we never put a screen in. We keep a salt block in the natural grasses and wildflowers about 20 yards from the window. When white-tailed deer, mule deer, or moose come to lick the salt block, we quietly slide the window open and use our long zoom lenses to photograph the animal and it is completely unaware of our presence. Since we never know when a subject will visit the salt block, keeping the screen out of the window makes it possible to be ready when a handsome
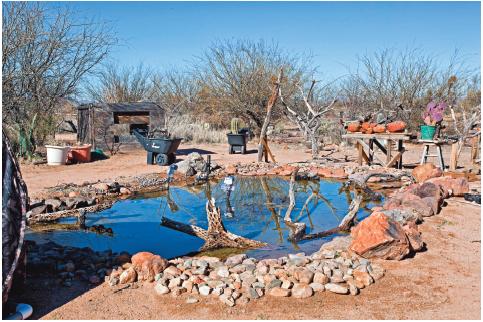
Bill Forbes’ small man-made pond in southern Arizona is a magnet for at least two dozen species of birds and mammals. The water and the seeds he provides keep this spot busy. Notice the cactus props are in wheelbarrows to make them easy to move around. The flashes fastened to sticks in the pond are used to photograph drinking bats at night. Unfortunately, when we visited, few bats were around and we had little success as it was too early in the spring season. To rent time at this spot, go to www.phototrap.com.. Canon EOS-5D Mark II, Canon 17–40mm lens at 40mm, f/20 at 1/60 second, ISO 320, and manual metering.
creature shows up. We keep the curtain closed in this window all of the time to prevent the subject from noticing us through the window. We simply move the curtain a tiny bit to let the lens poke through the open window to photograph.
The most elaborate permanent blinds we have used are in South Texas. A number of ranches dig pit blinds that make it possible to photograph wildlife at eye level, since the lens is only a few inches above the ground. These elaborate blinds are well-made, comfortable, and highly effective. Usually, a small pond is built in front of the blind and feeders are stocked each day to keep the wildlife coming in regularly. These blinds are rented to wildlife photographers by the half-day, day, or longer. The ponds are set up to entice the animal to face the camera. The far edge of the pond is lined with natural-looking rocks, sand, or branches. This is a good way to capture mirror reflections of the subjects. These rentable blinds are quite popular in South Texas because there are many unique birds such as green jays that barely extend their range across the US border from Mexico. Try visiting www.martinrefuge.com. to discover one South Texas ranch where we enjoyed excellent wildlife photography.
Another superb set-up that you can rent is in the Sonoran Desert south of Green Valley, AZ. It is called “The Pond.” Bill Forbes is the mastermind behind this fine set-up. Water is in short supply in the desert, so the pond acts as a magnet to many desert birds and mammals. Desert cottontail rabbits, antelope ground squirrels, Gambel’s quail, white-wing doves, mourning doves, northern cardinals, greater roadrunners, and other desert birds are attracted to the water and seeds Bill provides for them. Contact Bill at www.phototrap.com..
WATER BLINDS
Approaching wildlife from the water is incredibly effective. Many wildlife photographers construct a floating blind that resembles a muskrat house. Thanks to my dentist, Alan Charnley, who is a master at building these types of blinds, we have one, too. Our fourth-generation “Charnley Blind” is made out of a large sheet of Styrofoam and encased in thin boards to keep it all together. A camouflage blind is attached to the floating platform. The photographer wears chest waders and slips through a hole in the middle of the floating blind. A gimbal tripod head (a Kirk Cobra in our case) is attached to the front of the blind at a comfortable distance from the hole the photographer occupies. Then a long lens in the 500mm to 800mm range is attached to the gimbal head. With great care, the photographer slips into the blind through the hole that is just large enough for their waist and crawls to deeper water. The blind easily supports and floats the photographer and all of the gear inside the blind. It is incredibly stable and not tippy as the center of gravity is low. The floating blind works best in shallow water from 2–4 feet because you can use your feet to walk along the bottom of the marsh. It is possible to awkwardly swim slowly in the blind, though we try to avoid that.
We use our floating blind extensively during the spring and summer. Some birds do notice it and swim away, while others accept its slow approach and allow us to photograph them from very close distances. Using this blind we have enjoyed wonderful times with red-necked grebes, ring-necked ducks, Forster’s terns, and especially ruddy ducks. During one calm morning that offered perfect mirror-reflections, I had six male ruddy ducks dancing within 15 feet for the attention of a single lady ruddy duck.
This Forster’s tern attacked me vigorously when I unknowingly wandered into its nesting territory while paddling my kayak along the edge of a nearby lake. I paddled fast to make a hasty retreat. The floating “Charnley” blind we use proved to be completely acceptable to them and they did not react to it at all. Canon EOS-7D, 500mm f/4.0L, f/5.6 at 1/800 second, ISO 640, and manual metering.

Photographing Forster’s terns was an unexpected bonus. I was unaware of a pair nesting on the lake near our home. While kayaking one afternoon along a marshy shoreline, a Forster’s tern suddenly plummeted out of the sky and began hitting the bow of my kayak. Its loud cries and determined attacks told me it must be nesting somewhere in the marshy bay. I immediately turned away and left the tern in peace. Terns of all species are well known for attacking and physically hitting intruders near their nest. I didn’t want to be hit by the tern and didn’t wish to disturb it either. Still, I wondered where the tern was nesting. I knew I would be aggressively attacked if I walked anywhere near that marshy bay. Being curious, I climbed a hill that let me look down on the bay from 300 yards away and used a powerful spotting scope to scan the marsh. It didn’t take long to spot the tern brooding its young on top of a muskrat house.
How would the terns react to the approach of my floating blind? A couple of afternoons later, I finally got the calm and clear weather conditions I was looking for. I launched the floating blind from a spot where nothing in the bay could see me and carefully got inside. I slowly pushed my way along the shoreline where the water was about 3 feet deep. As I rounded a point to enter the bay where the terns nested, I wondered if the terns would protest now that I was completely concealed from view. Eventually, I could see one tern on the muskrat house from 200 yards away. Its mate was flying down the shoreline looking for small fish. This was the point where I was aggressively attacked in my kayak two days earlier. Would they protest the approach of a floating blind or not? If they did protest, I would abandon my photo plans, leave immediately, and avoid the area for the duration of the nesting period. If they accepted the floating blind, then perhaps I could get some nice photographs. As it turned out, the terns completely ignored the floating blind. They never reacted to it in any way and behaved normally, including feeding their young, when I was around. I felt like I was invisible!
The floating blind isn’t for everyone. You must be completely comfortable working in and around water. If your feet aren’t touching the bottom, a sudden high wind might blow you into even deeper water. If it is a small pond, then that shouldn’t be too much of a problem. But, if it is a larger lake, you could be blown a long way and the waves gradually become more dangerous as you drift along. Also, safely walking in chest waders does take practice. Beginners often try to walk in chest waders like they are walking on a city street. When wearing chest waders, always make sure you don’t step into deep water. Chest waders can quickly fill with water and pull you under. Many fishermen drown every year for this reason. As you wade in chest waders, always move carefully. If you lean forward too much and the trailing foot sticks in the mud, you have a good chance of falling face first in the water. Obviously, water hides logs, slippery rocks, dropoffs, and other hazards that can trip you unexpectedly. In no way do I wish to dissuade you from working around and in the water. We absolutely love it! It isn’t that difficult, but there are some hazards that you must be aware of and you must keep safety the top priority at all times. Finally, remember that the floating blind makes you invisible to others using the water. Don’t use it in places where motor boats are active. Being run over
My former dentist and good friend, Alan Charnley, helped us (he did most of the work) build this floating blind. This is the fourth-generation version of it, so we feel lucky to have it. All of the plans for building the blind remain in Alan’s head and his lovely wife, Lynn, sewed the covers together for us. It always helps to have smart friends who are willing to help! Stalking wetland birds and mammals in this blind is my favorite kind of wildlife photography. You get to photograph plenty of wonderful subjects that can not be easily done in any other way.
by a high-speed jet boat will be a terrible outcome for you. Fortunately, the best wetlands for photography are often unappealing to other recreational users because they are shallow, choked with stumps and logs, and weedy.
CAR BLINDS
Your car doubles nicely as a wonderful moving blind that lets you easily photograph wildlife along roads. Animals that dwell near the road see vehicles speeding by and most eventually become rather unafraid of them. Car blinds work best on seldom-used dirt roads that offer fence posts or trees for birds to perch on. At many wildlife refuges, it’s possible to drive some of the access roads at slow speed and photograph birds swimming in the adjacent ponds. A long lens in the 500mm and up range works best for photographing from the vehicle because you need the magnifying power of the telephoto lens. Use a big bean bag in the window or a window mount to support the large lens and camera. We use a Kirk window mount with a Kirk BH-1 ball head attached to it. It helps to hang a bit of see-through cloth material over the window you are shooting out of to conceal your movements from the wildlife. Of course, turn the car off when photographing to avoid the deleterious effects of engine vibration.
While effective wildlife photography from the car was once limited to those who owned super telephoto lenses—now with the digital crop factors—it is quite feasible for anyone to do it today. After all, a modest 300mm telephoto lens with a 1.5x crop factor and a 1.4 x teleconverter behind the lens gives the lens the field of view of a 630mm (300mm x 1.4 x 1.5 = 630mm) super-telephoto lens.
USE FEEDERS TO ATTRACT SUBJECTS
Providing food is an effective way to photograph many species of birds and mammals. Depending on the species you wish to attract, use the food they prefer to eat. Many birds and small mammals, such as squirrels and chipmunks, are easily attracted to cracked corn, thistle seeds, millet, and especially black oil sunflower seeds. Most of the birds we feed prefer the black oil sunflower seeds. Thistle seeds are a delicacy for many small finches, but very expensive. Many woodpeckers, nuthatches, chickadees, starlings, and other birds are attracted to suet which is raw animal fat that you can get at the meat counter if you ask the folks who prepare the meat. The most spectacular images are captured if you hide or disguise the food to keep it from appearing in the image. There are plenty of creative ways to achieve this goal. For example, you can drill a 1-inch diameter hole in an attractive log and stuff it with suet. Select a camera viewpoint to barely hide the hole behind the wood or bark of the log. When the bird lands on the log, you want to see as much of the bird as possible without seeing the hole or any suet protruding from it. This works quite well for those birds that enjoy suet. Unfortunately, suet is a bit sticky. Small bits of it tend to stick to the bill, making it noticeable in the image. The best defense is to shoot as soon as the birds arrive before it can grab any suet. For photographers who are skilled with image-editing software, it’s possible to remove the suet using digital darkroom techniques.
Even seeds stick to beaks at times, but the problem isn’t as bad as suet. Sunflower seeds are very popular with many seed-eating species, but birds break the outer shell to get at the nutritious heart of the seed. Now the outer shells of the sunflower seeds are left lying around the set-up and may appear in the image. To counteract this, we sometimes use sunflower seeds where the outer shell has already been removed. These cost more per pound, but they are worth the price to avoid the discarded shell problem. Birds and mammals are appealing when they are perched on natural branches that are especially photogenic. Avoid using just any old dead stick you find. Take your time and find truly photogenic props. We often use a 1-foot live branch from a conifer in our yard that has a couple nice pine cones attached to it. We hide a small metal cap of food behind the pine cones or branch if it is big enough. Conifer branches work well because the needles help to hide the food. Obviously, the food must be on the side facing away from the camera to hide it. The bird may face away from you most of the time. However, birds are generally nervous, so they look around a lot. Many will look back over their shoulder in your direction. This is a

pleasing composition that shows the back and the face of the bird nicely at the same time.
SUGAR WATER FEEDERS
If you live in an area that is appealing to hummingbirds, they are fun to attract to your home and easy to photograph. Start attracting them by obtaining four hummingbird feeders that are mainly red, as this color attracts them. Mix sugar water in a 4:1 or 3:1 ratio. We use the sweeter 3:1 ratio. This means we put one cup of real granulated white sugar (no artificial sugar) into a pot and then add three cups of water. We boil the mixture for two minutes to keep it fresher longer and stir the solution until all the sugar dissolves. Once it cools, we fill the hummingbird feeders. If you don’t know how many hummingbirds you have, fill the feeders only part way. You must replace the sugar water after four to seven days anyway to keep it fresh and safe for the birds. There is no point in wasting the sugar water by filling up the feeders if you don’t need to. Hummingbirds often guard “their” feeder. You’ll attract more hummers if you put up a feeder on every side of your home so they are out of sight of each other.
Perky Pet and Nature’s Best brands of hummingbird feeders work nicely for our needs. They come in different sizes. Use small feeders to avoid wasting sugar water if you only have a few hummingbirds. Get the larger sizes if you are blessed with a huge number of hummingbirds. Some locations literally get hundreds of hummingbirds, such as the Bull River Guest Ranch in British Columbia, where we conduct our workshops. Platform feeders are readily accepted by hummingbirds and they provide convenient perches for the birds to use. However, hummingbirds don’t photograph well when perched on plastic. When we photograph the birds, we substitute the plastic with a stick or use feeders that have a single feeding tube that drops down. We carefully hide the end of the feeding tube with a well-placed flower.
In some places, nectar-eating bats are attracted to sugar water feeders, too. This seems to be more common in the deserts. Unfortunately, we have not had the opportunity to photograph bats yet, but we enjoy the many images produced by those who do.
Gambel’s quail are readily attracted to water. When the wind is calm, photographing this adorable bird with a mirror reflection adds a positive element to the image. Nikon D300, Nikon 200–400mm lens, f/10 at 1/800 second, ISO 400, and manual metering.

USE WATER TO ATTRACT SUBJECTS
Many birds are insect eaters and are not attracted to suet and seed baits. However, nearly all mammals and birds must drink water. Often water is a super lure, especially in dry environments, that readily draw animal species that cannot be attracted with food. Water can be used in many ways. You can build a small pond, about 6 feet in diameter, and place photogenic rocks on the far side. When birds perch on the rocks, you’ll get a mirror reflection in the pond. Keep the pond shallow to let birds bathe in it.
Recently, we have been using a water drip with great success. This is a small diameter (1/8 inch or less) plastic hose about 25 feet long. The hose is attached to a regular outdoor faucet and it has a device that lets you control how much water drips from it. This small tube is easy to hide behind a moss-covered stick or lichen-covered rock. Birds readily land on the stick or rock to sip water from the drip and you don’t have to worry about seeds appearing in the image. We’ll be using the water drip that we bought at Wild Birds Unlimited a lot more from now on. It’s incredibly effective for making the subject perch exactly where you want it to. Even if you are using a small pond to attract wildlife, use a drip to keep the pond full and the water fresh. The sound of dripping water is enormously attractive to wildlife.
BE SAFE WITH FOOD AND WATER
There are times and places where it may be unwise, unsafe, and even illegal to feed wildlife. Check your local laws. Generally, it is illegal to feed big game animals, but legal to feed the birds and small mammals that frequent your yard. Both grizzly and black bears inhabit the forests near our remote mountain home. Therefore, we always keep garbage and other possible foods, such as bird seed, locked away from them in the garage. Of course, you have to put sunflower seeds out to attract birds. We only do this when we are home and only in small quantities. We must refill our feeders every day or two. So far, we have never had a bear find our feeders. Should a bear find one of our feeders, we would discontinue feeding until they hibernate in late November. The last thing you want to do is give food rewards to potentially dangerous animals like bears, wolves, and coyotes. Bears that learn to target human food sources quickly develop dangerous habits that all too often lead to the death of the bear. The bottom line, always be cautious when using food to attract wildlife.
It is widely believed that once you start feeding birds, you must keep it up or they will starve to death if you let your feeders go empty. This common advice is sheer nonsense. Birds exploit food sources as they find them, but continually look for more. If one food source disappears, they move on to others. Equally ridiculous is the idea that you must take your hummingbird feeders down in the fall or the hummers will refuse to migrate and freeze to death. Hummingbirds readily migrate when it is time without any regard to how much food is available where they are at. Otherwise, how do you explain the fact that most male hummingbirds begin migrating south a month or two ahead of females and young even though plenty of nectar-rich wildflowers are still blooming?
Some people believe that animals should never be photographed at their den or nest. They fear such activities may cause the parents to abandon the young or eggs, distress the adults unduly, and simply be hazardous to the subject. We agree that photographing wildlife can be hazardous to the subject, but it is possible to do it safely at certain places, or with specific species or individuals. We led a photo tour to the Galapagos Islands in 2011. Anyone who visits the Galapagos will agree the wildlife is almost completely unafraid of humans. We easily photographed nesting magnificent frigate birds with young without any distress to them. The hardest problem we encountered with the Galapagos wildlife is they are so acclimatized to humans that they often won’t open their eyes when you photograph them. The alligator farm in St. Augustine, Florida, is a well-known hotspot for nesting egrets and herons. You’ll be able to photograph some individuals with young from only a few yards away. These birds see people all of the time and don’t react to photographers.
We don’t do much wildlife photography at dens, but have easily photographed prairie dogs at Devil’s Postpile National

Any book Barbara and I do isn’t complete (according to Barbara) unless it has at least one of her pets in it. We have two Pomeranians, one wire-haired pointing griffon, and three Tennessee walking horses. This is Boo who is her 1.5-year-old pom. We carefully inserted him into the dense clump of Texas bluebonnets on a bright overcast day and managed to keep his attention for at least a few seconds before he bounded away. Boo is the boss in our home and believes we are his “captives.” Nikon D3, Nikon 200mm f/4.0, f/8 at 1/320 second, ISO 400, and manual metering.
Monument in northeast Wyoming, Unita ground squirrels at our Idaho home, and golden-mantled ground squirrels at Canada’s fabulous Jasper National Park. We doubt that photo activities at these dens are harmful to the animals. If they don’t like you, they disappear down the burrow and that is the end of it. You’ll soon tire of peering at an empty burrow and move on to something else. Indeed, always remember that some individuals are more trusting than others. If you find one that lets you photograph it easily, take advantage of it, and shoot plenty of excellent images.
Photographing birds that nest on the ground or in bushes is hazardous to them. In the old days, most birds were photographed at nests because the slow speed film that was used in that era made it necessary to use flash. You had to know precisely where the subject would be. Now that we have more flexibility with higher ISOs and projected flash, it is much more feasible to photograph wildlife away from the nest while engaging in natural behavior. As a result, photographing birds at the nest isn’t necessary today and should be avoided most of the time.
Still, photographing nesting birds is fascinating and can be safely done with some individuals. We photograph two or three nesting birds around our home each year. These are individuals that are already used to seeing us and don’t become alarmed when we move a blind into place. Often, they are so used to us that they continue to feed their young while we erect the blind. We especially like woodpeckers and photograph a couple of pairs each year. Nearly all cavity nesters such as chickadees, nuthatches, and woodpeckers are easy to photograph well with scaffolding because the nest cavities are always out in the open on the trunk of an aspen tree. With our 500mm lenses, it is a simple matter of erecting our blind on top of the scaffolding and filling the image with the adult woodpeckers. We use natural light whenever possible, but sometimes use projected flash as a key or main light source. During 2011, a wonderful family of common flickers provided plenty of memorable moments at their nest cavity that was adjacent to our home for the second consecutive year. Unexpectedly, we discovered a pair of nesting Lewis woodpeckers nearby, which are seldom seen in our area. Although we had to go to Michigan to teach landscape and macro workshops before the young were poking out of the nest hole, we still captured some pleasing images of the handsome adult birds.
Although it’s possible to photograph some nesting birds safely and easily, we agree that most nest photography should not be attempted. Adult birds that vigorously protest your presence should be left alone immediately. Never cut or move concealing branches from a nest. Never attempt to photograph colonial birds such as pelicans, gulls, terns, and others. Most bird colonies tend to erupt in alarm, exposing eggs and young to predation and the hot sun. It’s best to photograph most colonial birds away from their nesting colonies. The welfare of the subject is always far more important than your images.