1
Cameras and Accessories
The Best Wildlife Camera Systems
CANON AND NIKON
You may already own the DSLR you’ll use for wildlife photography. But if you’re going to buy one, either your first or a replacement, you should know that some cameras offer features especially helpful in wildlife photography. It’s true that Nikon, Canon, Sony, Sigma, Pentax, Olympus, and others, are all capable of splendid high-quality images, but wildlife photography is quite specialized. You’ll certainly want a camera system that offers appropriately helpful features and accessory equipment.
A survey of the world’s nature photographers in general, and wildlife photographers particularly, would loudly shout that an enormous major ity use either Canon or Nikon camera systems. Barbara and I use both. Barbara photographs with Nikon gear and I use Canon. This way we can be “up to speed” on both systems. We are better able to formulate effective techniques for each system and better able to respond to our students’ equipment questions. The two systems have been the most popular for decades, and many film aficionados have followed their Canon and Nikon brand loyalties into the digital age. Why? Surely because of the splendid images each can produce, but also because of the depth and breadth of the systems. Both Nikon and Canon offer enormous selections of “ordinary” lenses, but also offer wide selections of special-purpose lenses. They both offer wide arrays of accessories tailored for specialized photographic pursuits. Canon and Nikon
certainly attract the majority of nature photographers, but there are other worthy brands offering acceptable equipment at lower cost and lighter systems that are easier to carry.
I’ve already mentioned that both Canon and Nikon offer huge selections of lenses. Their long telephoto lenses, for bringing wildlife optically closer to the camera, are incredibly important to wildlife photographers. Nikon and Canon have 500mm f/4 lenses and 600mm f/4 lenses, and Canon even has an 800mm f/5.6 offering. Many versions of these lenses feature electronic optical stabilization systems, which Canon calls “IS” for image-stabilization and Nikon refers to its version as “VR” for vibration-reduction. Other manufacturers offer limited or no choices in these focal lengths.
While photographing birds at Bill Forbes’ “The Pond” in southern Arizona, a desert cottontail approached the pond. The 500/4 lens I used let me reach across the pond to make the rabbit large in the image. Canon EOS-1D Mark III, 500mm f/4.0 lens, f/11 at 1/500 second, ISO 250, and manual exposure.

TILT/SHIFT LENSES
Canon and Nikon both offer versions of “tilt/shift” lenses. These clever lens designs allow the user to change the physical position of the front elements of the lens with respect to the rear elements of the lens, allowing enormous depths of field even at the largest apertures. Wildlife shooters and their landscape shooting friends regularly find the unlimited depths of field to be invaluable. Wildlife aficionados revel in those large depths of field when shooting herds of animals or a dense colony of nesting penguins.
FLASH
The very word “photograph” derives partially from the word for light, correctly implying that you just can’t do it in the dark—at least not well. The wildlife subject though, is annoyingly indifferent to our photographic pursuits and is often uncooperatively more active in the dim light of early day and in the equally dim and fast-fading light of eve. The use of flash, anywhere from a simple single on-camera unit to a remotely triggered multiple flash array, can often provide the much needed light. Flash can provide the majority of the needed light or only a portion. Even when there’s no shortage of light, such as in the blinding light of the high noon sun, flash can make a wildlife image far more pleasant. The flash can fill in annoying harsh shadows and it can otherwise reduce excessive subject contrast. Both Canon and Nikon offer a wide array of flash equipment with wireless control that fills different needs and suits all budgets. You’ll find a great deal more about flash in Chapter 8.
THIRD-PARTY ACCESSORIES
Accessories marketed by third parties are crucial to wildlife photographers. Nearly all serious practitioners use L-brackets for mounting their cameras on the tripod head, flash brackets of various types for moving the flash off of the lens axis, camera mounting plates, lens mounting plates, tripods, tripod heads, camera bags, wires and cables, and a truly vast assortment of gizmos and gadgets to meet every photographic need. Where an accessory’s configuration is dedicated to a particular camera model, as with L-brackets, manufacturers will assess market potential before incurring the costs of producing and marketing those dedicated accessories. Since Canon and Nikon are the two most popular camera systems, more third party accessories are made for them. Some non-dedicated “universal” models of accessories are marketed for the less-popular cameras, but more often than not they’re like the oft-invented flying car … a lousy airplane and a worse car.
MORE HELP FOR NIKON AND CANON USERS
Digital cameras are truly marvelous, but can be complicated. Learning to use your new Canon or Nikon can be easier than learning other brands for several reasons:
- The majority of professional and serious amateur photographers doing outdoor shooting use Nikon or Canon. Consequently, there’s a large community of teachers, helpers, and mentors, able to offer experience and guidance in those particular brands.
- Like Barb and me, other workshop instructors are more likely to be using Nikons or Canons, so they become more familiar with the two brands and better able to answer the students’ camera-specific questions. (And let me tell you, students can present some very esoteric questions indeed!)
- At least 85 percent of our students shoot Canon or Nikon, so there’s no shortage of friendly help from that quarter, either. And, yes, it’s not unusual for us to learn a thing here and there from our students. We are blessed to have many gifted students attend our workshops who have helped us immensely.
- Instructional books and DVDs are readily available for these cameras, but sometimes much harder to find for other brands because of their limited market.
OTHER CAMERA SYSTEMS
If wildlife photography is an interest, and if you already have or intend to buy a camera system other than Nikon or Canon, then ignore our misgivings and press on regardless. The image quality of Sony, Sigma, Pentax, Olympus, and other cameras, can be excellent if you do your own part. Do remember, though, the limited availability of lens types, of other system components, and the relative shortage of learning materials, that some brands suffer.
SELECTING A CAMERA FOR WILDLIFE
Even within the product line of a given camera maker, some models can be more suited for wildlife photography than others. In our own photographic work, Barb uses a couple of different Nikon models and I use more than one Canon model. We’ll next explore the camera features that are especially desirable for wildlife work.
SHOOTING SPEED (BURST RATE)
This term describes how fast a camera can shoot a sequential series of images. It’s generally called “burst rate” and is described in “frames-per-second.” Suppose you’re photographing a flying bald eagle, and you want an image of the eagle at exactly the instant it snatches a fish from the lake.

We boarded a fishing boat and the captain threw small fish to the dozens of bald eagles that frequent the waterways around Homer, Alaska. I used the fastest shooting speed possible of 10 images per second to capture the peak of the action. Canon 1D Mark III, 70-200mm lens at 200mm, f/5.6 at 1/1000 second, ISO 500, and manual exposure.
Even Blistering Bob, fastest photographer west of the Pecos, isn’t fast enough to push his shutter button at that precise moment. Besides, he has to contend with the time delay between his finger push and the shutter actuation. It’s only a small fraction of a second, but it is a factor. You though, being a wise and wily wildlife shooter, set your camera into its continuous shooting mode, gently press the shutter release and hold it down, and let the camera’s machine-gun like clicketyclickety-clickety-click hopefully capture that eagle’s successful fish grab at the decisive moment. Many throwaways generally result, but the higher the camera’s burst rate, the higher the likelihood of at least one success in the burst.
My Canon 5D Mark II has an underwhelming burst rate of four frames-per second. It makes a new exposure every quarter of a second. That certainly seems fast, but by wildlife shooting standards, is dreadfully slow. Much more suited to shooting speedy wildlife is my Canon 7D with its much higher burst rate of 8 frames-per-second. Barb’s Nikon D3 model, properly configured, offers a burst rate approaching a speedy 10–11 frames-per second. Future DSLR generations surely will be even faster.
BURST DEPTH
When firing a burst, the camera can make only a certain num ber of exposures (called “burst depth”) before there is a data
Seeing a massive herd of wildebeest cross the Mara River in Kenya’s famous Masai Mara is a world-class wildlife experience. In this crossing, the water level was low and the crocodiles were full from eating unlucky animals at earlier crossings, so all of these animals crossed safely. Nikon D200, Nikon 200-400mm f/4 lens at 350mm, f/4 at 1/800 second, ISO 200, and manual exposure.

jam, the electronic equivalent of a traffic jam. A data jam causes the camera to stop shooting.
An image captured by the camera’s sensor must be transferred (“written”) to the camera’s memory card. Writing to memory cards is a relatively slow process, so to improve burst rates, cameras are designed to include a waiting area, called a “buffer.” Now the image moves from the camera sensor to the buffer, thus freeing up the sensor to take the next image while previous images wait in the buffer for their turn to be written to the memory card. Cameras can shoot faster than the buffer can be emptied by writing, so after some number of shots the waiting area fills up. Data can no longer be transferred from sensor to buffer, so the temporarily overloaded camera just stops. The number of shots made before the camera stops is called the burst depth. A few seconds later, sufficient image data has been written to the memory card to clear some space in the buffer, and the camera will resume shooting.
Barb and I learned early on about the importance of adequate burst depth. We were photographing the African Mara River
Tiny storm petrels are incredibly difficult to sharply photograph because they move erratically and rapidly as they search for food on the surface of the ocean. I shot hundreds of images to get a few good ones. Normally, it’s best to have the animal looking into the image, but the splash from its feet behind it completes the composition nicely. Canon EOS-7D, Canon 300mm f/4.0L lens, f/7.1 at 1/2000 second, ISO 400, and manual exposure.

crossing of wildebeests and zebras so often seen on television. The predatory crocodiles provided spectacular action, but as I shot, shot, and shot, my camera just stopped whenever its buffer filled. I had to grit my teeth and wait until the shots waiting in the buffer had been at least partially written to the memory card.
That made some buffer space available and I could resume shooting, but it left me plenty irritated at having missed some great shots. Several factors determine burst depth. Larger capacity buffers can provide the increased burst depths welcomed by wildlife shooters. File size is also very important to burst depth. RAW files are generally larger than JPEGs. The Canon EOS 7D offers a burst depth of 6 images when using a high burst rate on RAW + Large JPEG combination files. That 6-frame limit is increased to a significantly greater 15 frames if only RAW files are shot. The big difference suggests that when we’re shooting fast action, we set the camera to produce RAW files only. We’ll make the JPEGs in our editing, later.
Finally, the wildlife photographer should consider the writing speed of the camera’s memory card. It may be tempting to buy some off-brand card at the local drugstore, but a memory card’s in-camera writing speed is a crucial factor in the overall determination of burst depth. Note the term “in camera.” Memory card makers sometimes tout card speed when the card is being read during downloading to the computer, but we’re generally far more interested in the speed of the card as it’s being “written-to” in the camera.
HOW MANY MEGAPIXELS?
Now, let’s talk about the megapixels that so many (often unwisely) think are crucial to picture quality. The word means a million pixels, but what is a pixel anyway? The term derives from “picture element” and a pixel is one of the little squares that make up an image on a computer screen. If you magnify the image enough, it will break down into small squares of color. Those are picture-elements or “pixels.” No camera engineer has ever laid hands on a pixel or designed one into his latest creation. However, the word “pixel” is used in digital camera jargon to describe a “photosite,” the smallest component of the digital sensor in our cameras, of which there are millions, and which convert light into electrical signals. It is also used to describe the smallest part of a digital image. So even though a camera has no such physical entity as a pixel, we all live with the convention holding that the term pixel can refer to a camera photosite and also refer to one of those tiny squares that form a digital image.
Camera advertising invariably touts “megapixels” as a big selling point, with current DSLRs ranging from 10 megapixels to about 24 megapixels. Some buyers unfamiliar with the meaning of the term just think that more must be better. There’s an unrelenting pressure from camera marketers

Many leopards are unafraid of safari vehicles in the Masai Mara. This female is searching for prey before sunrise. The combination of Shutter-priority and Auto ISO let me maintain the shutter speed I needed to capture a sharp image of her in the dim light. It’s amazing that ISO 2500 does such a fine job. Canon 5D Mark II, 500mm f/4 lens, f/4 at 1/320 second, Auto ISO that selected ISO 2500, and Shutter-priority with a +1/3-stop exposure compensation.
for more and more megapixels because competing cameras have more. There can be too many megapixels, though. The upward spiral in pixel count comes at a literally and figuratively unwelcome price for some, including we wildlife photographers.
High pixel counts have both pros and cons. The main pro is making large prints requires high pixel count. An image data file must contain enough pixels to supply about 180 pixels per inch (ppi) for acceptable quality prints, up to about 300 ppi for super quality prints. If the original file were cropped, the crop is necessarily smaller and has fewer pixels, but the printing ppi requirements still apply. To summarize, with more initial pixels we can make bigger prints, and we can make better prints from smaller crops.
I use a Canon 5D Mark II for my landscape and macro work because it offers a pixel count high enough for the large prints that Barbara sometimes makes. Yet the bulk of our own photography is to illustrate our books, sell to calendar publishers, use on our web site, and project during our seminars and workshops. We don’t need a high pixel count for any of these applications and cameras of 10 megapixels are more than adequate. Most modern cameras have at least 10 megapixels and generally more. A 10-megapixel camera can produce a high-quality 8” × 12” print and software enhancement can produce a fully satisfactory 16” × 24” print. A data file from a 20-megapixel camera can produce a beautiful 30” × 40” print. So if large prints are an important goal, then by all means, buy a high-megapixel camera. If fast shooting is a more important goal, make sure the higher pixel count doesn’t make the camera too slow.
Looking at the “cons” of high pixel counts brings us to the purview of the wildlife shooter. High pixel counts generate large files that are slower for the camera’s electronics to process. Larger files lower the speeds of extracting image data from the sensor, moving it into the buffer, and most of all, writing it to the memory card. We get lower burst rates that action shooters dislike. Important burst depth also suffers because the larger data files fill the buffer more quickly and stop the shooting until the buffer is partially cleared. All other things being equal, high pixel count cameras are more expensive, too. So, the astute wildlife photographer carefully balances the never-ending inherent pressures for higher mega-pixel counts, with their understanding of when and where fewer megapixels are actually better. One accomplished amateur shooter I know has, not for the first time in his four decades of shooting, bought the latest and greatest model of his favorite brand, solely because its higher megapixel count causes lower burst rates and depths than his present camera has. Lastly, aside from camera considerations, don’t forget the effect of the larger file size of high pixel cameras as it affects the size, cost, and speed, of the memory, storage, and backup requirements of your computer.
ELECTRICAL NOISE IN IMAGES
The fundamental physics of many electrical components and devices causes unwanted electrical noise to be mixed with their desired signals. Remember the hiss of an old-time record player during soft musical passages? When the music was louder, the hiss wasn’t as annoying, but was still there corrupting the music. A digital camera’s sensor is no exception, and the hiss it creates, although electrical and not acoustical, contributes to the degradation of our digital images. Other camera components, including the buffer and processing electronics, also contribute to the total noise of an image. The total electrical noise is made evident by unwanted specks of color or brightness that can be visible in the darker areas of the image and which tend to soften the image. Clearly, the less noise the better. We quantify corruptive noise by the relationship of the desired image data (signal) to the undesired image data (noise), and call it “signal-to-noise ratio.” Thus, the higher our image’s signal-to-noise ratio, the better.
The ISO being used is a factor in noise. Cameras have a “native” ISO, typically 100 or 200, and all higher or lower ISOs require that the sensor data be processed by electronic amplifiers that add noise to the data. Thus, in a given camera, the native ISO produces the lowest noise and cleanest images. However, different camera brands and models have different noise levels at any given ISO and some better camera models

Galapagos tortoises are easy to photograph when they converge on ponds in the highlands during the dry season in November. Barbara used a Nikon 70-200mm zoom lens at 112mm to record this wrinkled individual. Nikon D300, Nikon 200-400mm lens, f/8 at 1/160 second, ISO 400, and Aperture-priority with no compensation
offer astonishingly low noise levels even at very high ISOs. When wildlife is active, we need faster shutter speeds to stop the action. Wildlife is most active, though, in the dim light of dawn and dusk. Burdened by dim light and the need for high shutter speeds, at any given aperture, we must use higher ISOs, like 400 and above, to properly expose. Those higher ISOs cause more noise.
There’s a definite relationship between a camera’s pixel count and its noise. Everything else being equal, the more pixels, the more noise. A camera’s design establishes its sensor as a certain fixed size. That size sensor can hold only a certain number of pixels (photosites)—unless of course, we make the pixels smaller. However, if we make them smaller to shoehorn more of them into our sensor, we’re once again sabotaged by the laws of physics, which insist that smaller pixels are noisier pixels. What is the bottom line here? Remember that high ISO shooting is frequently necessary in wildlife photography so, before succumbing to the seductive siren song of misleading multi-megapixel marketing men, check the camera’s ability to make clean low noise images at higher ISOs while still giving satisfactory burst rates and burst depths!
The sensors of some modern full-frame DSLRs are the same size as a 35mm film slide, that is 36mm × 24mm. Many DSLRs are not full-frame and use a smaller sensor because of far more favorable economics. Some users wonder why a small change in sensor area makes such a large change in camera cost, and the answer is that the smaller sensors mean smaller and lighter cameras, less expensive camera electronics, smaller batteries, smaller and less expensive lenses, and on and on. Small sensor cameras are far more affordable than the full-frame varieties.
Assume an image of an alert deer on a full-frame sensor, where the subject distance and the lens focal length cause the height of the deer to be 50 percent of the height of the sensor. Now, if I slide the sensor out of the camera (without disturbing the deer, of course) and slide in a smaller sensor, the height of the deer image does not change, but that same size image occupies a greater percentage of the smaller sensor’s height. (Think of projecting a movie onto a large screen, making no change to the projector, and then changing to a smaller screen.) And, because the image of a given sized subject occupies a larger percentage of the smaller sensor size, it appears just as if we had shot with a longer lens! That effect, and its numerical definitions, are called the “crop factor” or “multiplication factor,” and some users call it a “magnification factor.” We’ll use the term “crop factor” because it’s shorter.
The crop factor of a camera is determined solely by the size of its sensor, and today’s DSLR models vary from about 1.3 to about 2.0. The more common Nikons and Canons typically have crop factors of 1.5 and 1.6, respectively. Assume a Nikon with a crop factor of 1.5. Further assume the image of a Galapagos tortoise, made by a 100mm lens, occupies n percent of the sensor height. This means that for that same tortoise image to take up n percent of a full-frame sensor’s height, we would have had to have used a lens of 150mm. Let’s say it another way. Assume my 1.5 crop factor camera using a 200mm lens produces a giraffe image occupying 80 percent of the sensor height. To get that giraffe image to be 80 percent of the height of my full-frame sensor, at the same camera to subject distance, would require a lens of 300mm. Thus, my smaller sensor seems to make my 200mm lens do the same thing as a 300mm lens would do on a full-frame camera. Put another way, my smaller-sensor camera apparently multiplies lens focal length by 1.5.
Well, the focal length didn’t change, but the increased percentage of image size on the sensor certainly makes it seem as if the focal length were longer. One downside to a smaller sensor with a crop factor is that the cameras have a smaller viewfinder that makes it a little more difficult to see everything in the viewfinder. The upsides include not only the several beneficial camera characteristics already mentioned above, but increased safety in that the lens crop factor allows us to stay farther from dangerous shooting locations or potentially dangerous animals, and always, the savings of size, weight, and cost.
CROPPING THE IMAGE
Since the image produced by a small sensor camera is nothing more than a crop of the image produced by a full-frame sensor camera, why not use a full-frame sensor to start with? Cameras with full size sensors tend to be far more expensive than cameras with smaller sensors. Many photographers simply can’t afford them. We do have full-frame sensor cameras, but normally use our small sensor cameras for wildlife photography. The smaller image files produced by the small sensor cameras offer us a higher burst rate and depth, both of which are crucial for wildlife.
However, there are occasions when using our large sensor cameras is highly advantageous. It helps to compose a looser composition when a white-backed vulture drops out of a clear blue Masai Mara sky to feed on the remains of a lion kill or when photographing flying hummingbirds. A loose composition reduces the chance of cutting off a wayward wing or tail. Then, using Adobe Lightroom or other software, we crop the image a bit. It is far easier to crop unwanted picture space than resurrect a missing wing or tail.
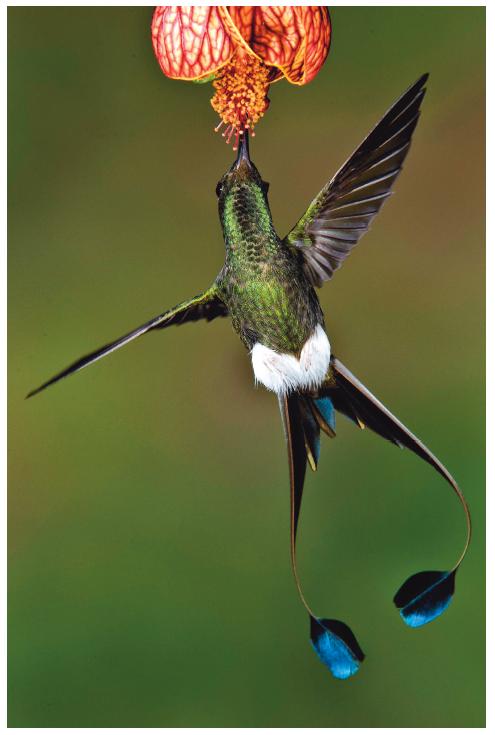
Booted Racketails are regular visitors to the sugar water feeders at the Tandayapa Lodge in Ecuador. Barbara simultaneously used four Nikon SB-800 flashes that were set to manual and 1/16 power. She composed the bird loosely with a camera that has a full-frame sensor to avoid cutting part of the hummingbird off. Then she cropped the image slightly. Nikon D3, 200-400mm f/4 lens, f/20 at 1/250 second, ISO 200, and manual exposure.
LCD MONITOR
The liquid-crystal display (LCD) on the rear of a DSLR is used for displaying setup menu information, for displaying operating information, for displaying the analytical histogram data, for displaying live-view images in some cameras, and reviewing your final images for composition and lighting. Some photographers use the LCD to check sharpness, but we use and prefer the computer for that job. At the risk of nagging, don’t even think of using the LCD image as an indicator of exposure! Insist on judging by using only your histogram, and if it’s available, the more informative RGB histogram. Here too, size matters. Recent camera models feature a 3” diagonal monitor and we find them far more pleasant to use than smaller LCDs. Perhaps future camera designs will feature even larger LCDs, but in the meantime, all else being equal, favor the camera with the larger LCD.
HISTOGRAMS
Luminance (Brightness)
Probably all of today’s DSLR cameras provide a display of the image histogram, a graph depicting the exposure of the image. The simplest form of histogram, generally called the “luminous” or “brightness” histogram, is based on data derived from the three color channels of the sensor: the red, green, and blue channels. The luminous histogram shows the relative quantities of an image’s pixels that are exposed at various brightness.
The luminous histogram works reasonably well when no one color predominates the subject amid its surroundings. The unwary shooter can be tricked, though, if the subject has a dominant color. Consider a shot of a tan-colored deer taken against a background of red foliage during autumn. The color red dominates this image, and at some exposure level, the sensor’s red channel becomes saturated (overexposed) well before the green or blue channels. The luminous histogram is based on all three channels, but is weighted toward the green channel. In our example, the green favoring luminous histogram might show a satisfactory exposure even though the red channel is overexposed and degrades the image.
The luminous histogram is widely used, even with its shortcomings, and for most images, gives us a reasonable means of determining good exposures. And, regardless of shortcomings, that histogram is a vastly more accurate and reliable indicator of your exposure than the exposure-ignorant LCD image.
RGB Histogram
Many cameras offer a second and superior form of histogram. It’s called an “RGB” histogram and it separately displays the histograms of each of the three color channels superimposed onto one image. The separate color data eliminates the subtle errors of the green favoring luminous histogram. Barbara and I use RGB histograms exclusively, and every year we teach hundreds of our students to do the same to achieve fabulous exposures. If you’re buying a new camera, be sure to look for this very important feature. The RGB histogram is always the camera’s most accurate means of evaluating your exposures. We will say more about histograms in Chapter 3.
HIGHLIGHT ALERTS
Perhaps all DSLR cameras offer a feature called “highlight alerts” or “blinkies.” When the feature is activated, generally through the setup or custom function sections of the camera menu, the overexposed areas of an image will prominently blink white and black on the LCD monitor. These attention-getting blinkies enable the photographer to quickly and precisely see what portions of the image are overexposed. You can then decide whether the overexposure is or is not important to that particular image. It’s a very useful feature indeed and should be a definite feature in the specs for your new camera.
CAMERA SETTINGS
FORMAT
The images formed by digital cameras are electrical data files presented to the user in formats commonly used by com puters. The most commonly used formats are called RAW files and JPEG files, and most cameras will produce images in both formats simultaneously if you program it for this outcome. The best format for you to use is wholly determined by your own needs and you might change back and forth from time to time as your needs change.
A RAW file approximates the actual data captured by the camera’s digital sensor, changed into the manufacturer’s often proprietary RAW format, and sent to the memory card with very little additional in-camera editing. No image data is actually discarded during the formatting, and several image parameters including color, sharpness, saturation, and contrast, can all be easily edited later by a “RAW converter” computer program with no loss or degradation of the image. Some camera manufacturers themselves offer RAW conversion programs, and third-party RAW conversion programs abound, such as Adobe Camera Raw, Adobe Lightroom, and Aperture.
JPEG, sometimes written as JPG, and either way pronounced “jay-peg,” is a commonly used file format. When a camera is set up to produce JPEG images, the raw data from the digital sensor undergoes considerable in-camera editing. Image parameters of file size, sharpness, tonal contrast, and color rendition, among others, can all be camera programmed to send an image to the memory card consistent with the shooter’s taste and it can be changed tomorrow if need be. One disadvantage of JPEGs is that the photographer’s flexibility in post-capture (computer) editing of the programmed parameters is more limited than it is with RAW files.
ADVANTAGES OF JPEG FILES
Images in JPEG format have smaller file sizes than RAW images, and smaller files offer several advantages, some of which are:
- Smaller files take up less space on the memory card, so one’s shooting plan needs fewer memory cards to purchase and manage.
- Smaller files occupy less space in the buffer, so more files can be held by a given sized buffer, providing the greater burst depth always coveted by action shooting wildlife photographers.
- Smaller files take less electrical energy for in-camera processing of each shot, so we get more shots from each battery charge.

Elk winter along the Madison River in Yellowstone National Park. Since this river drains thermal basins, the water never freezes, providing opportunities for herbivores to find food along the river banks. Using ETTR exposure techniques sometimes reduces the blacks in the image too much. This unprocessed RAW image shows a severe lack of contrast. Canon EOS-20D, Canon 100-400mm lens at 180mm, f/5.6 at 1/90 second, ISO 400, and aperturepriority with a +1-stop exposure compensation.

Barbara processed this version of the previous image with PhotoShop CS5. She adjusted the black point to increase the contrast, improved the color, and sharpened the image.
- The already edited JPEG files may often benefit from, but generally do not require, post-capture editing. Unlike RAW files, JPEGs are available for immediate use and sharing with others after being downloaded to a computer.
- Computers can display JPEGs with simple software, often built right into the operating system, and the JPEGs do not need more sophisticated RAW conversion software.
ADVANTAGES OF RAW FILES
All else being equal, RAW files are considerably larger than JPEGs. The larger files sizes have several advantages of varying interest to different shooters:
- Larger RAW files contain more image data and allow the making of higher quality larger prints.
- The photographer can make better crops from a larger initial image because the greater pre-crop data gives proportionally more post-crop data.
- Moreover, and this is a “biggie” for many shooters, RAW files allow much greater latitude in post-capture editing. As a couple of examples, white-balance correction or modification is completely unlimited, and within reasonable limits, even exposure blunders can be nicely corrected.
- The absence of data loss caused by in-camera image editing, and the absence of data loss caused by usage, as with JPEGs, let us download all of the camera’s originally captured image data into our computers for archival storage. Your RAW files can be reused as often as desired over years and years to come, and will forever maintain the very same image quality that your camera originally captured. It’s a benefit that’ll be especially welcome when the never-ending evolution of software gives us better and better RAW conversion programs.
WHAT WE SHOOT!
Barbara usually shoots both RAW files and high-quality JPEGs at the same time. Usually I shoot only RAW files, but sometimes shoot both when I need instructional JPEGs right away to show to my students. Her Nikons and my Canons both allow the combination. We get the best of both worlds, and while the two versions of each image carry identical file numbers, their different filename extensions permit well-organized storage and retrieval. The combination offers several post-capture benefits, but does occupy more storage space. Sometimes our subjects require us to shoot at the greatest burst depths possible, and in those cases we’ll shoot RAW only, without the JPEG file. We can generate a JPEG later in our computer. Also, suppose we are running out of card space and don’t have another card to use; to conserve memory space, here too we’ll switch over to RAW files only.
MEMORY CARD CONSIDERATIONS
Today’s digital cameras store their captured images on solid-state memory cards. Memory cards are available in several configurations, the most common being known as Compact Flash (CF) cards and Secure Digital (SD) cards. Some cameras even accommodate two cards simultaneously, either of the same or different types. Memory cards for digital cameras are made by several well-known manufacturers, including Delkin, Kingston, Lexar, and Sandisk. Each of those firms sells memory cards of several types, capacities, and speeds. The cost of a memory card of a particular configuration varies with capacity and speed, the two major parameters to consider when choosing cards.

We prefer large capacity memory cards from 8GB to 32GBs. These cards are protected in a plastic cardholder. We use a Sandisk downloader to copy the image files to external hard drives.
Memory card capacity is measured these days in “gigabytes” where each gigabyte (GB) is a billion bytes or a thousand megabytes. What does it all mean?, you ask. Well, first of all, what on earth is a byte? It’s the smallest piece of information that can be recognized by our digital doodads, whether that doodad is an IBM supercomputer that beats chess masters or a lowly cell phone camera. Expanding the thought, we call one thousand bytes, a kilobyte (1 KB), a million bytes, a megabyte (1 MB), and a billion bytes, a gigabyte (1 GB). Assuming your camera generates a data file of 10 megabytes, your 1 GB memory card will hold 1 billion bytes divided by 10 million bytes per image, which equals 100 images. At 100 images per gigabyte, a modestly sized 8 GB card will hold 800 images, enough for a day’s shooting by most photographers. The CF cards commonly used in DSLRs are available in capacities from 1 GB to 128 GB with proportionate prices. A 128 GB card, although extremely expensive at this writing, can hold an astonishing 12,800 of your 10 MB images. The ever-decreasing cost of memory cards will soon make that 128 GB card more affordable, and the inexorable advance of technology will someday offer cards of even greater capacity and eventually, memory cards will probably become obsolete by some yet unknown memory scheme.
MEMORY CARD SPEED
The speed of a memory card is of minor importance in landscape and macro photography, but the exact opposite is often true in wildlife work. Capturing fast action pictures at the proverbial peak of that action generally requires shooting a rapid burst of images in the hope that somewhere within the burst is the exact image you want. Barb and I configure our cameras to the highest available burst rate (frames-persecond). Barbara has a choice of shooting 12-bit or 14-bit RAW files with her Nikons. Shooting 14-bit files slows down her shooting speed, so she opts for 12-bit image files for wildlife.
Here, it’s vital that the memory card’s writing speed be as high as possible to obtain the high burst depths demanded by the fast action. Higher speed memory cards are more costly than their lower speed versions, so the wildlife shooter must not only consider capacity, but must balance speed, cost, and application. If you’re going to shoot wildlife, and you probably are, given that you’re reading this, don’t forget the harsh language you’ll be directing at yourself when you miss “The World’s Best Wildlife Picture” just because your camera stopped when its buffer couldn’t write fast enough to your low cost memory card!
One bit of good news is that the price of memory drops rapidly after introduction. One photographer I know, bought several 4GB Compact Flash cards upon their introduction several years ago, and paid well over $400 each. Faster 4GB cards are available today for around 20 bucks each!
Our international photo tour clients, seminar attendees, and workshop students, often ask what kind of gear we use. We’ve no secrets and we’re more than happy to talk about it. Here’s one very important point, though. Having this or that brand of camera does not guarantee excellent results. Only knowledge and lots and lots of practice will do that. The skilled and practiced photographer can make fine images with practically any equipment. Barbara and I use Sandisk memory cards and years of use of many cards have never produced a failure. They’re reliable cards. Yet, we know another photographer who has used nothing but Lexar cards for a lot of years, and he too has never had a failure. Come to think of it, we know of no major brand of memory card that we consider inferior, but no brand of memory card will make your images better.
What capacity cards should you use? Our preference for wildlife work is high-speed 16GB and 32GB cards. At this time of writing, the fastest Sandisk 32GB card costs about $270, but that price will probably drop significantly by the time this gets into print. A slightly slower 32GB card can be had for about $170, showing that at a slight sacrifice in speed, appreciable money can be saved.
MEMORY CARDS: LOTS OF GIGABYTES OR LOTS OF CARDS?
A photographer’s worst nightmare may be the loss or failure of memory cards filled with irreplaceable shots. Folks have agonized for years about the best way to protect their valuable images. Some maintain that several smaller cards, each containing relatively few images, is safer. The theory is that if you lose a card or a card fails, you lose only a few images. Others uphold with equal vigor that it’s safer to have fewer cards, each containing a relatively large number of images. Here the theory is that fewer cards have a lower probability of being damaged or lost.
Barb and I agree on many things photographic and likewise agree on this. Based on how we shoot, where we travel, how we travel, how we store and transport gear, our needs are better served by fewer cards of greater capacity. The idea is valid only if we take reasonable anti-loss precautions, so we’ve evolved a rigid protocol for managing memory cards. We store all cards in card wallets designed for the purpose. Like other brands, our Sandisk wallets allow visibility of stored cards and we store formatted ready-to-shoot cards label-side up. Filled cards are inserted label-side down. This systematic approach ensures that our valuable cards (and even more valuable images) are managed in an organized manner, reducing loss probability. And it prevents us from becoming confused in the chaos of a fast-shooting event. All of our cards are either in cameras or in card wallets. Don’t keep your cards loose in pockets or purses. If you must, do it only in the little plastic boxes suitable for your card type. Lint or other dirt entering tiny connector holes in certain cards, like CF cards, can cause expensive camera damage. Also, a cycle or two through the washing machine may bring unhappy results.
Memory cards rarely fail in mid-life, so if your card survives its newness and infancy, and if you use them with reasonable care, they should last a lifetime of ordinary use. We observe the following card rules, and we’ve never yet suffered a card failure.
- Keep the card protected in the safety of your camera or card wallet.
- Don’t turn the camera off until all writing has stopped, to avoid corrupting image files. Some cameras are designed to temporarily maintain power if turned off while writing to the card to prevent problems.
- Format your cards only in your camera. Never format a card in the computer.
- After downloading images from your card, re-format the card and put it in your card wallet label-side up.
Running out of memory space at the wrong time can spoil your whole day. Trust me on this one. I was co-leading a photo safari in Kenya a few years ago, using a camera equipped with a 2GB memory card. We spotted a rosy-patched shrike, a species uncommonly seen, and I had never photographed one. The bright overcast light was splendid, the soft yellow-green background was pleasing, and the bird was stunning. Just as I pushed the shutter and squeezed off a short burst of shots, the darn bird turned its head away and I had nothing except the back of its head. I waited and waited some more. The instant it turned its head back, I excitedly pushed the shutter button again, only to “hear” a terrible silence.
That camera did nothing but smile at me. My memory card was filled. I frantically jammed a new card into the camera only to have that silly shrike fly away the instant before I pushed the shutter again. After 36 African safaris, I still don’t have any photos of the elusive rosy-patched shrike, but I’ve sure learned to favor larger memory cards!
One last thought on memory cards—if you do use large capacity memory cards, if you are shooting fast-action wildlife, and if your card is getting near the end, change cards when you have a shooting break. Don’t wait until the card is completely filled. We have made it a habit to change our big cards even with a few dozen shots remaining on the card. If there’s a sudden opportunity needing quick shooting, we’ll always have card space available.
EXTENSION TUBES
In much of our wildlife photography, we use longer lenses, such as those in the 200mm to 500mm range. Those lenses, like all lenses, have a minimum focus distance (MFD). The MFD varies from lens to lens and can range from about 4 feet up to 15 feet or even more. Suppose we encounter an opportunity to photograph a small bird or tiny mammal. When we

Rosy-breasted longclaws thrive in the Masai Mara grasslands. A 25mm extension tube let me make the 500mm lens focus closer to capture a large image of this colorful small bird. Canon EOS-7D, Canon 500mm f/4.0 lens, Canon 25mm extension tube, f/7.1 at 1/320 second, ISO 320, and Shutter-priority at a +2/3-stop exposure compensation.

Extension tubes permit lenses to focus closer than their built-in minimum focusing distance. They must frequently be used to photograph small birds and mammals with telephoto lenses. The tube on the left is a Canon 25mm extension tube. The set of three extension tubes on the right is made by Kenko for the Canon system. Kenko builds a set of extension tubes for other camera systems, too.
move close enough to make a frame-filling shot, we might discover that our lens will not allow focus at such a close distance. We solve this problem by using an accessory called an “extension tube.”
An extension tube is a cylindrical spacer that fits between the camera body and the lens. It contains no lenses or glass of any kind, it’s just a hollow metal tube configured to fit both camera and lens. By moving the lens away from the camera body, we can obtain focus at subject distances much closer than that allowed by the MFD of the lens itself. So why didn’t those lens designers just make the lens that way in the first place? Because there’s a trade-off. The trade-off is that the lens, now spaced away from the camera, will no longer focus at great distances, having now acquired a hitherto absent maximum focus distance, or more easily said, will not focus at infinity. So, we take the tube off and put it back on as needed.
The distance at which one can focus when using an extension tube depends on the lens focal length, its MFD, and the length of the tube. Tubes are available in several lengths, from about 8mm up to about 50mm. One of my favorite combinations for tiny birds is a 300mm lens with a 25mm extension tube. The combination allows me to fill the frame with tiny birds.
Extension tubes are simple to use, and the absence of glass means there’s no loss of image quality. Some light is lost, but your in-camera exposure meter readings, as confirmed by your histograms, compensates for the light loss.
Tubes are available in different lengths, and from camera manufacturers and third-party manufacturers. Kenko, for example, offers sets of three tubes of different lengths, and available for different camera systems. An important consideration when selecting extension tubes is whether the tubes maintain the electrical connections between lens and camera body.
These are called “automatic” extension tubes, and they ensure that the autofocus and auto-aperture operations of the lens are not disrupted. So, we urge you to always carry a selection of automatic extension tubes if you’re going to encounter subjects needing an approach to closer distances than allowed by your lens itself.