
15. Working with Content Management Systems
Perhaps the biggest new feature in Dreamweaver CS5 is the ability to work with sites that are built upon the foundation of a content management system (CMS). There are many types of CMSs, but the ones we (and Dreamweaver) focus on are Web content management systems, which are applications that run on a Web server that create and manage Web content. The CMS manages and controls a dynamic collection of Web material and usually (but not always) assembles and creates Web pages that are served to the user “on the fly”; that is, the page is built and sent to the user when the user requests the page. Unlike the static HTML pages we discuss creating in the rest of this book, pages that come out of a CMS often don’t exist at all before the CMS software puts together the HTML, CSS, images, and scripts, and squirts them over the Internet to a user’s waiting Web browser.
Dreamweaver CS5 supports three of the most popular Web CMSs: WordPress, Joomla!, and Drupal. You can now use Dreamweaver to author and test content from any of these systems.
About Content Management Systems
Dreamweaver CS5 supports the three most popular PHP-based (PHP is a programming language that typically is installed and runs on Web servers) CMSs: WordPress, Joomla!, and Drupal. These systems have several things in common. They are all open-source projects and can be downloaded from their respective project Web sites at no cost. Installations generally (but not always) use a MySQL database to store and manage their data. As noted before, Web pages and their elements are assembled by the CMS upon request, with text, images, and other content drawn from the database. The CMS takes content out of the database and serves it up as a Web page.
Pages generated by a CMS are based on templates that control the site’s look and feel. Because the content of the site is separate from its presentation, you can easily change the entire look of the site by modifying or switching the set of templates used by the site. A CMS can accommodate multiple users, with an administrator assigning different roles to particular users (for example, subscriber, contributor, editor, etc.). All of the systems provide plug-in architectures that make it easy for developers to extend the features of the core software.
Each CMS has its own adherents. Imagine that a group of Web geeks walk into a bar. After a few rounds of drinks, the conversation turns to the apparently simple question: Which is the best CMS? The discussion goes on for a while, becoming more spirited, and, as more drinks are consumed, people’s opinions are expressed with more emphasis. Finally, the frank exchange of views ends when the bouncers break up the fistfight and turn everyone out into the street.
Let’s leave the sound and fury behind, and just talk a bit about each of the three.
WordPress
More than the other two systems, WordPress is primarily known as weblog creation software, though it is certainly not limited to creating only weblogs. By far the most popular blog software, WordPress was in use by more than 200 million Web sites worldwide as of late 2009. WordPress blogs are based on sets of templates called themes and also can include widgets that can add extra features to a site, such as Twitter integration, easy access to the site archives, and much more. One of the reasons for its popularity is that it has an installer program that makes setting up WordPress relatively easy for the novice. WordPress’s home can be found at www.wordpress.org ![]() . WordPress has a very active developer community, providing free and paid themes, widgets, and other plug-ins.
. WordPress has a very active developer community, providing free and paid themes, widgets, and other plug-ins.

![]() The WordPress Web site has launched a zillion blogs.
The WordPress Web site has launched a zillion blogs.
Joomla!
Joomla! excels at creating larger sites, such as corporate Web sites, e-commerce sites, online newspapers and magazines, community sites, and government sites. Joomla! is fairly easy to install and set up for the novice user. Many Web hosting services offer easy installs, which help you get your site up and running with little effort. Web designers can create sites in Joomla!, and then turn the sites over to clients to add and manage content. Joomla!’s user management system can be configured to give different user groups varying levels of permissions for editing and publishing. Joomla! allows the administrator to easily set up polls and provides extensive template management features. You can get started with Joomla! at www.joomla.org ![]() .
.

![]() The Joomla! site lets you download the CMS and boasts extensive documentation to help you get started.
The Joomla! site lets you download the CMS and boasts extensive documentation to help you get started.
Drupal
Well known as a workhorse for sites with heavy traffic, Drupal is in use at many large corporate and government sites, including Sony Music and whitehouse.gov. The CMS makes it easy to create a static Web site, a single or multiuser blog, online forums, or a community Web site that can accept user-generated content. Drupal sites also boast advanced search features, a robust commenting system, a multilevel menu system, and the ability to host multiple sites from a single installation. Drupal is widely considered to have a steep learning curve for new administrators but makes up for it in part by having excellent performance in delivering pages. Drupal’s home is at www.drupal.org ![]() .
.
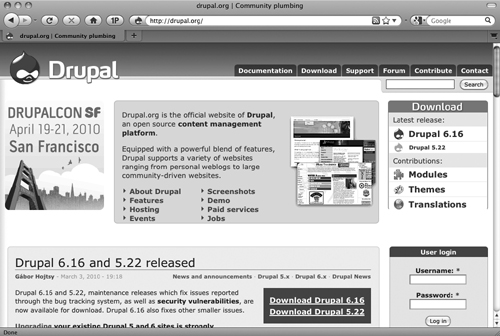
![]() Like the other two systems, the Drupal site provides news about the platform.
Like the other two systems, the Drupal site provides news about the platform.
In this chapter, we’ll use a WordPress blog in our examples. There are only minor differences in the way that Dreamweaver interacts with each of the three CMSs.
Connecting to Your CMS
To get started working on your site, you’ll need to make the initial connection to the CMS in Dreamweaver. You can work with a testing server (preferred) or directly on your live server.
You need to let Dreamweaver know where each of the servers resides. If you have a local testing server (see the “Using XAMPP and MAMP for Local Testing Servers” sidebar), you need to make sure that it is installed, configured, and running.
To connect to your CMS
1. If you have not already done so, define the local and remote sites. See Chapter 2 for more information, if necessary.
2. In the Files panel, open the folder that contains your dynamic site and double-click on the index file (usually called index.php).
Dreamweaver opens the file, but you don’t see any content. Instead, in a status bar at the top of the document window, Dreamweaver tells you that you need to set up a testing server ![]() .
.
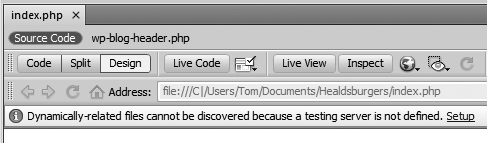
![]() Before you can discover dynamically related files, you have to set up a testing server.
Before you can discover dynamically related files, you have to set up a testing server.
3. Click the Setup link in the status bar.
Dreamweaver opens the Site Setup dialog, which is set to the Servers category ![]() .
.

![]() You define the testing server in the Site Setup dialog.
You define the testing server in the Site Setup dialog.
4. (Optional: Perform this step only if you want to use the live remote server as the testing server, which we do not recommend.) Select the Testing check box next to the previously defined Remote site, and then skip to step 10.
5. Click the plus icon at the bottom left to add a server.
6. In the resulting dialog ![]() , enter a name in the Server Name field (we recommend Testing Server).
, enter a name in the Server Name field (we recommend Testing Server).

![]() Enter the testing server configuration information in the server definition dialog.
Enter the testing server configuration information in the server definition dialog.
7. Choose Local/Network from the Connect Using menu.
8. Click the folder icon next to the Remote Folder field, and navigate to the local copy of your site that is inside the appropriate Web directory on your testing server.
Depending on the testing server software you’re using, this folder could be named /www/ or /htdocs/.
9. Click Save.
You return to the Site Setup dialog, and now you can see that a testing server has been added and selected as the Testing server ![]() .
.

![]() You can tell at a glance which server is the remote server and which is the testing server.
You can tell at a glance which server is the remote server and which is the testing server.
10. Click Save to close the Site Setup dialog.
Tip
It’s possible for you to use the same server as both the Remote and Testing server. You’ll have to decide if you are comfortable with the risk of messing up your live site as you make changes to it.
Using XAMPP and MAMP for Local Testing Servers
A CMS needs a server to run on, and the CMSs supported by Dreamweaver need a server that must be running at least three programs: a Web server program, such as Apache; the database program MySQL; and the programming language PHP.
Most professional sites use at least two servers: a server on which content is developed and tested (called a local, testing, or staging server) and the server that the site’s users interact with (the live or production server). In many situations, the testing server is on a machine elsewhere on a company Intranet, or even on the Internet (suitably access-protected, of course; you probably don’t want people looking at your site while it’s under construction).
If you don’t have a handy Intranet, you can run the testing server on your own machine with the help of two freely downloadable packages: XAMPP for Windows (www.apachefriends.org/en/xampp.html) and MAMP for Mac (www.mamp.info). There are other packages that provide much the same services, but these are the ones we recommend. These packages make it easy to install an instance of Apache, PHP, and MySQL on your machine; installing these programs can otherwise be frustratingly complex and difficult. In contrast, installing and using XAMPP or MAMP is a simple process, like working with any other program.
Both packages have a control panel, as shown in ![]() . From the control panel, you can access the Web-based configuration tools for the running server programs
. From the control panel, you can access the Web-based configuration tools for the running server programs ![]() . You will also have to create a local installation of your preferred CMS. Once you have local and remote versions of your site, you can work with the different files on your machine, and use Dreamweaver’s synchronization tools to upload changes from the testing server to the live remote server.
. You will also have to create a local installation of your preferred CMS. Once you have local and remote versions of your site, you can work with the different files on your machine, and use Dreamweaver’s synchronization tools to upload changes from the testing server to the live remote server.

![]() The MAMP control panel gives you the server status and lets you start and stop the Apache and MySQL servers.
The MAMP control panel gives you the server status and lets you start and stop the Apache and MySQL servers.

![]() Both MAMP and XAMPP give you access to the phpMyAdmin Web application, which gives you more information and control over your servers.
Both MAMP and XAMPP give you access to the phpMyAdmin Web application, which gives you more information and control over your servers.
Using Dynamically Related Files
As mentioned earlier in this chapter, Web pages served by a CMS are assembled on the fly from many different elements (often dozens or hundreds of PHP, JavaScript, CSS, and other types of files), so you often have no idea exactly what the page will look like until you preview it in a Web browser. Each CMS has a back-end administrative interface where you enter content and control the elements of the site, but they all rely on browsers to view the final output.
As you might guess, this presents a challenge for a tool like Dreamweaver. It requires the CMS to put together the page you want to work with before Dreamweaver can show it to you. Then Dreamweaver can display the page to you in Live View.
Dreamweaver knows how to work with the supported CMSs so that it can discover all of the files that go into building the page you want to work with in the document window. Once Dreamweaver has discovered all the files that make up the document, it lists them all in the Related Files toolbar. You can then open any of the related files and edit it using Dreamweaver’s tools. Dreamweaver makes it relatively easy to do something that was previously quite difficult and required serious expertise in a particular CMS: find the particular related files you need.
To discover dynamically related files
1. In the Files panel, double-click on a file you want to view (you will usually start with index.php).
Dreamweaver displays a status bar under the document toolbar letting you know that “This page may have dynamically-related files that can only be discovered by the server” ![]() .
.
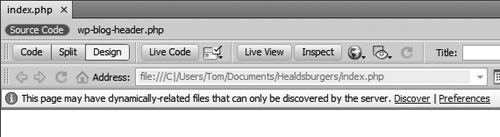
![]() Dreamweaver lets you know that you need to discover the dynamically related files.
Dreamweaver lets you know that you need to discover the dynamically related files.
2. Click the Discover link in the status bar.
Depending on the CMS, Dreamweaver may display a Script warning dialog ![]() .
.

![]() This alert dialog lets you know that to discover the dynamically related files, Dreamweaver must execute the scripts included in the page.
This alert dialog lets you know that to discover the dynamically related files, Dreamweaver must execute the scripts included in the page.
3. Click Yes to dismiss the Script warning dialog.
Dreamweaver begins discovering the dynamically linked files and displays them in the Related Files toolbar.
4. If you’re not already in Live View, Dreamweaver uses the status bar to alert you that you need to switch to that view ![]() . Click the Live View link in the status bar.
. Click the Live View link in the status bar.

![]() Click the link to switch to Live View.
Click the link to switch to Live View.
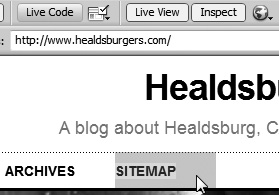
Dreamweaver displays the rendered page in the document window ![]() .
.
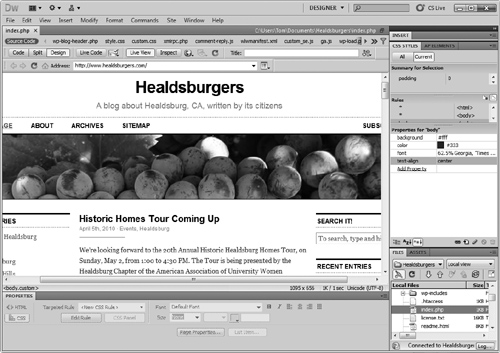
![]() The page in the document window is a dynamic page being served by WordPress.
The page in the document window is a dynamic page being served by WordPress.
To work with dynamically related files
• Clicking any of the files in the Related Files toolbar will change the document window into Split view, displaying the file in the Code pane ![]() .
.

![]() Clicking this CSS file in the Related Files toolbar displays it in Split view.
Clicking this CSS file in the Related Files toolbar displays it in Split view.
• You can click the Inspect button in the document toolbar to turn on CSS Inspect mode, so you can see the box model for elements on the page ![]() . Just hover over an element on your page, and it displays with different colors for the background, margins, padding, and borders. For more information about CSS Inspect mode, see “Using CSS Inspection” in Chapter 9.
. Just hover over an element on your page, and it displays with different colors for the background, margins, padding, and borders. For more information about CSS Inspect mode, see “Using CSS Inspection” in Chapter 9.
![]() In CSS Inspect mode, you can see the box model for elements on the page.
In CSS Inspect mode, you can see the box model for elements on the page.
• Nobody’s monitor is wide enough to display all of the dynamically related files, so the Related Files toolbar now supports scroll arrows on either end when there are too many related files to display ![]() . Scroll as needed to find the files that you want to work with. Click the Show More button next to the right scroll arrow to display the related files in a menu
. Scroll as needed to find the files that you want to work with. Click the Show More button next to the right scroll arrow to display the related files in a menu ![]() .
.
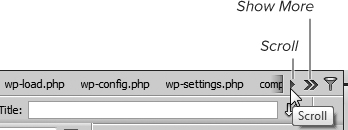
![]() When there are too many files to fit in the window, the Related Files toolbar scrolls.
When there are too many files to fit in the window, the Related Files toolbar scrolls.
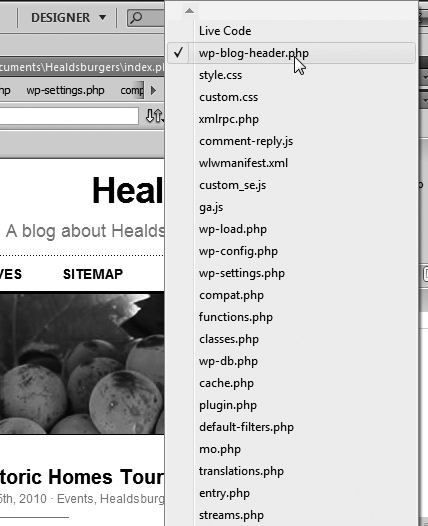
![]() The Show More menu displays all of the Related Files.
The Show More menu displays all of the Related Files.
Filtering Related Files
One of the problems with discovering the dynamically related files in a CMS-backed site is that you can get an embarrassment of riches. There can be so many files that it can be difficult to scroll through them in the Related Files toolbar or find them in the Show More menu. Dreamweaver allows you to filter the related files to show only the file types you want. That lets you easily work on, for example, just the CSS files, or those and the JavaScript files, hiding all the PHP files. You can also customize the filter to show only the files you want.
To filter related files
1. At the right edge of the Related Files toolbar, click the Filter Related Files button.
Dreamweaver shows that the button is actually a menu that contains the file types in the Related Files toolbar ![]() .
.

![]() The Filter Related Files menu shows you the file types represented in the Related Files toolbar.
The Filter Related Files menu shows you the file types represented in the Related Files toolbar.
2. In the menu, deselect the file types you do not want to view. To go back to viewing all file types, choose Show All File Types.
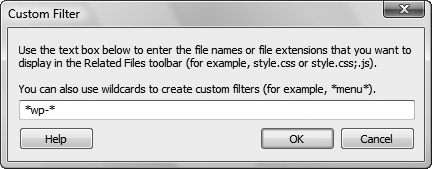
To create a custom filter
1. From the bottom of the Filter Related Files menu in the Related Files toolbar, choose Custom Filter.
The Custom Filter dialog appears ![]() .
.
![]() Enter your custom filter criteria.
Enter your custom filter criteria.
2. Enter the filenames or file extensions you want to display in the Related Files toolbar in the dialog. Separate different names or extensions with a semicolon. You can also use asterisks as wildcard symbols. For example, in ![]() we used
we used *wp-* to create a filter that captured WordPress-specific files, producing the result as shown in ![]() .
.
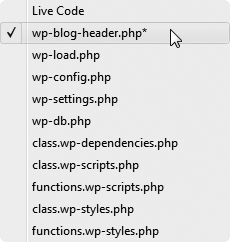
![]() After filtering, the Show More menu displays considerably fewer files.
After filtering, the Show More menu displays considerably fewer files.
3. Click OK to put your filter into action.
Tip
You can filter the results in the Related Files toolbar at any time, not just when you are viewing dynamically related files.
Using Live View Navigation
Live View, introduced in Dreamweaver CS4, renders pages in the Dreamweaver document window using WebKit (the same page rendering engine found in several standards-compliant browsers). This greatly speeds Web development, because designers don’t always have to resort to previewing in a separate browser. But because Live View couldn’t follow links, you couldn’t easily explore your sites. Now that Dreamweaver can work with dynamically based sites, the ability to follow links is vital, so it has been added in Dreamweaver CS5.
Live View navigation allows you to interact with server-side applications and dynamic data. In addition to Live View, Live Code highlights changes as they happen, allowing you to quickly locate the dynamically loaded data or code changes triggered by JavaScript. You can also use the Browser Navigation toolbar to enter a URL to inspect pages from a live Web server and edit pages you’ve browsed to, as long as they exist in one of your locally defined sites.
To use Live View navigation
1. Open a document that contains links and elements that are updated via JavaScript—for example, a navigational menu.
2. Click Live Code in the Document toolbar.
or
Choose View > Live Code.
The document window splits to display both the Code and Live View panes ![]() . As usual with Live Code, the Code pane isn’t editable but will show how the code changes as you interact with the document in the Live View pane.
. As usual with Live Code, the Code pane isn’t editable but will show how the code changes as you interact with the document in the Live View pane.

![]() Live Code view shows you the code as it is being rewritten by JavaScript.
Live Code view shows you the code as it is being rewritten by JavaScript.
3. Use the menu. As you do, note how the code changes in the code pane.
4. Click one of the links in the menu.
Notice how the link is not followed, as it would have been in a browser. Dreamweaver does this purposely so that you can create, style, and modify active links.
5. To follow the link, Ctrl-click (Cmd-click) the link.
Dreamweaver follows the link.
6. To follow links as you would in a browser, choose Follow Links Continuously from the Live View Options menu in the Browser Navigation toolbar ![]() . You can then click a link in the Live View pane, and it will change to the link’s destination.
. You can then click a link in the Live View pane, and it will change to the link’s destination.
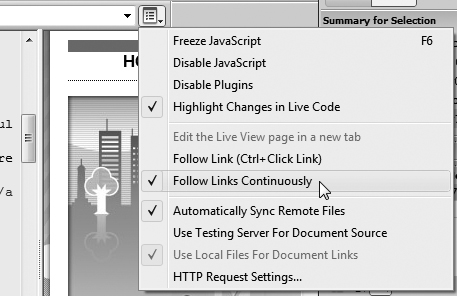
![]() Choosing Following Links Continuously makes the Dreamweaver’s Live View treat links in the same way as a Web browser.
Choosing Following Links Continuously makes the Dreamweaver’s Live View treat links in the same way as a Web browser.
Tip
You can enter any URL in the address field of the Browser Navigation toolbar and Dreamweaver will display the page in Live View, as well as list its associated files in the Related Files toolbar ![]() . If you click on one of the files in that toolbar, Dreamweaver switches to Split view and displays the code, but will also show a status bar telling you that you cannot edit the remote file.
. If you click on one of the files in that toolbar, Dreamweaver switches to Split view and displays the code, but will also show a status bar telling you that you cannot edit the remote file.

![]() You can enter any URL you want in the Browser Navigation toolbar, and Dreamweaver will display that URL in Live View.
You can enter any URL you want in the Browser Navigation toolbar, and Dreamweaver will display that URL in Live View.
Freezing or Disabling JavaScript
When you are working with interactive elements, it can be very useful to freeze the action when it is in a particular state. You can then inspect the code in that state without worrying that a stray movement of your mouse will change the state (and therefore, the code you’re trying to inspect). Dreamweaver allows you to freeze JavaScript as it is executing. You can then edit your CSS or JavaScript and then refresh the page to see the effect of your changes. You can also disable JavaScript altogether, which re-renders the page to show how it would appear in a browser that has JavaScript disabled.
To freeze JavaScript
1. Click the Live View button in the Document toolbar.
2. (Optional) Click the Live Code button in the Document toolbar.
3. Interact with the document in the Live View pane until the page is in the state you want.
4. Press F6.
or
Choose Freeze JavaScript from the Live View Options menu in the Browser Navigation toolbar (see figure ![]() in “Using Live View Navigation”).
in “Using Live View Navigation”).
Dreamweaver displays a status bar telling you JavaScript is frozen ![]() .
.
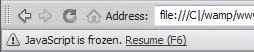
![]() Dreamweaver lets you know when you freeze JavaScript.
Dreamweaver lets you know when you freeze JavaScript.
5. (Optional) Edit your JavaScript or CSS. Save your changes, and then press F6 to resume JavaScript rendering. Click the Refresh Design View button in the Document toolbar (or press F5) to see your changes.
To disable JavaScript
• Choose Disable JavaScript from the Live View Options menu in the Browser Navigation toolbar.
Putting It All Together
1. Define your local and remote sites and connect to your CMS.
2. Discover all the dynamically related files.
3. Create a custom filter to show only the related files you may want to edit in Dreamweaver.
4. Use Live View navigation to open a document that contains links and elements that are updated via JavaScript.
5. Use an element in the document and note how the code changes in the code pane.
6. Create, style, and modify links, and then follow the links as you would in a browser.
7. Freeze JavaScript to inspect the code.