
14. Building Pages with Dynamic Elements
One foundation of “Web 2.0” is widespread user interactivity enabled by extensive use of CSS and JavaScript. This allows applications that run inside a Web browser to offer the kind of responsiveness that was once reserved for native applications.
In Dreamweaver CS3, Adobe added a library of widgets to enable Web builders to make their sites look like cutting-edge destinations. This library—also referred to as a framework—is named Spry. Spry is a collection of HTML, CSS, JavaScript, and graphics, the relevant pieces of which are automatically added to your site when you add any of the Spry elements. No, you don’t need to know anything about CSS or JavaScript to use Spry.
In Dreamweaver CS5, Adobe expanded the program’s ability to use other popular frameworks, such as jQuery. In this chapter, we’ll focus mainly on using the Spry elements that come with Dreamweaver, but we’ll also touch on using the new Adobe Widget Browser to use elements from other frameworks in your pages.
What Is Spry?
To use Spry’s full functionality, it helps to know a little bit more about what Spry is and how it works behind the scenes.
A (brief) history of frameworks
When people first started adding JavaScript to pages, they quickly realized that a lot of the work they were doing was the same stuff, over and over and over again. Just about every JavaScripter has their collection of code snippets that they’ve already debugged and now reuse regularly.
In recent years, it’s become common to let JavaScript handle more and more of the user interface (UI) duties. This means that Web sites have become smarter and more flexible, but it’s also been a lot more work for people who write code. Programmers tend to hate writing new code when they know someone else has already solved that particular problem. Instead, they go looking for free code offered by others, and in return offer their own solutions. The result is shared libraries of code that can handle most of the usual user interface requirements.
However, programmers also tend to have definite (and idiosyncratic) opinions about the “right” way to write code, and the result of that has been the creation of many different frameworks. If you’ve ever heard of libraries such as Dojo, YUI, jQuery, or Prototype, they’re all more or less the same thing, built by developers who thought that their way of doing things was better than what already existed.
Spry is Adobe’s answer to this same challenge, geared to work with Dreamweaver and to stand on its own. It’s not an application; instead, it’s a collection of code snippets (both CSS and JavaScript) that when added to your pages creates some standard effects.
What’s in Spry
Spry contains three types of components:
• Widgets: These elements let you create a more interactive Web site. There are two main types of widgets: UI widgets (such as the accordion, menu bar, and collapsible panel), and form validation (such as text fields and text areas).
• Effects: Unlike widgets, effects don’t so much interact with the user as just look good on their own. You can use effects to visually highlight transitions or to emphasize elements on your page. Some examples of effects are highlight, shrink, and squish.
• XML data sets: If you want data on your page that’s read from an external file, or you want users to be able to sort displayed information without having to reload the page, or you want to show some detailed information when the user selects various options, then you’re looking at using Spry data sets.
Ajax and more
One of the hot buzzwords of modern day Web design is Ajax. Unfortunately, that term has come to mean different things to different people, to the point where it’s almost a meaningless term.
On the one hand, Jesse James Garrett, who invented the name, says that it stands for “Asynchronous JavaScript And XML”—meaning that Ajax-enabled pages are those where JavaScript is used to read data off a server, allowing you to update Web pages on the fly without your browser loading an entirely new document.
On the other hand, some people only care that the page is updating, not what technology it’s using to do it. To those people, any time you use CSS to change the content of a page or to hide or show different areas, it’s Ajax in action.
But no matter what definition you use, if you want to add Ajax to your pages with Dreamweaver’s built-in tools, the Spry framework is what you’ll be adding to your site.
If after working with Spry you decide that you really want to learn more about asynchronous JavaScript, we recommend another book we’ve written, JavaScript & Ajax for the Web: Visual QuickStart Guide (Peachpit, 2009).
Adding Spry Elements
By now, you’ve surely noticed the Spry category ![]() in the Insert panel. It’s just one of the many places where you can find Spry elements to add to your page.
in the Insert panel. It’s just one of the many places where you can find Spry elements to add to your page.

![]() Spry widgets are found in the Spry category of the Insert panel.
Spry widgets are found in the Spry category of the Insert panel.
To add a Spry element
• For widgets and data objects: With the Spry category showing in the Insert panel, choose where on your page you want to add the element, and then click the desired Spry button.
or
For widgets and data objects: Choose Insert > Spry from the menu bar, and then choose which Spry element you want to add from the submenu ![]() .
.

![]() Spry commands can be found in several locations in the Insert menu, as shown in this composite illustration.
Spry commands can be found in several locations in the Insert menu, as shown in this composite illustration.
or
For form validation widgets: Choose Insert > Form from the menu bar, and then choose which Spry widget you want to add from the submenu ![]() .
.
or
For UI widgets: Choose Insert > Layout Objects from the menu bar, and then choose which Spry widget you want to add from the submenu ![]() .
.
or
For effects: Select the element on the page you want the effect to affect, click the plus button on the Behaviors tab of the Tag Inspector panel, and choose an action from the Effects submenu ![]() .
.
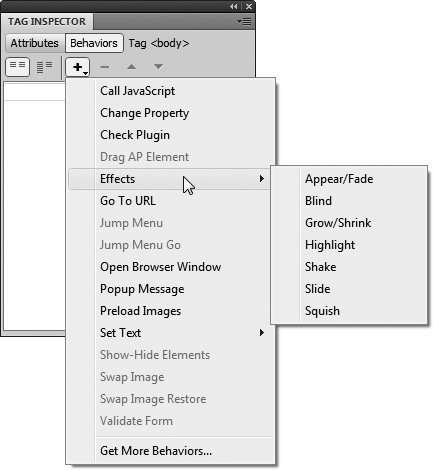
![]() Spry effects are considered behaviors, so they’re found in the Behaviors tab of the Tag Inspector panel.
Spry effects are considered behaviors, so they’re found in the Behaviors tab of the Tag Inspector panel.
Tip
If you’ve added a widget, you’ll see the object on the page outlined with a bright blue border and the name of the widget. If you’ve added an effect, you’ll see it listed in the Behaviors panel tab of the Tag Inspector.
Tip
Believe it or not, these aren’t all the places where you can find options to add Spry elements in Dreamweaver.
Using the Menu Bar Widget
One of the most common user interface items you’re likely to add to a site is the common menu bar. As mentioned in Chapter 13, you can build complex menu bars in Fireworks—but what if you don’t have Fireworks, or its menus aren’t quite what you want? Spry menu bars are simple, flexible, and powerful.
To add a menu bar widget
1. Decide where you want the menu bar on your page, and click the Spry menu bar button in the Spry category of the Insert panel. The Spry Menu Bar dialog appears ![]() .
.

![]() The Spry menu bar can be horizontal or vertical.
The Spry menu bar can be horizontal or vertical.
2. Decide if you want a horizontal menu bar (a pull down, where the main menu options go across and submenu options go down) or a vertical menu bar (a flyout, where the main menu options go down and submenu options go across). Click OK to accept.
3. The Spry menu bar appears on your page with default data displayed in the Property Inspector ![]() .
.

![]() The brand-new Spry menu bar on our page starts off with some default values.
The brand-new Spry menu bar on our page starts off with some default values.
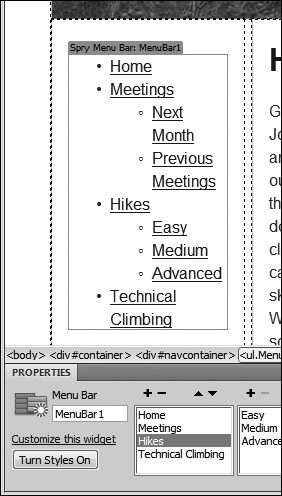
4. To change the names of menu items, click any item name in the first column of the Property Inspector ![]() and change the Text field on the right. Items in the second and third columns are submenus of the selected item in the previous column. To delete an item, select it, and click the minus button at the top of the column. To add items, click the plus button at the top of the column, and then change the name from the automatically named default. And to change the order, select an item, and then click the up or down arrow at the top of the column.
and change the Text field on the right. Items in the second and third columns are submenus of the selected item in the previous column. To delete an item, select it, and click the minus button at the top of the column. To add items, click the plus button at the top of the column, and then change the name from the automatically named default. And to change the order, select an item, and then click the up or down arrow at the top of the column.

![]() After you’ve created the menu bar, you’ll set its values using the Property Inspector.
After you’ve created the menu bar, you’ll set its values using the Property Inspector.
5. Turn menu options into links by selecting the option and changing the link field to the URL of the desired page ![]() .
.

![]() Set the link for each menu bar item in the Property Inspector.
Set the link for each menu bar item in the Property Inspector.
6. Click the Turn Styles Off button in the lower left of the Property Inspector to see how the menu bar appears when CSS isn’t available ![]() . Click the Turn Styles On button to make the styles reappear.
. Click the Turn Styles On button to make the styles reappear.
![]() It’s a good idea to always check to see how your Spry elements appear without styling.
It’s a good idea to always check to see how your Spry elements appear without styling.
7. When you first save the page, or when you view the page in a browser, you’ll see the Copy Dependent Files dialog ![]() . This lets you know that the required Spry files are being added. They’ll all be in a directory named SpryAssets at the root of your site, and you’ll need to upload that directory and the files it contains to your server so your site works correctly.
. This lets you know that the required Spry files are being added. They’ll all be in a directory named SpryAssets at the root of your site, and you’ll need to upload that directory and the files it contains to your server so your site works correctly.

![]() Every Spry command has associated JavaScript, CSS, and graphics. Dreamweaver warns you that it’s adding them to your site.
Every Spry command has associated JavaScript, CSS, and graphics. Dreamweaver warns you that it’s adding them to your site.
8. When you view your site in a browser ![]() , you’ll see your new flyout (or pull-down) menu.
, you’ll see your new flyout (or pull-down) menu.
However, what you see is the menu in Dreamweaver’s default menu style. If that isn’t quite what you want, you’ll need to edit the widget’s styles.

![]() And here’s our Web page with its new flyout menu.
And here’s our Web page with its new flyout menu.
To edit a menu bar widget
1. This page uses an attached style sheet (hiking.css) that defines the desired appearance of its elements. To use the styles you’ve defined in the style sheet for menus, you first need to change the menu bar’s id from MenuBar1 to navlist, which you do by changing its name in the Property Inspector ![]() .
.

![]() You can modify the way the menu looks by changing the styles, as seen in the CSS Styles panel. We’ve begun the process by disabling some of the selected properties.
You can modify the way the menu looks by changing the styles, as seen in the CSS Styles panel. We’ve begun the process by disabling some of the selected properties.
2. SpryMenuBarVertical.css contains the CSS for the Spry menu bar. You probably don’t want all the default Spry styles, so you need to figure out which rules affect the menu. Once that’s done, you can either add rules to hiking.css to override them, or delete/disable them in SpryMenuBarVertical.css. The easiest way to see which rules affect the menu is with the Code Navigator (see Chapter 7 for more about using the Code Navigator).
3. And finally, when you view the page in the browser, you see the new flyout menu just the way you’d expect it to appear ![]() .
.

![]() The new flyout menu looks even cooler when its design matches the rest of the site.
The new flyout menu looks even cooler when its design matches the rest of the site.
Tip
The Turn Styles Off button on the Property Inspector is also useful to verify that you’ve set up all your menus and submenus correctly, because it causes them to display all at once on the page.
Tip
Be sure to always test your pages in a browser, though you can also get a good idea of how the menu will look by clicking the Live View button on the Document toolbar.
Tip
To delete the widget, make sure the entire menu bar is selected, and then press Delete.
Tip
When using any Spry widget, be careful to test your pages for accessibility for those users who don’t have JavaScript, those with older browsers, and those with disabilities. Your sites need to work for everyone, not just people with the latest and greatest browsers, and the current version of Spry doesn’t always create widgets that work when (for instance) a visitor to your site sees it on a mobile device.
Tip
In ![]() , you can add a tool tip to any link simply by typing text into the Title field.
, you can add a tool tip to any link simply by typing text into the Title field.
Using the Tabbed Panels Widget
Another common user interface element is tabbed panels, which make a Web page look similar to an application. Creating tabbed panels was a time-consuming and difficult process until Spry came along, but not any more.
To add a tabbed panel
1. Decide where you want the tabbed panel on your page, and click the Spry Tabbed Panels button in the Spry category of the Insert panel. A Spry tabbed panel with defaults and the Tabbed panels Property Inspector display ![]() .
.
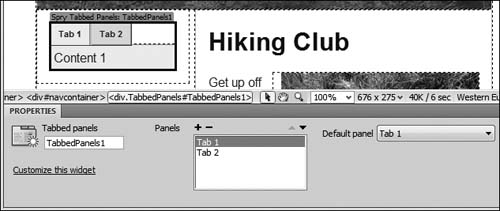
![]() Tabbed panels can be a way to show a lot of information in a limited space (although not all at once).
Tabbed panels can be a way to show a lot of information in a limited space (although not all at once).
2. To change the default tab names and panel content, simply type over them in the Dreamweaver document. The first tab is shown by default when the page first loads; you can change that by resetting the Default panel pop-up menu in the Property Inspector.
3. To delete tabs, select the tab in the Property Inspector and then click the minus button. To add tabs, click the plus button. And to change the display order of the tabs, select a tab, and then click the up or down arrow.
4. To view a specific panel inside Dreamweaver, hover over the tab until you see an icon of an eye. Click the eye, and that panel displays ![]() .
.

![]() In Dreamweaver, you can see how each tab and panel will appear in the browser window.
In Dreamweaver, you can see how each tab and panel will appear in the browser window.
5. As always, be sure to test your Spry widget in a browser and Dreamweaver’s Live View to see how it actually works ![]() .
.

![]() And here’s the final version in a browser.
And here’s the final version in a browser.
Tip
As with the menu bar widget, you can use Dreamweaver to modify the CSS that applies to the tabbed panel widget to make it match the rest of your site design. If you want detailed information on how to change a widget’s CSS properties, click the Customize this widget link in the Property Inspector to launch the Adobe Help Viewer.
Tip
You can use the Code Navigator to figure out what CSS rules apply to the widget. See Chapter 7 for more about the Code Navigator.
Tip
Unless you change the applicable CSS, the tabbed panel widget takes up as much room as is available horizontally. There wasn’t much room available in this design, so as ![]() shows, the tabs wrapped. Dreamweaver makes that happen automatically, but if that’s not what you’re looking for, you may want to try an accordion widget instead, as described next.
shows, the tabs wrapped. Dreamweaver makes that happen automatically, but if that’s not what you’re looking for, you may want to try an accordion widget instead, as described next.
Using the Accordion Widget
An accordion widget is a set of panels, where one (and only one) is displayed at a time. It’s a handy way to present several discrete chunks of information in a limited space.
To add an accordion widget
1. Decide where you want the accordion on your page, and click the Spry Accordion button in the Spry category of the Insert panel. A Spry accordion widget with defaults and the Accordion Property Inspector display ![]() .
.

![]() The accordion widget might be a better match for the type of information that we’re trying to display, so we’ve added one here.
The accordion widget might be a better match for the type of information that we’re trying to display, so we’ve added one here.
2. To change the default labels and content panels, simply type over them in the Dreamweaver document. The first panel is always shown by default when the page first loads.
3. To delete panels, select the panel in the Property Inspector and then click the minus button. To add panels, click the plus button. And to change the display order of the panels, select a panel, and then click the up or down arrow.
4. To view a specific panel inside Dreamweaver, hover over the label until you see the eye icon. Click the eye, and that panel displays ![]() .
.

![]() The panels can be set to display or hide inside Dreamweaver.
The panels can be set to display or hide inside Dreamweaver.
5. Here’s your new accordion as seen in a browser ![]() . Simply click the label, and the currently open panel closes and the desired panel opens. In this example, we’ve decreased the height of the accordion panels (see the tip below), because they don’t need to be as tall as the default (shown in
. Simply click the label, and the currently open panel closes and the desired panel opens. In this example, we’ve decreased the height of the accordion panels (see the tip below), because they don’t need to be as tall as the default (shown in ![]() ).
).

![]() And here’s the final accordion in the browser.
And here’s the final accordion in the browser.
Tip
To change the height of an accordion panel, we first needed to discover which CSS rule controlled the panel’s height. We clicked in the panel’s content, and chose View > Code Navigator (see Chapter 7 for more on that feature). The Code Navigator window showed a rule named .AccordionPanelContent, which had a default height of 200 pixels. We clicked the rule in the Code Navigator window, which changed the document window to Split view, highlighting the rule in the code pane. We then changed the value of the height attribute to 100 pixels and saved the file.
Tip
When adding a widget to an existing page, be careful about moving text that’s already on the page into the widget. Widgets can be fragile, and if you don’t drag and drop the text into exactly the right spot, you can end up with a mess. We’ve had better luck just deleting text and retyping it directly into widgets.
Using the Collapsible Panel Widget
If the accordion widget is almost, but not quite, just what you want, then the collapsible panel widget is probably what you’re looking for. Where the accordion widget allows you to have one—and only one—open panel, the collapsible panel widget lets you have as many or as few open as you and your visitors want.
To add a collapsible panel widget
1. Decide where you want the collapsible panel on your page, and click the Spry Collapsible Panel button in the Spry category of the Insert panel. A Spry collapsible panel widget with defaults and the Collapsible panel Property Inspector display. ![]() shows a document with two collapsible panel widgets that have content in each panel.
shows a document with two collapsible panel widgets that have content in each panel.

![]() Multiple collapsible panels is another UI approach, allowing us to have multiple panels display at one time.
Multiple collapsible panels is another UI approach, allowing us to have multiple panels display at one time.
2. You can set each panel to be open or closed when the page loads. Toggle the display by changing the Default state in the Property Inspector from Open to Closed or vice versa.
3. Choose whether or not the panel contents are viewable inside Dreamweaver by toggling the Display value in the Property Inspector from Open to Closed and back again.
or
Hover over the label until you see the eye icon, as seen in ![]() . If the panel is closed, the eye icon is open. Click it to open the panel
. If the panel is closed, the eye icon is open. Click it to open the panel ![]() . If the panel is open, the eye icon is closed, and clicking it closes the panel.
. If the panel is open, the eye icon is closed, and clicking it closes the panel.
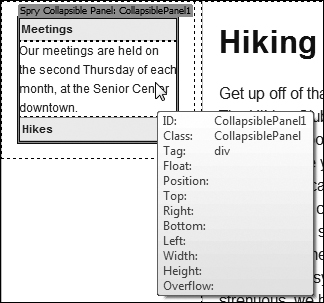
![]() Again, panels can be seen and hidden inside Dreamweaver without affecting how they will appear in the browser. When you hover over a panel, a tool tip with the panel’s CSS property information will also briefly appear, as shown here.
Again, panels can be seen and hidden inside Dreamweaver without affecting how they will appear in the browser. When you hover over a panel, a tool tip with the panel’s CSS property information will also briefly appear, as shown here.
4. Change the default labels and content panels by simply typing over their current values in the Dreamweaver document.
5. Finish up by checking the display in Dreamweaver’s Live View or a browser. ![]() shows the panels in their collapsed state, and
shows the panels in their collapsed state, and ![]() shows them in their open state.
shows them in their open state.

![]() Here are the two panels—both closed—in the browser window.
Here are the two panels—both closed—in the browser window.

![]() Click each label, and its panel slides open so you can see all the information at once.
Click each label, and its panel slides open so you can see all the information at once.
Tip
The Property Inspector also contains a check box to enable (or disable) animation. If it’s on, visitors to your site see a brief animation when they open and close panels. If you think that people might get impatient, turn off the animation.
Validating Forms with Spry
The form in ![]() should look familiar, because it’s the same form example used earlier in this book. But if you look at
should look familiar, because it’s the same form example used earlier in this book. But if you look at ![]() , it’s actually a little different—you can see that Spry has added some smarts to it. The addition of the new error messages tell people filling out the form more about what kind of data they need to enter where.
, it’s actually a little different—you can see that Spry has added some smarts to it. The addition of the new error messages tell people filling out the form more about what kind of data they need to enter where.

![]() This contact form doesn’t look particularly intelligent.
This contact form doesn’t look particularly intelligent.

![]() But once visitors see the error messages, they have a better idea of what’s required.
But once visitors see the error messages, they have a better idea of what’s required.
Dreamweaver has the ability to validate a group of radio buttons, validate password fields, and require the user to enter a password twice for verification.
To add Spry validation to a text field
1. Select an existing text field and click the Spry Validation Text Field button in the Spry category of the Insert panel. The usual blue box appears around the field, and the Spry TextField Property Inspector appears ![]() .
.

![]() Text fields can be set to require some value before the form can be submitted.
Text fields can be set to require some value before the form can be submitted.
2. Using the Property Inspector, you can make your text fields require a wide range of input types. ![]() shows a text field that requires that something (anything) be in the last name field. That’s done by selecting the Required check box, and setting the Min chars field to one.
shows a text field that requires that something (anything) be in the last name field. That’s done by selecting the Required check box, and setting the Min chars field to one.
![]() shows the email address field, which is a little more complex. Here, the Type drop-down menu is set to Email Address, which rejects the user’s entry unless it matches the format of an email address.
shows the email address field, which is a little more complex. Here, the Type drop-down menu is set to Email Address, which rejects the user’s entry unless it matches the format of an email address.

![]() Text fields can also be set to require very particular data, such as this email field, before submission is allowed.
Text fields can also be set to require very particular data, such as this email field, before submission is allowed.
The last name field is set to show the field required error, and the email address field is set to show the invalid format error. These are done via the Preview states drop-down menu in the Property Inspector, which lets you see how each possible error message displays inside Dreamweaver. And along with the error messages, the entry field has a pink background, showing that the current entry is insufficient.
To add Spry validation to a select field
• Select an existing pop-up menu and click the Spry Validation Select button in the Spry category of the Insert panel. Once again, you’ll see the blue box appear with its associated Property Inspector ![]() .
.

![]() This pop-up menu is now set to require visitors to make a choice.
This pop-up menu is now set to require visitors to make a choice.
A pop-up menu can be set to have a required value or to only allow certain selections. You can also preview the various error messages inside Dreamweaver.
To add Spry validation to check boxes
1. Select where you want your new check boxes to be placed and click the Spry Validation Checkbox button in the Spry category of the Insert panel. The Input Tag Accessibility Attributes dialog appears, which was covered in Chapter 11. Enter the appropriate data and click OK. Your new check box appears in its standard blue box, and the Property Inspector displays the Spry Checkbox ![]() .
.
![]() Check boxes can be validated individually or in groups.
Check boxes can be validated individually or in groups.
2. If you want the validation to apply to a group of check boxes instead of a single check box, add them inside the Spry region at this point or drag existing check boxes into the region.
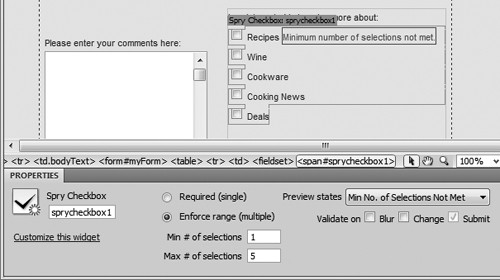
3. The Property Inspector allows you to require a single check box to be set, or to require a certain minimum number of check boxes to be set. In this example, we want visitors to click at least one check box of the five, so the minimum is set to one and the maximum to five. ![]() shows the error message that displays when they submit the page without picking any of the check boxes.
shows the error message that displays when they submit the page without picking any of the check boxes.
To add Spry validation to radio buttons
1. Select where you want your new radio buttons to be placed and click the Spry Validation Radio Group button in the Spry category of the Insert panel.
The Spry Validation Radio Group dialog appears ![]() . This is similar to the Radio Group dialog discussed in Chapter 11.
. This is similar to the Radio Group dialog discussed in Chapter 11.

![]() Begin adding your validated radio button group by entering the button values.
Begin adding your validated radio button group by entering the button values.
2. Fill out the dialog, and then click OK.
The radio buttons appear on the page, and you see the Spry Radio Group in the Property Inspector ![]() .
.

![]() By default, a radio button group is set to have a required value.
By default, a radio button group is set to have a required value.
Tip
A radio button group must have one of its choices selected, but Dreamweaver doesn’t know which button you want selected, so you must do it yourself. Click the button that you want to use as the default choice, and the Property Inspector will change to show that button’s properties. In the Initial state section, choose Checked.
To add Spry validation to a text area
1. Select an existing text area field and click the Spry Validation Textarea button in the Spry category of the Insert panel. You’ll see the usual blue box and Property Inspector ![]() .
.

![]() Text area boxes can require that at least a certain amount of data be entered and give a hint to the visitor as to what’s necessary.
Text area boxes can require that at least a certain amount of data be entered and give a hint to the visitor as to what’s necessary.
2. In the Property Inspector, you can set it so the text area is required and set it to have a minimum or maximum length. Additionally, you can choose to display a counter of characters filled in or characters remaining, so that users know how close they are to the limit. And finally, the Hint field puts optional text into the field when the form loads, telling users what type of information you’re requiring them to enter.
3. ![]() shows how the form appears in the browser when the page first loads.
shows how the form appears in the browser when the page first loads. ![]() is an attempt to validate our bad input, showing the two error messages we’ve received.
is an attempt to validate our bad input, showing the two error messages we’ve received.
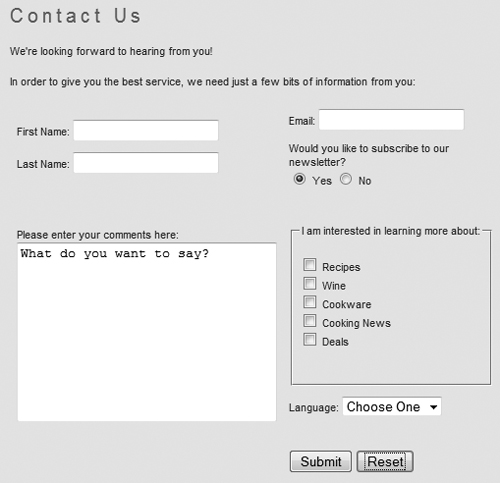
![]() The form looks straightforward when it’s first loaded in the browser.
The form looks straightforward when it’s first loaded in the browser.

![]() But this form won’t let us get away with trying to submit it without the required fields.
But this form won’t let us get away with trying to submit it without the required fields.
Tip
Any field can be set to validate on blur, change, or submit, where the default is submit. Blur refers to when users exit the field, whether or not they’ve actually changed its value.
Tip
The text area Hint text automatically clears itself when the user enters the field. Hint text also doesn’t count as characters towards the entry requirements/limits.
To add Spry validation to a password field
1. Click to place the insertion point where you want to add your password field, and click the Spry Validation Password button in the Spry category of the Insert panel.
The Input Tag Accessibility Attributes dialog appears ![]() .
.

![]() You need to give the password field an ID and a label.
You need to give the password field an ID and a label.
2. Enter the appropriate data and click OK.
The password field appears in the document, and the Property Inspector changes to reflect the Spry Password choices ![]() .
.

![]() Set the password’s requirements in the Property Inspector.
Set the password’s requirements in the Property Inspector.
3. Set the requirements for the password in the Property Inspector. You can specify the minimum and maximum number of characters, how many letters and numbers must appear in the password, whether or not letters must be uppercase, and whether special characters are allowed or required.
To add a Spry confirmation field
1. Confirmation fields require the user to reenter the same value as another field in the form. They’re usually used with password fields. Begin by placing the insertion point where you want to add your confirmation field, and click the Spry Validation Confirm button in the Spry category of the Insert panel. The Input Tag Accessibility Attributes dialog appears.
2. Enter the appropriate data and click OK.
The confirmation field appears in the document, and the Property Inspector changes to reflect the Spry Confirm choices ![]() .
.

![]() The confirming password field is set to validate against the original password field.
The confirming password field is set to validate against the original password field.
3. In the Validate against pop-up menu, choose the field you want to validate against. If there is only one field and one form on the page, it will appear in the pop-up menu automatically.
Adding Spry Tooltips
Dreamweaver allows you to add a Spry Tooltip, which is a short bit of text that appears when you hover over an area on your page. Spry Tooltips have two parts: the trigger, which is the part of your page that serves as the hotspot for the user’s cursor, and the content, which is the Tooltip’s text.
To add a Spry Tooltip
1. Click to place the insertion point where you want to add the Tooltip, and click the Spry Tooltip button in the Spry category of the Insert panel.
Default trigger text and a field for the content appear in the document ![]() .
.

![]() If you don’t select an element before adding a Spry Tooltip widget, you get boilerplate text for the Tooltip’s trigger and content.
If you don’t select an element before adding a Spry Tooltip widget, you get boilerplate text for the Tooltip’s trigger and content.
or
Select an element on the page and click the Spry Tooltip button in the Spry category of the Insert panel.
The field for the Tooltip’s content appears in the document. When you first select an existing element, Dreamweaver assumes that you want the element to be the Tooltip’s trigger.
The Property Inspector changes to reflect the Spry Tooltip choices.
2. If you did not select an element before you inserted the Tooltip, type over the default trigger text with the text you want to appear on the page. If you did select an element, skip to step 3.
3. Type over the default text in the Tooltip content field, replacing it with your desired text.
4. In the Property Inspector, choose from the Trigger pop-up menu ![]() .
.

![]() You need to set the Tooltip’s trigger and visual effects (if you want them) in the Property Inspector.
You need to set the Tooltip’s trigger and visual effects (if you want them) in the Property Inspector.
5. (Optional) Choose how the Tooltip will appear to the user in the browser by setting its horizontal or vertical offset and whether there will be a delay or a visual effect as the Tooltip appears or disappears ![]() .
.

![]() The Tooltip appeared when I hovered the cursor over the password field.
The Tooltip appeared when I hovered the cursor over the password field.
Adding Spry Effects
You can use Spry to add visual effects to elements on your page with behaviors. As shown in ![]() in “Adding Spry Elements” earlier in this chapter, Spry Effects are found in the Behaviors tab of the Tag Inspector panel. There are seven Spry effects: Appear/Fade, Blind, Grow/Shrink, Highlight, Shake, Slide, and Squish. You can see them in action at
in “Adding Spry Elements” earlier in this chapter, Spry Effects are found in the Behaviors tab of the Tag Inspector panel. There are seven Spry effects: Appear/Fade, Blind, Grow/Shrink, Highlight, Shake, Slide, and Squish. You can see them in action at labs.adobe.com/technologies/spry/demos/effects/.
If you need a refresher on behaviors, please review Chapter 13. Remember to be careful setting which events trigger behaviors; if you want an effect to take place when an element is clicked, it should happen on the onClick (for instance), not onMouseOut.
Appear/Fade
The Appear/Fade effect makes an element appear or fade away. ![]() shows the dialog, which allows you to set the element, duration, effect (appear or fade), start and end percentages, and whether you want the effect to be reversible.
shows the dialog, which allows you to set the element, duration, effect (appear or fade), start and end percentages, and whether you want the effect to be reversible.

![]() The Appear/Fade dialog lets you control that effect.
The Appear/Fade dialog lets you control that effect.
Blind
The Blind up/down effect works like a window blind that hides or shows the element. ![]() shows the dialog, which lets you choose the element, duration, effect (blind up or down), start and end values, and whether you want the effect to be reversible.
shows the dialog, which lets you choose the element, duration, effect (blind up or down), start and end values, and whether you want the effect to be reversible.

![]() The Blind dialog might sound scary, but in reality it makes an element on your page look like it’s a window shade.
The Blind dialog might sound scary, but in reality it makes an element on your page look like it’s a window shade.
Grow/Shrink
The Grow/Shrink effect makes the element larger or smaller. Use the dialog ![]() to set the element, duration, effect (grow or shrink), start and end values, whether you want the element to move towards the center of the page or its upper-left corner, and whether you want the effect to be reversible.
to set the element, duration, effect (grow or shrink), start and end values, whether you want the element to move towards the center of the page or its upper-left corner, and whether you want the effect to be reversible.
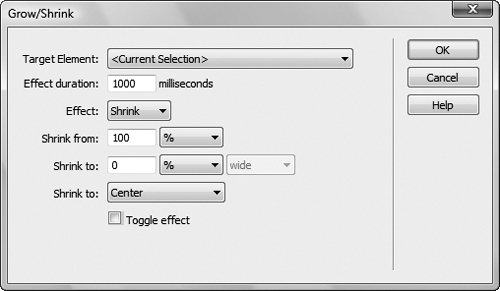
![]() The Grow/Shrink dialog allows you to make objects on your page get larger or smaller.
The Grow/Shrink dialog allows you to make objects on your page get larger or smaller.
Highlight
The Highlight effect changes the background color of the element, causing it to stand out on the page. The Highlight dialog ![]() is where you set the element, duration, start and end colors of the highlight, color you want displayed after the effect has completed running, and whether you want the effect to be reversible.
is where you set the element, duration, start and end colors of the highlight, color you want displayed after the effect has completed running, and whether you want the effect to be reversible.

![]() The Highlight effect changes the background color for the target element.
The Highlight effect changes the background color for the target element.
Shake
The Shake effect does just what it sounds like—it makes the selected element shimmy in place. As ![]() shows, all you can set is the target element.
shows, all you can set is the target element.

![]() The Shake effect does just what it sounds like.
The Shake effect does just what it sounds like.
Slide
The Slide up/down effect moves the selected element up or down on the page. The Slide dialog allows you to set the target element, duration, effect (slide up or down), beginning and ending values, and whether you want the effect to be reversible ![]() .
.

![]() Make an element slide up or down your page with the Slide effect.
Make an element slide up or down your page with the Slide effect.
Squish
The Squish effect makes the selected element disappear into the upper-left corner of the page. The element is set in the Squish dialog, as shown in ![]() .
.

![]() The Squish dialog lets you make elements on your page appear smooshed.
The Squish dialog lets you make elements on your page appear smooshed.
Tip
Not all effects can be applied to all elements. Play with them to see which behaviors work with particular objects on your page.
Tip
You can combine effects as well; all you have to do is keep adding behaviors to a given element. Be careful, though, to avoid getting too tacky!
Using the Adobe Widget Browser
Spry isn’t the only framework available to Web designers. In fact, because Spry is mainly available just to Dreamweaver users, it’s not garnered anywhere near the popularity of some of the other JavaScript frameworks, notably jQuery. Recognizing this fact, along with the introduction of Dreamweaver CS5, Adobe has also shipped the Adobe Widget Browser, which is an Adobe AIR application that makes it easy to browse and download widgets (which Adobe is defining as small collections of JavaScript, CSS, and HTML packaged together to form a complex Web component) from the Adobe Exchange, a Web site that contains extensions for many Adobe programs (www.adobe.com/exchange/).
The problem that the Widget Browser solves is that while there are many widgets that are freely available on the Web, it can be difficult for designers to customize and configure the code for their particular needs. For example, while a widget may allow you to change its colors and fonts, it may not be easy to do so without digging into the code. The Widget Browser provides a user interface for this configuration. However, for the Widget Browser to use a widget, the widget must be specially packaged for use by the Widget Browser and added to Adobe Exchange.
With the Adobe Widget Browser, you can look through the available choices, preview them to see if they’ll do what you want, download widgets, and configure a widget to set its properties. After you have downloaded and configured a widget, the Widget Browser makes it available for use in Dreamweaver.
To browse and download widgets
1. Launch the Adobe Widget Browser, which is found in /Program Files/Adobe/Adobe Widget Browser/ (Applications/Adobe/ on the Mac).
2. The first time you launch the program, you’ll have to sign in to the Adobe Exchange using your Adobe ID. When you are signed in, the browser window appears ![]() .
.

![]() The Adobe Widget Browser allows you to pick from a variety of new widgets for your pages. When we wrote this, there were only a few widgets available.
The Adobe Widget Browser allows you to pick from a variety of new widgets for your pages. When we wrote this, there were only a few widgets available.
3. Click a widget in the browser window to get more information on it ![]() .
.

![]() Clicking a widget gives you details about it.
Clicking a widget gives you details about it.
4. To see the widget in action, click the Preview button in the Widget Browser’s toolbar. The widget preview is displayed ![]() .
.
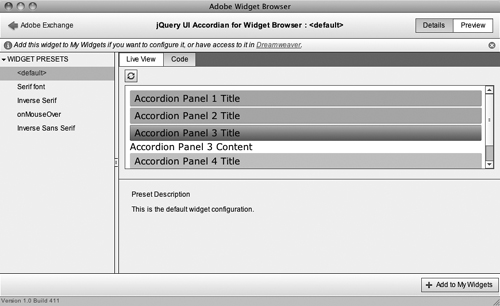
![]() Click the Preview button in the Widget Browser’s toolbar to give the widget a spin.
Click the Preview button in the Widget Browser’s toolbar to give the widget a spin.
Depending on the widget, you can click on the preview to try it out. Also, presets may appear on the left side of the window, allowing you to change the parameters of the widget.
5. When you find the widget you want, click the Add to My Widgets button to download it to your computer and make it available for Dreamweaver’s use.
The widget downloads, and the Widget Browser displays a dialog that tells you that you can change the presets for the widget and that it has been added to Dreamweaver.
To configure a widget
1. In the Widget Browser’s toolbar, click My Widgets.
The program shows you the widgets you have downloaded.
2. Click to select the widget you want to configure.
The widget appears in the Widget Browser window with the default presets. New features include a My Presets section in the preset area and a Configure button below ![]() .
.

![]() After you download the widget and add it to My Widgets, you can begin to configure it.
After you download the widget and add it to My Widgets, you can begin to configure it.
3. Click Configure.
The window changes to show you the available parameters for the widget ![]() .
.
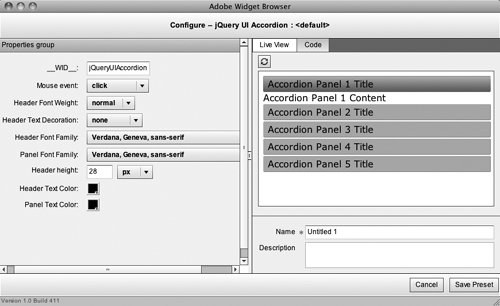
![]() Depending on the widget, you can configure and save your own presets.
Depending on the widget, you can configure and save your own presets.
4. Make any changes you want to in the properties area on the left side of the window, and then enter a name for the preset in the Name field (you may also add an optional description).
5. Click Save Preset.
The new preset appears in the presets list.
Using Widgets
Widgets that have been downloaded and configured by the Adobe Widget Browser are available for use in Dreamweaver CS5. You insert them into your pages as you would other Dreamweaver elements.
To insert a widget
1. Click in the document to place the cursor where you want the widget to appear, and then choose Insert > Widget.
or
From the Common category of the Insert panel, click Widget.
The Widget dialog appears ![]() .
.
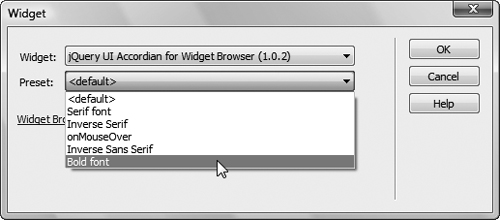
![]() Choose the widget and its preset as part of inserting it on your page in Dreamweaver.
Choose the widget and its preset as part of inserting it on your page in Dreamweaver.
2. From the Widget pop-up menu, choose the widget you want to use.
The widget must have been made available to Dreamweaver by the Adobe Widget Browser to appear in this menu.
3. Choose the preset you want from the Preset pop-up menu.
4. Click OK.
The widget appears in the document ![]() .
.

![]() The widget appears on the page, shown here in Design view. With this accordion panel widget, you would go on to edit the placeholder text.
The widget appears on the page, shown here in Design view. With this accordion panel widget, you would go on to edit the placeholder text.
5. If appropriate to the widget you are using, edit the placeholder text or graphics to customize the widget’s contents for your page ![]() .
.

![]() The inserted and edited widget, as shown in Live View.
The inserted and edited widget, as shown in Live View.
Tip
Sometimes it is easier to change a widget’s text information in Code view than in Design view, because you can see with more precision where the text needs to go inside a div.
Putting It All Together
1. Add a Spry menu bar widget to your site.
2. Add a tabbed panel widget.
3. Add an accordion widget and see how it displays one panel at a time.
4. Add a collapsible panel widget and see how it expands and collapses panels.
5. Apply Spry validation to a text field, a select field, check boxes, and a password field.
6. Add Spry Tooltips to some elements on your page.
7. Apply Grow/Shrink, Highlight, and Squish effects to a few elements.
8. Use the Adobe Widget Browser to browse and download a widget from the Adobe Exchange.
9. Insert that widget into your page and configure it.