Chapter 18. Packaging and Distributing Software
No matter how productive it makes you, a programming language won’t save you any time if you can’t take advantage of a body of code written by other people. A community works faster than any one person, and it’s usually easier to install and learn a library than to write and debug the same code yourself.
That is, if you can find the library in the first place. And if you’re not sucked into an mess of dependencies that grow and grow, making you want to write the code yourself just so you can be doing some real programming.
The success of Perl’s CPAN archive has made the Ruby community work on our own centralized code repository and packaging system. Whatever you think of Perl, you must admit that a Perl programmer can find just about any library they need in CPAN. If you write your own Perl library, you know where to send it: CPAN. This is not really a technical aspect of Perl, but it’s a powerful component of that language’s popularity.
The problem of packaging is more a logistical problem than a
technical one. It’s a matter of coordination: getting everyone to agree on
a single mechanism for installing packages, and a single place to go to
find those packages. For Ruby, the installation mechanism is Ruby gems (or
rubygems or just “gems”), and
rubyforge.org is the place to go to find gems (packaged libraries and
programs).
In many recipes in this book, we tell you to use a gem for some task: the alternative is often to show you pages and pages of code. This chapter covers how to find the gems you need, install them, and package your own software as gems so that others can benefit from your work.
You may need to find and install the Ruby gems system itself. It comes installed by default on Windows, but not on Unix. You can download it from this URL:
http://rubyforge.org/frs/?group_id=126
To install the Ruby gems package, unzip the tarball or ZIP file, and run the
setup.rb script within. You can then
use the gem command to search for and
install gems, as described in Recipes 18.1 and 18.2. You can also build your own
gems from “gemspec” files, as described in Recipe 18.6, and upload it to
RubyForge or some other site (Recipe 18.7).
An older installation system called setup.rb is still in use (for instance, to
install the Ruby gems package itself). We cover this mechanism briefly in
Recipe 18.8.
Neither Ruby gems nor setup.rb
play well with a Unix distribution’s native package installers. If you use
a system like Debian or Red Hat, you may find that some packages (like
Rails) are available both as gems and in your native package format. These
issues are still being resolved; in the meantime, you should use your
native package format whenever possible.
18.1. Finding Libraries by Querying Gem Respositories
Problem
You want to find new gems to install on your system, or see which gems you already have installed.
Solution
From the command line, use gem’s query command:
	$ gem query
	*** LOCAL GEMS ***

	sources (0.0.1)
	   This package provides download sources for remote gem installation

	$ gem query --remote
	*** REMOTE GEMS ***
	actionmailer (1.1.1, 1.0.1, 1.0.0, 0.9.1, 0.9.0, 0.8.1, …)
	     Service layer for easy email delivery and testing.

	actionpack (1.10.1, 1.9.1, 1.9.0, 1.8.1, 1.8.0, 1.7.0, …)
	    Web-flow and rendering framework putting the VC in MVC.

	[… Much more output omitted ….]
From Ruby code, use Gem::cache to query your locally installed
gems, and Gem::RemoteInstaller#search to query the
gems on some other site. Gem::cache can be treated as an Enumerable full of tasty Gem::Specification objects. Gem::Remote-Installer#search returns an
Array containing an Array of Gem::Specification objects for every remote
source it searched. Usually there will only be one remote source—the
main gem repository on rubyforge.org.
This Ruby code iterates over the locally installed gems:
	require 'rubygems'

	Gem::cache.each do |name, gem|
	  puts %{"#{gem.name}" gem version #{gem.version} is installed.}
	end
	# "sources" gem version 0.0.1 is installed
The format_gems method defined below gives a
convenient way of looking at a large set of Gem::Specification objects. It groups the
gems by name and version, then prints a formatted list:
	require 'rubygems/remote_installer'
	require 'yaml'

	def
format_gems(gems)
	  gem_versions = gems.inject({}) { |h, gem| (h[gem.name] ||= []) << gem; h}
	  gem_versions.keys.sort.each do |name|
	   versions = gem_versions[name].collect { |gem| gem.version.to_s }
	    puts "#{name} is available in these versions: #{versions.join(', ')}"
	  end
	end
Here it is being run on the gems available from RubyForge:
	format_gems(Gem::RemoteInstaller.new.search(/.*/).flatten)
	# Asami is available in these versions: 0.04
	# Bangkok is available in these versions: 0.1.0
	# Bloglines4R is available in these versions: 0.1.0
	# BlueCloth is available in these versions: 0.0.2, 0.0.3, 0.0.4, 1.0.0
	# …
Discussion
Not only are Ruby gems a convenient packaging mechanism, they’re an excellent way to find out about new pieces of Ruby code. The gem repository at rubyforge.org is the canonical location for Ruby libraries, so you’ve got one place to find new code.
You can query the gems library for gems whose names match a certain regular expression:
	$ gem query --remote --name-matches "test"
	** REMOTE GEMS ***

	lazytest (0.1.0)
	    Testing and benchmarking for lazy people

	test-unit-mock (0.30)
	    Test::Unit::Mock is a class for conveniently building mock objects
	    in Test::Unit test cases.

	testunitxml (0.1.4, 0.1.3)
	    Unit test suite for XML documents
	ZenTest (3.1.0, 3.0.0)
	    == FEATURES/PROBLEMS
Or, from Ruby code:
	format_
gems(Gem::RemoteInstaller.new.search(/test/i).flatten)
	# ZenTest is available in these versions: 3.0.0, 3.1.0
	# lazytest is available in these versions: 0.1.0
	# test-unit-mock is available in these versions: 0.30
	# testunitxml is available in these versions: 0.1.3, 0.1.4
This method finds gems that are newer than a certain date. It
has to keep around both a Date and
a Time object for comparisons,
because RubyForge stores some gems’ dates as Date objects, some as Time objects, and some as string
representations of dates.[1]
	require 'date'

	def gems_newer_than(date,
query=/.*/)
	  time = Time.local(date.year, date.month, date.day, 0, 0, 0)
	  gems = Gem::RemoteInstaller.new.search(query).flatten
	  gems.reject do |gem|
	    gem_date = gem.date
	    gem_date = DateTime.parse(gem_date) if gem_date.respond_to? :to_str
	    gem_date < (gem_date.is_a?(Date) ? date : time)
	  end
	end

	todays_gems = gems_newer_than(Date.today-1)
	todays_gems.size                                           #=> 7
	format_gems(todays_gems)
	# filament is available in these versions: 0.3.0
	# mechanize is available in these versions: 0.4.1
	# mongrel is available in these versions: 0.3.12.1, 0.3.12.1
	# rake is available in these versions: 0.7.1
	# rspec is available in these versions: 0.5.0
	# tzinfo is available in these versions: 0.2.0
By default, remote queries look only at the main gem repository on rubyforge.org:
Gem::RemoteInstaller.new.sources # => ["http://gems.rubyforge.org"]
To query a gem repository other than rubyforge.org, pass in the
URL to the repository as the --source argument from the command line.
This code starts a gem server on the local machine (it can serve all
of your installed gems to other machines), and queries it:
	$ gem_server &

	$ gem query --remote --source http://localhost:8808
	# *** REMOTE GEMS ***
	# Updating Gem source index for: http://localhost:8808
	# sources (0.0.1)
	#    This package provides download sources for remote gem
installation
From Ruby code, modify the Gem.sources variable to retrieve gems from another source:
	Gem.sources.replace(['http://localhost:8808'])
	format_
gems(Gem::RemoteInstaller.new.search(/.*/).flatten)
	# sources is available in these versions: 0.0.1
See Also
Recipe 18.7, “Distributing Your Gems,” for more on hosting your own gem repository
The Ruby Application Archive is a companion to rubyforge.org: rather than hosting Ruby projects, it links to Ruby packages hosted all around the Web; you’re more likely to see projects on the RAA that aren’t packaged as gems (see Recipe 18.8 for tips on installing them)
18.2. Installing and Using a Gem
Problem
You want to install a gem, then use the code it provides in your programs.
Solution
You can install the latest version of a gem with the gem install command. This command looks for an uninstalled gem file
on your local system; if it can’t find one, it calls out to an
external source (gems.rubyforge.org, unless you specify otherwise)
asking for a gem file. Since gem
install changes the system-wide Ruby installation, you’ll
need to have superuser access to run it.
$ gem install RedCloth Attempting local installation of 'RedCloth' Local gem file not found: RedCloth*.gem Attempting remote installation of 'RedCloth' Successfully installed RedCloth-3.0.4
A gem contains standard Ruby code files, and once you install
the gem, you can require those
files normally and use the classes and modules they define. However,
gems are not installed in the same path as the standard Ruby
libraries, so you’ll need to tell Ruby to supplement its normal
library path with the path to the gems. The simplest way is to
require 'rubygems' in any program
that uses a gem, before you write any require statements for libraries installed
via gems. This is the solution we use throughout this book.
# This code assumes the "redcloth" gem has been installed, as in the # code above. require 'redcloth' # LoadError: no such file to load -- redcloth require ' rubygems' require 'redcloth' parser = RedCloth::CommandParser.new # …
For a solution that works across Ruby scripts, you’ll need to
change your Ruby runtime environment, either by setting the RUBYOPT
environment variable to rubygems,
or by aliasing your ruby command so that it always passes in a
-rubygems option to the
interpreter.
$ ruby -e "require 'redcloth'; puts 'Success'" -e:1:in `require': no such file to load -- redcloth (LoadError) from -e:1 $ ruby -rubygems -e "require 'redcloth'; puts 'Success'" Success # On Unix: $ export RUBYOPT=rubygems $ ruby -e "require 'redcloth'; puts 'Success'" Success # On Windows: $ set RUBYOPT=rubygems $ ruby -e "require 'redcloth'; puts 'Success'" Success
Discussion
Once you’ve installed a gem, you can upgrade it to the latest
version with the gem update
command. Even if you’ve already got the latest version, you’ll see
output like this:
$ gem update RedCloth # Upgrading installed gems… # Attempting remote upgrade of RedCloth # Attempting remote installation of 'RedCloth' # Successfully installed RedCloth-3.0.4 # Gems: [redcloth] updated
You might install a gem for your own use, or because it’s required by a program you want to run. If you want to use a gem in your own programs, there’s no reason not to always use the latest version. Some programs, though, impose version constraints that force you to install a particular version of a gem.
Ruby’s gem system can keep multiple versions of the same gem
installed at once. You can satisfy one program’s archaic dependencies
while still being able to use the latest version of a gem in your own
programs. To install a specific version of a gem, append the version
number to the name, or specify a --version argument to gem install.
$ gem install RedCloth-3.0.4 $ gem install RedCloth --version "3.0.4"
Use the technique described in Recipe 18.3 to require the one that’s right for your
program.
A program that imposes a version constraint doesn’t usually tell
you which specific version of a gem you need to install. Instead, it
crashes with an error that tells you which contraint string you need
to meet. Again, you can see Recipe 18.3 for more on
constraint strings, but they look like >2.0 or <=
1.6. You can install a version of a gem that satisfies a
constraint string by passing the contraint as a --version argument to gem install. The gem command will find and install the latest
version that meets that constraint.
$ ruby -e "require ' rubygems'; require_gem 'units', '~>1.0' puts 'Units'" /usr/local/lib/site_ruby/1.8/rubygems.rb:204:in `report_activate_error': Could not find RubyGem units (~> 1.0) (Gem::LoadError) $ gem install units --version "~> 1.0" Attempting remote installation of 'units' Successfully installed units-1.0.1 Installing RDoc documentation for units-1.0.1… $ ruby -e "require 'rubygems'; require_gem 'units', '~>1.0'; puts 'Units'" Units!
Whether you run the gem
install command, or install a gem from Ruby code that you
write, you’ll need to have the proper permissions to write to your gem
directory.
When you install a gem from the command line, the gem command will offer you a chance to
install all other gems on which it depends. You can have gem install the dependencies without
prompting by passing in the --include-dependencies flag. This invocation
installs the rubyful_soup gem and
the htmltools gem on which it
depends:
$ gem install rubyful_soup --include-dependencies Attempting local installation of 'rubyful_soup' Local gem file not found: rubyful_soup*.gem Attempting remote installation of 'rubyful_soup' Successfully installed rubyful_soup-1.0.4 Successfully installed htmltools-1.09 Installing RDoc documentation for rubyful_soup-1.0.4… Installing RDoc documentation for htmltools-1.09…
You can install a gem from Ruby code by creating a Gem::Installer or Gem::RemoteInstaller object, and calling its
install method. The install method will return an array
containing a Gem::Specification
object for the gem that was installed.
Here’s a simple method that mimics the behavior of the gem install command, looking for a local
copy of a gem before going out to the network:
require ' rubygems/installer' require 'rubygems/remote_installer' def install_gem(gem_name) if File.file? gem_name: Gem::Installer.new(gem_name).install else Gem::RemoteInstaller.new.install(gem_name) end end install_gem('redcloth') # Updating Gem source index for: http://gems.rubyforge.org # => [#<Gem::Specification:0xb5fc7dbc # @loaded_from="/usr/lib/ruby/gems/1.8/specifications/redcloth-2.0.0.gemspec"] # …
To install a gem from Ruby code, you must first go through all of its dependencies and install them, too.
See Also
Recipe 18.3, “Requiring a Specific Version of a Gem”
18.3. Requiring a Specific Version of a Gem
Problem
Your program depends on an interface or feature of a gem found only in particular versions of the library. If a user tries to run your program with the wrong version installed, you want to tell them which version you require, so they can upgrade.
Solution
The rubygems library defines
a method, Kernel#require_gem, which
is a kind of assertion method for gems. It will raise a Gem::LoadError if the given gem is not
installed, or if no installed version of a gem meets your
requirements.
The easiest solution is to allow any version of a gem; you don’t
need to use require_gem at
all:
require 'rubygems' require 'cmdparse' # => true
This is equivalent to requiring a minimum version of 0.0.0:
require_gem 'nosuchgem' # Gem::LoadError: Could not find RubyGem nosuchgem (> 0.0.0)
If you can’t use just any version of a gem, it’s usually safe to require a minimum version, relying on future versions to be backwards-compatible:[2]
require_gem 'cmdparse', '>= 1.0' # => false require_gem 'cmdparse', '>= 2.0.3' # Gem::LoadError: RubyGem version error: cmdparse(2.0.0 not >= 2.0.3)
Discussion
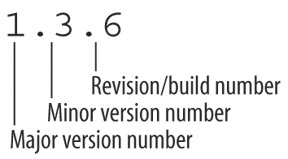
Although you may already be familiar with it, a brief review of the structure of version numbers is useful here. A version number for a Ruby gem (and most other pieces of open source software) has three parts: a major version number, a minor version number, and a revision number or build number (Figure 18-1).
Some packages have only a major and minor version number (such as 2.0 or 1.6), and some have additional numbers after the revision number, but the three-number convention is the accepted standard for numbering Ruby gems.
The revision number is incremented at every new public release of the software. If the revision contains more than minor changes, or changes the public API in a backwards-compatible way, the author increments the minor version and resets the revision number to zero. When a release contains large changes, especially ones that change the public API in backwards-incompatible ways, the author usually increments the major version number, and resets the minor version and revision number to zero.
Version numbers are not decimal numbers: version 1.10 is more
recent than version 1.1, not the same. Version numbers should be
represented as a string or an array of integers, not as a
floating-point number or BigDecimal.
The require_gem method takes
the name of a gem and an optional version requirement. A version
requirement is a string containing a comparison operator and a version
number: for instance, "< 2.4“. A
version requirement can use any of the comparison operators usable in
Ruby code, including =, !=, <, >,
<=, and =>.
RubyGems uses the comparison operator to compare the installed
version of a gem to the required version. The assertion is met if the
installed version has the given relationship with the required
version. For instance, if version 1.1.4 is installed, and the version
requirement is "> 0.9“, the two
version numbers are compared with an expression similar to "1.1.4 > 0.9“, which evaluates to true
(the installed major version, 1, is greater than the required major
version, 0).
A version requirement can also use the special ~> comparison operator, which restricts
certain parts of the version number while leaving the others alone.
You’ll usually use it to restrict the installed version of a gem to a
particular minor version, but allowing any revision number. For
instance, the version requirement ~>
2.0 will match any version with a major number of 2 and a
minor number of 0: 2.0, 2.0.1, 2. 0.2, and 2.0.20 will all be
accepted. ~> 2 will match any
version whose major number is 2; 2.0, 2.1, and 2.10 will all be
accepted.
A library is supposed to increment its major or minor version
whenever the published API changes, so ~> is designed to let you require a
particular version of a library’s API. This is slightly more
restrictive than requiring a minimum version, and is useful if the API
changes drastically between versions, or if you anticipate incompatible changes in
the future.
Since a single Ruby installation can have multiple versions of a single gem installed at once, there’s no technical reason (other than disk space) why you can’t make your users install the exact same versions of the gems you used to develop your program:
require_gem 'gem_1' '= 1.0.1' require_gem 'gem_2' '= 2.6' require_gem 'gem_3' '= 1.3.2'
However, it’s usually not necessary, and such draconian
specificity imposes burdens on the programmers as well as the users.
It’s usually better to use >= or
~>.
If a particular version of a library has an awful bug in it, you can refuse to use it with code like this:
require_gem 'buggy' '!=1.0.3'
You can combine comparison operators by making multiple calls to
require_gem. For instance, you can
simulate ~> with two
calls:
require_gem 'my_gem' '>= 2.0' require_gem 'my_gem' '< 3'
See Also
Recipe 18.2, “Installing and Using a Gem,” for information on using the version requirement strings to install the appropriate version of a gem
The Facets Core library defines a
String#natcmpthat can compare version numbers: that is, “1.10.0” will show up as being less than “1.2.0”
18.4. Uninstalling a Gem
Problem
You want to remove an installed gem from your Ruby installation.
Solution
From the command line, use the gem
uninstall command:
$ gem uninstall blinkenlights Attempting to uninstall gem 'blinkenlights' Successfully uninstalled blinkenlights version 0.0.2
From Ruby code, the most reliable way to uninstall a gem is to
simulate a command-line invocation with the Gem::GemRunner class. This code installs a
gem, then immediately removes it:
require 'rubygems'
require 'rubygems/installer'
require 'rubygems/remote_installer'
Gem::RemoteInstaller.new.install('blinkenlights')
require 'rubygems/gem_runner'
require 'rubygems/doc_manager'
Gem.manage_gems
Gem::GemRunner.new.run(['uninstall', 'blinkenlights'])
# Successfully uninstalled blinkenlights version 0.0.4Uninstalling a gem can disrupt the normal workings of your Ruby programs, so I recommend you only uninstall gems from the command line. That way, there’s less chance of a bug wiping out all your gems.
Discussion
Since rubygems can manage multiple installed versions of the same gem, you won’t usually have to remove old copies of gems. There are three main reasons to remove gems:
You find out that a particular version of a gem is buggy, and you want to make sure it never gets used.
You want to save disk space.
You want to clean up the list of installed gems so that it’s more obvious which gems you actually use.
If uninstalling a gem would leave another installed gem with an
unmet dependency, you’ll be told about the dependency and asked
whether you want to go through with the uninstall anyway. You’ll get
this interactive prompt whether you run the gem uninstall command or whether you use the
Gem::Uninstaller class from Ruby
code.
Gem::Uninstaller.new('actionpack', {}).uninstall
# You have requested to uninstall the gem:
# actionpack-1.8.1
# actionmailer-0.9.1 depends on [actionpack (= 1.8.1)]
# If you remove this gem, the dependency will not be met.
# Uninstall anyway? [yN]The sources gem is a special gem that tells rubygems to look for remotely installable gems at http://gems.rubyforge.org/ by default. If you uninstall
this gem, you won’t be able to install any more gems, except through
complicated hacks of the classes in the Gem module. Just don’t do it. Not even if
you never plan to install any gems from rubyforge.org. Not even if
you’d never thought of doing it until I brought it up in this recipe,
and now you’re curious.
You did it, didn’t you? Now you’ll have to reinstall rubygems by
rerunning its setup.rb
script.
18.5. Reading Documentation for Installed Gems
Problem
You want to read the RDoc documentation for the gems you have installed. Although some gem projects provide human-written documentation like tutorials, the generated RDoc documentation isn’t usually available online.
Solution
RDoc documentation isn’t usually available online because when you install a gem, Ruby generates your very own HTML copy of the RDoc documentation and installs it along with the software. The documentation you need is probably already on your computer.
The simplest way to browse the documentation for your installed
gems is to run the gem_server
command, then visit http://localhost:8808/.
You’ll see all your installed gems in a table form, and be able to
browse the generated documentation of each gem that provides
any.
Otherwise, you can find your Rubygems documentation directory, and browse the installed documentation with local filesystem tools.
Discussion
The generated rdoc for a gem is kept in the doc/ subdirectory of the base directory in
which the gem was installed. For instance, on my computer, gems are
installed in /usr/lib/ruby/gems/1.8/. For every gem that
has RDoc, the generated HTML documentation will be kept in the
directory /usr/lib/ruby/gems/1.8/doc/[gem
name]/rdoc/. If I were to install one particular gem to
another directory, the documentation for the gem would be in a
doc/ subdirectory of that
directory.
Here’s some code that prints out the location of the RDoc files
for every installed gem. Unless you’ve installed specific gems in nonstandard locations, they’ll all be in the
doc/ subdirectory of Gem.dir. This code snippet also shows off
some of the capabilities of Gem::DocManager, the Ruby class you can use
to manipulate a gem’s RDoc.
require 'rubygems'
Gem.manage_gems
def show_gem_rdoc
puts "Your generated docs are all probably in #{File.join(Gem.dir, "doc")}"
puts "Just to be safe, I'll print out every gem's RDoc location:"
specifications_dir = File.join(Gem.dir, 'specifications')
lacking_rdoc = []
Gem::SourceIndex.from_installed_gems(specifications_dir).each do |path, spec|
manager = Gem::DocManager.new(spec)
if manager.rdoc_installed?
doc_path = File.join(spec.installation_path, 'doc', spec.full_name)
puts " #{spec.full_name} => #{doc_path}"
else
lacking_rdoc << spec.full_name
end
end
unless lacking_rdoc.empty?
puts "
These installed gems have no RDoc installed:"
puts " #{lacking_rdoc.join("
")}"
end
end
show_gem_rdoc
# Your generated RDoc is probably all in /usr/lib/ruby/gems/1.8/doc
# Just to be safe, I'll print out every gem's RDoc location:
# flexmock-0.1.7 => /usr/lib/ruby/gems/1.8/doc/flexmock-0.1.7
# simple-rss-1.1 => /usr/lib/ruby/gems/1.8/doc/simple-rss-1.1
# classifier-1.3.0 => /usr/lib/ruby/gems/1.8/doc/classifier-1.3.0
# actionmailer-1.1.5 => /usr/lib/ruby/gems/1.8/doc/actionmailer-1.1.5
# …
#
# These installed gems have no RDoc installed:
# Ruby-MemCache-0.0.1
# RedCloth-3.0.4
# sources-0.0.1
# …RDoc is generated for most gems whether or not the author was careful to add RDoc descriptions to all their Ruby code. At minimum, a gem’s RDoc will list the classes and methods present in the gem, which is useful in a bare-bones way.
If you don’t want to generate RDoc when you install a gem, pass
in the --no-rdoc argument to the
gem install command. The only real
reason to do this is a concern for disk space.
The flip side of reading a gem’s documentation is writing it. When you’re writing your
gemspec (see Recipe 18.6), you should set
spec.has_rdoc = true. This will let
the end user’s gem installer know that your gem was written with RDoc
in mind. It doesn’t do much except suppress a warning during the
installation of your gem.
See Also
The Ruby Standard Library Documentation collection (http://www.ruby-doc.org/stdlib/) contains generated HTML for the RDoc of all the packages in the Ruby standard library: it includes everything in
lib/ruby/, but it doesn’t include the core applicationRecipe 17.11, “Documenting Your Application”
Recipe 18.6, " Packaging Your Code as a Gem”
Recipe 19.2, “Automatically Generating Documentation”
18.6. Packaging Your Code as a Gem
Problem
You want to package a program you wrote as a Ruby gem, possibly to distribute it on the main gem server at rubyforge.org.
Solution
First, you must write a specification file. This file consists
of a few lines of Ruby code that instantiate a Gem::Specification object and populate it
with information about your program. Assuming that all of your
program’s files are in a subdirectory called lib/, the following might make a good
specification file:
# shielding.gemspec
require 'rubygems'
spec = Gem::Specification.new do |spec|
spec.name = 'shielding'
spec.summary = 'A library for calculating the strength of duophasic shielding'
spec.description = %{This library calculates to high precision the
physical and electrostatic strength of a duophasic shield. It knows
about most real-world shield configurations, as well as many
theoretical arrangements not yet built.}
spec.author = 'Bob Zaff'
spec.email = '[email protected]'
spec.homepage = 'http://www.example.com/software/shielding/'
spec.files = Dir['lib/*.rb']
spec.version = '1.0.0'
endYou can then use the gem
build command to create the actual gem from its
specification file:
$ gem build shielding.gemspec Attempting to build gem spec 'shielding.gemspec' Successfully built RubyGem Name: shielding Version: 1.0.0 File: shielding-1.0.0.gem $ ls shield.gemspec shielding-1.0.0.gem
Then install the gem normally:
$ gem install ./shielding-1.0.0.gem Attempting local installation of './shielding-1.0.0.gem' Successfully installed shielding, version 1.0.0 Installing RDoc documentation for shielding-1.0.0… WARNING: Generating RDoc on .gem that may not have RDoc.
You can also build a gem from within Ruby code by passing the completed Gem::Specification into a Gem::Builder object.
require 'rubygems/builder' builder = Gem::Builder.new(spec).build # Successfully built RubyGem # Name: shielding # Version: 1.0.0 # File: shielding-1.0.0.gem # => "shielding-1.0.0.gem"
Gem::Builder is useful as a
starting point for automating your releases, but if you’re interested
in doing that, you should use Rake (see Chapter 19, especially Recipe 19.4).
Discussion
Other recipes in this chapter query gem repositories for
information and get it back in the form of Gem::Specification objects. To create your
own Ruby gem, you need to create a Gem::Specification object from scratch. A
file that defines a Gem::Specification object is called a
"gemspec" and it usually has a
.gemspec extension.
To make a Gem::Specification
object that can be turned into a gem, you must define the four
attributes name, summary, version,
and files. The version attribute
should be a string of the form “[major version].[minor
version].[revision]”; this is the recommended form for version numbers
of software products packaged as gems (see Recipe 18.3).
I recommend you also define author,
email, description, and possibly homepage. The description attribute advertises your gem,
and the other three attributes give a way for your users to get in
touch with you.
Some other tips on creating your gemspec:
If you want a user to be able to
requirea file from their own Ruby code, put it into thelib/subdirectory of your project. If you put it into some other directory, you’ll need to add the name of that directory to therequire_pathsattribute.If you want a user to be able to run a file as a Ruby script, put it into the
bin/subdirectory of your project. If you put it into some other directory, you’ll need to change thebindirattribute.If the code in your gem has associated unit tests, put the names of the test files into an array as the
test_filesattribute. It’s also a good idea to keep those files together in atest/ subdirectory. Once the gem is installed, you can run its tests by issuing the commandgem check-t [gem name]Ruby automatically generates a set of RDoc HTML pages for all the Ruby classes and files in your gem. Unless you set the
has_rdocattribute, when you install the gem you’ll get a “WARNING: Generating RDoc on .gem that may not have RDoc.”You can take advantage of the RDoc generation by linking nonRDoc files from the RDoc site: just name those files in the array
extra_rdoc_files. If your gem comes with a README file or other nonRDoc documentation, it’s a good idea to include that with the RDoc, since that’s where most people will look first for documentation.The
filesattribute should be an array that includes every file you want to be packaged in the gem. If you included any files intest_filesorextra_rdoc_files, you must include them again here or they won’t actually be installed. The simplest way to do this is to definefileslast of all, and sticktest_filesandextra_rdoc_filesinside:spec.test_files = Dir['test/*.rb'] spec.extra_rdoc_files = ['README'] spec.files = Dir['lib/*.rb'] + spec.test_files + spec.extra_rdoc_files
If your gem requires another gem to work, the spec file is where you define the dependency. Use the
Gem::Specification#add_dependencymethod rather than modifying thedependenciesattribute directly. Theadd_dependencymethod accepts an optional version restriction, in a format that should be familiar to you if you’ve read other recipes in this chapter. You can use a version restriction to make sure your gem is only used with certain versions of another gem.spec.add_dependency('another_gem') spec.add_dependency('yet_another_gem', '~> 3.0') # Any version will do. # Must be 3.0.x series.
See Also
The Gemspec reference (http://docs.rubygems.org/read/chapter/20)
Recipe 18.3, “Requiring a Specific Version of a Gem”
Recipe 18.7, “Distributing Your Gems”
Recipe 19.4, “Automatically Building a Gem”
18.7. Distributing Your Gems
Problem
You’ve packaged your software as a Ruby gem, but nobody knows about it. You want to make your gem easy to find and install, so that your genius does not go unrecognized.
Solution
The simplest solution (for you, at least) is to upload your
.gem file to a web site or FTP
site. Your users can download the .gem file, then install it by passing the
filename into the gem install
command:
$ wget http://www.example.com/gems/my_gem-1.0.4.gem --10:40:10-- http://www.example.com/gems/my_gem-1.0.4.gem => `my_gem-1.0.4.gem' Resolving gems.example.com… 204.127.202.4 Connecting to gems.example.com|204.127.202.4|:80… connected. HTTP request sent, awaiting response… 200 OK Length: 40,823 (40K) [text/plain] 100%[====================================>] 40,823 46.96K/s 10:40:11 (46.85 KB/s) - `my_gem-1.0.4.gem' saved [40823/40823] $ gem install ./my_gem-1.0.4.gem Attempting local installation of './my_gem-1.0.4.gem' Successfully installed my_gem, version 1.0.4 Installing RDoc documentation for my_gem-1.0.4…
If your gem has dependencies, the end user must separately
install the dependencies before installing a downloaded gem, or the
gem command will become confused
and die. This will happen even if the user specifies the --include-dependencies flag:
$ gem install --include-dependencies ./my_gem_with_dependency-1.0.0.gem Attempting local installation of './my_gem_with_dependency.1.0.0.gem' ERROR: Error installing gem ./my_gem_with_dependency-1.0.0.gem[.gem]: my_gem_with_dependency requires my_dependency > 0.0.0
If you distribute your gem from a web site, be sure to set the
homepage attribute in your gemspec
file.
Discussion
Gems are usually distributed through HTTP. A web server
might serve standalone .gem files
intended for download by the end user, or it might also serve some
metadata that allows the gem
command to download and install gems on its own.
There are several ways of setting up gems for distribution. In general you must negotiate a tradeoff between the developer’s (your) convenience and the end user’s ease of installation. The Rubygems package makes it easy to install and manage third-party Ruby packages, but the developers of those packages have to jump through some hoops if they want to make the installation process as transparent as possible.
Simply uploading the raw gem files to your web site is the
simplest solution from your point of view (assuming you already have a
web site), but it’s less convenient for your users. This is especially
true if your gem has dependencies. The most convenient solution for
the end user is for you to upload your gem to the rubyforge.org site.
Whenever you upload a .gem file to
a project on this site, it is automatically mirrored to the canonical
rubygems repository at http://gems.rubyforge.org/gems/. This is where the
rubygems package looks for gems by default.
However, getting your gem onto rubyforge.org is more complicated
than uploading a gem to your own web site. You must first sign up for
a RubyForge account, giving the administrators your personal
information. You must then submit a project (the name of the project
should go into the rubyforge_project attribute in your gemspec)
and have it approved by the site administrators.
Once your RubyForge project is set up, you can use the web
interface to “create a new release” for your project, then upload your
prebuilt gem to your project’s file repository. Within a few minutes
to a few hours, your gem will be mirrored to the main gem repository.
From that point on, anybody with the rubygems package and Internet access can
install your gem, along with any dependencies, simply by running
gem install your_gem
-—include-dependencies. But for your smaller projects, the
work you have to do to get to this point may seem like overkill
A compromise is to host the gem yourself on an existing web
server, and also host the YAML metadata that lets the gem command locate, download, and install
gems on its own. You can generate the YAML metadata with the generate_yaml_index.rb script that comes
with the rubygems package. Put all your gems into a
gems/ directory somewhere in your webspace, and
pass in the parent of the gems/ directory as the
--dir argument to generate_yaml_index.rb.
	$ cd ~/public_html/
	$ mkdir gems
	$ cp ~/mygem-1.0.0.gem gems/
	$ generate_yaml_index.rb --dir=~/public_html/ --verbose
	Building yaml file
	   … adding mygem-1.0.0
	Building yaml.Z file
	$ ls yaml*
	yaml yaml.Z
The yaml and yaml.Z files are intended for download by
the various gem commands. Simply
tell your users to pass in an appropriate --source argument to gem, and they’ll be able to install
gems from your web space just as they can from the
canonical repository at RubyForge
The --source argument should
correspond to the directory in your webspace that contains the
yaml and yaml.Z files. For instance, if your ~/public_html/ directory in the example
above corresponds to the URL http://www.example.com/~leonardr/, you should ask your
users to install your gems with gem install
--source= http://www.example.com/~leonardr/. Passing in a
--source is more work than just
getting everything from RubyForge, but once the user knows the URL,
it’s not much more.
Note, however, that one invocation of the gem install command can only load gems from
a single source. If you’re hosting a gem that depends on other gems,
you must assume the user has already installed the dependencies, or
else provide copies of the dependency gems in the same gems/ directory as your own gems. If
gem install is given a --source argument, it won’t know to look at
gems.rubyforge.org as a backup.
If you don’t already have a web site, you can run a special web
server that only serves gems. The rubygems package comes with an
application called gem_server that
acts as a web server providing copies of all the gems installed on
your system. The best way to use this is as a private gem repository
that distributes in-house Ruby gems throughout your team or
organization.
See Also
Recipe 18.2, “Installing and Using a Gem”
Recipe 18.6, “Packaging Your Code as a Gem”
A tutorial for running a gem server as a Windows service (http://rubyforge.org/docman/view.php/85/126/gemserver_tutorial.txt)
18.8. Installing and Creating Standalone Packages with setup.rb
Problem
You want to install a Ruby package that includes a setup.rb script instead of being packaged as
a Ruby gem. Or, you want to make it possible for people to install
your software package without having to install Ruby gems.
Solution
To install a setup-rb—based
Ruby package as root or the administrative user, simply run the
setup.rb script:
$ ruby setup.rb
By default, setup.rb installs
a package into your site_ruby
directory. If you don’t have root access or only want to install the
package for your own use, you can install the package into your home
directory, like this:
$ ruby setup.rb all --installdirs=home
That command installs the package into the lib/ruby/ subdirectory of your home
directory. Make sure you have that directory included in your RUBYLIB environment variable, or Ruby won’t
know to look there when you require
a library. You can check your library path with the special $: global
variable:
	$:
	# => ["/home/leonardr/lib/ruby", "/usr/local/lib/site_ruby/1.8", … ]
	require 'installed_via_setup'
	# => true
Discussion
Because Ruby gems are not yet part of the standard Ruby library,
some people prefer to package their software releases as
self-contained archives. A package that includes a setup.rb installation script contains all
the code and data necessary for installation; it might have
dependencies, but it doesn’t rely on another component just to get
itself installed. The rubygems
package itself is installed via setup.rb, since it can’t assume that the
system already supports gem-based installations.
You might also use a setup.rb
script instead of a Ruby gem if you want to add Ruby hook scripts to
the installation procedure. For instance, you might want to create a
new database when your package is installed. Once the Rubygems package
is included in the Ruby standard library, this will be just about the
only reason left not to package all your software as Ruby gems. Even
native C extensions can be included in a Ruby gem and built as part of
the gem installation.
Ruby gems and setup.rb impose
similar file structures on your package: your Ruby libraries go into a
lib/ subdirectory, command-line
applications go into a bin/
subdirectory, and unit tests go into a tests/ subdirectory.
To use setup.rb, simply
arrange your package to conform with its file stucture, and copy the
setup.rb file itself into the
top-level directory of your package.
setup.rb works kind of like a
Unix Makefile: it has various tasks like test, clean, install, and all
that are triggered when the user runs setup.rb with certain options. You can put a
pre- or post-hook into any task by creating a Ruby script called
“pre-[task].rb” or “post-[task].rb”. All such files will be run before
or after the appropriate task.
Here’s a simple example. I’ve created a small package with the following layout:
	setup.rb
	post-clean.rb
	lib/
	lib/installed_via_setup.rb
	lib/pre-config.rb
	bin/
	bin/command.rb
I’ve got a library, a command-line script, a hook script
pre-config.rb that needs to run
before the config task, and a
second hook script post-clean.rb
that needs to run after the clean task. The hook scripts simply print
out the messages “Pre-config hook called” and “Post-clean hook
called”.
When I run the clean task,
with the command ruby setup.rb
clean, I see the following output:
	$ ruby setup.rb clean
	---> bin
	<--- bin
	---> lib
	<--- lib
	Post-clean hook called.
	rm -f .config
	rm -f InstalledFiles
When I run setup.rb without
specifying a task, I see the following output:
	$ ruby setup.rb
	…
	Pre-configuration hook called.
	…
	rm -f InstalledFiles
	---> bin
	mkdir -p /usr/bin/
	install command.rb /usr/bin/
	<--- bin
	---> lib
	mkdir -p /usr/local/lib/site_ruby/1.8/
	install installed_via_setup.rb /usr/local/lib/site_ruby/1.8/
My command-line program gets installed into /usr/bin/, and my library file into site_ruby. The preconfiguration hook script
gets called because the default task, all, simply runs three other
tasks: config (triggering the hook
script), setup, and install.
Once I’ve run ruby setup.rb,
I am free to require 'installed_via_setup' from within any Ruby
program, and to invoke command.rb
from the command line.
There’s no easy way to uninstall a package installed with
setup.rb; you need to delete the
files manually.
One final thing to watch out for: standalone Ruby packages
created before about 2004 may be installed via a script called
install.rb. This script works much
the same way as setup.rb. The two
scripts were both written by Minero Aoki and are both part of the
setup.rb package, but install.rb
was intended for smaller-scale installations. As of late 2003, the two
scripts were merged, so now you only have to worry about setup.rb.
See Also
Many of the packages on the Ruby Application Archive use
setup.rb, while most of the packages onrubyforge.orgare packaged as gems (http://raa.ruby-lang.org/)The "
setup.rbUser Manual” describes how to run and createsetup.rbscripts (http://i.loveruby.net/en/projects/setup/doc/)If you want to write
setup.rbhook scripts, see the hook script API at http://i.loveruby.net/en/projects/setup/doc/hookapi.html
[1] This is because of differences in the underlying gem specification files. Different people build their gemspecs in different ways.
[2] The first require_gem
command in this code snippet returns false not because the
cmdparse gem isn’t there, but
because we’ve already loaded the cmdparse library (in the very first code
snippet of this recipe). The require method only returns true the
first time it loads a library.