
IN THIS CHAPTER
To begin understanding how your Linux computer works, you need to know how it starts. Booting in Linux is a three-step process, as the computer’s basic input/output system (BIOS) starts the machine’s hardware without a care as to what operating system its owner (you) wants to run.
It hands control over the machine to a boot manager (such as LILO or GRUB), which does care about finding at least one operating system on the machine.
Finally, you tell the boot manager what file system to run, and it does. The Linux kernel then manages the rest of the session.
In this chapter, you learn exactly what you need to know about the Linux boot process. Some of this information applies to other operating systems, but in this chapter, we focus on starting up and booting SUSE Linux.
Determining which services run in a Linux box partly depends on what kind of Linux box it is. Its system state, or runlevel, controls what starts and what doesn’t. Ultimately, you have the power, as SuperUser, to define which services run when.
You’ll walk through a boot process to see exactly what happens when your computer starts up. You will use the YaST Runlevel Editor to manage services. You’ll also look at some of the tools you can use to monitor your system and keep it in tip-top shape.
All x86-type computers, whether running processors from Intel or AMD—no matter what operating system they have—start up the same way. BIOS software that sits on a specialized chip activates all the circuitry on the motherboard, and occasionally other hardware connected to the motherboard, and then goes looking for a boot manager—a piece of software code that starts an operating system. This boot manager code can sit on a hard drive (where it’s called the Master Boot Record, or MBR), a floppy disk, a CD-ROM, or even on another computer if the system is using the network file system (NFS). This bootloader software tells the BIOS where the Linux kernel is located, how to load it into memory, and how to start it.
If all goes well in the hardware initialization, the BIOS locates a special hexadecimal value written to the volume, which makes the volume bootable.
The order in which it looks for this is in the BIOS settings, which you can access by pressing a certain key or key combination while the BIOS is still in command. The traditional order was floppy disk, hard drive, some other place. In recent years, bootable CD-ROMs joined the BIOS options and now should be first on the list.
Any modern BIOS should have considerable flexibility in the devices it searches for a bootable volume, but it always stops looking when it finds the first bootable volume. This is why it’s a good idea to remove your SUSE Linux installation CD after adding new software to your system. If you don’t, the next time you boot will be to the CD. This is presumably why the CD now has Boot from Hard Drive as the default option on its opening menu.
Note
Your BIOS will alert you with a series of beeps if it finds a hardware problem that makes your system unbootable. Each motherboard manufacturer has a different system of generating those beeps, so consult your motherboard manual to learn the code, or contact your PC vendor or manufacturer to try to fix the problem.
When the BIOS finds the bootloader code, it then looks for the MBR, the first sector on the hard drive. This is the most important sector on the disk because the bootloader code (just 446 bytes) and the partition table (64 bytes) reside there. Having properly initialized the hardware, the BIOS can now place the bootloader code into memory and hand over the boot process to the bootloader. The bootloader code that sits in the MBR has one job—to start the full bootloader program, GRUB by default, and load it into memory.
You may not realize it unless you are dual booting multiple operating systems, but after your BIOS starts firing up the fan, the microprocessor chip, and the power supply, a boot manager, or bootloader, takes over the process until the kernel starts up.
Linux supports a variety of open-source and proprietary boot managers, but you can install only two with YaST: the Grand Unified Bootloader (GRUB) and the Linux Loader (LILO). GRUB has been the default bootloader for SUSE Linux since v8.2, but LILO still runs quite a few systems, and you may want to use it instead.
LILO succeeded loadlin as the primary Linux bootloader and seems to be in the long process of being superseded by GRUB. LILO carries out its single task, booting to a file system, well. It is not quite as flexible nor as configurable as GRUB. Nonetheless, it is still the default bootloader for systems in which the Root partition is installed on CPU-dependent RAID controllers (such as many Promise or Highpoint controllers), Software RAID, or Logical Volume (LVM) managed disk.
The chief difference between the two bootloaders is in how they find and load file systems. LILO looks for a file system based on where the partition table says it is. GRUB can read and identify several file systems (ext2, ext3, ReiserFS, JFS, XFS, Minix, and DOS).
In YaST, the Boot Loader Configuration module is on the System page. You can set LILO as the default if you want and set many other options in this screen (see Figure 22.1). If you prefer, you can edit the file directly by clicking Edit Configuration Files.
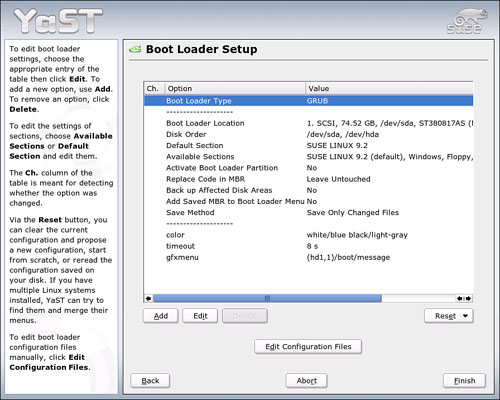
By default, GRUB displays a menu, allowing you to boot SUSE Linux from the hard drive, from a floppy drive, or into fail-safe mode. Fail-safe mode loads a kernel version with a set of parameters that makes it possible to boot with some hardware problems. If there’s another operating system on your computer, GRUB will list this on your boot menu as well. After 8 seconds, GRUB will boot the first item on the menu; that is, SUSE Linux.
You can see how each process builds on the previous one, allowing different operating systems to work on the same hardware.
The GRUB menu you see is controlled by the GRUB configuration file, which is located at /boot/grub/menu.lst. A sample menu.lst file is shown in Figure 22.2.
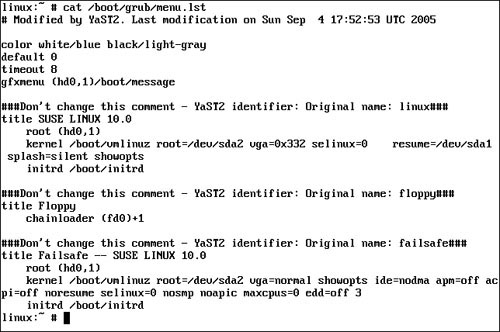
The first portion of menu.lst defines options for the display of the GRUB menu, such as the color scheme of the menu, the default menu option, and the number of seconds (timeout) before GRUB runs the default menu option.
Following the display options are a list of items that will be displayed in the GRUB menu. Each menu item begins with “title.” Notice in Figure 22.2 that this particular GRUB menu will display three items:
SUSE LINUX 10.0
Floppy
Failsafe—SUSE LINUX 10.0
The remaining lines tell GRUB where to find the operating system files needed to run Linux. These include the following:
root: This command sets the current root device to the specified device.
kernel: This command loads the primary boot image from the boot image file.
initrd: This command loads an initial ramdisk for the boot image.
To configure how GRUB boots your system, you can either manually edit menu.lst with a text editor, or you can use the YaST System, Boot Loader module, shown in Figure 22.3.

As you can see in Figure 22.3, each of your menu items is displayed in the Section Management screen. Here you can add, delete, or modify your GRUB menu items, as shown in Figure 22.4.
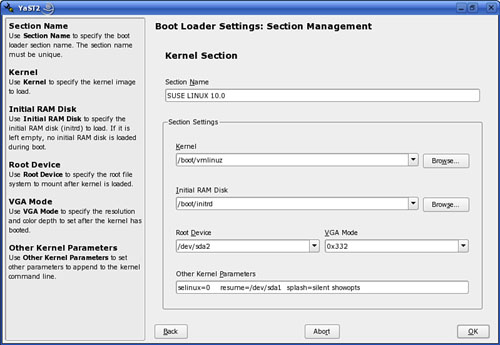
In this screen, you can edit your menu item name, the kernel file, initial ramdisk file, root device, and VGA mode, as well as optional kernel parameters.
When GRUB hands over the process to the SUSE Linux kernel, it leaves the scene. The kernel now takes charge, putting up the message Uncompressing Linux...; it is present and available to you until you shut down the system. While the kernel boots, SUSE Linux puts up a nice blue wallpaper to hide all the boring text that scrolls by as the kernel initializes first your peripheral hardware, then the hard drive and attending file systems, followed by the serial ports. Press the Esc key to watch the boot process unfold.
As a user, or even as an administrator, you don’t have much direct interaction with the Linux kernel. You run applications, which occasionally interact with the kernel to get things done. In the kernel’s view of things, an application is simply a process, one of many it deals with. The father of all processes, which the kernel loads soon after the kernel itself loads, is called init, located in the /sbin directory. The rest of the boot process (and later, the shutdown process) is really handled by init, not the kernel. All other processes are started by init or one of its child processes. Init is centrally configured by the /etc/inittab file.
After activating the serial ports, the kernel runs a series of boot scripts, located at /etc/rc.d/boot.d, which activates (and, if required, mounts) still more devices and local file systems.
Then boot.clock sets up the system clock, ldconfig identifies the current time zone, and local networking interfaces are turned on via boot.sysctrl, boot.localnet (for the loopback interface), and boot.isapnp.
Finally, the kernel’s System Boot Control declares
The system has been set up
and runs /etc/init.d/boot.local. This program invokes the appropriate runlevel for the system. There is much more on runlevels in the next section, but a standard networked desktop will launch Runlevel 5 as it hits the home stretch of the boot process.
At Runlevel 5, networking services are started and various other services and the system logs come online. The sound driver, keyboard maps, CUPS printer interfaces, mail transfer agent, and xinetd Internet services come next.
Finally, the kernel starts the X Window System and the display manager (KDM by default) that allows the user to log in. Logging in loads the desired desktop, and you’re done.
There are several ways to start and stop services. SUSE Linux uses the runlevel method that originated with Unix System V. Runlevels determine when, or if, a service runs. They also determine the order in which services are started.
Runlevels, generally speaking, identify the type of use for the computer. Table 22.1 explains the different runlevels in SUSE Linux; notice that they correspond somewhat directly to the basic choices of software installations presented to you during the initial installation of SUSE Linux.
Table 22.1. Runlevels
The minimum installation is roughly equivalent to Single User Mode, Runlevel 1, whereas the minimum graphical install corresponds to Runlevel 3. The gluttons who want a graphical desktop use Runlevel 5, the whole enchilada.
While the system is running, you can actually change your current runlevel. When you change runlevels, all services essential to your current runlevel are stopped and the services essential to the new runlevel are started.
To do this, enter the init command at a shell prompt, followed by the runlevel number you want to switch to. For example, if you want to switch from runlevel 5 (complete with X and a desktop environment) to runlevel 3 (the minimal graphical environment), you would complete the following:
Open a terminal session and switch to your root user account.
At the shell prompt, run the init script for runlevel 3 by entering
init 3.
When you do this, init consults the /etc/inittab configuration file and runs /etc/init.d/rc with 3 (the new runlevel) as a parameter. The rc utility runs stop scripts for every service missing a start script in /etc/init.d/rc3.d, but having a stop script in /etc/init.d/rc5.d.
Stop scripts have filenames that begin with K (for “kill”), and start scripts begin with S (for “start”). The numbers following the letter indicate an order for each script to be executed. This prevents files with some dependencies from crashing before they stop.
After all the unnecessary runlevel 5 scripts have been stopped, the start scripts run for services needed in runlevel 3 but not in runlevel 5.
When you installed SUSE Linux, you were given the option to set your system’s default run level. By default, this is runlevel 5. This is usually the best option for most users. However, suppose it isn’t the right choice for you. Suppose you want to use your SUSE Linux system as a server (which it can do very well) and you don’t want the CPU spending unneeded cycles redrawing your graphical screens. You would prefer it to boot, by default, to a text-based prompt while retaining the capability to run your graphical desktop when needed. In this situation, runlevel 3 would be a better choice.
You can set your default runlevel in two ways. First, you can edit your /etc/inittab configuration file with a text editor, as shown in Figure 22.5.

Notice that about three-fourths of the way down the screen, a line reads as follows:
id:5:initdefault:
This line specifies which runlevel your system should boot to by default. If you want to change this to runlevel 3, you should complete the following:
Open a terminal session and switch to your root user account.
At the shell prompt, enter
vi /etc/inittab.Arrow down to
the id:5:initdefault:line in the file.Press Ins.
Change the 5 to a
3.Press Esc.
Enter
:exit.Reboot your system.
When the system boots, it will enter runlevel 3, as shown in Figure 22.6.

When it’s finished booting, your system will display a simple, text-based screen asking you to authenticate. After logging in, you can optionally start your graphical environment by entering startx from the shell prompt.
The second way you can change your default run level is with YaST. If you’re not comfortable using Linux text editing tools, you can let YaST do the work for you. To change your default runlevel using YaST, complete the following:
Start YaST and navigate to the System, System Services (Runlevel) module.
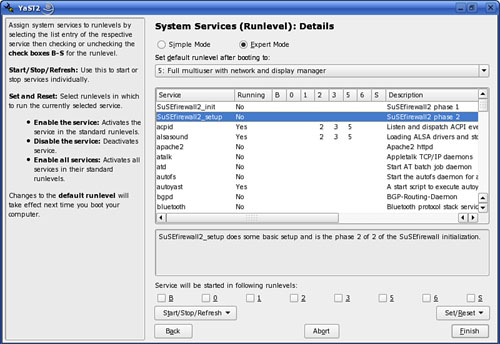
Select Expert Mode. The screen in Figure 22.7 is displayed.
In the Set Default Runlevel After Booting drop-down list, select the default runlevel for your system.
Select Finish.
The next time you restart your system, it will boot to the default runlevel you configured.
YaST provides a startlingly easy way for system administrators to manage which services run at boot. The YaST Runlevel Editor module is easy to understand and gives you important information about each service. The start/stop process is nothing more than a mouse click.
How wonderful, you’re thinking. A nice change. Experienced system administrators may cringe a little, though. It is so easy to destroy your system. The help text to the left of the Runlevel Editor, shown in Figure 22.8, offers a relatively calm warning: The runlevel editor is an expert tool. Only change settings if you know what you are doing, otherwise your system might not function properly afterwards.
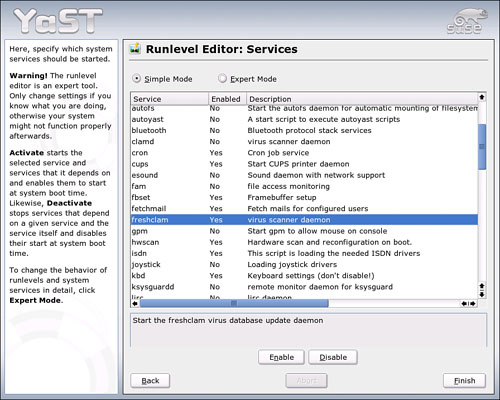
Figure 22.8. The YaST Runlevel Editor makes it incredibly easy to turn services on and off. Great care must be taken so that you do not disrupt your system’s functioning.
That’s fine as far as it goes. The Caution box coming up next may be closer to the point.
Caution
You can render your system unbootable if you do not take particular care when starting new services, and especially when stopping existing services.
Using the Runlevel Editor in Expert Mode is potentially more dangerous. Don’t change the runlevel for a service without very good reason.
Always review the changes you made before closing the Runlevel Editor. They will not take effect until you reboot your computer, so you can prevent catastrophic errors if necessary.
When you open the Runlevel Editor module from the YaST System page, a list of all available services appears. The second column tells you whether this service currently is loaded at boot, and the third column offers a brief description of each service. Click a service, such as freshclam in Figure 22.9, and see a more detailed description in the bottom pane.
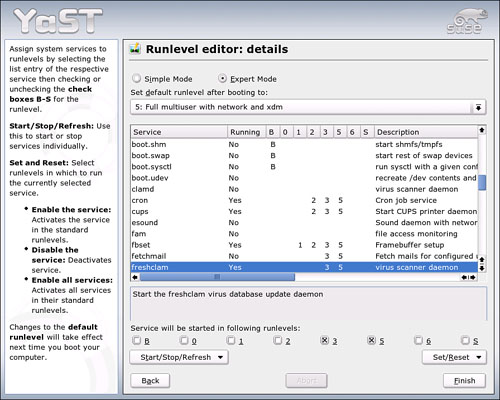
Figure 22.9. The Runlevel Editor Expert Mode lets you start and stop services, set different runlevels for individual services, and set the default runlevel on boot.
To start a service when you next boot your system, select it from the list and click Enable. To turn a service off, select it and click Disable. Review your changes and click Finish to confirm them. Reboot your computer to force the changes.
Click the Expert Mode button to display the additional options (see Figure 22.9). The first thing you may notice are the boot scripts and other services listed here. When in Expert Mode, you really need to know what you’re doing, and you get much less hand holding as far as descriptions of each service.
In Expert Mode, you can do the following:
Change the default runlevel on boot.
Identify which service can run on each runlevel, from boot to shutdown and everything in between.
Start, Stop, or Restart any service without rebooting.
Enable all services on boot.
As in Simple Mode, the editing process is straightforward. Use the drop-down menu to select the default runlevel. Select a service to make changes. Click the Start/Stop/Refresh menu to act on a service now: Start a service not currently running, Stop a running service, or Refresh (stop, if necessary, then start) a service.
Use the check boxes near the bottom of the screen to change the runlevel of a selected service. B runs a service at boot. S runs a service at shutdown.
Notice that when you change from Simple Mode to Expert Mode, the second column changes from Enabled to Running. This lets you use the Start/Stop/Refresh menu. The Set/Reset menu lets you Enable or Disable individual services and adds a third option: Enable All Services.
Make your changes, review them carefully, and then click Finish to confirm your changes.
If you change the configuration file for a particular service, you usually have to stop and restart the service to use the new configuration. When making changes to the X server, it is often worthwhile to change from Runlevel 5 to Runlevel 3 to test the changes, then switch back to reenable the display manager. This way, if you make a mistake, you can fix it and get it right without having to reboot every time.
To stop, start, or restart any service, open a shell as the SuperUser. To see if your ALSA sound server is running, type the following:
/etc/init.d/alsasound status
The script will report its status. It should report
ALSA sound driver loaded. running
To stop and restart the service, type
/etc/init.d/alsasound restart
and the following should appear:
Shutting down sound driver               done
Starting sound driver:  via82xx          done
Restoring the previous sound setting     done
As noted in the previous section, you can also use the YaST Runlevel Editor in Expert Mode to start, stop, or restart any service.
SUSE Linux and the two desktop environments offer several tools, both graphical and shell based, to help you manage and monitor your system.
Windows users sooner or later become familiar with the Task Manager tool, if for no other reason than to close out some application that is “not responding” to the user or the operating system. Those who make the switch to SUSE Linux will feel comfortable the first time they open the KDE equivalent: KSysGuard. The good news is you rarely, if ever, have to run this program to make a program behave (or, failing that, go away).
Although KSysGuard looks like and behaves much like Task Manager, do not press Ctrl+Alt+Delete to bring it up. The famous Three Finger Salute just brings up a shutdown dialog box. You can launch this application from the shell by typing ksysguard or going to System, Monitors in the KDE menu.
KSysGuard offers two types of information by default in its tabbed window. The System Load tab (see Figure 22.10) gives you a graphical view of several system processes. You can adjust the information this tab displays using the menus on the left side. The Process Table (see Figure 22.11) has a list of every process currently running on your system, with many details on its status. If you find an application hung up, you can locate its process(es) here and (with the right permissions) kill it.


Note
If a problem application is owned by Root, you can write down the Process ID (PID) number, log in as SuperUser in a shell, and type kill <PID> to end that process.
To add a new set of monitors to KSysGuard, go to the File, New menu (or press Ctrl+N) and select a set of monitors from the menu on the left.
Short on disk space? Need to know when to modify your partitions or logical volumes? KwikDisk can sit in your KDE system tray and tell you what disks are currently mounted and how much space each has remaining. By default, it will also pop up a warning box when a disk is getting full.
To put KwikDisk in your tray, right-click in an empty spot on the tray. Choose Add to Panel, Application, System, Desktop Applet to find KwikDisk.
KwikDisk is the watchdog for a larger program, KDiskFree, which gives you similar information from your /etc/fstab file and lets you mount and unmount drives with a right-click.
This is an oddly wonderful little program that can be just geek eye candy, but also can be a very powerful and informative tool at your disposal.
GKrellM (see Figure 22.12) is a GTK-based monitor that uses krells to display its information. Krells? Joe Barr at NewsForge.com tracked down this definition: “A krell is a unit of measurement used in the horizontal display of various measurements. If you were monitoring the amplifier in the movie Spinal Tap, for example, while it was running wide open, krells would be seen along the entire length of the meter.”

By default, the program will pull information from the /proc directory and tell you several important things about your computer, including
What sort of use your CPU is getting.
The number of users (both “live” and system) logged in and the processes running.
When the hard drive is being accessed, and for how much data at a time.
Your network connection speed.
A graph of your Random Access Memory usage, both hardware RAM and your Swap partition.
The very top of the display gives you your machine name and the date and time. On the bottom is a running total of how long you have been logged in (the uptime total).
Right-click any monitor to configure that monitor. Right-click on an edge to bring up the GKrellM Configuration screens. Insert any monitor you’d like from the lengthy list of choices.
GKrellM has been blessed with devoted users who have written plug-ins for nearly everything you might like to do with the application. And in its eye-candy role, there are themes you can download to change colors and some behaviors. Access all these at the application website, http://www.gkrellm.net.
http://www.linuxgazette.com/issue70/ghosh.html—This Linux Gazette article, “Bootstrapping Linux,” offers much detail on the BIOS and MBR.
http://www.lostcircuits.com/advice/bios2/1.shtml—The LostCircuits BIOS Guide. The site itself is a bit ad heavy, but there is excellent information on various BIOS settings.
http://www.rojakpot.com/freebog.aspx—“The Definitive BIOS Optimization Guide,” another excellent site with plain-language explanations of many BIOS settings. Useful no matter what OS you use.
http://www-106.ibm.com/developerworks/linux/library/l-slack.html—Joe Brockmeier explains the Slackware Linux boot process, which is not so different from SUSE Linux.
http://linux-newbie.sunsite.dk—The Linux Newbie Administrator Guide. Very helpful.
http://www.troubleshooters.com/linux/grub/grub.htm—“GRUB from the Ground Up,” a fine explanation of how to create a GRUB boot floppy and boot it on a disabled machine.
http://www.gnu.org/software/grub/manual—The GRUB manual in various formats.
http://tldp.org/HOWTO/LILO.html—The LILO Mini HOWTO.
http://tldp.org/LDP/lame/LAME/linux-admin-made-easy—Linux Administration Made Easy. See Section 4.8 on booting with LILO.
http://www.linux.com/article.pl?sid=04/05/17/1832239—A brief review of KSysGuard.
http://docs.kde.org/en/3.3/kdebase/ksysguard—The KSysGuard Handbook.
http://www.gkrellm.net—The home of GKrellM.