
Using Online Help and Learning Aids
Microsoft Project has extensive online help, both about using Microsoft Project and about managing projects effectively. There are many special features to help you learn how to use Project and the wizards that you can call on to guide you through processes or that pop up voluntarily to intercept your actions when they may potentially cause problems.
You should take full advantage of the following to learn how to use Microsoft Project:
Choose Help, Getting Started, Tutorial for a lesson-based approach to building and managing a project.
Choose Help, Getting Started, Project Map for a checklist of steps you should take when managing a project with Microsoft Project.
Choose Help, Getting Started, Microsoft Project Server Quick Tour for an overview of the features and capabilities of Microsoft Project Server, both as a collaboration tool and for managing enterprise resources and project portfolios.
Choose Help, Contents and Index to look up specific topics or keywords to explain how Microsoft Project works.
Working with Project Guide
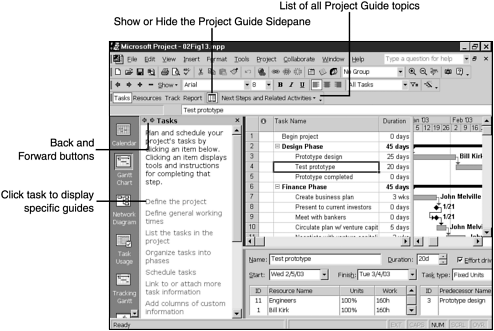
 | Project Guide is a sequence of tasks or activities (see Figure 2.12) that guides you through the process of creating a project plan, tracking actual work, and generating reports. You can click the sequenced links in the Project Guide sidepane to go through the steps of managing a project file. When you click one of the steps, the sidepane changes to display detailed instructions and wizards to help you complete that task. You use the Back arrow to return to the list of tasks. |
Figure 2.12. You can use the Project Guide toolbar to select the guided steps that are displayed in the sidepane.
By default Project Guide is enabled, but you can hide it if you prefer. To disable Project Guide, choose Tools, Options, and choose the Interface tab. Clear the check box labeled Display Project Guide.
When Project Guide is enabled, you might also find it convenient to use the Project Guide toolbar. To display the toolbar, right-click over the toolbar area and click Project Guide. Four of the buttons on this toolbar display the four Project Guide sidepanes:
Tasks— You can click the Tasks button to display the Tasks sidepane, which provides sequenced activities, advice, and wizards to help you build a task list and create a schedule.
Resources— You can click the Resources button to display the Resources sidepane, which guides you through creating the resource pool, assigning resources to tasks, and publishing a project in Project Central.
Track— You can click the Track button to display the options that guide you through saving the baseline, setting up the tracking method, entering tracking information, and reporting on progress.
Report— You can click the Report button to display a sidepane that gives you various options for reporting on the project and customizing the look of the reports.
|
| If you want to hide the Project Guide sidepane, click the Toggle Taskbar tool on the Project Guide toolbar. Click the button again to display the Project Guide sidepane. |
|
| You can use the Next Step button to see a list of all the topics included in the Project Guide steps and select one to jump to immediately. |
NOTE
You can display the Project Guide toolbar even when you have Project Guide disabled. In that case, the buttons simply don’t function.
→ You can write your own Project Guide pages to be displayed in the sidepane. See the bonus Web chapter, “Using Visual Basic with Project 2002,” at www.quepublishing.com.
Using SmartTags
 | Several procedures in Microsoft Project consistently cause problems for beginning users. Project 2002 displays a SmartTag (see Figure 2.13) to alert the user about the possible problem and to offer a choice of actions that Project can take. SmartTags appear for the following actions: |
Figure 2.13. SmartTags intercept commonly troublesome actions and offer choices for how Project should proceed.

In earlier versions of Project, when you pressed the Delete key in a task or resource table, Project deleted the entire row. In Project 2002, pressing the Delete key clears the cell that is selected. However, if the selected cell is the Name field, a SmartTag appears to offer the option to delete the entire record.
However, if you select the entire row (by clicking the ID number or pressing Shift+spacebar) the Delete key deletes the row. The only key combination now that deletes a row when you have just a cell selected is the Ctrl key plus the minus sign on the number keypad.
When you edit the start or finish date for a task, a SmartTag alerts you that this action sets a constraint on the task and offers guidance about avoiding the constraint.
When you add to or subtract from the number of resource names assigned to a task, a SmartTag offers to let you choose whether you want Project to change duration, work, or units for the other resources.
When you change the duration, units, or work for an assignment, a SmartTag lets you choose how Project should calculate the change in the assignment.
Immediately after you take one of these actions, Project executes a default response but then displays the SmartTag to let you chose a different action if you prefer. It also displays a small green triangle in the upper-left corner of the cell to flag where the change was recorded and displays the SmartTag icon to the left of that cell. You can click the SmartTag to see the action choices.
NOTE
SmartTags remain displayed only as long as the action is reversible. Because Project has only a one-step Undo capacity, the SmartTag disappears as soon as another action has begun.
You can disable any of the four SmartTag responses by choosing Tools, Options and clicking the Interface tab. Then, you clear the check box next to the SmartTag that you don’t want generated.
Working with the Planning Wizard
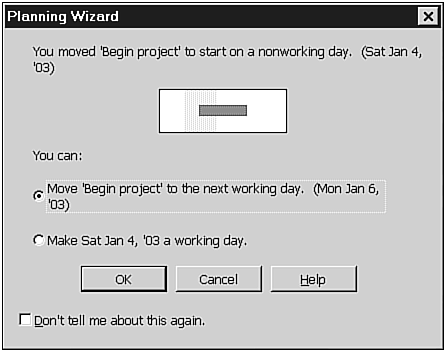
The Planning Wizard is a feature that continuously monitors your use of Microsoft Project and displays alerts that range in urgency from simple tips for easier ways to do things to warnings telling you that you might create a problem if you proceed. For example, the message in Figure 2.14 appears when the Planning Wizard detects that a task is being moved to a nonworking day; it suggests appropriate ways to complete the procedure.
Figure 2.14. The Planning Wizard monitors your work and offers suggestions to improve your use of Microsoft Project.
NOTE
If the Office Assistant is active, the suggestions and warnings offered by the Planning Wizard are displayed through the Office Assistant. If the Office Assistant is not active, the Planning Wizard uses its own standard dialog boxes, such as the one shown in Figure 2.14, to display messages.
The Planning Wizard is enabled by default and its alerts are controlled on the General tab of the Options dialog box. There are three categories of alerts: general usage problems, scheduling problems, and errors. To disable alerts from any of the categories, choose Tools, Options, select the General tab, and clear the check box next to the category you want to disable.
Many Planning Wizard dialog boxes also include a disabling check box labeled Don’t Tell Me About This Again. If you have disabled a Planning Wizard alert, the Planning Wizard group it belongs to displays a gray mark in its check box on the General tab of the Options dialog box. If you want to turn the alert back on, choose Tools, Options, select the General tab. Then click the check box once to clear the gray mark or click twice to enable the group of alerts.