Sharing Resources Among Projects
It is not unusual to have several projects use the same set of resources. When this is the case, it’s cumbersome to manage the same resources in several different project files. You can’t easily see what each resource is doing for all projects. You might want to have Microsoft Project store the resource information in one file and only the assignment information in the project files. You do this by entering all resources in one project file (which might not even have any tasks) and by instructing the other project files to use the resources defined in the file with the resources.
If a number of projects share the same list of resources, you can open all the projects at the same time and view the allocation of resources across the projects. Microsoft Project warns you when a resource is overallocated because of conflicting assignments in different projects, and you can use the leveling command to resolve the resource overallocation by delaying tasks in different projects.
→ For more information on managing resource allocations, see “Strategies for Eliminating Resource Overallocations,” p. 428.
Creating the Resource Pool
Any project file can be the one that contains the resource pool. If the resources typically work on many different projects, you can create a project file that has no tasks in it but that simply contains a list of the resources.
→ For more information on Project templates, see “Creating and Using Templates,” p. 106.
Using the Resource Pool
You can define any project file to use the resources of another project file, by choosing Tools, Resources, Share Resources. If both files have resources defined in them at the time the link is established, the resource pool is enlarged to include all resources defined in both files. If the same resource is defined in both files and there is a difference in the definition between the two files, you must tell Microsoft Project which file takes precedence in settling definition conflicts. The Share Resources dialog box provides a check box for this purpose.
After a sharing link is established, you can look at the Resource Sheet view in either file to see the complete list of resources, and you can change the resource definitions in either file. When you close the files, each includes a copy of the entire resource pool. In this way, you can open the project file that uses the resource pool independently of the file that actually contains the resources, if needed, to modify and manage that project file.
To enable a project file to use the resources of another file, follow these steps:
1. |
Open both project files: the one containing the resource pool and the one that is to share that pool. Make sure that the active project is the one that is to use the other project’s resources. |
2. |
Choose Tools, Resources, Share Resources to display the Share Resources dialog box (see Figure 16.16). Choose the Use Resources option button and use the From drop-down box for a list of currently open files from which you can choose. Figure 16.16. You can use the Share Resources dialog box to link to a resource pool in another project file.
|
3. |
Select the Pool Takes Precedence option button if you want conflicting definitions to be settled by the entry in the file that contains the resource pool. Select the Sharer Takes Precedence option button if you want resource definition conflicts to be settled by the entry in the file that uses the resource pool. |
4. |
Click OK to complete the link. |
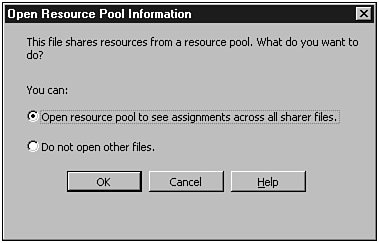
If the file containing the resources is not open when you open a connected file that shares its resources, an Open Resource Pool Information dialog box opens (see Figure 16.17). You can choose to have Project open the resource pool as well as all other project files that use the resources. However, you can work on the file even if you do not have the resource pool project open, because a copy of the pool is saved with each file that uses the common resource pool.
Figure 16.17. Microsoft Project offers to open the file that contains the resources.

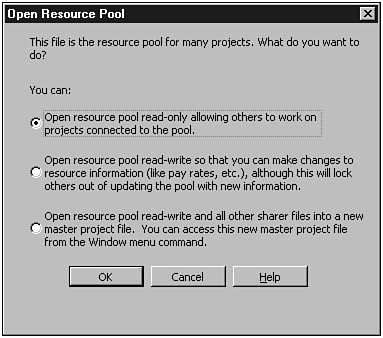
The Open Resource Pool Information dialog box display several different options (see Figure 16.18). If you choose the first option, to open the resource pool and see assignments across all sharer files, both files are opened and any changes made to the sharer file are immediately reflected in the pool. The pool file is said to be opened as read-only, but this is misleading. The pool can accept changes to resource assignment information, so it isn’t read-only; however, it is locked to prevent other sharer files from making immediate changes to the pool.
Figure 16.18. Access to and the behavior of the resource pool file are affected by how the pool was opened.

The other option in the Open Resource Pool Information dialog box allows you to open and work on a project file without also opening the resource pool. This lowers the computing overhead and increases work speed.
CAUTION
If you open a shared file without also opening the pool and you make changes to the file, the changes are saved with the file, but the pool is not immediately updated. Your changes are not incorporated into the pool until the pool itself and all sharer files have been opened at one time. Options for opening the resource pool file are shown in Figure 16.18.
When you open the resource pool file directly, the option you choose on the Open Resource Pool dialog box determines the accessibility and updating behavior of the pool. The read-only option allows you to make changes and see the results immediately in a copy of the last-saved version of the pool file, but changes made in real-time by any other user are not reflected until the pool is closed and reopened. However, you can use certain commands to refresh the pool with current information while multiple users are working in it. Under Tools, Resources, choose the Update Resource Pool option to save changes to the stored resource pool, and then use the Refresh Resource Pool option to load a fresh copy of the pool into the open pool window. If these two options are not available (that is, they are grayed out), the file-sharing environment is such that updating and refreshing the pool are not necessary.
The second option for opening a resource pool file is to open the file as read-write. The descriptive text in the Open Resource Pool dialog box informs you that this option gives you complete editing control over the pool file but it completely locks out other users while you have the file open. You can use the third option—open the resource pool and all sharer files—to force the pool file to retrieve the latest saved versions of all attached files and essentially rebuild the pool.
TIP
It is good computing practice to periodically open the resource pool file and all sharer files, forcing the most up-to-date information into all files. This procedure also alerts you if files have lost or corrupted links.
After a project is set up to share another project’s resource pool, if the resource pool is open in read/write mode, any changes you make to the resource pool while both files are open are recorded directly into the shared pool and are shared by both files immediately.
If you work with the dependent project file alone, however, and you make changes in the resource sheet of that project, the changes might not be saved back to the resource pool immediately (although you should be prompted to do so when saving the file). And if you merely add new resources with different names, the resources are added to the resource pool when the resource pool is next opened in read/write mode.
If you change the definition of the resource (for example, the pay rate, maximum units, or working days on the resource calendar), the changes might be lost when both files are loaded in memory together the next time. If you marked the Pool Takes Precedence option button in the Share Resources dialog box, the changes are lost if you try to make the changes in a dependent file; if you marked the Sharer Takes Precedence option button in the Share Resources dialog box, the changes are recorded in the resource pool. However, the Sharer Takes Precedence option is not used very often, and in the vast majority of cases, the Pool Takes Precedence option is the default.
TIP
For consistency, the resource pool should be the only file where underlying resource details are changed. Typically, one or two people in a company are made custodians of the resource pool, and they enter all changes to pay rates and other resource details. The sharer files should be connected to the pool, and the Pool Takes Precedence option should be selected.
Saving Multiple Files in a Workspace
The pool and resource-sharing files can be saved simultaneously into a workspace file. This workspace file is assigned the default filename of resume.mpw. You can choose File, Save Workspace to save all open pool and sharer files together.
An easy way to open files attached to a resource pool is to open the pool file first and then opening the Share Resources dialog box (by choosing Tools, Resources, Share Resources). The Share Resources dialog box presents a list of all sharing files. You open all sharing files by clicking the Open All button (see Figure 16.19). You can also open an individual sharing file by selecting the filename in the Sharing links area and clicking Open.
Figure 16.19. You can open all sharing files from within the Share Resources dialog box in the pool file.

Discontinuing Resource Sharing
You can discontinue the sharing of resources at any time. To do so, simply open the file that uses another file’s resources, open the Share Resources dialog box (by choosing Tools, Re-sources, Share Resources), and choose the Use Own Resources option button. The resources in the resource pool are then no longer available to the file. However, any resources that were assigned to tasks in the file are copied into the file’s resource list and are saved with the file. Likewise, any resource in the file that was sharing the resource pool of another project is copied into the pool and remains there, even after sharing is discontinued.
To discontinue a project file’s dependence on another file’s resource pool, perform the following steps:
1. |
Open the file that is to become independent and use its own resources. |
2. |
Make the file that is to use its own resources the active file window. |
3. |
Choose Tools, Resources, Share Resources to open the Share Resources dialog box. |
4. |
Choose the Use Own Resources option button. |
5. |
Click OK to execute the new definition. |
The message in Figure 16.20 confirms the removal of the connection between the two files.
Figure 16.20. Project confirms that you want to remove the connection between a project file and a resource pool.

NOTE
You can also break a sharing link from the other direction: Open the pool file and display the Share Resources dialog box. As shown in Figure 16.19, a Break Link option is available.
Identifying Resource Pool Links
A resource-sharing connection is recorded in the file that contains the resource pool and in the file that uses the resource pool. The Share Resources dialog box displays linking information is both file types, and the layout of the dialog box tells you which of the two file types is active.
Figure 16.16 displays the Share Resources dialog box in a file that uses the resource list from another file. Contrast that illustration with Figure 16.19. As you can see, Project knows which file is acting as the pool file and changes the Share Resources dialog box to offer file link-management options.
TIP
When you first begin to experiment with inserted projects, cross-project links, and sharing resource pools, it would be worth your while to create a table that includes the following columns: External, Linked Fields, Predecessors, Successors, Subproject File, Subproject File Read-Only, and Notes. As you begin working with the files, you can see exactly what is happening and where Project is storing the information. Then you can change the column titles to abbreviations so that you can make the columns narrow and see more onscreen without scrolling.
→ For more information on customizing tables, see “Using and Creating Tables,” p. 841.
→ For more information on using resources across the Enterprise, see “Working with Enterprise Resources,” p. 1029.
Viewing Resource Loads Without Sharing a Pool
In a large organization, it might not be desirable to have multiple project managers attaching their files to a single resource pool. Performance can be affected, and other managers might be prohibited from making and saving changes to their files if someone has inadvertently opened all the sharer files. If your main reason for pooling is to summarize and report on resource assignments across multiple files, it is not necessary to maintain file links to a resource pool.
When two or more Project files have been consolidated, as discussed earlier in this chapter, Project can create a combined list of resources assigned to those files. Breaking the link to all underlying files causes Project to re-create a list of resources from all consolidated files. Resource names from each file are matched, and the assignments are totaled. Then the Resource Usage view, among others, shows the distribution of work by resource across all projects consolidated in the particular file.
To create this combined resource list, open the Task Information dialog box for the project summary line of each inserted project. Move to the Advanced tab and, in the Source Project area, clear the check box for the Link to Project option, as shown in Figure 16.21. Now the Gantt Chart view displays tasks renumbered consecutively; duplicate task IDs no longer exist. The individual files cannot be edited within this revised consolidation because the links no longer exist. You can create a separate consolidated file, including file links, to edit projects from this level.
Figure 16.21. You can unlink consolidated files to create a combined resource list across projects.

TIP
When using this method to create a consolidated resource list, you should still maintain a separate file that acts as a resource information repository. Designate someone to keep the resource detail information—pay rate, nonworking time, and so on—up-to-date in a single file. When updates are made, notify all project managers to open their Project files, link them to this resource file to bring down the most recent resource information, and then simply break the resource-sharing link and save their files.


