Collaborating During the Planning Process
During the planning process, a project manager creates a project plan that outlines the tasks to be completed, along with the estimated work effort and resource assignments. The project manager can then use the Project Collaborate functionality to notify the team members of their task assignments. Each team member has the option of accepting or declining the assignment.
Communicating Resource Assignments
|
| A project manager can communicate assignments to a team easily by using the Publish/New and Changed Assignments command on the Collaborate toolbar or the Project Guide sidepane. If assignments are changed during planning, Project will alert the project manager that assignments need to be updated, as shown in Figure 24.9. |
Figure 24.9. Alerts in the Indicators column remind the project manager to update assignments by using the sidepane or toolbar commands.

TIP
If you want to communicate assignments for a subset of tasks, you can select these tasks prior to updating.
You create and send an assignment message by following these steps:
1. |
Click on the Publish command in the sidepane, or choose Collaborate, Publish, New and Changed Assignments. You are prompted to send team assignments for all tasks or just the tasks you selected. The Publish New and Changed Assignments dialog box appears (see Figure 24.10). Figure 24.10. The Publish New and Changed Assignments dialog box allows you to specify the assignments to be published, add task notes, and edit the text of the email message that will go to the resources.
|
2. |
If you want to modify or add to the default email message to resources, click the Edit Message Text button, and you see the dialog box shown in Figure 24.11. Figure 24.11. The Edit Message Text dialog box describes the results of the operation and allows you to modify or add to the email message that will go to the resources.
|
3. | |
4. |
TIP
One likely source of trouble is the URL entered in the Tools, Options, Collaborate tab. You must enter it exactly as provided by the Server administrator. When the URL is entered correctly, the Set As Default button ensures that the URL is used for every new project.
When assignments are published to Project Server, each team member receives an email notice as well as an alert under the Tasks section of his or her Project Web Access home page.
Replying to Resource Assignments
Clicking the Tasks tab on the Project Web Access home page or the new task notice takes the user to the View My Tasks page; tasks can be shown in either a Timesheet view or a Gantt Chart view, as shown in Figure 24.12.
Figure 24.12. The View My Tasks page can show current and new tasks for any team member in a Gantt Chart view.

The View My Tasks page includes the View Options and Filter, Group, Search tabs, as described previously, along with Delegation tab, which is described in the section “Delegating Tasks with in Project Web Access.”
Anyone with tasks assigned on any project in the Project Server database will use Microsoft Project Web Access to report progress and provide updates on that project.
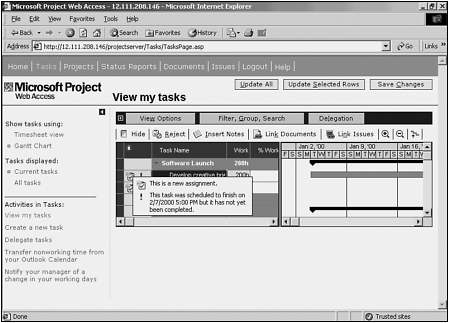
As shown in Figure 24.13, icons in the Indicators column provide information about the status of tasks.
Figure 24.13. Icons in the Indicators column appear with ScreenTips to provide information about the status of individual tasks.

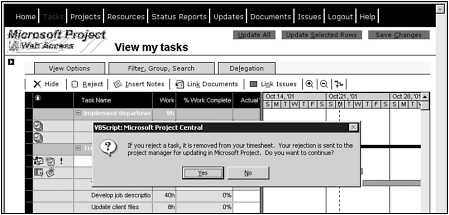
Project Web Access assumes that assigned tasks will be accepted unless the resource specifically rejects the task. To reject a task, select it and click Reject. The dialog box shown in Figure 24.14 appears.
Figure 24.14. The task assignment rejection process begins with this dialog box, which describes how rejected tasks are handled.

If you click Yes to reject the task, a confirmation message appears. It might be a good idea to provide an explanation for your rejection, rather than simply rejecting the task. Selecting the Insert Notes command before rejecting the task allows you to attach a note to the task when it is returned to the project manager.
NOTE
The estimated work, start dates, and finish dates cannot be revised through the View My Tasks page. If you think these values need to be revised, you can provide that information by using the Insert Notes command.
Responding to Assignment Replies
A project manager receives task changes in the Updates page and can decide to reject them or to accept and incorporate them into the project plan. The project manager can also continue the dialogue with a team member by rejecting a change and clicking the Update command in the upper-right corner of the window.
After changes are accepted, the project manager can automatically update the project plan by selecting Update. If the project plan isn’t currently active, Project starts and the file is opened. A dialog box then confirms the update.
TIP
It’s a good idea for a project manager to keep abreast of declined task assignments. To do so, you can add the Confirmed field to a task sheet and use the Unconfirmed filter to keep track of these tasks.
The Resources tab in Project Web Access takes you to the View Assignments page, where you can review team assignments in a view similar to the Resource Usage view in Microsoft Project. You can choose a Gantt Chart view or a timesheet format, view current assignments or all assignments, and use filter, group, and search as on other pages. These options are also accessible via the Collaborate menu’s Resource Center command.
Clicking the Projects tab in Project Web Access takes you to the Project Center page, where a portfolio view of all your projects is displayed. This page includes filtering and grouping options and allows users to edit Enterprise custom fields based on their permissions.


