Customizing Toolbars
Buttons that are displayed on the toolbars provide shortcuts for executing menu commands. The menu commands that are used most frequently are attached to specific buttons and positioned on toolbars according to the types of tasks they perform. Microsoft has standardized its toolbars across applications so that tasks that are common to all applications remain constant in their presentation on toolbars. As a result, when you become accustomed to using toolbar buttons in one application, you recognize them in other applications. The Open button, for example, is available on the Standard toolbar of other Microsoft applications besides Project.
As you continue to work with Microsoft Project, you will find that some of the buttons on the toolbars are vital to the way you work, but you rarely use others. This is often determined by the type of work you do. In addition, you might find that there are tasks you perform frequently for which there are no toolbar buttons available. You can customize toolbars to remove the buttons you rarely use and replace them with buttons that help perform those tasks you do more frequently.
When you create simple macros to perform tasks you use most frequently, you can assign them to toolbar buttons. For example, if you were to create a simple macro designed to turn on the Project Summary task, you could assign a toolbar button to run the macro and include the button on a toolbar. After the macro is assigned to a toolbar, all you have to do is click the toolbar button to perform the function.
NOTE
In previous chapters, you may have created special views, tables, forms, or filters and found that they were stored as part of the project in which you created them. When you need to use them in another project, you have to copy them into the new project file or to the GLOBAL.MPT file. Customizing toolbars and menus is different because toolbars and menus are part of the application file rather than part of a project file. As a result, when you change the toolbars and menus, the changes are available to all projects you create or edit on your computer. They are automatically stored as part of the GLOBAL.MPT file. You can still copy them from the GLOBAL.MPT file to a project file when you want to include them in a file you are sending to someone else or when you want to copy them to a different computer. Otherwise, copying them is not necessary.
Reviewing the Built-In Toolbars
 | Microsoft Project 2002 includes 15 built-in toolbars, plus the menu bar, that group activities by type. Three of these toolbars—the Standard, Formatting, and Task Pane toolbars— appear by default when you start Microsoft Project. You can display any of the remaining toolbars as you need them. The Project Guide toolbar is new in Project 2002, and a Collaborate toolbar replaces the Workgroup toolbar from Project 2000. |
There are two default toolbars in Project:
The Standard toolbar— This toolbar provides access to the main Microsoft Project features. Buttons on the left end of this toolbar are found on the Standard toolbars of other Microsoft applications. Buttons on the right end of the toolbar are specific to Microsoft Project.
The Formatting toolbar— Buttons on this toolbar give you access to outlining features, filters, and text formatting features. Many of the buttons in the center of this toolbar are found on the Formatting toolbars of other Microsoft applications. Buttons on the left of this toolbar are frequently found on Outlining toolbars of other Microsoft applications. Project-specific buttons appear on the right end.
Ten additional toolbars are included with Microsoft Project:
The Custom Forms toolbar— This toolbar contains many of the buttons needed to customize tasks or resource information entry screens.
The Drawing toolbar— This toolbar provides access to graphic drawing tools for drawing figures and text boxes in the Gantt Chart view.
The Resource Management toolbar— This toolbar provides access to tools for resolving resource overallocations.
The Tracking toolbar— This toolbar provides access to the commands that are necessary to track progress and reschedule work on uncompleted tasks.
The Visual Basic toolbar— This toolbar displays buttons for recording, running, and editing macros.
The Web toolbar— This toolbar displays buttons that activate your Web browser, keep a list of your favorite Web sites, and assist you in moving through Web pages.
The Analysis toolbar— This toolbar provides button access to installed add-in programs.
The Network Diagram toolbar— This toolbar displays analysis, viewing, and layout tools for use with the Network Diagram view.
The PERT Analysis toolbar— This toolbar provides button access to the PERT estimating tools available in Project.
The Collaborate toolbar— This toolbar makes workgroup communication and assignment features available.
The Task Pane toolbar— This toolbar displays a pane on the screen that contains shortcuts to common operations, such as opening and saving files and is consistent with other Microsoft applications.
The Compare Project Versions toolbar— This toolbar helps you create a report comparing two Project files and then drill down to the specific information in the comparison report.
The Project Guide toolbar— This toolbar includes buttons for opening side panes containing context-sensitive help and wizards from the new Project Guide interface.
Many toolbar buttons are easy to identify, and their use is self-explanatory. The purpose of some buttons, however, is difficult to determine. To identify a button’s function, you can point to it and pause briefly. The purpose of the button appears in the form of a ScreenTip. When you need a more detailed description of a button, you can click the What’s This? command from the Help menu and then click the button for which you need more information. A definition of the button appears.
Displaying Toolbars
Project enables you to show and hide toolbars by using two different procedures. Perhaps the more efficient means is by selecting a toolbar from the Toolbar shortcut menu. Another way to select a toolbar is by using the View, Toolbars command. The procedures for displaying toolbars using both approaches are explained in the following sections.
The Toolbar shortcut menu contains a listing of all toolbars, as well as a command that lets you customize toolbars. To activate the shortcut menu, shown in Figure 23.4, position the mouse pointer over one of the visible toolbars and click the right mouse button. Notice in Figure 23.4 that the Standard and Formatting toolbars have checkmarks next to them. These checkmarks indicate that the toolbars are currently displayed, or active. Other toolbars do not contain checkmarks, indicating that they are inactive.
Figure 23.4. The Toolbar shortcut menu lists all toolbars and identifies displayed toolbars with a checkmark.
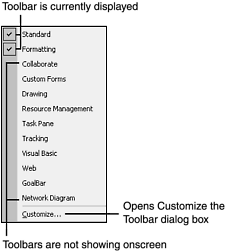
Click on a toolbar name that isn’t checked and Project will display the toolbar. If you click on a toolbar name that is already active, the checkmark disappears, and the toolbar is then hidden.
As an alternative, you can show and hide toolbars by selecting View, Toolbars. The toolbar choices via this method are identical to those available through the Toolbar shortcut menu method.
Positioning Toolbars on the Screen
Most toolbars are set to position themselves at a docking location at the top of the screen. Each toolbar you activate docks beneath the other active toolbars, in the order in which you activate them. When a toolbar is displayed, however, you can move it from the top of the screen to a new position. Toolbars can be docked at the sides or bottom of the screen or floated in a small window of their own in the middle of the screen. Some toolbars have combination boxes (that is, buttons with a text box and an entry-list arrow). The Group drop-down box on the Standard toolbar and the Font drop-down box on the Formatting toolbar are examples of combination (or combo) boxes. When toolbars are docked on the sides of the screen, the combo boxes are not displayed.
To reposition a toolbar, click the move handle that appears on the left edge of the toolbar. As you drag, the toolbar changes shape to fit the active position. When you have the toolbar placed where you want it, release the mouse button. Figure 23.5 shows a docked toolbar and a floating toolbar.
Figure 23.5. You can position toolbars onscreen to suit your taste.
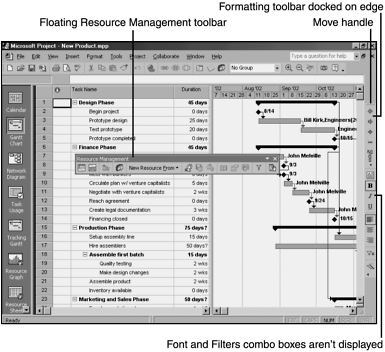
Notice that the floating toolbar has a title bar and a Close button. You can click the Close button to hide a floating toolbar or drag the title bar to dock it.
TIP
You can double-click the title of a floating toolbar to return it to its docked position.
Floating toolbars can be resized in the same way you resize other windows. When you position the mouse pointer on a border of the toolbar window, the mouse pointer changes to a double-headed arrow. Simply drag to resize the toolbar.
Using the Customize Dialog Box
Before you can create a new toolbar or customize an existing toolbar, you must display the Customize dialog box (see Figure 23.6). From the Customize dialog box, you can create new toolbars, add buttons or remove buttons from any active toolbar, resize combo boxes, rearrange the order of the buttons on a toolbar, and establish toolbar options, such as activating the setting in which the Standard and Formatting toolbars share one row. The toolbar you want to customize must be active before you can customize it.
Figure 23.6. Open the Customize dialog box to create new toolbars or to change the buttons that appear on the existing toolbars.

There are three ways to display the Customize dialog box:
Right-click any toolbar and choose Customize from the Toolbar shortcut menu.
Choose Tools, Customize, and select Toolbars from the cascading menu.
The Customize dialog box has three tabs:
Toolbars— You can choose to display or hide a toolbar by marking or unmarking the toolbar name. New toolbars can be created, renamed, or deleted, and toolbars you have customized can be reset to display their original buttons.
Options— From this tab you can change a button’s size, control what is displayed in the toolbar button’s ToolTip, and control how the menus are animated.
When the Customize dialog box appears in front of toolbars you want to customize, you can drag the colored title bar of the Customize dialog box to move it to a different location.
Organizing Toolbar Buttons
The Customize dialog box is the place to change your Project environment. With the Customize dialog box open, you can add, remove, and rearrange buttons on toolbars. You can also change the underlying button function, modify the button image, and place buttons into logical groups on the toolbars.
Before you can customize a toolbar, the toolbar you want to modify must be activated. You then need to access the Customize dialog box. From the Customize dialog box, choose the Commands tab (see Figure 23.7) to add buttons to or remove buttons from any active toolbar.
Figure 23.7. Choose the Commands tab in the Customize dialog box to select the buttons that appear on the active toolbars and to see button descriptions.

The Commands tab displays a list of categories of tools on the left. Whenever you select a category, the corresponding commands appear in the list box on the right. In Figure 23.7, the File category is selected.
To see the description of a command, select a command and choose Description. In Figure 23.7 the [Close/Close and Return] command from the File category has been selected. You must click the Description button to see the command description.
You use the Modify Selection button to change the actions performed by command buttons on the toolbars. It is active when you select a command on a toolbar—not when the command is selected in the Commands list box. You can also activate Modify Selection by right-clicking a button on a toolbar.
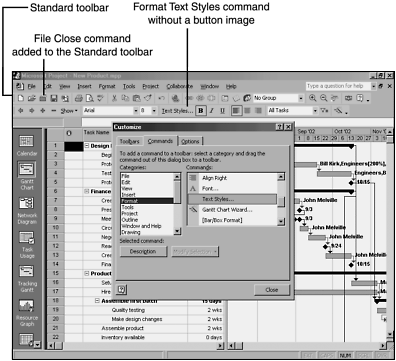
Commands you add to the toolbars might or might not have corresponding icon buttons. Those that do not have icon buttons are displayed as text buttons.
Adding and Removing Command Buttons
When you want to add a command button to a toolbar, you simply drag the button from the Commands list onto the desired toolbar. If you position the button between two existing buttons, the button drops into place, and existing buttons move to accommodate it. If there are too many buttons on the toolbar, those at the far right end begin to wrap to a new line for the toolbar while the Customize dialog box remains open. When you close the dialog box, Project removes the least-used buttons from the toolbar, to make room for the added buttons, and it places the removed buttons on the Toolbar Options drop-down list for that toolbar, as described in the section “Adjusting the Behavior of Toolbars,” earlier in this chapter.
Figure 23.8. You can add commands to any active toolbar; some appear as icons, and others display as text.
TIP
Microsoft Project makes it easy to insert a button on a toolbar that executes a macro you have created. The category All Macros on the Commands tab of the Customize dialog box lists every macro in Project, including the ones you create. Simply drag the macro name to the desired toolbar. The name of the macro appears as a button on the toolbar. You can create an image for that button instead of having the macro name appear on the toolbar.
→ For more information on creating your own customized command buttons, see “Customizing Command Buttons,” p. 937.
→ To learn how to take advantage of macros with Project, see the chapter “Using Visual Basic with Project 2002” at www.quepublishing.com.
One nice feature of the toolbars is that if you add more buttons than can be displayed on a single toolbar line, the buttons at the far right end begin to wrap to a new line for the toolbar as long as the Customize box remains open. The grouping of the buttons helps determine how many buttons wrap. See the section “Grouping Command Buttons,” later in this chapter, for more information on setting and changing groups. Naturally, the more toolbars (or lines to a toolbar) that are displayed, the smaller the viewable area of your screen becomes.
If you find that there are certain command buttons you never use, you can remove them from the toolbar to make room for other buttons. To remove a button from a toolbar, open the Customize dialog box, drag the button off its toolbar and release it in the center of the screen, away from other toolbars.
Moving Command Buttons
You can rearrange the buttons on a toolbar by dragging them to different locations. When you select a button to move it, a heavy border indicates that the button is selected. As you move the button, the mouse pointer changes to a thick capital I. Before you can move buttons, the Customize dialog box must be open.
When you want to move a button from one toolbar to another, you can use the procedures described in the previous section for removing and adding buttons. Or, you can simply drag the button from one toolbar to the other. When you move buttons from one toolbar to another, both toolbars must be displayed and the Customize dialog box must be open.
Grouping Command Buttons
Command buttons on toolbars are organized by groups. Vertical separator bars distinguish one group from another. To add a separator bar in front of the active command button, right-click the button that should begin the new group. A list of command-button display options appears. Figure 23.9 shows the Text Styles button selected on the Formatting toolbar and the list of options that appears.
Figure 23.9. You can change the grouping of command buttons on toolbars.
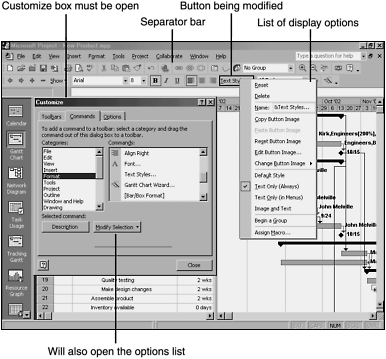
To add a separator bar, click Begin a Group. A separator bar appears in front of the selected button. You can remove a separator bar from a button by right-clicking it on the toolbar and selecting Begin a Group again. A checkmark in front of an option indicates that the option is active.
NOTE
You can also activate the list of display options by selecting the appropriate button on the toolbar and clicking the Modify Selection button on the Commands tab of the Customize dialog box. The Modify Selection button is active only when you select a button on a toolbar—not when the command is selected in the Commands list box.
Resizing Combo Boxes
A combo box is a two-part box that combines a text box with a drop-down list arrow that can be used to select valid options. Combo boxes appear frequently in dialog boxes and on toolbars. For example, on the Formatting toolbar there are combo boxes for Font, Font Size, and Filter. You can change the width of the text box portion of a combo box while the Customize dialog box is active.
To increase or decrease the width of combo boxes, follow these steps:
1. |
Display the toolbar that contains the combo box and display the Customize dialog box. You can have any tab in the Customize dialog box active to resize a combo box. |
2. |
Select the combo box in the toolbar. A heavy black border appears around the combo box, indicating that it is selected. |
3. |
Position the mouse pointer over one side of the combo box. The mouse pointer changes to a dark two-headed arrow. |
4. |
Drag the edge of the combo box to the desired size. |
5. |
Repeat steps 2–4 for each combo box you want to re-size. |
6. |
Creating New Toolbars
Sometimes the buttons you use most frequently are on several different toolbars. Instead of having four or five toolbars displayed, which reduces the space available on the screen to display your project document, you might want to have one or two toolbars that contain most (if not all) of the command buttons you use. At other times, you might want to customize an existing toolbar without affecting the original toolbar. Microsoft Project enables you to create new toolbars on which you can store the buttons you use most frequently, without affecting the buttons currently available on other toolbars.
When the toolbar you want to create contains many of the same buttons that are available on an existing toolbar, you can make a copy of the existing toolbar, give it a unique name, add the buttons you use most frequently, and delete any buttons you don’t want on it. Alternatively, you can start with a blank toolbar and create a completely new collection of buttons.
Creating a Toolbar by Copying an Existing Toolbar
When an existing toolbar contains many of the buttons you want to include on your new toolbar, making a copy of the existing toolbar is a good starting point. Copying the existing toolbar reduces the number of buttons you have to place on the new toolbar.
You cannot create a copy of a toolbar from within the Customize dialog box. To copy a toolbar, you have to access the Organizer.
→ To learn how to copy and rename a toolbar, see “Managing Toolbars with the Organizer,” p. 948.
After you create a copy of a toolbar, access the Customize dialog box and use the techniques outlined in the previous sections to modify the copied toolbar for your needs.
Building a New Toolbar
Creating a new toolbar from scratch creates an empty floating toolbar window that you must fill with the command buttons you want to add to the new toolbar.
To build a new toolbar, follow these steps:
1. |
Right-click any toolbar and choose Customize from the Toolbar shortcut menu, or choose View, Toolbars, Customize. The Customize dialog box appears. |
2. | |
3. |
Type the new toolbar name. Toolbar names must be unique and are limited to any combination of 51 characters and spaces. |
4. |
Click OK. |
The new toolbar name appears in the list on the Toolbars tab, and the new empty toolbar appears in the Project window (see Figure 23.10). Select the Commands tab and drag the desired buttons onto the toolbar to create the collection you desire. The toolbar enlarges as you add command buttons. As is true with all toolbars, you can dock the toolbar or leave it floating.
Figure 23.10. User-defined toolbars are initially displayed floating in the Project window.

Deleting a User-Defined Toolbar
Toolbars installed with the Microsoft Project software remain a part of the application even after you customize them. As a result, you can reset them but you cannot delete them. However, you can delete new toolbars you create, which are referred to as user-defined. To delete a user-defined toolbar, open the Customize dialog box, move to the Toolbars tab, select the toolbar to be removed, and click Delete.
NOTE
If the Delete button is not active, you have selected a toolbar that is installed with the Microsoft Project software. These toolbars can be reset but not deleted.
Restoring the Built-In Toolbars
Changes you make to the built-in toolbars as you customize might become out-of-date and might not fit every project you create. As a result, you might want to restore the default buttons to a toolbar. Microsoft Project includes a feature that makes restoring toolbars quick and easy.
CAUTION
Resetting a toolbar removes all customized changes you have made to that toolbar—not just the most recent changes. If you reset a toolbar on which you have placed custom buttons, you lose the custom buttons. To avoid this, drag the custom buttons to another toolbar to preserve them.
To restore the default set of command buttons to the built-in toolbars, open the Customize dialog box, move to the Toolbars tab, select the toolbar to be restored, and click Reset. Project will issue a warning that all customization is about to be lost; click OK to complete the procedure.
Customizing Command Buttons
Some of the commands that are available in the Customize dialog box have no button image associated with them. When such a command is added to a toolbar, only the name of the command is displayed. In addition, sometimes no command button is available for a task you perform frequently, and it might be necessary for you to create a macro to record the steps of such a task. After you have created the macro, the name of the macro is listed on the Commands tab of the Customize dialog box. No button image is associated with the macro command. When the command is added to a toolbar, only the name of the macro is displayed.
You can copy one of the available images to a command button that doesn’t have an image, or you can design your own image for the command button by using the button display options.
Accessing the Button Display Options
To modify toolbar button images, you need to access the list of button display options. To see these options, you must first display the toolbar that contains the command button you want to change and then display the Customize dialog box. (The quickest way to display the Customize dialog box is to right-click any toolbar and choose Customize.) When you have the toolbar and dialog box displayed, choose one of the following methods to see the button display options list:
Right-click the button you want to modify.
Select the button you want to modify, and then select the Commands tab in the Customize dialog box and click the Modify Selection button.
Customizing a Button Face
The Customize dialog box enables you to copy an existing button or access the Editor dialog box, where you can customize a button design. If another button carries a design that resembles the one you want to use on the new button, you can copy the design from the button to the Clipboard and then paste it on the blank button. Copying the design does not copy the functionality of the original button to the new button. After you paste the design on the blank button, you can modify the design to customize it for the new button. You can also create a design from scratch.
To change a button image, follow these steps:
The option Paste Button Image becomes active on the Modify Selection list after an image has been copied; be sure to select another button and paste the new image onto it. The receiving button does not have to blank; the existing face is replaced with the copied image.
Project contains a library of images you can apply to a button face instead of copying the face of a displayed button. Figure 23.11 shows the image library that is available in Microsoft Project.
Figure 23.11. Select the Change Button Image option to display the list of images from the Project image library.
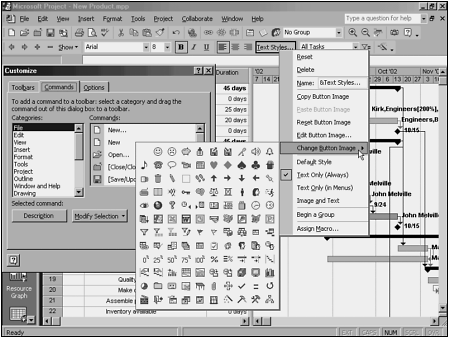
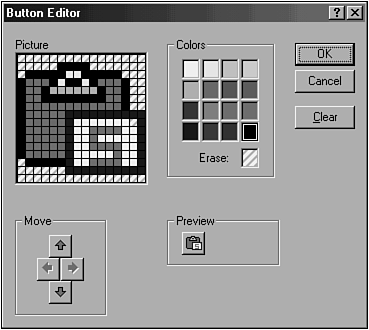
A third approach for changing a button face is to design your own image. When a command button has a blank button image, you can design your own image for it. You can also edit a button face after you choose a button image from the library or copy an image from another button, you might want to edit the picture. If the image was copied, changing the picture so that it differs from the design of a button used to perform a different task helps you identify both buttons. To edit the picture, you must use the Button Editor dialog box. The button design appears enlarged so that individual pixels can be identified in the Picture box. You can then change the location of each pixel in the image by using the mouse to achieve the desired design.
In Figure 23.12 the design assigned to the Paste button (on the Standard toolbar) is selected as the design for a new command button (Text Styles) on the Formatting toolbar, and you need to edit it so that it isn’t confused with the Paste button.
Figure 23.12. You use the Button Editor dialog box to create or modify a button image.

The Colors box in the Button Editor dialog box is a palette for selecting colored pixels for the design. The Move arrows help you position the picture on the button by moving it one row or column at a time. The Preview area shows how the current picture appears.
To change the picture, use any of the following techniques:
To change the color of a pixel, click a color in the Colors box and then click the pixel, or drag the color across a group of pixels.
To erase or clear pixels, select the Erase box and then click all pixels you want to clear, drag the pointer across pixels you want to clear, or click a pixel a second time to clear the existing color.
To reposition the picture on the button, clear an area along the edge toward which you want to move the design and then click the desired move arrow button.
To clear the picture canvas and start a new image from scratch, click Clear.
To cancel changes and start over, click Cancel or press Esc.
When you are finished modifying the button, click OK, and the new design appears on the new button. Figure 23.13 shows the finished picture that will be assigned to the Text Styles button.
Figure 23.13. The finished picture for the Text Styles button is slightly different from the picture copied from the Paste button.
Changing the Actions of a Button
After you have added a command button to a toolbar or modified a button’s image, you might decide to change the command associated with that button. The command that is executed when a button is clicked is identified in the Command drop-down list on the Customize Tool dialog box. Figure 23.14 shows the command for the Text Styles button on the Formatting toolbar.
Figure 23.14. You can use Ctrl+click on a button to customize its behavior.
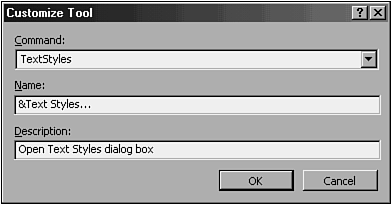
When you click the Command drop-down list, you see all the Microsoft Project commands (including forms and macros) that you can assign to a button. For example, to assign a Project add-in macro to a button, select the Macro command that displays the desired macro in double quotes from the Command drop-down list. Similarly, to designate the button to activate a custom form, you can choose the Form command that includes the desired form name in double quotes. Commands with names in double-quotes designate custom elements added to the Project environment.
→ To learn more about macros and Microsoft Project, see the chapter “Using Visual Basic with Project 2002” at www.quepublishing.com.
You can access the Customize Tool dialog box directly from the Project window, without having to go through the Customize dialog box, by following these steps:
1. |
If you need to create a button (including a button for a macro), see the section “Adding and Removing Command Buttons,” earlier in this chapter. |
2. |
Press the Ctrl key and click the button you want to change. The Customize Tool dialog box appears. |
3. |
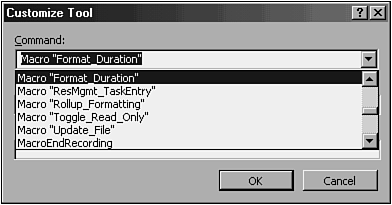
Choose the Command drop-down list arrow and scroll through the commands to find the one you need. In Figure 23.15, a supplied macro named is selected. Commands are listed in alphabetical order and are grouped by type on the list. As a result, you might have to scroll through the list to find the command you need. Figure 23.15. Macros automatically appear in the list of commands that can be assigned to a button.
|
4. |
Entering a Button Description
Descriptions for many commands installed with Microsoft Project automatically appear in the Description field of the Customize Tool dialog box when you choose a command from the Command drop-down list. When you assign a command to a toolbar button, this description is set to appear in the status bar at the bottom of the screen when you use the button. When no description appears, you can create your own description. In addition, you can edit existing descriptions to meet your needs, when necessary. A macro that you create has a default description that identifies the macro name, the date it was created, and by whom it was created. Figure 23.14 shows a custom description for the Text Styles toolbar button.
