Defining a Calendar of Working Time
Microsoft Project uses a calendar, called the base calendar, to define the default working and nonworking days used for scheduling tasks in projects. Three base calendars are built in to Microsoft Project:
Standard— The 5-day, 40-hour week, with work from 8:00 a.m. to 5:00 p.m. that’s standard in the United States.
Hour— A round-the-clock operation from 12:00 a.m. to 12:00 a.m.
Night Shift— An example of a calendar for those whose work shift starts toward the end of one day and ends in the morning of the next day.
All projects are assigned to a base calendar, and the default assignment is to the Standard base calendar. You can edit the Standard calendar, use one of the other built-in calendars, or create additional base calendars and assign a project to one of them if you want.
The Standard calendar assumes 5 working days per week, Monday through Friday, with 8 hours of work per day (including an hour off for lunch). The default schedule is 8:00 a.m. to 12:00 p.m. and 1:00 p.m. to 5:00 p.m. No designated holidays are set in the original Standard calendar.
You can edit the Standard calendar to reflect your organization’s regular working and nonworking days and hours. You can also designate the exceptions to the normal workdays, such as holidays, or time periods when the organization will be closed for remodeling, a companywide meeting time when no work should be scheduled, and so on.
Base calendars are also used as the basis for resource calendars. Each resource has its own calendar, and the resource calendar is linked to a designated base calendar (by default the Standard calendar). The resource calendar inherits all the working days and hours of its base calendar, as well as all the holidays and other exceptions in its base calendar. The resource calendar can be edited to record the days and hours when the availability of the resource differs from the normal working times found in the base calendar. Examples of resource exceptions are vacation days, sick leave, and unusual hours on particular days.
→ To learn more about adjusting calendars to reflect the available resources, see “Understanding Resource Scheduling,” p. 331.
For example, the base calendar for an organization in the United States might show that Thanksgiving Day, the third Thursday in November, is a company holiday. Suppose a security guard is scheduled to work on Thanksgiving Day and to have the following Friday off. The resource calendar for this worker would initially show the company holiday, Thanksgiving Day, as a nonworking day and the next Friday as a working day. For this security guard only, the resource calendar needs to be edited to reverse the status of both days.
If a resource has only a few exceptions to the Standard calendar, it’s easy to edit the resource calendar. If the resource has working times that are radically different from the standard working times, the editing job can require a lot of work. If there are several resources with the same unique set of working times, it’s easier to create an additional base calendar that has those unique working times and link each unique resource to that custom base calendar. For example, night and weekend security guards have unique days and hours. Instead of greatly altering a number of individual resource calendars, it’s easier to create a Security Guard base calendar to reflect the special working times for security guards. Then, you can link each security guard to that base calendar.

→ To adjust the resource calendars, see Chapter 9, “Understanding Resource Scheduling,” p. 331.
Scheduling with Calendars
Project uses the base calendar for an overall project and the resource calendars to schedule the start dates for tasks. When Project schedules a task, it notes the earliest possible starting date, based on when the predecessors to the task will be completed. If no resources are assigned to work on a task, the project’s base calendar is used to schedule the start and finish of the task. Otherwise, Microsoft Project checks to see what resources are assigned to work on the task and when the resource calendars for these resources show them being available for work. The task is then scheduled to start on the next available working hour for the assigned resources.
NOTE
The resource calendars take precedence over the project’s base calendar. In the absence of a resource calendar, the task is scheduled using the project base calendar.
To select a base calendar, choose Project, Project Information. Click the Calendar drop-down list and choose one of the calendars—Standard, 24 Hour, and Night Shift—from the list.
Editing the Standard Calendar
Changing the working days and hours on the Standard calendar affects the scheduled work time for all tasks that have no resources assigned to them and for all tasks whose resources are linked to the Standard base calendar.
Changing Working and Nonworking Days
The original Standard calendar shows all weekdays, Monday through Friday, as working days and all Saturdays and Sundays as nonworking days. You can change the status of any day to make the day working or nonworking, and you can specify the number of hours available for work on any day by defining the starting and ending times for work shifts on that day.
To edit the Standard calendar, choose Tools, Change Working Time. The Change Working Time dialog box appears (see Figure 3.16). The Change Working Time dialog box can display a calendar of working and nonworking times for any of the base calendars and resource calendars defined for the project.
Figure 3.16. You can use the Change Working Time dialog box to define the days and hours when work can be scheduled by Microsoft Project.

The dialog box contains a monthly calendar form, daily working times, buttons to change the calendar, and a legend. The legend indicates how working and nonworking days will be displayed, along with days that have different hours from the default hours. Each date that is modified from the default has the date underlined. If you modify a day of the week for the entire project—for example, you make the working time on every Monday from 1 p.m. to 5 p.m.—the letter M in the Working Time calendar is underlined and in bold. You can use the calendar scrollbar to change months and years. The calendar spans the period from January, 1984, to December, 2049.
To change the status of a single day or a consecutive period of days from working to nonworking or vice versa, you click the day with the mouse. You can select consecutive days by clicking and dragging. You can select multiple days that are not consecutive by pressing the Ctrl key as you click the extra dates. On the right side of the dialog box, there are several options in the Set Selected Date(s) To area; you can use these options to change the working or nonworking status of a day.
In the Set Selected Date(s) To area of the dialog box, you select the Nonworking Time option button to make the selected day(s) nonworking. To make the selected day(s) working days, you select the Nondefault Working Time option button.
TIP
To select days by using the keyboard, use the arrow keys to move to the first day you want selected. Hold down the Shift key and use the arrow keys to select additional consecutive days.
You can also change the working status of any day of the week for all weeks throughout the year. If your organization works on Saturdays, for example, you will want to make all Saturdays working days.
To change the working status of a day for all weeks, you select the day of the week by clicking the day letter at the top of the calendar (for example, S for Saturday). Then, you select the Nondefault Working Time or Nonworking Time option button in the Set Selected Date(s) To area of the dialog box.
After the working status of a day of the week is set, that becomes the default status for that day of the week. For example, suppose you have made every Friday, with the hours 8:00 a.m. to 12:00 p.m. (noon), a working day. If you changed a particular Friday to either a full working day or a nonworking day and then wanted to change it back to the default hours for Fridays, you would need to select the Use Default option button to reset the hours from 8 a.m. to 12 p.m. Selecting any specific date and the Use Default option button sets that date’s working hours to the default for its day of the week.
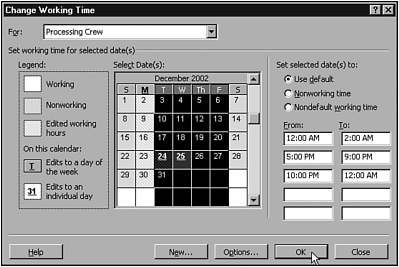
Figure 3.17 shows the Change Working Time dialog box for the month of December 2002. Because the company gives all its employees the afternoon of December 24 and all of December 25 to celebrate Christmas, these days are marked as nonworking days. Partial working days are marked with slash marks; full nonworking days are marked in gray.
Figure 3.17. You use the Change Working Time dialog box to define the days and hours when work can be scheduled by Microsoft Project.

Changing the Standard Working Hours
You can define the work periods for each day by supplying up to five work periods in the From and To text boxes of the Change Working Time dialog box. The default 8-hour work time periods each day are 8:00 a.m. to 12:00 p.m. and 1:00 p.m. to 5:00 p.m.
Most of the time only the first four boxes (under From: and To:) are used. The remaining six boxes are typically filled in when the working times go across midnight, to account for several breaks or meal times, or for some other unusual work schedule. The section “Creating a New Calendar,” later in this chapter provides a good example of using six time boxes.
To change the working hours in the Change Working Times dialog box, follow these steps:
1. | |
2. | |
3. |
Select the To text box and enter a time. |
4. |
Repeat this process, by clicking (or using the Tab key) on each subsequent From and To text box, to change the time in that box. |
5. |
NOTE
Project checks all time entries for consistency. Each successive time must be later in the day than the time in the preceding time text box.
You cannot leave a work period blank and put data in a work period beneath it. Therefore, you must use the top pair of From and To text boxes first; then you can fill in the next pair.
Entering Time Formats
You can use several formats for entering times in the text boxes of the Change Working Time dialog box. You can use either the 12-hour clock or the 24-hour clock to enter times. If you enter times based on the 12-hour clock, make sure that you use the a.m. and p.m. suffixes to ensure that the program understands your intent. If you enter a time without using an a.m. or p.m. suffix, Project uses the first instance of the time following 8:00 a.m. (or whatever time you designate as the Default Start Time on the Calendar tab of the Options dialog box).
For example, if you enter 3:30 without a suffix, Project assumes that you want to use 3:30 in the afternoon and attaches the p.m. suffix. If you wanted to set a work shift to start at 5:00 in the morning, you would need to enter 5 am instead of 5:00 because the program interprets 5:00 to mean 5:00 p.m. (If the time you want to enter is on the hour, you can simply enter the hour number.)
NOTE
You enter noon as 12:00 pm and midnight as 12:00 am .
Clearing the Working Hours Text Boxes
To remove a work period from the working hours text boxes in the Change Working Time dialog box, you need to delete both the From time and the To time for that period. To do so, follow these steps:
1. |
Select the From text box for the work period you want to remove. |
2. |
Press the Delete key to clear the text box. |
3. |
Resetting a Calendar
You can select the Use Default option button in the Set Selected Date(s) To area of the Change Working Time dialog box to cancel changes you have made for calendar days. Selecting individual days and choosing Use Default returns those days to the original working hours for those days of the week (as defined in the base calendar). Selecting the day of the week letters at the top of the calendar and choosing Use Default returns all days in the selected column to the standard 8-hour day, 8 a.m. to 5 p.m. (or whatever timeframes you have designated for the calendar). Selecting all the weekday letters at the top of the calendar and choosing Use Default returns the working hours, as well as any other exceptions to the holidays and a 40-hour week, to the initial settings back to the default of the currently selected calendar. A warning message appears, indicating that the calendar will be reset to the original settings.
Creating a New Calendar
Suppose you have a processing crew that works from 5:00 p.m. to 2:00 a.m., Monday through Friday. You can create a Processing Crew calendar to use as a base calendar for the resources in that group. On this calendar, the regular shift begins at 5:00 p.m. and continues to 2:00 a.m. the following day. An hour break is scheduled from 9:00 p.m. to 10:00 p.m.
Say that on Monday the crew starts at 5 p.m., breaks for dinner at 9 p.m., comes back to work at 10 p.m., and finishes the day at 12 a.m. (midnight). The work from midnight to 2 a.m. is entered on Tuesday. Tuesday through Friday the working times would show 12 a.m. to 2 a.m., then 5 p.m. to 9 p.m., and 10 p.m. to 12 a.m. Saturday would reflect the last hours (12 a.m. to 2 a.m.) of Friday night’s shift. (Figure 3.21, later in this chapter, illustrates this example.)
You can create a new base calendar for this group by following these steps:
1. |
Click the New button at the bottom of the Change Working Time dialog box to create a new base calendar. The Create New Base Calendar dialog box appears (see Figure 3.18). Figure 3.18. You can start a new calendar from scratch or you can use a copy of any existing base calendar.
|
2. |
In the Name text box, type a distinctive name, such as Processing Crew , for the new calendar. |
3. |
Select the Create New Base Calendar option button if you want to start with no holidays and the standard 40-hour week. Or Choose the Make a Copy of…Calendar option button to start with a copy of an existing base calendar and all its holidays and exceptions. Then select an existing base calendar from the drop-down list. If you have already defined all regular company holidays on the Standard calendar, you should start with a copy of it so you don’t have to enter those holidays again. |
4. |
Click OK to start defining the new calendar. If you made changes in another calendar that you haven’t saved, you see the warning shown in Figure 3.19 before you can proceed to make changes in the new calendar. Click the Yes button to save the changes you made in the other calendar. The new calendar name then appears in the For list box in the Change Working Time dialog box. Figure 3.19. You must save or discard earlier, unsaved changes in another calendar before you can start working on a new calendar.
|
5. |
To change the hours for a weekday such as Monday, select the letter at the top of the day column and enter the shift hours for that day in the From and To text boxes (see Figure 3.20). The hours for Mondays are 5:00 p.m. to 9:00 p.m. and 10:00 p.m. to 12:00 a.m. The remainder of the shift appears in the From and To boxes for Tuesdays. Figure 3.20. You can select the day letter at the top of a day column to change the hours for that day for every week.
|
6. |
To change the hours for several days that have identical hours, drag from the letter for the first day to the last day in the group and enter the common hours in the text fields on the right side of the dialog box. The Tuesday through Friday schedules require three shifts, as shown in Figure 3.21. The first shift is the continuation of the previous evening’s shift. The second and third shifts show the periods for the beginnings of the next evenings’ shifts. Figure 3.21. You can select several days by highlighting the letters for the days at the top of calendar display.
|
7. |
To set hours for a day that is currently a nonworking day, you must first make the day a working day. Then you can enter the hours in the From and To text boxes. The Saturday hours in the Processing Crew calendar are just from midnight to 2:00 a.m. (see Figure 3.22). Select the S at the top of the Saturday column and choose the Nondefault Working Time option to make it a working day. Then you can enter the hours in the From and To text boxes. Figure 3.22. You must make a day a working day before you can define working times for it.
|


Saving or Canceling Calendar Changes
To finish editing base calendars and save the changes you have made, click the OK button at the bottom of the Change Working Time dialog box. When you save the calendar, all the calendar information is saved along with the task and resource information in the project document. Clicking the Cancel button causes Project to ignore all the changes you have made.
Working with Calendars
If you create a base calendar in one project and want to use the same base calendar in future projects, you can use the Organizer to copy the calendar to the Global template (GLOBAL.MPT). The calendars in the GLOBAL.MPT file are automatically included in any new project file. You can also use the Organizer to copy a calendar to another existing project file, to delete a calendar from the active file, and to rename a calendar in the active file. The following section describes how to access the New Project Wizard and how to use it.
NOTE
The GLOBAL.MPT file is stored in the directory with the Microsoft Project program files, which is usually C:Program FilesMicrosoft OfficeOffice1033.
Using the New Project Wizard

There are two ways to access the wizard:
By selecting Define a Project from the Goal-Based User Interface
By selecting File, New and then selecting New Blank Project from the wizard dialog box
NOTE
If the Goal Based User Interface is not on, the New from Wizard option does not appear in the sidepane.
The following steps describe the dialog boxes that take you through the wizard:
You can programmatically modify the New Project Wizard to enforce the best practices in attaching required documents, which might include many of the ones described in step 4.
Using the New Calendar Wizard
 | The New Calendar Wizard gives you a single, convenient place to set up calendars and options that affect a project (see Figure 3.23). |
Figure 3.23. The New Calendar Wizard steps you through the process of defining the working times for a project.
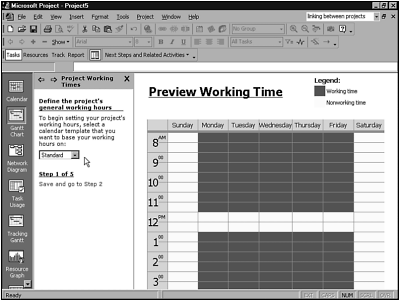
You access this wizard via the Goal-Based User Interface by selecting Tasks and then selecting Define projects general working hours. When you run the wizard, you work a series of steps. The following steps describe the dialog boxes that appear in sequence:
Using the Define Working Times for Resources Wizard
Project provides the Define Working Times for Resources Wizard for setting resource calendars. You access this wizard by clicking Resources from the Project Guide toolbar and then selecting Resource Calendars. You are then walked through how to set resource calendars by proceeding through a series of steps. The following steps describe the dialog boxes in the wizard:
Working with the Organizer
You can use the Organizer to copy items (such as calendars) from one project or template to another. You can also use the Organizer to delete or rename a calendar. If you copy a calendar to the GLOBAL.MPT file, the calendar becomes part of all newly created project documents. For example, to customize the Standard calendar for all new projects, you follow these basic steps:
1. |
Choose Tools, Change Working Times to edit the Standard calendar in an active project document. Define special working times, holidays, and hours in the Standard calendar, as described in the section “Editing the Standard Calendar.” |
2. |
Use the Organizer to copy the customized Standard calendar to the GLOBAL.MPT file, replacing the existing Standard calendar in the GLOBAL.MPT file. The Standard calendar for all new projects will then have the customized features. See the section “Copying Calendars to the Global Template,” later in this chapter. |
You can use the Organizer to manage not only calendars but also other customized items (such as views, reports, macros, forms, tables, filters, toolbars, and menu bars). Therefore, you can activate the Organizer from several points in Project. Probably the most convenient way to access the Organizer is by choosing Tools, Organizer.
NOTE
You can also access the Organizer through several other dialog boxes, such as those you access by choosing the following options:
View, More Views, Organizer
View, Table, More Tables, Organizer
Project, Filter For, More Filters, Organizer
Project, Group By, More Groups, Organizer
Copying Calendars to the Global Template
You can access the Organizer through the Tools menu. The active file—that is, the file that contains the calendar—is referred to as the source file. The file in which you would like to place a copy of the calendar is referred to as the target file.
Follow these steps to copy a calendar to the GLOBAL.MPT file:
1. | |
2. |
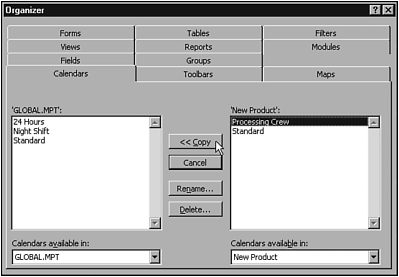
Choose the Calendars tab (see Figure 3.24). The calendars in the active file are listed on the right side of this tab. The calendars in the GLOBAL.MPT file are listed on the left. Figure 3.24. You can use the Organizer to make customized calendars available for use in other projects you are working on.
|
3. |
Choose the calendar you want to copy from the list of calendars in the source file on the right side of the dialog box. |
4. |
Click the Copy button. If there is a calendar in the target file that has the same name as the source file you’ve selected (for example, the Standard calendar), Project asks for confirmation to override the former calendar (see Figure 3.25). Figure 3.25. You must confirm that you want to replace the Standard calendar in the GLOBAL.MPTfile with the Standard calendar from the source file.
|
5. |
Click the Yes button to replace the calendar in the target file with the new calendar from your active file. Or click the Rename button to copy the calendar to the target file by using a name that is not being used by another calendar. |
6. |

NOTE
You cannot directly edit the calendars in the GLOBAL.MPT file. To edit a calendar in the GLOBAL.MPT file, copy it to a project file by using the Organizer. Edit the calendar in the project file, and then use the Organizer to copy it back to the GLOBAL.MPT file.
Copying a Calendar from One Project to Another
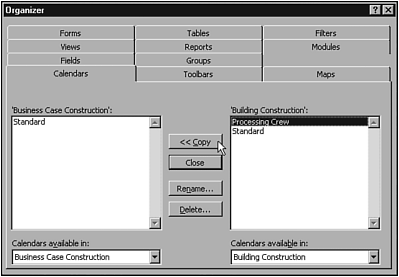
You also use the Organizer to copy a calendar from one project document to another. For example, if you want to place a copy of the Processing Crew calendar from the Building Construction file in the Business Case Construction file, follow these steps:
1. |
Open both the source and target files. |
2. |
Choose Tools, Organizer to display the Organizer dialog box. |
3. |
Choose the Calendars tab. The calendars in the active file (for example, Building Construction in Figure 3.26), are listed on the right. The calendars in the GLOBAL.MPT file are listed on the left. Figure 3.26. You can display the target and the source files in the Organizer dialog box.
NOTE The source file does not always have to appear on the right. You can copy from right to left or left to right. When you select the item you want to use as the source, the Copy button’s arrow changes direction accordingly. |
4. |
Use the Calendars Available In drop-down list box on the bottom-left side to choose the target file. Figure 3.26 shows the Business Case Construction project as the target. |
5. |
Choose the calendar you want to copy from the list of calendars in the source file. |
6. |
Click the Copy button. If there is a calendar with the same name in the target file, such as the Standard calendar, Project asks you for confirmation to override the former calendar. |
7. |
Click the Yes button to replace the calendar in the target file with the new calendar from your active file. Or click the Rename button to copy the calendar to the target file by using a name that is not already being used by a calendar in the target file. |
8. |
→ You can also use the Organizer to share items you customize with other project files (such as views, reports, and tables). For more information, see Chapter 21, “Customizing Views, Tables, Fields, Filters, and Groups,” p. 835.
Printing the Base Calendars
You can print a report to show the details of each of the base calendars in the active project file. Printing reports is covered in detail in Chapter 13 and Chapter 22, “Using and Customizing the Standard Reports.” This section is a quick reference on how to print the Working Days report, a report that provides information about the working and nonworking days in all your base calendars.
To print the Working Days report, follow these steps:
1. |
Choose View, Reports. The Reports dialog box appears, as shown in Figure 3.27. Figure 3.27. The Reports dialog box organizes reports into five standard categories plus a Custom option for customizing reports.
2. Choose the Overview category by double-clicking the Overview icon or by selecting the icon and then clicking the Select button. The Overview Reports dialog box appears (see Figure 3.28). Figure 3.28. The Working Days report prints all calendars for the active project.
|
3. |
Click the Working Days report. Click the Select button to preview the report or simply double-click the Working Days report (see Figure 3.29). Figure 3.29. The Print Preview screen shows the layout of the Working Days report.
|
4. |
Click the Print button to access the Print dialog box and send the report to your printer. |
5. |
Click Close to return to the project workspace. |


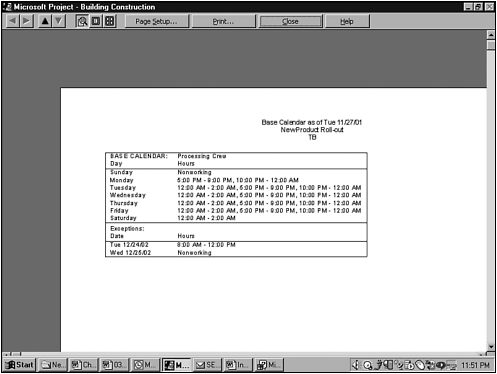
The report shows the standard working hours for each day of the week, followed by a list of the exceptions for individual days. Each base calendar prints on a separate page. Figure 3.30 is an illustration of the report for the Processing Crew base calendar. Holidays are listed as exceptions below the standard days and hours.
Figure 3.30. The Working Days report for the Processing Crew base calendar shows the standard working times plus the exceptions (such as holidays).