
Chapter 7. Yahoo! Store Tips and Tricks
In This Chapter
• How to enable the built-in breadcrumbs for the new store Editor
• How to add Cascading Style Sheets
• How to add related product items
• How to add a quantity box
In this chapter, we show you step by step how to implement the advanced features mentioned in the previous chapter. These features improve your store’s navigation, marketing capability, and customer user experience.
Istvan Siposs and Michael Whitaker of Y-Times Publications (www.ytimes.com) have generously allowed us to share some of their step-by-step tips and tricks from their book Yahoo! Store Tips and Tricks (Y-Times Publications, 2005), which includes more than 100 useful tricks. Siposs and Whitaker are recognized Yahoo! store experts who have helped hundreds of merchants improve their Yahoo! stores through books, seminars, and consulting.
Enabling the Built-In Breadcrumbs
Breadcrumbs are a set of links to parent sections. This is a great way to let customers know where they are in your site and provide an easy way to backtrack to parent sections. The new Yahoo! Store Editor has the breadcrumbs feature built into it. This might come as a surprise, and, no wonder: No switch or variable in the editor lets you enable breadcrumbs. This is part of the body-switch template, as shown here:
Body-switch. (wid)
MULTI
IF test @show-path.
then MULTI
TEXT "[ "
WITH-LINK TO :index
TEXT "Home"
TEXT " > "
CALL :walk-up.
TEXT @name
TEXT " ]"
LINEBREAK number 2
else nil
IF test EQUALS value1 @type
value2 :search.
then CALL :search-body.
wid
else CALL :page-body.
wid
In this template, if the variable show-path. is true, breadcrumbs will show up at the top of the page. The problem is, there is no variable or property called show-path. Let’s create a custom variable by that name. However, notice that the variable in this template has a period at the end of its name. Because periods are not allowed in custom variables, you cannot add show-path. You can, however, modify the copy of this template. To turn on the built-in breadcrumbs, all you have to do is modify your copy of the body-switch template and change @show-path. to up. The template should then look like this:
MULTI
IF test up
then MULTI
TEXT "[ "
WITH-LINK TO :index
TEXT "Home"
TEXT " > "
CALL :yourstoreid-walk-up.
TEXT @name
TEXT " ]"
LINEBREAK number 2
else nil
IF test EQUALS value1 @type
value2 :search.
then CALL :yourstoreid-search-body.
wid
else CALL :yourstoreid-page-body.
wid
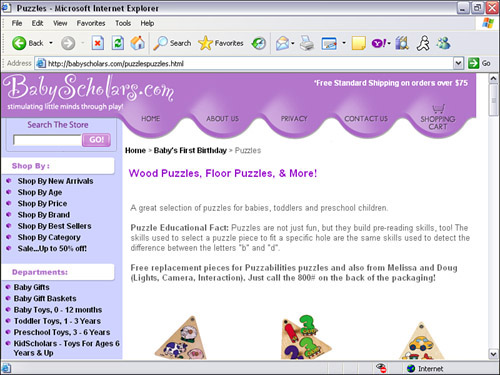
This makes sense because you want to show breadcrumbs only for pages that have parents (where up has a value). With this template modification, you get breadcrumbs that look something like those in Figure 7.1.
A couple of problems crop up with this: First, the font is the default browser font (Times New Roman, in this case). Second, the font is too big; breadcrumbs are usually smaller than the regular text font. To rectify this, first replace the second MULTI expression with a FONT, and paste that MULTI expression within the FONT operator:
MULTI
IF test up
then FONT size 1
face @text-font
MULTI
TEXT "[ "
WITH-LINK TO :index
TEXT "Home"
TEXT " > "
CALL :yourstoreid-walk-up
TEXT @name
TEXT " ]"
LINEBREAK number 2
else nil
IF test EQUALS value1 @type
value2 :search.
then CALL :yourstoreid-search-body
wid
else CALL :yourstoreid-page-body
wid
This is better, but the links between the home page and the current page are still too large. To fix that, edit your copy of the walk-up template. Originally, it looks like this:
yourstoreid-walk-up ()
FOR-EACH-OBJECT GET-PATH-TO dst id
src :index
nodst :t
nosrc :t
WITH-LINK TO id
FONT size @text-size
face @text-font
TEXT @name
FONT size @text-size
face @text-font
TEXT " > "
As you can see, FONT is set again in this template, so you have two choices:
- Edit each
FONToperator in this template and changesizeto1. - Better yet, remove the
FONToperators altogether.
This is what the finished template should look like:
Yourstoreid-walk-up ()
FOR-EACH-OBJECT GET-PATH-TO dst id
src :index
nodst :t
nosrc :t
WITH-LINK TO id
TEXT @name
TEXT " > "
Click to Enlarge
When an image is larger than the size specified by the item-height and item-width variables, the visitor can click on the image to view it full size. The problem is that unless the customer moves the mouse over the image, the customer will not know that the image can be clicked. Wouldn’t it be more obvious if you could add the text “Click to Enlarge” right below the product image (see Figure 7.2)? To do this, you need to modify the imexpand template. The original, untouched template looks like this:
Yourstoreid-iImexpand (im orig hlimit wlimit align)
WITH= variable exp
value CALL :yourstoreid-imexpands
RENDER image orig
hlimit
wlimit
IF test NOT EQUALS value1 exp
value2 :no
then WITH-LINK IMAGE-REF orig
IMAGE source im
align align
alt WHEN EQUALS value1 exp
value2 :yes
"Click to enlarge"
else IMAGE source im
align align

The bold line puts the image on the page using the IMAGE operator. That’s the line you need to modify so that instead of simply displaying the image, you display the image and a text line that says, “Click to Enlarge.” This can be achieved by replacing the source argument of the IMAGE operator with the image FUSE, together with the text line. The modified template looks like this:
Yourstoreid-imexpand (im orig hlimit wlimit align)
WITH= variable exp
value CALL :yourstoreid-imexpands
RENDER image orig
hlimit
wlimit
IF test NOT EQUALS value1 exp
value2 :no
then WITH-LINK IMAGE-REF orig
IMAGE source FUSE axis :vertical
im
RENDER text "Click to Enlarge"
align align
alt WHEN EQUALS value1 exp
value2 :yes
"Click to enlarge"
else IMAGE source im
align align
To format the “Click to Enlarge” line to suit your needs, edit the RENDER operator and modify the text-color, text-font, font-size, and text-align arguments.
Cascading Style Sheets
CSS was introduced to define how to display HTML tags. Without CSS, the browser basically decides how to display common tags such as <P>, <H1>, and <A>, giving the designer little control over the appearance. CSS gives you more control and options over the appearance of your Yahoo! store. CSS is particularly useful for creating rollover effects for text-navigation links. Just as with HTML, you can create CSS by hand in a text editor, but it’s easier to use editors such as Dreamweaver for that task. You can use CSS in a Yahoo! store in two ways:
• Internal style sheet— Paste the style sheet information directly into the HEAD-TAGS variable:
<style type="text/css">
a:link {color: #FF0000}
a:visited {color: #00FF00}
a:hover {color: #FF00FF}
a:active {color: #0000FF}
</style>
This changes the appearance of every hyperlink in your Yahoo! store that uses the simple <A> tag. Remember to provide a proper opening (<style....>) and closing (</style>) tag.
• External style sheet— Upload your CSS file to your Yahoo! Web Hosting account and link to it as in the previous example:
<link rel="stylesheet" type="text/css" href="http://site.yourdomain.com/style.css" />
The preferred approach to using CSS is to use an external style sheet. After the external style sheet file is loaded into the browser, it is cached for subsequent pages and, hence, reduces page-load times. Also, from an SEO standpoint, the fewer nonvisible page elements there are in the HTML source code, the better. (For this reason, you should also put any JavaScript in an external file.)
Here is a practical example you can use right away: removing the default padding and margin from your page layout (see Figure 7.3).
Figure 7.3. Using CSS to remove padding and margin.
Without having to modify any templates, you can simply add the following instruction to your style sheet:
body {margin:0; padding:0;}
Naturally, you can also use this to add increase margin and padding.
It is beyond the scope of this book to cover CSS in any great detail. If you are not familiar with style sheets, you should consult the excellent tutorial at www.w3schools.com/css/css_intro.asp, or purchase Sams Teach Yourself CSS in 24 Hours (Pearson Education, 2002).
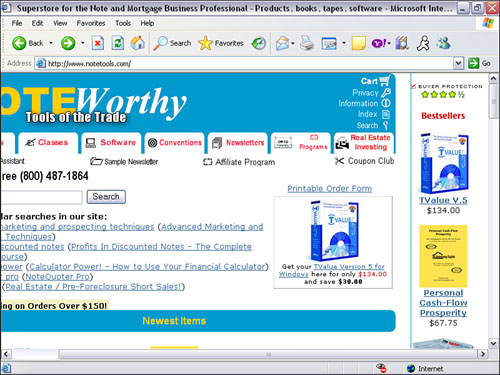
Bestsellers
The Bestseller feature is usually similar to the Specials feature (see Figure 7.4). Whereas specials are items you want to promote (typically because of reduced prices or other promotions), bestsellers are products that you sell a lot of—and that’s exactly the reason you want to call your customers’ attention to them. Bestsellers are usually not as important as specials; therefore, their placement is normally not as prominent. Bestsellers can appear in various locations on the home page depending on the design of the store. For most stores, a narrow column along the right side of the home page works well for this purpose. To see an example, go to www.notetools.com.
Figure 7.4. Bestsellers advanced feature.
Setting up the bestsellers is a task with two main parts: identifying and listing the bestsellers, and showing them on the home page. Identifying the bestsellers is very similar to identifying specials. You need a field like the Specials property of the home page. Because the bestsellers will most likely be displayed on the home page only, you can add a new property called bestseller of type references to the home page. To mark an item as a bestseller, simply enter its ID into this new Bestseller box while editing the home page. As in the case of the specials, you can enter the IDs of multiple bestsellers into the Bestsellers box. Multiple IDs must be separated by spaces.
To show the bestsellers, you need a template that will create the thumbnails and links for the bestsellers, and then you need to place this template on the home page. The template that creates the bestseller thumbnails, show-bestsellers, is listed next. For each bestseller, it shows the thumbnail of the bestseller, the name (or label) of the bestseller, and its price. It also hyperlinks both the thumbnail and the name to the bestseller’s page:
Show-bestsellers ()
TABLE border 0
cellspacing 0
cellpadding 0
width "100%"
TABLE-ROW valign :top
TABLE-CELL align :center
TEXT-STYLE :bold
TEXT "BESTSELLERS"
LINEBREAK number 2
FOR-EACH-OBJECT @bestsellers
FONT size 2
face @text-font
WITH-LINK TO WHEN @template
id
WHEN IF test @icon
then @icon
else @image
IMAGE source RENDER image IF test @icon
then @icon
else @image
max-height WITH-OBJECT :index
@thumb-height
max-width WITH-OBJECT :index
@thumb-width
hspace 3
alt @name
LINEBREAK
FOR-EACH-BUT variable line
sequence LINES IF test NONEMPTY @label
then @label
else @name
last LINEBREAK
TEXT line
WITH= variable price
value OR
@sale-price
@price
WHEN price
LINEBREAK
FONT size 2
color @emphasis-color
face @text-font
TEXT PRICE number ELEMENT position 0
sequence price
currency @currency
LINEBREAK number 2
A number of small details require further explanation:
• Notice how the thumbnail is created. First, if the item has an icon, it is used as the thumbnail; otherwise, it is the image. The maximum size of the thumbnails is determined by the thumb-width and thumb-height variables as defined on the home page. That’s what the WITH-OBJECT:index business is about. There, you take the value of the thumb-width and thumb-height variables from the home page. Without that (if you simply used thumb-width or thumb-height), your bestseller list could end up with various thumbnail sizes if either of these variables was overridden for any of the bestsellers.
• The way the hyperlink is created (the WITH-LINK TO... part) might seem a bit strange, but here is what’s going on: You want to hyperlink to the bestseller only if the bestseller has a page to hyperlink to. Every item in a Yahoo! store that has a page also has a template. Conversely, if an item has no template (if its template is nil), the item has no page generated for it.
• I use either the label property (if provided) or the name property to show the title of the bestseller. That’s what the IF test NONEMPTY @label expression does. This way, you can have different text appear for the bestseller on the home page than on the bestseller’s own page. This can come handy if the name of the item is too long.
• Finally, you can simplify the way prices are displayed. Show the base of either the sale price or the regular price. Don’t worry about quantity pricing here, although you can change this if you need to show quantity discounts.
Now that you have a way to display the bestseller block, you need to add it to the home page. You can do this by modifying the copy of the home. template. Where you modify the template depends on the style of your home page: whether it uses top buttons or side buttons. The side button arrangement is easier. In this arrangement, you can simply add a new table cell before the part dealing with RIGHT-MODULES (this section is at the end of the page-body template in the old Yahoo! Store Editor, but it is missing from the new editor) and then call your show-bestsellers template. The entire cell is within a WHEN @bestsellers block so that you show the bestseller block if there are bestsellers to be shown. The relevant part of the template is listed here:
:side-buttons
TABLE border 0
cellspacing 0
cellpadding 0
TABLE-ROW valign :top
CALL :yourstoreid-side-nav
vnav
TABLE-CELL
FONT size @text-size
face @text-font
WITH= variable wid
value (@page-width - 26) - vnav-wid
CALL :yourstoreid-home-body
nil
nil
wid
WHEN @bestsellers
TABLE-CELL
CALL :show-bestsellers
WHEN @right-modules
TABLE-CELL width 10
SHIM height 1
width 10
TABLE-CELL valign :top
width 150
CALL :yourstoreid-right-modules
@right-modules
If the store has a top navigation bar, adding the bestseller box is a little trickier. In this case, you want to put the entire page inside the left cell of a table, and put the call to show-bestsellers in the right cell of the same table.
Quantity Box
You might have seen online stores that let the customer type a quantity right on the item’s page before clicking the Order button. Although this feature is not readily available in the Yahoo! Store Editor, it is easy to add in RTML (see Figure 7.5).
Figure 7.5. Quantity input box.

The quantity box is a simple text box. Its name makes it work as a quantity box. If you name a text box vwquantity and submit it to the shopping cart page, the Yahoo! store system takes the value in this box as the order quantity.
The key to add this feature to your store is the template called order. To add the quantity box, you must modify your copy of this template. Toward the bottom of the order. template, locate the part that reads as follows:
INPUT type :submit
value @order-text
This RTML expression generates the Order button. You have to add the quantity box before this expression. To begin, click the New button, select INPUT from the operator list, and click Create. Next, click the INPUT expression just above the one that creates the Order button. The one to click reads as follows:
INPUT name :vwcatalog
type :hidden
value account
After you have selected this INPUT expression, click the Paste After button. This inserts the blank INPUT operator you created earlier right above the Order button. Now click Edit and fill in the parameters as follows:
• For name, enter :vwquantity.
• For type, enter :text.
• For value, enter 1.
• For maxlength and size, enter 3.
Note that the entries for name and type have no quotes around them and both begin with a colon. In addition, the number 1 you entered for value is the default quantity that will appear in the quantity box on your item pages. You might need to change this if another number makes more sense for your store. When you have entered these values, click the Update button. The finished INPUT expression should look like this:
INPUT name :vwquantity
type :text
value 1
maxlength 3
size 3
Now you have a functioning quantity box next to the Order button. You might want to add a TEXT Quantity expression just before the box or tweak the appearance a little to suit your particular needs.
Radio Button Options
You can also change the default drop-down option boxes to radio buttons (see Figure 7.5). The radio button input element does the same thing as the drop-down list: It enables the user to select one of a number of choices. To do this, again modify the Order. template. Locate the following block in the Order. template:
else MULTI
TEXT ELEMENT position 0
sequence set
TEXT ": "
SELECT name ELEMENT position 0
sequence set
options ELEMENTS sequence set
first 1
Replace the entire block starting with MULTI with the following:
CALL :radio-options
set
Because you do not have the radio-options template, you will need to create it as follows:
Radio-options (set)
WITH= variable name
value ELEMENT position 0
sequence set
TEXT name
TEXT ":"
LINEBREAK
FOR-EACH variable option
sequence ELEMENTS sequence set
first 1
INPUT name name
type :radio
value option
TEXT option
LINEBREAK
These modifications to the Order.template change all the drop-down options to radio buttons. If you want the option to selectively change the options to radio buttons, you can modify the Order. template, based on how we did it for the check boxes, to indicate whether you want radio buttons or standard drop-downs. (We leave the details of this change to you as an exercise.)
One additional note: For this to work, you might have to go to Order Form in the Store Manager, scroll down to the bottom, and change the Item Option Validation setting to allow items with unrecognized options. But try it first: If your radio buttons work without that setting, you won’t need to change it.
Figure 7.6. Radio button options.
Free Forms (Email Form)
The Catalog Request feature provided to every Yahoo! store is a great way to collect information about visitors who haven’t made up their minds to actually make a purchase in your store. Those who fill out an online information request form are usually very “hot” leads because they are close to clicking that Order button. The Catalog Request form is not just to request a catalog; you can call it anything that makes sense in your store: More Information, Online Newsletter Signup, and so on. On the Variables page, you can change the Request-text variable to reflect whatever you use that feature for. Under Order Form in the Store Manager, you can change the title of the Catalog Request form and add your own message. The problem is, there is only one such form and you cannot tell what fields you want to collect. What if you would like a separate sign-up form for a newsletter or another form for those interested in your affiliate program (see Figure 7.7)? The answer is an undocumented CGI script available to all store owners. This script can process any form and email the form’s fields (as filled out by a visitor) to the email address you specify. Here is how you can use it.
Figure 7.7. Free forms (email forms).
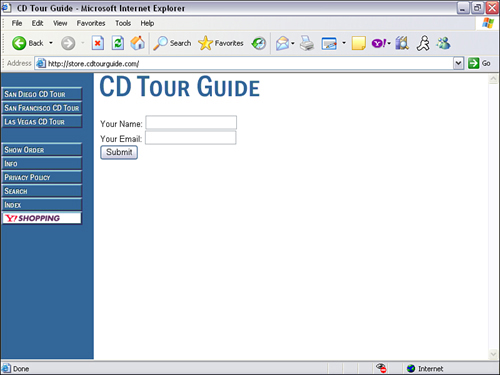
Copy the following in the Caption property of a page where you want the form to appear:
<form method="POST" action="http://store.yahoo.com/cgi-bin/pro-forma">
Your Name: <input type="text" name="Name"><br>
Your Email: <input type="text" name="Email"><br>
<input type="submit" value="Submit">
<input type="hidden" name="owner" value="type your email here">
<input type="hidden" name="newnames-to" value="type your store's Yahoo! ID here">
<input type="hidden" name="continue-url" value="target page">
</form>
For target page, enter the URL of a page you want to send your visitors after they have filled out the form. If you leave out that entire hidden variable, visitors will be sent to the home page of your store. You can add other fields the same way as Name and Email. You can also include drop-down boxes, check boxes, radio buttons, and anything that can be part of a standard HTML form.
List of On-Sale Items
Using RTML, you can create a page that automatically lists all the items in your store that are on sale. With this trick, you can add an On Sale Now page to your store without having to manually copy all the sale items into this page.
First, create a new section for the sale items. You can call this section On Sale Now or Sale Items or Clearance Items, or whatever else you think sounds good. After you have created this section, make a note of its ID.
Next, create a custom template called sale-items, as shown here:
Sale-items ()
YANK element nil
sequence FOR-EACH variable item
sequence WHOLE-CONTENTS
WITH-OBJECT item
WHEN @sale-price
id
After this template has been set up, edit your copy of the page-body. template. Toward the bottom, you’ll find the following block:
WHEN @contents
WHEN OR
side-im
NONEMPTY @caption
LINEBREAK
CALL :contents.
@contents
wid
LINEBREAK
warning
This template makes use of the WHOLE-CONTENTS operator. Besides being slow for stores with a large number of pages, WHOLE-CONTENTS has a minor issue: Pages that use WHOLE-CONTENTS aren’t flagged automatically for regeneration. This means that if you change prices, for example, even though the on-sale page you set up using the previous example looks right in the editor, after publishing, the on-sale page won’t be updated on the published site. You can fix this in two ways. Before publishing, either edit the on-sale page and, without changing anything, click the Update button, or click Variables and then click Update without changing any variables.
Paste the following after that block, replacing :saleitems with the ID of your Sale Items section:
WHEN EQUALS value1 id
value2 :saleitems
CALL :contents.
CALL :sale-items
wid
LINEBREAK
Now you have a section that automatically lists all items in your store that are on sale. There is no need to manually add or remove items from this page.
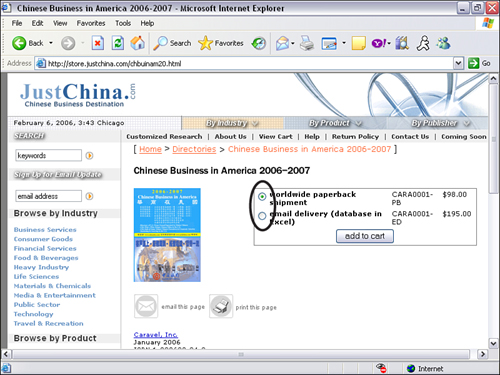
Related Items
Related items and cross-sells are a way of suggesting related items (see Figure 7.8). Until recently, the Yahoo! store cross-sell feature was rather limited. You could create some families by entering their names in the Families variable and assign items to these preset families. Then, when a customer placed one of these items in a shopping cart, the related items were listed as hyperlinks at the bottom of the shopping cart page. This was quite limited and uninteresting.
Figure 7.8. Related Items feature.
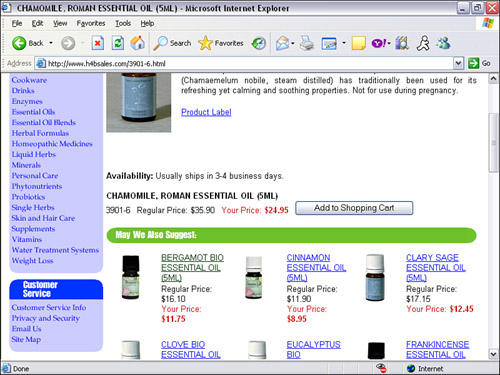
The current cross-sell functionality is a lot more complex and is now located in the Store Manager, in the Promote section. Here, you can set up complex cross-sell rules to offer discounts, for example. When such an item is placed in the shopping cart, the item’s thumbnail is shown in addition to the hyperlink. Additionally, if a discount is offered, it is mentioned on that page, making the cross-sell feature more useful to the merchant and more interesting to the customer.
One feature still missing from this, however, is the capability to show related items on the item pages themselves. Luckily, this limitation—like many others—can be solved using RTML.
Like the bestsellers, the cross-sell has two main parts: identifying the related items and showing them on the page.
Find-family ()
YANK element id
sequence YANK element nil
sequence WITH= variable family
value @family
WHEN AND
family
NOT EQUALS value1 family
value2 :none
FOR-EACH-OBJECT WHOLE-CONTENTS
WHEN EQUALS value1 @family
value2 family
id
The first template, Find-family, returns a list of all the items that are assigned to the same family as the current item. Because you don’t need the current item (it is definitely part of its own family), you use the YANK operator to pull its ID of the list of the family members.
The following YANK expression removes all nils from the list of family members. You need that because the FOR-EACH-OBJECT block at the end of the template produces a list that has as many elements as there are objects in the store. For each object that is in the same family as the current page, this list has the ID of the object. For all other objects, the list contains nil.
To display the elements of the family, you could use the same approach as with the bestsellers. In fact, you could use the exact same template, Show-bestsellers, with the only change being replacing the variable @bestsellers with CALL:find-family (and perhaps changing the title of Bestsellers to @cross-sell-text). However, I would like to show a slightly different method.
In this method, you use a built-in template called Contents that is used to show the contents of a section or an item. This template comes in handy because you want your cross-sells to show thumbnails and links just like the regular content. Contents takes two parameters: a list of IDs and a width. For your cross-sells, the list of IDs consists of the IDs of the family members.
The most convenient place to call this template is in page-body. At the very end of that template, it already makes a call to yourstoreid-contents (where yourstoreid is the Yahoo! ID of your store) to handle the regular contents of the page. To show your cross-sells right after that, paste the following after the WHEN @contents expression:
WHEN @contents
WHEN OR
side-im
NONEMPTY @caption
LINEBREAK
CALL :yourstoreid-contents
@contents
wid
LINEBREAK
WITH= variable family
Value CALL :find-family
WHEN family
LINEBREAK
TEXT-STYLE :bold
TEXT @cross-sell-text
LINEBREAK
CALL :yourstoreid-contents
family
wid
In this example, the variable cross-sell-text serves as a heading for the cross-sell section, but you could get creative and format it more nicely, perhaps using a nice banner or graphical letters. The great thing about this small feature is that it is completely automatic. From now on, all you have to do is define your families (using the Families variable); as soon as you have at least two items in a family, they will be shown at the bottom of the item page, formatted the same way as your regular contents. (To add an item to a family, edit the item and select the appropriate family in the Family drop-down list.)
One final note about the previous example: If you want to show the cross-sells in multiple columns as shown in “Error! Reference source not found.” using the contents template, you also need to click Config and change the Leaf-columns variable from 1 to the number of columns you need.
Using WHOLE-CONTENTS is quite slow, especially in stores with a large number of pages. An alternate solution is not to use the Family feature at all, but rather add a custom property called related-items to your items. This new property should be set up as type references. Then, for any item, you can enter the IDs of the related products into the related-items property. To make this work, simply change the find-family template to this:
Find-family ()
OR
@related-items
YANK element id
sequence YANK element nil
sequence WITH= variable family
value @family
WHEN AND
family
NOT EQUALS value1 family
value2 :none
FOR-EACH-OBJECT WHOLE-CONTENTS
WHEN EQUALS value1 @family
value2 family
id
Text Page Titles
As we discussed earlier, a Yahoo! store always creates an image for the name of the item or section. Although a Yahoo! store also generates an “alt text” for these images, pictures are no match for text when it comes to search engine optimization (SEO). Although the Yahoo! Store Editor does not provide you with any way to show item and section names as text (instead of automatically generated images), it is quite easy to tweak a template to give yourself this feature.
The key is the template called head (or your copy of it, that is.) This template is used to create the heading for any item or section page (it’s also used by the info and privacy policy pages). Before modifying this template, create a new template called show-title. We use this template to display the name of the page in text. show-title is listed here:
Show-title (title)
FONT size 3
color @display-text-color
face @text-font
TEXT-STYLE :bold
FOR-EACH variable line
sequence LINES title
TEXT line
LINEBREAK
LINEBREAK
Feel free to modify this template to suit your needs. The example uses text size 3 for the heading here; the same color is set for the display title (the graphic titles are replaced here). When you have this template, bring up your copy of the template called head. In this template, locate the following expression (you will find it in three places):
IMAGE source textim
alt text
When you have located these expressions, replace them with the following:
CALL :show-title
text
This does the trick. The template show-title preserves line breaks you might have in the headline field just like the generated graphical headings would. However, whereas the generated graphic headings don’t let you use any HTML tags in the name or headline parameters, show-title has no such problems because it deals with text. When you have these modifications in place, for example, you can include a trademark sign next to a trademark by entering this into the headline field:
My Trademarked Item<sup><small>TM</small></sup>
If you tried doing the same without these template changes, you would end up with something like this on your page:
My Trademarked ItemTM
You can do other things, including changing the color of certain words in the page heading by simply including the <font color=...>...</font> tags in the headlines field (you should never include HTML tags in the name field. name is used as the title tag of the page and is also used by Yahoo! shopping’s search engine.)
Being able to format those headlines any way you want is certainly a plus, but the most you can gain from not having graphical headlines is better search engine placement. Remember, search engines can’t see images, but they can read text. In fact, that’s all they do.
Shipment Status Form
Keeping the customer up-to-date on the status of an order is an integral part of good customer service. Yahoo! store makes it easy to keep your customers informed about order status. Simply log into the Store Manager and click Shipment Status in the Order Settings column to enable and configure the store’s shipment status-reporting function. Of course, this feature by itself doesn’t do any good; you need to update the status of your orders either manually (by opening the order in the Store Manager and changing the shipping status) or automatically (see http://store.yahoo.com/vw/uptracstatau.html).
When shipment tracking is enabled, each time you update the status of an order (say, the order was shipped or will ship in one day or two days), Yahoo! automatically sends a status update email to the customer (the email is somewhat configurable in the Store Manager under Shipment Status). However, customers sometimes miss these emails; the messages can be ignored or these days even caught by some spam filters. When a customer wants to find out about the status of an order, chances are, the customer goes to your store and then goes to the Info page to look up your customer service email or phone number. Why not make it easy for customers and provide an order-tracking form that will save time and customer support calls or emails (see Figure 7.9). Setting this up is rather simple, and you can do this with no RTML or even HTML knowledge.
Figure 7.9. Shipment status form.
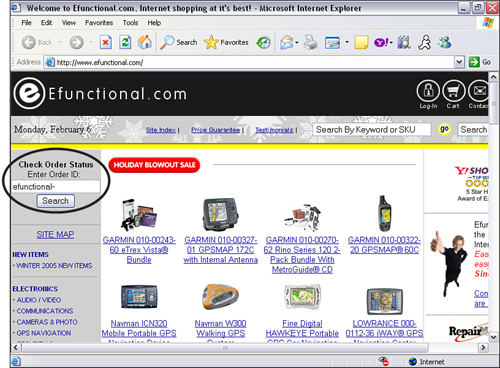
First, decide where you want the order-tracking form to reside. As mentioned earlier, an obvious place for it is on the Info page, but you might want to put it on a separate page and perhaps add an Order Status link to the navigation bar. In this example, we show you how to add the order-tracking form to the Info page.
Edit the info page, and wherever you want the order-tracking box to appear (in the Greeting or Info fields), enter the following HTML (but replace yourstoreid with the Yahoo! ID of your own store):
<form name="vw-form" method="post"
action="https://order.store.yahoo.com/cgi-bin/wg-order-status">
Enter Your Order ID<br>
<input name="oid" type="text" size="20" value="yourstoreid-">
<input type="submit" value="Show">
</form>
The HTML will produce a form on your Info page. When a customer enters the order number in this form and clicks the Show button, he or she is sent to Yahoo!’s built-in order tracking screen. If the customer is logged in with a Yahoo! ID, the order status is displayed immediately. If the customer has no Yahoo! ID, unfortunately, the only message that customer gets is that the order has been placed. In this case, you will get that customer service call or email after all. For an example of what such an order-tracking form looks like, go to www.efunctional.com.
If these tips and tricks were useful and you would like to learn and implement additional features, consider purchasing the book Yahoo! Store Tips and Tricks (Y-Times Publications, 2005), available at www.ytimes.com. The book contains more than 100 tips and tricks. If you need assistance or would rather outsource the implementation of these advanced features, contact Monitus (www.monitus.com).
Now that you’ve learn how to implement a handful of advanced features yourself, in the next chapter, you’ll learn how to design your customized Yahoo! store to sell.