
CHAPTER 5
Design Engineering
Oracle Engineering allows you to provide your design engineers with controlled access to item information, bills of material, and routings for items that are being designed. During the product lifecycle phases, Oracle Engineering allows you to record, track, and implement engineering changes to items, bills of material, and routings.
Developing Prototypes
While developing a product, most enterprises try to track the development in one engineering organization and then manufacture it in many plants. This concept of one engineering organization is not in the context of physical location. You may have designers/engineers who are located all over the world, but all of them belong to this virtual engineering community of a company.
You can define a single inventory organization in Oracle Applications to model your virtual engineering community and enable all the engineering items in this organization; when you’re ready to manufacture an item, you can transfer/copy that item to manufacturing and enable it in the appropriate manufacturing/distribution organizations.
Engineering Items
The difference between an engineering item and a manufacturing item is that they are controlled through different security functions. Typically, the ability to access (view and update) engineering items is given to a smaller group of users. Other than the ability to view and update the item information, engineering items behave exactly the same way as manufacturing items. For example, whether you can purchase an item or not is determined by the item attribute Purchaseable irrespective of that item being an engineering or a manufacturing item.
You define engineering items in the Define Engineering Item form. In the real world, an item has many characteristics that could be identified by the item itself, or sometimes by the location in which it is stored. You can model these characteristics of an item using one of the two features—item attributes and item-subinventory attributes. Both of these are covered in detail in various parts of this book. For an engineering item, the item attribute Engineering Item is automatically checked. You will not be able to update this attribute, although you can see it. You will not be able to view an engineering item using the Define Item form that is available through Oracle Inventory. You will be able to purchase, build, and sell an engineering item, based on the setting of its other item attributes.
The Engineering Items: Revisions security function secures the ability to create revisions for an engineering item, whereas Engineering Items: Delete secures the ability to delete engineering items.
Engineering Bills and Routings
You can define the structure of your item as an engineering bill in the Engineering Bills of Material form. Because this is an “as designed” structure, it might not be used for manufacturing the product. So, you can define an Alternate called As Designed and use that to represent all your engineering structures.
You can define the operations to produce your item as an engineering routing in the Engineering Routing form. Similar to the component structure, you can use the As Designed label to distinguish your prototype routings.
NOTE
Unlike some ERP systems, Oracle Applications allow a particular item, bill of material, or routing to exist only in one environment (engineering or manufacturing) at a time; once you transfer the object from engineering to manufacturing, it no longer exists in engineering. To keep a separate copy of a bill or routing, you can create an alternate as described here. Alternatively, you can copy the engineering objects to manufacturing under a new item number; this alternative is discussed later in this chapter.
Accessing Engineering Information
The ability to access engineering items is controlled using function security. Any user who has the function Master Engineering Items in their menu has the ability to define/update engineering items. There is a corresponding function at the organization level called Organization Engineering Items, which controls the ability to edit engineering items in the enabled organizations.
Similarly, you can access engineering bills and routings if you have the functions Engineering Bills of Material and Engineering Routings in your responsibility.
Transferring to Manufacturing
Once you have completed the development of a new product and the product is proven through various tests, you release this product for manufacturing. You accomplish this by transferring or copying the item and its related information to manufacturing.
Typically, you do a transfer if the item is handed over to manufacturing and from then on that item’s information will be maintained by manufacturing. During the development cycle, if an item has reached a stage so that it can be built and sold in the market, you may want to start manufacturing that item and at the same time continue its development. In such cases, you copy an engineering item to manufacturing by giving a new name for the item. Manufacturing will maintain this item’s information from now on, whereas engineering will own the original item and carry out the development on that item. When you transfer an item, the transfer is done only in the organization where you’re performing the transfer. Later on, you can enable this item in the appropriate manufacturing organizations.
NOTE
Transferring an item from engineering to manufacturing in a child organization does not automatically result in a transfer to the master organization also. Conversely, transferring the item in the master organization does not result in a transfer in its child organizations. Transfers must be done separately in each organization; this allows you to be very specific in your engineering controls.
As illustrated by Figure 5-1, transferring engineering information is a one-way process. You can transfer information from engineering to manufacturing, but you cannot transfer information back from manufacturing into engineering.

FIGURE 5-1. Transfer of items, bills, and routings is a one-way process
To transfer an engineering item to manufacturing, navigate to the Transfer to Manufacturing form. Once there, select the item that you want to transfer in the Revisions tab and choose the information that you want to transfer by checking one or more of Item, Bill, and Routing. The current revision of the item and the routing will be shown, and you can optionally specify new revisions for the item and routing that will be effective after the transfer. In the alphanumeric sequence, the new revisions should be higher than the current revisions.
Because a manufacturing bill might not include engineering items, transferring an engineering bill of material will automatically transfer any first-level engineering components of that bill. This is a single-level transfer. It transfers the items only; it does not transfer the bills of material of any engineering components; you must transfer these separately.
NOTE
There is no separate revision for bills. The item revision is used as the bill revision.
If you don’t specify a specific alternate in the Alternates tab, all the alternates defined for the item including the primary will be transferred. You can choose the information that you want to transfer by selecting one of the three possible values in the Selection field. If you want to transfer a specific alternate, choose Specific to Transfer, and then specify an alternate to transfer. You should choose Primary to Transfer if you want to transfer just the primary. Choosing All to Transfer will have the same effect as not specifying anything in this tab.
If you want to relate this transfer with an Engineering Change Order (ECO; explained in more detail in the following section), you can choose an ECO in the ECO, Description tab; this might be useful for you in inquiries, though there is no additional functionality provided by ECO.
If you want to create a copy of an engineering item in manufacturing, you should use the Copy to Manufacturing form that is shown in Figure 5-2. In addition to the information in the transfer form, this form has a Manufacturing tab, which has the new item name and description.

FIGURE 5-2. The Copy to Manufacturing form duplicates an item from engineering in manufacturing
CAUTION
When you copy an engineering item to manufacturing, you must provide a new name for the item. Also, if you want to copy bills and routing from engineering to manufacturing, you must copy them at the same time that you copy the item. This is because the copy function doesn’t allow you to reference an item after you have copied it to manufacturing. So, if you want to copy, copy everything in one step.
The security function Engineering Items: Transfer secures the ability to transfer engineering items to manufacturing.
Engineering Change Orders
In a manufacturing organization, a standard document is used as the vehicle for communicating new product releases and changes in existing products. There are several names for this document, such as Engineering Change Note, Engineering Change Notification, etc. Oracle Engineering supports this business process with the Engineering Change Order (ECO) feature. You will be able to define an ECO that can consist of multiple items, bills, and routings, allowing you to group your changes logically as illustrated by Figure 5-3. Once the ECO is defined, you can submit this ECO for approval from various people. Later on, you will implement this ECO. The approval process is carried out using workflows defined using Oracle Workflow. You can either use the seeded workflow or define custom workflows and use them.
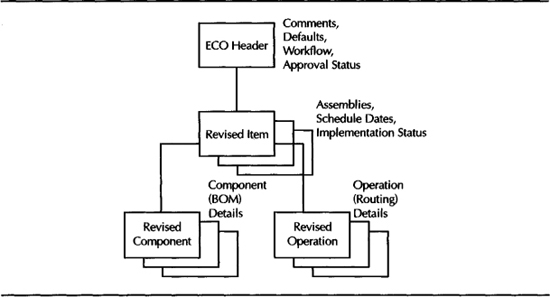
FIGURE 5-3. Structure of an ECO—Items, Components, Operations, and Resources
ECO Setup
ECOs allow you to manage engineering changes to your items, bills, and routings. You can update your existing items or release new items using an ECO. Although most of the setup steps are optional, defining and using the following would help in simplifying the process of defining and using ECOs.
ECO Autonumbering
You can configure the way ECOs are automatically numbered and control this numbering pattern on a user-by-user basis. If this level of control is not necessary in your environment, the next level is to have a numbering pattern for each organization. Beyond this, you can have a single pattern for all users across all organizations. Figure 5-4 illustrates the hierarchy Oracle Engineering uses to automatically number the new ECOs. When you create an ECO, it will be numbered using your specific prefix in the current organization. If the you/current organization combination doesn’t exist, the prefix at the next combination in the hierarchy—you/all organizations—will be used.

FIGURE 5-4. The hierarchy of ECO autonumbering options
CAUTION
ECO Autonumbering always requires a prefix from this hierarchy. If a prefix is not found, you will have to manually define a number. If you plan to use autonumbering, it would be safe to define a prefix for the combination all users/all organizations.
The system administrator can set the profile option ENG: Change Order Autonumbering at the user level. If this is Yes for a user, that user can define the autonumbering prefix for all users. If this is No, those users can only define prefixes for themselves. If you don’t want users to define their own prefixes, you should give them a responsibility that has the function Change Order Autonumbering excluded.
You define the autonumbering prefix in the ECO Autonumbering form. There are two sections in this form. In the first section, you identify the user(s) for whom you want to define a prefix for autonumbering. In the second section, you identify the organization(s) and specify the prefix and also the next number in the sequence for this prefix.
ECO Priority
You use the ECO Priorities form to define an ECO Priority. You can define as many priorities as you want, but you assign each a priority sequence in the range of 0-9. Priorities are used in conjunction with the ECO type to select the workflow process that will be used for approval. Other than that, priorities are for your information only.
ECO Type
You define ECO Types in the ECO Types form. ECO Types are useful in classifying your engineering changes. Secondly, an ECO Type identifies the type of information that is changeable by an ECO—Manufacturing and/or Engineering. Finally, ECO Type identifies the workflow process that is to be used for approval. You associate a workflow to an ECO Type in the Change Type Processes form.
You can optionally specify an ECO Priority for each workflow that you associate with the ECO Type. When you define an ECO, if a workflow is associated for an ECO Type/ECO Priority combination, that workflow will be used for the approval of that particular ECO. You can associate a workflow without specifying the ECO Priority, in which case that workflow will be used in cases where the ECO Type is specified and the ECO Priority is left blank. Another important fact is that, since ECO Priorities are organization-specific whereas ECO Types are not, if you associate a workflow to an ECO Type along with the ECO Priority, the combination will be valid in only the organization where the ECO Priority is defined.
ECO Reason
If you want to track and report on ECOs based on the reason they were proposed and implemented, you can define reason codes in the ECO Reasons form. You define a unique reason code and a brief description for each reason; you can assign these reasons to your ECOs for classification purposes.
ECO Approval List
You can predefine approval lists in the Approval Lists form. When you define an ECO, you can select one of these approval lists, which will then be used by engineering to get the approval from the individual people in the list.
NOTE
Approval List is used for sending notifications using Oracle Alert; this field will be disabled if you select a workflow to manage your ECO.
Profile Options
In your business, you may want to impose a rule that you should assign a new revision to an item, whenever the item is included in a change order. You can do this by appropriately setting up the ENG: Require Revised Item New Revision profile option.
You can control if you want to implement an ECO when the ECO has been superceded by higher revisions by appropriately setting up the ENG: ECO Revision Warning profile option. If the value is Yes, you will be able to implement a lower-level ECO revision. If the value is No or Blank, the implementation process will error out and the ECO cannot be implemented.
Defining ECOs
You define ECOs in the Engineering Change Orders form. If autonumbering is enabled, you will get a default number automatically, which you can change. The ECO Type you choose determines the types of items that you can include in this ECO (Manufacturing items only or Engineering/Manufacturing items). The ECO Type and ECO Priority combination is used to default the workflow process, and in this case, you cannot enter an Approval List. An ECO Department will be defaulted from the profile option ENG: ECO Department. Choose an ECO Reason to classify this ECO into one of your reason groupings.
If a workflow process is associated with the ECO, you start the workflow process using the Submit button. Once the workflow is started, you can view the approval history.
If you don’t associate a workflow with the ECO, you can associate an approval list with the ECO. When you change the status to Ready to Approve, Oracle Alert will send notifications to the people on the approval list. If you use an approval list, the ECO approval status can only be changed manually.
If you don’t specify an approval list or a workflow process, the ECO approval status will be set to Approved without being subjected to a formal approval process.
Choose a status for the ECO using the ECO Status window from the Tools menu. If the status is Scheduled or Cancelled, the Scheduled Date or Cancelled Date will also be displayed. You can provide an estimate of the implementation cost (both engineering and manufacturing) for the proposed change, by accessing the Enter Costs window through the Tools menu. This information can be used to calculate the payback period for the change, by comparing the current costs and future savings.
Choose the items that are included in the ECO in the Revised Items window that is shown in Figure 5-5. If you check the MRP Active flag, MRP will consider the change in components when exploding the revised item during the planning process. You can add or disable components in the Revised Components window. When you want to replace a component, you explicitly disable a component and add the new component.

FIGURE 5-5. The Revised Items form enables selection of items to include in the ECO
Starting from Release 11i.5, you can create ECOs for tracking and implementing routing changes. You can revise a routing to add, change, and disable its operations or events, by specifying the appropriate details in the Routing Details tab. You can also add or disable Operation resources.
The logical data model presented in Figure 5-6 will reinforce your understanding of ECOs and the related entities.

FIGURE 5-6. ECO Logical Data Model
The security function Engineering Change Orders: Update secures the ability to update engineering change orders, and Engineering Change Orders: Approvals secures the ability to submit an ECO for approval, while Engineering Change Orders: Release secures the ability to release engineering change orders.
ECO Approval
In an enterprise setting, you’ll typically have an engineering board or a change review committee that will review the engineering changes proposed and either approve or reject the proposal. Oracle Engineering lets you model these engineering boards and change control committees using ECO approval lists.
If an approval list is used for approval, the ECO status should be modified manually to reflect the current status. When an approval list is used, all the users in the list are notified using Oracle Alert. Users can respond to the alert notification with their approval/disapproval. Based on the responses, you set the approval status manually.
On the other hand, if you use a workflow to manage the approval process, the workflow will modify the status to Approved programmatically, when all the approvals have been received. Workflow needs to know how to select the necessary approvers; one way to do this is to associate an approval list with the seeded workflow. In this case, you should open the default workflow provided by Oracle Engineering and load an ECO approval list as a role to the approval process using the following steps:
1. Open the workflow builder and connect to the applications database.
2. Open ECO Approval.
3. File I Load Roles from database.
4. Load the approval list that you want to use in the ECO workflow.
5. Click Processes and open Standard Approval Process.
6. Open the property window of the node Standard Approval and click the Node tab.
7. Select the role that you loaded in step 4 as the performer.
8. Save your changes to the database.
You should recognize that this is a static assignment. So, if this process is selected, the approval list that you assigned here will be used always. If you wish, you can define additional workflows with different approval lists, then assign the appropriate workflow to the combination of ECO Type and ECO Priority, as discussed earlier.
If you want to use the same workflow, but a different approval list for each ECO, you must configure the workflow to select the correct approval list. One simple method is to identify the desired approval list on a Descriptive Flexfield (DFF) on the ECO, and then design the approval workflow to get the approval list from the DFF. Use the following steps to customize your workflow:
1. Open the workflow builder and connect to the applications database.
2. Open ECO Approval.
3. Click Processes and open Standard Approval Process.
4. Open the properties window of the node Standard Approval and click the Node tab (shown in Figure 5-7).
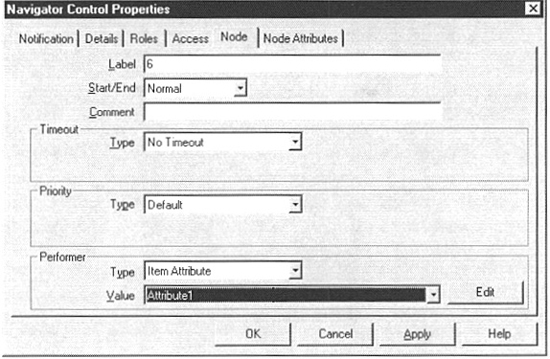
FIGURE 5-7. The properties of a Workflow Process are organized into many tabs in this window
5. In the Performer section, set the type to Item Attribute.
6. Set the performer to ATTRIBUTE1 (or any descriptive flexfield column that you enable to store the ECO approval list for each ECO).
7. Save your changes to the database.
To create an approval list value set, follow these steps:
1. Navigate to the Value Sets form.
2. Enter a name for the value set with the following settings:
![]() Format Type Char
Format Type Char
![]() Max. Length 100
Max. Length 100
![]() Validation Type Table
Validation Type Table
3. Navigate to the Validation Table Information by clicking the Edit Information button and fill in the following information:
![]() Table Application: Applications Object Library
Table Application: Applications Object Library
![]() Table Name: WF_ROLES
Table Name: WF_ROLES
![]() Uncheck Allow Parent Values
Uncheck Allow Parent Values
![]() Table Columns (see Table 5-1)
Table Columns (see Table 5-1)

TABLE 5-1. Value Set Table Columns
![]() Where/Order by clause: where wf_roles.orig_system=‘ENG_LIST’
Where/Order by clause: where wf_roles.orig_system=‘ENG_LIST’
4. Save the value set.
To enable an ECO Descriptive Flexfield, follow these steps:
1. Navigate to the Descriptive Flexfield Segments form and find the descriptive flexfield that is called Change Order Information.
2. Unfreeze the flexfield definition and click on the Global Data Elements field.
3. Click the Segments button and fill in the following information:
![]() Number 1 (the sequence in which you want this field to appear in the flexfield form)
Number 1 (the sequence in which you want this field to appear in the flexfield form)
![]() Name Specify a name (e.g., Approval List)
Name Specify a name (e.g., Approval List)
![]() Window Prompt Specify the prompt
Window Prompt Specify the prompt
![]() Column ATTRIBUTE1 (or other unused attribute)
Column ATTRIBUTE1 (or other unused attribute)
![]() Value Set Select the value set that was created before
Value Set Select the value set that was created before
4. Freeze the flexfield definition; compile and close all the forms.
When you define your ECO, you should select an approval list in the descriptive flexfield and save the ECO. When you submit the ECO for approval, the workflow process will use the approval list that was selected in the descriptive flexfield.
Accessing ECOs
Access to ECOs is controlled using two filtering mechanisms: the ECO Department and the BOM Item Type (an item attribute covered later in this chapter) of items. Figure 5-8 illustrates the access control provided by ECO Departments. The profile option ENG: ECO Department, which can be specified at all the levels, determines the department that will be defaulted if a user creates an ECO. This profile option is also used to determine whether the user has access to ECOs from either one department or all departments.

FIGURE 5-8. The ECO department controls who can access an ECO
CAUTION
If a user doesn’t belong to any ECO Department (the user’s ENG: ECO Department is not specified), that user can access all the ECOs in the system. So you should make sure that users are not provided with this level of authority unintentionally.
If you want to strictly enforce department-wide security to your ECOs, specify the ENG: Mandatory ECO Departments profile option as Yes. This will ensure that all ECOs belong to ECO Department. The profile options in Table 3-2 control access to ECOs at the item level, depending on the BOM Item Type of the item.
Product Family items are not controlled using this security mechanism. Additionally, you can control the ability to create ECOs for engineering items using ENG: Engineering Item Change Order Access.
Rescheduling ECOs
You can reschedule all the revised items that are pending in the ECO together or one by one, using the Reschedule window from the Tools menu. If you reschedule from the ECO form, all the revised items will be rescheduled. If you reschedule from the revised items window, only the current revised item will be rescheduled.

TABLE 5-2. ECO access control using BOM Item Types
CAUTION
Just specifying the effectivity date (by rescheduling) doesn’t mean that the changes will be implemented on the effectivity date. You should make sure that you change the ECO status to Scheduled and run the autoimplement manager daily, if you want this to happen.
The security functions Engineering Change Orders: Schedule and Engineering Change Orders: Reschedule secure the ability to schedule and reschedule engineering change orders, respectively.
Implementing ECOs
Once the proposed changes are approved, you can implement the changes. You can implement an ECO if the approval status is not Rejected and if the status of the ECO is not Hold or Cancelled.
There are two ways in which you can implement an ECO: manually, using the Tools I Implement option, or automatically, using the concurrent program AutoImplement Manager.
When you implement an ECO manually, you can implement all the revised items together or individually in different dates. The security function “Engineering Change Orders: Implement” secures the ability to implement engineering change orders manually. If you want to implement all the revised items in an ECO, choose Tools I Implement when you are in the ECO form. On the other hand, if you want to implement only one revised item, choose Tools I Implement from the revised items window.
You can schedule an ECO for implementation by changing the ECO status to Scheduled. The AutoImplement Manager will implement this ECO on the scheduled date. AutoImplement Manager is a concurrent program that will automatically implement all the ECOs whose schedule dates are on or before the current system date. It’s a good practice to have the AutoImplement Manager running on a daily basis, at the start of the day. Once an ECO or a revised item is implemented, all changes to the revised item are prohibited in the ECO.
Canceling ECOs
You might want to cancel an ECO or a few revised items in the ECO, or even further down, a few component changes on a revised item. If you choose Tools I Cancel when you are in the Engineering Change Order form, the ECO will be cancelled. If you choose Tools I Cancel from the Revised Items window, the selected revised item will be cancelled. If you choose Tools I Cancel from the Revised Components window, the selected revised component will be cancelled.
If you cancel an entire ECO, you will not be able to perform any action on the ECO, other than merely viewing it. Component cancellations can be viewed in the Cancel Details tab on the Revised Components window. The security function Engineering Change Orders: Cancel secures the ability to cancel engineering change orders.
Using ECOs for Mass Changes
When a component that is used in many assemblies is to be replaced, you can use the mass change capability that is available in Oracle Engineering or Oracle Bills of Material. It is always a good idea to use the mass change capability in engineering, since engineering provides more control through a two-step process. You define the mass change order first and then later implement it. The other benefit is that this change could be tracked with an ECO number, whereas the implementation through the Bills of Material applications is immediate and there is no tracking ability in bills of material.
In a mass change, you can add, delete, or replace a component or modify component information across all or a subset of parent items. You can use item categories and item types as a mechanism for selecting a subset of affected assemblies. This will be particularly useful if you can identify the pattern of occurrence of your mass changes.
Unlike ECOs, when you want to replace a component with a mass change, you don’t have to explicitly add and disable a component. When you choose update as the action, another row is added with the action of New, and you should update the new row with your new details, including the new component.
Use-up ECOs
Use-up dates are calculated during every planning run for all the items in that plan. The use-up date for an item is the date on which the on-hand quantity for the item will be exhausted, considering the gross requirements calculated by that plan. Figure 5-9 illustrates how the use-up date is calculated during every planning run. In the illustrated example, the use-up date is the fourth day.

FIGURE 5-9. How the use-up date is calculated
When you define an ECO, you can base the effective date of the revised item on the use-up date of either the revised item or one of the components of the revised item. You can select the use-up date of either the revised item or one of its components in the main tab. Navigate to the Effective Date field in the Main tab and bring up the LOV, to select a use-up date. In this list of values, you will see the use-up date of the revised items and all its components, in each of the current MRP plans for the item. This way, the use-up item and the MRP plan will be defaulted and the revised item’s effective date will be linked to the use-up item and the corresponding plan.
If the use-up date changes in a subsequent MRP run, the results vary depending on whether the use-up item is the revised item itself or one of its components. If the use-up item is the revised item, the effective date will be changed automatically. But if the use-up item is a component, the ECO Use Up Alert will be triggered to notify the items’ planner of the date change; the effective date on the ECO will not be changed automatically. The rationale is that you might want to base the schedule on a different component, particularly if you are replacing components in a matched set. In this case, you must manually reschedule the revised item’s change.
ECO Business Object API
You can use the ECO business object API to integrate with other software systems. In a nutshell, the ECO business object API can be used to create or update an ECO in Oracle Applications by calling a PL/SQL procedure directly instead of using the open interface.
1. Initialize the system. Follow the initialization guidelines in the section “BOM Business Object” in Chapter 4.
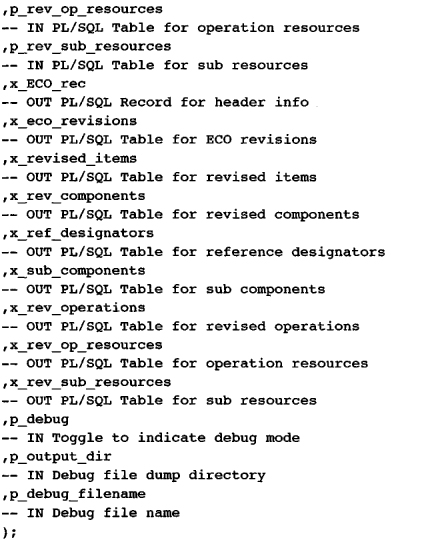
2. Construct a PL/SQL Record for the ECO header information, for example, p_eco_header of type Eng_Eco_Pub.eco_rec_type.
3. Construct the following PL/SQL tables for all the information that is associated with the ECO:


4. Call the procedure process_eco, with the parameters that you constructed in step 3. You don’t have to supply all the parameters in every case. If you browse through the signature of this procedure in the manual, you would note that most of the parameters have a default value. So, if you were inserting a whole new ECO, you would provide all the information. On the other hand, if you are modifying an ECO header attribute, you just provide the new header record.

5. Check completion status by processing the OUT parameters and commit, if everything was fine.
CAUTION
Business Object APIs will not issue commits or rollbacks. You have to do that explicitly in your calling code. The API will return the state of the business object and the process completion code (success or error). You can decide to commit or rollback the changes in your code.
Summary
In this chapter, we covered the features related to prototyping your engineering concepts and managing engineering changes during the product development phase. You can define engineering items, bills, and routings and use them to prototype your new product ideas. Once your product is proven, you can release the product to manufacturing.
Engineering Change Orders allow you to define, track, and implement changes to your items, bills, and routings. You can create engineering changes for both manufacturing and engineering items. If you want to mass replace a component across many using assemblies, you can use Mass Change ECOs.
