
CHAPTER 6
Assemble to Order and Pick to Order
Assemble to Order (ATO) and Pick to Order (PTO) are stocking strategies that are used by manufacturers, when they can produce a variety of finished products from a relatively small number of subassemblies and components. This stocking strategy is widely known as the “hourglass” strategy, where you maintain your inventory at the narrowest level in your bill structure. This maintains inventory in a more flexible state and helps minimize your inventory investment. An ATO environment is where you wait until you have an actual sales order before you begin manufacturing the finished product. PTO implies that you will pick multiple items based on one line item on a sales order.
Configure To Order Environment
In both ATO and PTO environments you might actually configure products based on the customer order, or simply manufacture or ship standard products or predefined configurations. A configure to order environment is where you allow your customers to configure the finished product that they intend to buy. Typically you will offer a variety of choices to your customer from which they can choose the best options that suit them.
Market Orientation versus Stocking Strategies
Whether you offer configurable products depends on your market orientation; but if you do, you cannot follow a Make to Stock strategy. You will potentially follow one of the three possible stocking strategies—Make to Order (MTO), ATO, or PTO, depending on the complexity of your products (how configurable your products are). On the contrary, you can operate with an MTO/ATO/PTO stocking strategy but still choose not to offer configurable products. The difference between MTO and ATO is the level at which you stock your components. So, from here on, when we mention ATO we really mean both ATO and MTO because the business processes are similar albeit the stocking levels are different.
ATO/PTO Scenarios
In a configuration scenario, a model bill of material is used to represent the list of choices; if there’s no need to offer choices, a standard bill of material is used. The difference between models and items is essentially the ability to configure an item while creating an order. Beyond this creation of the configuration item, the manufacturing and distribution processes are the same for both models and standard items. These scenarios are summarized in Figure 6-1.

In an ATO environment, the strategy is to forecast, build, and stock the subassemblies and parts that are used in the model. Oracle offers two flavors of ATO—the first one is the ATO model in which the customers can configure the product to their liking, and the other one is the ATO item that is preconfigured. Once the customer order is received, the subassemblies and components are assembled, according to the instructions in the routing, and shipped.
For configurable models, the subassembly/component list will vary with respect to each order and so will the manufacturing instructions (routing). So, a notional item is created for each unique combination of options using an automatic process. This item can be numbered and named according to your business needs. For example, when a model called MD45890 is ordered with a set of chosen options, the system will create a notional item to represent the chosen options, and numbers the new item as MD45890*99, based on your BOM parameters. This item is referred to as the configuration item in Oracle Applications.
The strategy in PTO is similar, although there is no manufacturing. There are two flavors of PTO as well—PTO models that can be configured by the customers and PTO kits that are ordered as they are. Because there is no manufacturing involved, PTO models or PTO kits can be shipped as soon as they are ordered, depending on the availability of the required items. When the pick list is generated for these items, the individual items that were selected (in the case of a PTO model) or that were part of the standard PTO kit will be printed in the pick list, which can then be picked and shipped.
Over and above the vanilla flavors that are shown in Figure 6-1, Oracle allows you to have hybrid items such as an ATO model within a PTO model. Starting with Release 11 i5, Oracle supports multiple levels of configuration within a model; the applications will generate a unique configured item for each ATO model within a structure. Prior to Release 11 i5, however, multiple ATO models could be used, but the result was one flat bill of material for all levels of configuration in the structure.
The ATO/PTO Business Process
An ATO/PTO process flow starts with entering sales orders and goes through the major steps in shipping a configurable ATO/PTO model or an ATO/PTO item to your customer. Figure 6-2 demonstrates this flow for both models and standard items. The figure also highlights the steps that will be applicable for ATO/PTO models vis-à-vis ATO/PTO items.

In the case of configurable models, you invoke the configurator from the sales order; choose appropriate options, and save the configured item sales order. Once the sales order is booked, you can create the configuration item, configuration item bills, and configuration item routing in the appropriate inventory organizations automatically. For ATO/PTO items, and PTO models, these two steps are not necessary because you order and use standard predefined items.
When using ATO models/items, you create a final assembly order (a discrete job or a flow schedule) to fulfill the sales order. The item is manufactured using the designated items and then shipped to the customer.
With PTO models/items, a pick list is generated for the sales order; the subassemblies and components are picked and optionally packed, before shipping to the customer.
Setup for ATO/PTO
Oracle enables you to define various business rules that support these business processes, so that your day-to-day operations will be easier to manage. For example, in a configurable ATO environment, the system will define a new item for every order, if a matching item is not found. This section will cover the setup for using Oracle Applications in an ATO/PTO environment.
BOM Parameters and Profile Options
Almost all the information in this section applies, only if you are planning to operate with configurable ATO/PTO models.
The factory floor that produces the products doesn’t have to concern itself with the model bills, because there is a lot of additional information in the model bills. For this reason, a configuration item is created for each order that includes the options that were selected by the customer. The values in the fields Numbering Segment and Numbering Method in the BOM Parameters window are used to create a number for the new configuration item. You identify one of the segments from your item key flexfield as your numbering segment. Let’s say you use only one segment from the Item key flexfield. Your numbering segment would be SEGMENT1.
The numbering method can take one of the four values as illustrated in Table 6-1.
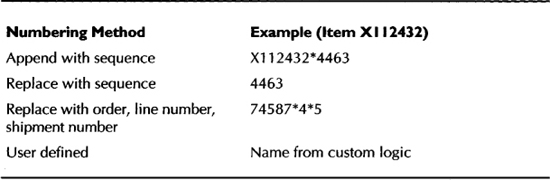
TABLE 6-1. Configuration Numbering Method
NOTE
If your numbering method is User defined, you should write your custom naming logic in the function user_item_number in the BOMCFGIB.pls file. The function takes two parameters: the model item id is an in parameter, and the new name is an out parameter.
In Table 6-1, the examples illustrate the usage of the asterisk (*) as the delimiter character. You can define a delimiter character using the BOM: Configuration Item Delimiter profile option which will be used in between your numbering segment and the generated sequence value or in between the order, line number, and shipment number.
CAUTION
You can choose any character for a delimiter except the one you chose for the Item key flexfield delimiter, if you use a multi-segment item. If in fact you have the same delimiter for both the Item key flexfield and the configuration item delimiter, the Create Configuration Item process will fail.
You can specify the default User Item Type for every configuration item that is automatically created using the BOM: Configuration Item Type profile option.
Before creating a new configuration item, you can check for existing configurations that match with the selected options of the new sales order. You can control this using the BOM: Match to Existing Configuration profile option. if the value is Yes, a check for matches will be performed before a configuration is created through the AutoCreate Configuration concurrent program or the Create Configuration Item workflow activity.
The standard matching logic checks for the existence of another configuration that has the same options with the same quantity as the one that is being ordered. If you want to use a custom logic for matching instead of the standard matching logic, you can indicate that using the BOM: Use Custom Match Function profile option.
NOTE
If you want to use custom matching logic, you should implement that logic in the function find_matching_config in the CTOCUSMB.pls file. The model line id from the table oe_order_lines should be passed as an in parameter, while you have four out parameters - the matched item id, error message, message name, and table name.
When you enter orders in Oracle Order Management (OM), OM verifies that the items exist in the organization that is pointed by QP: Item Validation Organization. The value of this profile option should normally be the item master organization for the install, unless there are good reasons to do otherwise. As in the case of items, OM uses the same item validation organization to get the model bills of material that is to be configured. It’s a very good idea to define all your configurable model bills in your item validation organization. If you have to maintain your bills from a different organization, define common bills of material in your item validation organization, so that you always maintain your bills of material from one organization.
CAUTION
MO: Operating Unit and QP: Item Validation Organization are definable at the responsibility level. You must ensure that responsibilities that share a common operating unit should also have a common item validation organization. Otherwise, AutoCreate Configuration might not work properly, because:
![]() It attempts to enable the configuration item in the organization identified by QP: Item Validation Organization and
It attempts to enable the configuration item in the organization identified by QP: Item Validation Organization and
![]() It uses the numbering method from the BOM Parameters in QP: Item Validation Organization for numbering the item.
It uses the numbering method from the BOM Parameters in QP: Item Validation Organization for numbering the item.
Item Templates
There are various types of items that are used in an ATO/PTO scenario. The templates for the top-level items are outlined in Figure 6-3, with the appropriate attribute settings.

FIGURE 6-3. Item templates for top-level items
The seeded templates include ATO Item, ATO Model, PTO Model, ATO Option Class, and PTO Option Class.
We discuss some of the attributes that are important for ATO/PTO operations next. The models, items, and components should all have the BOM Allowed flag enabled.
For PTO models/items, the Pick Components flag is enabled, whereas for ATO models/items, the Assemble to Order flag is enabled. These two attributes are mutually exclusive.
Ship Model Complete is applicable only for PTO models, PTO items, and PTO option classes. Enabling this attribute will mean that all the components in the model, kit, or option class ship together.
You can enable Available To Promise (ATP) checking for the model/components using the Check ATP and ATP Components attributes. ATP is covered in detail in Chapter 12.
You have to enable the Forecast Control appropriately for ATO models, ATO items ATO, and option classes. Forecast Control is not applicable to PTO models, PTO kits, and PTO option classes; forecasts are always exploded for PTO models/kits/option classes.
The MRP Planning Method determines the type of planning that you intend to use on your ATO models, ATO items, and ATO option classes. PTO models, PTO kits, and PTO option classes are not planned using MRP; their components are always exploded while loading the forecasts. Forecasting and Planning are covered in detail in Chapters 8-11.
Setup for Configurable ATO/PTO Models
The first step is to define your ATO/PTO models as items with a BOM Item Type of Model and one of the two attributes—Assemble to Order (for ATO models) or Pick Components (for PTO models)—enabled. You should then define the bills for these models with appropriate option classes and options. The last step is to define a generic routing for ATO models, which can then be used as a template routing. You can define your model routing in such a way that your configured items will get a routing that inherits the appropriate operations automatically. Routing is not applicable to PTO models.
Item Setup
Define your model in the item master organization, and enable it in the organization(s) from where the model will be manufactured and shipped. You should then define your components, apply the appropriate template, and enable them in the organization(s) from where the model will be manufactured.
The model, option classes, and options should be added to a price list in Oracle Order Management. Thus there is a price for the basic and standard features and the price adds up as each option is selected.
You should have your model bill defined in the manufacturing organization(s), because the configuration bill of material is created using the model bill defined in the manufacturing organization. The configuration item will be enabled in the item master organization, the organization pointed by the responsibility’s QP: Item Validation Organization, the shipping organization, and the manufacturing organization(s). As described earlier, if BOM: Match to Existing Configurations is Yes, the auto-create process checks for matching configuration items in the system. The standard matching logic tries to find a match in the whole system and is not organization dependent.
Bill of Material Setup
A configurable model can potentially contain four types of items—additional models, various option classes, the options within each option class, and the standard included items. An ATO/PTO model can have option classes, options, and standard items as components. An ATO model can have another ATO model as a component. A PTO model can have both ATO models and PTO models as components.
If the parent item has its item attribute ATP Components enabled, the cases where a component’s ATP will be performed is indicated in Figure 6-4.

You can enter the Minimum Quantity and Maximum Quantity for each option (not for mandatory components), defining a quantity range that is enforced during order entry. These quantities must be a multiple of the particular component’s quantity in the bill. The Optional attribute is applicable only in model and option class bills and is used to indicate if a model, option class, or option is optional.
The Mutually Exclusive attribute is only applicable to option class items. If the option class is flagged as mutually exclusive, you can only select one option from that option class. For example, if you are a car manufacturer, you can have an option class called Audio System with three options—Bose, Sony, and Sharp. These options are mutually exclusive; but the decision is indicated at a higher level, which is the option class.
In the case of PTO option classes, you can set the Basis to Option Class to prevent modification of the extended order quantity on the option class item. This determines if the extended order quantity on an option class can be modified during order entry. Extended order quantity of options within an option class can be modified irrespective of the value of the Basis field.
NOTE
Extended order quantity is calculated by multiplying order quantity of the model and the component quantity in the bill.
You can assign item catalog descriptive elements to models and option class bills, if the descriptive element is also listed in the catalog for the item. The auto-create process will generate an item description based on the option’s values for models and if the item has one or more descriptive elements that have their Description Default enabled. You can use this feature to generate meaningful item descriptions. For example, Neptune uses this feature to include the memory in the description among other things. So, if a customer selects 256MB as the RAM option during his order, the value 256MB will be included in the item’s description.
Routing Setup
You can specify if a routing step is option-dependent while defining routing operations. During the auto-create process, all the operations that are not option-dependent are copied over to the configuration routing. But, an option-dependent operation is copied only if an option referencing that operation is selected during order entry.
When the configuration item is created, you might want your chosen options to inherit the operation sequence number from their option classes. You can achieve this using the profile option BOM: Inherit Option Class Operation Sequence Number. When this profile is set to Yes, all the option items whose operation sequence numbers are 1 will inherit the operation sequence numbers from their parent option classes.
The inheritance logic goes all the way up to the top of the model structure, until it finds a sequence that is not 1. For example, the options (Celeron, Pentium III, Athlon, and K6) shown in Figure 6-5 have an operation sequence of 1. The option classes AMD and Intel also have an operation sequence of 1. The next level option class, which is CPU, has an operation sequence of 45. The chosen option will inherit the operation sequence number from the CPU option class as 45, when the configuration item is created.

FIGURE 6-5. Operation sequence inheritance
This is a convenient feature if multiple option choices will use the same routing operations. For example, Neptune offers a choice of several CD-ROM and DVD-ROM drives on its machines. Regardless of the drive chosen, the same routing operation is used to install it. But the drive is not required, so the operation is option-dependent. (If an option were mandatory, e.g., the choice of processor, you would not have to make the operation option-dependent at all.)
Making the Auto-Created Configurations Orderable
If you want to accept customer orders for the configured items that are created by the auto-create process, you should enable the following item attributes for that item:
![]() Shippable
Shippable
![]() Customer Ordered
Customer Ordered
![]() Customer Orders Enabled
Customer Orders Enabled
![]() OE Transactable
OE Transactable
You should also add the item to the appropriate price lists.
Setup for Standard ATO/PTO Items
You can create a standard ATO/PTO item, by enabling the Assemble to Order or the Pick Components attributes of the item appropriately. Alternatively, you might want to predefine standard configurations, which are based on a model and use them directly during order entry, instead of picking option by option. The idea is to save time and effort during order entry, especially for frequently sold configurations. We’ll take a look at the steps in defining standard configurations.
Item Setup
Define the configuration item with your desired name and apply either the ATO Item or PTO Kit template, depending on the type of standard item that you’re defining. In the Bills of Material section of the item attributes, select the base model for this item as the model on which you are basing this new item.
TIP
In most cases, you can copy the item attribute values from your base model and change the base model attribute and the BOM Item Type attributes.
You can catalog the configuration item using the same catalogs established for the base model, so that this item will also appear in catalog searches like all the configuration items that were created automatically and are based on the same model. The ATO item should be added to a price list in Oracle Order Management.
Bill of Material Setup
If you want to define the bills of an ATO/PTO item from scratch, you can do that just like you would do for any normal item. Alternatively, if you want to define the ATO/PTO item bill that is based on another item (the item’s Base Model), navigate to the Bills of Material window and select the item for which you want to define the configuration bill. Navigate to the Configurator window using Tools I Configure Bill menu and select the various options that are available in the model.
NOTE
You should identify the configurator engine URL using the BOM: Configurator URL of Ul Manager. This URL will be used to invoke the configurator from the Bills of Material form.
Once you complete your selections, Oracle Bills of Material creates a single level bill for the configuration item that includes the model item, selected option classes, selected options, and all the mandatory/included items. You can roll up lead times and cost for the configuration item by running the appropriate concurrent programs.
Routing Setup
Routings for ATO items can be defined in the same way that you do for any normal item. If you created a configured bill, using Tools I Configure Bill, the routing is not created for you automatically. However, this feature always assumes that your BOM: Inherit Option Class Operation Sequence Number is Yes and shares the routing from the Base Model; the Op Seq number in the configuration bill will be inherited from the Base Model.
Ongoing Activities
The ongoing activities in managing an ATO/PTO environment relate to almost every module in Oracle Applications. Because all these modules are covered in detail in various parts of the book, we attempt to mention only the aspects that are relevant to ATO/PTO in this chapter.
Because ATO/PTO is a stocking strategy, it affects almost every part of the business from planning to invoicing. In this section we cover all the features in the various modules of Oracle Applications that support the ATO/PTO business process.
Forecasting and Master Scheduling ATO Models/Items
You can create aggregate forecasts for the ATO models/items and option classes and generate forecasts for your options and mandatory components by exploding these aggregate forecasts. Depending on the value of the item attribute Forecast Control, the item’s forecasts will be exploded and consumed.
Forecasts for the ATO model will be consumed once the sales order is entered. Once the configuration item (covered in the section “Managing the Configuration Item”) is created, the configuration bill is exploded and the forecast(s) for model, option class, option and mandatory items are consumed again, if their Forecast Control is Consume or Consume and Derive.
You can master schedule your ATO models and later on assemble your ATO items and configuration items using a final assembly schedule. Forecasting and Master Scheduling are covered in detail in Chapters 8-11.
Enter Sales Order
Enter a sales order from the Sales Orders window. You can start entering the sales order by specifying the customer. Most of the information could be defaulted based on the customer that was selected.
For ATO/PTO models, the options that are selected will be included in the sales order as separated lines. This is covered in detail in the next section, “Select Options.” In the case of ATO items, only the ATO item appears in the sales order.
You can mix ATO models, ATO items, PTO models, PTO items, standard items, and non-shippable items in a single sales order. You can ship each line to a different ship to location, and you can source each line from a different warehouse. You can also create customer shipment schedules from a line so customers can get volume discounts, but still manage to maintain their inventory levels to match their plans.
Order Management is covered in detail in Chapter 12.
Select Options
Navigate to the sales order line that contains the ATO/PTO model and invoke Oracle Configurator using the Configurator button. In the Configurator window that is shown in Figure 6-6, you can choose the options that are to be included in the item. When you select an invalid option, the configurator explains the rule violations in the rules window. You will be allowed to save the selections partially, but you cannot proceed to create the configuration item, until you complete all the required selections.

FIGURE 6-6. Configurator runtime engine
The Configurator window that is used throughout Oracle Applications for creating configured products is the runtime engine of Oracle Configurator. We discuss Oracle Configurator briefly, in the section “The Oracle Configurator,” later in this chapter.
When you finish choosing your options and save your configuration, all the chosen options and their respective option classes will be included in the sales order, as separate lines along with the automatically included (mandatory) items.
If you know that a configuration item with similar options exists already, you can link that item to the ATO/PTO model line using Actions/Link Config Item, after you book the order line.
Managing the Configuration Item
This step is applicable only for configured (CTO) items. As mentioned before, the system creates a configuration item, if it doesn’t find a matching configuration during the auto-create process. In this section, we will discuss how to create and deactivate a configuration item.
Creating the Configuration Item
Once the sales order line becomes Create Configuration Eligible, you can proceed to create the configuration item. You can create a configuration item either by running the AutoCreate Configuration Items concurrent program or by using the Progress Order action from the Sales Order Line. Figure 6-7 shows the sales order after the configuration item is created. As you can see, the configured item is inserted as a separate line with a “.0” appended to the line number that contains the ATO model. The selected options and option classes are also included in the sales order with increasing lines numbers appended to the line number that contains the ATO model.

FIGURE 6-7. Configured item in the sales order
When you create the configuration item using the AutoCreate Configuration Items concurrent program, you can specify the sales order number to create configuration items for a sales order. If you leave the sales order field blank, all the eligible sales orders will be considered.
When you specify Release Offset Days, all the sales orders whose latest start date falls within the range of today (the date on which the concurrent program is run) and the date of (today + release offset days), adjusted for non-workdays, will be processed. For example, let’s say the scheduled shipment date is 24-DEC-2001 for an order. The order has a configuration item ConfigItem in line 2 with a quantity of 10. The fixed lead-time for ConfigItem is 2 days, and variable lead-time is 0.30 days. The latest date on which this order needs to be started (or the expected release date for final assembly) is calculated as 24-DEC-2001 - (2 + (0.30 * 10)+1), and adjusted for non-workdays. The expected release date is 14-DEC-2001. If you run the AutoCreate Configuration Items program on 11-DEC-2001 with a Release Offset Days of 5 days, this sales order will be processed. If the Release Offset Days is 3 days, the sales order will not be processed. This is illustrated in Figure 6-8.

FIGURE 6-8. Release offset days
You can specify an Organization, in which case, all the sales orders that have the specified organization as the shipping warehouse will only be processed.
When a configuration is created, many item attributes, including lead-time, are copied from the model item. The configuration’s routing is generated by picking all required operations from the model’s routing and any optional operations corresponding to selected options. You need to decide if the optional operations will significantly change the configuration’s lead-time from the lead-time of the model; if it will, you should calculate the item’s lead-time during the auto-create process. The concurrent program will calculate the lead-times for the configuration item if the Perform Leadtime Calculation parameter is Yes. If this parameter is No, lead-times will be copied from the model. This parameter is defaulted from the profile option BOM: Perform Lead Time Calculations.
During the auto-create process, you can calculate various flow manufacturing parameters such as the Total Product Cycle Time, Yield, Net Planning %, and Operation times, by setting the parameter Perform Flow Calculation to Yes. If Perform Flow Calculation is No, these values will be copied from the model. The auto-create process performs a single level cost rollup.
As mentioned earlier, you can create configuration items from the sales order pad as well. In this case, you will create configuration items for one sales order line at a time. When you create configurations from the sales order pad, lead-times will always be calculated for the configuration item.
Characteristics of the Configuration Item
The configuration item that is created by the AutoCreate process has a BOM Item Type of Standard. The Base Model attribute points to the model item from which this configuration is created. The item attributes Customer Orders Enabled and Internal Orders Enabled are set to No.
When you view the bills of material for the configuration item, you’ll see a single level flattened bill. In addition to the included items and the selected options of the model, the model itself and the chosen option classes are listed as components, as shown in Figure 6-9. This is because for configuration items, the forecast consumption logic explodes the configuration bill and consumes forecasts for the model, option classes, and options. The auto-create process replaces the sales order demand for the model, option classes, options, and mandatory components with a sales order demand for the configuration item. After this, forecast consumption first unconsumes and then reconsumes (by exploding the configuration bill) forecasts for the model and its components which have their Forecast Control as Consume or Consume and Derive.
FIGURE 6-9. Configuration item bills
The included items and the chosen options inherit the component attributes such as supply type, supply subinventory, and the locator details from the base model and option class bills. The model and option class items that are included in the configuration item bill are assigned with the supply type of phantom automatically.
A routing for the configuration item is created automatically during the AutoCreate process. Option-dependent operations are dropped if the corresponding option was not chosen. The completion subinventory and locator are derived from the base model’s routing. The resources for each operation are copied from the base model routing operations.
Deactivating Configuration Items
In a high-volume configure-to-order environment, you can generate a large number of configured items, bills, and routings. Over time, you might want to deactivate your configuration items if you don’t intend to use that item in the future. You do this by running the Deactivate Configuration Items concurrent program. This concurrent program will change the item status to whatever you specify in the Inactive Status field in BOM Parameters window. You can choose any one of your item statuses as your inactive status.
TIP
You might want to create a unique status to differentiate obsolete configurations from items that are obsolete for other reasons.
You can deactivate configuration items if the items are
![]() Not in any open sales order
Not in any open sales order
![]() Not available as on-hand inventory
Not available as on-hand inventory
The Deactivate Configuration Items concurrent program is available in Oracle Bills of Material. Specify the Organization in which you want to check and deactivate configuration items as a parameter to this concurrent program. You can also specify the Shipped Number of days ago parameter, and the system will only deactivate items that were last shipped before these many days.
The deactivation process only sets the status of the configuration to the status that is specified in the BOM parameter Inactive Status of the organization; it doesn’t delete the item. Use the standard deletion process in Oracle Inventory to define a group of obsolete configurations and delete them. If you have used a unique status to identify obsolete configurations, you can use it as the search criterion to populate the delete group.
Manufacturing
For configured ATO models and standard ATO items, you create final assembly orders once your sales orders are booked. Depending on the type of manufacturing method you follow, you can either create a discrete job or a flow schedule to manufacture the configured item. Although Discrete Manufacturing and Flow Manufacturing are covered in detail in Chapter 16, we are covering the features relevant to ATO in this section.
Discrete Manufacturing
You can create a discrete job automatically using the AutoCreate Final Assembly Schedule concurrent program or using the Progress Order action from the sales order pad for configured sales order lines. In these cases, a work order created for the full line quantity and is reserved to the sales order automatically.
Finally you can create a discrete job manually and include an ATO item in the job. In these cases, the jobs are not reserved to any sales order automatically. However, you can reserve them manually by navigating to the Sales Orders window that is shown in Figure 6-10, in the Discrete Jobs form.

FIGURE 6-10. Sales Order window in the Discrete Jobs form
Once a final assembly order is reserved to a sales order, you cannot make changes to the sales order without unreserving it from the WIP job. You can instruct WIP how to respond when you unreserve the WIP job from the sales order using the parameter Respond to Sales Order Changes in the WIP Parameters window. If the value is Never, there won’t be any effect on the existing work orders. If the value is Always, all the work orders that are reserved by a particular sales order will be put on hold. If the value is When linked 1 to 1, the work order will be put on hold if it is the only supplying work order for a sales order (the sales order is not linked to any other work order).
When you complete the discrete job, the sales order reservation is transferred from the discrete job to the completed quantity. When you return a completed assembly back to the job, the on-hand inventory is unreserved from the sales order.
CAUTION
In the case of assembly returns, the reservation is not transferred back to the job. You have to explicitly create a reservation between the job and sales order, if necessary.
Flow Manufacturing
You can create a flow schedule from the Line Scheduling Workbench or using the Progress Order action from the sales order pad. In the Line Scheduling Workbench, you can create fresh flow schedules for unscheduled sales orders by selecting the Unscheduled Orders and implementing them.
Pick Releasing and Confirming Shipments
The Pick Release process releases only eligible sales order lines that meet the release criteria. However, what gets released depends on the type of the item. For ATO items, the process releases the sales order for shipment, if there’s enough inventory to fulfill the quantity required by the line. The ATO item is printed on the pick slip.
For ATO models, the process doesn’t release the sales order line until the finished items are received into Oracle Inventory from the job/schedule that was reserved to the sales order line. If you allow partial shipments, the pick release process releases the sales order line as and when inventory becomes available from the reserved job/schedule. If you don’t allow partial shipment, the process waits until the entire line quantity is produced by the reserved job/schedule. Only the ATO configuration item is printed on the pick slip.
For PTO kits and PTO configuration items (created from a PTO model), the process explodes the kit and prints all the shippable components on the pick slip. If the item attribute Ship Model Complete is enabled, pick release will wait until the whole set of configuration components become available. Otherwise, pick release would release a partial release component, depending on availability of components.
You can confirm individual pick slips, in the Confirm Shipments form. If you want to confirm an entire batch of pick slips you can do that from the Confirm Shipment Batches window. You can view the details about your shipment in the View Orders form, from the Shipping Lines region.
The details of the Pick Release and Ship Confirm are covered in Chapter 17.
Invoicing
Although Invoicing is part of Oracle Financials, the features relevant to ATO/PTO models are briefly mentioned here for completeness. ATO/PTO items are treated just like regular items, as far as invoicing is concerned. You can create invoices for all shipped, invoiceable items using the Receivables interface.
Only order lines are invoiced—included items and mandatory standard components are not invoiced. In addition to being in an individual order line, the item attributes Invoiceable and Invoice Enabled must be enabled for the invoicing process to pick up an order line containing the item.
So, if the item attribute Invoice Enabled is not enabled for a ATO/PTO model, neither the model nor the options are invoiced. If the item attribute Invoice Enabled is enabled for an ATO/PTO model, the model and all options with the Invoice Enabled attribute enabled are invoiced, because the selected options and option classes are included as separate order lines.
All the Invoice Enabled components of a PTO kit will be invoiced (the components of a PTO kit are listed as separate order lines). Because an ATO item is ordered as it is, only the ATO item appears on the invoice to the customer.
The Oracle Configurator
Oracle Configurator is a user-friendly tool for implementing guided selling applications. The configurator has a runtime engine that is embedded in using modules such as Oracle Order Management, Oracle Sales Online, Oracle Bills of Material, etc. The runtime engine uses the model information that is available in Oracle Bills of Material, while checking for constraints/rules.
Oracle Configurator has a developer tool, which can be used by implementers or developers to develop configuration models and user interface customizations. You can test your configuration models from within Oracle Configurator Developer. You can use Configurator Developer to create and verify configuration rules such as automatic inclusion or automatic exclusion, etc. A complete coverage of Oracle Configurator is beyond the scope of this book.
Summary
In this chapter, we discussed the detailed business flows that are applicable in Assemble To Order and Pick To Order environments. We discussed the setup for ATO/PTO including BOM parameters, items, bills and routings.
This chapter also looked at the day-to-day activities in the ATO/PTO environment in the later part of the chapter. The ongoing activities included planning, entering orders, choosing options, creating configuration items, manufacturing configured items, picking and shipping ATO/PTO items, and finally invoicing ATO/PTO items.