Chapter 13. Deploying SharePoint for Extranets and Alternative Authentication Scenarios
In This Chapter
![]() Outlining Common Extranet Scenarios and Topologies
Outlining Common Extranet Scenarios and Topologies
![]() Configuring Google as an Identity Provider in Azure Access Control Services
Configuring Google as an Identity Provider in Azure Access Control Services
![]() Enabling Facebook Authentication to Azure Control Services
Enabling Facebook Authentication to Azure Control Services
A useful but difficult-to-implement usage of a SharePoint environment is the extranet. An extranet is an extension of the intranet to users who exist outside the direct environment of the provider, allowing access to required services without exposing an entire intranet to the outside world.
The two key properties of an extranet are accessibility over the Internet and mandatory authentication. From a SharePoint perspective, an extranet is easy to implement because it is just another web application on a SharePoint farm that has been created so that it is accessible via the Internet after a user has authenticated.
The more challenging aspect of an extranet deployment is in the authentication. A user account must exist somewhere to be utilized by SharePoint; traditionally, this would be an Active Directory (AD). Maintaining AD accounts requires a large amount of work to create and support user accounts; for instance, if a user forgets his password, manual intervention is required. This scenario happens much more often for extranet users than for intranet users, because accounts are less likely to be used on a regular basis, and therefore users are more likely to forget their login details between login attempts.
This particular problem was resolved in SharePoint 2007 by utilizing forms-based authentication. This method involved modifying the SharePoint web applications to leverage a membership provider; this is a Dot Net terminology that reflects a source of user authentication, such as a Structured Query Language (SQL) database or AD.
In most scenarios, an SQL database membership provider was used to allow user login based on details contained within the database. This method was quite popular because it allowed vendor solutions to assist with the user management, incorporating functions such as reset lost password and create new account. With SharePoint 2010, however, the addition of a claims-based authentication and a Security Token Service meant that understanding and deploying a forms-based authentication approach was more difficult and that troubleshooting was much more complex.
Fortunately, the addition of the claims-based authentication has larger implications in that it enables us to use authentication sources outside our established identity sources, which totally eliminates the headaches of implementing and troubleshooting membership-based forms authentication and also has the benefit of completely externalizing sources of user authentication so that there is never any need to reset passwords or assist users with their authentication. Furthermore, we can use sources of authentication that the users most likely already have, such as a Facebook account, a Windows Live account, or a Google account.
SharePoint 2013 builds upon the platform provided by SharePoint 2010 by now having claims-based authentication as the default and supported option on web applications.
This chapter explains and demonstrates how to leverage three different external identity sources, coupled with the Windows Azure Access Control Services (ACS), to create a framework for extranet authentication. This cloud-based approach gives tremendous flexibility while reducing the complexity of extranet authentication significantly. The end goal of this is, of course, to use LiveID, Google, or Facebook accounts to log in to the SharePoint extranet site.
Outlining Common Extranet Scenarios and Topologies
To allow SharePoint 2013 to be used for alternative authentication scenarios and to perform the steps outlined in this chapter, you need the following:
![]() A SharePoint 2013 web application: In this case, you want extranet.contoso.com.
A SharePoint 2013 web application: In this case, you want extranet.contoso.com.
![]() An Azure subscription: You can obtain this from www.windowsazure.com.
An Azure subscription: You can obtain this from www.windowsazure.com.
![]() A Windows Live, Google, or Facebook account: You can obtain these from www.live.com, www.google.com, and www.facebook.com, respectively.
A Windows Live, Google, or Facebook account: You can obtain these from www.live.com, www.google.com, and www.facebook.com, respectively.
When obtained, complete the steps outlined in this chapter.
Creating an Access Control Services Namespace
To leverage Azure ACS, you must first create a namespace. A namespace is just a partition within Azure that acts as a container for settings. In this case, the namespace is used to partition authentication information for just this farm.
Visit www.windowsazure.com and sign in. If you do not have an account, you can sign up for a free trial or create a new account.
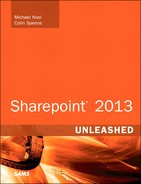
The Azure Management Portal, shown in Figure 13.1, is used to create the custom authentication provider.

For the duration of this exercise, the focus is on ACS, which you can find under Service Bus, Access Control & Caching. You can access this area by clicking Service Bus, Access Control & Caching and then selecting Access Control from the Services tree that appears, as shown in Figure 13.2.
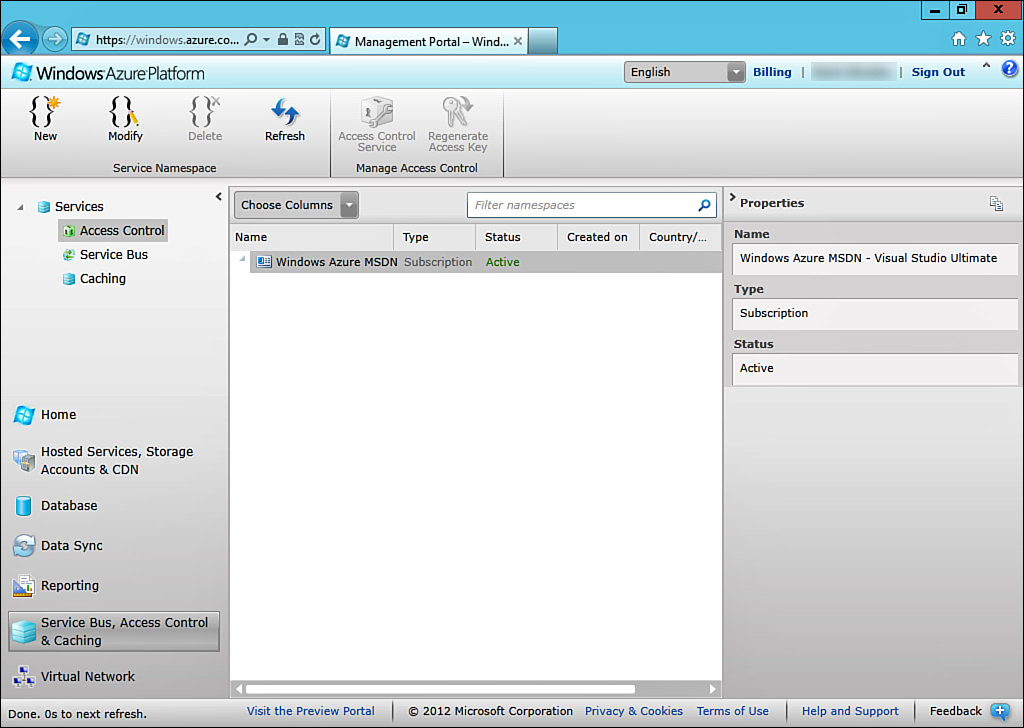
You now need to create a new namespace. So, click New to bring up a new form that you can complete.
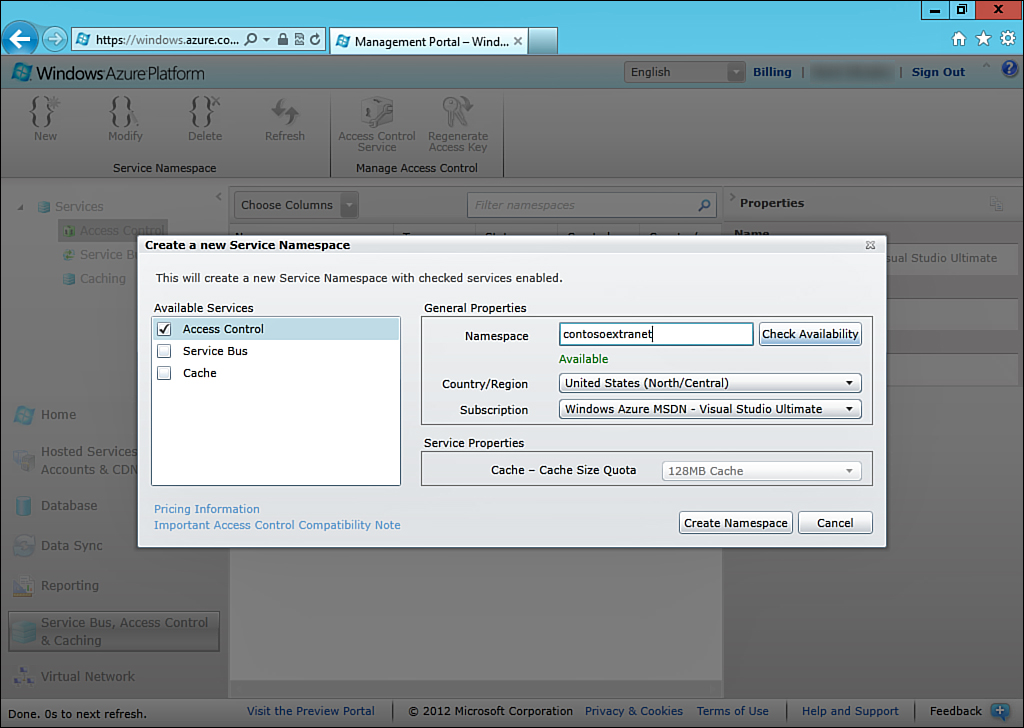
When a namespace is created, it is across the entirety of Azure and therefore must be unique. The name of the namespace has no bearing on the implementation, so choose a name that helps identify your environment while still being unique. For demonstration purposes, the namespace created here is ContosoExtranet. A geographic region must also be selected, and for this it makes sense to pick the closest geographic region to the location of your SharePoint environment, as shown in Figure 13.3.
After you click Create Namespace, it might be several minutes before the namespace is available for use, as indicated in the Azure Management Portal by the namespace showing a status of Activating.
When the namespace is created, this status changes to Active, and at that point the namespace is ready for use, as shown in Figure 13.4.

You can access the namespace from the Manage Access Control area on the Windows Azure Management Portal’s ribbon. To access this area, click Access Control Service while the new Namespace is selected. Clicking this redirects the browser to a new address (in this case, https://contosoextranet.accesscontrol.windows.net/v2/mgmt/web), as shown in Figure 13.5.
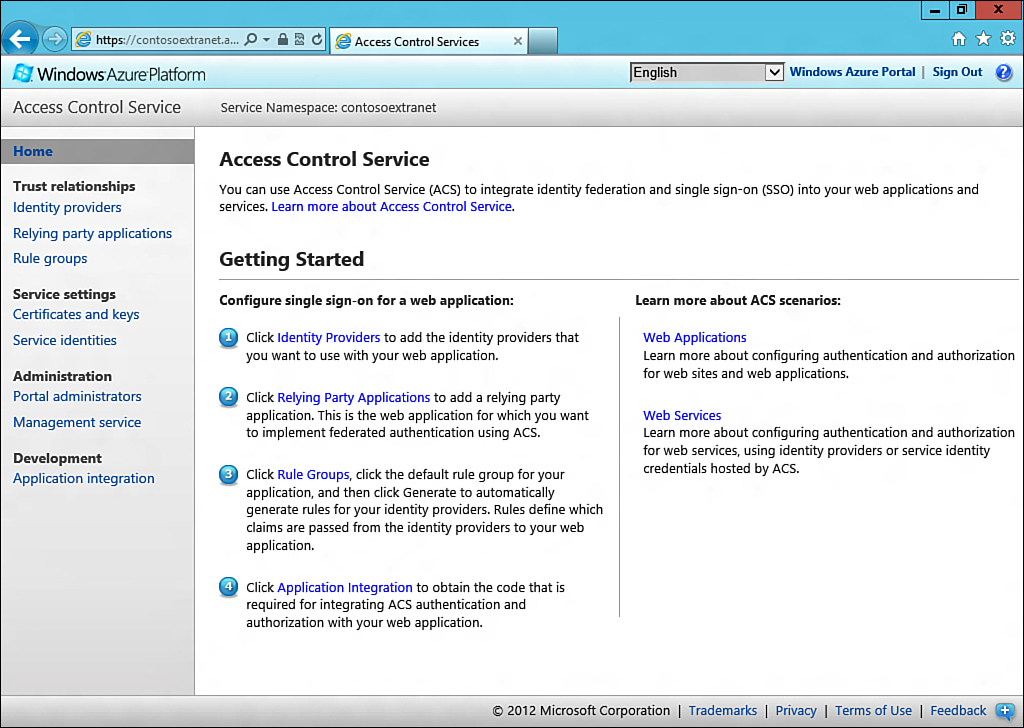
As the Getting Started page indicates, four activities need to take place to set up ACS for this new namespace:
![]() Configuring an identity provider or multiple identity providers
Configuring an identity provider or multiple identity providers
![]() Configuring a relying party application
Configuring a relying party application
![]() Configuring the appropriate rules for the relying party to function
Configuring the appropriate rules for the relying party to function
![]() Configuring integration with the namespace
Configuring integration with the namespace
While these entities might be difficult to understand at first glance, they are quite easy to configure, and when these are configured do not generally need to be modified unless significant changes occur to your farm.
Prior to these four options being configured, you need to complete some work on your SharePoint farm. On your SharePoint farm, you need to create a new certificate. This is used to establish a trust between the SharePoint farm and the Azure ACS namespace.
Log in to your SharePoint farm’s server to begin.
Creating and Exporting Certificates
Before you can create a trust between the new Azure ACS namespace and your SharePoint farm, a self-signed (or Enterprise Certificate Authority created) certificate must be generated and uploaded to Azure. This certificate is also uploaded into the SharePoint certificate authority.
To create this certificate, open a command prompt as an administrator and issue the following commands, as shown in Figure 13.6:
1. CD "C:Program FilesMicrosoft Office Servers15.0Tools"
2. makecert.exe -r -pe -n "CN=extranet.contoso.com" -sky exchange -ss my

Note
Do not use "CN=extranet.contoso.com". For ease of identification, you should use anything that will easily identify your certificate, such as the URL of your extranet or a simple short designator.
The command prompt can now be closed. The command that was issued to it created a new certificate with the name of Contoso.extranet.com that was stored in the certificate store of the user that executed it. To be of use in this exercise, this certificate now needs to be exported in two formats.
To export the certificate, follow these steps:
1. Type MMC.
2. Select File, Add/Remove Snapins.
3. Select Certificates from Available Snapins and click Add.
4. Select My User Account.
5. Click Finish.
6. Click OK. The Microsoft Management Console (MMC) should then display the Certificates snap-in, as shown in Figure 13.7.

7. Expand Certificates—Current User, Personal and click Certificates.
The certificate that was previously generated should now be visible.
8. Right-click the certificate and select All Tasks, Export.
9. Click Next to skip the welcome message on the Certificate Export Wizard.
10. Select Yes, Export the Private Key and then click Next.
11. Leave all the default values on this screen and click Next again.
12. Enter a password. This can be any password. However, do not lose this password; otherwise, the exported certificate will not be of any use. Click Next.
13. Click Browse and create a new directory on C: called Certificates.
14. Save the certificate on the local file system. Save this in C:Certificates (for example, C:Certificatesextranet.contoso.com.pfx).
15. Click Next.
16. Click Finish.
17. Click OK.
The Azure ACS namespace requires a .pfx format for certificate import, but for import into the SharePoint certificate authority, we use a .cer with no private key. To generate a .cer format certificate, follow these steps:
1. Right-click the certificate and select All Tasks, Export.
2. Click Next to skip the welcome message on the Certificate Export Wizard.
3. Select No, Do Not Export the Private Key and then click Next.
4. Leave all the default values on this screen and click Next again.
5. Click Browse and select the C:Certificates directory.
6. Save the certificate on the local file system. Save this in C:Certificates (for example, C:Certificatesextranet.contoso.com.cer).
7. Click Next.
8. Click Finish.
9. Click OK.
If you now browse to C:Certificates, there should be two files present. The file named Extranet.Contoso.com.pfx is now uploaded to Azure ACS.
Configuring Google as an Identity Provider in Azure Access Control Services
An identity provider is the source of identity that is being provided to Azure ACS. In this chapter, three sources are used: LiveID, Google, and Facebook. An identity provider for each of these needs to be configured.
Return to the web browser and the Azure Management Portal and the namespace’s ACS page for this step. Click Identity Provider to bring up a screen similar to the one shown in Figure 13.8.

An identity provider for Windows LiveID has already been created, but providers for Google and Facebook integration do not yet exist:
1. Click Add to create an identity provider entry for Google accounts.
2. Select Google, as shown in Figure 13.9.

3. Click Next.
4. Click Save.
Because ACS already has the built-in functionality to leverage Google accounts, you need to do very little to add the identity provider.
Now that the identity providers have been created, you need to configure the relying party applications.
Configuring the Relying Party Applications
Relying parties are services that consume the authentication from identity providers to allow federated sign in. In this case, the relying party is the Contoso extranet site, which needs to be created.
Click Relying Party Applications to begin, as shown in Figure 13.10.

Because no relying party has been created, click Add to begin the process of creating a relying party application for the Contoso extranet, and then complete the following steps:
1. Enter a name. For simplicity, it is easiest to use the URL for the extranet (in this case, extranet.contoso.com).
2. Enter the full URL for the realm (in this case, http://extranet.contoso.com).
3. Enter the full URL for the return URL, suffixed with /_trust/ (in this case, http://extranet.contoso.com/_trust/), as shown in Figure 13.11.

4. Ensure that the token format is set to Security Assertion Markup Language (SAML) 1.1.
5. Ensure that the token lifetime is set to a value greater than 600, because 600 is the same value that will be set in SharePoint and can cause unpredictable behavior. In this case, the value of 1,800 has been used to give a 30-minute timeout.
6. Ensure that both Google and LiveID options are checked for the identity providers to be used with this relying party, as shown in Figure 13.12.

7. Ensure that Create New Rule Group is ticked.
8. Select Use a Dedicated Certificate from the Token Signing area.
9. Click Browse to select a certificate to upload. Ensure that the .pfx certificate is uploaded (in this case, C:Certificatesextranet.contoso.com.pfx).
10. Enter the password that was associated with this certificate from the earlier steps, as shown in Figure 13.13.

11. Click Save to complete the creation of the relying party application.
Configuring Rule Groups for the Relying Party Application
Before the identity providers will work with the relying party applications, you need to create a set of rules to govern how the identity providers interact with the relying party applications.
These rules allow the association of inbound and outbound claims to be mapped against specific properties, which in turn facilitates the ability to log in to the sites. Examples of these claims include values such as email address, first name, last name, or a unique identifier.
SharePoint requires very few claims that are needed to establish authentication, but these are often not enough to be useful within the SharePoint site. It is much easier to share with John Smith than it is with a long unique identifier string such as User 57439772-3dfd-4fc8-aa5e-a47f3dfda13b.
To begin the creation of these rules that will translate the identifier strings to names, click the Rule Groups area of Azure ACS.
A default rule should be visible on this page, and as in the previous step, the Create New Rule Group option should be checked.
Click the Default Rule Group link, as shown in Figure 13.14, and then complete the following steps:

1. Click Generate on the page displayed in Figure 13.15. This generates a setup of default rules that Azure ACS is already aware of for the in-built identity providers that are utilized here.

2. Ensure that both Windows LiveID and Google are ticked.
3. Click Generate.
A set of basic rules has been generated by these steps. By default, though, these rules are insufficient to allow SharePoint access, because the minimum requirement for an account to sign in to SharePoint is an email address.
Note that this is conspicuously absent for the LiveID identity provider (listed as a claim issuer on this page). This is due to LiveID only providing a NameIdentifier attribute as a consumable property or claim.
Because the EmailAddress property must be present, but only the NameIdentifier property is available, you must create an additional rule mapping the incoming attribute of NameIdentifier to the outgoing attribute of EmailAddress.
To create this additional rule, follow these steps:
1. Click Add.
2. Ensure that the identity provider is set to Windows LiveID.
3. Select http://schemas.xmlsoap.org/ws/2005/05/identity/claims/nameidentifier as the input claim type. This should be the only option that is available for selection, as shown in Figure 13.16.

4. Select http://schemas.xmlsoap.org/ws/2005/05/identity/claims/emailaddress as the outgoing claim type, as shown in Figure 13.17.

5. Click Save.
Adding a Trusted Identity Provider in SharePoint
Azure ACS has been configured to allow sign-in from both Google and Windows LiveID, and a relying party application has been created. However, you still need to complete a few more steps to configure SharePoint to leverage this external identity source.
This configuration must be done via PowerShell utilizing the SharePoint snap-ins provided. Start PowerShell by navigating to the Start menu and selecting the SharePoint 2013 Management Shell. Ensure that this PowerShell session is run as an administrator (otherwise the steps will most likely fail).
To configure SharePoint to leverage this external identity source, follow these steps:
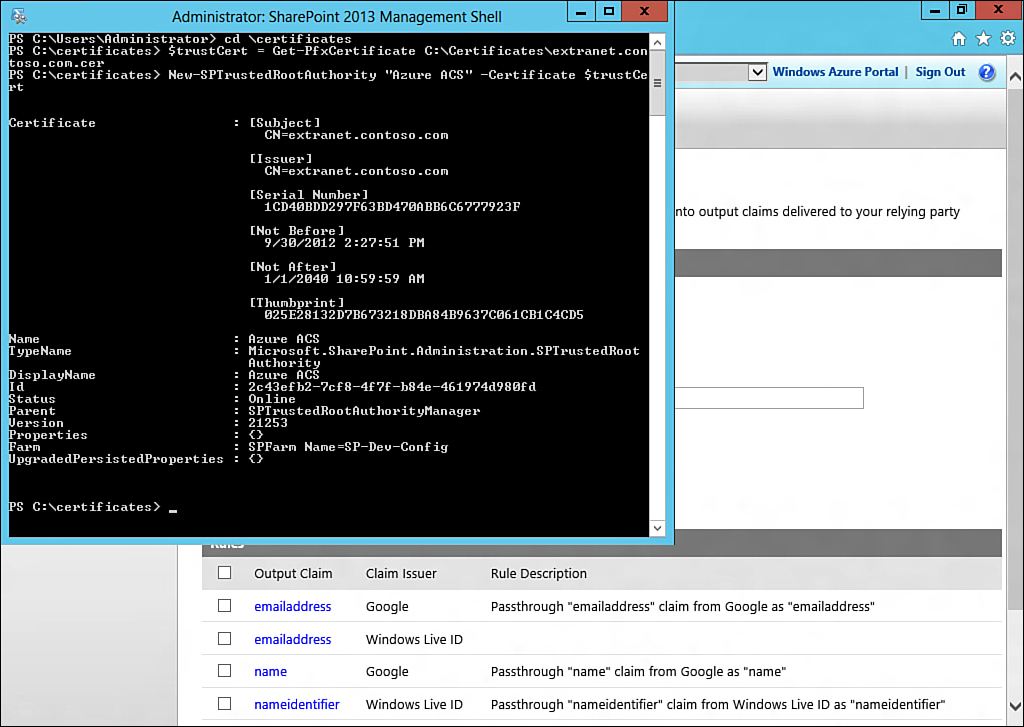
1. Change directory to C:Certificates by issuing "CD Certificates".
2. Create a new object called $trustCert and import the certificate to this object "$trustCert = Get-PFXCertificate C:Certificatesextranet.contoso.com.cer". Ensure that the .cer file is used rather than the .pfx file for this operation.
3. Create a new trusted root authority within SharePoint by issuing New-SPTrustedRootAuthority "Azure ACS" -Certificate $trustCert, as shown in Figure 13.18.
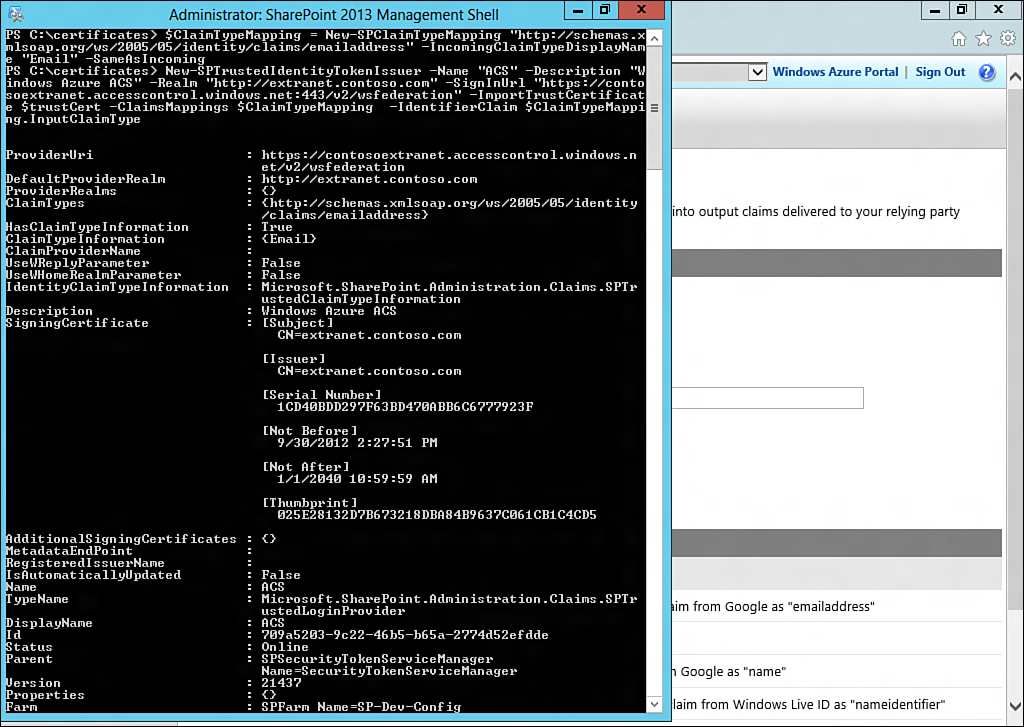
4. Issue the following command to create a ClaimTypeMapping object:
$ClaimTypeMapping = New-SPClaimTypeMapping
"http://schemas.xmlsoap.org/ws/2005/05/identity/claims/emailaddress" -
IncomingClaimTypeDisplayName "Email" -SameAsIncoming
5. Issue the following command to create a new trusted identity token issuer, as illustrated in Figure 13.19. Be sure to replace http://extranet.contoso.com with the appropriate URL. This is https://<yournamespace>.accesscontrol.windows.net:443/v2/wsfederation. If in doubt, you can retrieve this from the Azure ACS portal under the Application Integration area:
New-SPTrustedIdentityTokenIssuer -Name "ACS" -Description "Windows Azure
ACS" -Realm "http://extranet.contoso.com" -SignInUrl
"https://contosoextranet.accesscontrol.windows.net:443/v2/wsfederation" -
ImportTrustCertificate $trustCert -ClaimsMappings $ClaimTypeMapping -
IdentifierClaim $ClaimTypeMapping.InputClaimType
Step 4 creates a mapping on the incoming claim types so that when a user signs in, it will utilize the EmailAddress claim as the email claim.
Step 5 then creates a new trusted identity token issuer; this is an external system that SharePoint trusts for authentication. The mapping used in step 4 is used to establish which claim is used as the unique identifier for each account that signs in to SharePoint.
The core configuration is now complete for this system, and you can now use it to add additional authentication providers to each SharePoint application. Step 5, in particular, added a new authentication provider named ACS to the SharePoint farm.
Using the Authentication Provider
Now that you have finished the work in PowerShell, you can complete the rest from within a web browser from Central Administration. One big advantage of using this method is that zero configuration files have to be modified, and the most complicated part of the entire exercise is now behind us with the PowerShell completed.
To configure authentication for web applications, follow these steps:
1. Open Central Administration and navigate to Managed Web Applications, as shown in Figure 13.20.
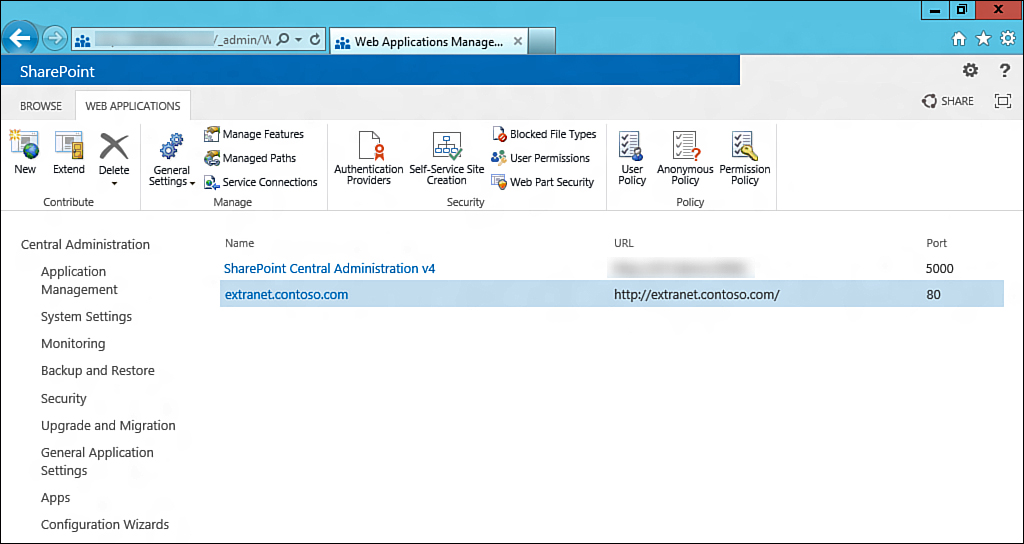
2. Select the appropriate web application and click Authentication Providers.

3. Click Default to open the settings for the default zone.
4. Scroll down through the authentication provider settings until you reach the Claims Authentication Types area.
5. Unselect the Enable Windows Authentication option, and then select Trusted Identity Provider and ACS, as shown in Figure 13.22. This activates the ACS authentication and sets it is as the default authentication for this zone.

You may note a warning: If Windows authentication is not selected on any Zone of this web application, crawling for this web application will be disabled. If Windows Authentication is left ticked, your users are given a selection box to choose between Windows authentication and ACS, which might cause confusion. The solution to this issue is to extend an additional zone to the web application and use this for crawling. If another zone is extended, users are not prompted for the type of authentication to be used, which will dramatically reduce the number of confused users calling your help desk.
6. Scroll to the very bottom of the page and click Save.
This completes the configuration of the web application, but there is a problem: No ACS users currently have access to the site, and Windows authentication has been disabled.
The easiest way to deal with this problem is to edit the site collection administration to be a Google or LiveID account. For this step, you should use a Google account because producing the unique identifier on a LiveID account can prove difficult.
Setting a New Site Collection Administrator
To set a new site collection administrator, follow these steps:
1. From Central Administration, browse to Application Management and then Change Site Collection Administrators.
2. In the Primary Site Collection Administrator field, there is an account that is no longer valid, because the Windows authentication provider has been removed.
3. Clear this field and enter a correct address as the site collection administrator. Then click the icon that resembles a person with a tick. This should validate the user account and put an underline under it, as shown in Figure 13.23.

Note that all accounts return a successful validation regardless of the account name; this is due to SharePoint being unable to poll the remote directory to approve the account. This is not a concern; however, it is behavior that most users do not expect.
4. Click OK to save the new site collection administrator.
Testing the New Authentication Type
With all these steps complete, it is now time to test the authentication. Browse to the URL of your web application to begin this process.
The browser should redirect to Azure and display the form shown in Figure 13.24.
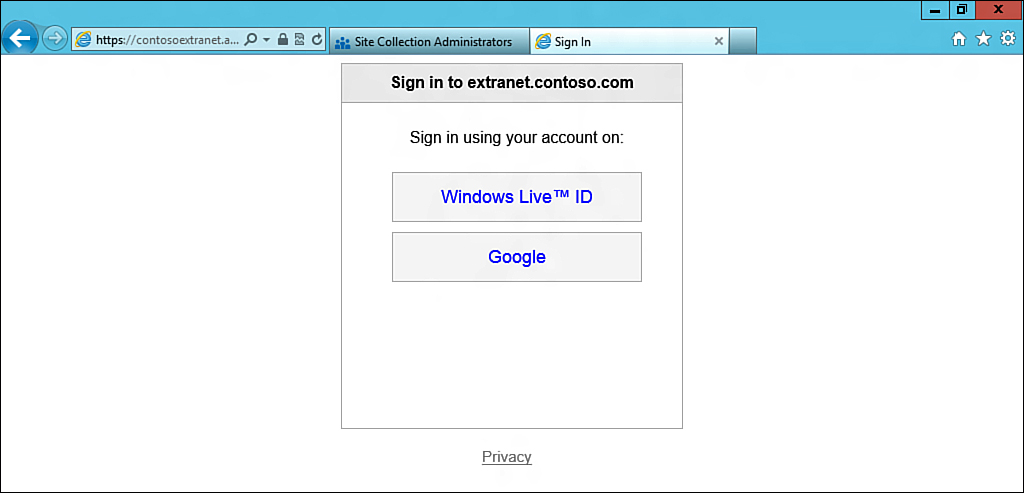
This is the default Azure sign-in form. Should the form require modification, this is possible but is not covered in this chapter.
Click Google to sign in with your Google account.
The browser should be redirected to a standard Google login, where username and password can be entered. Do this to complete the sign in. A page similar to one displayed in Figure 13.25 will open.

This is Google Accounts asking for your permission for the Contosoextranet.accesscontrol.windows.net application to access your Google account. In particular, Google is being asked permission for your email address. Click Allow to continue.
The browser should now be redirected back to SharePoint and access should be granted to the site, as shown in Figure 13.26.

Adding additional users is as easy as adding in their Google address or LiveID.
Discovering a Windows LiveID Unique Identifier
Unfortunately, utilizing the Windows LiveID system is a little more difficult because each account does not have an easy-to-use identifier like Google and Facebook have. The best scenario to allow this is to have a landing page with anonymous access where users can sign in and then discover their unique identifier.
For this reason, most users of this authentication method prefer to stick to Google and Facebook accounts, for their ease of use.
Enabling Facebook Authentication to Azure Control Services
Because a trust has been established with Azure ACS from SharePoint, any modifications or enhancements to the sign-in process are now done completely outside SharePoint and are handled within Azure ACS.
This simplifies the addition of identity providers, and in this exercise, that simplicity is exploited to add in Facebook authentication.
Before Azure ACS can leverage Facebook authentication, you need to create a new Facebook app. This is much simpler than it sounds. Just follow these steps:
1. Visit http://developers.facebook.com and sign in. After you have signed in, click Apps from the top menu, and then the Create a New App button, as shown in Figure 13.27.

2. Enter a valid app name and namespace, and then click Continue.
The screen shown in Figure 13.28 appears.

3. Take note of both the app ID and app secret. These are used to establish a trust between Facebook and Azure ACS.
4. Scroll down until you reach the Select How Your App Integrates with Facebook section. Select Website with Facebook Login. You are now prompted for a site URL. Enter the URL for your Azure ACS namespace. This will always be https://<yournamespace>.accesscontrol.windows.net, as shown in Figure 13.29.

5. Click Save Changes.
Completing Facebook Integration with Azure Control Services
Return to Azure ACS to complete the integration with Facebook. Then complete the following steps:
1. After you have returned to the Azure ACS namespace, click Identity Providers and then Add.
2. Select Facebook Application from the list of custom identity providers and click Next, as shown in Figure 13.30.

3. Enter the app ID and app secret that were created in the previous step on Facebook, as shown in Figure 13.31, and then scroll down and click Save.

The only thing that now remains to ensure Facebook users can authenticate to SharePoint is to generate the appropriate rules for the account. To do this, follow these steps:
1. Click Rule Groups, and then select the default rule group for your namespace. Click the Generate link shown in Figure 13.32.
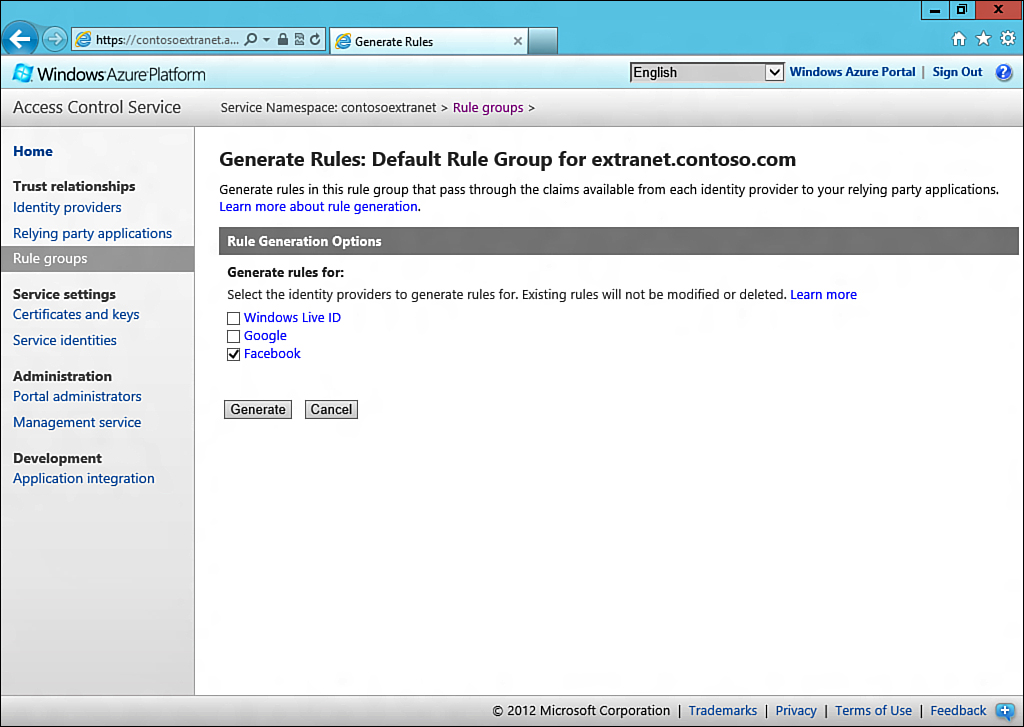
2. Ensure that only Facebook is ticked, and then click the Generate button.
There should now be rules for Facebook, LiveID, and Google identity providers, as shown in Figure 13.33.
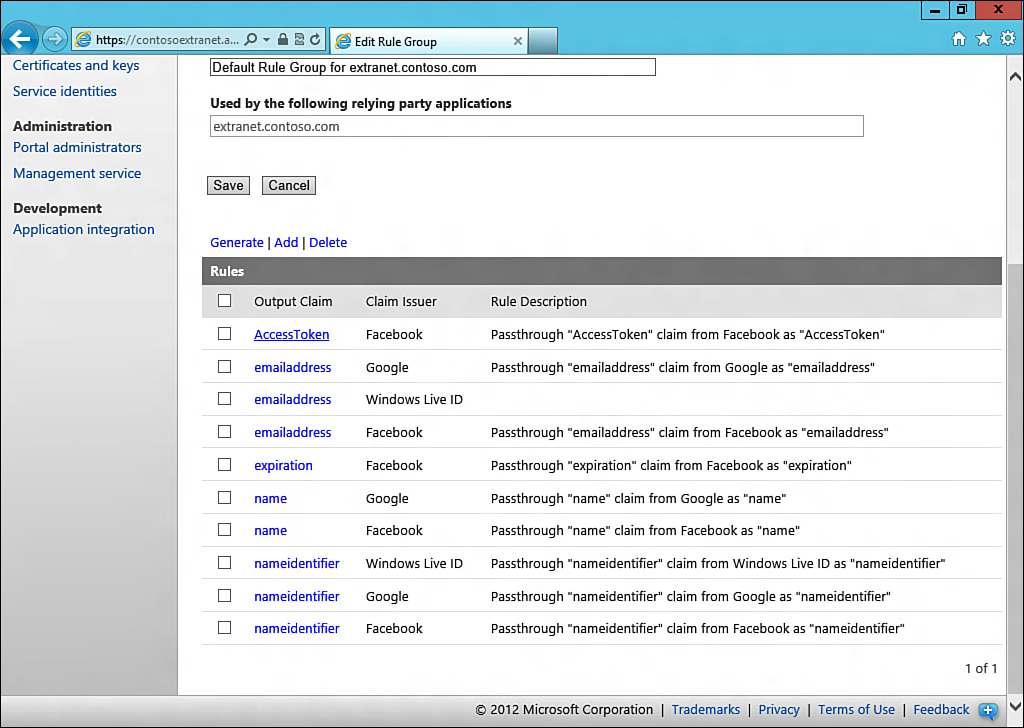
The addition of Facebook as an identity provider is now complete.
Testing Authentication with Facebook
To test authentication with Facebook, open a new browser and browse to the URL of your web application.
Note
Prior to testing, it is recommended to wait at least 15 minutes for Facebook to replicate the changes made to the new Facebook app.
Facebook should now be an option on the Azure ACS login page, as shown in Figure 13.34.

When you click Facebook, the browser is directed to a Facebook login page. Enter your account details to sign in.
After sign-in, the browser redirects to a page prompting for acceptance of your account logging in to the new Facebook app. Click Go to App to confirm, as shown in Figure 13.35.

Congratulations, you have successfully authenticated to SharePoint using a Facebook account!
If you receive an access denied message, ensure that your Facebook email address is added into the Site Collection Administrator fields or that an administrator has added your Facebook email address as a user in the site collection.
Summary
SharePoint 2013 offers many new features and enhancements that improve extranet scenarios for collaboration with partners, vendors, and customers. Most notable, the ability to easily use external authentication providers such as Google, LiveID, and Facebook accounts allows for simplified management of extranet accounts. In addition, improved Office client integration with forms-based authentication and other authentication providers make SharePoint 2013 a better extranet solution platform.
Best Practices
The following are best practices from this chapter:
![]() Secure your extranet with Secure Sockets Layer (SSL) encryption and always use port 443 inbound only. Using nonstandard ports does not improve security and only complicates the farm configuration. Some services do not work on nonstandard ports.
Secure your extranet with Secure Sockets Layer (SSL) encryption and always use port 443 inbound only. Using nonstandard ports does not improve security and only complicates the farm configuration. Some services do not work on nonstandard ports.
![]() Avoid storing confidential and secure data in an extranet.
Avoid storing confidential and secure data in an extranet.
![]() External-facing web front end (WFE) servers should always be in a secured network. Seek to reduce the vulnerability surface area.
External-facing web front end (WFE) servers should always be in a secured network. Seek to reduce the vulnerability surface area.
![]() Use external authentication providers such as Facebook, Google, or LiveID to provide for extranet access to simplify the management of extranet accounts.
Use external authentication providers such as Facebook, Google, or LiveID to provide for extranet access to simplify the management of extranet accounts.
![]() If an external auth provider is not an option, consider the use of an identity management tool such as Forefront Identity Manager (FIM) 2010 R2 to manage the accounts and automate the provisioning/deprovisioning process.
If an external auth provider is not an option, consider the use of an identity management tool such as Forefront Identity Manager (FIM) 2010 R2 to manage the accounts and automate the provisioning/deprovisioning process.