Chapter 19. Using Libraries and Lists in SharePoint 2013
In This Chapter
![]() Empowering Users Through SharePoint 2010 Libraries
Empowering Users Through SharePoint 2010 Libraries
![]() Adding Documents to a Document Library
Adding Documents to a Document Library
![]() Working with the Other Standard Tools in a Document Library
Working with the Other Standard Tools in a Document Library
![]() Working with the New Document Tools
Working with the New Document Tools
![]() Using the Edit Document Tool, Check Out, Check In, and Discard Check Out Tools
Using the Edit Document Tool, Check Out, Check In, and Discard Check Out Tools
![]() Using the Version History Tool
Using the Version History Tool
![]() Empowering Users Through SharePoint 2010 Lists
Empowering Users Through SharePoint 2010 Lists
Lists and libraries are two fundamental building blocks of a SharePoint 2013 environment and offer the tools that dramatically differentiate SharePoint from a file share. They enable users to manage documents by uploading them to libraries or to manage rows of information in a list—similar to a spreadsheet in many ways—manage versions, and alert the user if anything changes; they also offer a wide range of other powerful features. This chapter presents a high-level overview of the standard tools offered in libraries and lists provided by SharePoint Server 2013 and SharePoint Foundation 2013. Examples illustrate the capabilities of the tools that are most commonly used by end users and library and list administrators.
The next three chapters cover related topics that will be of interest to information workers, architects, and managers alike. Chapter 20, “Customizing and Managing Libraries and Lists to Meet Business Requirements,” builds on the content provided in this chapter to provide additional information about the standard management tasks required to customize and maintain sites and workspaces. Chapter 21, “Designing and Managing Pages and Sites for Knowledge Workers,” moves beyond lists and libraries to focus on the design and management of the containers that hold them and that provide views of the data and files contained within. And then Chapter 22, “Managing Metadata and Content Types in SharePoint 2013,” focuses on the complex topic of metadata for readers interested in the process of building a vibrant taxonomy for the organization.
This chapter assumes that users are using the Windows 8 operating system, with Internet Explorer (IE) 10. For users with different environments, be sure to test the appropriate combination of operating system and browser, and be aware that the user experience may vary based on the combination of software products used. For example, the experience of a user with Windows 7, IE 9, and Office 2010 will differ from that of a user with Windows 8, IE 10, and Office 2013. Likewise, a user with a Macintosh using Safari will also have a different experience.
Empowering Users Through SharePoint 2010 Libraries
Many users wonder what the difference is between simply continuing to store their files in a file share on their network, keeping them on their local hard drives to make sure they are close at hand, or using their email inboxes as storage and management tools. They also want to understand the differences in level of effort required to use the SharePoint tools and get an inkling of the benefits they and their organization will see after investing in the new technologies presented by the SharePoint 2013 product line.
SharePoint 2013 document libraries offer a variety of features that have proven to be useful to a wide range of users and projects and empower the site administrators to customize the storage and collaborative features of the library and enhance user productivity. Advantages provided by a SharePoint document library include the following:
![]() The administrator of a document library has a great deal of control over who can add, modify, and delete documents, or just read them, which often is not the case if a file share on the network is being used. Therefore, a departmental manager can easily control the set of users who can read or modify documents under her control without filing a help desk ticket or needing special privileges on the network. Permissions can be modified for an individual document or folder within the document library as well.
The administrator of a document library has a great deal of control over who can add, modify, and delete documents, or just read them, which often is not the case if a file share on the network is being used. Therefore, a departmental manager can easily control the set of users who can read or modify documents under her control without filing a help desk ticket or needing special privileges on the network. Permissions can be modified for an individual document or folder within the document library as well.
![]() Versioning can be turned on for a document library that keeps a complete copy of previous versions of the document for reference or recovery purposes. Both major and minor versions can be tracked, encouraging a more formal process of determining when a document is ready for general use or still in the development cycle.
Versioning can be turned on for a document library that keeps a complete copy of previous versions of the document for reference or recovery purposes. Both major and minor versions can be tracked, encouraging a more formal process of determining when a document is ready for general use or still in the development cycle.
![]() Alerts can be set on a document within the library, a folder in the library, or for the entire library so that the user receives an email notification if a document is modified, added, or deleted. Users can also set other criteria, such as weekly summaries to minimize in-box clutter.
Alerts can be set on a document within the library, a folder in the library, or for the entire library so that the user receives an email notification if a document is modified, added, or deleted. Users can also set other criteria, such as weekly summaries to minimize in-box clutter.
![]() Documents can be checked out, with the name of the person who has the document checked out listed in the library, so that other users can’t modify the document. Checking out can be required before a user can edit a document to further ensure best practices for document editing.
Documents can be checked out, with the name of the person who has the document checked out listed in the library, so that other users can’t modify the document. Checking out can be required before a user can edit a document to further ensure best practices for document editing.
![]() SharePoint 2013 enables users to drag and drop documents directly to the web interface. This feature is new to SharePoint 2013 and is more intuitive and easy to use when adding documents to a SharePoint 2013 document library.
SharePoint 2013 enables users to drag and drop documents directly to the web interface. This feature is new to SharePoint 2013 and is more intuitive and easy to use when adding documents to a SharePoint 2013 document library.
![]() A template can be stored in the document library that can be used to create a new document that is in turn stored in the library by default. So, for example, a document library designed to hold technical specifications documents can provide a Word template document with the latest format, layout, and sections in it.
A template can be stored in the document library that can be used to create a new document that is in turn stored in the library by default. So, for example, a document library designed to hold technical specifications documents can provide a Word template document with the latest format, layout, and sections in it.
![]() Metadata can be added to a document library that enables users to better describe what type of document it is, based on company standards (for example, Proposal, Project Plan, Report, Procedure), which product it covers, who owns the document (as opposed to who last modified it), or pretty much any other kind of textual or numerical information. SharePoint 2013 adds more control over default settings in a document library and allows ratings to be added. Figure 19.1 shows ratings in the far-right column.
Metadata can be added to a document library that enables users to better describe what type of document it is, based on company standards (for example, Proposal, Project Plan, Report, Procedure), which product it covers, who owns the document (as opposed to who last modified it), or pretty much any other kind of textual or numerical information. SharePoint 2013 adds more control over default settings in a document library and allows ratings to be added. Figure 19.1 shows ratings in the far-right column.

![]() Views can be created that group documents by certain criteria, sort them by any of the columns in the library, or only display documents that meet certain criteria. For example, the view from the home page may well be different from the view within the document library to minimize the amount of space taken up on the home page and to only show the last ten documents modified.
Views can be created that group documents by certain criteria, sort them by any of the columns in the library, or only display documents that meet certain criteria. For example, the view from the home page may well be different from the view within the document library to minimize the amount of space taken up on the home page and to only show the last ten documents modified.
![]() The ability to search within the library for text contained within the document is provided by SharePoint, a feature often not available on a corporate network. In addition, the ability to search the metadata associated with a document makes it easier for users to find the desired document more quickly. Entering a search term in the Search bar in a SharePoint 2013 document library defaults to the This List scope and the user can then expand and fine tune the search from the search results page.
The ability to search within the library for text contained within the document is provided by SharePoint, a feature often not available on a corporate network. In addition, the ability to search the metadata associated with a document makes it easier for users to find the desired document more quickly. Entering a search term in the Search bar in a SharePoint 2013 document library defaults to the This List scope and the user can then expand and fine tune the search from the search results page.
![]() If the organization decides on certain standards for the customization of a document library, it can create a template that can include the content if desired and can be used in other sites. This helps promote standards for document library design and features supported.
If the organization decides on certain standards for the customization of a document library, it can create a template that can include the content if desired and can be used in other sites. This helps promote standards for document library design and features supported.
![]() SharePoint 2013 libraries offer additional features such as the Follow tag, and users can add additional tags and notes to documents (which encourages comments and input from the users).
SharePoint 2013 libraries offer additional features such as the Follow tag, and users can add additional tags and notes to documents (which encourages comments and input from the users).
![]() Workflows can be created on-the-fly or predesigned for use within the document library to get feedback or approval. More advanced workflows can be designed by developers to start more complex processes that involve more complex actions and business logic. A Quick Step can be defined that appears on the ribbon to allow one-click actions that are custom designed for the library users.
Workflows can be created on-the-fly or predesigned for use within the document library to get feedback or approval. More advanced workflows can be designed by developers to start more complex processes that involve more complex actions and business logic. A Quick Step can be defined that appears on the ribbon to allow one-click actions that are custom designed for the library users.
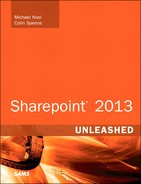
![]() Incremental changes in the document library such as the ribbon interface and the ability to check the document or documents you are working on make it easier for administrators and end users to quickly come up to speed with the array of tools offered in the document library. Figure 19.2 shows the ribbon interface, with the Files tab active, three documents selected, and the cursor hovering over the Delete button.
Incremental changes in the document library such as the ribbon interface and the ability to check the document or documents you are working on make it easier for administrators and end users to quickly come up to speed with the array of tools offered in the document library. Figure 19.2 shows the ribbon interface, with the Files tab active, three documents selected, and the cursor hovering over the Delete button.
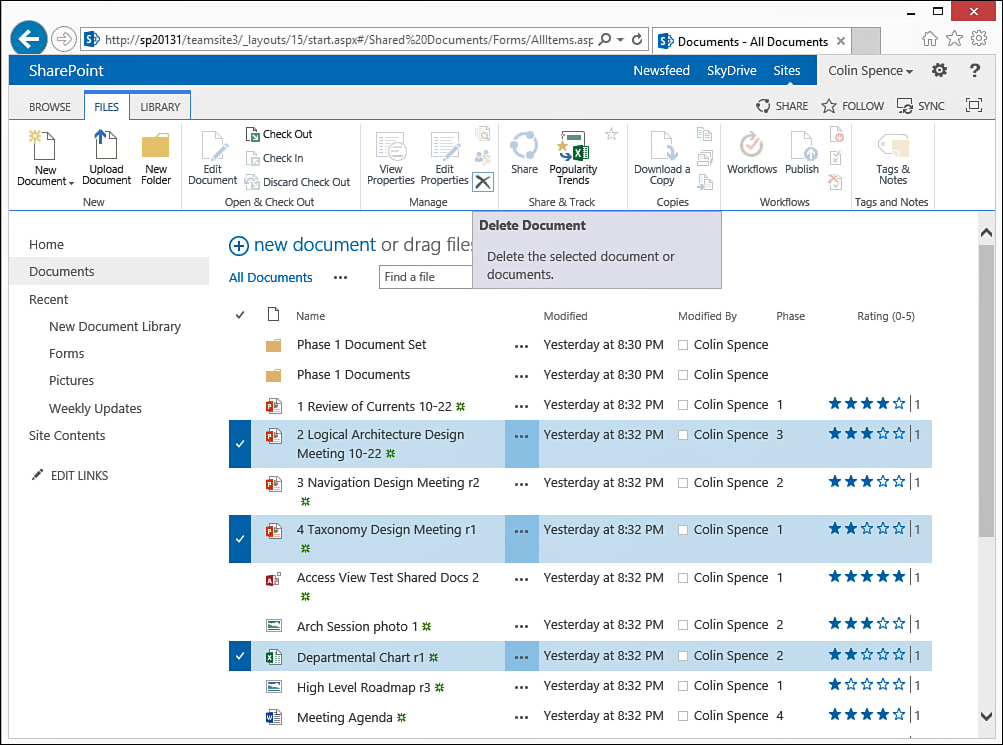
FIGURE 19.2 SharePoint 2013 document library with the Files tab on the ribbon visible and several documents selected.
![]() The contents of the document library can be downloaded to SharePoint Workspace or the Outlook client so that it can be accessed when the user is offline.
The contents of the document library can be downloaded to SharePoint Workspace or the Outlook client so that it can be accessed when the user is offline.
![]() A two-stage Recycle Bin is available, to rescue users’ documents from the inevitable accidental deletions that occur.
A two-stage Recycle Bin is available, to rescue users’ documents from the inevitable accidental deletions that occur.
Note
Mastering all these features can be complex for the document library administrator as well as for the users. It is important to balance the complexity of the library and the number of features leveraged with the sophistication of the typical users of the library and the type of content that is stored in the document library. Better to “start simple” with a few metadata columns, the ratings column, versioning enabled, and standard workflows than to overcomplicate the document library if users are brand new to SharePoint. However, if the document library users have been using SharePoint 2010 for several years, it can make sense to enable more complex features, such as complex metadata, document workspaces, and custom workflows.
Although a percentage of users of SharePoint document libraries may complain about learning yet a new software application, after a little training they will quickly appreciate the features that make their working day more productive. For example, one immediate benefit of having versioning enabled is that only the latest version shows up in the document library. This means that users don’t have to spend extra time deciphering complex filenames or looking at modification dates to ensure that they are in fact editing the latest version. The ability to check out a document makes it easy for a user to “reserve” a document that he doesn’t want anyone else modifying and knows he needs to work on over the weekend. By allowing users to rate documents, the document library takes on an added dimension of social interaction, further differentiating best-of-breed documents from mediocre and worst-of-breed documents.
Administrators will quickly come to appreciate the ability to add new columns of information to a document library that help them manage their documents and help users quickly find the exact document they are looking for, create customized views, leverage granular search, and navigate metadata. For example, by simply adding a column called Client, a sales manager can make it clear which client a document was created for. In addition, by providing a column titled Value of Opportunity, the total dollar amount of the proposal can easily be seen without opening the document. And if the Ratings column is enabled, an administrator can see over time which documents are the most popular and well received and learn about the needs of the users, as well as archive the less-useful documents if applicable.
Note
The ribbon interface in SharePoint 2013 offers quick access to the large number of tools available to users and admins in a tabbed interface in one place, rather than spread out among different drop-down menus, and the use of visually relevant icons truly makes a difference and speeds the learning process.
Using the Site Contents Page in SharePoint 2013
SharePoint 2013 offers a number of different libraries, which are compared later in this chapter, but it is important to understand which type of document library you are working with. You might not find this easy if you are using a SharePoint 2013 environment created by someone else, so a good place to start is by accessing the Site Contents link from the Settings (gear icon) drop-down menu or from the bottom of the quick launch area. Figure 19.3 shows the Site Contents (viewlsts.aspx) page revealing the lists and libraries (referred to as “apps” in SharePoint 2013) on the site (in this case, a SharePoint Server 2013 Enterprise team site).
This is a useful page to visit because it gives the visitor a summary of all the lists, libraries, and other apps that she has access to. Other information is obvious on this page, such as the names of the libraries and the lists, any notes provided about a specific library or list, the number of items in each one, and the last modified date. This gives a very quick overview of how complex the site is, which lists and libraries have been modified most recently, and how many items are in each one. If none of the lists or libraries have been modified in months, for example, this clearly indicates that no one has added, modified, or deleted content on the site in that amount of time, and it might be time to find out why.
Note that hovering over a list or library causes an ellipsis (...) to appear in the upper-right corner of the selected list or library. Clicking the ellipsis reveals additional tools and information, including descriptive text about the list or library and the tools Settings, About, and Remove.
Note
It is generally a bad idea to delete document libraries created by SharePoint during a site creation because they might provide functionality important to the functionality of the site.
A Brief Tour of a Document Library
This section summarizes the main features of a document library to provide an overview of the tools and features provided; the following section then drills down more deeply into more of these tools.
Figure 19.4 shows a document library titled New Documents at the root of a team site created in SharePoint Server 2013. Note that as shown in the URL, the view displayed is the AllItems.aspx page. The basic components include navigation tools in the quick launch area on the left, which includes links to libraries and lists the site administrator has chosen to include in the Quick Launch and the Site Contents links. The ribbon tools along the top include the Browse, Files, and Library tools tabs. On the right side can be found a search field. There is also a Find a File search field within the document library allowing the user to search for a file name within the document library.

In the working area, one document is visible with a Word icon in the Type column, name of the document in the Name column, modified date in the Modified column, and modified by information in the Modified By column. Note that because SharePoint 2013 is a fifth-generation product, Microsoft has worked diligently and taken end-user input to create an environment that provides a good combination of aesthetics, features, and usability, and SharePoint 2013 has an excellent balance of these components.
Adding Documents to a Document Library
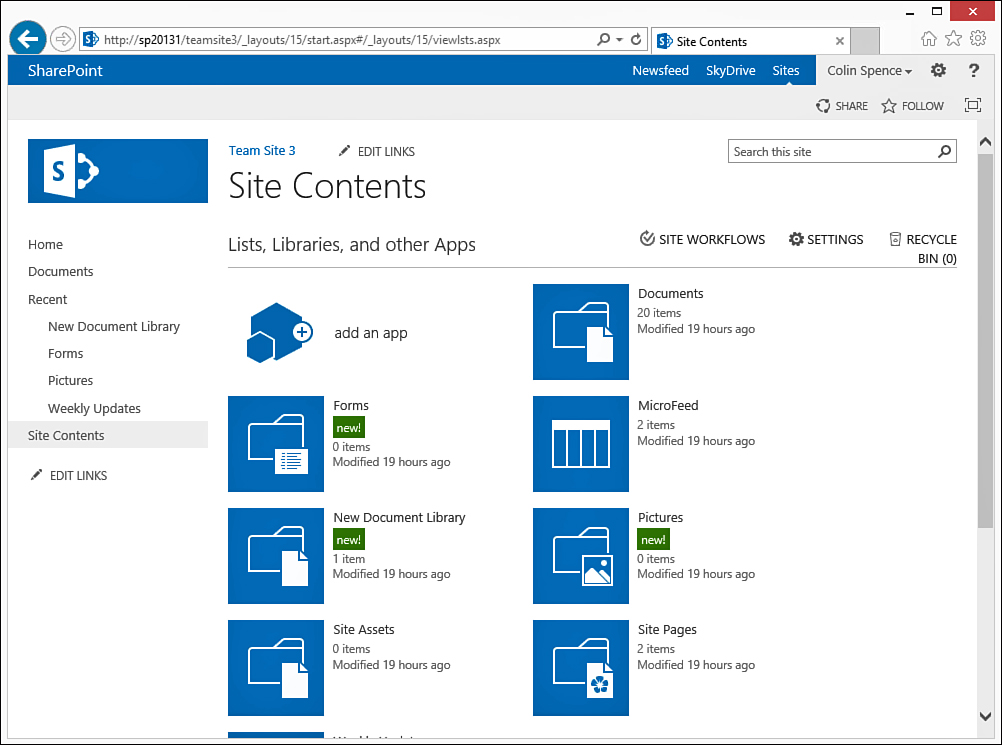
The primary means of adding items to a document library is to access the new document link, which lives at the top of the working area of the document library. Figure 19.5 shows the Add a Document window that opens when this link is clicked, and this window provides the Browse button, which allows the user to browse for and select a single document for uploading, an Upload Files Using Windows Explorer Instead link, and an Overwrite Existing Files check box.

The Upload Files Using Windows Explorer Instead link, shown in Figure 19.6, differs dramatically from the SharePoint 2010 Upload Multiple Files, which launched another window for dragging and dropping multiple files. SharePoint 2013 opens a Windows Explorer screen and users can then drag files and folders from a Windows Explorer window to this Windows Explorer screen or click a Browse for Files Instead link. The process of dragging files and folders to the upload pane is more flexible because the user can drag over nearly any combinations of folders and files using the familiar Windows Explorer interface.
Another method that power users will find of interest is the ability to enter in the address of the document library into the Address bar of Windows Explorer in the format \servernamesitelibraryname (also referred to as Web Distributed Authoring and Versioning [WebDAV] access). Figure 19.7 shows an example where Windows Explorer was opened in Windows 8 and the address was entered as \sp20131 eamsite3New Document Library; as you can see, the usual Explorer tools (Open, New, Print, Cut, Copy, Delete, and Rename) are available.

Explorer view (WebDAV) access is not always available to end users on a corporate network; it might be disabled on purpose or disabled due to operating system configurations.
An additional way to add items to a document library is to use the inbound email feature for the document library. A farm administrator would need to enable inbound email from the Configure Incoming E-Mail Settings page in the Central Administration site and assign an email address to the document library from the Incoming E-Mail Settings link on the Document Library Settings page. After that is enabled, users can send emails with attachments to the document library. Chapter 16, “Configuring Email-Enabled Content, Site Mailboxes, and Exchange Server Integration,” covers the configuration process.
Note
To determine which types of documents are allowed to be uploaded, a farm administrator needs to access the Manage Web Applications page in Central Administration, where the Blocked File Types icon provides access to all blocked file types. These include .bat, .cmd, .com, .dll, .exe, .vb, and a number of other file types.
Note
The default maximum upload size for a SharePoint 2013 document library is inherited from the web application that is managed in the Central Administration site. This setting is 250MB by default. Changing this setting does requires modifying the web application’s Maximum Upload Size setting as well as other configuration changes (including a change to the web.config file) to ensure that the front-end SharePoint servers are able to support larger file sizes. The upload size could be theoretically as large as 2GB (2047MB), but most organizations choose to keep this in the range of 150MB to 250MB because “very large” files can take a long time to save and to open when stored in SharePoint.
Working with the Other Standard Tools in a Document Library
Now that the basic layout of a document library and the process of adding documents to a document library have been covered in the previous section, we review the additional tools available from the Documents ribbon and the drop-down menu. A number of tools are available, and the tools differ between SharePoint Foundation 2013 and SharePoint Server 2013 Standard and Enterprise, so the version of SharePoint being used in each case is clarified. Be aware that the features enabled in the document library and privileges of the user accessing the tools also affect which tools do and do not display on the ribbon and the drop-down menu, as well as which are grayed out or available for use. What you see in your environment may differ from these examples.
Figure 19.8 shows a SharePoint Server 2013 document library with several items in it. For one of these documents, the user has accessed the menu by clicking the ellipsis. This results in a checkmark being added to the left of the document signifying that the document is selected while also bringing up the menu. When one or more documents are selected, the user can access various tools from the Files tab.
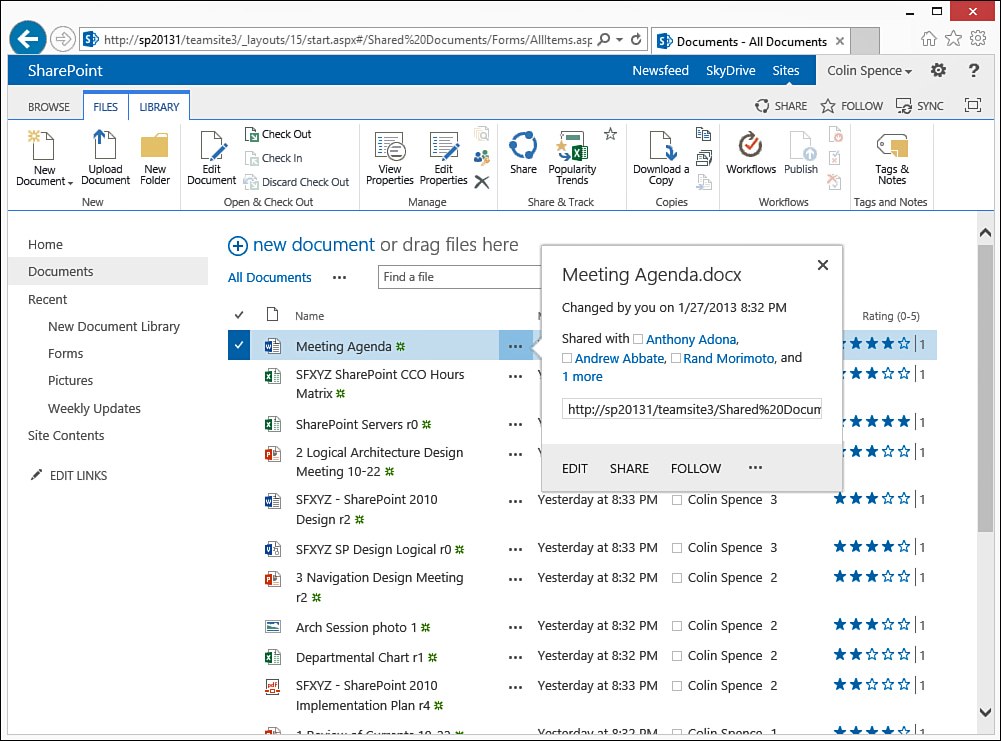
The pop-up menu offers additional information about the selected document as well as providing access to tools including Edit, Share, Follow, and another ellipsis. If the ellipsis on the pop-up menu is clicked, a number of the tools available on the Files tab of the ribbon become accessible.
The tools in the Files tab are covered in the following sections, from left to right, and include both the tools from SharePoint Foundation 2013 and SharePoint Server 2013.
Working with the New Document Tools
Located to the far left of the Documents tab on the ribbon, the New Document and Upload Document tools are often-used tools that allow a user with sufficient permissions to create a new document using the template assigned to the document library or upload documents. The Upload Document tool was discussed in detail in the earlier “Adding Documents to a Document Library” section and so is not covered in more detail in this section.
Follow these steps to use the New Document tool:
1. Create a new document library or use an existing document library for this exercise. If an existing document library is used, the steps may vary depending on how the library is configured, whether content types are enabled, and other variables.
2. From within a document library, using an account with Contributor or greater permissions, click the New Document icon from the Files tab on the ribbon.
Note
If the computer you are using to access the SharePoint environment is not a domain member, you are asked to log in again at this point.
Note
The new document link in the main body of the document library underneath the ribbon is actually a link to the Add a Document document-upload screen, and therefore can cause confusion. Logically that link should be labeled “Add a Document” or “Upload a Document.”
3. Word 2013 loads and displays the template. You might need to click Enable Editing first, but then customize the template in whatever fashion desired and click the Save icon.
4. On the Save As screen, the Other Web Locations option should show the source library. Click that library on the right, and then provide the document an appropriate name. Click Save.
5. Return to the document library, refresh the page if needed, and the new document appears. The Modified information should show “A few seconds ago.”
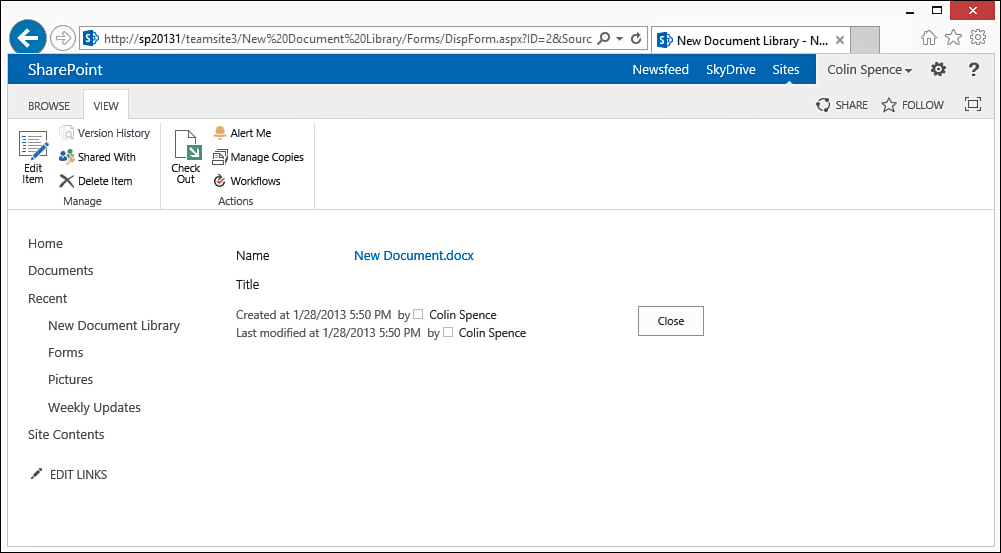
6. Select the new document by checking the box to the left of the document, and then click View Properties from the Files menu on the ribbon. As shown in Figure 19.9, this page provides access to a variety of tools on the ribbon, including Edit Item, Version History, Shared With, Delete Item, Check Out, Alert Me, Manage Copies, and Workflows, and shows the Name, Title, Created, and Last Modified information.
The document library administrator can edit the template from the Advanced Settings page, accessible from the Settings page for the document library. However, if the Allow Management of Content Types option is enabled, the Edit Template option in the Document Template section is no longer available. If content types are enabled for the library, the templates for each content type are defined and managed from the Site Content Types gallery accessible from the Site Settings page.
Users can only use tools that their permission levels allow them to use. For example, if a user with Reader permissions is visiting a document library, he is not able to click the Edit Document icon. It is grayed out because he only has the ability to read documents in the library.
Pros and Cons of the New Folder Tool
An icon for the New Folder tool is available for use to the right of the Upload Document icon if the library administrator allows the creation of new folders in the document library. To allow the use of folders in a document library, the administrator needs to access the Settings page, then click the Advanced Settings link, and select Yes under the “Make New Folder” command available.
If folders are enabled, and the New Folder icon is clicked, the folder needs to be given a name; it can then be created and used to store documents or other folders. Folders are objects in the library that can be selected, just like a document, and a variety of the tools on the Files tab are active and can then be used. For example, a folder can have unique permissions assigned to it, users can create alerts based on the contents of folders, and they can be connected to Outlook, but they are not as manageable as standard items in a document library. For example, metadata columns added to a document library are not editable for a folder in that document library.
Opinions vary about the usefulness of folders in SharePoint and have been argued for years. One point of view is that folders should not be used in SharePoint because they can be seen as keeping alive old and possibly bad habits from file shares. However, folders in SharePoint are familiar to users, and comforting to less sophisticated users, and so can prove helpful to users who are just getting used to the SharePoint tool set.
An advantage of using folders in SharePoint 2013 becomes apparent if a user accesses the drop-down menu of a folder and then clicks the Connect to Outlook icon. By following the prompts that then appear, assuming the user has a current version of the Outlook client installed, he can link the folder or subfolder to Outlook and have the contents of this folder available when offline. This is a handy way to synchronize a portion of the contents of a document library with the Outlook client, rather than synchronizing the entire document library, which could be many megabytes or gigabytes in size.
The use of folders in SharePoint document libraries that contain many thousands of documents can speed up the performance of the library. For example, a document library with 20,000 documents that doesn’t use folders may perform more slowly when a user is using filters to try and find the document she wants, whereas if these documents were split up among 20 folders of roughly 1,000 documents each, the performance within each folder should be faster.
Note
SharePoint shows an error message if the overall URL length that is created by nested folders is too long: “The specified file or folder name is too long. The URL path for all files and folders must be 260 characters or less (and no more than 128 characters for any single file or folder name in the URL). Please type a shorter file or folder name.” This restriction limits the complexity of the folder structure that you can create in SharePoint.
Ultimately, the use of folders comes down to a governance issue, and different organizations handle it in different ways. Some organizations forbid their use, instead recommending metadata and customized views be used. Other organizations allow them, but limit the number of subfolders and total URL length that can be used, because long URLs can sometimes result in negative issues.
Using the Edit Document Tool, Check Out, Check In, and Discard Check Out Tools
The Edit Document, Check Out, Check In, and Discard Check Out tools are usually the most often used tools in a collaborative document library, and so time and effort should be dedicated to providing training to end users and administrators on these tools, even if they seem intuitive and everyone should know how to use them.
Clicking the Edit Document icon when a document is selected opens the Microsoft Office application and allows the user to edit the document, assuming she has permissions to modify the document in that library. The user may be shown the Open Document window with a warning that “Some files can harm your computer,” but then can open the file in the appropriate application. Chapter 25, “Using Word, Excel, PowerPoint with SharePoint 2013,” goes into more detail on best practices of using Office applications with SharePoint 2013.
The ability to check out and check in documents is widely considered one of the more important features of a document management system and differentiates SharePoint from a file share, putting it on par with other ECM (enterprise content management) products or document management products.
Note
If non-Microsoft file types are going to be stored in document libraries (for example, Adobe Photoshop, Autodesk AutoCAD files), IT should carefully test the behaviors of these files in SharePoint 2013 document libraries. In many cases, users may need to copy the file to their desktop, open the file for editing, save to the desktop, and finally upload back to the SharePoint 2013 document library.
A generally recommended best practice is for every user to check out a document before he is going to work on it. This lets other users of the library know that a specific user has “reserved” the document and is either working on it currently or will be in the near future.
When users check out the document, the Type icon for the document changes to include a small green arrow, as shown in Figure 19.10. The options in the document pop-up menu now include the tools Check In and Discard Check Out, also shown in Figure 19.10.

Note
Checking out a document can be made mandatory by a document library administrator: From the Settings page, click the Versioning Settings link. Then in the Require Check Out section, click Yes under Require Documents to Be Checked Out Before They Can Be Edited.
When a user has the document checked out, she can elect to then edit the document or wait until later. Other users will see from the changed icon that the document is checked out, and if the library administrator has elected to include the Checked Out To column in the view of the documents, it will be even clearer not only that the document is checked out but also to whom.
Reviewing the View Properties and Edit Properties Tools
All documents have properties, whether they are saved in SharePoint document libraries or not. Documents have filenames, created date and time, modified date and time, author, and other tags attached to the document. SharePoint allows document library administrators to define additional properties, which are metadata fields that are stored in that document library. Unlike some basic file properties, properties defined by metadata fields might get stripped from the document if it is moved to a different document library that doesn’t contain the same metadata columns. The View Properties and Edit Properties tools allow users of the library to see what information about the document is available within the document library.
Figure 19.11 shows the Edit Properties window for a document stored in a document library that has been customized with the addition of a row titled Phase, a row titled Document Type, and a Document Owner row. A SharePoint Server 2013 Enterprise document library has been used for this example. The version number of the document is visible at the bottom of the window and indicates that versioning is on for the document library, and the created and last modified date, time, and user account information is also provided.

The document library administrator chose to add several columns to better categorize documents using metadata. By adding a row titled Document Owner that requires the entry of a domain user account name, it is clearly defined who the ultimate authority is for that specific document. Otherwise, the document library tracks who created the document (or uploaded it) and who last modified it, but neither of these people may actually be responsible for the document. By adding the Document Type row, a list of options is given to the user to choose from. This saves time and encourages users to better define the type of document, because document names can be confusing and might actually give little insight into the type of document it is.
Chapter 22 provides more information about this essential topic.
Using the Version History Tool
The next icon on the toolbar is the Version History icon. Note that Version History is not available unless versioning is enabled for the document library (accessible through the library Settings page, Versioning Settings, and then choosing either Create Major Versioning or Create Major and Minor [draft] Versions).
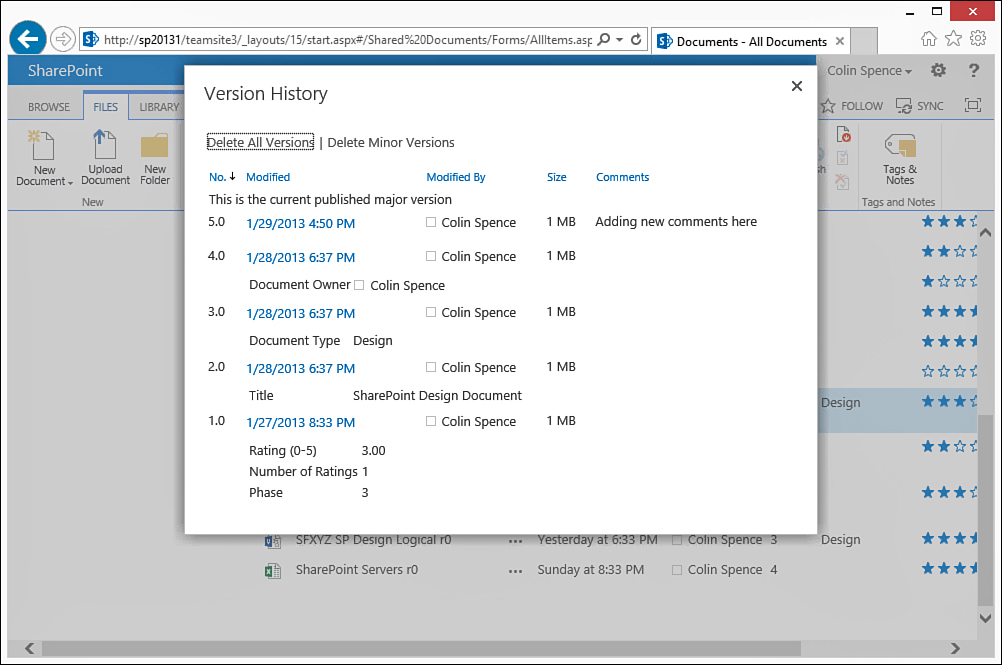
Version history shows the different versions of a document in the library if versioning was enabled in the library and provides information about changes that were made to the metadata of the document. Figure 19.12 shows a version history for a document with several major versions. The topmost version is indicated as being the current published major version, and the date and time modifications that took place are clearly indicated, along with the logged-in user who made the changes, the size of the document, and any comments added.
Note
Versioning is such an important feature in SharePoint 2013 that it is critical that administrators and end users feel comfortable with working with major and minor versions. They also must understand the importance of following best practices of always checking out documents before working on them, then checking them back in when complete, and deciding whether the new version should be a minor or draft version (0.1, 0.2 version) or a major or published version (1.0, 2.0 version). Comments should be added when checking a file back in to facilitate later review of previous versions as a best practice.
Note
The View option in the Version History window does not actually show you the document; instead, it displays the full properties of the file. So, if a user notices that the current version of a Word document is “incorrect” and wants to revert to an older version of the file, the process is somewhat complex. The user would first need to restore an older version (the one he thinks is the right version) as the current version, open it in Word, and review the actual content of the document. If this is the correct version of the document, the user then simply exits the file, as it is promoted to be the current version. If this restored version is not the version the user was looking for, however, he needs to then return to the library, access Version History again for the document, restore a different older version, and again review the contents of the document to determine whether that is the desired version. Most users find this is an arduous process, so the use of effective notes when checking in and publishing versions of documents is highly recommended.
Each version has a drop-down menu that provides the options to View, Restore, or Unpublish this version. The Restore tool “promotes” that version to be the latest version by making a copy of the older version and incrementing the number. Note that there are also tools to Delete All Versions and Delete Minor Versions above the version listing. Chapter 20 provides more information about the options for versioning and pros and cons of these options.
Versioning is discussed in more detail in the “How to Use the Publish, Unpublish, and Cancel Approval Tools” section later in this chapter (in the context of the Publish and Approve/Reject tools).
Using the Shared With Tool
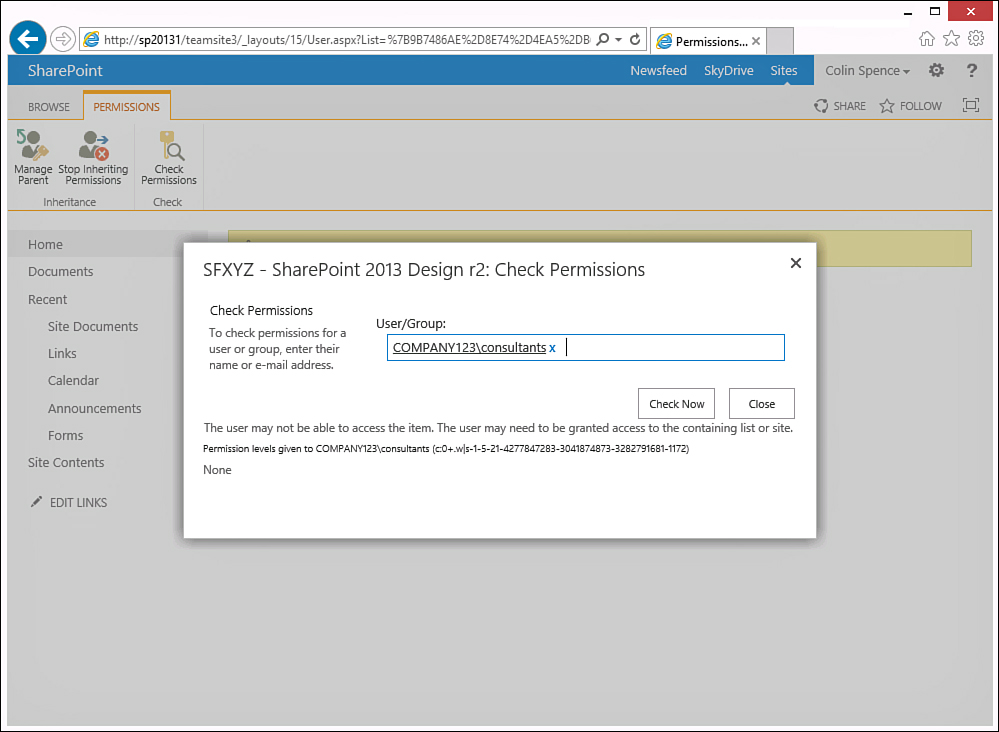
The Shared With tool allows a user with sufficient permissions (members of the Owners group by default) to modify the permissions applied to a specific document. Figure 19.13 shows the Shared With window that loads after a document has been selected in the library and the Shared With button is clicked from the Files tab on the ribbon. (The same icon can be found on the Library tab as well, but it addresses the library as a whole, not the individual document.)

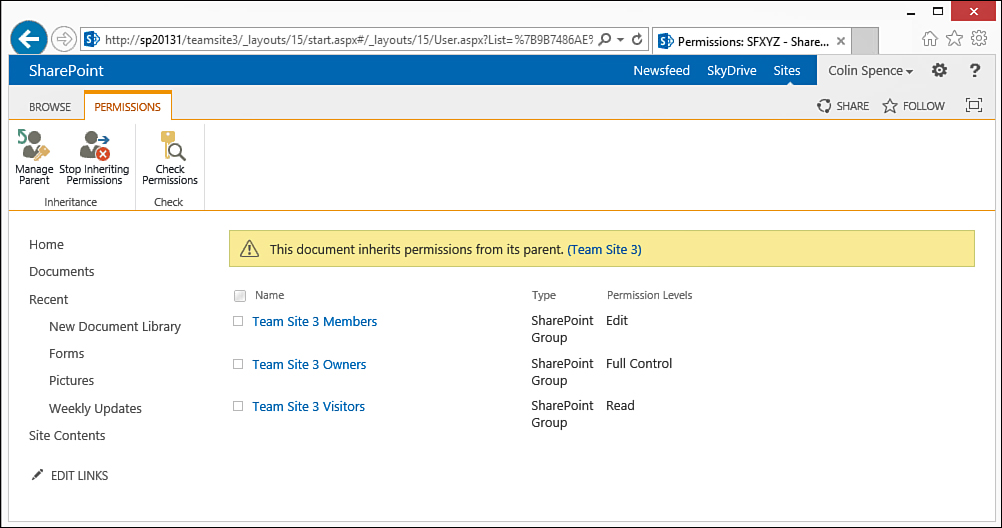
Note in the lower portion of the window shown in Figure 19.13 the options Invite People, Email Everyone, and Advanced. Figure 19.14 shows the Permissions Tools page that appears after selecting the Advanced option. Underneath the ribbon, a note reads, “This document inherits permissions from its parent,” which is the default behavior. On the ribbon itself are icons to Manage Parent, Stop Inheriting Permissions, and Check Permissions.
If needed, the document library administrator can grant unique permissions to this specific document by clicking the Stop Inheriting Permissions button, but this should be used only when absolutely necessary because of the added overhead and complexity of managing overly customized document libraries. That said, the Check Permissions tool is useful if unique permissions for a document are to be used.
Figure 19.15 shows the results of using the Check Permissions tool on a document with customized permissions for the SharePoint group Company123Consultants. After the Check Now button is clicked, the tool shows the level of permissions granted to the user or group. Figure 19.15 shows that the Company123Consultants group has no permissions, because the lowest entry on the screen after the text “Permission levels given to Company123Consultants” reads None. If a group or user name is entered that does have permissions, this text would read Full Control, Edit, or a similar entry, and it will be clarified whether the privileges were given directly or through a group.
Using the Delete Button
The Delete button on the Documents tab sends one or more documents to the Recycle Bin for the document library. The ability in SharePoint 2013 document libraries to check one or more items as being selected allows a user who has contributor permissions or an administrator to easily delete a number of items. Note that the Delete key on the keyboard can also be used.
Note
In SharePoint 2013, the Recycle Bin is harder to find than in SharePoint 2010. It is no longer found on the Quick Launch menu, but can be found on the Site Contents page on the right side of the page under the Search bar. A link to the Recycle Bin could easily be added by an administrator, as follows: Access the Site Settings page and click the Navigation link in the Look and Feel section. Then, add a link to the Current Navigation options that points to /[sitename]/_layouts/15/RecycleBin.aspx.
After items are sent to the Recycle Bin, a member with Full Control permissions can restore anyone’s items, or a member with Contributor permissions can restore items he has deleted. A member with Read permissions won’t have access to the Recycle Bin. An administrator with site collection administrator privileges can access the Site Collection Recycle Bin (otherwise known as the second-level Recycle Bin) that contains items deleted from the End User Recycle Bin, or to see and restore items still in the End User Recycle Bin.
Note that a farm administrator needs to determine the base settings for the Recycle Bin for the site collection in question. A farm administrator can access the Web Application General Settings interface from the Central Administration site to determine the following settings:
![]() Recycle Bin status on or off.
Recycle Bin status on or off.
![]() The amount of time after which to delete items in the Recycle Bin. The default is 30 days; the number of days can be changed, or Never can be checked.
The amount of time after which to delete items in the Recycle Bin. The default is 30 days; the number of days can be changed, or Never can be checked.
![]() The percentage of live site quota allocated that will be added for the second-stage deleted items, with 50 percent being the default. Note that the second-stage Recycle Bin (otherwise known as the Site Collection Recycle Bin) can be turned off.
The percentage of live site quota allocated that will be added for the second-stage deleted items, with 50 percent being the default. Note that the second-stage Recycle Bin (otherwise known as the Site Collection Recycle Bin) can be turned off.
It is an important task for site administrators and farm administrators to manage the Recycle Bins appropriately. A maximum age for retaining deleted items in the second-stage Recycle Bin should be clarified, and it should be emptied accordingly.
Understanding the Share, Popularity Trends, and Follow Tools
New to SharePoint 2013 is the grouping of tools that includes the Share, Popularity Trends, and Follow tools. The Share button is similar to the Shared With tool mentioned previously. Figure 19.16 shows the Share window, where document library administrators can enter names, email addresses, or the Everyone keyword. Then, the document library administrator can select Can Edit or Can View permissions from a drop-down, effectively granting invited people with specified access to a document.

Selecting the Popularity Trends tool opens an Excel file that contains a daily and monthly table and graph of hits for the document as well as unique users. This could be helpful in analyzing how often a document was accessed and how many users accessed this document within a certain time frame. The Follow tool allows a user to follow documents. Followed documents can be seen in their personal newsfeed.
Reviewing the Alert Me Tool
The Alert Me tool allows the user to create an alert on a specific document, if one is checked, or to Manage My Alerts, which opens the My Alerts on This Site page. Then the user can create an alert for a list or library. Alerts are another powerful tool that sets SharePoint document libraries apart from traditional file storage solutions, because they allow SharePoint to communicate directly to end users via email alerts when existing documents change or new documents are added to a specific document library. The following example shows additional benefits of the tool set.
To create an alert for a document library, which is a common task that a user or a site or document library administrator will perform, follow these steps:
1. From within a document library, access the Files tab from the ribbon and click the drop-down arrow next to the Alert Me icon.
2. Click Manage My Alerts.
3. Click Add Alert.
4. Select a document library or list that you want to keep track of. Click the Next button.
5. Provide a title for the alert. It is a best practice to include the name of the site and the list or library in the title, such as HRSharedDocsAlert.
6. Add the users/groups the alerts will be sent to, separated by semicolons. Note that you can add whomever you like in this field, which is a power that you should not abuse! You will usually be creating the alert for your own use, but administrators and managers might put in a group name.
7. Leave the delivery method set to E-mail, unless the farm is configured to send text messages (SMS).
8. Select the Change Type to trigger the alert. This can be All Changes, New Items Are Added, Existing Items Are Modified, or Items Are Deleted.
9. Select additional criteria in the Send Alerts for These Changes section. These options are Anything Changes, Someone Else Changes a Document, Someone Else Changes a Document Created by Me, and Someone Else Changes a Document Last Modified by Me.
10. Select an option for the When to Send Alerts section. The options are Send Notification Immediately, Send a Daily Summary, or Send a Weekly Summary. For the daily summary and weekly summary options, you need to select a time or day and time. Figure 19.17 shows the Change Type, Send Alerts for These Changes, and When to Send Alerts settings for an alert.

11. Click OK to complete the alert.
12. If the SharePoint 2013 environment is configured properly, the person or people listed in the Send Alerts To field will receive emails letting them know the alert was successfully created.
Understanding the Download a Copy, Send To, Manage Copies, and Go To Source Tools
Next on the Documents ribbon is the grouping of tools that includes Download a Copy, and then to the right, the tools Send To, Manage Copies, and Go To Source.
The tools in this section (Download a Copy, Send To, Manage Copies, and Go To Source) should be considered advanced tools, and end users should be educated about the complexities and limitations of these tools. A criticism of these tools is that they go against one of the purposes of SharePoint, which is to centralize and consolidate documents rather than have multiple copies in different places, which these tools make possible. Sometimes, however, these tools can prove very useful, or even essential, but should still be used with caution.
The Download a Copy tool is self-explanatory and, if clicked, allows the user to save a copy of the document to another location. Ideally, this option should rarely be used, because there are a variety of ways to take content offline, including syncing a folder with Outlook or using SharePoint SkyDrive Pro 2013 or third-party tools. Sometimes, however, downloading a copy is useful. The primary situation is when a user has the document checked out and another user really needs to use the document for reference or possibly to edit it. Although a primary purpose for the checkout process is exactly so that other people don’t edit the document, people sometimes forget that they have the document checked out, and the user who needs it is in a rush and doesn’t want to bother an administrator or file a help desk ticket. Note that downloading a copy, editing it, and then saving back to the library when the version stored by the library has been checked in is a bad practice because the changes made in the previous version are “buried” in the previous versions.
For example, User 1 checks out a Visio and makes changes, such as adding a server icon, and then forgets to check it in. User 2 downloads a copy because he needs to make an edit and adds a printer icon to the Visio. User 2 now cannot save back to the document library as the same name, so he saves to the document library with a slightly different name (rev1). User 1 later checks in his version. Now there are two different primary documents, which is a classic problem from a file share, and this is confusing to users. A better practice is for User 2 to email User 1 and request he check the document back in, and if that fails after a reasonable amount of time, have the administrator force a check in. This way, the versioning system keeps all the versions together, and there aren’t multiple primary documents in the library.
The Send To tool provides two options by default: Other Location and Create Document Workspace. If a custom Send To location is defined by the library administrator, it shows as an option as well. The Other Location can be defined on-the-fly by the user and must be a SharePoint 2013 document library that the currently logged-in user has contribute privileges in, or it can be defined by the document library administrator in document library settings, Advanced Settings page. Figure 19.18 shows the Copy window that opens when a user chooses the Send to Other Location option. The user then types in the name of the destination document library and can edit the name of the document if desired. The user has the option to ask that the author send out updates when the document is checked in and to create an alert on the source document. Although not perfect, these are both good methods of helping to ensure that the person who made the copy is aware if the source document has changed. When the process completes, a copy of the document is created in the destination library.

An interesting feature of the Send To tool and process is that SharePoint is aware that there is another copy of the document, or even that there are multiple copies of the document. Figure 19.19 shows the Manage Copies window for the document that was just copied using the Send To command. This window allows the user to create a new copy if needed or to update copies of the document. The user can remove links to documents if desired by clicking the Edit button next to the destination URL. Note, however (and this relates to the note on the topic of document workspaces), that the document library is not aware of the copy of the document placed in the document workspace, which can cause administrative challenges.

Document workspaces are not discussed in detail here because they are covered in Chapter 21. A document workspace is actually a site that can be created by a user with sufficient privileges that contains a copy of the document as well as other lists designed for collaboration purposes. Note, however, that unlike when the Send To command is used, a document workspace copy of a document does not maintain a connection to the original, which can lead to confusion on the part of users about which is the latest and greatest version of the document (the one in the document library on the parent site or the one in the document library in the workspace).
Although document workspaces can be useful in some situations, creating document workspaces can be overly complex to administer, so many organizations decide to discourage their use and lock down which users have the permissions to create workspaces. For example, when a new workspace is created, the creator needs to perform the role of a site administrator and give permissions to users to allow them to access the workspace, make sure the right version of the document is being edited, and finally publish the document back to the source document library when the collaboration is complete.
The final tool in this section, Go To Source, is active if the document selected is connected to a source document. If clicked, it then shows the property information of the source document.
A High-Level Overview of Workflows
Workflows are a complex topic and have been given their own chapter, which is Chapter 28, “Out-of-the-Box Workflows and Designer 2013 Workflows,” but because the Workflow tool is provided in the Documents tab on the ribbon, it is covered here at a high level.
Note
The Three-State Workflow is the only workflow template provided in SharePoint Foundation 2013; others are available in SharePoint Server 2010. SharePoint Server 2010 Standard and Enterprise provide the following workflow templates: Disposition Approval, Publishing Approval, Collection Signatures, Approval, and Collection Feedback.
A workflow must be created by a document library administrator for it to be available to users of the document library. The document library administrator decides whether the workflow starts automatically or if it can be started manually by users with Edit Item permissions or if users must have Manage List permissions to start the workflow. When started, the workflow communicates to participants via email, which gives instructions of what they need to do. At the same time, tasks are created in a SharePoint tasks list, which the participants interact with and update as they perform their tasks.
If more complex workflows are required, developers and administrators can use tools such as SharePoint Designer 2013, Visio 2013, Visual Studio 2013, and other tools to create more complex workflows. InfoPath 2013 can be used to create advanced forms that are used within the workflow, emails can be customized, and complex business logic can be created if needed.
To start a workflow, a user with sufficient rights follows these steps:
1. The user either selects Workflows from the drop-down menu or clicks the Workflow button in the Documents ribbon after selecting the document.
2. The Workflow.aspx opens and shows the user any workflows associated with the document library. The user clicks the desired workflow. If no workflows are available, the document library administrator needs to be contacted to create one.
3. The user then modifies the settings for the workflow entered by the document library or site administrator, which can include who is involved in the workflow, a text message, due dates for all tasks, duration per task, and other fields depending on the workflow. Figure 19.20 shows a workflow based on the out-of-the-box Collect Feedback workflow.

4. The user then clicks Start to kick off the workflow; emails are sent to the participants with instructions on the steps to take.
The next section provides an example of a Page Approval workflow, to provide a context for how an out-of-the-box workflow can be useful in an approval process.
How to Use the Publish, Unpublish, and Cancel Approval Tools
To begin with, the Publish, Unpublish, and Cancel Approval tools are active only when a document library has versioning enabled and configured to allow the creation of major and minor (draft) versions. A major version is considered the published version. Versioning is a key component of SharePoint 2013 and other document management applications because it not only keeps track of earlier versions of a document but also hides them from end users in the standard views, to make errors less likely when working with the document.
Be aware that when versioning is enabled, each version of the document adds the full document size to the Structured Query Language (SQL) content database. Versioning in SharePoint 2013 does not just track differences between the documents, but keeps a full copy. Administrators should keep this in mind when determining the policy for enabling versioning for lists and libraries.
The process of turning a draft version (for example, 0.1) into a major (for example, 1.0) version is called publishing in SharePoint parlance, and the Publish button is used to either start a workflow or instantly publish the document. It is up to the document library administrator whether to use a workflow for this process, which is more complex and time-consuming, or to enable instant publishing. The following example walks through the process of uploading a document to a document library with major and minor versioning enabled, scheduling enabled, and workflows enabled in SharePoint Server 2013 Enterprise.
The scheduling feature can be turned off or on for a document library by the library administrator. Scheduling determines when a document is published and available for general viewing by users of the site. Before the scheduled start date is reached, the item remains in draft status, and when that date is reached, but before the end date is reached, the document is promoted to major version published status. After the end date is reached, if there is one set, the document returns to draft status.
The Draft Item Security settings, which are set by the document library administrator and accessible from the Document Library Settings page via the Versioning Settings page, determine who can see draft (unpublished) versions of documents. The options are Any User Who Can Read Items, Only Users Who Can Edit Items, and Only Users Who Can Approve Items (and the author of the item). So, it is important for a document library administrator to determine the most appropriate combination of settings. This topic is revisited in Chapter 20.
Some document libraries that are created during the creation of a publishing site or site collection have major and minor versioning enabled, and also have Content Approval turned on, which means that a user with approver privileges needs to approve a document before it is published as a major version. And scheduling may also be enabled for the library, which determines when the item, when approved, is available for the general public. The following example helps clarify the process:
1. A user of a site collection documents library in a publishing site in SharePoint Server 2013 Enterprise uploads a document to the library. This library has major and minor versioning enabled, requires content approval for submitted items, has an Approval workflow configured, as well as scheduling enabled, and so requires a number of steps to take place before an uploaded document is available to the general public.
2. As shown in Figure 19.21, the user is prompted to verify the name and title of the document, and decide whether the scheduling start date should be immediately or a fixed date, and whether the end date should be never or a fixed date. In this example, the user wants the document to not be published to a major version until a given date, and wants it to stay published for only a few weeks. After he likes the setting, he clicks Save.

3. The document is now saved in the document library, but is in draft status, with a version number of 0.1. Based on the settings of the document library, only users who can edit items in this document library can now see the document, which includes the user himself.
4. The user, having decided that the document is ready to be published, then accesses the drop-down menu for the item in the All Items view, and clicks the Publish button on the Documents tab of the ribbon.
5. Because the Approval workflow was configured to start this workflow to approve publishing a major version of an item, the workflow window automatically opens.
6. As shown in Figure 19.22, the user enters additional information to complete the workflow—including request text, a due date, duration for the task—and clicks Start.

7. The approval status of the document is now set to pending and remains that way until an approver approves the document.
8. At this point, members of the approvers group on the site receive emails that a document needs approval. The approver clicks the Open This Task button in the Outlook 2013 ribbon for the email, and a form opens with the options to Approve, Reject, Cancel, Request Change, or Reassign Task. The approver clicks Approve.
9. Now the document is approved to be published on the scheduled start date. As shown in Figure 19.23, the Approval Status is set to Scheduled with the start and end dates shown in the two columns to the right. Note also in Figure 19.23 that the Cancel Approval icon is active, so a user can choose to cancel the approval if needed and start the process over again.

This example shows the management possibilities of enabling major and minor versioning in a document library, requiring content approval for documents, using a Page Approval workflow, as well as using Scheduling Start and End dates. Enabling the full combination of features does add overhead and complexity to the process, but it helps ensure that content is reviewed by one or more members of the approvers group for that site before the “general public” can see the document in a major published version. This complexity does require testing and training for administrators, approvers, and end users to avoid frustration during the process.
Using the Tags & Notes Tool
The Tags & Notes icon is not available from SharePoint Foundation 2013, but is available in both SharePoint Server 2013 Standard and Enterprise, and appears on the Files tab on the far-right side. These tools are discussed more in Chapter 23, “Leveraging Social Networking Tools in SharePoint 2013.”
These tools are easy to use and engaging enough to end users that they will soon find themselves experimenting with them to understand the full breadth of their potential. For a specific item, such as shown in Figure 19.24, if Tags & Notes is clicked, the window for Tags and Note Board opens. In this example, a tag and a note was added by the user to this document, and recent activities are listed at the bottom of the window. This allows users to quickly create and apply their own tags and to see how others are tagging this item. Users can also set tags as Private if they don’t want other users to see how they are tagging items. Clicking My Tags takes users to their My Site where they can see histories of tags they have applied. Figure 19.25 shows a My Site for a user (Colin Spence) who has been creating tags and posts recently. A tag cloud shows the frequency that tags have been used, as indicated by the size of the fonts.


As with any other tool that makes it easy to post comments, there is the possibility for abuse, but the user community should be informed of any policies surrounding inappropriate use of the tools and the repercussions of inappropriate language or use.
The social tags and note board ribbon controls can be disabled by a farm administrator from the Central Administration site, as follows: Access the System Settings page and then click Manage Farm Features. Scroll down to the Social Tags and Note Board Ribbon Controls and click Deactivate.
Empowering Users Through SharePoint 2010 Lists
As the previous section showed, there are many very powerful features and tools provided by SharePoint libraries, and SharePoint lists provide a similar set of tools and features. Because a number of these tools and features overlap with libraries, this section concentrates on the differences between lists and libraries and gives examples that will help users and administrators grasp the differences and how to best utilize lists. Examples also show how list administrators and site administrators can customize lists to make them better suited to the needs of the users.
Differentiating Lists from Libraries
Libraries are one of the most often-used building blocks for SharePoint-based collaboration and information management systems, and lists are another. Libraries store files, whereas lists are designed to store rows of information, in much the same way as a spreadsheet stores rows of data defined by columns that are configured to support certain types of data, such as text, numbers, date and times, choices, and others.
When a user clicks the New Item link in a list, she is prompted to enter different types of information (such as text, currency value, time, and date), select an item from a list of items, or perhaps enter a user’s name. This information then gets saved as a row in the list and is given a unique ID number. No document needs to be uploaded at this point, which is a fundamental difference from a library, which cannot store data without a document to attach it to.
Another revealing exercise for an administrator is to anticipate ways in which end users, especially power users, might get themselves into trouble. Earlier in the chapter, Figure 19.7 showed how a user can navigate to a SharePoint folder by using Windows Explorer (WebDAV) and entering the SharePoint server name, site name, and document library in the following format (\servernamelibraryname). In this previous example, there is no specific site name needed because the document library exists as part of the root site and the user could see the contents of the document library clearly shown as documents and even a folder. Navigating to a list in a similar fashion isn’t quite as friendly a process, as shown in Figure 19.26, where there is a folder titled Announcement, one titled Attachments, and then several documents that can be seen to be ASP.NET Server Pages. Double-clicking the Announcement folder does not actually show the data that was entered into the list because the data is written to SQL databases and stored in tables. Also, data cannot be added from the Explorer interface, so there is arguably no benefit to end users of accessing a list in this fashion.
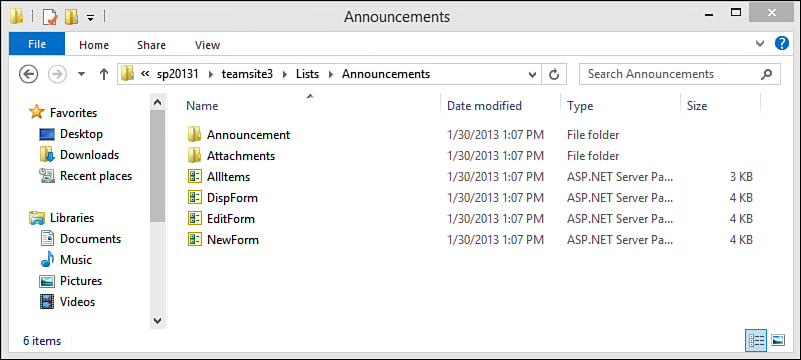
The organization should decide whether to allow Explorer view (WebDAV) access to SharePoint 2013 content, because the results end users see when visiting lists, in terms of the folders and ASP.NET pages end users find, may confuse them. Furthermore, an overzealous power user who deletes the folders or forms can impact the functionality of the list.
A fact that can be confusing to new users and administrators is that a SharePoint list can also add one or more attachments to a list item, so be prepared for discussions along the lines of pros and cons of using lists and libraries to store items. These attachments are stored in the Attachments folder seen via the Explorer view in Figure 19.26. Another difference between list and library functionality pertains to versioning. Even if versioning is turned on for a list, attachments do not have their versions tracked if they are changed. This can lead to potential confusion or even lost productivity if users are expecting attachments in a list to be versioned. Along these lines, a user could delete an attachment to a list item, and it will not be recoverable by just recovering an older version of the item, because the attachments aren’t tracked with the versioning tool. Note that attachments that are deleted end up in the Recycle Bin for recovery if needed. An additional point on versioning is that lists offer only major versions and do not allow the saving of minor versions, making them less well suited for more intricate document review and approval processes. Possibly for these reasons, lists can be configured so that attachments to list items are disabled.
Reviewing Several Common Lists
Commonly used lists include an Announcements list, Calendar list, Links list, and Tasks list. These were included in the Team Site template in SharePoint 2010, but have been removed in SharePoint 2013. These remain popular lists, and many organizations add them to standard team site templates for collaboration purposes.
Each of these lists consists of several columns, different views, and in some cases some special functionality that has been added by Microsoft. The columns included in each list are as follows:
![]() The Announcements list stores announcements that consist of a Title, a Body section, and an Expires date. This makes it well suited as a starting point to input data that will make up an announcement on the site, which “expires” and no longer displays after a certain date.
The Announcements list stores announcements that consist of a Title, a Body section, and an Expires date. This makes it well suited as a starting point to input data that will make up an announcement on the site, which “expires” and no longer displays after a certain date.
![]() The Calendar list stores rows of data that include a number of columns of data, including: Title, Location, Start Time (and date), End Time (and date), Description, Category, whether it’s an All Day Event, and whether there is Recurrence. Collected together, each row of data serves to represent an event taking place, can be displayed on a special calendar-like view, and provides different display options and navigation tools.
The Calendar list stores rows of data that include a number of columns of data, including: Title, Location, Start Time (and date), End Time (and date), Description, Category, whether it’s an All Day Event, and whether there is Recurrence. Collected together, each row of data serves to represent an event taking place, can be displayed on a special calendar-like view, and provides different display options and navigation tools.
Note
SharePoint 2010 users may notice that the Calendar list no longer provides the option of creating a meeting workspace. In fact, in SharePoint 2013, all five of the Meeting Workspace site templates are no longer available. This includes the Basic Meeting Workspace, Blank Meeting Workspace, Decision Meeting Workspace, Social Meeting Workspace, and Multipage Meeting Workspace.
![]() The Links list is quite simple, and just provides a URL field, with a Description field and a Notes field. This list is designed to track URL information while displaying a friendly description instead of the whole URL.
The Links list is quite simple, and just provides a URL field, with a Description field and a Notes field. This list is designed to track URL information while displaying a friendly description instead of the whole URL.
![]() The Tasks list is also quite complex and stores data, including Task Name, Start Date and Due Date, Assigned To, % Complete, Description, Predecessors, Priority, and Task Status. This list has specially configured views to display only items that meet certain filters, such as Completed, Gantt Chart, Late Tasks, My Tasks, and Upcoming.
The Tasks list is also quite complex and stores data, including Task Name, Start Date and Due Date, Assigned To, % Complete, Description, Predecessors, Priority, and Task Status. This list has specially configured views to display only items that meet certain filters, such as Completed, Gantt Chart, Late Tasks, My Tasks, and Upcoming.
Chapter 18, “SharePoint Foundation Versus SharePoint Server 2013,” provides additional details comparing the different lists and libraries that are available in the different versions of the SharePoint 2013 products, but this initial handful of lists gives some insight into several of the most popular lists.
Examining the Tools in an Announcements List
Figure 19.27 shows an Announcements list in SharePoint Server 2013 with an item selected in it and the Items tab on the List Tools ribbon visible. Most of these tools should look familiar, as most were covered in the earlier walk through for a library.
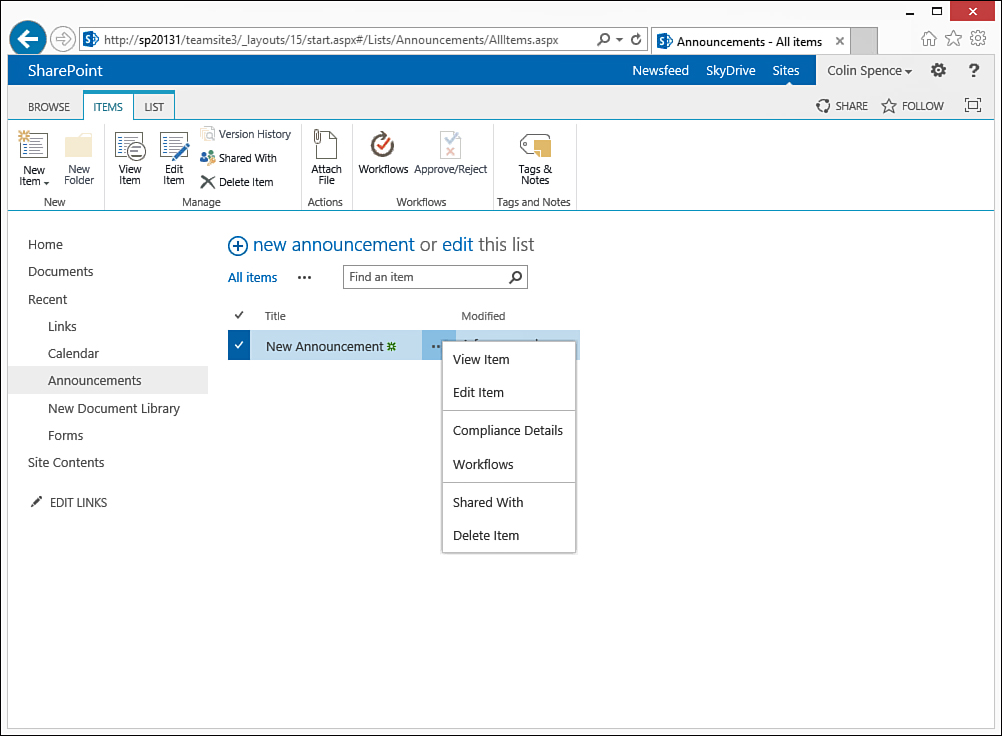
One new tool offered in the list is the Attach File tool on the Items tab; this tool enables the user to browse for a single file and then save it as an attachment. Attachments are saved in the Attachments folder within the list, and although there is no published limit to the number of attachments that can be added to a list item, there are a few benefits to storing documents in this manner, as discussed earlier in this section.
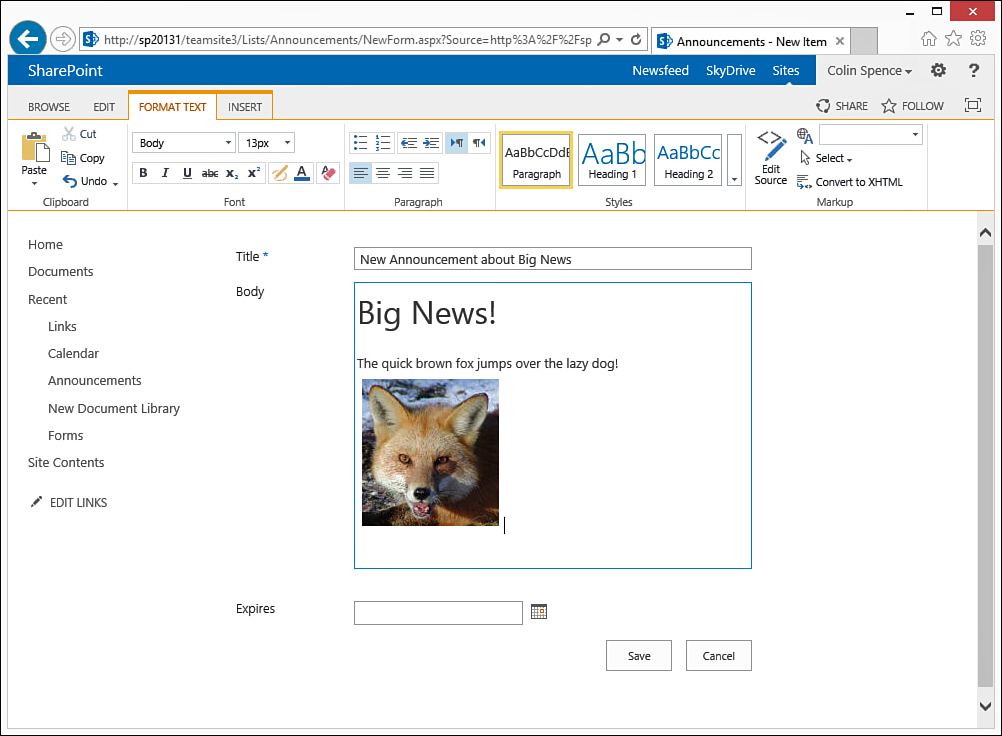
The process of creating a new item in the list is simpler than in a library; the user just needs to click the New Item icon and then add content to the fields, as shown in Figure 19.28. For this example, an image was also included, which was uploaded from the user’s Pictures folder, and SharePoint allows the user to simultaneously choose the picture to use and also to upload it to a desired library on the site. The text formatting tools can be seen, which are quite extensive, and the graphic image can be resized from within the editing window. These tools make it very simple and quick for users to create quite intricate postings. After the Save button is clicked, the content is saved to the list.
As with a library, an item in a list can be checked as active, and then the relevant tools become active. Figure 19.29 shows the List tab of the List Tools ribbon, as a list administrator needs to become familiar with these tools to fully realize the potential of lists. A valuable set of tools is revealed in the next section, which covers the Quick Edit (formerly called datasheet view in SharePoint 2010) from a high level, and to round out this chapter, the Create View and Create Column tools are demonstrated and discussed.
Adding a Column in a List and Updating a List Item
Whereas libraries store documents, and can be extremely useful even if additional metadata columns aren’t added, lists derive their value from the columns that make up the list, so adding columns to lists is an often performed task. Figure 19.30 shows the Create Column window that opens when a user with the manage lists permission clicks the Create Column button. Similar to a spreadsheet, a number of different column options are provided. In SharePoint Server 2013, these are as follows:
![]() Single line of text
Single line of text
![]() Multiple lines of text
Multiple lines of text
![]() Choice (menu to choose from)
Choice (menu to choose from)
![]() Number
Number
![]() Currency
Currency
![]() Date and Time
Date and Time
![]() Lookup (information already on this site)
Lookup (information already on this site)
![]() Yes/No (check box)
Yes/No (check box)
![]() Person or Group
Person or Group
![]() Hyperlink or Picture
Hyperlink or Picture
![]() Calculated (calculation based on other columns)
Calculated (calculation based on other columns)
![]() Task Outcome
Task Outcome
![]() External Data
External Data
![]() Managed Metadata
Managed Metadata

SharePoint Server 2013 Standard or Enterprise give the option of creating Managed Metadata columns in lists. Chapter 22 provides additional information about the column choices.
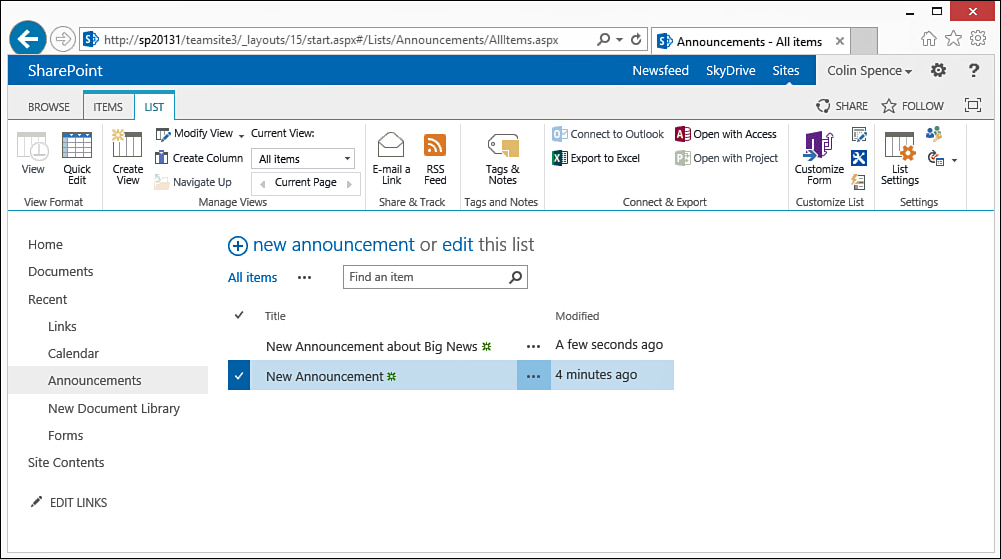
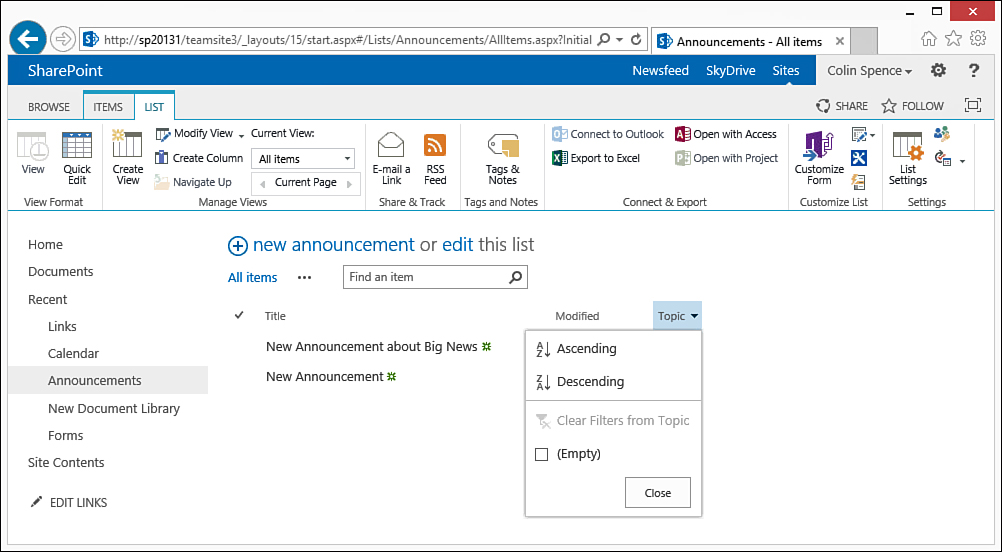
In this example, the Choice column is chosen, and several items that appear in the drop-down menu are provided. Radio buttons or check boxes can also be selected, and fill-in choices can be allowed, as well as a default value provided. After OK is clicked, the column is added, and if the check box is left checked to Add to Default View, the new column is added to the default view. In the earlier example, the new column named Topic can be seen on the right side of the Announcements list in Figure 19.31, because the Add to Default View check box was selected when the new column was added. The drop-down arrow next to the column header Topic is shown selected in Figure 19.31, and sorting options are provided; when there is content in this column, the different distinct values are available for selection for the filter. To populate this new column with data, several different sets of steps can be followed, as described in the following three sections.
Clicking the Item Title to Edit Content
To edit content by clicking the title of an item in a list, follow these steps:
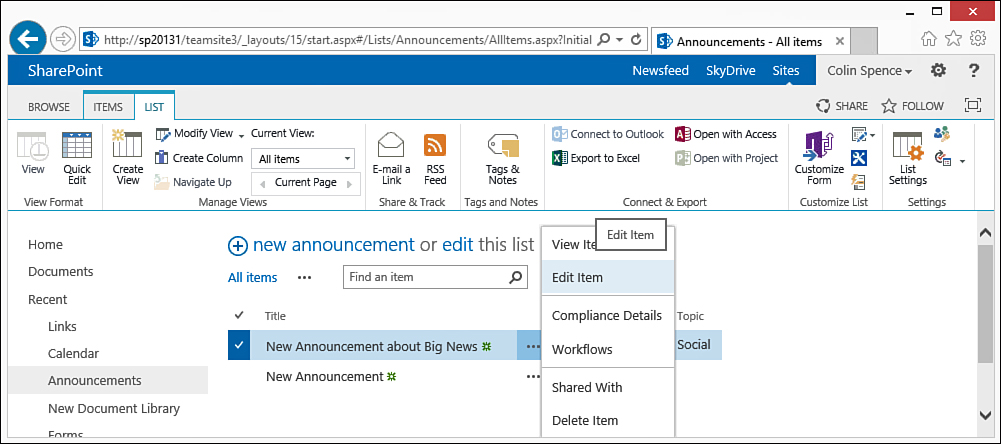
1. The easiest option, and most intuitive, is to simply click the title of the item (for example, New Announcement about Big News shown in Figure 19.31); the window for the item in view mode will open.
2. Then click Edit Item from the View tab, and the item changes to edit mode, as shown in Figure 19.32. Now make a change, such as clicking the drop-down arrow next to the Topic field, and select from the provided choices.

3. Then click Save to save the modification and return to the previous view of the list.
Accessing the Drop-Down Menu to Edit an Item
To edit content by accessing the drop-down menu, follow these steps:
1. As shown in Figure 19.33, hover over the Title for the list item in the list, and then access the menu by clicking the ellipsis to the right and click Edit Item.
2. The list item then opens in edit mode. Update one or more fields and click Save.
Selecting the Item and Choosing Edit Item
To edit an item by first selecting it and then choosing Edit Item from the ribbon, follow these steps:
1. Hover over the list item until the box appears to the left of the title, and then check the box.
2. The Items tab under List Tools is then active. Click Edit Item, and the list item opens in edit mode. Update one or more fields and click Save.
Note
The check box might not always be enabled in a list or library.
Interacting with Lists Using the Quick Edit
The Quick Edit is extremely useful for quickly entering data into a list or for rapidly entering metadata for items in a library. As shown in the preceding three processes, editing a single item can involve several hovers, clicks, more mouse-work, entering the information, and then another click to save the data. Quick Edit appeals to the efficiency-conscious part of many users, and should be introduced to new users. Follow these steps to use the Quick Edit in an Announcements list (and most other lists):
1. Click the List tab under List Tools.
2. Click the Quick Edit icon in the List tab ribbon. Figure 19.34 shows an Announcements list in Quick Edit. The user clicked in an empty cell under the bottom announcement, entered a new announcement title, tabbed past the Modified cell (because this cell is populated by SharePoint automatically), and then selected Social from the drop-down menu in the Topic column. If a user tries to enter any data in the Modified column, he gets this message: “The selected cells are read-only.”

3. Click Enter. The selected cell drops to the next row down, triggering a save of the data entered.
Note that the Body column is not visible in this view, so the user can’t actually enter data in the body of the announcement.
In Figure 19.34, notice that there is an empty column to the right of the Topic column indicated with a +. Clicking the + icon allows the list administrator to easily and quickly add new columns. With a little experimentation, it can be seen that the Quick View allows a user to quickly enter data in lists (or libraries), cut, and paste into other cells if needed (which dramatically cuts down on the time it takes when compared to selecting items one at a time, accessing the drop-down menu, or selecting the item and then accessing the Edit Item tool on the ribbon).
In SharePoint 2010, a Multiple Lines of Text column that is configured to allow enhanced rich text (text with pictures, tables, and hyperlinks) cannot be edited in datasheet view. However, multiple lines of text configured to allow plain text or rich text (bold, italics, text alignment, and hyperlinks) does allow editing in datasheet view. However, in SharePoint 2013, the Quick Edit option now enables you to edit multiple lines of text configured to allow enhanced rich text.
Creating a View in a List
Another important concept to understand when using SharePoint 2013 lists is that of views. When someone visits a list, the default view displays. Every list is created with a default view, and then the list administrator can either modify that view or create new views, one of which could be set to be the default. The tools required are accessed from the List tab of the ribbon toolbar and include the Create View tool, Modify View tool, and List Settings tool. The List Settings tool is the “long way” of getting to the link to modify a view.
In the following example, a user decides a new view is needed in the Announcements list that was modified in the previous example by having a new column titled Topic added. Follow these steps to create a new view in the list:
1. Click the List tab, and then click the Create View tool.
2. Several view format options are offered: Standard View, Calendar View, Access View, Datasheet View, Gantt View, and Custom View in SharePoint Designer. For this example, click Standard View.
3. The Create View page opens, as shown in Figure 19.35. Enter in a name for the view, such as New View, and check the Make This the Default View check box, if desired.

4. In the next section, leave Create a Public View checked, or select Create a Personal View if you intend to use only this view and you don’t want to share it with other users of the list. In this example, leave Create a Public View checked.
5. In the Columns section, check any column names that you want included in the view. Change the number in the Position from Left column if needed; this often takes some trial and error to get just right. In this example, the columns titled Attachments and Body are checked because they were left out of the default view.
6. In the Sort section, determine which column to sort by. In this example, choose Title from the drop-down menu under First Sort by the Column, and check the circle next to Show Items in Ascending Order.
7. In the Filter section, choose whether to filter items and only display items that meet certain criteria. Leave the Show All Items in this View option checked for this example.
8. Feel free to experiment with the various other settings on the Create View page, such as Tabular View, Group By, Totals, Style, Folders, Items Limit, and Mobile.
9. Click OK to save the changes.
The Group By option can be very useful for lists with numerous items as it allows the contents of one or more columns to be used to group items. Groupings can be displayed by default in collapsed mode, so a user can easily browse through different groups by expanding a header and then reviewing the contents to see whether they are of interest.
Note
In the Folders section for the Create View page, the option is provided to either Show Items Inside Folders or to Show All Items Without Folders. Although this might seem a fairly innocuous option, realize that the efforts to organize content in folders can be completely ignored by simply checking the circle next to Show All Items Without Folders. Any granular security settings applied to contents of folders is still honored; the view is simply flattened. With this simple option, SharePoint allows a list administrator to be freed from the constraints of folders inside of lists, even if users demand folders for peace of mind or comfort level.
Summary
Document libraries and lists are arguably the most important features of most SharePoint 2013 implementations, because they contain the documents and data that users interact with every day. Although an in-depth review of every tool and feature available from every document library and list in SharePoint is beyond the scope of this chapter, it highlights the most important and commonly used features and sets the stage for Chapter 20. SharePoint 2013 builds upon and refines the features provided by SharePoint 2010 lists and libraries in many important ways that turn SharePoint into a world-class and (just as important) easy-to-use document and data management tool.
Best Practices
The following are best practices from this chapter:
![]() The improvements from SharePoint 2010 to SharePoint 2013 make it easier for administrators and end users to interact with the documents and data stored in document libraries and lists and reduce the learning curve as well.
The improvements from SharePoint 2010 to SharePoint 2013 make it easier for administrators and end users to interact with the documents and data stored in document libraries and lists and reduce the learning curve as well.
![]() There are a variety of ways to upload documents to SharePoint 2013 document libraries, including the Open with Explorer button on the Library tab, the Upload Multiple Documents option, and using Windows Explorer to navigate to the SharePoint server, site, and library.
There are a variety of ways to upload documents to SharePoint 2013 document libraries, including the Open with Explorer button on the Library tab, the Upload Multiple Documents option, and using Windows Explorer to navigate to the SharePoint server, site, and library.
![]() Folders can be created within a document library, and as discussed in this chapter, there are pros and cons to using folders in SharePoint document libraries. A best practice is for the organization to understand the pros and cons of using folders and make informed decisions on where they make sense (for example, document libraries with tens of thousands of documents) and where they don’t (for example, smaller document libraries where the organization wants to promote the use of metadata for organization rather than folders).
Folders can be created within a document library, and as discussed in this chapter, there are pros and cons to using folders in SharePoint document libraries. A best practice is for the organization to understand the pros and cons of using folders and make informed decisions on where they make sense (for example, document libraries with tens of thousands of documents) and where they don’t (for example, smaller document libraries where the organization wants to promote the use of metadata for organization rather than folders).
![]() Although creating unique permissions for documents in a document library creates added overhead for administrators, the new Check Permissions tool enables administrators to determine what permission levels are given to users or groups, which allows the administrator to quickly check whether specific users or groups have any access to the document.
Although creating unique permissions for documents in a document library creates added overhead for administrators, the new Check Permissions tool enables administrators to determine what permission levels are given to users or groups, which allows the administrator to quickly check whether specific users or groups have any access to the document.
![]() Alerts can be created for items, lists, or libraries and are a very easy way to keep track of activities within a list or library or of any changes made to a document that a user is specifically interested in. Use daily and weekly summary alerts to keep the number of emails sent out to a minimum.
Alerts can be created for items, lists, or libraries and are a very easy way to keep track of activities within a list or library or of any changes made to a document that a user is specifically interested in. Use daily and weekly summary alerts to keep the number of emails sent out to a minimum.
![]() Although document libraries provide tools in the toolbar that can make a copy of a document in another library (the Send To tool) and track that copy and maintain the connectivity to a certain extent by requesting updates, or can create a document workspace that contains a copy of the document, this can be a confusing and complicated process for less-experienced users and administrators. When the user base and administrators are new to SharePoint, a best practice is to recommend against using these tools unless specifically required for a business solution.
Although document libraries provide tools in the toolbar that can make a copy of a document in another library (the Send To tool) and track that copy and maintain the connectivity to a certain extent by requesting updates, or can create a document workspace that contains a copy of the document, this can be a confusing and complicated process for less-experienced users and administrators. When the user base and administrators are new to SharePoint, a best practice is to recommend against using these tools unless specifically required for a business solution.
![]() Document library administrators can enable versioning in a document library and decide whether major and minor versions will be tracked, whether content approval is required, who can see draft versions, whether workflows are used to approve a document, and even if scheduling is used to determine when the content is published. A best practice is to make sure that the right combination of these features is applied based on the content of the document library and the sophistication of the user base. Enabling too many of these features for a user base that is new to SharePoint 2010 may steepen the learning curve and make employees hesitant to use the document libraries.
Document library administrators can enable versioning in a document library and decide whether major and minor versions will be tracked, whether content approval is required, who can see draft versions, whether workflows are used to approve a document, and even if scheduling is used to determine when the content is published. A best practice is to make sure that the right combination of these features is applied based on the content of the document library and the sophistication of the user base. Enabling too many of these features for a user base that is new to SharePoint 2010 may steepen the learning curve and make employees hesitant to use the document libraries.
![]() Although the Quick Edit is available for use in both lists and libraries, it is most often used in lists for rapid data entry or bulk changes, because many users use SharePoint lists for similar tasks as they normally use spreadsheets for.
Although the Quick Edit is available for use in both lists and libraries, it is most often used in lists for rapid data entry or bulk changes, because many users use SharePoint lists for similar tasks as they normally use spreadsheets for.
![]() Lists are another main building block of SharePoint collaborative environments, but they are designed primarily for storing rows of information rather than documents. As discussed in this chapter, lists can store documents as attachments, but they do not manage documents as well or as thoroughly as libraries. For example, lists do not manage versions of attachments.
Lists are another main building block of SharePoint collaborative environments, but they are designed primarily for storing rows of information rather than documents. As discussed in this chapter, lists can store documents as attachments, but they do not manage documents as well or as thoroughly as libraries. For example, lists do not manage versions of attachments.
![]() For lists to be useful, they must contain the appropriate combination of columns. A variety of lists come with SharePoint 2013 out-of-the-box, but administrators should familiarize themselves with the wide variety of columns that can be created; the usefulness of the list will increase as these are properly leveraged.
For lists to be useful, they must contain the appropriate combination of columns. A variety of lists come with SharePoint 2013 out-of-the-box, but administrators should familiarize themselves with the wide variety of columns that can be created; the usefulness of the list will increase as these are properly leveraged.
![]() Views are also key to the efficacy of lists, and a list administrator should become familiar with the process of creating a new view, setting it as the default, and working with sorting, filtering, and grouping within list views.
Views are also key to the efficacy of lists, and a list administrator should become familiar with the process of creating a new view, setting it as the default, and working with sorting, filtering, and grouping within list views.
![]() Mobile views are created by default with any new view, and the URL is available on the Edit View page (ViewEdit.aspx) in the Mobile section at the bottom of the page.
Mobile views are created by default with any new view, and the URL is available on the Edit View page (ViewEdit.aspx) in the Mobile section at the bottom of the page.