Chapter 20. Customizing and Managing Libraries and Lists to Meet Business Requirements
In This Chapter
![]() Planning the List and Library Ecosystem
Planning the List and Library Ecosystem
![]() Understanding the Range of List and Library Options
Understanding the Range of List and Library Options
![]() Mastering the Library Tab on the Ribbon
Mastering the Library Tab on the Ribbon
![]() Document Library Settings Tools Reviewed
Document Library Settings Tools Reviewed
![]() Permissions and Management Tools for Lists and Libraries
Permissions and Management Tools for Lists and Libraries
![]() Document Sets Compared to Folders as Organizational Tools in Document Libraries
Document Sets Compared to Folders as Organizational Tools in Document Libraries
![]() Content Organizer as a Document Routing Tool
Content Organizer as a Document Routing Tool
The preceding chapter provided an overview of the wide and powerful range of tools available to SharePoint 2013 users in lists and libraries. This chapter now builds on this information to help SharePoint architects and administrators design an environment that meets the various needs of end users by focusing on the main containers of information in SharePoint 2013: lists and libraries.
This chapter concentrates on the tools available within lists and libraries, primarily from the Library tab on the ribbon, and Settings page, with the goal of exposing administrators to the range of tools they will use to initially configure lists and libraries and will access to manage them on an ongoing basis.
The chapter also covers two of the site features that can be activated by site administrators that provide tool sets pertaining specifically to the management of files and data within lists and libraries: document sets and the content organizer.
Planning the List and Library Ecosystem
The process of planning the appropriate combination of lists and libraries to meet the needs of different business units and groups can be very simple or very complex, depending on the general philosophies surrounding the SharePoint project and the needs of the organization. Some organizations spend a minimal amount of time planning, build one or more SharePoint site collections with sites defined for business units, departments, or groups, and then allow end users to customize these environments with the lists and libraries that they deem best suited to their needs. Other organizations create sites and site collections using carefully crafted templates that have specific combinations of preconfigured lists and libraries, and carefully weigh the pros and cons of the different types of lists and libraries and related features that can be provided. And then there are other permutations. For the sake of discussion, it is posited here that four primary strategies can be employed:
![]() Minimal planning and testing; minimal restrictions on list and library use and configuration
Minimal planning and testing; minimal restrictions on list and library use and configuration
![]() Minimal planning and testing; more restrictions on list and library use and configuration
Minimal planning and testing; more restrictions on list and library use and configuration
![]() More extensive planning and testing; minimal restrictions on list and library use and configuration
More extensive planning and testing; minimal restrictions on list and library use and configuration
![]() More extensive planning and testing; more restrictions on list and library use and configuration
More extensive planning and testing; more restrictions on list and library use and configuration
By using the minimal planning and testing approach, the organization shortens the time frame of the implementation, which generally controls the costs of the project. In general, the risks of “missing the mark” are higher in the minimal planning and testing approach. This can manifest, from the authors’ experience, in sluggish adoption of the lists and libraries unless end users are already experienced with, and even clamoring for, SharePoint technologies or have training made readily available. Alternatively, assuming end users adopt the technology, this “blank slate” approach encourages end users to modify the tools to meet their specific needs. Combine this minimal planning approach with minimal restriction on the types of lists and libraries that can be used, and empower certain users to configure these lists to meet their needs, and the results can be positive. Tightly control the range of lists and libraries that can be used and restrict end users’ ability to change the configuration of lists and libraries, and IT stays integrated in the adoption cycle, learns what the end users are requesting in terms of functionality, and can develop best practices along the way.
However, more extensive planning and testing requires more time and resource involvement and can add to the overall costs of the project. Pilots, prototypes, and proof of concepts can be executed and managed, with specific decisions made along the way of which lists and libraries will be made available and which tools enabled in the lists and libraries. Following the implementation, end users can be more or less empowered to create new libraries and lists and customize the configurations.
Every organization has its own processes and methodologies for planning and testing, so those topics are not addressed in detail here, but the topics revolving around list and library use and configuration are looked at in detail to help readers better understand the capabilities of the lists, libraries, and related tools provided by SharePoint 2013 and then decide which are appropriate for the implementations.
Understanding the Range of List and Library and App Options
Lists and libraries are key repositories in the SharePoint ecosystem, and each offers dozens of powerful features, and Microsoft offers numerous different templates for organizations to use in constructing the SharePoint environment. This section delves into more detail on the different list and library options and provides some guidance on how they should be used from a high level.
Note
SharePoint 2013 terminology refers to lists and libraries now as apps in some places, and lists or libraries in others, which can cause confusion. For example, on the Site Contents page, the top section is titled List, Libraries, and Other Apps. And there’s a button to Add an App, which then displays the lists, libraries, and any other apps that are available. A general definition is that a list or library can be an app, and an app can be a list or a library but doesn’t have to be.
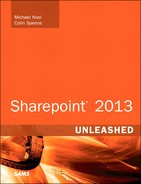
Because of the sheer number of lists and libraries, as shown in Table 20.1, a detailed overview of each one is beyond the scope of this chapter. This table clarifies whether the template creates a list, a library, or an app and whether the template is available in SharePoint Foundation 2013 or SharePoint Server 2013 Enterprise; it also provides notes on what the list or library is designed by Microsoft to be used for.


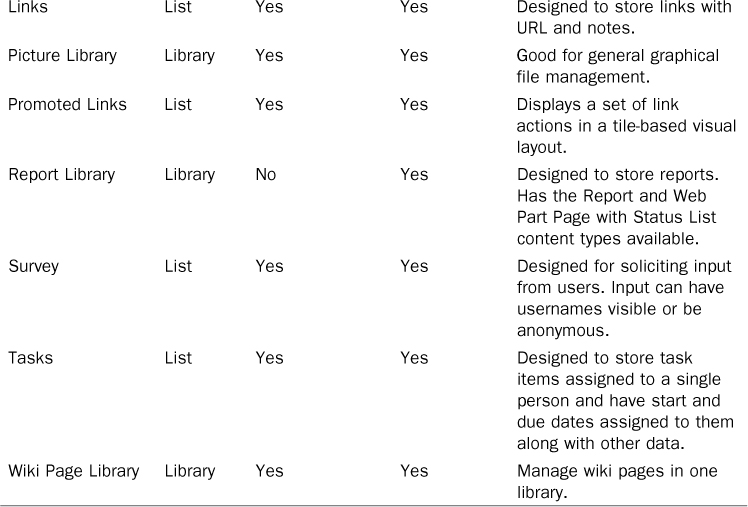
TABLE 20.1 Library and List Options in SharePoint Foundation 2013 and SharePoint Server 2013 Enterprise
To view which apps are available on the current site, follow these steps:
1. Click the gear icon in the upper-right corner.
2. Click Site Contents; the lists, libraries, and other apps that currently exist on the site then display.
Figure 20.1 shows a Site Contents page. Note that the permissions of the user account determine which lists, libraries, and apps display. Lists, libraries, and apps that the user account does not have permissions to at least view are not displayed.
Although this list is certainly not enough to make the final decision about which lists and libraries the organization will support and make available to specific sets of users, it can serve as a starting point, and the grid can be expanded for use during the planning process. The design team can simply review the lists and libraries, make decisions about whether to use each one, can determine whether specific lists or libraries meet the needs of a subset of users, groups, or divisions, and verify that they are all included in the version of SharePoint that the organization has chosen.
Several lists and libraries have been deprecated from SharePoint 2010, including the following:
![]() Status List
Status List
![]() Project Tasks
Project Tasks
![]() Slide Library
Slide Library
Note that the Status List enabled you to define key performance indicators that accessed a view within a list or library and displayed red, yellow, and green icons. However, there were many limitations on how these could be configured, rendering them of limited value. This functionality has now been “moved” to Power View reports, so the Power View site collection feature needs to be enabled. Note that Structured Query Language (SQL) Server Analysis Services in SharePoint Mode needs to also be configured. Then the Power View reports in Excel can have key performance indicators added and can then be accessed via Excel Services.
Creating Lists and Libraries
After the high-level decisions have been made about which lists and libraries will be used and supported by the organization, the next step is to configure a test site with these lists and libraries and configure them to meet the expected needs of the end users and capabilities of IT to support the environment. This section gives high-level guidelines for these tasks.
A good place to start is with the team site template. The team site template contains the following lists and libraries if created in SharePoint Foundation 2013:
![]() Shared Documents document library
Shared Documents document library
![]() Site Assets document library
Site Assets document library
![]() Site Pages wiki library
Site Pages wiki library
If the team site template is used to create a site in SharePoint Server 2013, there will also be a Microfeed list.
Note
The SharePoint 2010 team site included a number of other lists that are no longer in this template in SharePoint 2013, as follows: announcements list, calendar list, links list, tasks list, and team discussion list.
To create a team site, follow these steps:
1. From the parent site (under which the new site will be created), click the Gear icon, and then click Site Contents.
2. When on the Site Contents page, scroll down to the bottom of the page and click New Subsite. If this option isn’t provided, the account you are using doesn’t have sufficient permissions to create a new site.
3. From this page, enter a title for the site (such as Team Site 1) and provide a description if needed.
4. Provide a URL name in the Web Site Address section (for example, TeamSite1). By not including spaces in the title, you avoid seeing “%20” in the URL.
5. In the Template Selection section, choose the Team Site template.
6. Under User Permissions, choose Use Same Permissions as Parent Site. You can choose Use Unique Permissions, if needed, and if so will then need to provide additional information on the groups that will be used to provide access to the site.
7. In the Navigation section, choose whether to display this site on the quick launch of the parent site and whether to display this site on the top link bar of the parent site. Choosing Yes for either or both options makes it easier to navigate to the new site, but can also clutter up the quick launch or top link bar. For this exercise, choose No for both.
8. In the Navigation Inheritance section, choose whether to use the top link bar from the parent site. For this exercise, choose No.
9. Click Create. Figure 20.2 shows an example of the resulting team site.

After the new site has been created, additional lists and libraries can be created to fully flesh out the site for testing or production purposes. Creating additional lists or libraries requires that the user have the Manage Lists permission, which permits you to create and delete lists, add or remove columns in a list, and add or remove public views of a list. This is available in the Full Control permission level and the Design permission level. To see the permission level details, follow these steps:
1. From the home page of the top-level site in the site collection, click the Gear icon, and then click Site Settings.
2. Click Site Permissions in the Users and Permissions section.
3. Click Permission Levels on the Permissions tab on the ribbon.
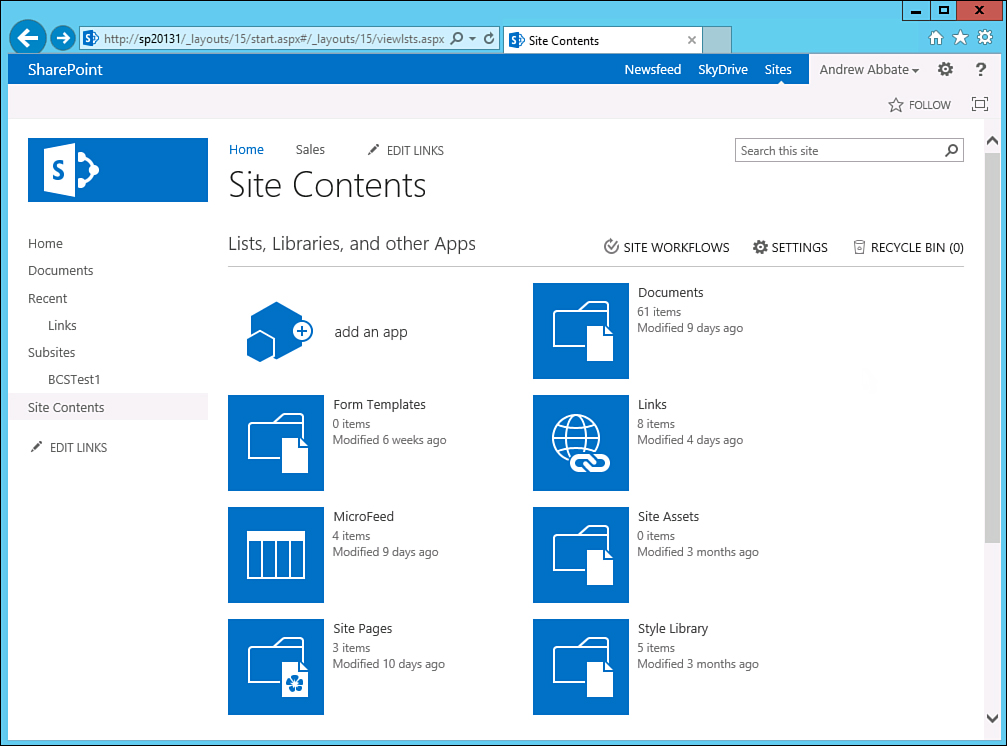
4. As shown in Figure 20.3, you will now see the different permission levels in place for the site collection. Note that Full Control and Limited Access permission levels cannot be deleted.
5. Click the link to a permission level, such as Design, to see the list permissions, site permissions, and personal permissions that are enabled for that level. A Copy Permission Level link appears at the bottom of the Edit Permissions Level page, which is handy if you want to create a new permission level for testing or production purposes.
It is recommended for any site collection administrator to become very familiar with the permissions enabled for different permission levels. It is generally recommended not to change any of these default permission levels, but rather create new ones for specific purposes.
The following methods can be used to create lists and libraries from a SharePoint 2013 site:
![]() Access the Settings menu by clicking the Gear icon, then click Add an App, and then select the appropriate list, library, or app. Provide a name and click Create, or click Advanced Options link if needed to access additional settings.
Access the Settings menu by clicking the Gear icon, then click Add an App, and then select the appropriate list, library, or app. Provide a name and click Create, or click Advanced Options link if needed to access additional settings.
![]() From the Settings menu, click Site Contents, and then from the Site Contents page, click Add an App, and then select the appropriate list, library, or application. Provide a name and click Create, or click Advanced Options link if needed to access additional settings.
From the Settings menu, click Site Contents, and then from the Site Contents page, click Add an App, and then select the appropriate list, library, or application. Provide a name and click Create, or click Advanced Options link if needed to access additional settings.
![]() From the quick launch, click Site Contents, and then from the Site Contents page, click Add an App, and then select the appropriate list, library, or application. Provide a name and click Create, or click Advanced Options link if needed to access additional settings.
From the quick launch, click Site Contents, and then from the Site Contents page, click Add an App, and then select the appropriate list, library, or application. Provide a name and click Create, or click Advanced Options link if needed to access additional settings.
![]() From the Settings menu, click Site Settings, and from the Site Settings page, click the Site Libraries and Lists link in the Site Administration section. Then click Create New Content, which opens the Site Contents page, and click Add an App.
From the Settings menu, click Site Settings, and from the Site Settings page, click the Site Libraries and Lists link in the Site Administration section. Then click Create New Content, which opens the Site Contents page, and click Add an App.
Making Basic Decisions About the List or Library
It is important to start making decisions about the configuration of the lists and libraries early in the process, certainly before hundreds of sites and possibly thousands of lists and libraries have been deployed. This section covers some of the basic configuration decisions and standards that should be clarified during the testing process.
A general tendency is to “wing it” and make decisions when the individual lists and libraries are configured, but this should be resisted, because lack of consistency makes the environment harder to manage. For example, lack of standards for a list of library names can make it more confusing for visitors to the site, and lack of standards on versioning, or whether libraries are configured to allow inbound emails, can also cause confusion.
For more managed and controlled environments, it is recommended that the organization make decisions on standards for the following items:
![]() Naming lists and libraries: Although this sounds simple, coming up with a naming scheme can actually be somewhat challenging. What might seem common sense to IT may not make sense to the end users who will be using the lists and libraries every day. From an IT standpoint, it is generally recommended that the name of the list or library include the type of list or library used. For example, creating a Picture Library and naming it Images or Graphics is not as clear to management as naming it Pictures. Ideally list or library names are unique (and the SharePoint interface states a unique name should be used in the list creation process), so adding a reference to the site that contains the list can be of help. For example, HR Pictures reveals the site that houses the library as well as the type of library template used. Finally, if there will be multiple lists or libraries of the same type, providing a number is helpful, and in some cases, lists or libraries are private as opposed to being shared with all visitors to the site. For example, HR Pictures 1 Private is a very descriptive name that should be unique. It is not unusual to see sites that have more than a handful of libraries, and it is generally easier for end users to remember to access HR Doc Library 4 than to remember a less-precise name such as New Shared Docs.
Naming lists and libraries: Although this sounds simple, coming up with a naming scheme can actually be somewhat challenging. What might seem common sense to IT may not make sense to the end users who will be using the lists and libraries every day. From an IT standpoint, it is generally recommended that the name of the list or library include the type of list or library used. For example, creating a Picture Library and naming it Images or Graphics is not as clear to management as naming it Pictures. Ideally list or library names are unique (and the SharePoint interface states a unique name should be used in the list creation process), so adding a reference to the site that contains the list can be of help. For example, HR Pictures reveals the site that houses the library as well as the type of library template used. Finally, if there will be multiple lists or libraries of the same type, providing a number is helpful, and in some cases, lists or libraries are private as opposed to being shared with all visitors to the site. For example, HR Pictures 1 Private is a very descriptive name that should be unique. It is not unusual to see sites that have more than a handful of libraries, and it is generally easier for end users to remember to access HR Doc Library 4 than to remember a less-precise name such as New Shared Docs.
Tip
When a name is first provided to SharePoint during the list creation process, that becomes the URL, and spaces are converted to %20 in the URL. Therefore, a general recommendation is to not use spaces in list or library names and to edit the title of the list or library from list settings for that list or library at a later date. This can be done by accessing the Library Settings for the library, clicking the List name, description and navigation link, and simply changing the Name field. This results in a simpler and easier-to-read URL and a more standard title that is displayed on SharePoint pages.
Note
This default library in a Team Site is labeled as Documents on the Site Contents page and in the quick launch, yet the URL shows .../Shared%20Documents/... as the real library name. It is not usually a best practice to potentially confuse end users in this way, so a recommendation is to change the name of the library to Shared Documents to avoid confusion.
Note
The name chosen initially for the list or library remains in the URL even if the administrator changes the name and description by accessing the title, description, and navigation link from the settings page.
![]() Choose whether to display the list or library on the quick launch: The quick launch can get cluttered quite quickly in a site that is highly utilized and has many lists and libraries. Usually, only the most utilized lists and libraries should be included on the quick launch. Users should be reminded to use the Site Contents page to get the full listing of lists, libraries, apps, and subsites. To configure this setting, access Library Settings from the Library tab, and then click List Name, Description and Navigation, and select Yes or No in the Display This Document Library on the Quick Launch section.
Choose whether to display the list or library on the quick launch: The quick launch can get cluttered quite quickly in a site that is highly utilized and has many lists and libraries. Usually, only the most utilized lists and libraries should be included on the quick launch. Users should be reminded to use the Site Contents page to get the full listing of lists, libraries, apps, and subsites. To configure this setting, access Library Settings from the Library tab, and then click List Name, Description and Navigation, and select Yes or No in the Display This Document Library on the Quick Launch section.
![]() Decide whether versioning is enabled for the document library: This is a complex decision, and options are discussed later in the chapter. The organization should ideally set a standard for whether versioning is encouraged and supported. To configure this setting, access Library Settings from the Library tab, and then click Versioning settings and review the options.
Decide whether versioning is enabled for the document library: This is a complex decision, and options are discussed later in the chapter. The organization should ideally set a standard for whether versioning is encouraged and supported. To configure this setting, access Library Settings from the Library tab, and then click Versioning settings and review the options.
![]() Select a document template for the library: If a user clicks New Document on the File tab in a library, the template identified for the library loads. The type of template can be chosen while creating the library by clicking the Advanced Options link, as shown in Figure 20.4. Template options are as follows:
Select a document template for the library: If a user clicks New Document on the File tab in a library, the template identified for the library loads. The type of template can be chosen while creating the library by clicking the Advanced Options link, as shown in Figure 20.4. Template options are as follows:
None
Microsoft Word 97-2003 document
Microsoft Excel 97-2003 spreadsheet
Microsoft PowerPoint 97-2003 presentation
Microsoft Word document
Microsoft Excel spreadsheet
Microsoft PowerPoint presentation
Microsoft OneNote 2010 notebook
Microsoft SharePoint Designer web page
Basic page
Web part page

![]() If the template type isn’t changed, it defaults to a Word document. You can modify the template later from the Library Settings page by clicking Advanced Settings and then Edit Template in the Document Template section.
If the template type isn’t changed, it defaults to a Word document. You can modify the template later from the Library Settings page by clicking Advanced Settings and then Edit Template in the Document Template section.
For organizations that see the value in more extensive planning and testing, it is strongly recommended that each of the lists and libraries available in the version of SharePoint 2013 that will be implemented be created and then tested to determine their relevance to the user community and goals of the project, ease of use, and anticipated support challenges.
Mastering the Library Tab on the Ribbon
Chapter 19, “Using Libraries and Lists in SharePoint 2013,” covered the tools available on the Documents tab on the ribbon inside a document library. This section follows up by reviewing the tools on the Library tab, which are generally of more interest to a document library administrator and power users.
As with the Documents tab, the Library tab allows users to access only the tools that they have permissions to use and that are enabled for the list or library. For example, as shown in Figure 20.5, the user Andrew is logged in and can use only a subset of the tools, because he is a member of the Visitors group for the site and therefore has Read-level permissions.

The tools on the Library tab are as described in the following bulleted list. A number of these tools are examined in more detail later in the chapter, and the appropriate sections are referenced as applicable:
![]() View: Only active when a different view, such as Quick Edit, is selected. Restores the standard view of the library.
View: Only active when a different view, such as Quick Edit, is selected. Restores the standard view of the library.
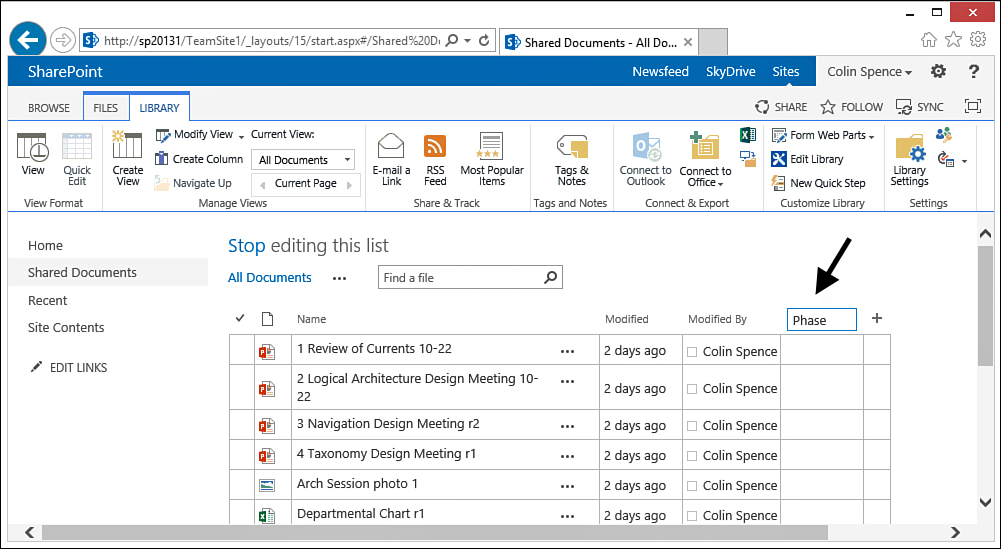
![]() Quick Edit: Provides a view (similar to the datasheet view in previous versions of SharePoint) where metadata can be edited in a grid view. New columns can be added in this view. Figure 20.6 shows an example where the plus sign was clicked and the user chose the Number column type and then labeled it Phase, as indicated by the arrow.
Quick Edit: Provides a view (similar to the datasheet view in previous versions of SharePoint) where metadata can be edited in a grid view. New columns can be added in this view. Figure 20.6 shows an example where the plus sign was clicked and the user chose the Number column type and then labeled it Phase, as indicated by the arrow.
![]() Create View: Create View gives access to a number of different types of views. The most commonly used is standard view, but several others are discussed later in this chapter in the “Creating and Managing Views” section.
Create View: Create View gives access to a number of different types of views. The most commonly used is standard view, but several others are discussed later in this chapter in the “Creating and Managing Views” section.
![]() Modify View: Modify View offers two drop-down menu options: Modify View and Modify in SharePoint Designer. The process of modifying a view is discussed later in this chapter in the “Creating and Managing Views” section.
Modify View: Modify View offers two drop-down menu options: Modify View and Modify in SharePoint Designer. The process of modifying a view is discussed later in this chapter in the “Creating and Managing Views” section.
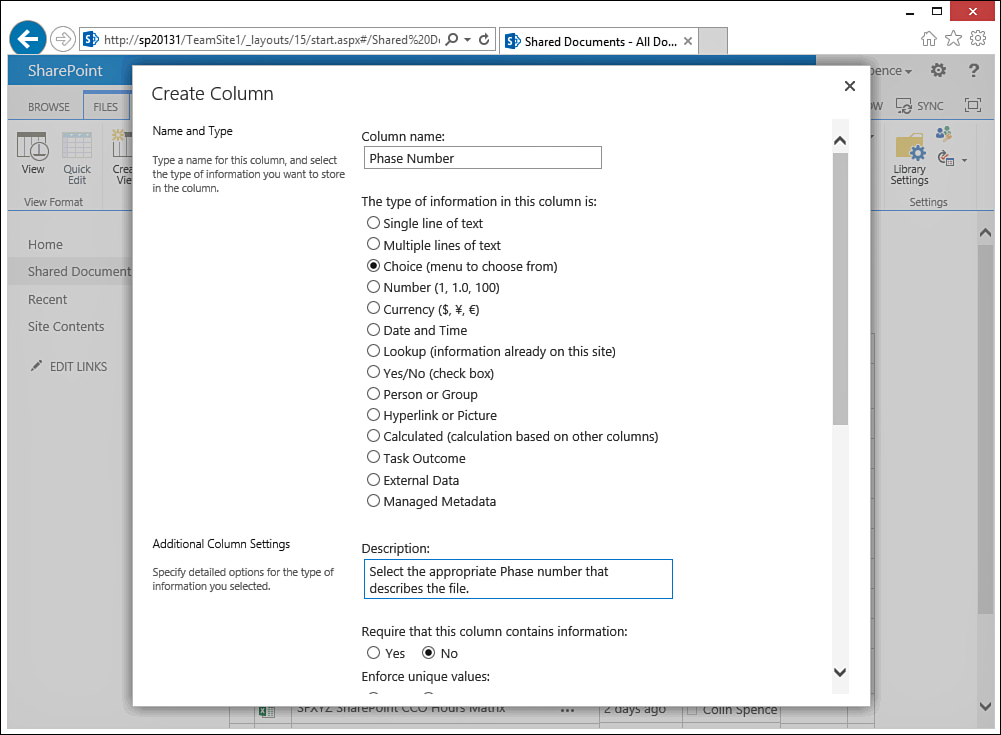
![]() Create Column: Provides access to the Create Column window, which provides a variety of column options, as shown in Figure 20.7. Columns in a document library are similar to columns in a spreadsheet and, with some planning, can add greatly to the value of the data stored in the library.
Create Column: Provides access to the Create Column window, which provides a variety of column options, as shown in Figure 20.7. Columns in a document library are similar to columns in a spreadsheet and, with some planning, can add greatly to the value of the data stored in the library.
![]() Navigate Up: Only active if the user has drilled into the contents of one or more folders. Navigates to the parent folder.
Navigate Up: Only active if the user has drilled into the contents of one or more folders. Navigates to the parent folder.
![]() Current View: Located below is a drop-down menu that shows the different views available to the logged-in user. Below that is a navigation tool that allows the user to page forward and backward if the library contains a large number of files.
Current View: Located below is a drop-down menu that shows the different views available to the logged-in user. Below that is a navigation tool that allows the user to page forward and backward if the library contains a large number of files.
![]() E-Mail a Link: When clicked, this provides available email options and enables the user to send an email that contains a link to the library. For example, it can provide links to Mail, Outlook, or Look for an App in the Store.
E-Mail a Link: When clicked, this provides available email options and enables the user to send an email that contains a link to the library. For example, it can provide links to Mail, Outlook, or Look for an App in the Store.
![]() RSS Feed: Opens the RSS Feed page and allows you to subscribe to it from your Outlook client. Other feed readers can be used to connect to this RSS feed if needed. This functionality can be turned off from the Settings page for the library via the RSS Settings link.
RSS Feed: Opens the RSS Feed page and allows you to subscribe to it from your Outlook client. Other feed readers can be used to connect to this RSS feed if needed. This functionality can be turned off from the Settings page for the library via the RSS Settings link.
![]() Most Popular Items: Opens the Most Popular Items page, which provides data on which documents have had the most views, most views by unique users, and most recommendation clicks. This page also allows the user to refine results based on Result Type, Content Type, and Author.
Most Popular Items: Opens the Most Popular Items page, which provides data on which documents have had the most views, most views by unique users, and most recommendation clicks. This page also allows the user to refine results based on Result Type, Content Type, and Author.
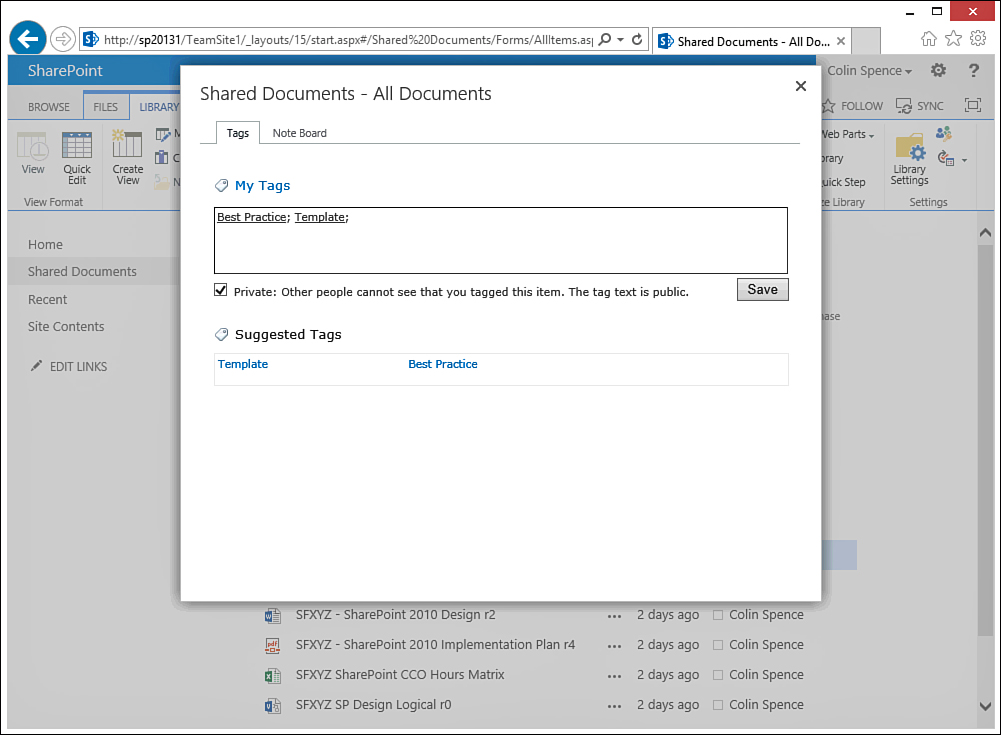
![]() Tags & Notes: Allows the user to tag an item with terms or phrases, set the tags to private if desired, or post longer notes as shown in Figure 20.8. The Personal Site tracks the tags or notes posted, so it is easy to find the content later.
Tags & Notes: Allows the user to tag an item with terms or phrases, set the tags to private if desired, or post longer notes as shown in Figure 20.8. The Personal Site tracks the tags or notes posted, so it is easy to find the content later.
![]() Connect to Outlook: Enables you to synchronize items to an Outlook folder for offline access.
Connect to Outlook: Enables you to synchronize items to an Outlook folder for offline access.
![]() Connect to Office: This provides access to several tools. Add to SharePoint Sites adds a shortcut in Microsoft Office applications, making it easy to save to this location in the future from the Office application. Remove from SharePoint Sites removes the shortcut. Manage SharePoint Sites allows you to manage the list of shortcuts.
Connect to Office: This provides access to several tools. Add to SharePoint Sites adds a shortcut in Microsoft Office applications, making it easy to save to this location in the future from the Office application. Remove from SharePoint Sites removes the shortcut. Manage SharePoint Sites allows you to manage the list of shortcuts.
![]() Export to Excel: Opens Excel and provides a “copy” of the library. The actual documents do not become embedded in the Excel file; instead, it provides links to the documents. Metadata provided in the active view is also exported.
Export to Excel: Opens Excel and provides a “copy” of the library. The actual documents do not become embedded in the Excel file; instead, it provides links to the documents. Metadata provided in the active view is also exported.
![]() Open with Explorer: Open the Windows Explorer tool to allow for interaction with the files in a more familiar fashion and for access to the standard Windows Explorer tools such as Open, Cut, Copy, Delete, Rename, and Properties. This is a popular tool to allow end users to quick copy documents to the library.
Open with Explorer: Open the Windows Explorer tool to allow for interaction with the files in a more familiar fashion and for access to the standard Windows Explorer tools such as Open, Cut, Copy, Delete, Rename, and Properties. This is a popular tool to allow end users to quick copy documents to the library.
![]() Form Web Parts: This tool allows the administrator to open the forms present for the list or library for editing. This is covered later in the “Modify Form Web Parts Tools” section.
Form Web Parts: This tool allows the administrator to open the forms present for the list or library for editing. This is covered later in the “Modify Form Web Parts Tools” section.
![]() Edit Library: This link opens SharePoint Designer 2013 and allows the end user to edit the configuration of the library. This topic is covered later in the “Edit Library Tool” section.
Edit Library: This link opens SharePoint Designer 2013 and allows the end user to edit the configuration of the library. This topic is covered later in the “Edit Library Tool” section.
![]() New Quick Step: The New Quick Step button opens SharePoint Designer 2013 and an Add a Button window, where you can start a new workflow, start an existing workflow, define the button label, and link to a button image.
New Quick Step: The New Quick Step button opens SharePoint Designer 2013 and an Add a Button window, where you can start a new workflow, start an existing workflow, define the button label, and link to a button image.
![]() Library Settings: This opens the Document Library Settings page, which is discussed in more detail in the “Document Library Settings Tools Reviewed” section.
Library Settings: This opens the Document Library Settings page, which is discussed in more detail in the “Document Library Settings Tools Reviewed” section.
![]() Shared With: This tool shows the users who have access to the library and provides the following tools: Invite People, Email Everyone, and Advanced. Clicking the Advanced link takes you to the Permission page for the document library for complete management of access to the document library.
Shared With: This tool shows the users who have access to the library and provides the following tools: Invite People, Email Everyone, and Advanced. Clicking the Advanced link takes you to the Permission page for the document library for complete management of access to the document library.
![]() Workflow Settings: The drop-down menu provides access to four tools: Workflow Settings, Add a Workflow, Create a Workflow in SharePoint Designer, and Create a Reusable Workflow in SharePoint Designer. This is covered in more depth later in this chapter in the “Workflow Settings” section.
Workflow Settings: The drop-down menu provides access to four tools: Workflow Settings, Add a Workflow, Create a Workflow in SharePoint Designer, and Create a Reusable Workflow in SharePoint Designer. This is covered in more depth later in this chapter in the “Workflow Settings” section.
Creating and Managing Views
The process of creating views was covered in Chapter 19, in the “Creating a View in a List” section, and so in this section is reviewed from the perspective of the list administrator.
One of the main concerns a list or library administrator should have pertains to the columns that are shown in the default view for a list or library (the view that shows by default when a user visits the list) and how it presents the information. It is generally an ongoing process for the list administrator to experiment with the best way to present the data stored in the list or library by manipulating the view by showing or hiding columns, using filtering, using groupings and totals, limiting the number of items shown in each view, and tuning the other options. An example is given in this section of a view that is created using a specific style to leverage the metadata that is available for documents by default (such as created date and time and created-by information).
A recommended best practice is to create a view titled Home Page View for each list or library that will have its list view web part added to the home page or other web part page. Generally, the default view can be modified and several columns hidden, which results in the list view web part taking up less space on the page that displays it, which is often the home page to the site.
When the administrator clicks the Create View button from the Library tab on the ribbon in a document library, several options are provided, as follows:
![]() Standard View
Standard View
![]() Calendar View
Calendar View
![]() Datasheet View
Datasheet View
![]() Gantt View
Gantt View
![]() Custom View in SharePoint Designer
Custom View in SharePoint Designer
A general recommendation is to experiment with the different views, but in most cases, the standard view is used. Access views are discussed later in the chapter in the “Access Views Explained” section.
Options Available When Modifying a View
If the administrator clicks the Modify View button from the Library tab on the ribbon, he has the option of changing which columns are displayed (and in which order), whether sorting is used, whether filtering is used, whether grouping is used, along with other options. Also, the administrator has the option to use tabular view, which determines whether individual item check boxes are displayed. These allow users to perform bulk operations by checking multiple items at a time. Items in the list or library can be grouped by one or more columns, and the display can default to collapsed or expanded, which can make navigating the list or library much easier. Totals can be displayed for some types of columns but not all, the Totals section shows which columns can be totaled, and the options of Count, Average, Maximum, Minimum, Sum, Std Deviation, or Variance are offered based on the type of data.
A variety of styles are offered that change the appearance of the data. For example, the shaded view style colors every other row a darker shade, making it easier for users to track metadata associated with a document as they scroll to the right.
Note
When you are editing or creating a view, not all columns can be totaled. For example, calculated columns cannot be totaled, which is an annoyance when tracking financial information or other numeric information where calculated columns are used.
In addition, when editing a view, the administrator can choose whether to show folders or show items without folders, and to show the view in all folders, in the top-level folder only, or in folders of a certain content type. Item limits can be set per view, and the administrator enters an integer for the number of items to display and specifies whether to display in batches of the specified size or to limit the total number of items returned to the specified amount. Finally, the administrator can determine whether the view is enabled for mobile access, if it is the default view for mobile access, and the number of items to display in web part for the view. This is important to test with any mobile devices supported because the size of the screens affects the ease of interacting with the view and how many items are displayed.
Access Views Explained
If the Access View option is chosen from the Create View page, SharePoint opens Access 2013 and asks the user to name and save (using the .accdb extension) the database that is then created. Right off the bat there is obviously more to the process than simply creating a “view,” but in fact a database is created for which forms, PivotCharts, PivotTables, or reports can be created. This database remains connected to the SharePoint list, so changes in the SharePoint list are synced with this database.
Note
The Access “view” does not show up as an option from the Current View drop-down menu in the library, but instead creates an Access file that can be used for data analysis. The Access database must be saved either locally or to a SharePoint document library. Therefore, this “view” is better suited for data analysts than administrators.
Figure 20.9 shows the design view for a report that was created based on the data contained in a sample document library. In this example, the site administrator wanted to create a report that captured the titles of all the documents in the library, as well as some of the metadata associated with the documents, including file size, and then sorted by the file size. And the report needed to print professionally for review in a weekly meeting, a requirement that SharePoint natively does not meet.

Modify Form Web Parts Tools
The Modify Form Web Parts button on the List tab of the ribbon allows the administrator to open the forms present for the list or library for editing. The editing allowed includes inserting text, image, video and audio, web parts, or the existing list view web part. The properties of the body of the form can be edited, too, such as height, width, chrome state, layout, advanced, and miscellaneous properties. This allows the administrator a great deal of control over how the various forms (such as New, Edit, and Display forms) appear and other forms associated with content types in use in that list or library. For a simple example, an administrator could add text or even a video to the new form for a list, which provides instructions on how to fill out the form.
Edit Library Tool
When clicked, this button opens SharePoint Designer 2013 and, as shown in Figure 20.10, provides an extensive dashboard of information about the library. This information can prove invaluable for a library administrator, as discussed briefly in this section.

From a list administrator’s perspective, the dashboard of information provided by SharePoint Designer 2013 provides insight into a variety of areas:
![]() List Information: Provides the name and description of the library or list, web address, list ID, last modified, and number of items.
List Information: Provides the name and description of the library or list, web address, list ID, last modified, and number of items.
![]() Customization: Provides links to the Edit list columns page and Permissions page for this list.
Customization: Provides links to the Edit list columns page and Permissions page for this list.
![]() Settings: Allows the administrator to quickly change various settings, including Display this List on the Quick Launch, Hide from Browser, Display New Folder Command on the New Menu, Require Content Approval for Submitted Items, Create a Version Each Time You Edit an Item, Allow Management of Content Types, and also provides the Document Template URL.
Settings: Allows the administrator to quickly change various settings, including Display this List on the Quick Launch, Hide from Browser, Display New Folder Command on the New Menu, Require Content Approval for Submitted Items, Create a Version Each Time You Edit an Item, Allow Management of Content Types, and also provides the Document Template URL.
![]() Content Types: Allows the administrator to add new content types and to view and manage settings for existing content types.
Content Types: Allows the administrator to add new content types and to view and manage settings for existing content types.
![]() Views: Allows for the creation of new views or editing of existing views.
Views: Allows for the creation of new views or editing of existing views.
![]() Forms: Allows for the creation of new forms or editing of existing forms.
Forms: Allows for the creation of new forms or editing of existing forms.
![]() Workflows: Allows for the creation of new workflows or editing of existing workflows.
Workflows: Allows for the creation of new workflows or editing of existing workflows.
![]() Custom Actions: Allows for the creation of buttons that can navigate to a form, initiate a workflow, or navigate to a URL.
Custom Actions: Allows for the creation of buttons that can navigate to a form, initiate a workflow, or navigate to a URL.
Just from this quick overview of tools, you can see that SharePoint Designer 2013 offers an alternative to the administrator to the tools provided in the SharePoint 2013 user interface, as reviewed throughout this chapter. It is arguably a faster way for an experienced site administrator to navigate between sites and between lists and make changes. However, most administrators work with the tools provided through the user interface provided by SharePoint 2013, because those are integrated and meet most day-to-day needs. Be aware, however, of the capabilities of SharePoint Designer 2013 as well.
Creating a Custom Action
From SharePoint Designer 2013, with a library opened (click the Edit Library link from the Library tab of the ribbon), follow these steps to add an entry to the drop-down menu in a document library. This is a powerful way for an administrator to provide added functionality within a list or library, but should be considered an advanced and potentially dangerous process (and so should generally be done first in a lab environment):
1. Confirm that SharePoint Designer is connected to a library by looking at the active tab and the breadcrumb that shows the site and library name. For example, the tab might be titled Shared Documents, and the breadcrumb might show Team Site > Shared Documents.
2. Click the Custom Action drop-down menu on the List Settings tab and select List Item Menu.
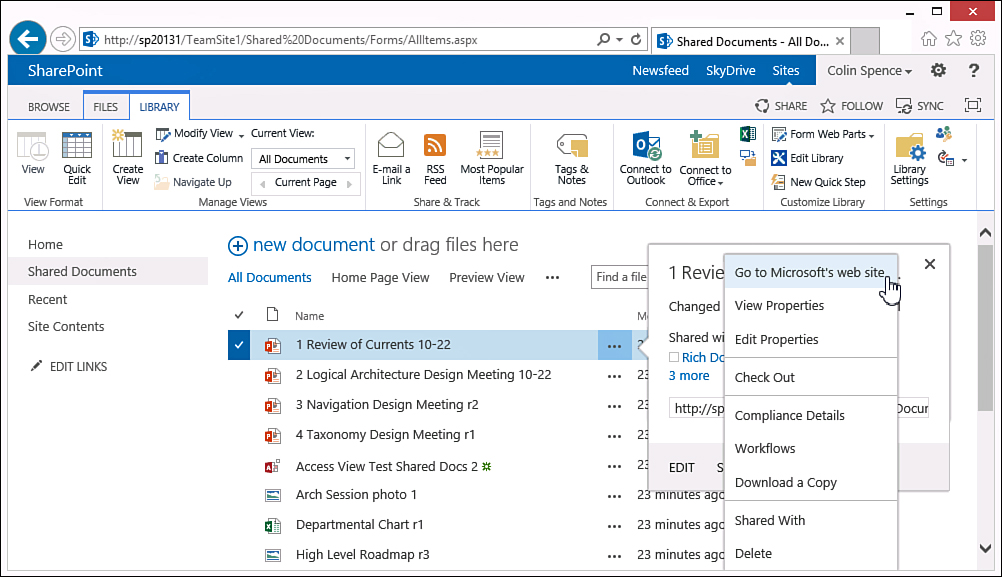
3. As shown in Figure 20.11, enter a name and description, and then specify either Navigate to Form, Initiate Workflow, or Navigate to URL. For this example, a link is added that simply navigates to a different website. Enter the name as Go To Microsoft’s Web Site, set the action as Navigate to URL, and enter www.microsoft.com.

4. Scroll down, and in the Rights Mask section enter ViewListItems. This results in this menu item only displaying to users with ViewListItems permissions.
Tip
For additional information about the options for rights masks, go to http://msdn.microsoft.com/en-us/library/microsoft.sharepoint.spbasepermissions.aspx. Some examples include EditListItems, Open, and DeleteListItems. Understanding which default groups have which permissions allows the site administrator to create menu entries that appear only for the appropriate users.
5. Click OK. This saves the new menu item to the document library. No save is needed from SharePoint Designer 2013. This new custom action displays in the Custom Action section in the lower-right corner of SharePoint Designer 2013 when the document library is connected to.
6. Navigate to the document library that was opened in SharePoint Designer 2013. In this example, it was named Shared Documents. Access the drop-down menu for an item and confirm that the new entry appears, as shown in Figure 20.12.
New Quick Step Button
The New Quick Step button opens SharePoint Designer 2013 and an Add a Button window, which provides the options to start a new workflow or start an existing workflow and to define the button label and link to a button image. Creating workflows in SharePoint Designer 2013 is covered in Chapter 28, “Out-of-the-Box Workflows and Designer 2013 Workflows.”
Document Library Settings Tools Reviewed
As one of the most commonly used libraries, the document library is a good starting point for the tools that are available for list and library administrators. The document library Settings page is reached by entering the document library, clicking the Library tab on the ribbon, and then clicking the Library Settings icon on the right side of the toolbar. The resulting array of tools varies based on whether SharePoint Foundation 2013, SharePoint Server 2013 Standard, or Enterprise is being used, and based on which site collection features and site features are enabled. Only users with the Manage Lists permission can click the Library Settings icon; it is grayed out for other users. This section reviews several of the most widely used library settings tools and explains best practices for using those tools.
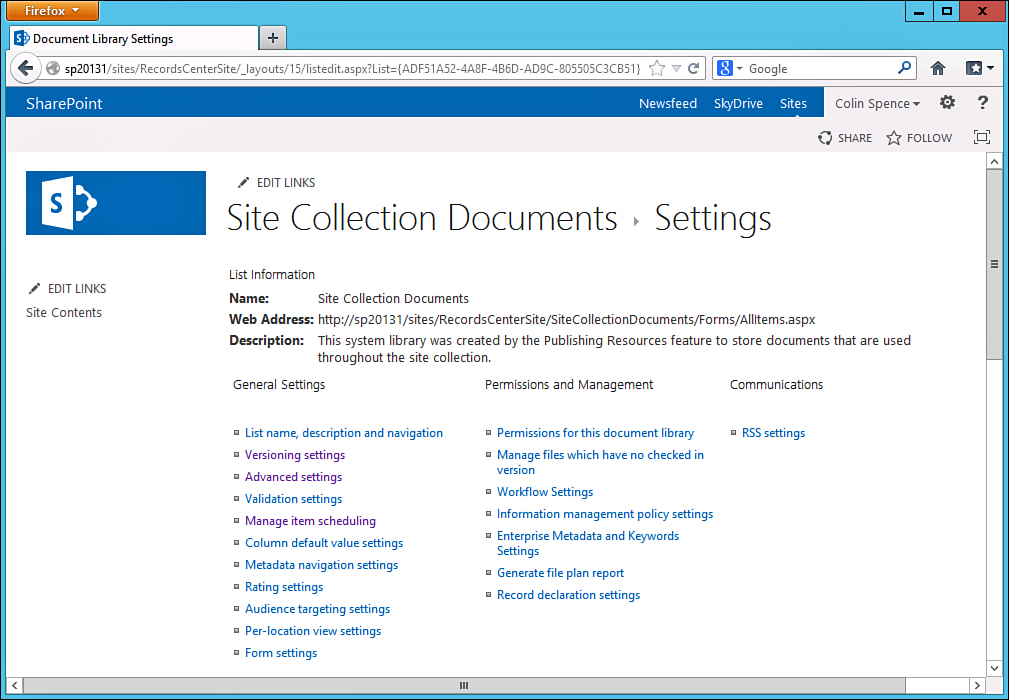
Figure 20.13 shows the document library Settings page for a document library created with the Team Site template in SharePoint Foundation 2013 with a user who has Owner-level permissions logged in. Figure 20.14 shows the document library Settings page for a document library created with the Team Site template in SharePoint Server 2013 Enterprise, also with a user who has Owner-level permissions. The SharePoint Server 2013 Enterprise document library Settings page shows tools that are enabled when the SharePoint Server Publishing Infrastructure is enabled for site collection features as well as site features for the site in question.

The tools provided in SharePoint Foundation 2013 in this example and specific configuration are as follows:
![]() List Name, Description and Navigation
List Name, Description and Navigation
![]() Versioning Settings
Versioning Settings
![]() Advanced Settings
Advanced Settings
![]() Validation Settings
Validation Settings
![]() Delete This Document Library
Delete This Document Library
![]() Save Document Library as Template
Save Document Library as Template
![]() Permissions for This Document Library
Permissions for This Document Library
![]() Manage Files Which Have No Checked In Version
Manage Files Which Have No Checked In Version
![]() Workflow Settings
Workflow Settings
![]() RSS Settings
RSS Settings
Additional tools provided by SharePoint Server 2013 Enterprise with SharePoint Server Publishing Infrastructure features enabled include the following:
![]() Manage Item Scheduling
Manage Item Scheduling
![]() Column Default Value Settings
Column Default Value Settings
![]() Metadata Navigation Settings
Metadata Navigation Settings
![]() Rating Settings
Rating Settings
![]() Audience Targeting Settings
Audience Targeting Settings
![]() Per-Location View Settings
Per-Location View Settings
![]() Form Settings
Form Settings
![]() Information Management Policy Settings
Information Management Policy Settings
![]() Enterprise Metadata and Keywords Settings
Enterprise Metadata and Keywords Settings
![]() Generate File Plan Report
Generate File Plan Report
![]() Record Declaration Settings
Record Declaration Settings
Note
The document library created in SharePoint Server 2013 Enterprise was created in a Records Center site collection template, as indicated in the URL. Because of this, the Delete This Document Library tool is not available. In addition, because the SharePoint Server Publishing Infrastructure is enabled, the Save Document Library as Template option is removed.
This section covers the tools provided on this page that are of most importance to document library administrators and site collection administrators. Some of the decisions of whether to enable these tools also impact overall farm governance, and therefore IT and the governance committee may need to be involved.
List Name, Description and Navigation
The first link on the document library Settings page provides access to the Name, Description, Navigation tools. Changing the name on this page does not change the library URL, but does change the display name on the Site Contents page and navigation elements, such as the Global Navigation bar. A general best practice is to have the display name and the URL name match as closely as possible, with a typical exception being the URL name should not have spaces in it, because SharePoint translates those to %20. A Description field is available, as well, and text typed in here is visible to the end user when she clicks on the i button to the right of the library title when inside the document library.
The other option is whether to display the library on the quick launch (also described as current navigation). This is a stylistic decision, as too many entries on the quick launch area can clutter up the page. One of the site owner’s jobs is to “advertise” the lists and libraries that are of most interest to typical site users by judicious use of the entries in the quick launch.
Versioning Settings
The second link on the document library Settings page, Versioning Settings, provides access to one of the most demanded features in a document management system: major and minor versioning. This is a “basic” functionality of an enterprise content management (ECM) system that is not available with a standard file share and that allows users to save copies of the document as it evolves without having to change the actual filename of the document by adding R1, R2, or R3 to the name. You can configure a variety of different settings for document libraries, and the pros and cons of different settings are reviewed in this section.
The pros include a structured process for turning a draft document into an approved version and restrictions relating to which users can see the draft. The cons include a multistep process for posting a document to a document library and getting it approved so that other users can view or edit it.
Figure 20.15 shows the Versioning Settings page for a sample document library. It has been configured to require content approval for submitted items and has been configured to create major and minor versions. A limit has been set for how many major versions are retained and the number of major versions for which draft versions are kept. Only users who can approve items and the author of an item can see draft items. While not shown in Figure 20.15, at the bottom of the screen is the Require Documents Be Checked Out Before They Can Be Edited option, which is set to No in this example.

Assuming a library is configured in this fashion, the process of uploading a document to the library and it being approved is as follows:
1. A user (Guy in this example) uploads a document to the library.
2. The document is saved, but in draft status (version 0.1), and no one but users of the site with Approve Items privileges and the author (Guy) can see the document.
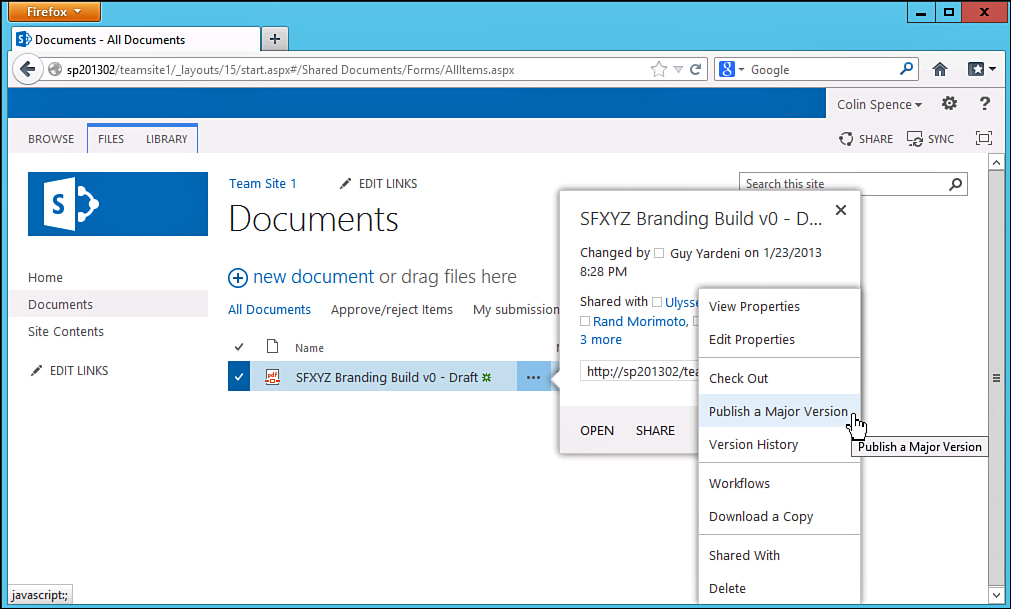
3. The document library administrator (Colin in this example) reviews the document, believes the document is ready for others to see it, and decides to “publish” the document, which will create a major version (version 1.0). So, Colin clicks the ellipsis next to the document title, which brings up the document menu; once again he clicks the ellipsis to bring up additional tools, as shown in Figure 20.16, and then clicks Publish a Major Version. Note that the Publish button on the Files tab of the ribbon could also be used.
4. Colin can enter comments if desired, and then clicks OK. This sets in motion the approval workflow. The approval status of the document is now set to Pending, so Guy can see that the workflow is in motion.
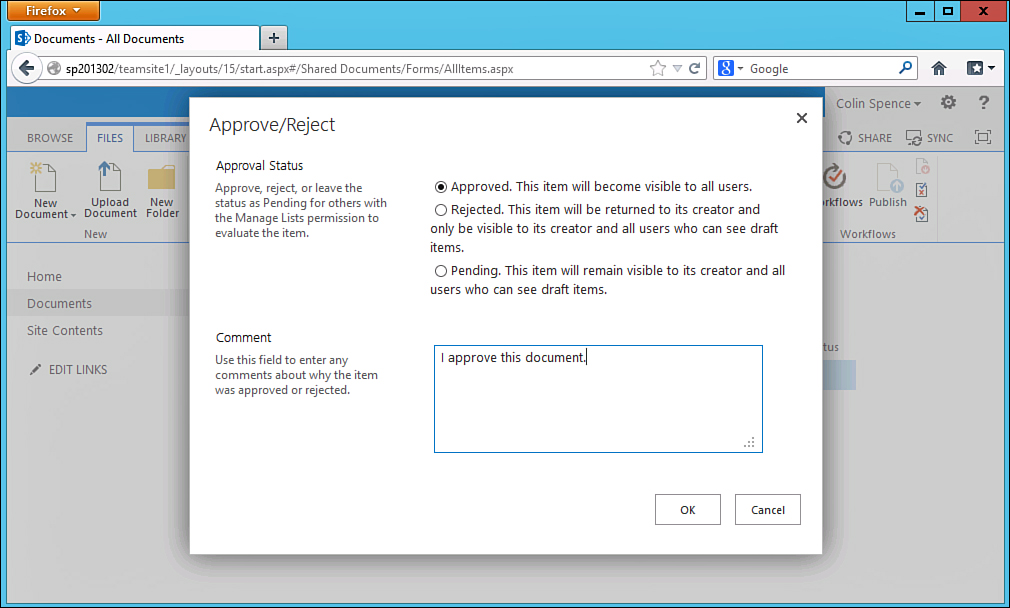
5. Colin (or another library administrator with Approve Items permissions) can now approve the document in one of two ways: by selecting the document and accessing the document menu and then the Approve/Reject tool, or by selecting the document and clicking the Approve/Reject button on the Files tab on the ribbon. Either of these methods opens the Approve/Reject window shown in Figure 20.17. In this example, the document is approved, a brief comment is added, and the OK button is clicked.
Another option is available from the Library tab under the Current View drop-down menu: the Approve/Reject Items view. This is a helpful view for libraries with large numbers of files because the approver doesn’t need to scan down long lists of files to see what is pending approval; instead, he sees only the items pending approval in this view.
6. Guy can now can see that the approval status of the document is set to Approved; and after checking version history for the document, he sees that there is now only one version, version 1.0, because the version number was incremented at the approval stage.
Returning to the concept of planning lists and libraries, Table 20.2 provides some guidelines for when to use versioning, page approval, and content approval features. A recommendation that can be seen in this table is to enable only major versioning in environments where “basic collaboration” is required and where the users are new to SharePoint. This is a generalization, but after testing the different configuration options, most organizations realize that the process can easily become overly complex and frustrating for users who only need basic collaboration (“someplace to store my files other than the file share”) and haven’t used SharePoint or another document management or ECM system.

TABLE 20.2 Guidelines for Using Versioning, Page Approval Workflows, and Content Approval in Document Libraries
Advanced Settings
The Advanced Settings link on the document library Settings page reveals additional tools of interest to the architect or administrator. In fact, these settings are so fundamental to the overall functionality of the document library that time should be spent during the design and testing phases reviewing these options and the pros and cons for the organization.
For example, the decision of whether to allow management of content types can have wide-reaching impact on the complexity of the environment and the amount of training required for users and administrators of the libraries. The ability to edit the template used by the document library may lead the architects to choose to create document libraries dedicated to the management of a single type of document (for example, resumes) and configure the template accordingly. In addition, the architects may decide that content from certain document libraries should not be able to be synced to Outlook clients or to the SharePoint Workspace product. All these settings are accessed via the Advanced Settings link:
![]() Allow Management of Content Types: The options are Yes or No. Content types can be an extremely powerful tool for more sophisticated document management in organizations that have invested time in creating a taxonomy for managing resources in SharePoint. Content types are discussed more in Chapter 22, “Managing Metadata and Content Types in SharePoint 2013.”
Allow Management of Content Types: The options are Yes or No. Content types can be an extremely powerful tool for more sophisticated document management in organizations that have invested time in creating a taxonomy for managing resources in SharePoint. Content types are discussed more in Chapter 22, “Managing Metadata and Content Types in SharePoint 2013.”
![]() Provide a Template URL: This option is grayed out if Allow Management of Content Types is set to Yes, because, in that case, the templates are managed with each content type. If content types are not enabled for the library, the administrator can click the Edit Template link to open the document in the appropriate application (such as Word) and then edit the template. This is an easy way for the library administrator to customize the template document for the library and is most useful if the document library has been created for a specific purpose, such as containing a specific type of document (for example, proposals, resumes, diagrams, spreadsheets, or other standard Microsoft document types).
Provide a Template URL: This option is grayed out if Allow Management of Content Types is set to Yes, because, in that case, the templates are managed with each content type. If content types are not enabled for the library, the administrator can click the Edit Template link to open the document in the appropriate application (such as Word) and then edit the template. This is an easy way for the library administrator to customize the template document for the library and is most useful if the document library has been created for a specific purpose, such as containing a specific type of document (for example, proposals, resumes, diagrams, spreadsheets, or other standard Microsoft document types).
Note
Although it appears that the URL of “any” document stored in a SharePoint document library can be entered in the Provide a Template URL field, the template must actually exist in the Forms directory of the document library. This is accessible by using the Edit Template link on the Advanced Settings page below the URL field. If a different URL is provided, an Invalid Template URL error is given when the administrator tries to save the configuration.
![]() Opening Documents in the Browser: The options are to Open in the Client Application, Open in the Browser, or Use the Server Default (Open in the Browser). For the document to open in the browser, SharePoint 2013 must be configured to use Office Web Apps Server.
Opening Documents in the Browser: The options are to Open in the Client Application, Open in the Browser, or Use the Server Default (Open in the Browser). For the document to open in the browser, SharePoint 2013 must be configured to use Office Web Apps Server.
![]() Define a Custom Send to Destination: This location is visible if a user selects a document and then clicks the Send To icon in the Files tab of the ribbon along with the options Other Location or Create Document Workspace. By inputting a URL of a different document library, the library administrator makes it easy for users to send documents to a specific location. When used, this tool can also prompt the author to send out updates when the document is checked in and to create an alert on the source document. So, SharePoint can actively create “safeguards” to help avoid situations where the source document changes and the copy is not updated. In addition, when the properties of the copy of the document are viewed, a note is shown that states, “This item is a copy of http://(url of source document)” and provides links to Go To Source Item or Unlink. Figure 20.18 shows an example of this Properties page.
Define a Custom Send to Destination: This location is visible if a user selects a document and then clicks the Send To icon in the Files tab of the ribbon along with the options Other Location or Create Document Workspace. By inputting a URL of a different document library, the library administrator makes it easy for users to send documents to a specific location. When used, this tool can also prompt the author to send out updates when the document is checked in and to create an alert on the source document. So, SharePoint can actively create “safeguards” to help avoid situations where the source document changes and the copy is not updated. In addition, when the properties of the copy of the document are viewed, a note is shown that states, “This item is a copy of http://(url of source document)” and provides links to Go To Source Item or Unlink. Figure 20.18 shows an example of this Properties page.

![]() Make New Folder Command Available: The library administrator should decide whether to allow the use of folders within the document library, a topic discussed in detail in Chapter 19, in the “Pros and Cons of the New Folder Tool” section.
Make New Folder Command Available: The library administrator should decide whether to allow the use of folders within the document library, a topic discussed in detail in Chapter 19, in the “Pros and Cons of the New Folder Tool” section.
![]() Allow Items from This Document Library to Appear in Search Results: Bearing in mind that all SharePoint search results are security trimmed (that is, only users with permissions to at least view the document see its contents appear in searches), in some rare situations, the contents of a document library should not appear in search results. For example, a document library might be created for brainstorming; the contents of that document library should be moved to another document library (possibly by using a custom Send To destination) before being available via the search tool. This helps ensure that the results of searches are as relevant as possible.
Allow Items from This Document Library to Appear in Search Results: Bearing in mind that all SharePoint search results are security trimmed (that is, only users with permissions to at least view the document see its contents appear in searches), in some rare situations, the contents of a document library should not appear in search results. For example, a document library might be created for brainstorming; the contents of that document library should be moved to another document library (possibly by using a custom Send To destination) before being available via the search tool. This helps ensure that the results of searches are as relevant as possible.
![]() Re-Index Document Library: This ensures that all the content of the document library is fully re-indexed during the next crawl. A site administrator might use this tool if documents in the library don’t appear in search results as expected or if a number of documents have just been deleted and the administrator wants to make sure that the search index is fully updated.
Re-Index Document Library: This ensures that all the content of the document library is fully re-indexed during the next crawl. A site administrator might use this tool if documents in the library don’t appear in search results as expected or if a number of documents have just been deleted and the administrator wants to make sure that the search index is fully updated.
![]() Offline Client Availability: This applies both to using SkyDrive Pro and syncing with the Outlook client. If this option is enabled, users receive errors if they try and synchronize to Outlook or use SharePoint Workspace to sync content. The error messages are very clear. For example, the error from Skydrive Pro states, “We ran into problems syncing,” and the error details state, “This library isn’t available offline.”
Offline Client Availability: This applies both to using SkyDrive Pro and syncing with the Outlook client. If this option is enabled, users receive errors if they try and synchronize to Outlook or use SharePoint Workspace to sync content. The error messages are very clear. For example, the error from Skydrive Pro states, “We ran into problems syncing,” and the error details state, “This library isn’t available offline.”
![]() Site Assets Library: If Yes is checked, this library is presented as the default location in the drop-down list for storing images or other files that users upload to their wiki pages. This does not convert the library into an assets library, nor does it add any content types to the library.
Site Assets Library: If Yes is checked, this library is presented as the default location in the drop-down list for storing images or other files that users upload to their wiki pages. This does not convert the library into an assets library, nor does it add any content types to the library.
![]() Quick Edit: The Quick Edit view allows users to access the document library in a grid view where certain metadata values can quickly be edited without having to access the properties for the document. In addition, new columns can be added from this view. If enabled, this can greatly enhance the speed with which document metadata is added and can encourage the use of metadata.
Quick Edit: The Quick Edit view allows users to access the document library in a grid view where certain metadata values can quickly be edited without having to access the properties for the document. In addition, new columns can be added from this view. If enabled, this can greatly enhance the speed with which document metadata is added and can encourage the use of metadata.
Warning
Exercise caution when using the Quick Edit view. It is relatively easy to perform large-scale edits by accident that cannot be undone with the click of a button. For example, the Name field can be selected for one document and then dragged to encompass a dozen or more, which results in the names changing for each document. There is no “undo” button after the changes are made, so many organizations shy away from allowing users to use the Quick Edit view (or enable it only during initial uploads).
![]() Dialogs: Setting this to No causes the whole page to change instead of the floating form to load. For example, if this is set to No, when a user clicks Edit Properties, the whole page changes to the editform.aspx page, rather than the floating form loading and the background dimming. This is essentially a stylistic decision, or a choice that is made if devices connecting to the SharePoint site have issues displaying the floating forms.
Dialogs: Setting this to No causes the whole page to change instead of the floating form to load. For example, if this is set to No, when a user clicks Edit Properties, the whole page changes to the editform.aspx page, rather than the floating form loading and the background dimming. This is essentially a stylistic decision, or a choice that is made if devices connecting to the SharePoint site have issues displaying the floating forms.
Validation Settings
If this link is clicked on the document library Settings page, the library administrator is taken to the Validation Settings page, as shown in Figure 20.19, where she can specify a formula to validate the data when new items are saved to the list or are edited. User message text can be entered, as well, so the end user is informed of the criteria that was not met successfully. In this example, the formula is as follows:
=Phase<10

This translates as follows: The value entered in the Phase column must be less than 10 to provide a value of True. Additional information on proper formula syntax can be accessed by clicking the Learn More About Proper Syntax for Formulas link.
If the results of the equation entered do not equal a value of True, the user sees the User Message entered in the Validation Settings page, so it is important that the message be informative and help users avoid data entry errors.
Manage Item Scheduling
This feature on the Document Library Settings page is seen only in document libraries on publishing-enabled sites and is not available in SharePoint Foundation 2013. The tool is available only if the list or library has major and minor versioning enabled and content approval enabled. Assuming that the library meets these criteria, you can enable the Enable Item Scheduling option from the Manage Item Scheduling page. When enabled, any items that have content types that include start and end dates can be scheduled for publication.
Figure 20.20 shows the Properties window for a document that has just been uploaded to a document library that meets the criteria for scheduling. The content type of Page is selected, which includes a Scheduling Start Date and Scheduling End Date, as shown in Figure 20.20.

Because content approval needs to be enabled, the document would need to be published to a major version and then approved by a user with Approve Items permissions in the library. Then, when the scheduling start date and time is reached, the item is available for users who could not see the draft version of the document; they can then see it and interact with it as their permissions allow.
Item scheduling is a fairly specialized tool, and because it has several dependencies that need to be configured for it to be available, as mentioned in this section, it is usually enabled only when a specific need exists to limit the time frame during which the item is available.
Column Default Value Settings
Not available in SharePoint Foundation 2013, this tool allows the library administrator to set a default value for columns in the library. This feature is covered in more detail in Chapter 22. From a list or library design standpoint, it is important to know that by using the Column Default Value Settings link from the Document Library Settings page, the administrator can set values based on folders, which can be a much more powerful and useful ability than setting default values on a column basis.
Metadata Navigation
Metadata navigation is a powerful tool available in SharePoint Server 2013 Standard or Enterprise but not in SharePoint Foundation 2013 (assuming Metadata Navigation and Filtering is enabled as a site feature) and involves the configuration of hierarchy fields, key filters, and the management of column indexes. Essentially, the Navigation Hierarchy fields allow a user to click in a tree structure to view the content contained in folders or that meet the field criteria (such as using a specific content type). The Key Filter fields allow the user to also filter the results based on specific criteria, such as modified by a certain user. Chapter 22 covers this topic in more depth.
Rating Settings
This page allows the library administrator to decide whether items in the list or library can be rated. If Allow Items in This List to Be Rated? is set to Yes, users with Read permission level or higher can provide ratings in a list or library. Two different types of ratings can be selected: Likes or Star Ratings.
If either type of ratings is enabled for a list or library, three fields are added to the list: Rating (0-5), Number of Ratings, and Number of Likes. Enabling Likes simply adds a column to the default view titled Number of Likes, and users can click the word Like. If Star Ratings are selected, a Rating (0-5) column is added to the default view, with star images in that column. Users then click one of the stars to indicate their rating, and the system averages out the ratings.
Ratings is a powerful tool that encourages users to rate documents or list items on a scale of 0 to 5. Although it is impossible to enforce “responsible” use of ratings, users should be informed that SharePoint does track who rates documents how, and other users can, in fact, see what ratings a specific user applies from a My Site site from the My Newsfeed tab. So if, for example, a user chooses to rate everything as a 1, other users will see this and possibly apply social pressure on the user to be more constructive in his ratings. If enough users apply ratings, the number of ratings will make the frivolous ratings less significant through the power of averages.
The use of ratings from My Site is covered in Chapter 23, “Leveraging Social Networking Tools in SharePoint 2013.”
Audience Targeting
Audience targeting can be enabled for lists and libraries by clicking this link and then clicking the Enable Audience Targeting check box. Audiences are compiled based on settings configured from Central Administration. This topic is covered in Chapter 21, “Designing and Managing Pages and Sites for Knowledge Workers,” because the audience targeting process happens when web parts are configured on a SharePoint page to use audience targeting to filter the content that is displayed.
It is important for a list and library administrator to understand the topic and decide whether it should be enabled for some or all libraries/lists, because this is another metadata item that end users or list administrators need to configure to ensure that members of a specific audience are in fact seeing all the documents that should be targeted to them.
Per-Location View Settings
Per-Location View Settings are available for SharePoint Server 2013 Standard and Enterprise sites when the Metadata Navigation and Filtering site feature is enabled. Views are a fundamental tool for the list or library administrator to make the end-user experience with the list or library a productive one. SharePoint 2013 allows the list or library administrator to determine which views are available from within folders in the list or library though per-location view settings.
This is a fairly advanced tool set not often used; it can, however, be useful for libraries where there are multiple views and folders, and metadata is used to manage files in the document library because it controls which views are available to end users who navigate to the folders or use the Metadata Navigation tool.
Form Settings
SharePoint 2013 does not allow the use of this tool for all lists and libraries, and clicking the Form Settings link may simply display a message that states, “InfoPath does not support customizing the form used for this list.” But if the forms are supported, the administrator can open the form in InfoPath 2013 and then edit the form to her heart’s content.
This section provides an example of creating a simple modification to the form in InfoPath that should impress site administrators with the power suddenly placed in their hands by InfoPath via this tool. A good example to use is the standard Announcements list. Follow these steps to edit the form used in an Announcements list (InfoPath Designer 2013 must be installed on the computer in use):
1. Navigate to an Announcements list, click the List tab on the ribbon, and click List Settings.
2. Click Form Settings in the General Settings column.
3. The Form Settings page should display, and the circle next to Customize the Current Form Using Microsoft InfoPath should be checked. Make sure that the circle is checked and click OK.
4. A message might display that asks whether you want to allow this website to open a program on your computer. If so, click Allow.
5. InfoPath 2013 opens and displays the form.
6. Click the Expires field, also shown in Figure 20.21, and then click Add Rule from the Home tab.
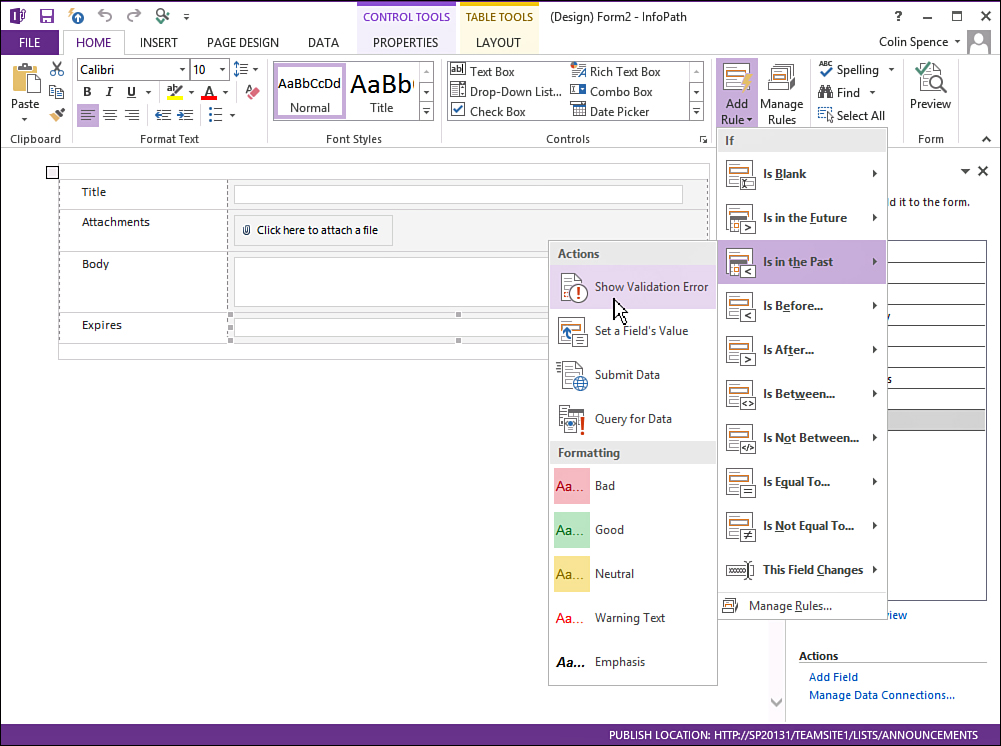
7. Select Is in the Past, and then Show Validation Error from the Actions submenu, as shown in Figure 20.21. Note that in an unaltered Announcements list, a user can actually enter an expiration date in the past, as illogical as that sounds.
8. Review the results in the Rules menu on the right side of the screen. Notice that a screen tip is automatically populated: Enter today’s date or a date in the future. You can modify this if desired.
9. Click the File tab, then click the Publish link, and then click the tile for SharePoint List to publish the updated form to the SharePoint 2013 Announcements list.
10. A message should appear stating, “Your form was published successfully.”
11. Navigate to the SharePoint 2013 Announcements list and click Add New Announcement. Enter a new announcement with a date that is in the past; when you enter that date, the error message as shown in InfoPath should display.
This simple example just scratches the surface of the power of InfoPath in the hands of experienced list and library administrators, who can easily customize the form used to add a new list item or edit a list item in a few minutes.
Permissions and Management Tools for Lists and Libraries
The Permissions and Management column on the document library Settings page provides even more tools that the list or library administrator must be familiar with. Because a number of them are covered in other chapters, this section covers just a subset of these tools.
As mentioned earlier in the “Document Library Settings Tools Reviewed” section, the tools provided to list and library administrators vary based on which version of SharePoint is being used. This section now delves into the different standard tools in the Permissions and Management Tools section of the document library Settings page.
Delete This Document Library
Every once in a while, the site administrator may need to delete a document library, and the tool executes as soon as the Delete This Document Library link is clicked. The administrator sees a message that states, “This document library will be removed and all its files will be deleted. Are you sure you want to send this document library to the site Recycle Bin?” If the administrator clicks OK, the document library and all its content are moved to the site Recycle Bin. The End User Recycle Bin now lists the document library. If deleted from the End User Recycle Bin, it is listed in the site collection Recycle Bin, so a site collection administrator can still restore it. If deleted from the Site Collection Recycle Bin, it is permanently deleted and needs to be recovered from other backups of the site collection.
Save Document Library as Template
Most organizations will customize a selection of lists and libraries and then use them as templates. This section provides an example of creating a List template from a document library and some tips pertaining to the use of these templates (as well as some of the limitations). Although these templates can be very useful, a site administrator should test them thoroughly to become familiar with the upsides as well as the downsides of using them, and might want to focus instead on using site templates for reasons provided next.
To create a List template, follow these steps:
1. From the document library Settings page for the library, click the Save Document Library as Template link.
Note
If there is no Save Document Library as Template link, chances are the site has SharePoint Server Publishing enabled, which removes this option.
2. Enter a filename (for example, DocLibTemplate01) and a template name (which can be the same as the filename). Leave the Save Content box unchecked. Click OK.
3. The Operation Completed Successfully message appears, mentioning that the template has successfully been saved to the List Template gallery. Click the List Template Gallery link visible in the body of the message; the List Template gallery for the site collection opens.
The templates are stored in the List Template gallery, accessible via the Site Settings page for the site by clicking List Templates in the Web Designer Galleries section. After a List template has been saved, it is available from the Add an App Page under Apps You Can Add.
The following list provides some tips for effectively using it:
![]() Create a site that contains the template lists and libraries so that they can be edited now and at later dates, and then save to the List Template gallery. Do not use this site for production purposes (for example, storing “live” files or list data) because it will be modified in the future and new templates created from it, possibly site templates as well.
Create a site that contains the template lists and libraries so that they can be edited now and at later dates, and then save to the List Template gallery. Do not use this site for production purposes (for example, storing “live” files or list data) because it will be modified in the future and new templates created from it, possibly site templates as well.
![]() Create a logical naming scheme for the List templates that includes an identifier, such as the date it was created. For example, a name such as ProjectDocLib130126 is more useful than DocLibrary01 because it describes the type of library (a project library) and contains the date when it was created, which will be visible when creating new libraries from it.
Create a logical naming scheme for the List templates that includes an identifier, such as the date it was created. For example, a name such as ProjectDocLib130126 is more useful than DocLibrary01 because it describes the type of library (a project library) and contains the date when it was created, which will be visible when creating new libraries from it.
![]() Although the option is given to include content when creating a template, there is a fairly small size limit of 50MB. Therefore, this is not a very powerful backup and restore tool for document libraries because most document libraries quickly exceed this limit; it could be useful for lists, though.
Although the option is given to include content when creating a template, there is a fairly small size limit of 50MB. Therefore, this is not a very powerful backup and restore tool for document libraries because most document libraries quickly exceed this limit; it could be useful for lists, though.
![]() List templates are shared only within a site collection. List templates can be saved locally from one List Template gallery and then uploaded to other List Template galleries for other site collections.
List templates are shared only within a site collection. List templates can be saved locally from one List Template gallery and then uploaded to other List Template galleries for other site collections.
![]() Changes to the List template do not affect lists previously created with the List template. So, for example, if five lists have been created using AnnouncementsTemplate121212, each one must be visited separately to replicate the changes.
Changes to the List template do not affect lists previously created with the List template. So, for example, if five lists have been created using AnnouncementsTemplate121212, each one must be visited separately to replicate the changes.
![]() When the List template is used to create a list at a later date, consider putting the name of the template used in the Description field of the list. This makes it easier to tell which template was used to create which list at a later date.
When the List template is used to create a list at a later date, consider putting the name of the template used in the Description field of the list. This makes it easier to tell which template was used to create which list at a later date.
![]() If too many List templates are created, the Add an App page can become cluttered and confusing. Consider creating Site templates rather than List templates for this reason.
If too many List templates are created, the Add an App page can become cluttered and confusing. Consider creating Site templates rather than List templates for this reason.
Armed with the preceding information, the site administrator should experiment with using List templates and determine whether they provide value for the organization or whether creating these templates clutters up the list creation options and will be confusing and whether site templates, each with customized lists, make more sense for the organization.
Permissions for This Document Library
Site administrators should be aware that list permissions can be customized and be familiar with the process. However, they should also be aware that lists and libraries with customized or “unique” permissions can be difficult to manage and that records should be kept of any changes made. No “magic” report lists all unique permissions used within a site collection or site, so a general best practice is to avoid customizing permissions for lists and libraries unless absolutely necessary.
Tip
Instead of customizing permissions on a list or library basis, consider creating a subsite with the revised permissions for that site—for example, a site (http://intranet/SiteA) is currently accessible to “everyone” (for example, Company123domain users have read access to it) in the organization. The site administrator wants to have a few libraries and lists that are only accessible to a select group (for example, Company123IT). Instead of modifying the permissions on those lists and libraries, he creates a subsite that houses those lists and libraries (http://intranet/SiteA/SiteAPrivate) and stops inheriting permissions for the site, and then removes Company123domain users from access to that site, and gives Company123IT users contribute permissions. Although this might seem like overkill initially, users can be easily taught that the subsite (SiteAPrivate) is where they upload documents that are for more restricted use, while the parent site (SiteA) is where documents that are available for anyone with a domain account to read. And the administrator now doesn’t need to customize permissions for any lists or libraries on either site!
Follow these steps to customize permissions for a document library:
1. For the document library, access the Library tab and click Library Settings, and then click Permissions for This Document Library.
2. Notice whether this note appears: “This library inherits permissions from its parent.” If this message appears under the ribbon, any changes to the parent will affect this document library. To change the permissions, click Stop Inheriting Permissions on the Edit tab of the ribbon.
3. A warning appears: “You are about to create unique permissions for this document library. Changes made to the parent site permissions will no longer affect this document library.” Click OK. The notice now reads: “This library has unique permissions.”
4. Now the user permissions can be edited. In general, it is a good idea to add the new permissions first and then remove the old permissions, to avoid excluding your own account from the list.
5. To add permissions for a group, user, or several users, click the Grant Permission link. Enter one or click the Show Options link to reveal the different permission levels available, as shown in Figure 20.22. By default, these are Full Control, Design, Edit, Contribute, Read, and View Only.

6. To remove or change user permissions, check the boxes next to the individual users or groups that are to be removed or modified. Then click Remove User Permissions or Edit User Permissions as appropriate, and repeat until the desired result is achieved.
7. Before exiting, click the Check Permissions icon and enter one or more individuals’ names, and then click the Check Now button to see what permissions, if any, the users or groups have after the changes made in previous steps.
8. Finally, you can click Inherit Permissions icon to overwrite your changes with the permissions assigned at the parent site level. This is basically a “get out of jail free” tool that you can use to undo undesirable changes.
Manage Files Which Have No Checked In Version
Rarely will a file have no checked-in version, but the Manage Files Which Have No Checked In Version tool on the document library Settings page does come in handy in certain situations. This tool is not helpful if a user simply checks out a file and then forgets to check it back in, because there will be a checked-in version that exists before the file is checked out.
Where this tool is handy is when documents are uploaded to the document library but required metadata is not entered. This can happen when the Open with Explorer button on the Library tab of the ribbon is used and multiple documents are pasted into the document library; it can also happen when the Upload Multiple Documents tool is used from the Documents tab. Because many end users want to save time, it can occur that the uploaded files will end up in a checked-out status, and the list administrator will need to access this link and add the required metadata to the items and then check them in.
Workflow Settings
This page allows the administrator to see the number of workflows in progress for the list or library, or entities in the list or library, and to add or remove workflows if needed. Workflow associations can be listed for the following:
![]() This List
This List
![]() Document
Document
![]() Folder
Folder
![]() Basic Page
Basic Page
![]() Document Set
Document Set
The Three-State Workflow is the only Workflow template provided in SharePoint Foundation 2013 by default; others are available in SharePoint Server 2013. In SharePoint Server 2013 Standard and Enterprise, additional workflows can be provisioned (assuming the Workflow Site Collection feature is enabled) as follows:
![]() Approval – SharePoint 2010
Approval – SharePoint 2010
![]() Collect Feedback – SharePoint 2010
Collect Feedback – SharePoint 2010
![]() Collect Signatures – SharePoint 2010
Collect Signatures – SharePoint 2010
![]() Disposition Approval
Disposition Approval
![]() Three-State
Three-State
Note
None of these default workflows appear to be SharePoint 2013 workflows, and that is in fact the case. To create true SharePoint 2013 workflows, the Azure components need to be installed and configured. The article “How To: Set Up and Configure SharePoint 2013 Workflows” (http://msdn.microsoft.com/en-us/library/jj163276(v=office.15).aspx) provides an overview of this process. This enables SharePoint 2013 workflows in SharePoint Designer 2013. Otherwise, SharePoint Designer 2013 is limited to SharePoint 2010-based workflows.
Workflows are examined in more detail in Chapter 28.
Additional Permissions and Management Tools
The several other tools in the Permissions and Management section on the document library Settings page are covered in other chapters. The site administrator should be familiar with these tools, too. These tools are also relevant to the topics of metadata and governance and so are covered in those chapters, as follows:
![]() Information Management Policy Settings are covered in Chapter 24, “Governing the SharePoint 2013 Ecosystem.”
Information Management Policy Settings are covered in Chapter 24, “Governing the SharePoint 2013 Ecosystem.”
![]() Enterprise Metadata and Keywords Settings is covered in Chapter 22.
Enterprise Metadata and Keywords Settings is covered in Chapter 22.
![]() Generate File Plan Report is covered in Chapter 24.
Generate File Plan Report is covered in Chapter 24.
![]() Record Declaration Settings is covered in Chapter 24.
Record Declaration Settings is covered in Chapter 24.
Document Sets Compared to Folders as Organizational Tools in Document Libraries
Document sets are a powerful tool that can be enabled for site collections that allow users to keep related documents together as a “set” to facilitate collaboration on the documents. When a user clicks a document set, all the files stored in the document set are visible. In this way, document sets are similar to folders, but as explained in this section, they have a variety of differences that are important to understand from an administrative standpoint. From a high level, folders are simpler to enable and are more limited in functionality and so make a better choice for less-advanced users or simpler collaboration requirements. But when the advantages of document sets are understood, many organizations will benefit from their capabilities.
Document sets are designed specifically to help users organize groups of files as a unit and give some special tools to users to facilitate the management of the group of documents as a whole, such as the ability to assign metadata to a document set, start a workflow on a document set, and capture a version of the entire set of documents. Following are some key technical details of document sets:
![]() Document sets are not available in SharePoint Foundation 2013.
Document sets are not available in SharePoint Foundation 2013.
![]() Document sets are available in SharePoint Server 2013 Standard and Enterprise Editions.
Document sets are available in SharePoint Server 2013 Standard and Enterprise Editions.
![]() A document set is a content type, with Document Collection Folder as the parent, and uses the Name column from the Folder content type and title from the Item content type.
A document set is a content type, with Document Collection Folder as the parent, and uses the Name column from the Folder content type and title from the Item content type.
![]() There is no hard limit on the number of documents that can exist in a document set.
There is no hard limit on the number of documents that can exist in a document set.
![]() Permissions changes to a document set do affect all items within the document set.
Permissions changes to a document set do affect all items within the document set.
![]() An alert set on a document set applies to contents of the document set.
An alert set on a document set applies to contents of the document set.
![]() Deleting a document set sends the document set and all members of the document set to the Recycle Bin.
Deleting a document set sends the document set and all members of the document set to the Recycle Bin.
![]() If the Send To feature is used with a document set, the sum for all documents in a document set cannot be larger than 50MB.
If the Send To feature is used with a document set, the sum for all documents in a document set cannot be larger than 50MB.
![]() Metadata assigned to the document set is not automatically assigned to members of the document set.
Metadata assigned to the document set is not automatically assigned to members of the document set.
Document sets can have the Capture Version tool run to create a version of the document set, which includes the latest major or major and minor versions of documents contained within the document set. This adds another level of granularity to versioning: Not only can individual documents be versioned but also whole sets of documents, to “snapshot” the document set at a point in time.
Document sets do require some additional configuration to be available to end users, because they need to be enabled from the site collection features, which is explained later in the chapter. The document set content type then needs to be added to the document library before it can be used. Folders, however, can easily be configured from the list or library Settings page (by clicking the Advanced Settings link) to either be available or not available for a document library. Document sets can have metadata associated with the document set itself, which is different from folders, which cannot have metadata manually assigned to them. Keep in mind several other notable differences when determining whether the organization should use them:
![]() Document sets are not available in SharePoint Foundation 2013; folders are available.
Document sets are not available in SharePoint Foundation 2013; folders are available.
![]() Document sets can be created only in document libraries; folders can be created in either libraries or lists.
Document sets can be created only in document libraries; folders can be created in either libraries or lists.
![]() Folders are not allowed within document sets.
Folders are not allowed within document sets.
![]() Document sets cannot be nested; folders can be nested.
Document sets cannot be nested; folders can be nested.
![]() Metadata can be assigned to document sets but not to folders.
Metadata can be assigned to document sets but not to folders.
![]() Workflows can be started on document sets but not on folders.
Workflows can be started on document sets but not on folders.
Tip
If a view is configured to Show All Items Without Folders, the items in a document set will be visible, just as items within a folder will be visible. Unique permissions will still be honored in both scenarios, so administrators don’t need to worry about users seeing documents they shouldn’t see.
Enabling Document Sets from Site Collection Features
To enable the Document Sets feature for a document library, first ensure that the feature is active for the site collection, and then add the content type to the document library by following the steps in this section. First, enable the site collection feature by following these steps:
1. Access the Site Settings page for the site collection. Under the Site Collection Administration section, click Site Collection Features.
2. On the Site Collection Features page, click Activate for Document Sets if it is not already set to Active. The Document Set content type now appears in the Content Type gallery for the site collection.
To add the content type to the document library, follow these steps:
1. Navigate to the document library that has the Document Set content type added; in this example, the document library is named Shared Documents. Click the Library tab on the ribbon, and then click Library Settings.
2. Click Advanced Settings in the General Settings section.
3. In the Content Types section, under Allow Management of Content Types, click the circle next to Yes if it is not already selected.
4. Scroll to the bottom of the page and click OK to save the change and return to the Document Library Settings page.
5. Scroll down to the Content Types section, which might not have been visible before. Click Add from Existing Site Content Types.
6. From the Add Content Types page, access the drop-down menu under Select Site Content Types From and choose Document Set Content Types. Click Document Set in the Available Site Content Types box, and then click the Add button, as shown in Figure 20.23, and then click OK.

7. Click the document library name in the breadcrumb from Document Library Settings to return to the document library.
Now, to create a document set, follow these steps:
1. Click the Files tab on the ribbon and access the drop-down menu for New Document; there should now be an entry for Document Set. Click Document Set.
2. Enter a name for the document set, such as Phase 1 Document Set, and click OK. The document set is now created and appears in the default view. There are no documents within this document set yet.
3. Locate the document set you have just created and click it.
4. From this page, you can then add documents by using the New Document link, Upload Document tool from the Files tab, or drag and drop from Windows Explorer. After a few documents have been uploaded, the results will look similar to Figure 20.24. (Library columns will vary depending on how the library has been configured.) Note that in Figure 20.24, the Manage tab is open; that tab provides tools specifically for managing document sets, including the Capture Version tool.
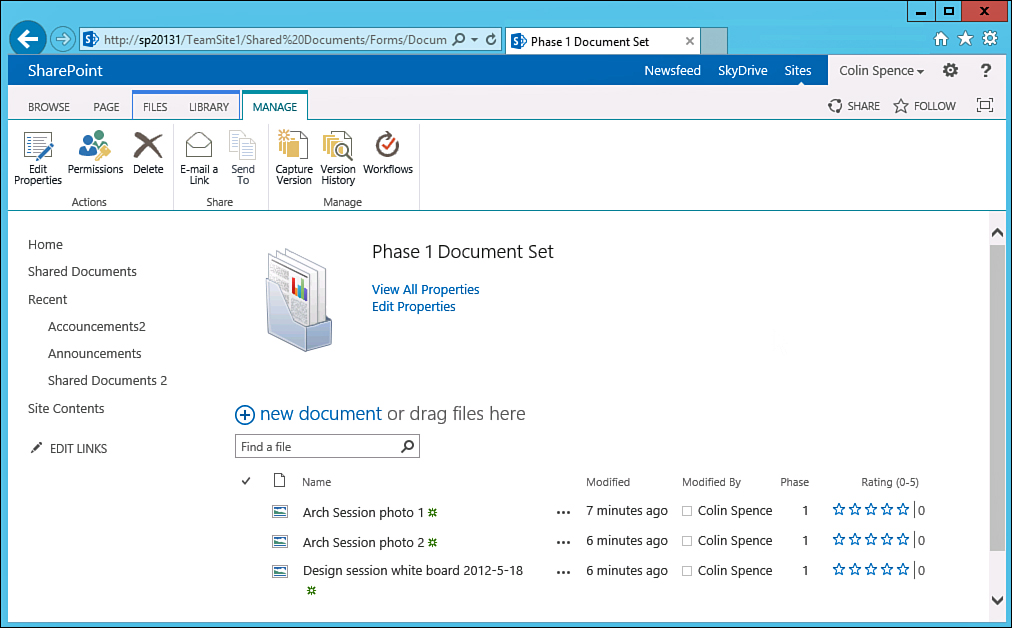
Content Organizer as a Document Routing Tool
The Content Organizer is a feature in SharePoint Server 2013 Standard or Enterprise that allows content uploaded to the Drop Off library to be routed to other libraries based on the Content Organizer rules that have been created. This is an important tool to be familiar with in the context of list and library design because it can automate the task of moving content to a specific library, which affects the overall management of content.
To create a Content Organizer rule, follow these steps in SharePoint Server 2013 Standard or Enterprise. To enable or confirm that the Content Organizer feature is on and to configure the Content Organizer settings, follow these steps:
1. Confirm that the Content Organizer feature is turned on for the site in question: Access the Site Settings page and, in the Site Actions section, click Manage Site Features.
2. Check the status of the Content Organizer feature. If it is not set to Active, click the Activate button. After it has activated, click Site Settings in the breadcrumb to return to the Site Settings page. Note that a Drop Off library is created as part of the feature activation process.
Note
Another option on the Manage Site Features page, under Content Organizer, is E-Mail Integration with Content Organizer. This adds another option to the Content Organizer Settings page, in the Submission Points section.
3. Click the Content Organizer Settings link in the Site Administration section of the Site Settings page.
4. The first option on this page in the Redirect Users to the Drop Off Library section is Require Users to Use the Organizer When Submitting New Content to Libraries with One or More Organizer Rules Pointing to Them. If this box is checked, users will see a notice in the upload window that states, “Documents uploaded here are automatically moved to the correct library and folder after document properties are collected.” Generally, this option should be enabled to ensure that the Content Organizer rules are applied to new content uploaded. Otherwise, users can bypass the rules by uploading to whichever library they choose (and thus ignoring the Drop Off library). For this example, check the Require Users to Use the Organizer check box.
5. In the Sending to Another Site section, the next decision to make is whether to check the box next to Allow Rules to Specify Another Site as a Target Location. Check this box if site quotas are in use and if IT expects the total amount of data uploaded to exceed this amount. In general, however, this complicates the management of content and can confuse end users, so leave it unchecked unless there are specific requirements for checking this box. Leave it unchecked in this example.
6. The Folder Partitioning section contains a Create Subfolders After a Target Location Has Too Many Items option, as shown in Figure 20.25. The administrator can specify the number of items allowed in a single folder and the format of the folder names that are created. Once again, it is up to IT to determine whether this is recommended as a best practice; there are pros and cons to the use of folders in SharePoint lists and libraries, but they can enhance performance when there are large numbers of items in the list or library. For this example, check the box and leave the defaults, which should be 2,500 for the number of items in a single folder and Submitted after %1 for the Format of Folder Name.

7. The Duplicate Submissions section has these options: Use SharePoint Versioning and Append Unique Characters to the End of Duplicate Filenames. In general, you should use SharePoint versioning because users will be familiar with its use. For this example, check the radio button next to Use SharePoint Versioning.
Note
If Use SharePoint Versioning is checked but the destination library does not have versioning enabled, the duplicate file or files will be appended with a string of six unique characters.
8. In the Preserving Context section, decide whether to Save the Original Audit Log and Properties of Submitted Content. For this example, check this box.
9. In the Rule Managers section, one or more users or groups who are tasked with managing the rules can be entered. These groups and/or individuals can be notified when content is left in the Drop Off Library, or when submissions do not match any rule. The default number of days to wait before sending an email is set to 3. Rule managers must have the Manage Web Site permission to access the Content Organizer Rules list from the Site Settings page.
10. The Submission Points section provides the URL to set up other sites or email messaging software to send content to this site.
11. After the settings are configured as desired, click OK to save the settings and return to the Site Settings page.
The next step in the process is to create an actual Content Organizer rule, as outlined here:
1. From the Site Settings page, in the Site Administration section, click Content Organizer Rules.
2. Click New Item to create a new rule.
3. In the Rule Name field, provide a name for the rule that will make sense to other content organizers. For this example, use the title Audio Routing Rule 1.
4. In the Rule Status and Priority section, select Active, and set the priority to 5 (Medium). A nice option here is to set the rule to Inactive, as opposed to having to delete the rule.
5. In the Submission’s Content Type section, choose from the content types available to the site, which by default are Business Intelligence, Digital Asset Content Types, Document Content Types, Document Set Content Types, Page Layout Content Types, Publishing Content Types, and Special Content Types. For this example, choose Digital Asset Content Types, and then select Audio from the Type drop-down box. Verify the box is unchecked next to This Content Type Has Alternate Names in Other Sites.
6. In the Conditions section, choose from the Property drop-down list, and then choose an operator. For this example, select Name as the property and Contains All Of as the operator and enter a value of Jazz.
7. In the Target Location section, the Browse button can be clicked and the administrator can select the destination library. In this example, the library Site Collection Documents is selected, and it is added to the Destination field.
Note
Note that the content type associated with the rule must be available at the target location. This means that the destination document library must have Allow Management of Content Types set to Yes and the content type in question (for example, Audio in this example) added to the Content Types section on the Document Library Settings page.
8. Click OK when the rule is completed.
9. To test that the Content Organizer is working, you can visit the Drop Off library and upload a document that matches the criteria just set for the rule. In this example, an MP3 file was uploaded with the term Jazz in the document name. After you upload the file, a message should appear, as shown in Figure 20.26, telling the end user that the document was submitted successfully and saved to its final location (and the URL is provided for that location). Click OK to close the message.

10. Visit the destination location and note that the file has been assigned to the Audio content type.
Summary
Lists and libraries will most likely be the repositories that end users work with most often on a day-to-day basis. Therefore, it is critical that administrators of all levels thoroughly understand the wide range of possibilities for configuring the options in lists and libraries. This chapter covered four general philosophies for customizing and managing lists and libraries in a SharePoint 2013 environment, as follows:
![]() Minimal planning and testing; minimal restrictions on list and library use and configuration
Minimal planning and testing; minimal restrictions on list and library use and configuration
![]() Minimal planning and testing; more restrictions on list and library use and configuration
Minimal planning and testing; more restrictions on list and library use and configuration
![]() More extensive planning and testing; minimal restrictions on list and library use and configuration
More extensive planning and testing; minimal restrictions on list and library use and configuration
![]() More extensive planning and testing; more restrictions on list and library use and configuration
More extensive planning and testing; more restrictions on list and library use and configuration
Regardless of which strategy the organization takes, site administrators need to be familiar with a wide range of tools to ensure that the adoption of SharePoint 2013 lists and libraries is successful and that they meet end-user needs. This chapter covered tools on the Library tab of the ribbon, as well as most of the tools available from the Document Library Settings page, and examined document sets and the Content Organizer tool to round out the coverage of tools that SharePoint 2013 list and library administrators should fully understand.
Best Practices
The following are best practices from this chapter:
![]() Versioning is one of the primary capabilities of a document management system, and should be used in most situations unless storage on the database server is limited.
Versioning is one of the primary capabilities of a document management system, and should be used in most situations unless storage on the database server is limited.
![]() Farm administrators and site architects should agree upon the right combination of content approval, versioning, draft item security, and other related tools when configuring standard collaboration sites.
Farm administrators and site architects should agree upon the right combination of content approval, versioning, draft item security, and other related tools when configuring standard collaboration sites.
![]() Review the features and tools available in different versions of SharePoint and decide which will have the most value for the organization.
Review the features and tools available in different versions of SharePoint and decide which will have the most value for the organization.
![]() Using SharePoint Designer 2013 to manage lists and libraries should be investigated as another means of managing lists and libraries. SharePoint Designer 2013 provides a powerful tool set and can be a time saver for experienced administrators, and provides access to tools not available in the SharePoint 2013 user interface, such as creating SharePoint Designer workflows, creating custom actions, and editing document templates.
Using SharePoint Designer 2013 to manage lists and libraries should be investigated as another means of managing lists and libraries. SharePoint Designer 2013 provides a powerful tool set and can be a time saver for experienced administrators, and provides access to tools not available in the SharePoint 2013 user interface, such as creating SharePoint Designer workflows, creating custom actions, and editing document templates.
![]() The Advanced Settings page accessible from the Document Library Settings page provides access to a number of key features that can be enabled, disabled, or configured for the library. A best practice is to review these options as a group during the design phase to see which will be enabled for different document libraries and for different levels of users. For example, content types can be turned on or off here, the document template can be edited, folders can be enabled or disabled, and offline client availability can be enabled or disabled, as can the Quick Edit feature.
The Advanced Settings page accessible from the Document Library Settings page provides access to a number of key features that can be enabled, disabled, or configured for the library. A best practice is to review these options as a group during the design phase to see which will be enabled for different document libraries and for different levels of users. For example, content types can be turned on or off here, the document template can be edited, folders can be enabled or disabled, and offline client availability can be enabled or disabled, as can the Quick Edit feature.
![]() Document sets offer a unique set of features that will be of interest to organizations with high-end collaboration needs and fairly sophisticated users. They differ from folders in a number of ways, as outlined in this chapter, which should be understood to help determine when folders are appropriate and when document sets are appropriate.
Document sets offer a unique set of features that will be of interest to organizations with high-end collaboration needs and fairly sophisticated users. They differ from folders in a number of ways, as outlined in this chapter, which should be understood to help determine when folders are appropriate and when document sets are appropriate.
![]() Enable the Content Organizer feature for a site collection in SharePoint Server 2013 Standard or Enterprise to allow you to then create rules that define where uploaded content is eventually stored when a user uploads a document to the Drop Off Library. The Content Organizer Rule Wizard is very sophisticated, allowing the site administrator to define with great specificity where documents assigned to different content types with attributes matching certain criteria are stored when uploaded to the Drop Off Folder.
Enable the Content Organizer feature for a site collection in SharePoint Server 2013 Standard or Enterprise to allow you to then create rules that define where uploaded content is eventually stored when a user uploads a document to the Drop Off Library. The Content Organizer Rule Wizard is very sophisticated, allowing the site administrator to define with great specificity where documents assigned to different content types with attributes matching certain criteria are stored when uploaded to the Drop Off Folder.