
Chapter 28. Out-of-the-Box Workflows and Designer 2013 Workflows
In This Chapter
![]() Defining Workflows in the Business Environment
Defining Workflows in the Business Environment
![]() Considering Alerts as Basic Workflows
Considering Alerts as Basic Workflows
![]() Reviewing the Workflow-Related Settings in Central Administration and Site Settings
Reviewing the Workflow-Related Settings in Central Administration and Site Settings
![]() Testing the Three-State Workflow
Testing the Three-State Workflow
![]() An Overview of Other Standard Workflows
An Overview of Other Standard Workflows
![]() Verifying the Web Application Settings for SharePoint Designer 2013 Use
Verifying the Web Application Settings for SharePoint Designer 2013 Use
![]() Downloading and Installing SharePoint Designer 2013
Downloading and Installing SharePoint Designer 2013
![]() Creating a Reusable Workflow from SharePoint Designer 2013
Creating a Reusable Workflow from SharePoint Designer 2013
SharePoint 2013 offers a variety of different types of workflows that can be used to enhance business processes and replace legacy business workflows that involve time-consuming manual processes and may not be well defined. This chapter provides information on a number of different workflows available in the SharePoint 2013 product line out-of-the-box. It is intended to whet the appetite of users and administrators alike to delve deeper into the out-of-the-box workflows as well as capabilities of SharePoint Designer 2013 to create powerful workflows to meet everyday user requirements.
Alerts are discussed briefly as an introduction to the concept of workflows in SharePoint 2013 products, and then a detailed look at a three-state workflow in action is provided, which is a complex enough process to give a solid introduction to the processes involved with starting and interacting with a workflow in SharePoint 2013. An overview of the other standard workflows is given from a high level, as well as the process of installing and using SharePoint Designer 2013 to create a custom workflow. Along the way, tips are given for farm administrators and site collection administrators about the tools and settings available to manage workflows and the use of SharePoint Designer 2013.
SharePoint 2013 has a host of new features in the realm of workflows; however, a number of complex configuration steps need to be completed to use the new workflow platform. This chapter focuses on the SharePoint 2010 workflows supported out-of-the-box by SharePoint 2013 because those are immediately available to users of the 2013 environment. SharePoint 2010 workflows in a SharePoint 2013 farm still run on top of Microsoft’s Windows Workflow Foundation, whereas the SharePoint platform 2013 workflows utilize the Azure-based workflow engine, which is installed and configured independently of SharePoint itself.
Defining Workflows in the Business Environment
In a business environment, workflows exist throughout the organization in formal and informal incarnations, and organizations of all sizes are increasingly concerned with formalizing and streamlining processes critical to the business. A key challenge in workflows is the combination of forms, the human element, time, and lack of defined processes. Consider the prototypical workflow involving an expense report form filled out by hand by User5, who then puts it in the mail slot of User2, who signs it, and puts it into the HR mail slot for processing. Consider then that User5 doesn’t get the reimbursement and the steps that need to be taken by him to try and figure out what happened.
The combination of all elements, actors, tasks, and timing is often summarized as business process management or BPM. BPM is an endeavor to automate or enhance a process within an organization to see an increased return on investment or a lower total cost of ownership. SharePoint 2013 has moved closer to a more seamless BPM solution with full integration of the core business components, including forms, email, tasks, document control, alerting, and timing. This BPM effort is supported under the hood by built-in workflows and alerts, SharePoint Designer workflows, Windows Workflow Foundation workflows, and Azure-based workflows, which are new in SharePoint 2013.
SharePoint-based workflow is one of the enterprise-level features that many users began to adopt in the SharePoint 2007 and 2010 product lines, and continues to leverage in SharePoint 2013 products. This is especially true as users come to embrace the SharePoint storage modules of libraries and lists, where the ability to leverage workflows is immediately available. Furthermore, the ability to harness the hybrid cloud and increased integration features with Active Directory and external data sources has furthered the platform’s reach and subsequent capabilities.
The several advantages of creating and managing workflows in a SharePoint 2013 environment include the following:
![]() An easy-to-use design interface in SharePoint 2013 that quickly enables site administrators and power users to translate informal processes into well-defined, automated, and audited processes
An easy-to-use design interface in SharePoint 2013 that quickly enables site administrators and power users to translate informal processes into well-defined, automated, and audited processes
![]() A structure that contains and manages the workflow engines, leveraging the hardware and software investment already made in SharePoint
A structure that contains and manages the workflow engines, leveraging the hardware and software investment already made in SharePoint
![]() Interaction with SharePoint lists such as the Tasks list to facilitate the use and management of workflows and reduce the learning curve for end users
Interaction with SharePoint lists such as the Tasks list to facilitate the use and management of workflows and reduce the learning curve for end users
![]() The option of using SharePoint Designer 2013 rather than the SharePoint interface to create different types of workflows that offer more options, flexibility, and intelligence
The option of using SharePoint Designer 2013 rather than the SharePoint interface to create different types of workflows that offer more options, flexibility, and intelligence
![]() The option to use Visio 2013 to make the workflow design process more intuitive for less-technical users
The option to use Visio 2013 to make the workflow design process more intuitive for less-technical users
![]() Seamless integration with InfoPath forms and forms libraries providing a rich forms development and hosting environment
Seamless integration with InfoPath forms and forms libraries providing a rich forms development and hosting environment
Considering Alerts as Basic Workflows
As discussed in Chapter 19, “Using Libraries and Lists in SharePoint 2013,” and specifically in the “Reviewing the Alert Me Tool” section, alerts are powerful and simple to use and can be seen to provide a type of workflow functionality. Alerts are triggered by certain activities or changes, and they result in an email being sent immediately, or at a later time, to one or more end users. The end users can then take action based on the alert as they see fit.
To create a workflow in a document library, follow these steps:
1. Select the document by clicking to the left of the document icon; a check mark appears. Note that if two or more documents are selected, an alert cannot be created.
Tip
If the alert button is not visible in the ribbon, the Simple Mail Transfer Protocol (SMTP) Server Feature is most likely not configured on the SharePoint front-end server or the Outgoing E-mail Settings are not set up in Central Administration for the farm.
2. Click the Alert Me icon on the Files tab on the ribbon. Click Set alert on this document. The New Alert window opens.
3. Configure the desired options and click OK.
This is a form of workflow because an automated process is pushing information to end users via email, which is similar to one component of the workflows that are discussed in this chapter such as the three-state workflow. Although alerts are very limited in terms of configuration options, they do provide a number of options, as shown in Figure 28.1. Note that the user in this case (because he has Full Control permissions in the library) is able to enter additional names in the Send Alerts To field. Alerts options include the following:
![]() When anything changes
When anything changes
![]() When someone else changes a document
When someone else changes a document
![]() When someone else changes a document created by me
When someone else changes a document created by me
![]() When someone else changes a document last modified by me
When someone else changes a document last modified by me
![]() Send a daily summary
Send a daily summary
![]() Send a weekly summary
Send a weekly summary

Certain lists add customized alerts to the list of what’s available. For example, in an Issues list, an alert option is added in the Send Alerts for These Changes section: Someone changes an item that appears in the following view. As shown in Figure 28.2, an alert in this type of list can be triggered by a change in a specific view. Because views are extremely customizable, and could, for example, just include items where the column values match certain criteria, this capability can be very powerful. For example, a view could be created in an Issues list called My Active High Priority Issues that only displays items where the Assigned To value equals [Me], the Priority is set to (1) High, and where the Issue Status is set to Active. Then if any changes happen in this very specific view, the user is notified.

Tip
Review the different Alert options available in lists such as Calendar, Tasks, and Issues to see the unique alerts provided and think about how they might be leveraged to enhance the usefulness of the alerts for users of the lists.
Reviewing the Workflow-Related Settings in Central Administration and Site Settings
Workflows are configured on a variety of SharePoint components, including the web application, site collection, site, list, or content type level. In the case of web application and site collection workflow manipulation, the configuration will likely be completed by a SharePoint administrator. For lists and content types, users can use the ribbon to manage workflows and may activate or deactivate some of the built-in SharePoint workflows in Site Features.
Each web application has workflow-related settings that should be reviewed. Follow these steps to review the workflow settings for a web application:
1. Click the Application Management link from the Central Administration home page, and then click Manage Web Applications.
2. Select the web application of interest (for example, SharePoint – 80) so that the row is highlighted, and then click General Settings on the Web Applications tab on the ribbon. Select Workflow from the drop-down list, and the Workflow Settings window opens, as shown in Figure 28.3. These determine whether user-defined workflows are enabled for all sites on the web application, whether internal users who do not have site access will be alerted if assigned a workflow task, and whether external users will be sent a copy of the document to participate in workflows.

3. Click OK after any required changes have been made.
It is important to understand the impact of these settings and make decisions on what will be supported by IT. If Enable User-Defined Workflows for All Sites on This Web Application is set to No, site users can still use out-of-the-box workflows, but they can’t create workflows from SharePoint Designer 2013. If a developer or power user tries to create a workflow on a web application where Enable User-Defined Workflows for All Sites on this Web Application is set to No, they will receive an error message: “User-defined workflows have been disabled by the Administrator. User-defined workflows will be unable to run.”
The Allow External Users to Participate in Workflow by Sending Them a Copy of the Document option could be used to circumvent security settings applied to a document library and allows User A to send a document to User B via a workflow. But it could also be argued that User A could simply download a copy of the document to his local PC and then send it as an email attachment to User B.
If nonsite members are to be included in workflows, each of those users needs a minimum of Contribute-level permissions to the task list that is used by the workflow. Otherwise, they won’t be able to interact with the tasks that are assigned to them, limiting the usefulness of the workflow.
Note
PowerShell commandlets (cmdlets) are available to complete these tasks: Get-SPWorkflowConfig returns workflow settings for the specified web application, and Set-SPWorkflowConfig configures the workflow settings for the specified web application.
There are also workflow-related jobs that can be found by clicking the Monitoring link from the Central Administration site and then clicking Job Definitions, as follows:
![]() Bulk Workflow Task Processing: This job processes bulk workflow tasks, and by default is set to occur once a day.
Bulk Workflow Task Processing: This job processes bulk workflow tasks, and by default is set to occur once a day.
![]() Workflow: This job processes workflow events and by default is set to occur every 5 minutes.
Workflow: This job processes workflow events and by default is set to occur every 5 minutes.
![]() Workflow Auto Cleanup: By default set to occur daily, this deletes tasks and workflow instances that have been marked complete longer than the expiration specified in the workflow association.
Workflow Auto Cleanup: By default set to occur daily, this deletes tasks and workflow instances that have been marked complete longer than the expiration specified in the workflow association.
![]() Workflow Failover: By default, set to occur every 15 minutes. This processes events for workflows that have failed and are marked to be retried.
Workflow Failover: By default, set to occur every 15 minutes. This processes events for workflows that have failed and are marked to be retried.
Note
SharePoint workflows are “long running,” meaning that they take longer than typical server operations, which complete in milliseconds. Workflows dehydrate (turn into a string and are stored to the database) and rehydrate (made active and returned to memory) as servers are rebooted. Workflow states are preserved during server reboots, and time-sensitive operations pick up when the server is back online.
Reviewing the Settings Tools for Workflows at the Site and List Levels
In addition to configuring some workflow behavior for the web application that hosts the site collection where workflows will be used, it is important for the farm administrator or site collection administrator to be familiar with the settings that affect the use of workflows in site collections under their management. The workflow settings will differ based on the site collection template that is used and if anyone has made modifications to the site collection features for the site collection.
Site collection features should be reviewed to see what is currently enabled by default for the specific site collection, and then to make changes if needed. For a site collection created using the Team Site site collection template, the default site collection features related to workflows are configured as follows:
![]() Disposition approval workflow: Active
Disposition approval workflow: Active
![]() Publishing approval workflow: Inactive
Publishing approval workflow: Inactive
![]() SharePoint 2007 workflows: Inactive
SharePoint 2007 workflows: Inactive
![]() Three-state workflow: Active
Three-state workflow: Active
![]() Workflows: Inactive
Workflows: Inactive
The workflows available from a library in a site collection created by using the Team Site site collection template when the Add a Workflow Page is accessed are as follows:
![]() Disposition approval
Disposition approval
![]() Three-state
Three-state
For a publishing site collection built off the Publishing Portal site collection template, the default site collection features related to workflows are configured slightly differently, as follows:
![]() Disposition approval workflow: Active
Disposition approval workflow: Active
![]() Publishing approval workflow: Active
Publishing approval workflow: Active
![]() SharePoint 2007 workflows: Inactive
SharePoint 2007 workflows: Inactive
![]() Three-state workflow: Inactive
Three-state workflow: Inactive
![]() Workflows: Active
Workflows: Active
Therefore, the workflows available from a library in a publishing site collection with default settings when the Add a Workflow page is accessed are more numerous:
![]() Approval – SharePoint 2010
Approval – SharePoint 2010
![]() Collect Feedback – SharePoint 2010
Collect Feedback – SharePoint 2010
![]() Collect Signatures – SharePoint 2010
Collect Signatures – SharePoint 2010
![]() Disposition Approval
Disposition Approval
![]() Publishing Approval
Publishing Approval
A general best practice is to not change the workflows feature settings for a site collection unless there is a specific reason to do so. Some reasons can include a specific need to support workflows that are migrated from a SharePoint 2007 environment. The publishing approval workflow should only be enabled in sites where content approval is going to be used in document libraries. (This is turned on from Document Library Settings, Versioning Settings page.) This workflow then triggers when documents are saved as major versions in document libraries with Content Approval enabled, which can annoy end users if they don’t see specific value in it and are not trained in the process.
A quick place for a site administrator to check on which workflows are associated with a site is from the Site Settings page in the Site Administration section by clicking the Workflow Settings link. This displays any workflows associated with the site, for example, created in SharePoint Designer 2013 and published to the site. Figure 28.4 shows an example where one workflow was created in SharePoint Designer 2013 and published to the site. The administrator can click the Remove, Block, or Restore a Workflow links to further manage the workflows associated with that site.

Note
Note that the workflows shown in the Workflow Settings page for a site are only the workflows that have been associated with that specific site. Workflows associated with subsites do not show up on the parent site, nor do the child sites show workflows associated with the parent.
To see the workflows associated with or running on a list or library, an administrator can access the Library tab on the ribbon and click the Workflow Settings icon on the far right. Or the administrator can access the List or Library Settings page and then click Workflow Settings from the Permissions and Management section. Figure 28.5 shows an example where a workflow was started within a list. Note that additional workflows can be added from the Workflow Settings page by clicking Add a Workflow, or additional information can be accessed about the workflow’s configuration by clicking the workflow name.

Note
A useful hidden page that is still available but no longer directly accessible in SharePoint 2013 is the Workflow Manager page. To open this page, go to http://<ServerName>/<SiteName>/_layouts/wrkmng.aspx. As shown in Figure 28.6, this page gives a full list of the out-of-the-box workflows, the status of each, any associations, and in-progress workflows for the whole site collection. One problem with this page is that it doesn’t provide any drill-down capabilities, so there is no way to know which site a particular workflow is running on.

FIGURE 28.6 Wrkmng.aspx page in SharePoint 2013 showing workflow status and activity for a site collection.
Testing the Three-State Workflow
The three-state workflow is a good choice for initial testing and to get more familiar with the “moving parts” of a workflow in SharePoint 2013. It is a somewhat complex workflow and takes a number of steps and at least two user accounts to test to completion. The main steps involved with this workflow are as follows:
1. An issue is created in an Issues list by a manager (Rand), where an assignee is specified (Colin) and the issue saved.
2. The workflow is manually started by the manager (Rand).
3. When the workflow starts, it notifies Rand and Colin with a brief email, then creates a new task in the Tasks list, which is assigned to Colin.
4. The assignee (Colin) gets a more detailed email 1 to 5 minutes later that gives instructions on what to do. These instructions tell the assignee to review the issue and then update the task.
5. When the assignee (Colin) updates the task and sets it to Completed, the state of the issue changes to Resolved and the manager/initiator (Rand) is assigned a new task.
6. The manager (Rand) receives an email with instructions to review the issue and then update the task.
7. When Rand sets the task to Completed, the state of the issue changes to Closed.
There are several key concepts to understand in this process. One is that this workflow is associated to a specific list and won’t be available from other lists in the site or site collection unless explicitly associated with that list. Another key concept is that tasks are generated in a separate Tasks list by the workflow, first when the workflow is started, and then when the first task is marked as Completed, which then changes the value of a column in the list and creates a second task. Each of these actions makes entries into the History list, which is visible on the workflow status page and provides an audit history of the workflow.
It is also important to realize that there are multiple points of interaction with the issue and the task items, and that users can change more than just the minimal fields discussed in the example. So, in other words, there is margin for error, and users need to be clear which fields they should and shouldn’t modify.
The prerequisites for this testing are as follows:
![]() The three-state workflow is enabled for the site collection. A site collection created using the Team Site site collection template has the three-state workflow site collection feature enabled by default.
The three-state workflow is enabled for the site collection. A site collection created using the Team Site site collection template has the three-state workflow site collection feature enabled by default.
![]() Two accounts are available for testing, each with an active email account in Outlook, and preferably Outlook 2010 or 2013. While this workflow can be completed by using just one account, it is harder to interpret the activities taking place and less useful as a training exercise.
Two accounts are available for testing, each with an active email account in Outlook, and preferably Outlook 2010 or 2013. While this workflow can be completed by using just one account, it is harder to interpret the activities taking place and less useful as a training exercise.
![]() The account that creates the workflow should be a site owner; the other account can just be a site member.
The account that creates the workflow should be a site owner; the other account can just be a site member.
Follow these steps to test the workflow:
1. Create a new list using the Issue Tracking application template and name it Issues List.
2. Click the List tab from within the Issue Tracking list, and then click List Settings.
3. Click the Issue Status link in the Columns section. Scroll down on the Edit Column page to the choices and note that there are three choices for this column: Active, Resolved, and Closed. These are the “states” that are modified during the three-state workflow.
4. Click Cancel to return to the List Settings page. Click Workflow Settings in the Permissions and Management section.
5. The Workflow Settings page opens. Click the Add a Workflow link.
6. The Add a Workflow page loads. Select Three-State from the list of workflows.
7. Name the workflow Issues-ThreeStateTest1.
8. Verify that the Task List is set to Tasks (New) and that the History List is set to Workflow History (New). These settings indicate that a new tasks list will be created to track tasks associated with this workflow and that a new workflow history list will be created to track workflow auditing information.
9. In the Start Options section, verify that the Allow This Workflow to Be Manually Started by an Authenticated User with Edit Item Permissions option is selected. Click Next.
10. The Customize the Three-State Workflow page opens. Verify that the Select a ‘Choice’ field is set to Issue Status, the Initial State is set to Active, the Middle State is set to Resolved, and the Final State is set to Closed, as shown in Figure 28.7.

11. Scroll down to the next section, Task Details, and review these settings. Leave these settings at their defaults, but review the different components of this section. Add some custom text in the two Body fields provided. In this example, the text added to the first (which is included in the email that is sent when the workflow is initiated) is “The quick brown fox jumps over the lazy dog.” And the second includes the text, “A rolling stone gathers no moss.”
12. Click OK to complete the workflow definition process and return to the Issue Tracking list.
To create an issue and assign it to a user for completion, follow these steps:
1. Verify that you are logged in to the SharePoint site as a user who will be considered to be the manager for this test (Rand in this example). This user will create the issue and then assign it to another user for completion.
2. From the Issues list, click the New Item link, create a new issue called Test Issue 1, and assign it to a test user who will be charged with completing the task (Colin in this case). Leave the Issue Status to Active, Priority to (2) Normal. Enter a brief description for the issue, such as Test issue for workflow testing. Leave the other settings on the page at their defaults and click Save.
3. Navigate to the Tasks list that was defined in step 8 of the previous exercise (in this case, Tasks) and note that no tasks have been created at this point. This is because the workflow has not been started.
4. The manager (Rand) needs to manually start the workflow that will assign it to the user in the Assigned To column (Colin in this example). To do this, return to the Issues list, select the issue by clicking to the left of the Issue ID for the Item to select the item, and then from the Items tab on the ribbon, click Workflows.
5. The Workflow.aspx page opens. Click the Issues-ThreeStateTest1 link in the Start a New Workflow section.
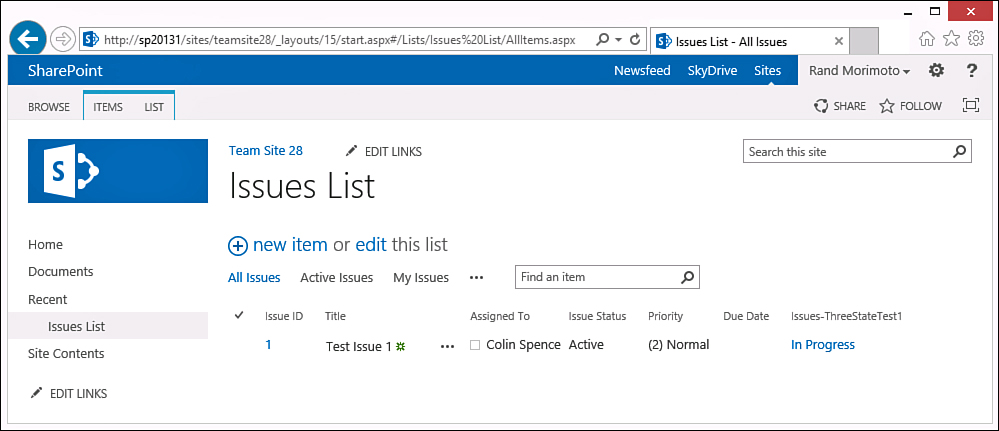
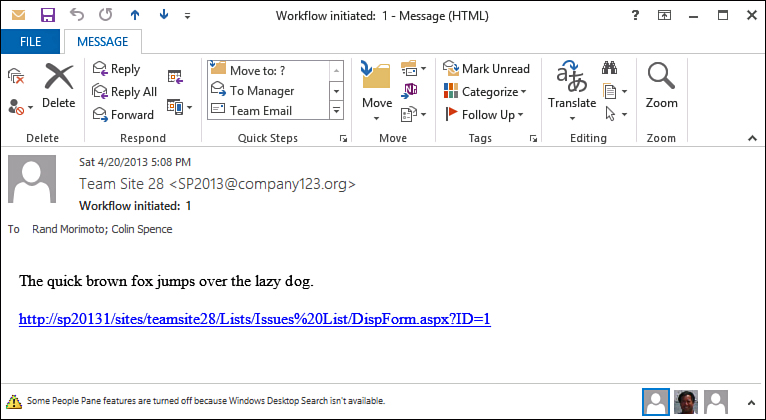
6. The workflow starts, and the user (Rand) is returned to the Issue Tracking list, as shown in Figure 28.8. Note that a new column is visible that is titled Issue-ThreeStateTest1 and shows the In Progress status for the workflow. The initiator and the assignee each receive an email with a subject that reads, “Workflow initiated” with the ID number of the workflow included. This email also provides a link to the issue in the Issues list. This helps remind the manager that he did in fact start the workflow. Note that the text entered while creating the workflow (“The quick brown fox jumps over the lazy dog”) in included in this email, as shown in Figure 28.9.
7. Log out as the manager (Rand in this example), log in as the assignee (Colin in this example), and open Outlook. This user should have received both a copy of the “Workflow initiated” email and shortly thereafter an email that informs him that he has been assigned a task; he is also given other information about the task, as shown in Figure 28.10. The email clearly informs the assignee that a task has been assigned by the initiator. A URL is given to the issue in the Issue Tracking list, as well as instructions on how to complete the task: Review the issue, perform specific activities required for this task, edit the task, and then mark it as Completed.

Caution
This is a key point in the workflow where users forget to edit the task! They click the link to the issue, update the issue, and then think they are done. So, the training process should emphasize the importance of updating the task as well as the issue.
8. At this point in the process, the assignee (Colin) now knows he has an issue to work on, and he clicks the URL to open the issue and get to work on it and updates the issue (for example, by clicking Edit Item and adding comments such as “I fixed the problem” and then clicking Save).
9. After the issue has been resolved, this user still needs to edit the task to indicate the issue has been resolved. To do this, the assignee (Colin) returns to the email and clicks the Open This Task button on the ribbon to edit the task that was created by the workflow.
10. The task opens. Click the Show More link at the bottom of the screen. Then scroll down and set the status to Completed, as shown in Figure 28.11. Then click Save.

11. The assignee (Colin) is then returned to the Tasks list and will see in a moment (may require a page refresh) that a new task has been created which is assigned to the initiator (Rand).
12. Log back in as the manager/initiator (Rand in this example) and open Outlook. Two emails should have been received, the first with the second custom set of text entered in step 11 of the previous section (“A rolling stone gathers no moss” in this example) and the second assigning the user his own task. In the second email, click the URL to review the issue, which the assignee (Colin) claims to have completed. Then click the Open This Task icon on the ribbon of the email to set the task status to Completed.
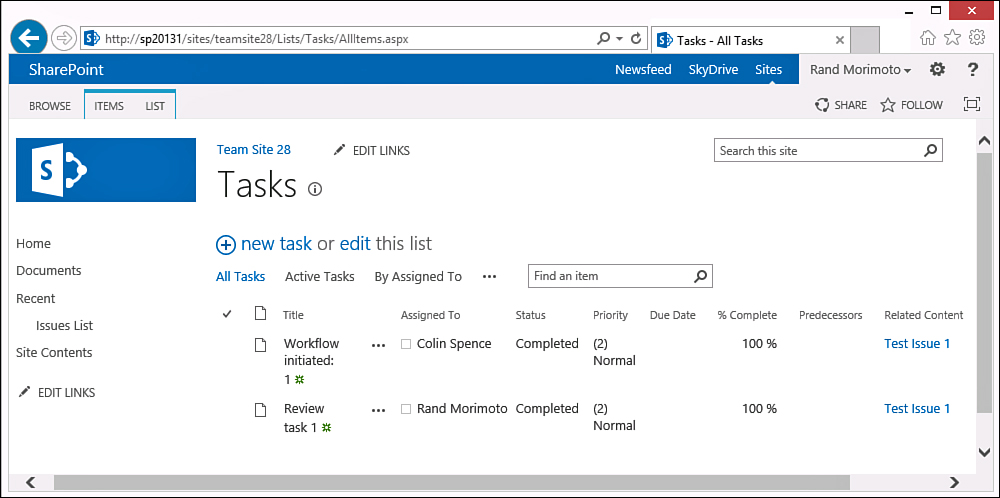
13. The Tasks list is now visible, as shown in Figure 28.12, and shows both the original task, where the assignee (Colin) was assigned a task and marked it as Completed, and the second task, where the initiator (Rand) was assigned a task.
14. Still logged in as the manager (Rand), navigate to the Issue Tracking list and verify that the status of the issue is now set to Closed and that the field under the column titled Issues-ThreeStateTest1 shows the value of Completed.
15. Click the Completed link in the Issues-ThreeStateTest1 column to view more details about the workflow, as shown in Figure 28.13. This page shows detailed information about the Tasks created in the workflow process (two tasks were created) as well as the Workflow History, which consisted of the following steps: Workflow Initiated, Task Completed, Task Completed, and Workflow Completed. It can be seen that the Issues List Status changed to Resolved and then to Closed in the Description column.

An Overview of Other Standard Workflows
The previous example of the three-state workflow could be considered a form of “tough love” because it is a fairly complex workflow in terms of end-user interactivity requirements. It could also be suggested by a savvy administrator that instead of using a three-state workflow, the manager could simply create an alert that notifies him via email if anything in the Issues list changes, which would save time and effort but not use the whole workflow engine.
Other standard workflows available in SharePoint 2013 Standard and Enterprise include the following:
![]() Approval – SharePoint 2010: An approval workflow routes a document for approval. Approvers can approve or reject the document, reassign the approval task, or request changes to the document.
Approval – SharePoint 2010: An approval workflow routes a document for approval. Approvers can approve or reject the document, reassign the approval task, or request changes to the document.
![]() Collect feedback – SharePoint 2010: This SharePoint 2010 workflow routes a document for review to reviewers who can provide feedback, which is compiled and sent to the person who initiated the workflow.
Collect feedback – SharePoint 2010: This SharePoint 2010 workflow routes a document for review to reviewers who can provide feedback, which is compiled and sent to the person who initiated the workflow.
![]() Collect signatures – SharePoint 2010: This workflow routes a Microsoft Office document to a group of people to collect their digital signatures and must be started in an Office application that is part of the Office 2007, 2010, or 2013 family.
Collect signatures – SharePoint 2010: This workflow routes a Microsoft Office document to a group of people to collect their digital signatures and must be started in an Office application that is part of the Office 2007, 2010, or 2013 family.
![]() Disposition approval: This manages document expiration and retention by allowing participants to decide whether to retain or delete expired documents.
Disposition approval: This manages document expiration and retention by allowing participants to decide whether to retain or delete expired documents.
![]() Publishing approval: This allows for approval of list and library submissions where the content approval advanced feature is enabled. When used properly, the publishing approval workflow can allow contributors to author content that is only visible to readers after explicit approval from an administrator.
Publishing approval: This allows for approval of list and library submissions where the content approval advanced feature is enabled. When used properly, the publishing approval workflow can allow contributors to author content that is only visible to readers after explicit approval from an administrator.
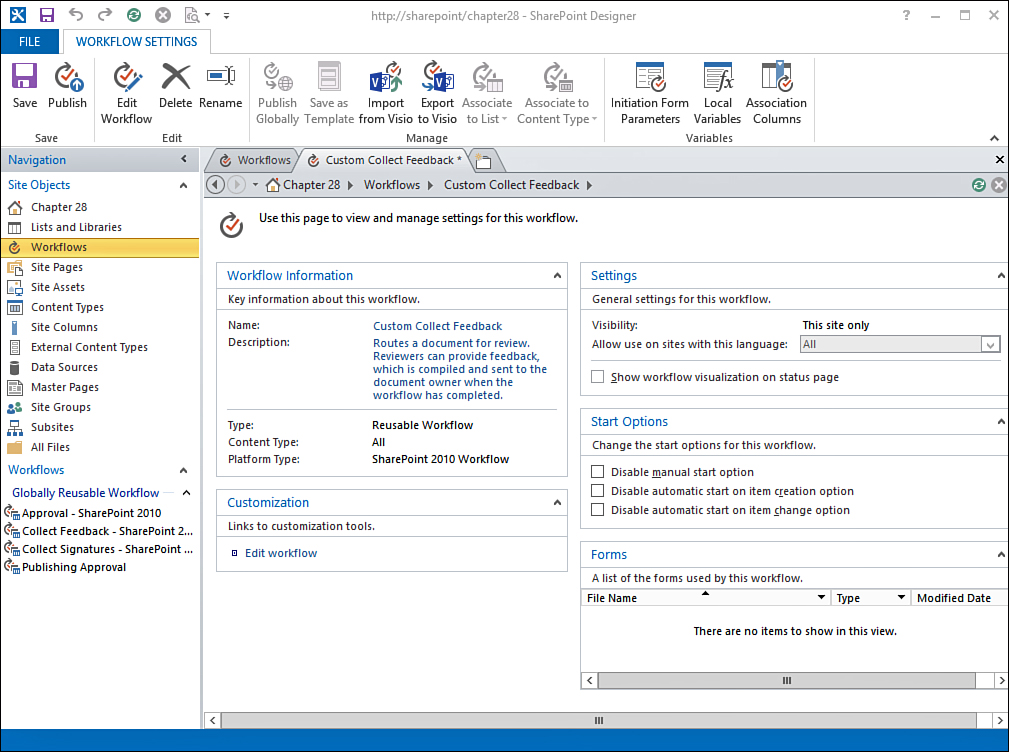
The approval, collect feedback, and collect signatures workflows are available for editing when Designer 2013 is used to open a site and are listed in the Globally Reusable Workflow section. Figure 28.14 shows the settings page for the collect feedback workflow. Note that there is an Edit Workflow link available in the ribbon, as well as the ability to disable different Start Options, and note that the actual InfoPath Forms can be accessed and edited. Using SharePoint Designer 2013 with SharePoint 2010 workflows is covered later in this chapter and in Chapter 29, “Application Development with SharePoint Designer 2013 and Visual Studio.”
Verifying the Web Application Settings for SharePoint Designer 2013 Use
Organizations often find that the standard out-of-the-box workflows simply do not provide enough flexibility to meet their requirements and want to be able to access additional tools to create these workflows and the logic that drives them. SharePoint Designer 2013 can be used to create a wide variety of workflows, including list workflows, reusable workflows, and site workflows. SharePoint Designer 2013 also allows users to leverage Visio 2013, InfoPath 2013, and a host of other tools to facilitate the overall design and implementation process.
Power users and developers who will be using SharePoint Designer 2013 should verify that it is supported by IT, even though the software can be downloaded for free, to ensure that it will function properly. It is not unusual for SharePoint Designer 2013 to not function properly if IT is not prepared to “officially” support it, due to configurations in SharePoint or on the desktop.
In addition, the farm administrator may have chosen to not allow the use of SharePoint Designer from the Central Administration site. This should be verified to avoid possible confusion or issues during the development process.
To configure SharePoint Designer settings for a web application, follow these steps:
1. Open SharePoint 2013 Central Administration and click Manage Web Applications from the Application Management Section.
2. Select the web application to manage (such as SharePoint – 80), click the General Settings button on the ribbon bar, and then choose SharePoint Designer from the drop-down menu that appears. The Configure SharePoint Designer Settings are usually all checked. If one or more are not enabled, that limits the number of SharePoint Designer 2013 customizations possible.
The options are as follows:
![]() Allow SharePoint Designer to Be Used in This Web Application: If this option is not checked (enabled), SharePoint Designer can’t be used in the web application.
Allow SharePoint Designer to Be Used in This Web Application: If this option is not checked (enabled), SharePoint Designer can’t be used in the web application.
![]() Allow Site Collection Administrators to Detach Pages from the Site Definition: If pages are detached from the site definition using SharePoint Designer 2013 and modified, they are not updated when the site definition is updated, for example by a server upgrade, or applying a solution upgrade. “Old timers” in the SharePoint world will remember this as the “unghosting” process, which can cause complexities in supporting sites.
Allow Site Collection Administrators to Detach Pages from the Site Definition: If pages are detached from the site definition using SharePoint Designer 2013 and modified, they are not updated when the site definition is updated, for example by a server upgrade, or applying a solution upgrade. “Old timers” in the SharePoint world will remember this as the “unghosting” process, which can cause complexities in supporting sites.
![]() Allow Site Collection Administrators to Customize Master Pages and Layout Pages: Master pages and page layouts define how SharePoint renders and displays content. By allowing site collection administrators to customize these items using SharePoint Designer 2013, they may unintentionally break from organizational branding standards or even damage functionality of the site collection.
Allow Site Collection Administrators to Customize Master Pages and Layout Pages: Master pages and page layouts define how SharePoint renders and displays content. By allowing site collection administrators to customize these items using SharePoint Designer 2013, they may unintentionally break from organizational branding standards or even damage functionality of the site collection.
![]() Allow Site Collection Administrators to See the URL Structure of Their Website: This allows site collection administrators to manage the URL structure of their site using SharePoint Designer 2013, by accessing the All Files icon in the Navigation pane. However, modifying the structure of the site, or deleting forms or folders, can damage the site’s functionality, and therefore can have negative side effects.
Allow Site Collection Administrators to See the URL Structure of Their Website: This allows site collection administrators to manage the URL structure of their site using SharePoint Designer 2013, by accessing the All Files icon in the Navigation pane. However, modifying the structure of the site, or deleting forms or folders, can damage the site’s functionality, and therefore can have negative side effects.
3. Click OK when finished.
Downloading and Installing SharePoint Designer 2013
SharePoint Designer is available free of charge from Microsoft, who wants to encourage power users and developers to customize the SharePoint 2013 environment to meet a wide variety of business needs. The workstation or server needs to have .NET 4.0 installed, and as discussed in the previous section, the web application needs to be configured to allow the use of SharePoint Designer 2013.
SharePoint Designer 2013 is available in both 32-bit and 64-bit versions, so users should be sure to download the version that corresponds to their workstation’s operating system version. SharePoint Designer 2013 is supported on Windows 7, Windows 8, Windows Server 2008 R2, and Windows Server 2012.
To install SharePoint Designer 2013, follow these steps:
1. If it is not already installed on the workstation that will house SharePoint Designer 2013, install .NET 4.0 from www.microsoft.com/en-us/download/details.aspx?id=17851.
2. Download the 32- or 64-bit version of SharePoint Designer from www.microsoft.com/en-us/download/details.aspx?id=35491.
3. Run the SharePointDesigner.exe and complete the install by selecting either the Standard or Custom option.
With SharePoint Designer 2013 downloaded and installed, development can begin immediately as long as the user has a minimum of Designer-level rights to a SharePoint 2013 site.
Creating a Reusable Workflow from SharePoint Designer 2013
A reusable workflow is technically a workflow associated with a content type instead of being associated directly to a SharePoint list. Content types not only contain columns and policies but also behavior that comes in the form of workflows. By associating a workflow with a content type, the user is causing that workflow to be available for reuse within any list or library that contains that content type.
To create a reusable workflow, the site that will house the workflow must be opened from SharePoint Designer 2013, and then the workflow is designed, tested, and published to the site. It can then be added to a list or library on that site and is then ready for use. The following example creates a reusable workflow that is triggered whenever the word rush is found in the title field of a document. The application in this example is a collaboration site where managers (User1 and User2) need to review and provide feedback on documents in different libraries before they can be released to marketing. Complaints had occurred before when User1 and User2 weren’t responsive enough, so the workflow was created. If a user believes her document deserves “rush” status, she just needs to add that text to the title field, and the workflow initiates, and User1 is informed of the task, and when he or she completes it, User2 is assigned a task. Auditing information tracks the responsiveness of both users.
This workflow takes advantage of the Start Feedback Process action in SharePoint Designer, which contains the logic and functionality of the collect feedback workflow that is a standard workflow in SharePoint Server 2013 that uses the SharePoint 2010 workflow platform. So this is an example of a workflow within a workflow, which enables even relatively novice workflow designers to take advantage of the standard workflows provided out-of-the-box.
Follow these steps to open a SharePoint 2013 site and create this site workflow:
1. Open SharePoint Designer 2013 (method will vary based on the operating system in use).
2. From the File tab, the Sites node should be open; if it does not open, click Sites. Then click the Open Site icon.
3. Type the URL of the site (for example, http://sharepoint/Chapter28) or select the site from the list of available sites if it has been accessed before. Note: Do not include a page name such as default.aspx or /pages/home.aspx.
4. Click Workflows from the Site Objects list in the Navigation pane.
5. Click Reusable Workflow from the Workflows tab; the Create Reusable Workflow window opens, as shown in Figure 28.15.

6. Provide a title for the workflow such as Reusable Workflow – Rush in Title, and a description if desired. In this case, the description reads Escalates any item with “Rush” in the title. Leave Content Type set to All, and under Platform Type, choose SharePoint 2010 Workflow and click OK.
7. Click the flashing line in the Step 1 canvas: type if and then press Enter. A dialog box pops up with several conditions that contain the word if. Choose If Any Value Equals Value. Alternatively, you can click the Condition button and choose Title Field Contains Keywords.
8. Click the Value link in the Step 1 box, and then click the Function button, which opens the Define Workflow Lookup dialog. Leave the Data Source set to Current Item and choose Title from the Current Item drop-down list. Click OK to save.
9. Click the Equals link in the Step 1 box, and select Contains from the drop-down menu.
10. Click the Value link in the Step 1 box, and then type rush and press Enter. The results will look like Figure 28.16.

Note
Workflows built using the SharePoint 2013 workflow platform type cannot call a workflow built on the SharePoint 2010 platform type.
11. Click the area directly below the line where data was just entered and type Start and press Enter. Designer 2013 provides several actions that contain the word Start including Start a Site Workflow or Start Feedback Process, as shown in Figure 28.17. This action effectively imbeds a Collect Feedback workflow within this Reusable Workflow, which provides significant functionality within the workflow as is demonstrated upon completion of the workflow.

12. Click the These Users link; the Select Task Participants window opens.
13. In the Participants field, use the address book dialog to enter two valid usernames separated by a semicolon (;). User1;User2 is used in this example. Leave Serial (one at a time) selected in the field to the right of Participants.
14. In the CC field, click the Select Users icon on the right, click User Who Created Current Item, and then click the Add>> button. Click OK.
15. In the Title field, enter the text Rush item escalated.
16. In the Instructions field, enter text describing the activity, such as: This item’s title contained the word “rush” and so it has been escalated for review and processing. The window should look like Figure 28.18.

17. In the Duration per Task field, enter 1 and verify that Day(s) is selected to the right. Click OK.
18. Click the Check for Errors button on the ribbon; a message that the workflow contains no errors should display.
19. Click the Publish button on the ribbon to publish the workflow to the site.
In this next section, the workflow is initiated, and started, to display the functionality without completing the entire workflow. To test the workflow, follow these steps:
1. Log in to the site as an account with Owner-level permissions (http://sharepoint/Chapter28 in this example).
2. Navigate to the document library, and add the reusable workflow to the library by accessing Library Settings and clicking the Workflow Settings link in the Permissions and Management section.
3. The reusable workflow should appear in the Select a Workflow Template list, as shown in Figure 28.19. Click the workflow.

4. Enter a name for the workflow in the Name section (for example, Rush in Title Workflow).
5. Leave the Task List and History List settings at their defaults.
6. Under Start Options, verify that the Allow This Workflow to Be Manually Started by an Authenticated User with Edit Item Permissions check box is checked, and check the Creating a New Item Will Start This Workflow and Changing an Item Will Start This Workflow boxes. Click OK.
7. Now, log in as a user who is not involved in the feedback process but has Contributor-level permissions in the library (for example, User3).
8. Access the document library on the site and upload a sample document. For this example, the document title is User3’s super important document.docx.
9. Edit the properties of the document and add the word Rush to the Title field, and then save.
10. The column titled Rush in Title Workflow appears, and the document should be set to a status of In Progress.
11. Open Outlook for this user (User3), and an email is there announcing the start of the feedback workflow.
12. Log out, and then log back in as the first approver (User1 in this example). Open Outlook and note that an email has been received.
The rest of the workflow is not covered here, but it gives User1 a chance to provide feedback on the document, and then when approved, a task is created for User2 and that user is given a chance to provide feedback.
Summary
This chapter touched on the different types of workflows provided out-of-the-box in the SharePoint 2013 product line, and gave two detailed examples to familiarize readers with the process of creating and using workflows. Information was also provided pertaining to the management of workflows and for controlling SharePoint Designer 2013 use. Testing workflows can be challenging due to the requirements of having multiple user accounts involved in the process, but it is the best way for an administrator to get comfortable with the “moving parts” of the workflow process. Having a solid foundation on the out-of-the-box workflows will lead to a better understanding of where SharePoint Designer 2013 can come into play and where it can extend upon basic workflows.
Best Practices
The following are best practices from this chapter:
![]() SharePoint 2010 workflows are the most common platform for general workflow development on SharePoint 2013. SharePoint 2013 workflows do support additional features such as For-Each loops, but there is significant setup and configuration effort required to take advantage of SharePoint 2013 workflows.
SharePoint 2010 workflows are the most common platform for general workflow development on SharePoint 2013. SharePoint 2013 workflows do support additional features such as For-Each loops, but there is significant setup and configuration effort required to take advantage of SharePoint 2013 workflows.
![]() As a starting point for encouraging end users to use SharePoint workflows, train them on the range of capabilities of list and library alerts, and educate users about some of the unique alerts available in lists such as the Calendar, Issues, and Tasks lists. This is a good starting place before more-complex workflows are implemented.
As a starting point for encouraging end users to use SharePoint workflows, train them on the range of capabilities of list and library alerts, and educate users about some of the unique alerts available in lists such as the Calendar, Issues, and Tasks lists. This is a good starting place before more-complex workflows are implemented.
![]() Before testing workflows in the organization, verify that the settings outlined in this chapter in the Central Administration site, as well as for the site collection where they will be used, to ensure that the settings meet the organization’s needs and that the appropriate workflows are enabled.
Before testing workflows in the organization, verify that the settings outlined in this chapter in the Central Administration site, as well as for the site collection where they will be used, to ensure that the settings meet the organization’s needs and that the appropriate workflows are enabled.
![]() As a general rule, don’t enable the SharePoint 2007 workflows unless they are specifically required.
As a general rule, don’t enable the SharePoint 2007 workflows unless they are specifically required.
![]() The three-state workflow is available in both SharePoint Foundation 2013 and SharePoint Server 2013 and is useful for testing and training purposes because there are multiple tasks generated and several points of interaction for end users.
The three-state workflow is available in both SharePoint Foundation 2013 and SharePoint Server 2013 and is useful for testing and training purposes because there are multiple tasks generated and several points of interaction for end users.
![]() Other standard workflows should be tested, and IT should decide which, if any, of the additional workflows will be available for use by end users.
Other standard workflows should be tested, and IT should decide which, if any, of the additional workflows will be available for use by end users.
![]() IT should decide whether to allow the use of SharePoint Designer 2013 to create or modify workflows and can control its use on a per web application basis in the Central Administration site.
IT should decide whether to allow the use of SharePoint Designer 2013 to create or modify workflows and can control its use on a per web application basis in the Central Administration site.
![]() SharePoint Designer 2013 allows the creation of new workflows and for the modification of out-of-the-box workflows and provides access to many powerful conditions and actions that can create complex workflows, as shown in this chapter.
SharePoint Designer 2013 allows the creation of new workflows and for the modification of out-of-the-box workflows and provides access to many powerful conditions and actions that can create complex workflows, as shown in this chapter.
![]() In SharePoint 2013, users may use SharePoint Designer 2013 to create workflows on SharePoint 2010 platform by default. To enable SharePoint 2013 workflows, IT must configure a Windows Azure farm and join SharePoint 2013 to that farm.
In SharePoint 2013, users may use SharePoint Designer 2013 to create workflows on SharePoint 2010 platform by default. To enable SharePoint 2013 workflows, IT must configure a Windows Azure farm and join SharePoint 2013 to that farm.