Chapter 5. Migrating from SharePoint 2010 to SharePoint 2013
In This Chapter
![]() Understanding Key Differences in the SharePoint 2013 Upgrade Process
Understanding Key Differences in the SharePoint 2013 Upgrade Process
![]() Planning for an Upgrade to SharePoint 2013
Planning for an Upgrade to SharePoint 2013
![]() Performing a Database-Attach Upgrade
Performing a Database-Attach Upgrade
![]() Performing a Site Collection Upgrade
Performing a Site Collection Upgrade
![]() Performing a Service Application Upgrade
Performing a Service Application Upgrade
![]() SharePoint 2010 (14) Mode and SharePoint 2013 (15) Mode
SharePoint 2010 (14) Mode and SharePoint 2013 (15) Mode
Organizations that have invested in SharePoint technologies over the years and are looking to take advantage of some of the new capabilities of SharePoint 2010 will eventually find themselves considering an upgrade of their content and their services over to the new SharePoint 2013 platform.
Fortunately, the story for upgrading content databases in SharePoint 2013 hasn’t changed much from its 2010 predecessor. That said, planning for upgrade to SharePoint 2013, particularly at the service application level, can be complex, with new PowerShell switches, service application databases, and deprecated options.
This chapter covers upgrade from SharePoint 2010 to SharePoint 2013, discussing content database upgrades and procedures for upgrading service applications as well. Upgrades from earlier versions of SharePoint to SharePoint 2013 are not natively supported, and organizations must first upgrade to SharePoint 2010 before beginning on the 2010 to 2013 upgrade path.
Understanding Key Differences in the SharePoint 2013 Upgrade Process
The migration paths to SharePoint 2013 have become much more streamlined than in earlier versions. In SharePoint 2010, three options for upgrade were available: in place, database-attach and hybrid. In SharePoint 2013, we still have database attach for normal and large-scale deployments, but we have lost the ability to do in-place upgrades, as most have found that most organizations were performing the database-attach upgrade and determined that it was a safer approach as well.
With the introduction of SharePoint 2010 and the service application model, SharePoint 2013 enables you to upgrade these features sets, which can complicate a migration process, so you want to closely examine whether service application functionality is required for migration. In other words, if you don’t have any customizations that you need to keep in SharePoint 2010 service applications, you should instead simply focus on migrating content, because service application migration is the most complex part of the upgrade process.
Note
There is no direct supported upgrade path to SharePoint 2013 from the 1.0, 2.0, or 3.0 versions of SharePoint technologies. The only way to upgrade these environments to 2013 using Microsoft techniques is to first upgrade the servers and sites to SharePoint 2010 and then follow the upgrade path demonstrated in this chapter.
Microsoft has deprecated NT LAN Manager (NTLM) authentication for use in content web applications for SharePoint 2013. This means that all web application authentication models must be made claims aware in order to take advantage of all the features in SharePoint 2013. This is an extra step of preparation for many organizations that are planning their upgrade and extra effort needed on the source SharePoint farm. There is also full support available for converting web applications in SharePoint 2010 to claims.
It is best practice to create a new web application using windows classic mode in the new SharePoint 2013 environment. After this is done it is possible to attach a windows classic mode content database directly to SharePoint 2013. It is also possible to carry on using this authentication model; however, sites in this content database will not be able to take full advantage of all features in SharePoint 2013, most notably the App Management Service (APPS). When this content database is mounted and tested, it is then possible to go through the steps of converting the content database base to claims-based.
Note
Microsoft has provided full documentation on how to migrate from classic mode to claims-based authentication at http://technet.microsoft.com/en-us/library/gg251985.aspx.
Visual Upgrade in SharePoint 2010 allowed organizations to keep the SharePoint 2007 look and feel during a migration. This model had a few drawbacks, however, as it only simulated a 2007 environment and many branding, features, and solutions that were deployed in SharePoint 2007 would not be compatible in the Visual Upgrade view. With SharePoint 2013, we have SharePoint 2010 mode (14 mode) in addition to the new SharePoint 2013 mode (15 mode). The SharePoint 2010 mode keeps many of the core SharePoint 2010 source files in the environment. As a result, many of the branding and feature solutions that were built for a SharePoint 2010 environment work in SharePoint 2010 mode for SharePoint 2013.
Examining the Database-Attach Scenario
The database-attach scenario is a supported upgrade scenario that involves a new SharePoint 2013 farm being built, followed by a restore of the SharePoint 2010 content databases directly attached to this farm and upgraded in place. The biggest drawback to using this method is that all configurations that need to match the source environment must be reconfigured in the destination environment because upgrade of the configuration database is not supported.
The types of settings that you must configure in advance of a database-attach scenario include the following:
![]() Internet Information Services (IIS) and domain name server (DNS) settings
Internet Information Services (IIS) and domain name server (DNS) settings
![]() Host headers
Host headers
![]() Alternate access mappings
Alternate access mappings
![]() Managed Paths
Managed Paths
The benefit of using the database-attach method is the ability to strictly control the content that gets populated into the destination environment. In addition, it gives the enterprise the flexibility to systematically “roll in” content databases and their site collections as needed.
The story as it pertains to content database upgrade has not changed at all in 2013 except in the case of scheduling individual site upgrades via PowerShell, as discussed later in this chapter.
Examining Alternative Approaches and Third-Party Migrations
Although the database-attach upgrade approach is the only Microsoft-supported migration scenario, you can use various other approaches, including the following:
![]() Third-party migration tools: These tools usually do not have limitations as to what versions can be migrated from and also allow for splicing and splitting of site collections and content databases, something not supported in the Microsoft approaches. They also usually handle exceptions better.
Third-party migration tools: These tools usually do not have limitations as to what versions can be migrated from and also allow for splicing and splitting of site collections and content databases, something not supported in the Microsoft approaches. They also usually handle exceptions better.
![]() STSADM/PowerShell exports or backups/restores: Although STSADM, the command-line tool, can only export or backup/restore to the same version, you can use it to export SharePoint content to a farm of the same version level and then run the upgrade process on that farm. You can use this same concept with database restores as well. Keep in mind that STSADM has been deprecated, but PowerShell commandlets (cmdlets) that allow for backups/restores and exports are also available.
STSADM/PowerShell exports or backups/restores: Although STSADM, the command-line tool, can only export or backup/restore to the same version, you can use it to export SharePoint content to a farm of the same version level and then run the upgrade process on that farm. You can use this same concept with database restores as well. Keep in mind that STSADM has been deprecated, but PowerShell commandlets (cmdlets) that allow for backups/restores and exports are also available.
![]() Manual content move: Some organizations simply prefer to build a new SharePoint 2013 environment and then show their users how to move content from the old farm to the new farm. This proves particularly useful if there is a great deal of abandoned or useless data in the older farms.
Manual content move: Some organizations simply prefer to build a new SharePoint 2013 environment and then show their users how to move content from the old farm to the new farm. This proves particularly useful if there is a great deal of abandoned or useless data in the older farms.
Determining which approach to use is critical during the planning phase of an upgrade or migration project.
Content Considerations
Prior to upgrade and as part of the planning process, it is wise to undergo an extensive view of the content in the environment that will be upgraded to SharePoint 2013. Many organizations choose to give power to site owners to archive, delete, or mark for upgrade the site content to the new environment. There are many ways to do this, and many administrators decide to enact a series of categorization either using content types deployed to all items or some other method of manually marking content.
Ultimately, regardless of the method, it is important to upgrade only the content that is actually needed in the new environment. The process of simply removing unnecessary versions of documents could potentially save hours in the upgrade process. Taking the time upfront to determine actual valuable content can save hours of upgrade time as well as resource costs and so on.
Creating a Prototype Test Environment
When installing and configuring a SharePoint 2013 test environment, it is important to replicate what the production environment was in SharePoint 2010 (to a degree) and what the end result in production will be.
The hardware requirements in SharePoint 2013 for standalone servers have increased and, as a result, administrators must take into account greater demand on physical and virtual resources. Creating an environment to test your final production upgrade is critical for many reasons. The most important reason is timing out the duration of your overall upgrade process.
No two content databases are created equally, a concept that comes into play with upgrades. For example, a content database that is exactly 50GB, has 20 site collections with 50 subsites each, and has a document library for each subsite with 100 items in each one takes exponentially longer to upgrade than a content database that is 50GB, has 1 site collection and 1 document library, and only a handful of items in that library.
The SharePoint upgrade process must iterate through all these sublevels of the content database and process each item for upgrade. As a result, there is no set way to determine the length of time an upgrade of a content database will take.
This also comes into play when the environment’s available resources differ from one environment to another. If during the upgrade testing process the environment used has less computing power or less RAM available, the time to upgrade a given database is affected. Therefore, when it becomes crucial to know exactly how long a given content database will take to upgrade (for example, a large database must be upgraded and traffic pointing to it before the 8 a.m. workday starts), it is imperative to test on hardware/resources as close as possible to final production.
Note
Many administrators work from a single set of hardware (virtual host) that has multiple servers provisioned virtually on that hardware. As servers are provisioned, snapshots of each major milestone are taken of the environment. All considerations are taken into account, and the upgrade process is tested and vetted out. When it is time to provision a new production SharePoint 2013 environment, you can use those snapshots to roll back the environment so that the same resources are consumed and timing can be estimated very closely.
SQL Server Upgrade Considerations
With the introduction of more features and more caching in SharePoint 2013, the demand on physical resources in the SharePoint 2013 server farm has increased as well. SQL servers now demand 8GB for small farms and 16GB for larger farms. They also require four cores and eight cores, respectively, for each type of farm. Administrators should keep in mind that this is for each node of a cluster if redundancy is built in to a given SharePoint 2013 environment.
The major software requirements are SQL Server 2012 x64 or SQL Server 2008 R2 x64 with Service Pack 1. Although some organizations might stay with SQL 2008 R2 SP1, the introduction of Microsoft SQL Server 2012 has many enterprises weighing the option of upgrading to this latest version because it provides some significant high-availability (HA) improvements, outlined in Chapter 9, “Managing and Maintaining SQL Server in a SharePoint Environment.”
Installing SharePoint 2013 Prerequisites
As in earlier versions of SharePoint, the prerequisites install portion of the install process can be handled through the PrerequisiteInstaller.exe before you install SharePoint. Alternatively, administrators may script out the download and install of the prerequisites. In addition, you can download all the prerequisites and store them on network or local storage for the prerequisite installer to execute these files with no Internet connectivity. This comes in handy when environments are in secure setups and are not permitted to access external networks.
If you need to manually install prerequisites, such as when there is no Internet access to the system, or you choose to install via a PowerShell script, the following roles and tools are required:
![]() Application server role
Application server role
![]() Web server (IIS) role
Web server (IIS) role
![]() Microsoft .NET Framework version 4.5 Release Candidate (RC)
Microsoft .NET Framework version 4.5 Release Candidate (RC)
![]() SQL Server 2008 R2 SP1 Native Client
SQL Server 2008 R2 SP1 Native Client
![]() Microsoft WCF Data Services 5.0
Microsoft WCF Data Services 5.0
![]() Microsoft Information Protection and Control Client (MSIPC)
Microsoft Information Protection and Control Client (MSIPC)
![]() Microsoft Sync Framework Runtime v1.0 SP1 (x64)
Microsoft Sync Framework Runtime v1.0 SP1 (x64)
![]() Windows Management Framework 3.0 RC, which includes Windows PowerShell 3.0
Windows Management Framework 3.0 RC, which includes Windows PowerShell 3.0
![]() Windows Identity Foundation (WIF) 1.0 and Microsoft Identity Extensions
Windows Identity Foundation (WIF) 1.0 and Microsoft Identity Extensions
![]() Windows Server AppFabric
Windows Server AppFabric
![]() Cumulative Update Package 1 for Microsoft AppFabric 1.1 for Windows Server (KB 2671763)
Cumulative Update Package 1 for Microsoft AppFabric 1.1 for Windows Server (KB 2671763)
Note
By altering the PrerequisiteInstaller.Arguments.txt file, administrators can “tell” SharePoint’s prerequisite installer to look for files located on a network or local drive location instead of going out to the Internet for the file downloads.
Planning for an Upgrade to SharePoint 2013
In Service Pack 2 for SharePoint 2007, Microsoft added a new Pre Upgrade Checker command-line tool. This tool enables the examination of a SharePoint 2007 environment and reports back on possible issues that would either limit or altogether block an upgrade to SharePoint 2010.
In SharePoint 2010, the Pre Upgrade Checker tool was deprecated and administrators were left with relying on the tools in PowerShell 2.0. Using PowerShell is the best way to shed light on possible issues that may arise in an upgrade from SharePoint 2010 to SharePoint 2013. If you use the Test-SPContentDatabase cmdlet, PowerShell simulates the result of actually mounting the database to a given web application and reports back any issues that would limit or block an upgrade, as shown in Figure 5.1.

FIGURE 5.1 Using the Test-SPContentDatabase cmdlet to view any pre-upgrade issues. As shown, a web application hasn’t been converted to claims, and there are some other artifacts.
After opening up SharePoint Management Shell (PowerShell for SharePoint) as Administrator, run Test-SPContentDatabase -Name DBNAME -WebApplication http://domain. In this example, DBName is the name of the database you want to test and is currently in SQL, and http://domain is the web application that currently exists in SharePoint.
Planning an upgrade requires the most upfront work in the overall upgrade process. Running through various test mounts, clearing issues in the source database, and running more test database mounts will result in an overall smooth upgrade when it comes time to actually perform the upgrade in production. Note that ignoring errors during the test mount of a database results in greater work after the mount is actually performed. After a database has been populated with references to site definitions that do not exist or solution packages that are not deployed to the new environment, cleaning these references while the site is live carries many risks as well as time restrictions.
One of the most common issues that administrators face when attempting to upgrade their content databases to SharePoint 2013 is the lack of claims-enabled databases in existence, because many organizations have opted instead to deploy SharePoint 2010 using the default, which is non-claims based. Microsoft has subsequently provided guidance on how to convert SharePoint 2010 web applications to claims.
Which method you use to “clean up” the database before the upgrade depends significantly on the issue that is showing in the Test-SPContentDatabase report. How to physically clean these issues out of a content database is entirely specific to each issue that the report identifies. Currently, you cannot successfully clean all potential issues in a few simple quick steps.
Performing the mount is as simple as replacing Test with Mount in the SPContentDatabase cmdlet. Doing so tells SharePoint to start the mount and upgrade process of the database specified. During the mount, SharePoint 2013 provides a percentage complete status indicator. After a successful or unsuccessful database mount, the final output is shown after the process has failed or succeeded, as shown in Figure 5.2.

Note
Missing web parts, solutions, features, site definitions, and the like are what are to be expected in artifacts displaced in the new SharePoint 2013 environment. Focus on one reported issue at a time and the process to scrub the database of that issue.
Performing a Database-Attach Upgrade
The database-attach process is a much more risk-averse upgrade process and is subsequently more likely to be used for most environments. It has the significant advantage of enabling SharePoint administrators to create new best-practice SharePoint 2010 environments and simply move the databases to a new farm and upgrade them there.
In SharePoint 2013, site collections are not upgraded when a content database is upgraded. This process is sectioned into two parts to allow site owners to decide whether and when to upgrade their site collections, as covered later in this chapter.
Content Database-Attach Upgrade Guide
The high-level steps involved with a database-attach upgrade are as follows:
1. Create a new destination SharePoint 2013 farm complete with all configurations made before attaching any databases. Remember that you need to configure any operational settings such as URLs or host headers as well.
2. Create a web application where the newly upgraded database will reside.
3. Perform an SQL backup of the content database you want to upgrade by going into the SQL instance that supports the 2010 environment, highlighting the database, and right-clicking and selecting Tasks > Backup.
4. When ready to do the actual upgrade, set the database in question to Read-Only in SQL. This allows for the SharePoint 2010 sites that are in that content database to be accessed but not written to or changed in any way.
5. Within SQL, restore the content database you backed up to the SQL instance.
6. Assuming that adequate test mounts have been done to clear any issues that would block a successful and clean upgrade, run the following PowerShell command Mount-SPContentDatabase -Name UnleashedDB -WebApplication http://SharePointUnleashed, where UnleashedDB is the backed-up content database and http://SharePointUnleased is the fully qualified domain name (FQDN) of the web application created in step 2.
Note
When creating a new web application, administrators must create a content database that under normal operation contains the site collections. However, when creating a web application for an upgraded content database, there is no need for this extra database, and it is later discarded. Be sure to name the database something relevant that ensures easy identification for later deletion.
In addition, you can append many parameters to Mount-SPContentDatabase.
Performing a Site Collection Upgrade
In SharePoint 2013, site collection owners now have the option of when to upgrade their sites from the SharePoint 2010 “mode” to the SharePoint 2013 “mode”; more on modes later in this chapter. The database upgrade process actually handles the upgrade in two components, database schema and site collections, and they are not mutually exclusive as they were in SharePoint 2010.
Site owners can use the preview mode and view how the SharePoint 2013 mode looks and, more important, how it functions with their site collection. Farm administrators can set the time limit and exceptions on matters that relate to when and by whom the site collection must be upgraded. These parameters include whether the site collection is allowed to be upgraded (if this is disabled, the farm administrator must perform the upgrade) and when reminders and notifications are sent to site owners.
Farm administrators may also choose to perform site collection upgrades immediately after schema upgrade, but a certain amount of risk that is associated with this must be taken into account, such as incompatible features, resource-intensive draw on servers, and so on.
Farm administrators may also control how frequently requested site collections can be upgraded. This is a valuable asset when resources are limited and during peak operation hours.
Here are a few script examples for site collection upgrade.
To upgrade an entire content database and all its site collections, use the following syntax, as shown in Figure 5.3:
Get-SPSite -ContentDatabase DBNAMEHERE -Limit All | Upgrade-SPSite –VersionUpgrade

To view upgrades that have completed, use the following syntax, as shown in Figure 5.4:
Get-SPSiteUpgradeSessionInfo -ContentDatabase -DBNAMEHERE -ShowInProgress
-ShowCompleted -ShowFailed

To add a site collection to the upgrade queue, use the following syntax:
Upgrade-SPSite http://URLHere -VersionUpgrade -QueueOnly
Performing a Service Application Upgrade
In SharePoint 2013, administrators now need to also be concerned about data stores in the service application databases. As a result of this added model in SharePoint 2010, a path for upgrading many service application databases has been made available in SharePoint 2013.
The following databases are supported for upgrade:
![]() Content databases
Content databases
![]() Sync database
Sync database
![]() Social database
Social database
![]() User profile database
User profile database
![]() Project databases (All four databases get merged into one in SharePoint 2013.)
Project databases (All four databases get merged into one in SharePoint 2013.)
![]() Secure store database
Secure store database
![]() Social database
Social database
![]() Search admin database
Search admin database
![]() Managed metadata database
Managed metadata database
Each service application differs slightly depending on which dependencies they have, in addition to their database and their proxy. For most of the service applications, however, the upgrade process is as follows:
1. Create an application pool or declare an existing application pool for the service application.
2. Restore the service application database.
3. Create the service application proxy.
Note
If upgrading the My Site host, you must upgrade the User Profile Service (UPS) and the Managed Metadata Service (MMS) first.
Managed Metadata Upgrade
Upgrade of the MMS involves multiple steps. For the MMS application, you must complete the additional steps of reconfiguring the content type hub and starting the MMS, as shown in the following screenshots. The content type hub should be changed because the old hub URL is still present in the content database. Changing the content type hub causes all the content types to be redistributed to the new 2013 farm.
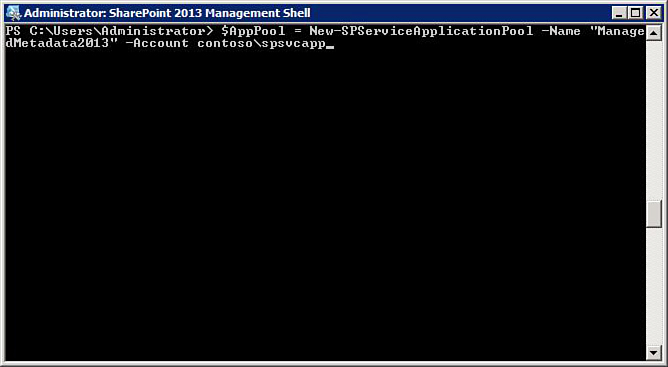
The first step in creating/associating the Managed Metadata application pool consists of running the New-SPServiceApplication Pool cmdlet, as shown in Figure 5.5. This creates a new application pool in your SharePoint 2013 environment.
If you choose to use an application pool currently in use, utilize the following PowerShell script:
"$AppPool = Get-SPServiceApplicationPool -Identity "Application Pool Name"
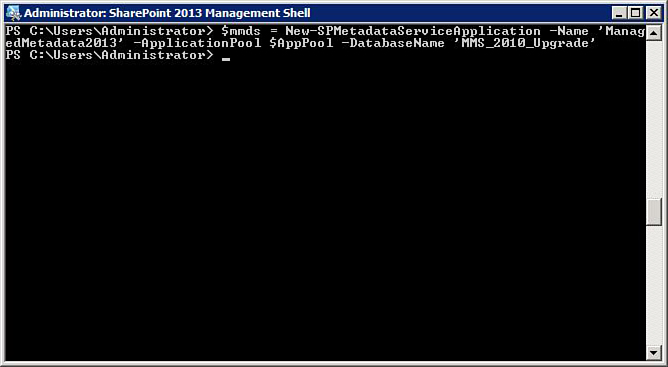
The next step, illustrated in Figure 5.6, is to create the MMS application and restore the managed metadata database (from SharePoint 2010) to the new application pool. Note that if you reference the restored (to SQL) database within the New-SPMetadataServiceApplication cmdlet, the cmdlet automatically uses the 2010 database to build the new service application and upgrade it in the process.
At this point, the newly created MMS application can be seen in Central Administration. We now have to create the proxy for our newly created service application.
Creating the Managed Metadata application proxy is as simple as running the New-SPMetadataServiceApplicationProxy cmdlet. This cmdlet name speaks for itself and does exactly that: creates the MMS proxy. By entering a few required parameters, such as name and service application, you can bind it to the proxy, as shown in Figure 5.7.

After the proxy creation has been completed, navigating through Central Administration displays the newly created MMS application proxy, as shown in Figure 5.8.

FIGURE 5.8 Viewing the new service application and service application proxy in Central Administration.
In addition, after the service application has been created, the administrator should then be able to navigate the MMS, as shown in Figure 5.9. Upon a successful upgrade, all the content from the previous SharePoint 2010 environment should be available in this structure.

Note
If a red error alert states that the MMS is unavailable, ensure that the service is started in Services on Server in Central Administration.
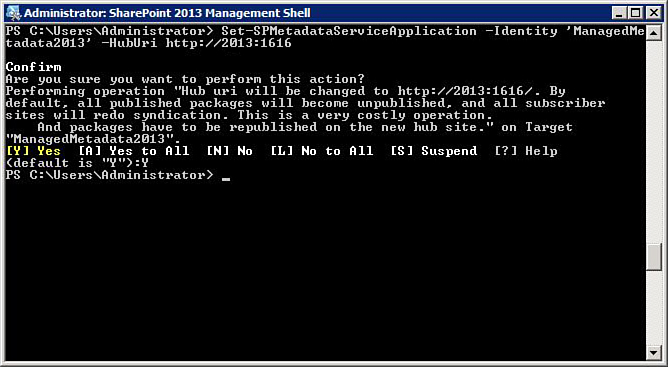
The final step in the process is to change the content type hub URL using the cmdlet shown in Figure 5.10. Note that the cmdlet is showing uri rather than what might seem logical (url).
User Profile Service Upgrade
You can upgrade the UPS application if you want, but you must give careful attention to the process. The high-level steps for upgrading the UPS application are as follows:
1. Export the Microsoft Identity Integration Services (MIIS) encryption key (optional).
2. Create the web application for the UPS.
3. Create the UPS.
4. Restore user profile databases to the new SharePoint 2013 farm (sync optional).
5. Import the MIIS encryption key (optional).
Exporting the MIIS Encryption Key
The UPS application depends on the MIIS key to authenticate its processes against Active Directory. To upgrade the user profile sync database, this key must be exported from its location at 14Synchronization ServiceBin and imported into the new SharePoint 2013 environment. The sync database stores configuration and staging data for use when profile data is being synchronized with directory services such as Active Directory.
It is possible to upgrade the UPS without exporting/importing the encryption key, but the administrator must re-create the sync database manually. This method is much easier and cleaner overall. However, if you choose to use the existing sync database and the resulting encrypting key, you need to complete some preliminary steps to extract this key:
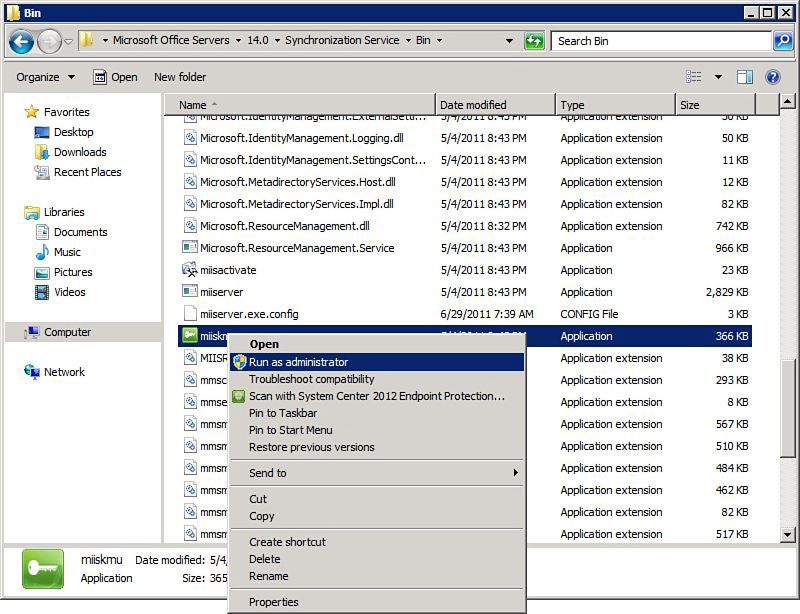
1. To export the existing encryption key, navigate to <root directory drive>Program FilesMicrosoft Office Servers14.0Synchronization ServiceBin on the SharePoint 2010 Server that hosts the Synchronization Service and locate the miiskmu.exe application. Run the miiskmu.exe application and choose the option to export the key set by filling out the credentials that are used to currently run the Synchronization Service and the desired location to save the key to. After doing this, review the summary and finalize the export with the Close button.
2. Navigate to <root directory drive>Program FilesMicrosoft Office Servers14Synchronization ServiceBin and execute miiskmu.exe, as shown in Figure 5.11.
3. Select Export Key Set, as shown in Figure 5.12. This process exports the encryption key currently being used for synchronization.

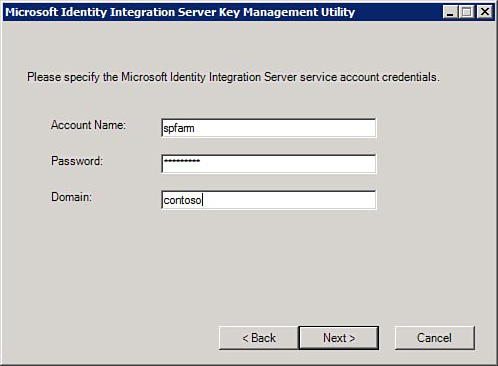
4. Enter the credentials that run the current 2010 UPS when prompted, as shown in Figure 5.13. This is usually the farm account that was originally used to start the User Profile Synchronization Service.
5. Choose the path to save the file, click Next, and then click Close when the operation completes successfully. The file exports as a .bin file, and it makes no difference where the file is exported to. However, it saves you work later if the file is exported to the new SharePoint 2013 server that runs the UPS and places the file at <Root>Program FilesMicrosoft Office Servers15.0Synchronization ServiceBin.
We cover adding this key back to the new environment later in this section; you should do that last.
Creating the New User Profile Synchronization Service Application
Just as before with the MMS application, the second process that is used to upgrade the UPS application is to create a new application pool to create the new service application and attach the previous SharePoint 2010 UPS database to it.
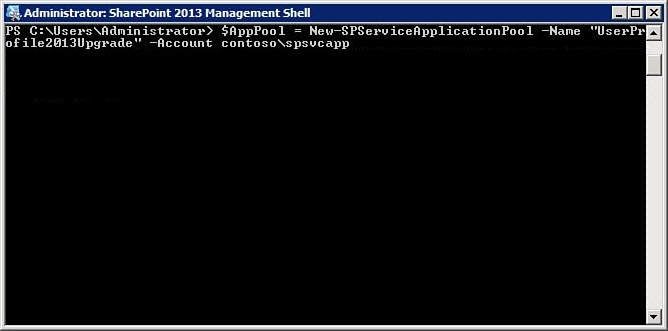
Before creating the application pool and UPS, start the UPS in Services on Server. Make sure that you select the server drop-down appropriate for the server on which the UPS will run and where you have set permissions. Then create the new application pool using the New-SPServiceApplicationPool cmdlet, as illustrated in Figure 5.14.
You must still complete all steps to provision a UPS application before restoring the service application. You must complete all the procedures to prepare the environment to accept a UPS application (for example, setting permissions correctly for the UPS accounts on the servers running the services).
During the creation of the new UPS application, the administrator has the option of defining specific parameters in the cmdlet, as shown in Figure 5.15. These parameters are optional, but in most cases, all are used in a normal upgrade situation, with the exception of -ProfileSyncDBName. If administrators choose to include the sync database, the ProfileSyncDBName parameter is used to reference the SharePoint 2010 SyncDB. When restoring the sync database to the new SharePoint 2013 environment, the build version of the database does not change from when it lived in SharePoint 2010 and when it gets “upgraded” in SharePoint 2013. The upgrade only serves the purpose of placing the database into the farm and making it usable.

After you create it, the new UPS application appears within SharePoint Central Administration.
In PowerShell, the administrator may use piping to insert the output value of a previously run cmdlet. However, if piping is not used in this process, the administrator must directly reference the service application that was created earlier (by globally unique identifier [GUID]) when creating the proxy for that service application. To acquire this GUID, just run the SQL query shown in Figure 5.16, which exposes the GUID needed in the -ServiceApplication parameter.

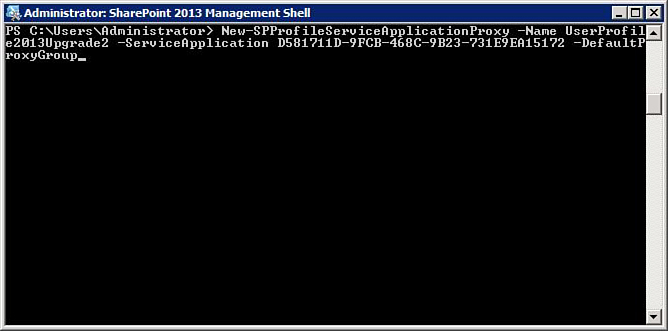
After recovering the GUID for the UPS application, creating the proxy is similar to creating the proxy for the MMS. However, the Profile Service is referenced in the cmdlet. Figure 5.17 shows a script example for creating a UPS application proxy with the GUID reference previously acquired.
After the service application and proxy has been created, the administrator can view the UPS application proxy, as shown in Figure 5.18.

Note
Unfortunately, no percentage status indicator appears during service application database upgrades.
Note that when you are restoring the MIIS encryption key, this process must be done last, because when declaring the location in which to associate the key, the key assumes that there is a sync database to connect to. If this process is done before restoring (or creating) a sync database, you receive this error: “The operation encountered an error and cannot be completed.”
The next step is to import and connect the encryption key that was previously exported (if you are restoring the sync database) from the SharePoint 2010 environment to the SharePoint 2013 environment. The first step in this process is to copy the key to <Root>Program FilesMicrosoft Office Servers15.0Synchronization ServiceBin.
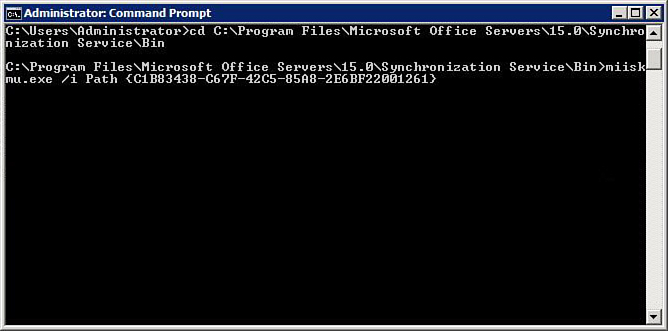
To do this, open the command prompt and change directory (cd) to the <Root>Program FilesMicrosoft Office Servers15.0Synchronization ServiceBin directory and press Enter. After the directory has been changed, enter the following:
miiskmu.exe /I Path {GUID}
If you do not know the GUID of the encryption key, you can query this in the SharePoint 2010 environment; they are identical when imported into the SharePoint 2013 environment.
Figure 5.19 shows the command-line query used on the SharePoint 2010 server to acquire the GUID of the MIIS encryption key. By pressing Ctrl+C directly within this alert box, the administrator can copy all the text, including the MIIS database key, to the Clipboard for easy extraction in the next step in the process of importing the key.

From the command-line tool on the SharePoint 2013 server, change the directory line to <Root>Program FilesMicrosoft Office Servers15.0Synchronization ServiceBin. miiskmu.exe /I Path {GUID} is being run to inject the key, as shown in Figure 5.20.
After completing these steps, proceed to Services on Server in Central Administration and start the User Profile Synchronization Service.
Figure 5.21 shows the restored SharePoint 2013 UPS application synchronization statistics and information. The last crawl shows from the last successful run when the database lived in the SharePoint 2010 environment.

Search Service Application
When restoring the Search service application, remember that only the Search administration database is restored. Any indexes must be re-created by running a new full crawl. This means that the only items that are upgradable from SharePoint 2010 Search to SharePoint 2013 Search are content sources, federated locations, crawl rules, schedules, best bets, and search scopes (and search results pages, web parts, and settings that come bundled with the content database of a site collection).
If the enterprise environment consists of multiple SharePoint 2010 farms where a designated farm serves as the search instance for multiple child instances, each child instance must be reconfigured to point to the new SharePoint 2013 search instance.
In SharePoint 2010, Microsoft included the FAST for SharePoint service application as part of the service application model. In SharePoint 2013, FAST has been integrated directly into SharePoint Server 2013.
Because site collections are upgraded at different times from when a content database is mounted to a web application, the Search service application can be upgraded before site collection-level search centers are fully upgraded. This scenario is known as mixed mode, and until the site collection is fully upgraded to 15 mode, some content features might not be available on the search center.
SharePoint 2010 (14) Mode and 2013 (15) Mode
By default, all upgraded content databases show as if they resided in SharePoint 2010. The SharePoint 2010 mode, as stated earlier, has taken the place of the Visual Upgrade in SharePoint 2013. Virtual directories in IIS control the management and routing of the bits that get used to drive the look and feel of the site as it renders in a given mode (for example, _layouts/_controltemplates in 14 hive or the same in the 15 hive). Solutions deployed originally to the 14Templates directly still have this directory on the environment to point to and thus still function correctly. After the upgrade of a database, unless otherwise instructed to do so, the SharePoint 2013 site collection shows up in 14 mode, meaning it will have the look, feel, and functionality of a site that is still in the SharePoint 2010 environment.
Having the 14 mode available during the upgrade makes it easier to complete the upgrade. The 14 mode files allow for site functionality to be more or less identical to the way it was in SharePoint 2010, and allows organizations the luxury of indefinitely keeping a site or its features as if they were still native to SharePoint 2010.
Two types of notifications are available when a mode event is triggered (read-only, upgraded, reminder to upgrade, and so on): An email can be sent out, or a dynamic status bar is shown on top of a site in a given mode.
Summary
With proper planning and risk management, upgrade from SharePoint 2010 can be a seamless and stress-free exercise. Planning is always the key, and key factors from this chapter should be taken into account when planning for an upgrade. Administrators need to take into account the need for a claims-based authentication upgrade as well as a content upgrade. In addition, organizations need to decide whether or not they will be upgrading their service applications, or whether or not those service applications will be recreated from scratch.
Best Practices
The following are best practices from this chapter:
![]() Planning is always overstated, but it really is the best defense against problematic upgrades. As a general rule of thumb, planning should take three times as long as the actual upgrade process itself.
Planning is always overstated, but it really is the best defense against problematic upgrades. As a general rule of thumb, planning should take three times as long as the actual upgrade process itself.
![]() Encourage content owners to review old and stale content. Upgrading data irrelevant or outdated data and archiving such add exponential time to the upgrade process.
Encourage content owners to review old and stale content. Upgrading data irrelevant or outdated data and archiving such add exponential time to the upgrade process.
![]() Do not assume that upgrading old content (and more specifically, service applications) is the best method. Often, it is much more efficient to reprovision content or service applications.
Do not assume that upgrading old content (and more specifically, service applications) is the best method. Often, it is much more efficient to reprovision content or service applications.
![]() Reset unghosted sites to standard SharePoint site definitions where possible to ensure consistency across sites.
Reset unghosted sites to standard SharePoint site definitions where possible to ensure consistency across sites.
![]() It is much easier to upgrade the profile and social database for UPS and simply re-create the sync database than it is to restore the sync database to the new SharePoint 2013 environment.
It is much easier to upgrade the profile and social database for UPS and simply re-create the sync database than it is to restore the sync database to the new SharePoint 2013 environment.
![]() Use 14 mode wisely; it can be a simple and easy transition from SharePoint 2010 to SharePoint 2013. Because of the 14 bits on the server, most customizations work inside the 2013 environment.
Use 14 mode wisely; it can be a simple and easy transition from SharePoint 2010 to SharePoint 2013. Because of the 14 bits on the server, most customizations work inside the 2013 environment.