Chapter 9. Managing and Maintaining SQL Server in a SharePoint Environment
In This Chapter
![]() Monitoring SQL Server in a SharePoint Environment
Monitoring SQL Server in a SharePoint Environment
![]() Maintaining SQL Server in a SharePoint Environment
Maintaining SQL Server in a SharePoint Environment
![]() Managing SharePoint Content Databases
Managing SharePoint Content Databases
![]() Externalizing BLOB Storage in SharePoint 2013
Externalizing BLOB Storage in SharePoint 2013
SharePoint 2013 introduces multiple new Structured Query Language (SQL) Server databases and, subsequently, more SQL Server resources are needed. SQL Server databases are the heart of every SharePoint farm; they are the back-end repository for all SharePoint data and provide for critical architectural elements. To achieve maximum stability of a SharePoint farm, administrators must monitor and maintain SQL Server’s storage and performance on a regular basis because heavy stress on an SQL Server can ultimately degrade the end-user experience.
This chapter covers the most important SQL Server administration concepts and techniques useful for administrators. It focuses on specifics for monitoring, maintaining, and managing SharePoint databases; discusses the essential monitoring and maintenance tools; and presents guidelines for improving the performance and storage of SharePoint Server solutions running on Microsoft SQL Server.
In addition, at the end of this chapter, administrators learn how to solve the storage, performance, and manageability issues associated with huge SharePoint content databases by making use of the powerful storage externalization capabilities of SQL Server 2012 with the Remote Binary Large Objects Storage (RBS) feature.
The new high availability features of SQL 2012 that involve the use of SQL Server 2012 AlwaysOn Availability Groups (AOAGs) are covered in Chapter 4, “Advanced SharePoint 2013 Installation and Scalability.”
Monitoring SQL Server in a SharePoint Environment
SharePoint administrators need to know how to proficiently monitor SQL Server performance and storage in SharePoint environments. Understanding monitoring strategies and tools enables administrators to shift from reactively dealing with issues to proactively troubleshooting and fixing problems before the server gets to the point where end users are impacted. This section walks administrators though a range of monitoring tools they should be aware of to efficiently and powerfully monitor, maintain, and troubleshoot SQL Server in SharePoint environments. Topics include Windows Management Instrumentation (WMI), event logs, dynamic management views, Reliability and Performance Monitor, Activity Monitor, Management Data Warehouse, and SQL Server Profiler. With a vast range of monitoring tools available, choosing the right tool for the job is an important skill.
Windows Management Instrumentation
WMI is a Microsoft implementation of Web-Based Enterprise Management (WBEM), an industry initiative that establishes management infrastructure standards. WMI supplies administrators with the tools to explore, understand, and use various system devices, resources, and applications of Microsoft operating systems and servers. WMI includes a rich infrastructure that enables efficient and scalable monitoring, data collection, and problem recognition. Think of WMI as a set of functionalities embedded into Microsoft operating systems and servers, including SQL Server, that enables local and remote monitoring and management.
WMI is a huge initiative and certainly deserves an entire book of its own. However, what administrators need to know is that the architecture of WMI enables extensibility through the use of providers, which are dynamic link library files that interface between WMI and software or hardware components.
Each provider contains a set of WMI classes. Each WMI class represents a manageable entity, exposes information through properties, and enables the execution of some actions via methods. Because a provider is designed to access some specific management information, the WMI repository is logically divided into several areas called namespaces. Each namespace contains a set of providers with their related classes specific to a management area.
Administrators should also know that SQL Server, as part of its installation process, adds two providers to the WMI repository (WMI Provider for Configuration Management and WMI Provider for Server Events):
![]() The WMI Provider for Configuration Management enables administrators to use WMI to manage SQL Server services, SQL Server client and server network settings, and server aliases. For example, after a connection is established with the WMI provider on a remote computer, not only is it possible to retrieve information about SQL Server instances, but it’s also possible to perform actions on them such as starting and stopping the instances.
The WMI Provider for Configuration Management enables administrators to use WMI to manage SQL Server services, SQL Server client and server network settings, and server aliases. For example, after a connection is established with the WMI provider on a remote computer, not only is it possible to retrieve information about SQL Server instances, but it’s also possible to perform actions on them such as starting and stopping the instances.
![]() The WMI Provider for Server Events enables administrators to use WMI to monitor events in SQL Server. Included are Data Definition Language (DDL) events that occur when databases are created, altered, or dropped and when tables are created, altered, or dropped, for example. In addition, software developers can write code that responds to these events, and they can even author their own set of monitoring tools. Administrators can also create an SQL Server Agent alert that is raised when a specific SQL Server event occurs that is monitored by the WMI Provider for Server Events.
The WMI Provider for Server Events enables administrators to use WMI to monitor events in SQL Server. Included are Data Definition Language (DDL) events that occur when databases are created, altered, or dropped and when tables are created, altered, or dropped, for example. In addition, software developers can write code that responds to these events, and they can even author their own set of monitoring tools. Administrators can also create an SQL Server Agent alert that is raised when a specific SQL Server event occurs that is monitored by the WMI Provider for Server Events.
It’s worth mentioning that WMI enables scripting languages such as VBScript or Windows PowerShell or even the WMI command-line utility (Wmic.exe) to manage local and remote servers. This enables administrators to query this huge amount of management information through an SQL-like language called the WMI Query Language (WQL).
To explore the available namespaces, classes, and events, administrators can use a downloadable tool such as the WMI Explorer shown in Figure 9.1.

Event Logs
An additional aspect of monitoring often disregarded by some administrators is monitoring the various log files available. SQL Server logs certain system events and user-defined events to the SQL Server error log and the Microsoft Windows application log.
Administrators can use information in the SQL Server error log to troubleshoot problems related to SQL Server. Browsing the SQL Server logs for irregular entries is an essential administration task; preferably, it should be carried out on a daily basis to help administrators spot any current or potential problem areas. An application-aware solution such as Microsoft’s System Center Operations Manager (SCOM) can help to automate the process of monitoring SQL (and SharePoint) logs.
SQL Server error log files are simple text files stored on disk, but it is good practice to examine them by using SQL Server Management Studio or by executing the xp_readerrorlog extended stored procedure to prevent any SQL operations from being blocked by opening one of these files in a text editor.
A new error log file is created each time an instance of SQL Server is started; however, the sp_cycle_errorlog system stored procedure can be used to cycle the error log files without having to restart the instance of SQL Server.
The Windows application log describes events that occur on the Windows operating system and other events related to SQL Server and SQL Server Agent. Administrators can use the Windows Event Viewer to view the Windows application log and to filter the information. These event logs should be another place that administrators go to look for information about any issues that take place with SQL Server.
In the past, administrators had to view the SQL Server and Windows event logs independently; however, the SQL Server Management Studio Log File Viewer makes it possible for administrators to combine both sets of logs into a united view.
Using the SQL Server Log File Viewer
To view the log files using SQL Server Management Studio, follow these steps:
1. Click Start, All Programs, Microsoft SQL Server 2012, SQL Server Management Studio.
2. Connect to the desired SQL Server database engine instance and expand that instance.
3. In Object Explorer, expand Management.
4. Right-click SQL Server Logs, click View, and then select either SQL Server Log or SQL Server and Windows Log.
5. Double-click any log file, such as the one shown in Figure 9.2.

Log File Cycling
One thing administrators should keep in mind is that in production environments, log files can get quite large and take a long time to open. To avoid huge log files, it is a good idea to cycle them on a regular basis. Restarting the SQL Server service is not good practice. Alternatively, the log file can be automatically cycled using the sp_cycle_errorlog system stored procedure. The more entries written to the error log, the more often it should be cycled. To automate the log cycling process, administrators can utilize the SQL Server Agent to create a new agent job with a single T-SQL task to execute the stored procedure, or they can include it in a regular daily or weekly maintenance plan. Maintenance plans are covered in depth later in this chapter.
Number of Log Files to Maintain
To keep as much historical information as possible, it is recommended that administrators configure the number of log files to be retained; this number depends on the amount of disk space available and the amount of activity on the server.
To configure the number of log files to be retained, follow these steps:
1. Click Start, All Programs, Microsoft SQL Server 2012, SQL Server Management Studio.
2. Connect to the desired SQL Server database engine instance and expand that instance.
3. In Object Explorer, expand Management.
4. Right-click SQL Server Logs, and click Configure.
5. As shown in Figure 9.3, check the box to limit the number of error logs created before they are recycled. SQL Server retains backups of the previous six logs, unless this option is checked and a different maximum number of error log files specified.

6. Specify a different maximum number of error log files and click OK.
Dynamic Management Views
Another area to retrieve monitoring information is the Master database; this is where SQL Server stores most of its configuration information. It is not a good idea to directly query the Master database, because Microsoft could change the structure of the Master database from version to version or even in service pack releases. Rather than developers building solutions that rely on the Master database schema and risking any changes in a service pack messing up the solution, Microsoft instead has created a set of dynamic management views (DMVs) and functions.
DMVs and functions return valuable information that can be used to monitor the health of a server instance, diagnose problems, and tune performance. They give administrators an easy way to monitor what SQL Servers are doing and how they are performing by providing a snapshot of the exact state of the SQL Servers at the point they are queried. They replace the need to query the system tables or to use other inconvenient methods of retrieving system information in use prior to SQL Server 2005. SQL Server 2005 introduced DMVs, and the latest release, SQL Server 2012, includes additional useful DMVs.
Whenever an instance is started, SQL Server starts saving state and diagnostic data into DMVs. When an instance is restarted, the information is flushed from the views, and new data begins to be loaded.
DMVs and functions are part of the sys schema in the Master database. Administrators can find a list of dynamic views in SQL Server Management Studio under Master/Views/System Views, and the dynamic functions are located under Master/Programmability/Functions/System Functions/Table-valued Functions. Each dynamic object’s name has a dm_ prefix.
For example, later in this chapter, the sys.dm_db_index_physical_stats dynamic management function is used to determine the fragmentation percentage of the indexes for efficient database maintenance.
Reliability and Performance Monitor
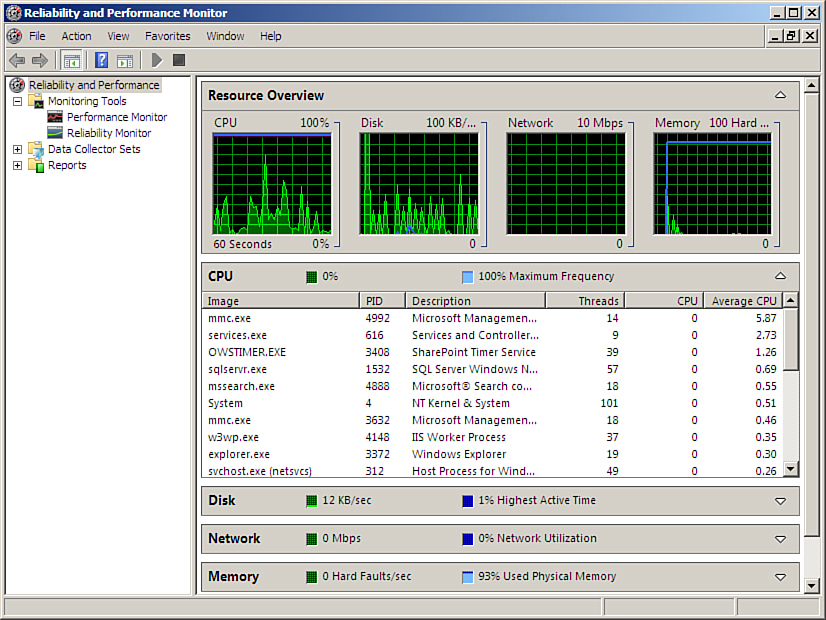
One of the Windows tools administrators should be skilled at using is the Reliability and Performance Monitor. Administrators who used perfmon in Windows Server 2003 may find the Reliability and Performance Monitor in Windows Server 2008/R2/2012 a bit confusing when they first explore it. However, in addition to all the features included in previous versions, it now presents some new functionality that can make performance troubleshooting much easier and powerful because it provides a more detailed view of Windows server performance and per-instance SQL Server-specific counters.
The Reliability and Performance Monitor can monitor resource usage for the server and provide information specific to SQL Server either locally or for a remote server. It provides a massive set of counters that can be used to capture a baseline of server resource usage, and it can monitor over longer periods to help discover trends. It can also detect abnormal values at a glance for key performance counters on critical SQL Server instances. In addition, administrators can configure it to produce alerts when preset thresholds are surpassed.
After opening the Reliability and Performance Monitor, as shown in Figure 9.4, the % Processor Time counter from the Processor object is automatically monitored in real time with a 1-second refresh interval. Additional counters can be appended to the graph by clicking the green plus icon on the toolbar and navigating through objects, which classify the counters into groups. When an SQL Server instance is installed on a server, it adds more than 1,000 new performance counters to the Performance Monitor section of the Reliability and Performance Monitor. Of the many performance counters that can be selected when troubleshooting an SQL Server instance, choosing the appropriate key indicators can significantly help administrators quickly isolate bottlenecks and direct their investigation to the appropriate resources for corrective actions.
In addition, administrators can capture performance counters to log files for long-term analysis by creating data collector sets. Creating data collector sets is beyond the scope of this chapter.
Activity Monitor
Undoubtedly, the Reliability and Performance Monitor is a great tool for administrators to monitor resource usage. However, an administrator should first leverage the SQL Server Activity Monitor, as shown in Figure 9.5, when needing to gain some quick insight into an SQL Server system’s performance. Starting in SQL Server 2008, the Activity Monitor introduced a new performance dashboard with intuitive graphs and performance gauges with drill-down and filtering capabilities. The new tool’s look and feel is similar to the Reliability and Performance Monitor, but the information captured is broken down into five main sections dedicated to SQL Server performance monitoring.

The sections are Overview, Processes, Resource Waits, Data File Input/Output (I/O), and Recent Expensive Queries. In SQL Server 2012, right-clicking an SQL Server instance within Object Explorer and specifying the Activity Monitor launches the tool, as shown in Figure 9.5.
![]() Overview: Shows the graphical display of Processor Time (%), Number of Waiting Tasks, Database I/O (MB/Sec), and the Number of Batch Requests/second.
Overview: Shows the graphical display of Processor Time (%), Number of Waiting Tasks, Database I/O (MB/Sec), and the Number of Batch Requests/second.
![]() Processes: Lists all the active users who are connected to the SQL Server database engine. This is beneficial for administrators because they can click any of the session IDs, run an SQL Server Profiler trace to capture all its activities, or even kill a specific process.
Processes: Lists all the active users who are connected to the SQL Server database engine. This is beneficial for administrators because they can click any of the session IDs, run an SQL Server Profiler trace to capture all its activities, or even kill a specific process.
![]() Resource Waits: Displays resource waits vertically based on the following wait categories: CPU, SQL Common Language Runtime (SQLCLR), Network I/O Latch, Lock, Logging, Memory, Buffer I/O, Buffer Latch, and Compilation. From a horizontal perspective, the Wait Time, Recent Wait Time, Average Waiter Counter, and Cumulative Wait Time metrics are published for each Wait category. Analogous to the Processes section, data can be filtered based on items within a column.
Resource Waits: Displays resource waits vertically based on the following wait categories: CPU, SQL Common Language Runtime (SQLCLR), Network I/O Latch, Lock, Logging, Memory, Buffer I/O, Buffer Latch, and Compilation. From a horizontal perspective, the Wait Time, Recent Wait Time, Average Waiter Counter, and Cumulative Wait Time metrics are published for each Wait category. Analogous to the Processes section, data can be filtered based on items within a column.
![]() Data File I/O: Displays disk-level I/O information related to all the data and log files of user and system databases. Administrators can use this to rapidly recognize databases that are performing badly because of disk bottlenecks.
Data File I/O: Displays disk-level I/O information related to all the data and log files of user and system databases. Administrators can use this to rapidly recognize databases that are performing badly because of disk bottlenecks.
![]() Recent Expensive Queries: The last section in Activity Monitor is Recent Expensive Queries. This section gives administrators the opportunity to capture the queries that are performing the worst and negatively influencing an SQL Server instance. Approximately 10 to 15 of the worst and most expensive queries are displayed in the performance dashboard. The actual query is displayed with augmenting metrics such as Execution in Minutes, CPU ms/sec, Physical Reads/sec, Logical Write/sec, Logical Reads/sec, Average Duration in ms, and Plan Count. It is also possible to right-click the most expensive query and show the execution plan.
Recent Expensive Queries: The last section in Activity Monitor is Recent Expensive Queries. This section gives administrators the opportunity to capture the queries that are performing the worst and negatively influencing an SQL Server instance. Approximately 10 to 15 of the worst and most expensive queries are displayed in the performance dashboard. The actual query is displayed with augmenting metrics such as Execution in Minutes, CPU ms/sec, Physical Reads/sec, Logical Write/sec, Logical Reads/sec, Average Duration in ms, and Plan Count. It is also possible to right-click the most expensive query and show the execution plan.
Data Collectors
The Management Data Warehouse provides administrators with a simple mechanism to track statistics over time. By implementing the Management Data Warehouse, administrators can monitor performance and do trend analysis for the SQL Server 2012 instances they manage.
The Management Data Warehouse is a relational database inside the SQL Server 2012 instance that holds a variety of performance-related statistics. The performance statistics in the Management Data Warehouse are gathered via special data-gathering routines, known as data collections. The Management Data Warehouse can include data collection information from a sole instance or can alternatively hold data collected from multiple instances. The data collection process depends on prebuilt SQL Server Integration Services (SSIS) routines and SQL Server Agent jobs, which diminishes the number of things administrators need to do to build and maintain a database that contains performance statistics.
SQL Server 2012 provides three different system data collection definitions. These data collections are Disk Usage, Query Activity, and Server Activity. Each of these data collection definitions identifies the data to be collected, how often it should be collected, and how long it should be kept in the Management Data Warehouse.
Data collections can be run manually, on a schedule, or continually. Manual and scheduled data collections collect and upload data into the Management Data Warehouse on the same schedule. These types of data collections are known as noncached collections. When a data collection runs continually, data is cached in a directory and then uploaded to the Management Data Warehouse from time to time. These are known as cached collections.
It is also worth mentioning that Microsoft has also provided standard reports to enable administrators to drill down into data gathered for each of these collections using SQL Server Management Studio.
SQL Server Profiler
Microsoft SQL Server Profiler is a graphical user interface to SQL Trace for monitoring an instance of the Database Engine or Analysis Services. Administrators can capture and save data about each event to a file or table to analyze later. For example, administrators can monitor a production environment to tell which stored procedures are affecting the overall performance. SQL Server Profiler is used for activities such as the following:
![]() Stepping through problematic queries to find the cause of a problem.
Stepping through problematic queries to find the cause of a problem.
![]() Finding and diagnosing bad-performing queries.
Finding and diagnosing bad-performing queries.
![]() Capturing the series of T-SQL statements that lead to a problem. Saved traces can then be used to replicate the problem on test servers for later diagnostics.
Capturing the series of T-SQL statements that lead to a problem. Saved traces can then be used to replicate the problem on test servers for later diagnostics.
![]() Monitoring the performance of SQL Server to tune architecture.
Monitoring the performance of SQL Server to tune architecture.
![]() Correlating performance-collected counters to diagnose problems.
Correlating performance-collected counters to diagnose problems.
To use SQL Server Profiler, an administrator needs to understand the terms that describe the way the tool functions.
Event
An event is an action that is generated within an instance of SQL Server Database Engine. These actions are used to perform specific tasks such as the following:
![]() Login connections and disconnections
Login connections and disconnections
![]() T-SQL
T-SQL SELECT, INSERT, UPDATE, and DELETE statements
![]() Remote procedure call (RPC) batch status
Remote procedure call (RPC) batch status
![]() The start or end of a stored procedure
The start or end of a stored procedure
![]() The start or end of statements within stored procedures
The start or end of statements within stored procedures
![]() The start or end of an SQL batch
The start or end of an SQL batch
![]() An error written to the SQL Server error log
An error written to the SQL Server error log
![]() Lock-related actions on a database object
Lock-related actions on a database object
![]() Security permission checks
Security permission checks
All the data generated by an event is displayed in the trace in a single row. This row is intersected by data columns that describe the event in detail.
Event Class
An event class is a type of event that can be traced. The event class contains all the data that can be reported by an event, like the following:
![]() SQL:BatchCompleted
SQL:BatchCompleted
![]() Audit Login
Audit Login
![]() Audit Logout
Audit Logout
![]() Lock:Acquired
Lock:Acquired
![]() Lock:Released
Lock:Released
Event Category
An event category defines the way events are grouped within SQL Server Profiler. For example, all lock events classes are grouped within the Locks event category. However, this grouping is only related to SQL Server Profiler, not the database engine.
Data Column
A data column is an attribute of an event class captured in the trace. Because the event class determines the type of data that can be collected, not all data columns are applicable to all event classes. For example, in a trace that captures the Lock:Acquired event class, the BinaryData data column contains the value of the locked page ID or row, but the Integer Data data column does not contain any value because it is not applicable to the event class being captured.
Template
A template defines the default configuration for a trace. Specifically, it includes the event classes an administrator wants to monitor with SQL Server Profiler. For example, an administrator can create a template that specifies the events, data columns, and filters to use. A template is saved as a file which controls the trace data that is captured when a trace based on the template is launched. This is useful for quick look and diagnostics in search for common known issues.
Trace
A trace captures data based on selected event classes, data columns, and filters. For example, an administrator can create a trace to monitor exception errors or to monitor what is being currently executed on the server, how long it takes, who is executing the statement, and all the different data columns.
Filter
Criteria can be defined to filter the data collected by an event. To avoid large traces, an administrator can limit the Microsoft Windows usernames in the trace to specific users, thereby reducing the output data.
If a filter is not set, all events of the selected event classes are returned in the trace output.
Using SQL Server Profiler
1. Click Start, All Programs, SQL Server 2012, Performance Tools, SQL Server Profiles.
2. Click File, New Trace, and then log in to the desired server.
3. The Create Trace window pops up, as shown in Figure 9.6.
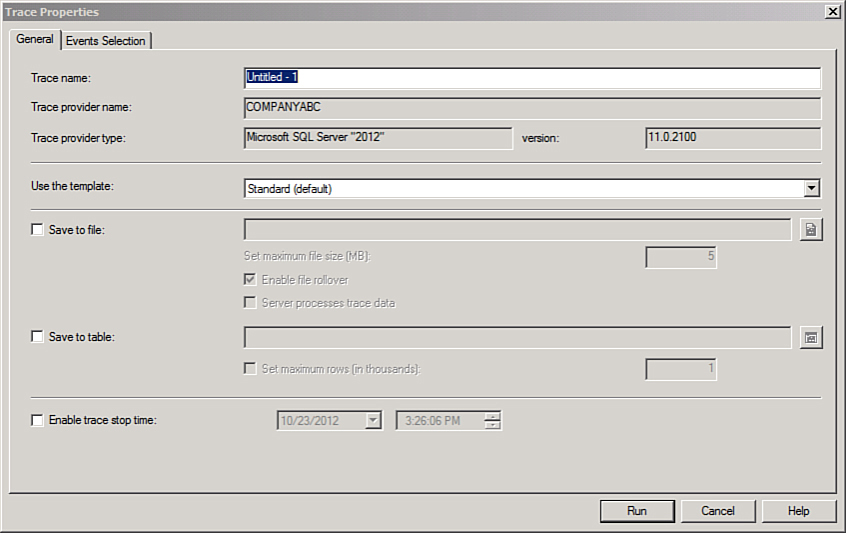
4. Administrators can provide the trace name and choose a template for tracking some events or filters in addition to the way to store the trace. This can be an SQL Server table or a simple file.
5. By clicking the second tab, the event selection opens as shown in Figure 9.7.
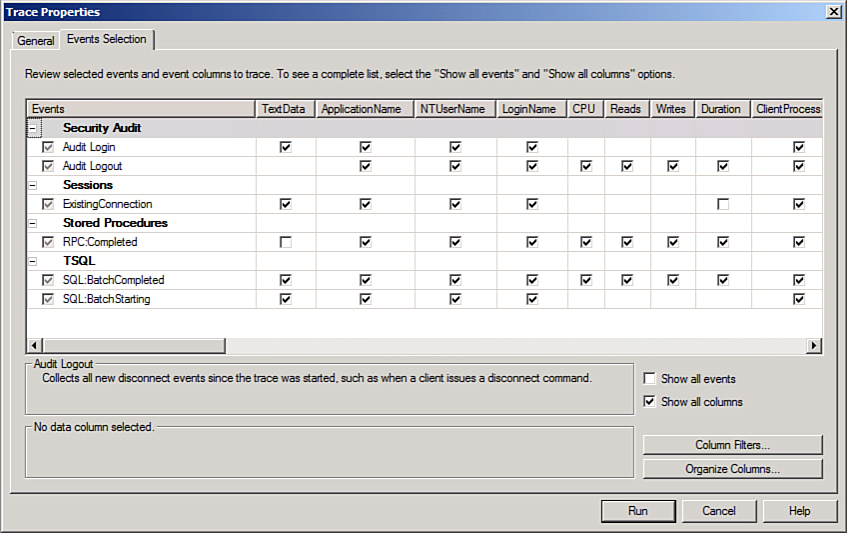
6. Administrators can select the events to trace, to view the query and its execution parameters; the info will reside in SQL:BatchCompleted because this event occurs when a query is fired to the database. In this event, the actual query appears, who fired it, and how long it took to execute.
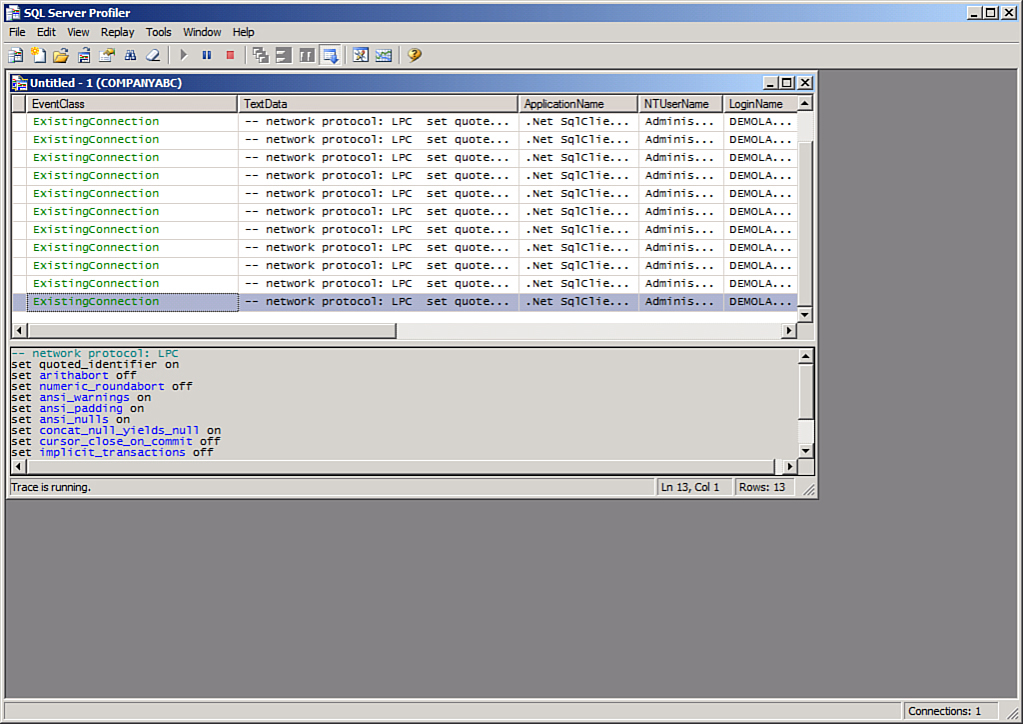
7. Figure 9.8 shows the trace that starts listing all events requested in the previous window and the actual statement that’s being executed on the database. Stopping or erasing the trace for better readability options exist, and filteration in the previous window is very useful to query down all the rows with useful information about the desired database.
Maintaining SQL Server in a SharePoint Environment
To keep SharePoint operating smoothly and with optimal performance, it is highly recommended that SharePoint administrators conduct regular maintenance on each SQL Server database. Such maintenance tasks include rebuilding indexes, checking database integrity, encrypting the databases, updating index statistics, and performing internal consistency checks and backups. Administrators can perform database maintenance tasks either by executing T-SQL commands or by running the Database Maintenance Wizard. This section provides information and recommendations for maintaining the databases that host SharePoint data and configurations. Later in this section, administrators learn how to automate and schedule the major maintenance tasks by creating database maintenance plans via SQL Server Database Maintenance Wizard.
Checking and Repairing Database Integrity
DBCC CHECKDB is the most often used validation command for checking the logical and physical integrity of the whole database. Essentially, DBCC CHECKDB is a superset command that actually runs CHECKALLOC, CHECKTABLE, and CHECKCATALOG.
Here are some recommendations for using DBCC CHECKDB:
![]() Administrators should run
Administrators should run DBCC CHECKDB rather than the individual operations because it identifies most of the errors and is generally safe to run in a production environment.
![]() After running
After running DBCC CHECKDB, administrators should run it again with the REPAIR argument to repair any reported errors.
![]()
DBCC CHECKDB can be time-consuming, and it requires schema locks that prevent metadata changes; therefore, it is highly recommended that administrators run it during nonproduction hours.
![]() The command should be run on a table-by-table basis if it is used to perform consistency checks on large databases.
The command should be run on a table-by-table basis if it is used to perform consistency checks on large databases.
Monitoring and Reducing Fragmentation
Although indexes can speed up the execution of queries, some overhead is associated with them. Indexes consume extra disk space and involve additional time to update themselves any time data is updated, deleted, or inserted in a table.
When indexes are first built, little or no fragmentation should be present. Over time, as data is inserted, updated, and deleted, fragmentation levels on the underlying indexes might begin to increase.
When a page of data is completely full and further data must be added to it, a page split occurs. To make room for the new arriving data, SQL Server creates another data page somewhere else in the database (not necessarily in a contiguous location) and moves some of the data from the full page to the newly created one. The effect of this is that the blocks of data are logically linear but physically nonlinear. Therefore, when searching for data, SQL Server has to jump from one page to somewhere else in the database looking for the next page it needs instead of going directly from one page to the next. This results in performance degradation and inefficient space utilization.
Monitoring Fragmentation
The fragmentation level of an index is the percentage of blocks that are logically linear and physically nonlinear. In SQL Server 2012 and SQL Server 2008 R2, administrators can use the sys.dm_db_index_physical_stats dynamic management function and keep an eye on the avg_fragmentation_in_percent column to monitor and measure the fragmentation level. The value for avg_fragmentation_in_percent should be as close to zero as possible for maximum performance. However, values from 0% percent through 10% may be acceptable.
Reducing Fragmentation
In the previous version of SharePoint, it was recommended to track and reduce the fragmentation level by running the database statistics timer job, which in turn updates the query optimization statistics and rebuilds all indexes in the content databases every time it runs. Another option was reorganizing or rebuilding the indexes on a regular basis using the SQL Server 2012 or SQL Server 2008 R2 Maintenance Wizard.
In SharePoint 2013, administrators no longer need to worry about fragmentation because SharePoint can do that on their behalf via the health analyzer. The health analyzer performs “health checks” based on timer jobs and self-heals the database index fragmentation automatically.
Shrinking Data Files
In SQL Server 2012 and SQL Server 2008 R2, administrators can reclaim free space from the end of data files to remove unused pages and recover disk space.
However, shrinking data files is not recommended unless the content database has lost at least half its content. This usually happens after some activities create white space in the content database, such as moving a site collection from a content database to another one or deleting a massive amount of data. Shrinking SharePoint databases other than content databases is not recommended, because they do not generally experience as many necessary deletions to contain considerable free space.
Shrinking a Database by Using SQL Server 2012 Management Studio
To shrink a database by using SQL Server 2012 Management Studio, follow these steps:
1. Click Start, All Programs, Microsoft SQL Server 2012, SQL Server Management Studio.
2. Connect to the desired SQL Server database engine instance and expand that instance.
3. Expand Databases, right-click the database to be shrunk, click Tasks, click Shrink, and click Files.
4. Select the file type and filename from the dialog box shown in Figure 9.9.
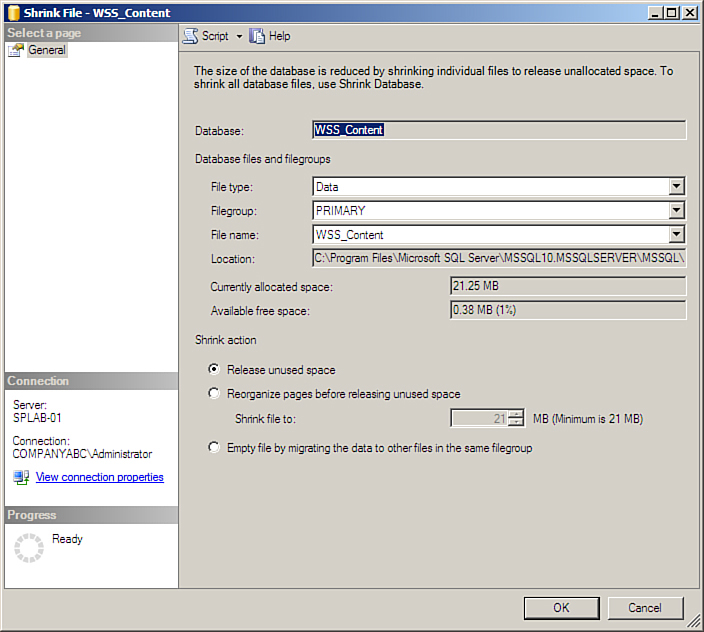
5. (Optional) Select Release Unused Space. Selecting this option causes any unused space in the file to be released to the operating system and shrinks the file to the last allocated extent. This reduces the file size without moving any data.
6. (Optional) Select Reorganize Pages Before Releasing Unused Space. If this option is selected, the Shrink File To option must be set to value. Selecting this option causes any unused space in the file to be released to the operating system and tries to relocate rows to unallocated pages.
7. (Optional) Select Empty File by Migrating the Data to Other Files in the Same Filegroup. Selecting this option moves all data from the specified file to other files in the filegroup. The empty file can then be deleted. This option is the same as executing DBCC SHRINKFILE with the EMPTYFILE option.
8. Click OK.
Creating SQL Server Maintenance Plans
Maintaining SharePoint back-end databases can significantly improve the health and performance of SharePoint servers. Unfortunately, administrators often do not perform regular database maintenance because maintaining SharePoint 2013 environments involves a huge set of maintenance tasks.
Fortunately, Microsoft has provided maintenance plans as a way to automate these tasks. A maintenance plan performs a comprehensive set of SQL Server jobs that run at scheduled intervals. Specifically, the maintenance plan conducts scheduled SQL Server maintenance tasks to ensure that databases are performing optimally, are regularly backed up, and are checked for anomalies. Administrators can use the Maintenance Plan Wizard (included with SQL Server) to create and schedule these daily tasks. In addition, the wizard can configure database and transaction log backups.
It is also worth mentioning that administrators should set any maintenance operations or maintenance plans to run during off-hours to minimize the performance impact on users.
Configuring an SQL Server 2012 Database Maintenance Plan
To configure an SQL Server 2012 database maintenance plan, follow these steps:
1. Click Start, All Programs, Microsoft SQL Server 2012, SQL Server Management Studio.
2. Connect to the desired SQL Server database engine instance.
3. Click Management, right-click Maintenance Plans, and click Maintenance Plan Wizard. (The SQL Server Agent Service should be running.)
4. On the Welcome to the Database Maintenance Plan Wizard screen, click Next to continue.
5. On the Select Plan Properties screen, as shown in Figure 9.10, enter a name and description for the maintenance plan.

6. Decide whether to configure one or more maintenance plans.
To configure a single maintenance plan, select Single Schedule for the Entire Plan or No Schedule. This option is chosen in the example in Figure 9.10.
To configure multiple maintenance plans with specific tasks, select Separate Schedules for Each Task.
7. Click Change to set a schedule for the plan. The Job Schedule Properties dialog box appears, as shown in Figure 9.11.
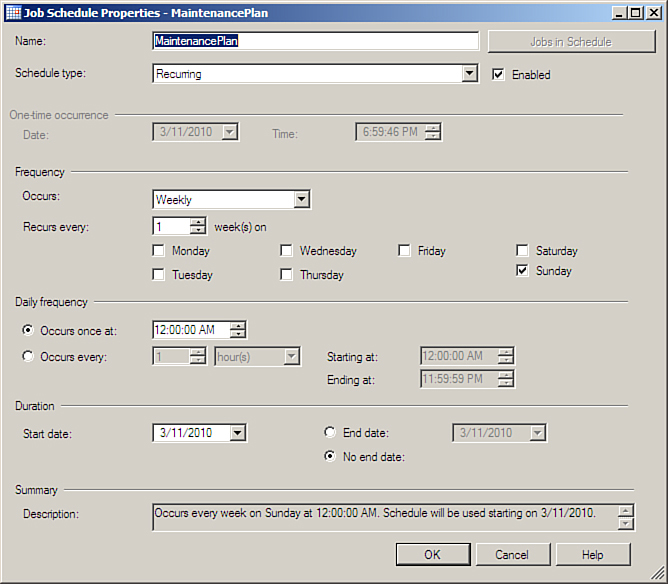
8. Complete the schedule, click OK, and then click Next to continue.
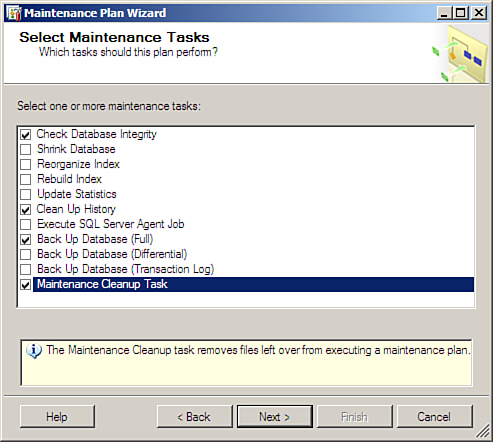
9. On the Select Maintenance Tasks screen (see Figure 9.12), select the maintenance tasks to include in the plan, and then click Next to continue.
10. In the Select Maintenance Task Order page, change or review the order that the tasks will be executed in, select a task, and then click Move Up or Move Down. When tasks are in the desired order, click Next. The wizard helps you through setting the details for each task. For example, Figure 9.13 shows the configuration of the Database Check Integrity Task.

11. On the Select Report Options page, select Write a Report to a Text File, select a location for the files, as shown in Figure 9.14, and then click Next until the wizard is completed.

Note
It is highly recommended that administrators include the Check Database Integrity maintenance task for all SharePoint databases and the Maintenance Cleanup Task maintenance task in their plans. It is also recommended not to select the option to shrink the database, primarily because automatically shrinking databases on a periodic basis leads to excessive fragmentation and produces I/O activity, which can negatively influence the performance of SharePoint.
Using SQL Server Transparent Data Encryption
Transparent Data Encryption (TDE) was first introduced in SQL Server 2008 to provide a real-time encryption and decryption for the database data and log files. This feature can be used to encrypt SharePoint content databases at the SQL level, without the need to modify any settings in the SharePoint farm. This type of transparent encryption allows organizations to comply with governmental and industry regulations that require content to be stored in encrypted format, but does not present any new complications to a SharePoint environment, as the application itself is unaware that any encryption is happening. Stolen SharePoint database backups or data files are useless since the database will not be restored on any other server without the master certificate or the encrypting key. TDE uses a database encryption key (DEK), which is a symmetric key secured by a certificate in the Master database or an asymmetric key stored in Enterprise Knowledge Management (EKM) module. The encryption process is very easy, and the first thing an administrator should do after encrypting the database is to back up the certificate. Otherwise, the database will not be readable on any another server without the master key.
To enable TDE encryption on a SharePoint database, follow these steps:
1. Open SQL Server Management Studio by clicking Start, All Programs, Microsoft SQL Server 2012, SQL Server Management Studio. Connect to the desired SQL Server database engine instance, and then create a master key and a certificate in the master database by executing the following T-SQL commands:
USE master;
GO
CREATE MASTER KEY ENCRYPTION BY PASSWORD = '<CERTIFICATEPASSWORD>';
go
CREATE CERTIFICATE MyServerCert WITH SUBJECT = ENCRYPTION_CERTIFICATE';
go
2. Create the encryption key that will encrypt the database with the pre-created certificate by executing the following T-SQL commands:
USE WSS_Content;
GO
CREATE DATABASE ENCRYPTION KEY
WITH ALGORITHM = AES_128
ENCRYPTION BY SERVER CERTIFICATE MyServerCert;
GO
ALTER DATABASE WSS_Content
SET ENCRYPTION ON;
GO
3. The process runs and starts encrypting the database. An administrator can check the status of the encryption process by executing the following T-SQL command:
SELECT *
FROM sys.dm_database_encryption_keys
WHERE encryption_state = 3;
3 is the status for an encrypted database.
4. Back up the encryption certificate to restore it on other servers:
BACKUP CERTIFICATE sales05 TO FILE = 'c:storedcertsMyServerCert'
WITH PRIVATE KEY (FILE = 'c:storedkeysMyServerCertKey',
ENCRYPTION BY PASSWORD = 'STRONGPASSWORD'),
5. Before restoring the database on other servers, restoring the certificate is mandatory by using the following T-SQL command:
USE master;
GO
CREATE MASTER KEY ENCRYPTION BY PASSWORD = 'STRONGPASSWORD';
GO
CREATE CERTIFICATE MyServerCert
FROM FILE = 'c:storedkeysMyServerCert'
WITH PRIVATE KEY
(
FILE = 'c:storedkeysMyServerCertKey',
DECRYPTION BY PASSWORD = 'STRONGPASSWORD'
);
GO
An administrator can now guarantee the security of the database files with an encryption standard that is compliant with most of the different security standards.
Managing SharePoint Content Databases
As previously explained in the “Monitoring SQL Server in a SharePoint Environment” section, administrators should always keep an eye on the performance and storage of SharePoint back-end databases. In response to the data they gather from the vast range of monitoring tools, administrators should also know how to manage SharePoint content databases, how to manually add a content database to a web application, how to move a site collection between content databases, and how to move content databases between servers that are running SQL Server, between instances of SQL Server, or from one SharePoint 2013 web application to another. Some of these tasks can be completed directly from Central Administration; others can be done only via PowerShell or the deprecated STSADM command-line utility. These different tasks and techniques are explained in detail in this section.
Adding a Content Database
Creating a new content database does not mean that any new content will be stored in it, because a site collection cannot span content databases. However, by creating a new content database and following some extra steps, administrators can instruct SharePoint where to create new site collections.
Adding a Content Database Using Central Administration
To create a new content database and attach it to the specified web application, follow these steps:
1. Click Start, All Programs, Microsoft SharePoint 2013 Products, SharePoint 2013 Central Administration.
2. On the SharePoint Central Administration (SPCA) website, click Application Management.
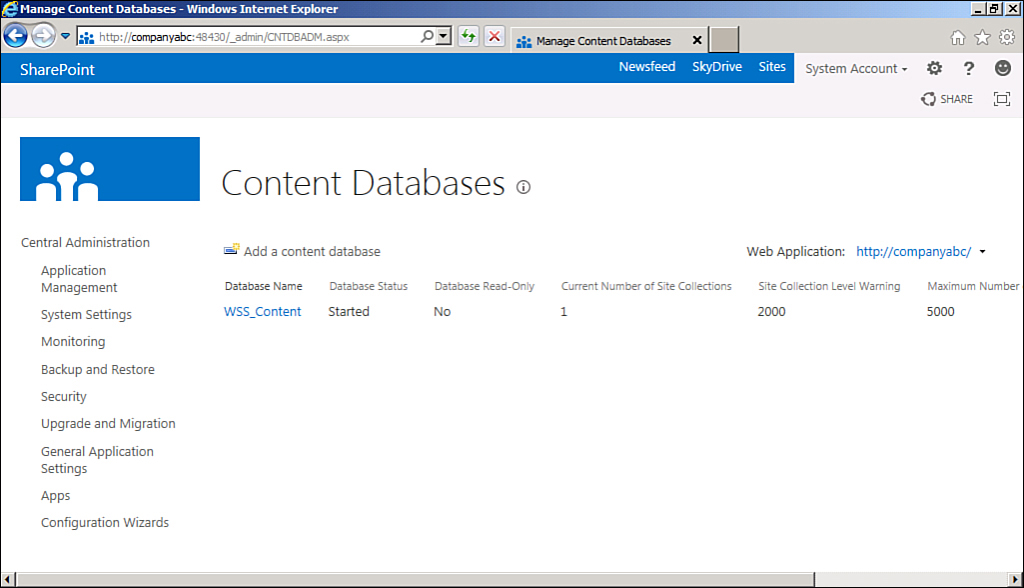
3. In the Databases section, click Manage Content Databases.
4. On the Manage Content Databases page, as shown in Figure 9.15, click Add a Content Database.
5. On the Add Content Database page, as shown in Figure 9.16, do the following:
A. Select a web application for the new database.
B. Select a database server to host the new database.
C. Specify the authentication method that the new database will use, and supply an account name and password, if they are necessary.
D. Specify both the total number of top-level sites that can be created in the database and the number at which a warning will be issued.
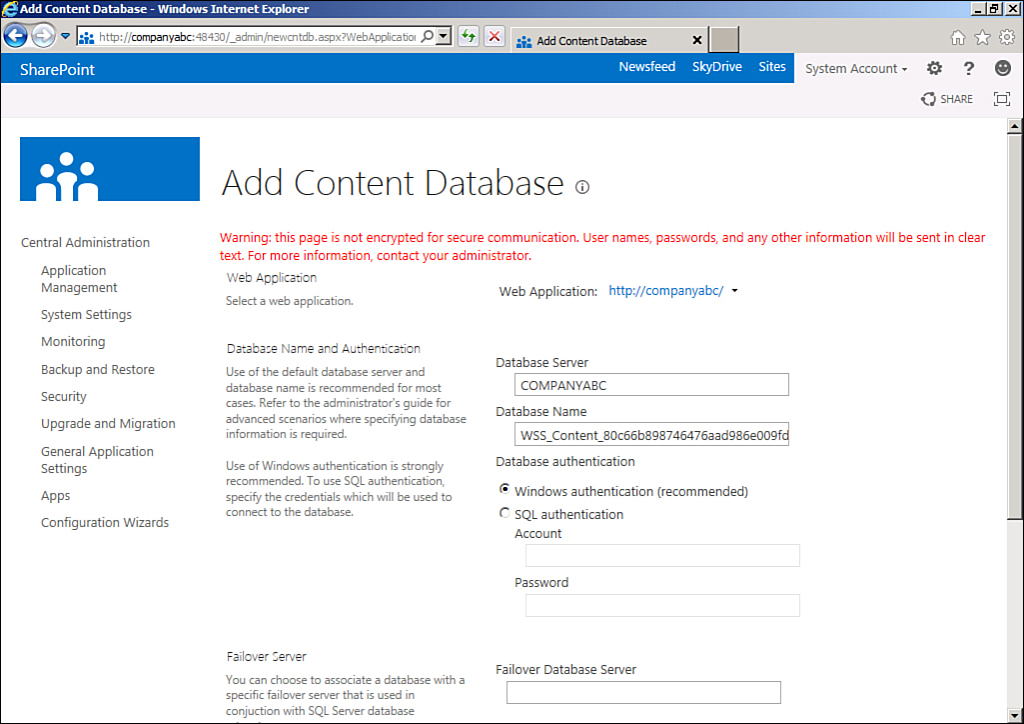
6. Click OK.
Adding a Content Database Using Windows PowerShell
Administrators can use the following procedure to create a new content database and attach it to the specified web application using Windows PowerShell:
1. Click Start, All Programs, Microsoft SharePoint 2013 Products, SharePoint 2013 Management Shell.
2. At the Windows PowerShell command prompt (PS C:>), type the following command, and then press Enter:
New-SPContentDatabase -Name <String> -WebApplication <SPWebApplicationPipeBind>
The -Name parameter specifies the name of the content database to be created. The -WebApplication parameter specifies the web application to which the new database is to be attached.
Creating a Site Collection in a Specific Content Database
In SharePoint 2010 days, to force SharePoint to create new site collections in a specific content database, the target database should have been the only one with the Ready status; all the other databases associated with the web application should have been set Offline. In SharePoint 2013, this is no longer the case; administrators can now directly use the New-SPSite PowerShell commandlet (cmdlet) to create a new Site Collection in a specific content database.
Creating a Site Collection in a Specific Content Database Using Windows PowerShell
To directly use the content database for a new collection using PowerShell, follow these steps:
1. Click Start, All Programs, Microsoft SharePoint 2013 Products, SharePoint 2013 Management Shell.
2. At the Windows PowerShell command prompt (PS C:>), type the following command, and then press Enter:
New-SPSite -Url <String> -OwnerAlias <String> [-ContentDatabase
<SPContentDatabasePipeBind>]
Moving Site Collections Between Content Databases
There might be some situations when a site collection hosted within a content database is unexpectedly growing, and the database is approaching the 100GB limit recommended by Microsoft. At such times, administrators should manually move the growing site collections from the larger content database to another smaller one.
Determining the Size of the Source Site Collection Using Windows PowerShell
Administrators should always double-check that the destination hard disk can comfortably store the site collection data by determining the size of the site collection that is to be moved. To determine the size of a site collection, follow these steps:
1. Click Start, All Programs, Microsoft SharePoint 2013 Products, SharePoint 2013 Management Shell.
2. At the Windows PowerShell command prompt (PS C:>), type the following command, and then press Enter:
Get-SPSiteAdministration –Identity http://ServerName/Sites/SiteName| ft
Url,DiskUsed
Replace http://ServerName/Sites/SiteName with the name of the site collection.
Moving Site Collections Between Content Databases Using Windows PowerShell
Administrators can use the Windows PowerShell command Move-SPSite to move site collections between content databases:
1. Click Start, All Programs, Microsoft SharePoint 2013 Products, SharePoint 2013 Management Shell.
2. At the Windows PowerShell command prompt (PS C:>), type the following command, and then press Enter:
Move-SPSite <http://ServerName/Sites/SiteName> -DestinationDatabase
<DestinationContentDb>
Replace http://ServerName/Sites/SiteName with the name of the site collection, and replace <DestinationContentDb> with the name of the destination content database.
Moving Content Databases in SharePoint 2013
Administrators might sometimes need to move content databases between servers that are running SQL Server, between instances of SQL Server, or from one SharePoint 2013 web application to another. This can be completed using SharePoint 2013 Central Administration or using Windows PowerShell. In both cases, you follow these steps:
1. Pause any service applications and services that might run against the desired content database.
2. Remove the content database from the SharePoint web application.
3. Detach the database from the source SQL Server instance.
4. Move the database files to the target location.
5. Attach the database files to the destination SQL Server instance.
6. Add the content database to the destination SharePoint web application.
Moving Content Databases Using Central Administration
1. Click Start, All Programs, Microsoft SharePoint 2013 Products, SharePoint 2013 Central Administration.
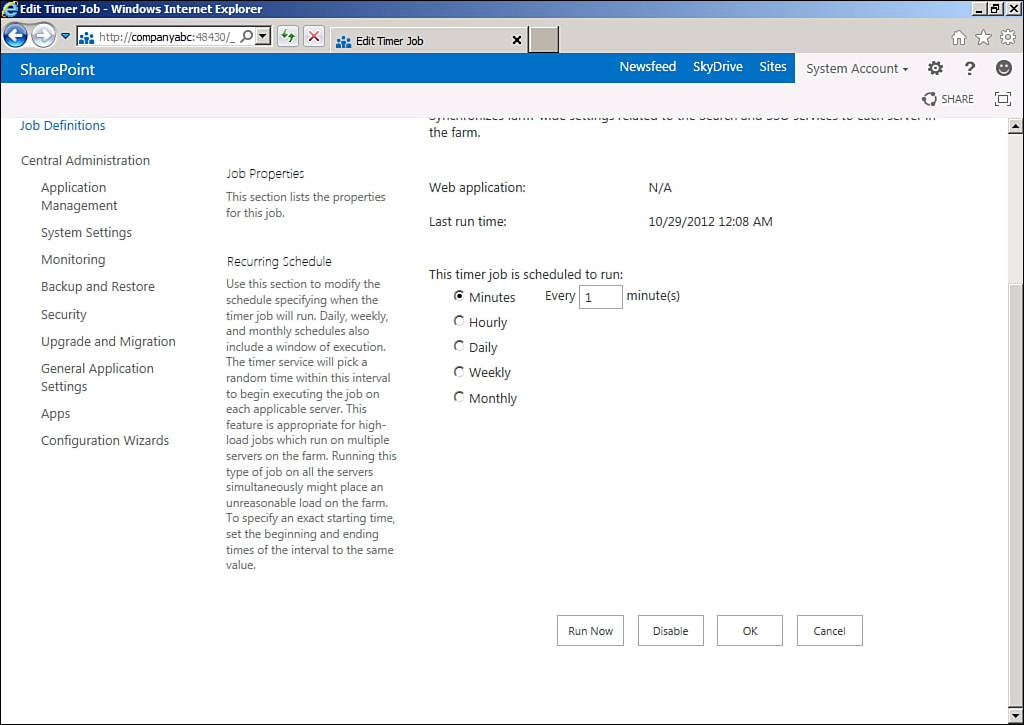
2. On the SPCA website, click Monitoring, and then click Check Job Status, as shown in Figure 9.17.

3. For each Timer Job running for the target database, click Edit Job, Disable, and then click OK, as shown in Figure 9.18.
4. On the SPCA website, click Application Management.
5. In the Databases section, click Manage Content Databases.
6. On the Manage Content Databases page, choose the desired content database.
7. In the Remove Content Database section, as shown in Figure 9.19, click Remove Content Database, and then click OK.

8. Open SQL Server Management Studio by clicking Start, All Programs, Microsoft SQL Server 2012, SQL Server Management Studio.
9. Connect to the desired SQL Server database engine instance and expand that instance.
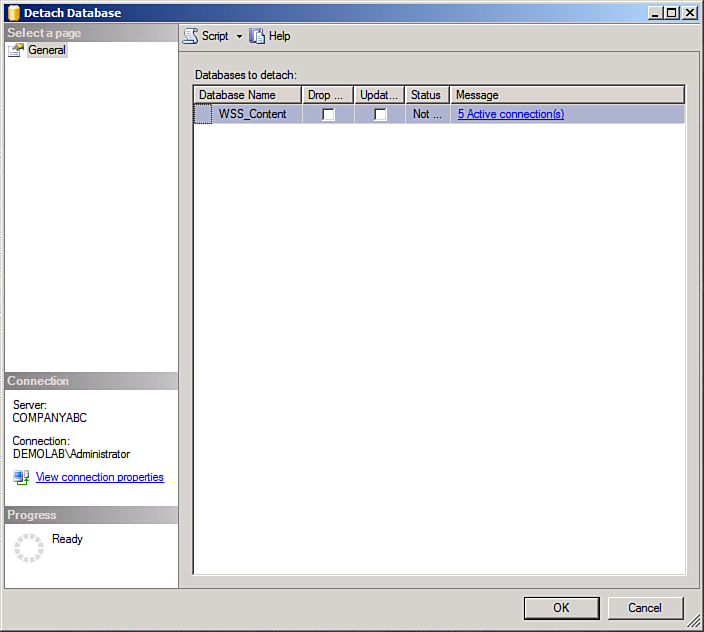
10. Right-click the content database, point to Tasks, and then click Detach, as shown in Figure 9.20.
11. Using Windows Explorer, move all database files (.mdf, .ldf, and .ndf) to the desired location in the other server.
12. In the destination server, open SQL Server Management Studio and connect to the desired SQL Server instance.
13. Right-click the destination instance in Object Explorer, point to Tasks, and then click Attach, as shown in Figure 9.21.

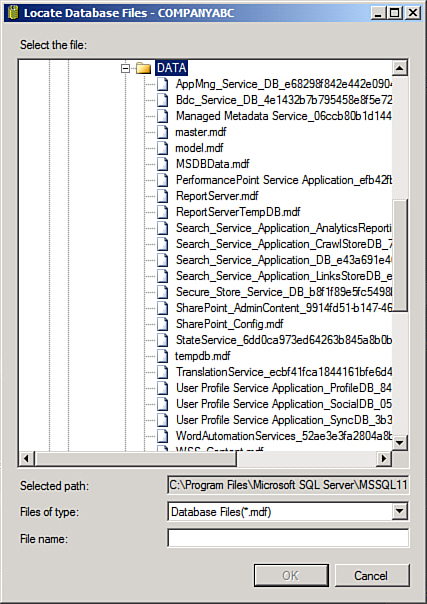
14. In the Attach Databases dialog box, point to the database files that were just moved, choose the .mdf file, and then click OK, as shown in Figure 9.22.
15. On the SPCA website, click Application Management.
16. In the Databases section, click Manage Content Databases.
17. On the Manage Content Databases page, click Add a Content Database while verifying that the target web application is selected.
18. Type the exact name in the Database Name field while specifying the required authentication.
19. On the SPCA website, click Monitoring, and then click Check Job status.
20. Start the paused services by clicking Edit Job and then starting back all the previously paused services.
Moving Content Databases Using Windows PowerShell
The previous SharePoint-related steps can be completed using Windows PowerShell as follows:
1. Click Start, All Programs, Microsoft SharePoint 2013 Products, SharePoint 2013 Management Shell.
2. At the Windows PowerShell command prompt (PS C:>), to stop all associated services to the database, type the following command, and then press Enter:
Get-SPTimerJob -webapplication <http://WebApplicationURL> | select name |
Out-File <c: imerjob.txt> –Append –Encoding ascii
ForEach($tmrjob in (Get-Content <c: imerjob.txt>)) { Get-SPTimerJob -Identity
$tmrjob | Disable-SPTimerjob }
The –webapplication is the URL of the desired web application and the c: imerjob.txt is the location of the file that will contain all timer jobs associated with this database.
3. Detach the desired content database using the following cmdlet:
Dismount-SPContentDatabase "<ContentDB>"
where ContentDB is the name of the desired database.
4. Detach the content database from the source SQL Server and reattach it again on the destination server by following steps 8 to 14.
5. Reattach the content database to the destination SharePoint web application using the following cmdlet:
Mount-SPContentDatabase "<ContentDb>" -DatabaseServer "<DbServer>"
-WebApplication <http://SiteName>
The -Name parameter specifies the name of the content database to be created. The -DatabaseServer specifies the database server where the database resides to be mounted. The -WebApplication parameter specifies the web application to which the new database will be attached.
6. To start back all the paused services, execute the following command:
ForEach($tmrjob in (Get-Content <c: imerjob.txt>)) {Get-SPTimerJob -Identity
$tmrjob | Enable-SPTimerjob}
The c: imerjob.txt is the location of the file that contains all timer jobs associated with this database.
Externalizing BLOB Storage in SharePoint 2013
By default, SharePoint stores all the uploaded documents and files in its content databases. This has always led to storage, performance, and manageability issues, especially for large SharePoint deployments in SharePoint 2003 and the early days of SharePoint 2007. In SharePoint 2007 SP1, Microsoft made its first attempt to store documents and files out of SQL Server; however, the implementation was difficult and came with many limitations. In SharePoint 2010 and SharePoint 2013, Microsoft took this to a completely new level by making use of the powerful storage externalization capabilities of SQL Server 2008 R2 and SQL Server 2012. This section explains what Binary Large Objects (BLOBs) are, how they are stored in SharePoint, and how Microsoft made use of the RBS technology in SharePoint 2013 to move the storage of large documents and files from SQL Server to remote stores. At the end of this section, administrators learn how to install and configure RBS in SharePoint 2013 environments and how to migrate and move data between different stores.
Understanding BLOBs
Most of the values stored in SQL Server consist of ASCII (American Standard Code for Information Interchange) characters. A basic explanation of ASCII characters is that they are the letters, numbers, and symbols found on the keyboard. A text editor such as Notepad can alter a file holding only ASCII characters without any consequences. However, data is not limited to strings and numbers; it is always a common requirement to store a large amount of binary data in an SQL Server table along with other ASCII data; Word documents, XML documents, and images are some examples. Binary files contain ASCII characters, special control characters, and byte combinations not found on the keyboard. Opening a Microsoft Word document inside Notepad and modifying it would result in the file being corrupted and not readable, because Notepad cannot correctly interpret or create binary bits. BLOBs, then, are binary files that are large, or Binary Large Objects (BLOBs).
SQL Server provides special data types for dealing with such large volumes of binary data. These various data types have changed over time.
In SQL 2000, there were two different families of data type options for this type of data: binary and image. The binary family included two different data types: the binary data type and the VARBINARY data type. The VAR in VARBINARY means that the size is variable rather than fixed, as in the case of the standard binary data type. However, it still has a maximum length of 8,000 bytes.
The image data type family was used to store BLOBs that are greater than 8,000 bytes. This data type is still present in newer versions, but it is deprecated. Microsoft recommends avoiding using these data types in new development work and recommends modifying applications that currently use them.
Starting in SQL Server 2005, Microsoft included the VARBINARY(MAX) data type to the binary data type family. This variation extends the usual limit of around 8,000 bytes and allows storage up to 2GB of data.
Later, in SQL Server 2008, Microsoft introduced the FILESTREAM option for VARBINARY(MAX) fields. This enables storage, efficient streaming, and integrated management of large BLOBs in an SQL database by using the underlying New Technology File System (NTFS) for BLOB storage/streaming, while managing and accessing it directly within the context of the database.
Instead of being a completely new data type, FILESTREAM is a storage attribute of the existing VARBINARY(MAX) data type. FILESTREAM alters how the BLOB data is stored—in the file system rather than in the SQL Server data files. Because FILESTREAM is implemented as a VARBINARY(MAX) column and integrated directly into the database engine, most SQL Server management tools and functions work without modification for FILESTREAM data.
It is also worth mentioning that the behavior of the regular VARBINARY(MAX) data type remains entirely unchanged in SQL Server 2008/R2/2012, including the 2GB size limit. The addition of the FILESTREAM attribute means a VARBINARY(MAX) column can essentially be unlimited in size. (In reality, the size is limited to that of the underlying NTFS volume.)
BLOB Storage in SharePoint
In SharePoint 2003 and the early days of SharePoint 2007, Microsoft SQL Server stored BLOB data in its databases as a rule, as illustrated in Figure 9.23. As a database’s usage increased, the total size of its BLOB data could quickly grow larger than the total size of the document metadata and the other structured data stored in the database. There were no exceptions for this; content metadata and BLOBs had to go into content databases. This was not efficient because Microsoft estimates that as much as 80% of the data stored in SharePoint content databases is nonrelational BLOB data, such as Microsoft Office Word documents, Microsoft Office Excel spreadsheets, and Microsoft Office PowerPoint presentations. Only 20% is relational metadata, and this caused storage, performance, and manageability issues, especially for large SharePoint deployments.

In May 2007, Microsoft released a hotfix for Windows SharePoint Services 3.0 and Microsoft Office SharePoint Server 2007 that was later rolled into Service Pack 1. The hotfix exposed an External BLOB Storage (EBS) application programming interface (API), which enabled the storage of BLOBs outside content databases by implementing a set of interfaces. This seemed revolutionary, but EBS was difficult to implement because it exposed an unmanaged interface. Accordingly, this part had to be handled by third parties, or independent software vendors (ISVs). In addition, EBS had some limitations; for example, it could be enabled only on the farm level and not on the content database level.
Starting in SharePoint 2010, Microsoft heard its customers’ feedback loud and clear and decided to fix the BLOB storage pain points. In SharePoint 2013, it is possible to move the storage of BLOBs from database servers to commodity storage solutions by using RBS technology, which was first introduced in SQL Server 2008.
Introducing Remote BLOB Storage
RBS is a library API set designed to move storage of BLOBs from Microsoft SQL Server to external storage solutions.
Using RBS, applications can store large amounts of unstructured data (such as Office documents, PDF files, or videos) and enjoy both the relational capabilities of SQL Server and the scalability of a dedicated BLOB store. Best of all, developers do not have to write the code to handle the job of tying together the SQL metadata and the BLOB data. RBS handles the transactional consistency completely.
An application stores and accesses BLOB data by calling into the RBS client library. ISVs and storage solution vendors can create their own RBS provider library to enable the use of custom stores with applications written against the RBS API set. Microsoft has even created a provider named FILESTREAM RBS provider, which comes with RBS 2008 R2 and RBS 2012, and can be used for storing BLOBs on the underlying NTFS file system. The FILESTREAM RBS provider ties the RBS technology with the FILESTREAM feature that was first introduced in SQL Server 2008.
SharePoint 2007 did not take advantage of the recent SQL Server features that Microsoft first introduced for unstructured data in SQL Server 2008, such as the FILESTREAM attribute or RBS technology; instead, SharePoint 2007 provided its own options to enhance the storage efficiency and manageability of huge data through EBS.
SharePoint 2010 and SharePoint 2013 support RBS and can leverage the SQL Server FILESTREAM RBS provider, thus providing cheaper storage and much better performance. Figure 9.24 illustrates how RBS works with SharePoint 2013.

EBS Support in SharePoint 2013
As mentioned, EBS was an earlier attempt by Microsoft in SharePoint 2007 SP1 to help customers externalize their BLOBs. However, EBS was hard to implement and had some limitations. Microsoft introduced EBS as an immediate help, and it was designed in a way that make it an evolutionary approach in that administrators can move to RBS later. Although EBS was supported for SharePoint 2010, its support was completely removed from SharePoint 2013.
Installing and Configuring RBS
Administrators can use the following procedure to install and configure the BLOB externalization in SharePoint 2013 using RBS and the RBS FILESTREAM provider. Each step in the following procedure is explained in detail in the following subsections:
1. Enable FILESTREAM on SQL Server.
2. Prepare the database, and create a BLOB store.
3. Install the RBS client.
4. Enable RBS using Windows PowerShell.
Note
For SQL Server 2008 R2, RBS is incorporated as an add-on feature pack and can be downloaded from http://go.microsoft.com/fwlink/?LinkID=165839&clcid=0x409. For SQL Server 2012, RBS is included on the installation media but is not installed by the SQL Server Setup program. It is also available as a separate download from www.microsoft.com/en-us/download/details.aspx?id=29065.
Enable FILESTREAM on SQL Server
Administrators must enable and configure FILESTREAM on the computer running SQL Server 2008 R2 or SQL Server 2012 that hosts the SharePoint Server 2013 databases, as follows:
1. Click Start, All Programs, Microsoft SQL Server 2012, Configuration Tools, SQL Server Configuration Manager.
2. In the left panel of SQL Server Configuration Manger, click SQL Server Services, which lists all the SQL Server 2012-related services on the right-side panel.
3. Locate the instance of SQL Server on which FILESTREAM is required to be enabled, right-click the instance, and then click Properties.
4. In the SQL Server Properties dialog box, click the FILESTREAM tab and select the Enable FILESTREAM for Transact-SQL Access check box, which enables the rest of the options.
5. Select all the check boxes, and then click Apply.
6. Click Start, All Programs, Microsoft SQL Server 2012, SQL Server Management Studio.
7. Connect to the desired SQL Server database engine instance.
8. In SQL Server Management Studio, click New Query to display the Query Editor.
9. In Query Editor, enter the following Transact-SQL code:
EXEC sp_configure filestream_access_level, 2; RECONFIGURE
10. Click Execute.
Prepare the Database and Create a BLOB Store
To prepare the database and create a BLOB store, follow these steps:
1. Click Start, All Programs, Microsoft SQL Server 2012, SQL Server Management Studio.
2. Connect to the desired SQL Server database engine instance and expand that instance.
3. Expand the databases, select the content database for which a BLOB store will be created, click New Query, and then execute the following commands:
use [ContentDatabaseName]
if not exists (select * from sys.symmetric_keys where name = N'##MS_
DatabaseMasterKey##')create master key encryption by password = N'Admin Key
Password !2#4'
use [ContentDatabaseName]
if not exists (select groupname from sysfilegroups where groupname=
N'RBSFilestreamProvider')alter database [ContentDatabaseName] add filegroup
RBSFilestreamProvider contains filestream
use [ContentDatabaseName]
alter database [ContentDatabaseName] add file (name = RBSFilestreamFile,
filename = 'c:RemoteBlobStore') to filegroup RBSFilestreamProvider
1. Launch SQL Server 2012 RBS with the FILESTREAM provider (RBS.msi) on the database server (RBS.msi must first be downloaded from Microsoft), all the web front ends, and all the application servers.
2. On the database server, run the following commands from the location of the RBS.msi file using the command prompt:
msiexec /qn /lvx* rbs_install_log.txt /i RBS.msi TRUSTSERVERCERTIFICATE=true
FILEGROUP=PRIMARY DBNAME="ContentDatabaseName" DBINSTANCE=
"DatabaseInstanceName" FILESTREAMFILEGROUP=RBSFilestreamProvider
FILESTREAMSTORENAME=FilestreamProvider_1
msiexec /qn /lvx* rbs_install_log.txt /i RBS.msi DBNAME=
"ContentDatabaseName" DBINSTANCE="DatabaseInstanceName" ADDLOCAL="Client,Docs,
Maintainer,ServerScript,FilestreamClient,FilestreamServer"
This should be run against each content database that should support RBS.
3. On all the web front ends and all the application servers, run the following command from the location of the RBS.msi file using the command prompt:
msiexec /qn /lvx* rbs_install_log.txt /i RBS.msi DBNAME="ContentDatabaseName"
DBINSTANCE="DatabaseInstanceName" ADDLOCAL="Client,Docs,Maintainer,ServerScrip
t,FilestreamClient,FilestreamServer"
These commands kick off an msiexec service that runs in a silent mode, not providing any feedback about their success or failure. Administrators can monitor the service in the Task Manager to ensure that they are finished.
4. Administrators can confirm the RBS installation by looking for the text Product: SQL Remote Blob Storage—Configuration Completed Successfully in the RBS log file. The previous installation commands create a log file named rbs_install_log.txt in the same location as the RBS.msi file. The installation also creates several tables in the specified content database with names that are preceded by mssqlrbs. Administrators can also look for these tables to confirm the installation.
Enable RBS Using Windows PowerShell
To enable RBS using Windows PowerShell, follow these steps:
1. Click Start, All Programs, Microsoft SharePoint 2013 Products, SharePoint 2013 Management Shell.
2. At the Windows PowerShell command prompt (PS C:>), type each of the following commands and press Enter after each one:
$cdb = Get-SPContentDatabase ContentDatabaseName
$blobstoragesettings = $cdb.RemoteBlobStorageSettings
$blobstoragesettings.Enable()
$blobstoragesettings.SetActiveProviderName($blobstoragesettings.
GetProviderNames()[0])
The Enable cmdlet enables the usage of RSB for a certain content database. When RBS is enabled, BLOBs get stored in the active BLOB store. When the active BLOB store is disabled through the Disable cmdlet, the BLOBs get stored back in the content database.
The GetProviderNames cmdlet can be used to list all the registered providers in the farm, and the names are retrieved from the configuration database.
The SetActiveProviderName cmdlet is used to activate a certain provider for a certain content database. A farm can have multiple RBS providers, but only one of them can be active at a time for a given content database.
Another useful cmdlet that was not used previously is the MinimumBlobStorageSize cmdlet. This cmdlet can be used to set a size threshold. For example, an administrator can decide to store files smaller than 1MB in the content database and larger ones in the BLOB store.
3. Now, all the uploaded documents should go to the BLOB store (c:RemoteBlobStore) rather than being saved in the specified content database. Figure 9.25 illustrates the upload operation workflow in SharePoint 2013 after enabling RBS.

Migrating and Moving BLOBs Between BLOB Stores
SharePoint 2013 ships with a powerful PowerShell cmdlet named Migrate that administrators can use to move BLOBs from their current locations to the current active RBS provider store. This implies that administrators can use the cmdlet to move data from SQL Server to another remote BLOB store and vice versa. Moving BLOBs from a content database is a typical requirement after installing and configuring RBS on already running SharePoint systems.
It is also worth mentioning that the Migrate cmdlet performs a deep copy of the BLOBs one BLOB at a time, and there is no downtime required for moving all the BLOBs. The migration process also can be paused and resumed at any time, which means that at a point, part of the BLOBs can be in SQL Server, and the other part can reside in another BLOB store.
This cmdlet can even be used to move BLOBs from one BLOB store to another one by moving them back to SQL Server and then migrating them to another store.
Migrating BLOBs from a Content Database to the Current Active Provider Store
To migrate BLOBs from a content database to the current active provider store, follow these steps:
1. Click Start, All Programs, Microsoft SharePoint 2013 Products, SharePoint 2013 Management Shell.
2. At the Windows PowerShell command prompt (PS C:>), type each of the following commands and press Enter after each one:
$cdb = Get-SPContentDatabase ContentDatabaseName
$blobstoragesettings = $cdb.RemoteBlobStorageSettings
$blobstoragesettings.Migrate()
Migrating BLOBs from the Current Active Provider Store Back to the Content Database
To migrate the current active provider store back to a content database, follow these steps:
1. Click Start, All Programs, Microsoft SharePoint 2013 Products, SharePoint 2013 Management Shell.
2. At the Windows PowerShell command prompt (PS C:>), type each of the following commands and press Enter after each one:
$cdb = Get-SPContentDatabase ContentDatabaseName
$blobstoragesettings = $cdb.RemoteBlobStorageSettings
$blobstoragesettings.Disable()
$blobstoragesettings.Migrate()
Summary
The proficient and regular monitoring of SQL Server performance and storage is vital to keeping a SharePoint farm running optimally. Monitoring can help administrators manage and maintain their environments as they grow and can help them proactively deal with catastrophic issues. It is crucial to plan SQL Server monitoring, management, and maintenance to help avoid redundant effort. Following a management and maintenance regimen reduces administration, maintenance, and business expenses while at the same time increases reliability, stability, and performance.
Best Practices
The following are best practices from this chapter:
![]() Keep an eye on SQL Server performance and storage using the vast range of available monitoring tools.
Keep an eye on SQL Server performance and storage using the vast range of available monitoring tools.
![]() Use the SQL Server Management Studio Log File Viewer to monitor both SQL Server and Windows event logs. It is highly recommended to look through the logs on a daily basis to detect any existing or possible issues.
Use the SQL Server Management Studio Log File Viewer to monitor both SQL Server and Windows event logs. It is highly recommended to look through the logs on a daily basis to detect any existing or possible issues.
![]() Use the SQL Server Maintenance Plan Wizard to set up SQL maintenance plans.
Use the SQL Server Maintenance Plan Wizard to set up SQL maintenance plans.
![]() Do not include the option to shrink the database when creating SQL Server maintenance plans; this should be run manually only if the content database has lost at least half its content.
Do not include the option to shrink the database when creating SQL Server maintenance plans; this should be run manually only if the content database has lost at least half its content.
![]() Set the maintenance plans in production environments to run during off hours.
Set the maintenance plans in production environments to run during off hours.
![]() Ensure that the health analyzer is configured to automatically self-heal the database’s index fragmentation.
Ensure that the health analyzer is configured to automatically self-heal the database’s index fragmentation.
![]() Saving the TDE certificate in a secured place is very important and the first action to be done after encrypting the database.
Saving the TDE certificate in a secured place is very important and the first action to be done after encrypting the database.
![]() To enhance the performance of SharePoint implementations, try not to let content databases grow larger than 100GB.
To enhance the performance of SharePoint implementations, try not to let content databases grow larger than 100GB.
![]() Create new site collections in new content databases; this enhances the performance, simplifies the manageability, and provides flexibility for disaster recovery strategies.
Create new site collections in new content databases; this enhances the performance, simplifies the manageability, and provides flexibility for disaster recovery strategies.
![]() Move the storage of BLOBs from content databases to commodity storage solutions by using the RBS technology to avoid storage and performance issues.
Move the storage of BLOBs from content databases to commodity storage solutions by using the RBS technology to avoid storage and performance issues.
![]() Highly consider the use of SQL Server 2012 AOAGs for high availability and disaster tolerance of your data. This concept is covered in Chapter 4.
Highly consider the use of SQL Server 2012 AOAGs for high availability and disaster tolerance of your data. This concept is covered in Chapter 4.