Chapter 8. Leveraging and Optimizing Search in SharePoint 2013
In This Chapter
![]() Outlining the Capabilities of SharePoint 2013 Search
Outlining the Capabilities of SharePoint 2013 Search
![]() SharePoint 2013 Search Architecture
SharePoint 2013 Search Architecture
![]() Deploying a Native SharePoint 2013 Search Service Application
Deploying a Native SharePoint 2013 Search Service Application
One of the core strengths with SharePoint 2010 was its Enterprise Search capabilities—and this is ever more remarkable in SharePoint 2013. A considerable investment has been made by Microsoft into the native search capabilities within the tool, and new features and functionalities have positioned SharePoint’s Search as a robust and comprehensive search application for organizations of all sizes.
As the main step on this way of improvements, Microsoft has fully integrated the former FAST Search core into SharePoint, so that there’s one search core we have in SharePoint 2013, making the installation, administration, and maintenance much easier.
This chapter covers all the main deployment and configuration topics related to SharePoint 2013 Search. Discussed are the various options in each search component and how to configure and set up the optimal search solution. In addition, advanced customization and configuration scenarios are discussed.
Outlining the Capabilities of SharePoint 2013 Search
SharePoint has always been strong in its search capabilities, and SharePoint 2013 Search features improve the situation even more, both from an end-user perspective and for administrators.
The first and most important architectural change is that there’s only one single search core in SharePoint 2013: The separated product FAST Search for SharePoint does not exist anymore; it has been fully integrated into the SharePoint core. This means much easier installation, deployment, and administration and much less confusion on the end-user side. Powerful indexing, linguistics, extraction, and query expressiveness that are the heritage of FAST are now available as a part of SharePoint search, as shown in Figure 8.1.

Of course, these architectural changes lead to a lot of functional changes and new capabilities:
![]() User experience (UX) is totally renewed—not just because of general changes in SharePoint UX, but with deep refiners everywhere, display templates, better display results using result blocks, a hover panel with document previews, and much more.
User experience (UX) is totally renewed—not just because of general changes in SharePoint UX, but with deep refiners everywhere, display templates, better display results using result blocks, a hover panel with document previews, and much more.
![]() On the query side, search scopes, federated locations, and best bets are now deprecated in favor of result sources, query rules, and result templates. As a result, we get much more effective query processing and search result presentation.
On the query side, search scopes, federated locations, and best bets are now deprecated in favor of result sources, query rules, and result templates. As a result, we get much more effective query processing and search result presentation.
![]() As for crawling, continuous crawling is a very important enhancement to get better content freshness. Also, content processing and linguistic capabilities are now very strong and extensible.
As for crawling, continuous crawling is a very important enhancement to get better content freshness. Also, content processing and linguistic capabilities are now very strong and extensible.
![]() As a result of the changes in the general development model of SharePoint 2013, extending Search is much easier now.
As a result of the changes in the general development model of SharePoint 2013, extending Search is much easier now.
SharePoint 2013 Search Architecture
Thanks to the new model, there’s one core and one integrated administration of Search in SharePoint 2013. This means a lot of improvements:
![]() Search is fully integrated into SharePoint; there is no longer a separate FAST Search for SharePoint, and there is no longer a separate Search Server. To get a “Search Server” functionality, simply create a service farm on SharePoint 2013 that is used for search only.
Search is fully integrated into SharePoint; there is no longer a separate FAST Search for SharePoint, and there is no longer a separate Search Server. To get a “Search Server” functionality, simply create a service farm on SharePoint 2013 that is used for search only.
![]() There are four databases (DBs) for Search, each dependent on each other:
There are four databases (DBs) for Search, each dependent on each other:
Crawl DB: Tracking information and details about crawled items.
Link DB: Information extracted by the content processing component. It also stores information about the number of times people have clicked a search result.
Analytics Reporting DB: The results of usage analytics and extracted information from the link database.
Search Administration DB: Search configuration data and the access control list (ACL) for the crawl component.
![]() Every component can be scaled out for capacity and fault tolerance.
Every component can be scaled out for capacity and fault tolerance.
![]() Search is multitenant and much more administration can be done at site, site collection, and tenant level.
Search is multitenant and much more administration can be done at site, site collection, and tenant level.
You can see the components in Figure 8.2:
![]() Crawler: This is the least changed component of SharePoint 2013 Search.
Crawler: This is the least changed component of SharePoint 2013 Search.
![]() Content Processing: Processes crawled items (for example, document parsing, property mapping, language detection, entity extraction) and sends these items to the index component.
Content Processing: Processes crawled items (for example, document parsing, property mapping, language detection, entity extraction) and sends these items to the index component.
![]() Index: A brand new next-generation search core. This receives processed items from the content processing component and writes those items to an index file stored on a disk.
Index: A brand new next-generation search core. This receives processed items from the content processing component and writes those items to an index file stored on a disk.
Also receives queries from the query processing component and returns result sets.
The search index can be divided onto discrete partitions. Each index partition holds one or more index replicas. The search index is the aggregation of all index partitions.
![]() Query Processing: Analyzes and processes queries and results to optimize precision, recall, and relevance. The processed query is submitted to the index component.
Query Processing: Analyzes and processes queries and results to optimize precision, recall, and relevance. The processed query is submitted to the index component.

![]() Analytics Processing: Analyzes crawled items (search analytics) and how users interact with search (usage analytics).
Analytics Processing: Analyzes crawled items (search analytics) and how users interact with search (usage analytics).
![]() Search Administration: Runs the system processes for Search.
Search Administration: Runs the system processes for Search.
Deploying a Native SharePoint 2013 Search Service Application
In SharePoint 2013, Search is deployed as a service application, similar to the SharePoint 2010 services. The most important difference is that there is no option to choose the type of search service application (SharePoint Search, FAST Content, FAST Query) because of the architectural changes described earlier.
During the post-installation configuration steps, you can choose to use the automated wizard to deploy farm components. It automatically configures native SharePoint 2013 Search for you. Although this can be convenient, it doesn’t allow for control of the process, so it is recommended to deploy Search manually. To do this, you need to create a new Search Service Application, as follows:
1. Go to the SharePoint 2013 Central Administration site and choose Application Management, Service Applications, Manage Service Applications.
2. In the next dialog box, as shown in Figure 8.3, you can find the list of deployed service applications, modify their settings, or add a new one.

3. If you want to add a new search service application, choose the menu New, Search Service Application. You get a pop-up window with the required settings for your search service.
4. Give a name to your service—in this example, Search Service Application.
5. Select the search service account, a managed account for running the search service on your farm. It is highly recommended to use a dedicated user instead of the default one with high farm administration privileges.
6. Select or create a new application pool for the Search Admin web service.
7. Select or create a new application pool for the Search Query and Site Settings web service.
After completing these steps, your search service application is ready to be used in your web applications. But before starting to use that, you need to associate the proper search service application to your web applications. To do so, complete the following steps:
1. Go to the SharePoint 2010 Central Administration site. Open Application Management, Service Applications, Configure Service Application Associations.
2. On this page, you can find the web applications with the associated service applications. Click the name of the web application; you then see the list of all associated and disassociated services. If you want to change the associations, change the group default to custom.
3. Select the service applications you want to associate with the web application, as shown in Figure 8.4. Choose the one created earlier—in this example, the one named SharePoint Search Service.

Capturing Content
Capturing content is fundamental to search; if it’s not crawled and indexed, you can’t find it. The process of connecting to content sources, crawling them to get content, and making that content searchable is much more complex than most people realize.
The functions of crawler are as follows:
![]() Connects to the content source
Connects to the content source
![]() Maps the content
Maps the content
![]() Feeds the Indexing engine
Feeds the Indexing engine
![]() Finds any changes
Finds any changes
Similar to SharePoint 2010, SharePoint 2013 can crawl and index various types of contents. The crawled content sources can include the following types of sources:
![]() SharePoint
SharePoint
![]() HTTP (web crawler)
HTTP (web crawler)
![]() Business Data Connectivity (BDC) Framework, including (all built on the BDC Framework)
Business Data Connectivity (BDC) Framework, including (all built on the BDC Framework)
![]() Exchange Public Folders Connector
Exchange Public Folders Connector
![]() Lotus Notes Connector
Lotus Notes Connector
![]() Taxonomy Connector: connects to the Managed Metadata Service (MMS)
Taxonomy Connector: connects to the Managed Metadata Service (MMS)
![]() People Profile Connector
People Profile Connector
Most parts and functions of the crawler component have been taken directly from SharePoint 2010, so they have few changes. However, these changes are still notable and important:
![]() Anonymous crawl for HTTP
Anonymous crawl for HTTP
![]() Asynchronous web part crawl
Asynchronous web part crawl
![]() Continuous crawl (as discussed in the next section)
Continuous crawl (as discussed in the next section)
Continuous Crawl
Continuous crawl is a new way of crawling, which makes possible to have the most current data in your index. When you enable continuous crawls, a crawl schedule no longer applies; you are running crawls in parallel, and the crawler gets changes from SharePoint sites every N minutes. (By default, this interval is set to 15 minutes by default, but you can change this parameter by using PowerShell.) Continuous crawls do not stop for errors, but rather note the error and continue to crawl content. Continuous crawls can occur while other crawls are active or starting. With this capability, you can now keep content fresh and won’t experience mysterious delays when additional content sources are added.
Note
Continuous crawl is available for SharePoint content only.
Content Sources
One of the first steps is to get SharePoint Search to index the local SharePoint sites. To do so, complete the following steps:
1. From SharePoint Central Administration, navigate to the administration page of your search service application and choose Content Sources from the Crawling group of the Quick Launch navigation bar.
2. Click New Content Source.
3. Enter a name for the new content source and choose SharePoint Sites as the type of the content source.
4. Type the start addresses for the SharePoint sites. By default, you have to type the following URLs. (In this example, the URL of the main SharePoint site is https://home.companyabc.com, and the My Site web application is https://mysite.companyabc.com.)
https://home.companyabc.com: for crawling the content
sps3://mysite.companyabc.com: for crawling people content
5. Choose one of the following options: Crawl Everything Under the Hostname for Each Start Address or Only Crawl the Site Collection of Each Start Address.
6. Define full crawl scheduling for the content source crawling. During the full crawling, all items of content source are crawled from scratch.
Also, select if you want to define a schedule for incremental crawl or if you prefer to enable continuous crawl, as in Figure 8.5.

Schedules can be daily, weekly, or monthly; each of them can be configured granularly.
7. Select the priority of this content source. Content sources with high priority are processed over the content sources with normal priority during the crawling.
The settings of content sources can be modified later. Just click the name of the content source and select Edit Operation from its context menu, and you get the same configuration page.
Content Processing
The Content Processing component is brand new with SharePoint 2013. It takes content from the crawler and prepares it for indexing, as shown in Figure 8.6. With SharePoint 2013, there is also a new Analytics Processing component that feeds information into Content Processing.

The most important new features of Content Processing are as follows:
![]() Linguistics (improved phonetic search for people names, cross-lingual name search, and so on)
Linguistics (improved phonetic search for people names, cross-lingual name search, and so on)
![]() Entity extraction (moved to the Term Store)
Entity extraction (moved to the Term Store)
![]() New format handlers in document parsing
New format handlers in document parsing
![]() Higher throughput
Higher throughput
![]() Automatic content-based file format detection, eliminating dependencies on file extensions
Automatic content-based file format detection, eliminating dependencies on file extensions
![]() Improved content processing and error reporting
Improved content processing and error reporting
Result Sources and Federation
Federation is the ability to query remote indexes and present the results together with the local results. As a result, users don’t have to be aware of and use multiple search centers to search all content available in their organizations.
Federation has been available since Microsoft Office SharePoint Server (MOSS) 2007 SP2, but SharePoint 2013 improved the federation capabilities. Besides Open Search protocol, you can now federate results from remote SharePoint farms via result sources. This is a big help for distributed organizations.
Some limitations apply to using remote result sources. If you are using remote SharePoint protocol, it’s limited to SharePoint 2013 and requires all federated farms to be upgraded to SharePoint 2013. Results are still not interleaved; they’re displayed in result blocks. Refiners are also not combined.
Query Processing
In SharePoint 2013, by understanding the intent of the query, you can use a lot of techniques to reformulate the query (for example, where the query is from, who initiated the query, what concepts or entities can be recognized in the query).
Query Rules
Query rules are designed to provide control and configurability based on the intent of the query. Each query rule is defined by three features:
![]() Query conditions: Define the conditions that fire this rule. Multiple conditions of different types can be defined for the same rule.
Query conditions: Define the conditions that fire this rule. Multiple conditions of different types can be defined for the same rule.
Note
Every condition becomes false if the query is not a simple keyword query. (For example, it has quotes, property filters, parentheses, or special operators.)
Query Matches Keyword Exactly
Query Matches Action Term
Query Matches Dictionary Exactly
Query Commonly Used on Source
Result Type Commonly Clicked
Advanced Query Text Match
The queries also can be restricted on specific result sources (for example, media files or conversations).
![]() Query actions: When a query rule fires, it can enhance search results in three ways. It can do the following:
Query actions: When a query rule fires, it can enhance search results in three ways. It can do the following:
Add promoted results above the ranked results.
Add blocks of additional results. Like normal results, these blocks can be promoted to always appear above ranked results or ranked so they only appear if highly relevant.
Change ranked results, such as tuning their ordering.
![]() Publishing options: These settings control when the rule can fire. If the rule is not active, it never fires. The start date is when you want it to start firing. The end date is when you want it to stop firing. The review date is when you want the contact to review the rule.
Publishing options: These settings control when the rule can fire. If the rule is not active, it never fires. The start date is when you want it to start firing. The end date is when you want it to stop firing. The review date is when you want the contact to review the rule.
Query Suggestions
Query suggestions enable users to ask better questions and make it simpler to search for information. Query suggestions now take on two forms, both helping the users to ask better questions by showing what others have asked before:
![]() Pre-query suggestions: Includes a list of queries from other users and a list of items the current user has clicked before. Pre-query suggestions are displayed while typing the query, before it gets executed.
Pre-query suggestions: Includes a list of queries from other users and a list of items the current user has clicked before. Pre-query suggestions are displayed while typing the query, before it gets executed.
Note
Suggestions with zero results are never provided by this feature.
![]() Post-query suggestions: Are provided after a query is executed and results are displayed. They are based on the results that you have clicked at least twice. These suggestions can be tuned (inclusions, exclusions) on the search service application level.
Post-query suggestions: Are provided after a query is executed and results are displayed. They are based on the results that you have clicked at least twice. These suggestions can be tuned (inclusions, exclusions) on the search service application level.
Query Spell Correction
Query Spell Correction is a useful and needed feature because people have a habit of misspelling and fat-fingering. It’s managed in the Term Store, including both inclusions and exclusions.
Result Types
A result type is a set of rules that describe which of the items in the search results match that result type. When a user runs a query, the results come back and each result is evaluated against the rules in the result types. Then a display template (as discussed later in this chapter) is applied to the result based on the type that it matches.
Features in result types include the following:
![]() Specify a rule based on a criterion.
Specify a rule based on a criterion.
![]() Specify the managed properties to have returned when the rule conditions are met.
Specify the managed properties to have returned when the rule conditions are met.
![]() Specify the rendering template to be used. With this, you can define the display of requested properties, by using HTML and JavaScript.
Specify the rendering template to be used. With this, you can define the display of requested properties, by using HTML and JavaScript.
Query Client Types
Client type identifies an application from which a search query is sent (for example, user interface [UI], ObjectModel, Alert). Applications are prioritized by tiers. The top tier has the highest priority. When the resource limit is reached, query throttling turns on and the search system processes the queries from top tier to bottom tier.
Delegated Administration
In SharePoint 2013, there’s an option to delegate some search administration tasks to site collection or even to site level. This feature can prove very useful because it makes the central search administrator’s life much easier and requires the local (site collection or site) administrators to take more responsibility for their search solutions.
Tasks that can be delegated to site collection and site admins include the following, as shown in Figure 8.7:
![]() Create/override query rules, including promoted results
Create/override query rules, including promoted results
![]() Create/override result types and display templates
Create/override result types and display templates
![]() Create/override result sources, either for remote locations or as a custom search “vertical”
Create/override result sources, either for remote locations or as a custom search “vertical”
![]() Create managed properties in search schema (site collection level only!)
Create managed properties in search schema (site collection level only!)
![]() Create refiners
Create refiners
![]() Start a local crawl (can even be done down to the list level)
Start a local crawl (can even be done down to the list level)

User Experience
SharePoint 2013 has a lot of overall UI enhancements and improvements provided via HTML, JavaScript, and AJAX style interactions. The same applies in terms of search experience: You now have a modern, cleaner, and more user friendly UI, as shown in Figure 8.8:
![]() Hover panel for all types of results.
Hover panel for all types of results.
![]() Document previews for Office documents.
Document previews for Office documents.
![]() Enhanced refiners and faceted navigation, with deep refiners everywhere.
Enhanced refiners and faceted navigation, with deep refiners everywhere.
![]() Display templates offer control over many aspects of the Search UI: result types, refiners, hover panels, and so on. For example, if you want to extend your Contract search experience, you could create a refiner for Contractors Bar Graph template. Or, you could create a custom hover panel that surfaces even more properties that are specific to your Contracts.
Display templates offer control over many aspects of the Search UI: result types, refiners, hover panels, and so on. For example, if you want to extend your Contract search experience, you could create a refiner for Contractors Bar Graph template. Or, you could create a custom hover panel that surfaces even more properties that are specific to your Contracts.

Deep Refiners and Item Counts
As an inheritance of FAST Search for SharePoint 2010, all refiners used in SharePoint 2013’s faceted navigation are deep refiners, so there are no gaps caused by a missed item in the deeper result set.
But the refiner UI might be surprising at first sight because we don’t have the item counts displayed, despite the deep refiners, as shown in Figure 8.9.

The reason for this behavior is that the item count is simply hidden by default. To display it, complete these steps:
1. Open the page for editing and go to the Refinement Panel web part’s properties.
2. Click the Choose Refiners button. This wizard opens, as shown in Figure 8.10.

What we have here are the following:
![]() The top half of this wizard is a visual control for selecting the refiners you need on your Search page. You don’t need to do more XSLT magic for configuring the refinement panel.
The top half of this wizard is a visual control for selecting the refiners you need on your Search page. You don’t need to do more XSLT magic for configuring the refinement panel.
![]() On the left side, there’s the list of available refiners (managed properties). On the right side, you can see your current selections. Of course, you can add and remove as well as reorder the refiners here.
On the left side, there’s the list of available refiners (managed properties). On the right side, you can see your current selections. Of course, you can add and remove as well as reorder the refiners here.
When you select a refiner in the list, you see its configuration in the bottom half of the screen. You can configure the following here:
![]() Display name
Display name
![]() Display template (as discussed later)
Display template (as discussed later)
![]() Sort by
Sort by
![]() Max number of refiner values
Max number of refiner values
By default, there are two display templates defined for refiners: Refinement Item and Multi-value Refinement Item, but the item counts are hidden in both cases.
If you want to display the item counts, you have two options:
![]() Modify the existing Refiner Item display template.
Modify the existing Refiner Item display template.
![]() Create a custom display template.
Create a custom display template.
In the first case, you modify the default behavior of your refiners. In the second case, you have the option to choose whether to display the item counts.
To create a new display template or modify the existing one, follow these steps:
1. Open Design Manager from the Site Settings menu.
2. Select Upload Design Files from the left-side navigation.
3. On this page, you can map the Master Page gallery as a network drive, where the display templates are. It looks like Figure 8.11.

4. When you have the Windows Explorer opened with your Master Page gallery, open the Display Templates/Filters folder.
It’s worth mapping this location as a network drive, to make the navigation easier in the future.
5. Locate the file named Filter_Default.html. This file contains the display template named Refiner Item we found in the Refiner Wizard earlier.
Note
To figure out which file contains what kind of display template, open the Design Manager and select Edit Display Templates from the left-side navigation. This opens the list of existing display templates with both titles and filenames. You can also do some operations here, like download the files (for further processing) and so on.
6. If you want to modify the default behavior of your refiners, open the file Filter_Default.html.
7. If you want to create your own display template for refiners with item counts, copy the file Filter_Default.html and give it a name like Filter_Default_with_ItemCounts.html.
8. Open the file with any HTML editor and locate these lines:
this.Options = {
ShowClientPeoplePicker: false,
ShowCounts: false
};
Here, note the parameter ShowCounts. This is what you have to change to true.
Note
If you’re going to create a new display template instead of modifying the existing one, it’s better to change its title too, in order to give it a unique name (for example, <title>Refinement Item with Counts</title>).
9. Save your file to the Master Page gallery.
Note
There’s a .js file for each design template HTML file. At this moment, don’t worry about it even if you’re going to create your new custom display template; this JavaScript is created when you create (or upload) the HTML file.
That’s it. Just go back to your Search page. If you have just modified the default display template, you should see the item counts for each refiner. Anyway, if you created a new display template, open the Refiner Panel’s properties and go back to the Display Template drop-down. At this point, you’ll see the third one with the title Refiner Items with Counts (see Figure 8.12).
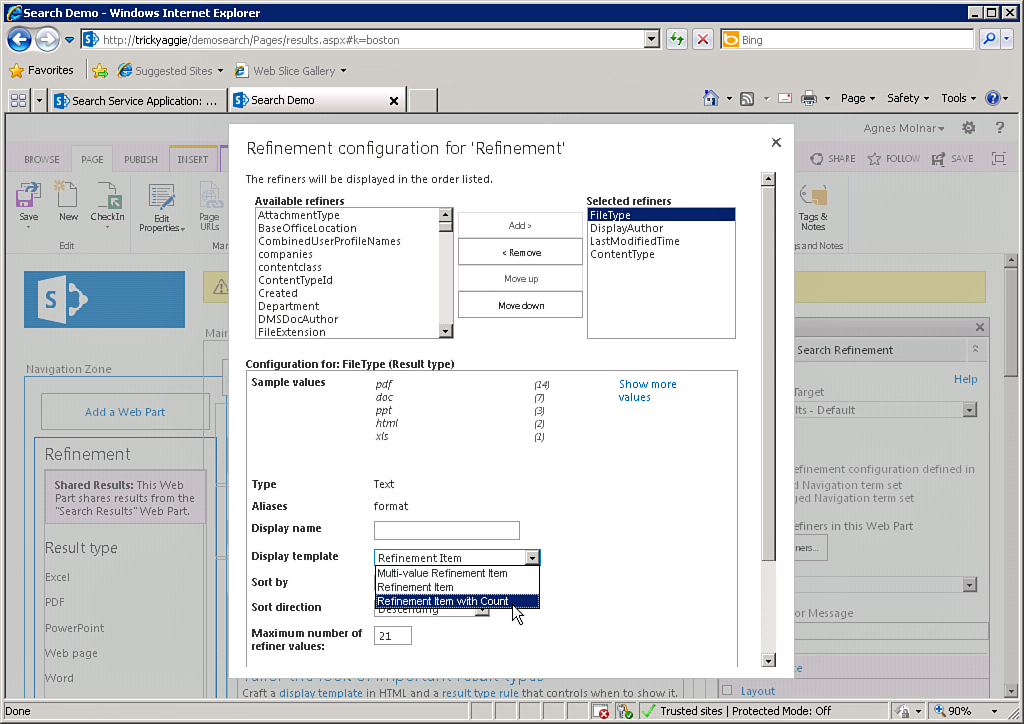
After you select the proper display template here, you’re done. Save your settings; the item counts are displayed with the refiners, as shown in Figure 8.13.

Summary
As shown in this chapter, Search has been improved significantly in SharePoint 2013 with features such as Crawl, Query, User Experience, and Analytics. As a result, the new platform is clean, fast, and easy to use. It makes creating search-based applications simpler than ever. It’s also straightforward to install, administer, and scale.
If you want to leverage SharePoint 2013 Search’s benefits but cannot or do not want to migrate your full SharePoint infrastructure to the new version, consider setting up a service farm first that hosts Search only and provides a “search first” solution to your users.
Best Practices
The following are best practices from this chapter:
![]() Consider the use of a dedicated Service Application farm that handles Search and that content farms can then utilize. This is particularly the case if you want to take advantage of SharePoint 2013’s Search capabilities without immediately upgrading a SharePoint 2010 Farm.
Consider the use of a dedicated Service Application farm that handles Search and that content farms can then utilize. This is particularly the case if you want to take advantage of SharePoint 2013’s Search capabilities without immediately upgrading a SharePoint 2010 Farm.
![]() Manually install the Search Service Application, either via PowerShell or via SharePoint Central Administration. Do not rely on the Automated Wizard to perform the process.
Manually install the Search Service Application, either via PowerShell or via SharePoint Central Administration. Do not rely on the Automated Wizard to perform the process.
![]() Utilize continuous crawl for SharePoint content to maintain fresh search results.
Utilize continuous crawl for SharePoint content to maintain fresh search results.