Chapter 7. Leveraging PowerShell for Command-Line SharePoint Administration and Automation
In This Chapter
![]() Understanding Windows PowerShell
Understanding Windows PowerShell
![]() SharePoint Administration with PowerShell
SharePoint Administration with PowerShell
![]() Using Scripts to Automate SharePoint Administration
Using Scripts to Automate SharePoint Administration
![]() Understanding Advanced PowerShell Topics
Understanding Advanced PowerShell Topics
![]() Beyond Built-In SharePoint PowerShell Cmdlets
Beyond Built-In SharePoint PowerShell Cmdlets
Microsoft originally developed Windows PowerShell in 2003 as an automation-scripting engine to help administrators use various products across the Microsoft stack. Unlike other command-line tools that accept and return text, PowerShell works with .NET Framework objects, which enables it to be more flexible for administration of bulk changes and automation.
With the release of SharePoint 2010, Microsoft released 500+ PowerShell commandlets (cmdlets) designed to help automate and administrate SharePoint environments. Microsoft has added further emphasis on PowerShell in SharePoint 2013 as well, adding additional cmdlets that provide for enhanced command-line administration of a SharePoint environment. Indeed, SharePoint 2013 administration is positioned as PowerShell-first rather than graphical user interface (GUI)-first, and many tasks can only be performed from the command line. It is subsequently critical that SharePoint administrators have at least a basic understanding of PowerShell and how to use it to administer a SharePoint farm.
This chapter introduces PowerShell to SharePoint administrators. It focuses first on a general overview of how PowerShell works, and then branches off to demonstrate how specific PowerShell cmdlets can automate and administer SharePoint. Specific examples of common SharePoint administration tasks in PowerShell are included, and download links for the examples are provided.
Understanding Windows PowerShell
Before understanding how to use PowerShell to manage SharePoint, an administrator must first understand how PowerShell functions and must conceptualize the concepts used with PowerShell.
Getting Started with Windows PowerShell
PowerShell is available on all new Microsoft operating systems, and administrators can begin learning PowerShell even when SharePoint 2013 is not installed. To make sure that the latest version of PowerShell is installed, check the Microsoft PowerShell scripting center (http://technet.microsoft.com/en-us/scriptcenter/default.aspx). All the examples in this book were written with PowerShell 3.0.
To start working with PowerShell, just click the PowerShell icon on the taskbar. This starts the PowerShell shell that you can use for typing PowerShell commands and executing scripts. Figure 7.1 shows the default PowerShell shell.

On a computer with SharePoint installed, a SharePoint 2013-branded PowerShell shell with preloaded SharePoint cmdlets is installed. To start this shell, do the following:
![]() On Windows 2008 R2, go to Start, All Programs, Microsoft SharePoint 2013 Products, SharePoint 2013 Management Shell.
On Windows 2008 R2, go to Start, All Programs, Microsoft SharePoint 2013 Products, SharePoint 2013 Management Shell.
![]() On Windows 2012, type SharePoint 2013 Management Shell to start the shell from the Start menu.
On Windows 2012, type SharePoint 2013 Management Shell to start the shell from the Start menu.
Using PowerShell to Display “Hello Shell!”
A common task performed when learning a new language is how to display “Hello World!” Creating such an application with PowerShell is simple. Type the following into a shell (You can omit lines starting with #. Everything after # is a comment.) and press Enter:
# To comment in PowerShell use a Hash tag followed by your comments.
Write-Host "Hello Shell!" # you can also put comments after your command
PowerShell scripts can also be saved to a file and executed. Save this Hello Shell example to HelloShell.ps1. Use the standard command-line cd command to navigate to the folder in which HelloWorld.ps1 is saved. To execute the script, type the following to the shell:
.HelloShell.ps1
Using the Integrated Scripting Environment
PowerShell comes with an integrated scripting environment to ease the creation and testing of scripts and functions. The scripting environment is available in Start, All Programs, Windows PowerShell 3.0, Windows PowerShell ISE (Integrated Scripting Environment; search from Start menu on Windows 2012). PowerShell ISE is shown in Figure 7.2. This newly updated tool color codes your scripts, includes integrated debugger and IntelliSense, and has a Help Wizard to help construct scripts.

FIGURE 7.2 Viewing the Hello World example from within the PowerShell-integrated scripting environment. The Commands Help Wizard is located on the right side of the screen, and it lists all the SharePoint-related cmdlets.
Before running any PowerShell cmdlets, make sure that you have loaded the appropriate snap-in (not required if you start SharePoint 2013 Management Shell). The following code checks if SnapIn has been loaded and loads it if necessary:
if((Get-PSSnapin | Where {$_.Name -eq "Microsoft.SharePoint.PowerShell"})
-eq $null) {
Add-PSSnapin Microsoft.SharePoint.PowerShell;
}
Site Collections, Sites, and Webs
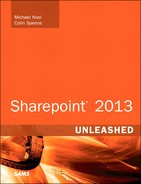
Cmdlets for SharePoint implement a different naming convention from the one used in the user interface (UI). Table 7.1 shows the names of the most important SharePoint user UI objects and the names of their respective GUI objects. The naming conventions in the PowerShell are the same as in server-side application programming interfaces (APIs).
Most of the examples in this chapter reference the preceding given objects, and you need to understand the difference between the two naming conventions.
The SharePoint Software Development Kit
PowerShell is a technology designed for IT professionals managing IT systems. However, the management of SharePoint is much easier if administrators are familiar with the SharePoint 2013 software development kit (SDK): Administrators should understand how SharePoint functions under the hood so that they know which objects enable them to retrieve certain properties.
Get-Command and Get-Help
PowerShell comes with numerous cmdlets. Microsoft released more than 800 just for SharePoint, and this number grows with each new release or service pack. Memorizing all these commands would be a challenge.
Two cmdlets come to the rescue and help administrators understand what the individual cmdlets are. Type the following in your SharePoint PowerShell shell:
Get-Command
This command lists all available SharePoint commands. Because there are so many cmdlets, they cannot fit on one screen. To check only specific sets of commands related with one object—for example, Site—type the following:
Get-Command *Site*
The preceding command lists all SharePoint cmdlets that have Site in their name. Depending on your SharePoint version, you will probably get the results shown in Figure 7.3 (or similar results).

As you can see, commands usually start with a verb (get, set, backup, and so on) and end with a noun. All the commands listed in Figure 7.3 enable you to work with SharePoint sites collections either for retrieving properties (Get- commands) or modifying site collection properties with Set- commands.
Most SharePoint commands require input before you can run them. If you run a command without all the required properties, you are prompted to enter these. To familiarize yourself with a PowerShell cmdlet, type the following:
Get-Help Get-SPSite
This command can give you detailed help for the Get-SPSite cmdlet. You can also type the preceding command with the following -examples or -detailed parameters to check out more info on this command. These SharePoint cmdlets are well documented and provide a great learning starting point.
If you already have different scripts written for SharePoint 2010, in most cases, these will work with SharePoint 2013. However, Microsoft removed a number of cmdlets for these services that were ether re-architected (Search) or removed (Web Analytics), so double-check old scripts against a SharePoint 2013 test farm.
The First SharePoint Cmdlet
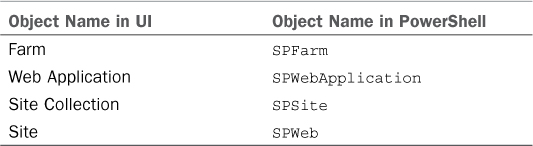
The easiest way to start working with SharePoint cmdlets is to start the SharePoint 2013 Management Shell. On a computer with SharePoint 2013 installed, go to Start, All Programs, Microsoft SharePoint 2013 Products, SharePoint 2013 Management Shell. After the shell loads, type the following command into the command prompt:
Get-SPSite
The preceding command lists all site collections in the current SharePoint farm. Figure 7.4 shows sample results.
Verbs and Nouns
Every built-in PowerShell cmdlet is composed of a verb and noun (Verb-Noun)—for example, Get-SPSite. The verb part of a cmdlet indicates an operation that will be performed, and the noun indicates the object on which the operation will be performed. The Get-SPSite command gets an SPSite object (SharePoint site collection object).
The other common PowerShell operations (verbs) are Set- (modifies object), Remove- (deletes object), and New- (creates a new object).
Most SharePoint cmdlets come with these four verb-noun combinations. However, some objects might have more or fewer cmdlets depending on the object type—for example, the SPSite object also comes with Backup-, Move-, Restore-, Test-, Copy-, Repair, and Upgrade cmdlets.
Working with Variables, Function, and Cmdlets
You can use PowerShell variables to store results from any executed command. The following example demonstrates how to use variables:
$SiteCollection = Get-SPSite "http://portal.companyabc.com"
$SiteCollection.Url
$SiteCollection.Owner
The preceding given command saves site collection (from http://portal.companyabc.com) to a variable $SiteCollection; the variable can then be used to retrieve properties. The preceding example shows how to retrieve Url and Owner properties and display them in the shell.
The value stored to $SiteCollection is a SharePoint-specific .NET Framework object (SPSite) and exposes all available properties as in any other .NET language.
PowerShell Command Piping
In real life, people use pipes to transfer goods (for example, oil) from one end to another. PowerShell pipes are similar because they enable you to easily transform, modify, or pass the result of one cmdlet to another.
Suppose, for example, that we want to list all site collections in a SharePoint farm. The Get-SPSite cmdlet displays all the site collections, but in large farms it might return hundreds or thousands of results. If Get-SPSite is combined with a filter command (over pipe), it returns only specific site collections that require attention:
Get-SPSite | Where {$_.Url -eq "http://portal.companyabc.com"}
By using the pipe (|), we see results (all site collections) of the Get-SPSite cmdlet that are passed to the Where pipe, which dictates that only site collections whose URL equals (operator -eq) to http://portal.companyabc.com are released to the next cmdlet in the pipeline.
The preceding example has only one pipe, but additional pipes could be used:
Get-SPSite | Where {$_.Url -like "*portal*"} | Sort RootWeb | Select
RootWeb, Url
The preceding command lists all the site collections that contain (operator -like) the word portal in their URL and then sorts them by RootWeb property and displays the results in table format with two columns, RootWeb and Url.
Figure 7.5 shows the results of running the preceding code in the SharePoint 2013 Management Shell.

FIGURE 7.5 Examining a PowerShell statement that returns a list of site collections with the word portal in the URL.
Formatting Results
Results retrieved from PowerShell cmdlets are usually displayed in a tabular form but can be further customized by adding the format command. Typical format commands are Format-List, Format-Table, and Format-Wide:
Get-SPSite | Select RootWeb, Url, Owner | Format-Table
The preceding command lists all the site collections and displays results in table format. (We selected RootWeb, Url, and Owner properties of site collection to be displayed in the table.)
In addition to formatting results, you can choose a different output destination than a default one (shell screen). One of the useful output destinations is GridView. (A PowerShell-integrated scripting environment must be installed to use it.)
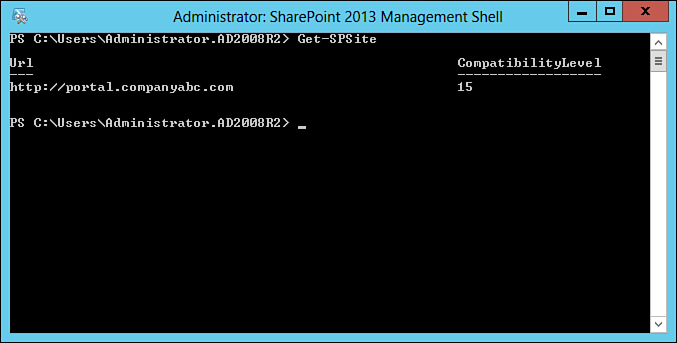
Get-SPSolution | Select * | Out-GridView
The preceding command displays all installed SharePoint solutions in a GridView format, as shown in Figure 7.6. If you do not have installed solutions, you could combine Out-GridView with other cmdlets, such as Get-SPSite.
What’s New in PowerShell 3.0
SharePoint 2013 Management Shell works on top of PowerShell 3.0, an enhanced version of PowerShell. The benefits introduced in the new version are general, but SharePoint admins will benefit because day-to-day operations should be easier.
The most important new features in PowerShell 3.0 include the following:
![]() Simplified syntax for Where-Object and ForEach-Object: Writing PowerShell syntax can be challenging for a novice administrator, so Microsoft introduced changes that allow administrators to write more “natural” commands. The following example shows how to list all the site collections with SharePoint 2013 (v15) compatibility level:
Simplified syntax for Where-Object and ForEach-Object: Writing PowerShell syntax can be challenging for a novice administrator, so Microsoft introduced changes that allow administrators to write more “natural” commands. The following example shows how to list all the site collections with SharePoint 2013 (v15) compatibility level:
Get-SPSite | Where CompatibilityLevel -eq 15
![]() The Get-Help cmdlet: This help cmdlet can now download help updates from the Web, and you can also use the
The Get-Help cmdlet: This help cmdlet can now download help updates from the Web, and you can also use the -Online switch to directly query the Microsoft knowledge base.
![]() Enhanced remoting in Windows Server 2012: With the release of Windows Server 2012, PowerShell becomes one of the most important tools in a toolbox of any Windows admin. Remoting is enabled by default in Windows 2012 and enables administrators to control remote servers even when these are in core mode (that is, when the UI has been turned off). If you are running a multiserver farm, this can prove handy for changes that need to be performed on any server in the SharePoint farm. Scripting various procedures can save you time when dealing with large farms or when environments need to be rebuilt on a regular basis (for example, a test or dev farm).
Enhanced remoting in Windows Server 2012: With the release of Windows Server 2012, PowerShell becomes one of the most important tools in a toolbox of any Windows admin. Remoting is enabled by default in Windows 2012 and enables administrators to control remote servers even when these are in core mode (that is, when the UI has been turned off). If you are running a multiserver farm, this can prove handy for changes that need to be performed on any server in the SharePoint farm. Scripting various procedures can save you time when dealing with large farms or when environments need to be rebuilt on a regular basis (for example, a test or dev farm).
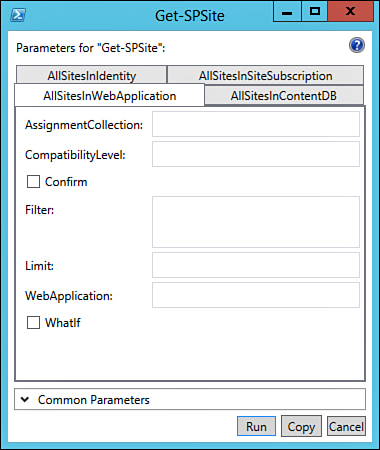
![]() Show-Command: This newly introduced cmdlet is a visual enhancement of
Show-Command: This newly introduced cmdlet is a visual enhancement of Get-Help, assisting when one is not sure about the proper choice of parameters and outcomes, as shown in Figure 7.7.
PowerShell-integrated scripting has been improved with IntelliSense and other features that can help administrators to be more efficient when writing scripts.
Introducing PowerShell: The SharePoint Admin’s Best Friend
With the release of SharePoint 2010, Microsoft decided to slowly replace STSADM with PowerShell. In SharePoint 2013, STSADM is still around, but only a few features can be exclusively managed (for example, People Picker) with STSADM. Everything else is available via PowerShell, and it becomes the most important tool for SharePoint administration automation. With the 2013 release, a number of new features can only be administrated with PowerShell because there is no UI in Central Admin. These include multitenancy administration (as in 2010), configuring infrastructure for apps and marketplace, configuring licensing options, managing integration with Office Web Apps Server 2013, and so on.
Administrators can still use various tools to administer SharePoint. An administrator who only periodically needs to create a single site collection should probably still use Central Administration, but PowerShell should be the first choice when one wants to fully automate SharePoint solutions. PowerShell is an important resource when it comes to building scripted environments like dev environments or test farms. Administrators running System Center Virtual Machine Manager 2012 can leverage PowerShell to script entire multiserver farms to be built from machine templates.
SharePoint Administration with PowerShell
This section covers some of the common PowerShell usage scenarios.
The Naming of PowerShell Cmdlets
As previously mentioned, the naming of PowerShell cmdlets differs from the ones you got used to in the SharePoint Central Administration interface and is similar to the SharePoint server object model. Here are the most commonly used cmdlets in this chapter:
![]() Get-SPFarm: Returns a SharePoint farm object (unique per farm)
Get-SPFarm: Returns a SharePoint farm object (unique per farm)
![]() Get-SPWebApplication: Returns all SharePoint web applications
Get-SPWebApplication: Returns all SharePoint web applications
![]() Get-SPSite: Returns all site collections
Get-SPSite: Returns all site collections
![]() Get-SPWeb: Returns all SharePoint sites in a given site collection
Get-SPWeb: Returns all SharePoint sites in a given site collection
Retrieving Site Collections and Sites with PowerShell
One of the most common scenarios when you use PowerShell is retrieving site collections and sites. To retrieve the list of site collections, simply type Get-SPSite in the shell.
To retrieve the list of all SharePoint sites in a site collection, Get-SPSite needs to be combined (piping) with Get-SPWeb. For example, type the following:
Get-SPSite | Get-SPWeb
This command lists all site collections in a SharePoint farm and then lists all the websites in each site collection.
If you need to list format or all object properties, type the following:
Get-SPSite | Select *
Your PowerShell shell lists all the site collections with all the associated properties. A special cmdlet, Get-SPSiteAdministration, enables farm administrators to view certain information (for example, owner, usage) about site collections to which they might not have access. The following example lists all site collections along with their primary and secondary admins:
Get-SPSiteAdministration | Select -Property Url, OwnerLoginName,
SecondaryContactLoginName
Modifying Site Collection Properties with PowerShell
Administrators can use PowerShell to easily modify all the properties of any PowerShell object.
Consider the following scenario. An administrator needs to add user CompanyABC.comJohn as a secondary administrator for all site collections. This is an ideal example of how PowerShell can help to automate SharePoint administration. To achieve the goal, type the following command:
Get-SPSite | Set-SPSite -SecondaryOwnerAlias "CompanyABC.comJohn"
In the preceding example, we use Get-SPSite to get the list of all the site collections and then combine that with the Set-SPSite cmdlet that sets a Secondary Owner value to "CompanyABC.comJohn".
To verify that the cmdlet completed successfully, run the following command to display the owner and secondary owner for each site collection:
Get-SPSite | Select RootWeb, Url, Owner, SecondaryContact
Working with Solutions and Features
One of the most common tasks that administrators perform on SharePoint farms is solution and feature management. Previously, in SharePoint 2007, administrators couldn’t install solutions without calling STSADM commands. In SharePoint 2013, this has not changed much; you still can use STSADM to install custom solutions, but dedicated PowerShell cmdlets now can help you further automate this procedure.
Deploying a Custom Solution with Features
Consider the following scenario. A custom solution needs to be deployed to the CompanyABC SharePoint portal. The solution has two features, as shown in Figure 7.8: a content type and custom web part.

FIGURE 7.8 Examining the structure of custom ABC-Solution, which contains two features: a web part HelloWorld and a custom content type.
Here are the steps you need to complete to install the ABC feature to a SharePoint environment.
The first step of this procedure is to upload the solution from the file system to the central solution farm store. Use this command (use the path where you have a .wsp file):
Add-SPSolution "C:My-SolutionsABC-Solution.wsp"
When the command uploads the solution, it is visible in the Central Administration, Solution Management. You need to deploy the solution via the Central Administration UI or with the following PowerShell code:
Install-SPSolution "CompanyABC_Solution.wsp" -AllWebApplications
-GACDeployment -Force
The preceding command deploys solutions to all web applications (-AllWebApplications parameter) and also enables custom code to be deployed to Global Assembly Cache (GAC) via the -GACDeployment parameter. If the solution already exists, it is overwritten (-Force).
To activate features on individual site collection, use the following code. The ABC solution has two features, and each needs to be enabled individually:
Enable-SPFeature "ABC-Solution_HelloWorld" -Url "http://portal.companyABC.com"
Enable-SPFeature "ABC-Solution_ContentType" -Url "http://portal.companyABC.com"
In the custom ABC-Solution, the HelloWorld web part is scoped as a site collection (Site) feature, and the ContentType is scoped as a site-level (Web) feature. To activate it on every site in your site collection, run the following command:
Get-SPSite "http://portal.companyABC.com" | Get-SPWeb | ForEach-Object
{Enable-SPFeature "ABC-Solution_ContentType" -Url $_.Url}
To remove these features and solutions, you must call commands in reverse order: First, deactivate the feature, uninstall the solution, and then remove it. To perform these operations, type the following:
Disable-SPFeature "ABC-Solution_HelloWorld" -Url "http://portal.companyABC.
com" -confirm:$false
Disable-SPFeature "CompanyABC-Solution_ContentType" -Url "http://portal.companyABC.
com" -confirm:$false
Uninstall-SPSolution "ABC-Solution.wsp" -confirm:$false -AllWebApplications:$true
Remove-SPSolution "ABC-Solution.wsp" -confirm:$false
PowerShell Backup and Restore Options
Backups can now be completely controlled via a series of cmdlets that perform backups of the SharePoint farm, site collection, and configuration database.
Every cmdlet comes with a restore command. SharePoint 2013 also maintained cmdlets from SharePoint 2010 that provide the ability to export and import site collections, web applications, sites, or lists.
Automating Site Collection Backup and Restore
To perform a backup of an individual site collection, type the following:
Backup-SPSite "http://portal.companyABC.com" -path "C:Backupsportal.bak" -force
The command in the preceding example backs up a site collection at the given URL to the designated path. Before running this cmdlet, make sure that this path (for example, C:Backup) exists. If there is a previous backup file at this location, use the -force parameter to overwrite an existing backup file. Additional backup cmdlets include Backup-SPConfigurationDatabase (creates a backup of SharePoint Config database), Backup-SPEnterpriseSearchServiceApplicationIndex (new in 2013, creates a backup of search index), and the overall Backup-SPFarm that creates a backup of the entire farm or an individual web application.
To restore the site collection, type the following:
Get-SPSite "http://portal.companyABC.com" | Get-SPWeb | ForEach-Object
{Enable-SPFeature "ABC-Solution_ContentType" -Url $_.Url}
Two parameters must be used for silent site collection restore. -force ensures any existing site collection at http://portal.comapanyabc.com will be overwritten; and -confirm:$false suppresses the overwrite confirmation dialog. By suppressing the confirmation, you can easily automate a restore operation.
Exporting SharePoint Sites and Content
In SharePoint 2013, Microsoft introduced a new capability to export and import SharePoint objects. These new operations enable administrators to more easily move content between different site collections. During import and export operations, administrators can control which content is transferred and how versions are affected by the move.
Here is an example for exporting a site:
Export-SPWeb "http://portal.companyABC.com/Team-Site" -path "C:Exports
Team-Site.bak"
The syntax to export a list is similar, but the list path, relative to the site path, must be passed as -ItemUrl parameter:
Export-SPWeb "http://portal.companyABC.com/Team-Site" -path "C:ExportsDoc-Lib.bak"
-ItemUrl "/Doc-Lib"
When exporting lists and libraries, associated workflows and alerts are not exported along with the content. In addition, item-level permissions are not maintained.
Sometimes a business might ask for a snapshot of SharePoint for archiving or compliance purposes, which PowerShell can easily handle. The cmdlet Export-SPWeb enables administrators to control versions that are exported to an export file.
To export content of a document library, use the same code as previously given. By using optional parameter -IncludeVersions, you can choose to export: LastMajor, CurrentVersion, LastMajorAndMinor, or All.
Importing Exported Content
Export operations can be performed via Central Administration, but import is available only via PowerShell. Before importing, you need to create an empty site in your site collection. A new site can be created via UI or PowerShell, but make sure you use the same site template as the site that was exported.
The following command lists all installed site templates:
Get-SPWebTemplate
To create a site with a desired template, use the following cmdlet (in this case, a site based on a blank site template is created):
New-SPWeb -url "http://portal.companyABC.com/New-Site" -Template "STS#1"
To import a document library, type the following:
Get-SPSite "http://portal.companyABC.com/New-Site" | Import-SPWeb -path
"C:ExportsDoc-Lib.dat" -force -UpdateVersions Overwrite
The preceding example imports a document library that was previously exported to a file. The -Force parameter ensures that existing data is overwritten, and -UpdateVersions instructs the command to overwrite all existing versions. There is also an append switch. (Versions are appended to existing versions.)
Monitoring SharePoint Databases and Site Collection Usage
To monitor SharePoint databases, first use the following cmdlet to retrieve the list of databases:
Get-SPWebApplication | Get-SPContentDatabase | Select WebApplication, Name, Server |
Format-Table
The preceding command displays all SharePoint web applications available in this farm, along with their respective database names and SQL server name.
To check the current size (in bytes) of each site collection, use the following cmdlet:
Get-SPSite | Select RootWeb, Url,
@{Name="Size"; Expression={"{0:N2} GB" -f ($_.Usage.Storage/1E9)}},
@{Name="Storage Warning"; Expression={"{0:N2} GB" -f
($_.Quota.StorageWarningLevel/1E9)}},
@{Name ="Storage Max"; Expression={"{0:N2} GB" -f
($_.Quota.StorageMaximumLevel/1E9)}} | ConvertTo-HTML | Out-File
"C:TempSiteUsage.html"
The example might look complicated, but it gets all the site collections and formats the output in any easy-to-read fashion. Here are a few notes:
![]()
SPSite.Usage property is a complex object, and to retrieve storage usage, we had to construct an expression.
![]() A similar expression was used to retrieve quota properties.
A similar expression was used to retrieve quota properties.
![]() An expression also demonstrates PowerShell’s capability to convert results to HTML and save it to a file (
An expression also demonstrates PowerShell’s capability to convert results to HTML and save it to a file (ConvertTo-HTML | Out - File).
Figure 7.9 shows results that could be retrieved by running such a command in CompanyABC’s farm.

Set-SPSite enables you to change quotas for a site collection via PowerShell. To change a quota for a site collection, type the following, and note that "My Quota Template" uses the name of an existing quota template available in your farm. A new template can be created via Central Administration:
Set-SPSite "http://portal.companyABC.com" -QuotaTemplate "My Quota Template"
(if Comment [JPC33] is applicable)
Managing Content Databases and Site Collections
The built-in cmdlets enable you to manage content databases. If a SharePoint farm is not adequately planned, one of your content databases might grow too large. In such scenarios, you can rely on PowerShell to fix the problem. Type the following command to create a new database:
$webApplication = Get-SPWebApplication "http://portal.companyABC.com"
New-SPContentDatabase -Name "WSS_Portal_Content_New" -WebApplication $webApplication
The preceding command creates a new content database for the portal web application. All the other database settings (for example, database server, warning site count, and maximum site count) can be changed at a later stage with the Set-SPContentDatabase cmdlet.
The following example demonstrates how warning and maximum site levels can be changed via PowerShell. Type the following to change the warning and maximum site count to 1000 and 2000, respectively:
Set-SPContentDatabase "WSS_Portal_Content_New" -WarningSiteCount 1000 -MaxSiteCount
2000
With multiple databases per web application, you can now easily move site collections between databases. Use the following code, but make sure that you already have "WSS_Portal_Content_New" in place:
Move-SPSite "http://portal.companyABC.com/sites/sub-site-collection" -
DestinationDatabase "WSS_Portal_Content_New" -confirm:$false
The preceding command moves the site collection at the given URL ("http://portal.companyABC.com/sites/sub-site-collection") to the new database. If you omit the -confirm parameter, you are prompted to confirm this operation. As noted in the warning, Internet Information Services (IIS) must be restarted to complete the move. You can accomplish this by using the iisreset command.
Enabling and Managing Per-User Licensing Models with PowerShell
Ever since three editions of SharePoint were introduced back in SharePoint 2007, customers have wanted to be able to mix users with Standard and Enterprise client access licenses (CALs) within the same SharePoint farm. In earlier versions, this was impossible to achieve without installing multiple farms. In 2013, however, Microsoft now allows for per-user licensing models within a single farm. These licensing models can be enabled with the following “licensing” PowerShell cmdlets to control the state of licensing enforcement (turned off by default):
![]()
Disable-SPUserLicensing
![]()
Enable-SPUserLicensing
![]()
Get-SPUserLicensing
The following commands are related to user objects:
![]()
Get-SPUserLicense
![]()
Get-SPUserLicenseMapping
![]()
Add-SPUserLicenseMapping
![]()
New-SPUserLicenseMapping
![]()
Remove-SPUserLicenseMapping
Administrators can use *-SPUserLicensing cmdlets to enable or disable licensing engines. When enabled *-SPUserLicenseMapping cmdlets help to assign licenses to individual users (claims based), Active Directory (AD) security groups, or roles. The following example shows how to assign an Enterprise license to a user:
$user = New-SPClaimsPrincipal -identity "CompanyABCBobSmith" -IdentityType
"WindowsSamAccountName"
$userMapping = New-SPUserLicenseMapping -Claim $user -License Enterprise
$userMapping | Add-SPUserLicenseMapping
Configuring New Service Applications and Features in SharePoint 2013
In SharePoint 2013, Microsoft introduced new offerings related to apps. To configure these administrators, use PowerShell cmdlets. This section provides an overview of these new cmdlets. To see these cmdlets in action, you can use the PowerShell script written to allow for automated farm provisioning and provided in Chapter 4, “Advanced SharePoint 2013 Installation and Scalability.” These scripts are also available for download at the following URL: http://tinyurl.com/SP2013-Config.
The Office Web Apps component is now a standalone server called Office Web Apps Server. Administrators should follow this guide to configure these servers to work together: http://technet.microsoft.com/en-us/library/ff431687(v=office.15).aspx. This article includes a couple of new cmdlets used to integrate these two servers: New-SPWOPIBinding and Set-SPWopiZone.
The same approach applies if you plan to use new SharePoint apps in your on-premises farm. The article http://technet.microsoft.com/en-us/library/fp161236(v=office.15).aspx explains this procedure in more detail. There are a few prerequisite steps like configuring domain name system (DNS) and obtaining a Secure Sockets Layer (SSL) certificate. SharePoint configuration needs to be performed via PowerShell. This includes the following:
![]() Starting the AppManagementServiceInstance with the
Starting the AppManagementServiceInstance with the Start-SPService cmdlet
![]() Creating an application pool with
Creating an application pool with New-SPServiceApplicationPool
![]() Creating a new SharePoint 2013 application Subscription Settings service application using the cmdlets
Creating a new SharePoint 2013 application Subscription Settings service application using the cmdlets New-SPSubscriptionSettingsServiceApplication and New-SPSubscriptionSettingsServiceApplicationProxy
![]() Creating an instance of Application Management service application using the cmdlets
Creating an instance of Application Management service application using the cmdlets New-SPAppManagementServiceApplication instance and New-SPAppManagementServiceApplicationProxy
![]() Configuring the domain for apps via
Configuring the domain for apps via Set-SPAppDomain and Set-SPAppSiteSubscriptionName
Administrators can use PowerShell to control marketplace settings. For some on-premises deployments, administrators can choose to completely block the marketplace feature or to redirect users to a different marketplace (for example, internal). PowerShell is used to control these settings via Set-SPAppMarketplaceSettings and Get-SPAppMarketplaceSettings.
One interesting new app in SharePoint is the Work Management service application. The application is in charge of integrating users’ tasks across the entire stack of Microsoft products, including SharePoint, Exchange, Project, and so on. The application can be created using the PowerShell cmdlets New-SPWorkManagementServiceApplication and New-SPWorkManagementServiceApplicationProxy.
Using Scripts to Automate SharePoint Administration
This section examines some of the most useful scripts you can use to automate a SharePoint farm. These scripts automate common SharePoint tasks, and in many cases, greatly improve the control administrators have over their SharePoint farms. You can download all these scripts from http://tinyurl.com/SP2013-Config.
Automating the Creation of Web Applications and Site Collections
PowerShell can help administrators when they need to create a number of site collections. This often happens when administrating large SharePoint farms or providing hosting services.
Site collection creation operations consists of the following three steps:
1. Create an IIS web application and application pool.
2. Create a site collection.
3. Choose a template for the site collection.
These operations can be performed via Central Administration or easily automated via PowerShell. The following example combines all three steps as a single cmdlet:
Function New-SPSiteSet
{
param(
[Parameter(Mandatory=$true)]
[string]$SiteName,
[int]$Port = 80,
[string]$HostHeader = "",
[string]$URL = "",
[Parameter(Mandatory=$true)]
[string]$ApplicationPool,
[Parameter(Mandatory=$true)]
[string]$ApplicationPoolAccount,
[string]$SiteCollectionOwner = $ApplicationPoolAccount,
[string]$TemplateName = "Blank Site"
)
$ap = New-SPAuthenticationProvider
if($URL -ne "")
{
New-SPWebApplication -Name $SiteName -Port $Port -HostHeader
$HostHeader -URL $Url -ApplicationPool $ApplicationPool -
ApplicationPoolAccount (Get-SPManagedAccount $ApplicationPoolAccount) -
AuthenticationProvider $ap
}
else
{
New-SPWebApplication -Name $SiteName -Port $Port -HostHeader
$HostHeader -ApplicationPool $ApplicationPool -ApplicationPoolAccount (Get-
SPManagedAccount $ApplicationPoolAccount) -AuthenticationProvider $ap
}
$webApplication = Get-SPWebApplication $SiteName
$currentUserAlias = "{0}{1}" -f $Env:USERDOMAIN, $Env:USERNAME
$templates = Get-SPWebTemplate | Where {$_.Name -eq $TemplateName -or $_.Title
-eq $TemplateName}
if($templates.Length -eq $null)
{
$template = $templates.Name
}
else
{
$template = $templates[0].Name
}
if($template -eq $null)
{
$templates = Get-SPWebTemplate | where {$_.IsHidden -eq $false -and
$_.IsRootWebOnly -eq $false}
$template = $templates[0].Name
}
New-SPSite -Name "SiteName" -Url $webApplication.Url -OwnerAlias
$SiteCollectionOwner -SecondaryOwnerAlias $currentUserAlias
Get-SPWeb $webApplication.Url | Set-SPWeb -Template $template
}
To execute this function, type the following into the PowerShell shell:
New-SPSiteSet -SiteName "NewSiteCollection" -Port 8080 -ApplicationPool
"ApplicationPool-NewSiteCollection" -ApplicationPoolAccount
"companyABC.comSPServiceAccount"
The script calls all necessary cmdlets and enables you to create a new site collection with a single call. In the previous example, a site collection with the associated pool is created, and it is available at port 8080 with the default template (Blank Site).
The function can be further customized with additional site collection parameters as needed. Default parameters include the following:
![]() SiteName: Name for your site collection and web application.
SiteName: Name for your site collection and web application.
![]() Port: Port used for your site collection URL; the default port is 80.
Port: Port used for your site collection URL; the default port is 80.
![]() HostHeader: Optional host header (for example, portal.companyABC.com). If the host header is not provided, the site collection is available as http://SP_Server_Name:Port.
HostHeader: Optional host header (for example, portal.companyABC.com). If the host header is not provided, the site collection is available as http://SP_Server_Name:Port.
![]() URL: Custom URL for your site collection.
URL: Custom URL for your site collection.
![]() ApplicationPool: Name of application pool used.
ApplicationPool: Name of application pool used.
![]() ApplicationPoolAccount: Account used as application pool account (must be managed account).
ApplicationPoolAccount: Account used as application pool account (must be managed account).
![]() SiteCollectionOwner: Account that is primary site collection administrator. If a value is not provided,
SiteCollectionOwner: Account that is primary site collection administrator. If a value is not provided, ApplicationPoolAccount is used instead.
![]() TemplateName: Template applied to newly created site collection. If a value is not provided, the Blank Site template is used.
TemplateName: Template applied to newly created site collection. If a value is not provided, the Blank Site template is used.
Customers upgrading from SharePoint 2010 should note that the default authentication mode for web applications in SharePoint 2013 is now claims-based authentication. To be able to use all the SharePoint 2013 features, all existing web applications should be converted to claims authentication using the Convert-SPWebApplication cmdlet. You can find detailed information about upgrade procedures in Chapter 5, “Migrating from SharePoint 2010 to SharePoint 2013.” You can also find more information at http://technet.microsoft.com/en-us/library/gg251985(v=office.15).aspx.
To use the previously mentioned cmdlet, type the following:
Convert-SPWebApplication -Identity "http://portal.companyabc.com" -To Claims
-RetainPermissions -Force
Creating Site Structures On-the-Fly
SharePoint comes with many built-in templates that you can customize to match your needs. With PowerShell, you can streamline site creation for any purpose you need. You can leverage the built-in cmdlets to create and tear up site structures.
The following example shows how you can use PowerShell to automate the creation of a site structure. It combines the abilities to list templates and to create a new site. The script first lists all available site templates. Hidden templates designed for root sites and templates with more complicated setup routines (for example, business intelligence [BI]) are omitted to retain simplicity of this script. For each site in that collection, a new site based on that template is created.
Here is the example:
Function Create-SPMockupSites($Path)
{
$webTemplates = Get-SPWebTemplate | Where{$_.IsHidden -eq $false -and
$_.IsRootWebOnly -eq $false -and $_.CompatibilityLevel -eq 15 -and $_.Name -ne
"BICenterSite#0" -and $_.Name -ne "EDISC#1"}
New-SPWeb -url ($Path + "/templates") -Template "STS#1" -Name "Templates"
$rootWeb = Get-SPWeb ($Path + "/templates")
ForEach($webTemplate in $webTemplates)
{
$templateName = ($webTemplate.Title -replace 's', '')
New-SPWeb -url ($rootWeb.Url + "/" + $templateName) -Template $webTemplate.
Name -Name $webTemplate.Title -Description $webTemplate.Description
}
}
To use the preceding code, type the following:
$siteUrl = Read-Host "Hello, please enter your site collection URL"
Create-SPMockupSites $siteUrl
The script creates a blank site at http://portal.companyABC.com/Templates and then a subsite below it for each template available.
In out-of-the-box SharePoint installation (Enterprise Edition), this command creates approximately 20 new sites. Use this script when you are preparing presentations, building demo sites, or preparing educational sites for end users.
Administrators can create a similar example when you need to create a number of sandbox sites for an upcoming educational course. All these sites could use the same template but have a different site owner.
Automating Site Collection Backups with PowerShell
In the original SharePoint 2003 and 2007 Unleashed books, the script to back up site collections was one of the most asked-for scripts because it enabled administrators to back up individual site collections to flat files on a nightly basis. In the SharePoint 2010 and 2013 Unleashed books, we upgraded this script to PowerShell, and the same script is available as part of this chapter.
The script enables the following:
![]() You can back up all site collections in your server farm.
You can back up all site collections in your server farm.
![]() The backup filename is a combination of the site collection name and date when the backup was created.
The backup filename is a combination of the site collection name and date when the backup was created.
![]() Users running this script can specify the number of previous backups they want to retain.
Users running this script can specify the number of previous backups they want to retain.
![]() When the backup finishes, a notification is sent to a specified email address.
When the backup finishes, a notification is sent to a specified email address.
Here is the script listing:
Function Backup-SPSiteCollections ()
{
param(
[Parameter(
Position=0,
Mandatory=$true
)]
[Guid]$SPSiteID,
[Parameter(
Position=0,
Mandatory=$true
)]
[string]$BackupFolder,
[Parameter(
Position=0,
Mandatory=$true
)]
[string]$RootWeb,
[Parameter(
Position=0,
Mandatory=$true
)]
[int]$BackupFilesLimit,
[Parameter(
Position=0,
Mandatory=$false
)]
[string]$Email = "",
[Parameter(
Position=0,
Mandatory=$false
)]
[string]$SmtpServer = ""
)
# Test if backup folder exists
if (Test-Path $BackupFolder)
{
# Retrieve previous backup files, sorted by last write time (last
modified)
$files = Get-Childitem $BackupFolder | where {$_.Name -like ("*" + $RootWeb +
"*.dat")} | Sort $_.LastWriteTime
$filesCount = @($files).Count
# If there are more files in directory than backupFilesLimit
if($filesCount -ge $BackupFilesLimit)
{
# Delete all older files
for ($i=0; $i -lt $filesCount-$BackupFilesLimit+1; $i++)
{
Remove-Item ($BackupFolder + $files[$i].Name)
}
}
}
# If backup folder does not exist it will be created
else
{
New-Item $BackupFolder -type directory
}
$backupFileName = ("" + $RootWeb + "_" + (Get-Date -Format yyyy-MM-ddThh-mm-ss)
+ ".dat")
$backupFilePath = $BackupFolder + $backupFileName
$startTime = Get-Date
Backup-SPSite -identity $_.ID -path ($backupFilePath) -force
$endTime = Get-Date
# Checking if Email and SmtpServer values have been defined
if($Email -ne "" -and $SmtpServer -ne "")
{
$subject = "SharePoint Site Collection Backup Completed!"
$body = "The following site collection was backuped: " + $RootWeb +
"`n"
$body += "Site collection was backuped to: " + $backupFileName + "`n"
$body += "Backup started on: " + $startTime + ", and ended on: " +
$endTime + "`n`n"
# Retrieving Site Collection size
$SiteCollectionSize = Get-SPSite | Where {$_.ID -eq $SPSiteID} |
Select @{Expression={$_.Usage.Storage/1MB}}
# Retrieving backup file size
$backupFileSize = Get-ChildItem $backupFilePath | Select {$_.
Length/1MB}
$body += "Site collection size on SharePoint system is: " +
$SiteCollectionSize + " MB`n"
$body += "Backup file size: " + $backupFileSize + " MB"
$smtp = new-object Net.Mail.SmtpClient($SmtpServer)
# Sending email
$smtp.Send($Email, $Email, $subject, $body)
}
}
You can execute this script by using the following code snippets:
# Back up all site collections in your farm
Get-SPSite | ForEach-Object {Backup-SPSiteCollections -SPSiteID $_.ID -
BackupFolder "C:Backups" -RootWeb $_.RootWeb -BackupFilesLimit 5}
# Back up all site collections in your farm and send an email
Get-SPSite | ForEach-Object {Backup-SPSiteCollections -SPSiteID $_.ID -
BackupFolder "C:Backups" -RootWeb $_.RootWeb -BackupFilesLimit 5 -Email
"[email protected]" -SmtpServer "mail.companyabc.com"}
# Back up a site collection whose URL equals http://portal.companyABC.com
Get-SPSite | Where {$_.ID -eq "http://portal.companyABC.com"} | ForEach-
Object {Backup-SPSiteCollections -SPSiteID $_.ID -BackupFolder "C:Backups"
-RootWeb $_.RootWeb -BackupFilesLimit 5}
# Back up all site collections whose URL is not equal to http://no-backup.companyABC.com
Get-SPSite | where {$_.ID -ne "http://no-backup.companyABC.com"} | ForEach-
Object {Backup-SPSiteCollections -SPSiteID $_.ID -BackupFolder "C:Backups"
-RootWeb $_.RootWeb -BackupFilesLimit 5}
The preceding three examples show you how you can execute your script in various scenarios. A backup script has six parameters:
![]() SPSiteID: A globally unique identifier (GUID) that uniquely identifies a site collection. In the earlier examples, we pass the ID value from the
SPSiteID: A globally unique identifier (GUID) that uniquely identifies a site collection. In the earlier examples, we pass the ID value from the ForEach-Object loop.
![]() BackupFolder: The Backup folder on a local drive. Leave the trailing backslash (
BackupFolder: The Backup folder on a local drive. Leave the trailing backslash (.) If this folder does not exist, it is automatically created.
![]() RootWeb: Value of site collection
RootWeb: Value of site collection RootWeb property. The value being used forms the backup filename (for example, RootWeb-BackupTime.dat).
![]() BackupFilesLimit: The number of previous backup files to retain at
BackupFilesLimit: The number of previous backup files to retain at BackupFolder location. If this number is five, only the last five backups are left in the Backup folder, and all previous files are deleted.
![]() Email: The email value used as a To and From email address. This value is optional. If a value is not provided, a notification email is not sent.
Email: The email value used as a To and From email address. This value is optional. If a value is not provided, a notification email is not sent.
![]() SmtpServer: The address of the Simple Mail Transfer Protocol (SMTP) server to send the notification email to. If this value is not provided, an email is not sent.
SmtpServer: The address of the Simple Mail Transfer Protocol (SMTP) server to send the notification email to. If this value is not provided, an email is not sent.
Automatic Solution Installation
When administrators need to prepare a new SharePoint environment, a number of features must sometimes be installed and deployed. New solutions cannot be added from the UI, only with STSADM or PowerShell. Third-party solutions usually have a built-in installer, but most free solutions or in-house solutions do not come with one. To install and deploy these features, you need to run a few cmdlets. The following script eases that procedure for you.
The following example “connects” a number of built-in cmdlets and creates a single function that streamlines the installation process. The script is listed here:
Function Install-SPFeatures ($Path)
{
$files = get-childitem $Path | where {$_.Name -like "*.wsp"}
ForEach($file in $files)
{
$existingSolution = Get-SPSolution | Where{$_.Name -eq $file.Name}
# check if this solution already exists
if($existingSolution -eq $null)
{
Add-SPSolution -LiteralPath ($Path + "" + $file.Name)
}
# upgrade existing solution
else
{
# if solution is deployed we will update it with new version
if($existingSolution.Deployed -eq $true)
{
Update-SPSolution -identity $existingSolution.SolutionId
-LiteralPath ($Path + "" + $file.Name) -GACDeployment
}
# non-deployed solution needs to be removed and installed
else
{
Remove-SPSolution -identity $existingSolution.SolutionId
-confirm:$false
Add-SPSolution -LiteralPath ($Path + "" + $file.Name)
}
}
$existingSolution = Get-SPSolution | Where {$_.Name -eq $file.Name}
if($existingSolution -ne $null)
{
Install-SPSolution -identity $existingSolution.SolutionId -GACDeployment
-force
}
}
}
To execute this script, call it with the following:
Install-SPFeatures "C:Installation-Store"
Installation-Store in the preceding example is the folder on your local drive (or network drive) that contains a number of .wsp files. The script iterates through .wsp files in this folder and tries to add and deploy each solution.
There are some limitations in the script. If there is a solution with the same name, it is upgraded. During deployment, GAC deployments are allowed, so use these scripts only with trusted solutions. Solutions are deployed to all sites.
Understanding Advanced PowerShell Topics
All administrators will eventually reach the point when their PowerShell skills are robust enough to do basic administration of SharePoint. At that point, it becomes valuable to understand how to take your PowerShell skills to the next level.
Remote SharePoint Administration with PowerShell
PowerShell 2.0 introduced an interesting feature: the ability to execute PowerShell cmdlets remotely from a client machine without having to be at the console of a server or use a server control tool such as the Remote Desktop Protocol (RDP). To run a cmdlet from a remote location, make sure that every server has an identical version of PowerShell.
The following code demonstrates how to execute Get-SPSite on a remote computer. During its execution, users are prompted for the SharePoint administration credentials. Replace SPServer with the actual SharePoint server name:
$administrator = Get-Credential
Invoke-Command -Computername SPServer -Credential $administrator -
ScriptBlock {Add-PSSnapin Microsoft.SharePoint.PowerShell; Get-SPSite |
Select Url}
Beyond Built-In SharePoint PowerShell Cmdlets
The set of 800+ PowerShell cmdlets that come with SharePoint enable you to perform a wide range of SharePoint administration tasks. But for complete automation of SharePoint administration, some areas are not covered via built-in cmdlets. This section explores how you can extend PowerShell beyond its original programming.
Creating Custom Functions with PowerShell
Custom functions in PowerShell enable developers to easily group sections of code together for easier and repeated usage.
Here is a simple HelloWorld function:
Function HelloWorld()
{
Write-Host "Hello World! "
}
To execute this function, type the following:
HelloWorld
The easiest way to get started with functions is with PowerShell ISE and by executing the code directly from the ISE. If the ISE is not available, save the code to a .ps1 file with any text editor, such as Notepad. Execute it from a PowerShell shell by typing the following:
HelloWorld.ps1
Functions and Parameters
When creating a PowerShell function, you can define a number of parameters that need to be passed when a function is called from the code. The simplest version of a PowerShell function with parameters is the following:
Function HelloWorld($YourName)
For more flexibility with parameter properties, use the Param syntax:
Function HelloWorld
{
Param (
[Parameter(Mandatory=$true)]
[string]$YourName ="John Smith",
[int]$YourAge = 0
)
Write-Host "$YourName ($YourAge)"
}
With the preceding syntax function, an author can define which parameters are required, variable types for each variable, and default values. Functions with parameters can be called as shown next. When passed, parameters are separated with spaces only; commas are not used:
HelloWorld "John Smith" 47
HelloWorld -YourAge 47 -YourName "John Smith"
Using the SharePoint .NET API to Extend PowerShell
The built-in SharePoint PowerShell cmdlets enable you to manage your SharePoint farm, all the features, site collections, and sites. These cmdlets do not give you access to SharePoint lists, pages, workflows, and so on. You can easily overcome this limitation by using the existing SharePoint .NET API.
To use the additional API (SharePoint, in this example) functions, the API must be referenced before using its objects and functions:
[System.Reflection.Assembly]::LoadWithPartialName("Microsoft.SharePoint")
Retrieving SharePoint Lists with PowerShell
The following example shows how to get a list of SharePoint lists and libraries on a SharePoint site. To display such a list, a custom function is needed:
function Get-SPList
{
param(
[Parameter(
Position=0,
Mandatory=$true,
ValueFromPipeline=$true
)]
[Microsoft.SharePoint.SPWeb]$CurrentWeb,
[Parameter(
Position=1,
Mandatory=$false
)]
[string]$Title = $null
)
foreach($list in $CurrentWeb.Lists)
{
if($list.Hidden -eq $false -and ($Title -eq $null -or $Title -eq ""))
{
Write-Output $list
}
elseif($list.Title -eq $Title)
{
Write-Output $list
}
}
}
The preceding function receives SPWeb as the object and then invokes the appropriate functions from SharePoint API to retrieve lists (only those available on the Quick Launch menu).
To call this function, type the following:
Get-SPSite | Get-SPWeb -Limit ALL | ForEach-Object {Get-SPList -CurrentWeb
$_} | Select ParentWeb, ParentWebUrl, Title, DefaultViewUrl
The Get-SPSite cmdlet lists all site collections (SPSite) and pipes the results to Get-SPWeb that lists every site (SPWeb) within the site collection. Finally, Get-SPList lists every list (only visible lists; system lists are usually hidden) in each of the sites found. The "-Limit ALL" parameter is optional and should not be switched on for large farms. To display only lists within a single site, use the following code:
Get-SPWeb "http://portal.companyABC.com/A-Project-Site" | ForEach-Object
{Get-SPList $_} | Select ParentWeb, ParentWebUrl, Title, DefaultViewUrl
Creating New Lists and Document Libraries
Administrators can combine the built-in PowerShell cmdlets with the SharePoint .NET APIs to create lists and document libraries on-the-fly. Use the following code:
function New-SPList()
{
param(
[Parameter(
Position=0,
Mandatory=$true,
ValueFromPipeline=$true
)]
[Microsoft.SharePoint.SPWeb]$SPWeb,
[Parameter(
Position=1,
Mandatory=$true
)]
[string]$Title,
[Parameter(
Position=2,
Mandatory=$false
)]
[string]$Description = "",
[Parameter(
Position=3,
Mandatory=$false
)]
[string]$ListTemplateType = "DocumentLibrary"
)
$SPWeb.Lists.Add($Title, $Description, $ListTemplateType)
}
To call the above given function, type the following:
Get-SPWeb "http://portal.companyABC.com/A-Project-Site" | New-SPList -Title
"Sample Doc. Lib" -Description "Doc. Lib. Sample"
Get-SPWeb " http://portal.companyABC.com/A-Project-Site" | New-SPList -Title
"Sample Custom List" -Description "Custom List Sample" -ListTemplateType
"GenericList"
Get-SPWeb "http://portal.companyABC.com/A-Project-Site" | New-SPList -Title
"Sample Calendar" -Description "Calendar Sample" -ListTemplateType "Events"
The preceding example creates three lists on a SharePoint site ("http://portal.companyABC.com/A-Project-Site"). The function New-SPList takes three parameters: Title, Description, and ListTemplateType. You must supply a unique title for a list within one site to pass an appropriate template value, such as those listed by SPListTemplateType. For more information, refer to http://msdn.microsoft.com/en-us/library/microsoft.sharepoint.splisttemplatetype(office.15).aspx.
Modify List Properties
Consider the following scenario. A site owner wants uniform versioning settings for all lists and libraries in the site farm. A combination of PowerShell and API comes to the rescue in such a scenario. To achieve that, we can combine existing Get-SPSite and Get-SPWeb cmdlets with a custom function:
function Set-SPList()
{
param(
[Parameter(
Position=0,
Mandatory=$true,
ValueFromPipeline=$true
)]
[Microsoft.SharePoint.SPList]$SPList,
[Parameter(Mandatory=$false)]
[bool]$EnableVersioning = $null,
[Parameter(Mandatory=$false)]
[bool]$EnableMinorVersions = $null,
[Parameter(Mandatory=$false)]
[int]$MajorVersionLimit = -1,
[Parameter(Mandatory=$false)]
[int]$MajorWithMinorVersionsLimit = -1
)
if($SPList -ne $null)
{
if($EnableVersioning -ne $null)
{
$SPList.EnableVersioning = $EnableVersioning
}
if($MajorVersionLimit -gt -1)
{
$SPList.MajorVersionLimit = $MajorVersionLimit
}
if($SPList.BaseType -eq "DocumentLibrary")
{
if($EnableMinorVersions -ne $null)
{
$SPList.EnableMinorVersions = $EnableMinorVersions
}
if($MajorWithMinorVersionsLimit -gt -1)
{
$SPList.MajorWithMinorVersionsLimit = $MajorWithMinorVersionsLimit
}
}
$SPList.Update()
}
}
If an administrator needs to enable five major versions and keep minor versions for the three last major versions, the function needs to be called like this:
Get-SPSite | Get-SPWeb -Limit All | ForEach-Object {Get-SPList $_ | ForEach-
Object {Set-SPList $_ -EnableMinorVersions $true -EnableVersioning $true -
MajorVersionLimit 5 -MajorWithMinorVersionsLimit 3}}
Creating List Items On-the-Fly
When building demonstration and presentation sites, a function that might come in handy is the PowerShell function for creating items in a list. The following example shows how you could build such a function. It creates a list item in a custom list and assigns only a title for the list item, but it could be extended to create more complex items:
Function New-SPListItem()
{
param(
[Parameter(
Position=0,
Mandatory=$true,
ValueFromPipeline=$true
)]
[Microsoft.SharePoint.SPList]$SPList,
[Parameter(
Position=1,
Mandatory=$true
)]
[string]$Title
)
[Microsoft.SharePoint.SPListItem] $listItem = $SPList.Items.Add();
$listItem["Title"] = $Title
$listItem.Update()
}
You can use the preceding function by typing the following:
Get-SPWeb "http://portal.companyABC.com/A-Project-Site" | Get-SPList -Title
"The Team" | New-SPListItem -Title "John White"
Get-SPWeb "http://portal.companyABC.com/A-Project-Site" | Get-SPList -Title
"The Team" | New-SPListItem -Title "Ann Green"
Get-SPWeb "http://portal.companyABC.com/A-Project-Site" | Get-SPList -Title
"The Team" | New-SPListItem -Title "Zoey Gray"
The preceding code creates three new items (John White, Ann Green, Zoey Gray) in the list "The Team" located on the site "http://portal.companyABC.com/A-Project-Site".
Managing Back-End Systems with PowerShell
PowerShell can also manage back-end systems in the SharePoint environment. Microsoft and third-party vendors released numerous packs to manage various systems, and the most important ones for SharePoint environment are management packs for IIS, Windows Server, and Active Directory.
IIS Management with PowerShell
The IIS PowerShell management module built into Windows 2008 R2 and Windows 2012 can help administrators automate most common operations with IIS sites and pools. SharePoint administrators in complex environments can benefit from the ability to automatically reset individual websites, recycle application pools, back up IIS configuration, and so on.
To use this module, it must be imported; type the following:
Import-Module WebAdministration
This snap-in is no different from the SharePoint one; use Get-Command and Get-Help to learn more about cmdlets. Use the following code to list all web applications and pools:
# Lists all web applications (sites and pools) on IIS
Get-WebApplication
# Lists names of all websites that are stopped
Get-WebSite | Where State -eq "Stopped" | Select Name with "Started"
Commands with Start, Stop, and Restart verbs enable administrators to perform those actions against websites and pools. To reset a SharePoint central administration pool, type the following:
# Restarts the Central Administration application pool
Restart-WebAppPool "SharePoint Central Administration v4"
Windows Server PowerShell Cmdlets
PowerShell cmdlets for managing Windows servers are built into the PowerShell core and do not need to be loaded separately. In SharePoint environments, you can use them to control, for example, SharePoint-related Windows Services and file systems.
The following command lists all SharePoint and ForeFront services currently stopped (ForeFront services are used to sync user accounts):
Get-Service | Where {($_.DisplayName -like "*SharePoint*" -or $_.DisplayName
-like "*ForeFront*") -and $_.Status -eq "Stopped"}
To start a service, type the following:
Start-Service -name "SharePoint Timer Service"
Automate User Provisioning with PowerShell
The built-in SharePoint PowerShell cmdlets enable you to easily manage users across site collections, but the real power of PowerShell is revealed when you combine these with AD management cmdlets.
The most common usage scenario for user provisioning occurs when a new user needs to have an AD user account provisioned and then needs access to a SharePoint site. In this scenario, each new employee must be given contributor rights to the SharePoint site at http://portal.companyABC.com.
Here is how a new employee procedure could be automated with PowerShell. Use the following sample code to create a new AD account:
Import-Module ActiveDirectory
New-ADUser -Name "JohnS" -GivenName "John" -Surname "Smith" -DisplayName
"John Smith" -AccountPassword (ConvertTo-SecureString "pass@word1" -
AsPlainText -force) -Enabled $true
To completely automate importing from PowerShell, use the Import-CSV cmdlet that enables automatic imports to be done from a CSV file. New-ADUser has more parameters that you can specify on account creation, but these are beyond the scope of this book.
When you have a new user created in AD, you can use existing SharePoint cmdlets to assign proper user privileges:
New-SPUser -UserAlias "companyABC.comJohnS" -Web "http://portal.companyABC.com"
PowerShell also enables you to implement a similar procedure for disabling employee access to a particular site and removing it from AD. The following example shows how to disable and remove a user:
# Removes a User from a SharePoint Site
Remove-SPUser -Web "http://portal.companyABC.com" -UserAlias "companyABC.comJohnS"
Import-Module ActiveDirectory
# Disables AD User
Set-ADUser "JohnS" -Enabled $false
# Removes AD User
Remove-ADUser "JohnS" -confirm $false
If you have multiple site collections, you can combine Remove-SPUser with results from Get-SPSite | Get-SPWeb cmdlets.
Tools for PowerAdmins
Microsoft has made substantial effort to make SharePoint administration with PowerShell as easy as possible. Still, an administrator who has never worked with PowerShell needs to invest some time to grasp the important concepts and then improve on these to be able to truly unleash PowerShell potential. You can use a number of resources to help you better utilize SharePoint:
![]() PowerGUI: Free PowerShell integrated development environment (IDE) from Quest that includes support for color coding, IntelliSense, debugging, and much more: http://www.powergui.org.
PowerGUI: Free PowerShell integrated development environment (IDE) from Quest that includes support for color coding, IntelliSense, debugging, and much more: http://www.powergui.org.
![]() SharePoint Downloads & Scripts: A large repository with a number of different SharePoint PowerShell scripts: http://gallery.technet.microsoft.com/sharepoint.
SharePoint Downloads & Scripts: A large repository with a number of different SharePoint PowerShell scripts: http://gallery.technet.microsoft.com/sharepoint.
![]() AutoSPInstaller: Community-driven project that fully automates the installation and configuration of a SharePoint 2010/2013 farm: http://autospinstaller.codeplex.com/.
AutoSPInstaller: Community-driven project that fully automates the installation and configuration of a SharePoint 2010/2013 farm: http://autospinstaller.codeplex.com/.
![]() Windows PowerShell for SharePoint Server 2010: Microsoft tool that helps administrators to create scripts with a GUI: http://technet.microsoft.com/en-us/sharepoint/ff603532.aspx.
Windows PowerShell for SharePoint Server 2010: Microsoft tool that helps administrators to create scripts with a GUI: http://technet.microsoft.com/en-us/sharepoint/ff603532.aspx.
Summary
Changes to PowerShell in SharePoint 2013 are not dramatic and represent a continuous investment made by Microsoft that started with the introduction of Windows PowerShell as a SharePoint management and administration tool in SharePoint 2010. All skills that SharePoint 2010 administrators had can be easily transferred to SharePoint 2013 farms. A number of new features introduced in SharePoint 2013 can be properly managed only via PowerShell, and PowerShell is the only option to fully automate farm and services provisioning in multiserver or multitenant environments.
SharePoint 2013 administrators need to have at least a basic knowledge of PowerShell to properly maintain and administrate SharePoint 2013, so it is subsequently critical that they learn how to leverage the tool. This chapter provides a good first step for understanding PowerShell and includes PowerShell script examples that you can use to immediately administrate a SharePoint 2013 environment.
Best Practices
The following are best practices from this chapter:
![]() Become familiar with Windows PowerShell for SharePoint 2013 administration.
Become familiar with Windows PowerShell for SharePoint 2013 administration.
![]() Understand the concept of piping commands from one cmdlet to another to automate processes.
Understand the concept of piping commands from one cmdlet to another to automate processes.
![]() Learn how to write functions in PowerShell and how to use .NET object properties and methods.
Learn how to write functions in PowerShell and how to use .NET object properties and methods.
![]() Script SharePoint farm installs.
Script SharePoint farm installs.
![]() Use PowerShell for remote administration of SharePoint farm servers and for automation of tasks.
Use PowerShell for remote administration of SharePoint farm servers and for automation of tasks.
![]() Download the script from this chapter from http://tinyurl.com/SP2013-Config and use them as a template to start building your own scripts.
Download the script from this chapter from http://tinyurl.com/SP2013-Config and use them as a template to start building your own scripts.