Chapter 6. Managing and Administering SharePoint 2013 Infrastructure
In This Chapter
![]() Operations Management with the SharePoint Central Administration Tool
Operations Management with the SharePoint Central Administration Tool
![]() Administering Site Collections and Sites
Administering Site Collections and Sites
![]() Using Additional Administration Tools for SharePoint
Using Additional Administration Tools for SharePoint
Administration of a SharePoint 2013 infrastructure can be complex and intimidating, because multiple running parts and tools can be used. The most important tool is the web-based SharePoint Central Administration (SPCA) tool, which is built in to the infrastructure of a farm itself. Aside from PowerShell, the SPCA is the most critical component to understand for a SharePoint administrator. PowerShell itself is covered in detail in Chapter 7, “Leveraging PowerShell for Command-Line SharePoint Administration and Automation,” and SPCA and other admin tools are covered in this chapter.
This chapter gives an overview of the SharePoint administrative tools, including a step-by-step look at all the major links and tasks included in the SharePoint Central Administration tool. Considerable emphasis is placed on common tasks performed by administrators using the SharePoint Central Administration tool. In addition, this chapter takes a look at the other administration interfaces a SharePoint administrator may run into, such as the developer dashboard, SQL Server Management Studio, and Internet Information Services (IIS) Manager.
Operations Management with the SharePoint Central Administration Tool
The single most important tool to a SharePoint administrator is the SPCA, shown in Figure 6.1. This tool runs on a dedicated SharePoint site collection within a dedicated web application and is initially installed on the first server in a farm. You can invoke the tool from the server console from the Start menu or, because it is web based and is effectively just a SharePoint site collection within a dedicated web application, you can invoke it from any workstation. It is actually preferable from a security perspective to access the SPCA tool from a different workstation. If doing so, note what the hostname and port are for the SharePoint central web application when created.

Note
Although the default is to choose a custom port for the SPCA tool, it is recommended to instead change this to the default Hypertext Transport Protocol Secure (HTTPS) port of 443 so that a Secure Sockets Layer (SSL) certificate can be easily added and a unique name for the SPCA tool can be used. For example, https://spca.companyabc.com is an example of a best-practice way of accessing the SPCA tool from another workstation. This has the added advantage of enabling SPCA to be easily load balanced using network load balancing (NLB), either hardware based or software based, between two servers running the SPCA service.
The SPCA tool’s home page, shown in Figure 6.1, provides a launching point for some of the most commonly used tasks in SPCA. You can launch more detailed sets of tasks by clicking the links listed in the left pane of the page. These links take you to specific pages for each category of administration, including the following:
![]() System Settings
System Settings
![]() Monitoring
Monitoring
![]() Backup and Restore
Backup and Restore
![]() Security
Security
![]() Upgrade and Migration
Upgrade and Migration
![]() General Application Settings
General Application Settings
![]() Apps
Apps
![]() Configuration Wizards
Configuration Wizards
Each of these categories and the tasks that can be performed within them are listed in subsequent sections of this chapter.
Administering Application Management Tasks in SPCA
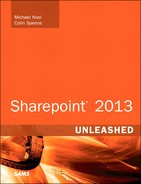
The Application Management page, shown in Figure 6.2, contains those tasks directly related to the management of site collections, sites, content databases, web applications, and service applications. It is therefore a page where an administrator can spend a great deal of time during the initial configuration of SharePoint 2013.
Web Applications
The first category on the page deals specifically with web applications and includes the following links:
![]() Manage Web Applications: Simply lists the web applications in the farm and their URLs and port. This area also enables the configuration of various web application settings.
Manage Web Applications: Simply lists the web applications in the farm and their URLs and port. This area also enables the configuration of various web application settings.
![]() Configure Alternate Access Mappings: This highly important area controls Alternate Access Mappings (AAMs), shown in Figure 6.3. AAMs are needed to indicate different server host header values for the machine. If an AAM is configured, SharePoint automatically translates all links to the host header value used by the client to access site content. This reduces the chance of links not working externally. For more information on configuring AAMs for remote access, see Chapter 14, “Protecting SharePoint with Advanced Edge Security Solutions.”
Configure Alternate Access Mappings: This highly important area controls Alternate Access Mappings (AAMs), shown in Figure 6.3. AAMs are needed to indicate different server host header values for the machine. If an AAM is configured, SharePoint automatically translates all links to the host header value used by the client to access site content. This reduces the chance of links not working externally. For more information on configuring AAMs for remote access, see Chapter 14, “Protecting SharePoint with Advanced Edge Security Solutions.”

Site Collections
Within the second category on the Application Management page, labeled Site Collections, all the options for creating, deleting, and managing individual site collections are listed. Site collections provide the highest level administrative object entity within SharePoint, with the exception of web applications and the farm. The links provided within the Site Collections category include the following:
![]() Create Site Collections: This link allows for the creation of new site collections from within SPCA, as shown in Figure 6.4. Site collections can be created from a default list of templates, or via custom templates created by the organization and added into SPCA using PowerShell or the STSADM command-line tool.
Create Site Collections: This link allows for the creation of new site collections from within SPCA, as shown in Figure 6.4. Site collections can be created from a default list of templates, or via custom templates created by the organization and added into SPCA using PowerShell or the STSADM command-line tool.

![]() Delete a Site Collection: Enables an administrator to delete specific site collections. Note that when deleted, it is not easy to recover an entire site collection.
Delete a Site Collection: Enables an administrator to delete specific site collections. Note that when deleted, it is not easy to recover an entire site collection.
![]() Confirm Site Use and Deletion: Leads to a page that enables the configuration of automatic site collection deletion of unused sites. This functionality is meant to help control the growth of SharePoint content by removing site collections no longer in use and enables administrators to define warnings that are sent to site collection administrators.
Confirm Site Use and Deletion: Leads to a page that enables the configuration of automatic site collection deletion of unused sites. This functionality is meant to help control the growth of SharePoint content by removing site collections no longer in use and enables administrators to define warnings that are sent to site collection administrators.
![]() Specify Quota Templates: Enables administrators to create and modify quota templates for site collections. Individual size limits can be defined for site collections and applied to the individual site collections as they are created or at a later time. Site collection administrators are notified if their sites grow above a warning limit or if they are above the maximum size limit, which results in new content not being added to the site.
Specify Quota Templates: Enables administrators to create and modify quota templates for site collections. Individual size limits can be defined for site collections and applied to the individual site collections as they are created or at a later time. Site collection administrators are notified if their sites grow above a warning limit or if they are above the maximum size limit, which results in new content not being added to the site.
![]() Configure Quotas and Locks: Takes the administrator to settings shown in Figure 6.5 that define whether a site collection is locked, effectively not allowing any content to be added because of the result of exceeding a template or simply because the content was locked into read-only mode for one reason or another.
Configure Quotas and Locks: Takes the administrator to settings shown in Figure 6.5 that define whether a site collection is locked, effectively not allowing any content to be added because of the result of exceeding a template or simply because the content was locked into read-only mode for one reason or another.

![]() Change Site Collection Administrators: Clicking this link in SPCA enables administrators to define who the primary and secondary site collection administrators are for a site collection.
Change Site Collection Administrators: Clicking this link in SPCA enables administrators to define who the primary and secondary site collection administrators are for a site collection.
![]() View All Site Collections: All site collections within a specific content database can be viewed from within this link.
View All Site Collections: All site collections within a specific content database can be viewed from within this link.
![]() Configure Self-Service Site Creation: Enables administrators to turn Self-Service Site Creation on or off for a web application. This concept enables users with the Use Self-Service Site Creation permission to create sites in defined URL namespaces. Be cautious when enabling this; it can lead to a proliferation of sites within a site collection very quickly.
Configure Self-Service Site Creation: Enables administrators to turn Self-Service Site Creation on or off for a web application. This concept enables users with the Use Self-Service Site Creation permission to create sites in defined URL namespaces. Be cautious when enabling this; it can lead to a proliferation of sites within a site collection very quickly.
Service Applications
Within the third category on the Application Management page, labeled Service Applications, the tasks related to the critical service applications in SharePoint 2013 can be modified. For more detailed information about individual service applications, see the chapters in which they are discussed. For example, for the Managed Metadata Service (MMS), see Chapter 22, “Managing Metadata and Content Types in SharePoint 2013,” and for many other service apps, see Chapter 26, “Extending SharePoint 2013 with Excel Services, Visio Graphics Services, and Access Services.”
![]() Manage Service Applications: This link takes administrators to the Service Applications page, shown in Figure 6.6. This page is the main administrative point to all the service applications, such as the MMS, PerformancePoint, Excel Services, and others.
Manage Service Applications: This link takes administrators to the Service Applications page, shown in Figure 6.6. This page is the main administrative point to all the service applications, such as the MMS, PerformancePoint, Excel Services, and others.

![]() Configure Service Application Associations: Configuring service application associations enables them to be “tied” to an individual web application so that they can be used by the site collections within those web applications. Administrators can modify which web applications these service applications are tied to from within this interface.
Configure Service Application Associations: Configuring service application associations enables them to be “tied” to an individual web application so that they can be used by the site collections within those web applications. Administrators can modify which web applications these service applications are tied to from within this interface.
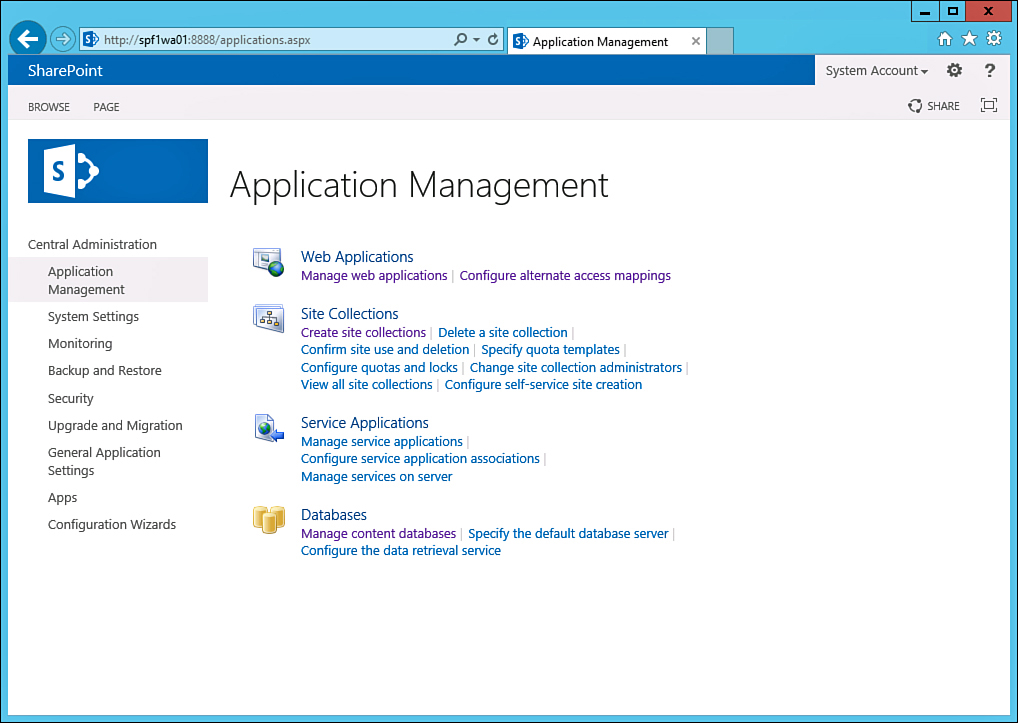
![]() Manage Services on Server: This link takes administrators to the page shown in Figure 6.7, which enables individual services to be started or stopped on servers. Configuration information for those specific services can be accessed by clicking the blue links for services that enable settings to be modified.
Manage Services on Server: This link takes administrators to the page shown in Figure 6.7, which enables individual services to be started or stopped on servers. Configuration information for those specific services can be accessed by clicking the blue links for services that enable settings to be modified.
Databases
Within the fourth category on the Application Management page, labeled Databases, all the tasks associated with SharePoint content databases are made accessible. This includes the following links:
![]() Manage Content Databases: This link presents a list of all content databases, similar to what is shown in Figure 6.8. As a side note, by modifying the maximum number of sites that can be created within a content database, you can control which content database a site collection is installed in. This can also be controlled from within PowerShell when creating a site collection.
Manage Content Databases: This link presents a list of all content databases, similar to what is shown in Figure 6.8. As a side note, by modifying the maximum number of sites that can be created within a content database, you can control which content database a site collection is installed in. This can also be controlled from within PowerShell when creating a site collection.

![]() Specify the Default Database Server: The default database server used for all new databases can be specified in this section of SPCA. In addition, if using SQL Server authentication (not recommended) to connect to the SQL Server, the Service Account account and password can be designated here.
Specify the Default Database Server: The default database server used for all new databases can be specified in this section of SPCA. In addition, if using SQL Server authentication (not recommended) to connect to the SQL Server, the Service Account account and password can be designated here.
![]() Configure the Data Retrieval Service: Data retrieval services such as Object Linking and Embedding Database (OLEDB), Simple Object Access Protocol (SOAP) Passthrough, CML-URL, or SharePoint Foundation can be enabled or disabled on individual web applications in this area of SPCA.
Configure the Data Retrieval Service: Data retrieval services such as Object Linking and Embedding Database (OLEDB), Simple Object Access Protocol (SOAP) Passthrough, CML-URL, or SharePoint Foundation can be enabled or disabled on individual web applications in this area of SPCA.
Administering System Settings Tasks in SPCA
The System Settings page, shown in Figure 6.9, consolidates tasks related to servers and the farm. This page is often referenced while setting up the infrastructure components of a farm during the initial configuration.

Servers
The first category on the page deals specifically with the servers used by SharePoint and includes the following links:
![]() Manage Servers in This Farm: Simply lists the servers in the farm, as shown in Figure 6.10, and which services they have running. This area also enables the removal of a specific server from the farm.
Manage Servers in This Farm: Simply lists the servers in the farm, as shown in Figure 6.10, and which services they have running. This area also enables the removal of a specific server from the farm.

![]() Manage Services on Server: This link takes you to the same services view as is linked to from the Application Management area of SPCA. It enables modification of individual service settings, and for starting and stopping services on individual servers.
Manage Services on Server: This link takes you to the same services view as is linked to from the Application Management area of SPCA. It enables modification of individual service settings, and for starting and stopping services on individual servers.
E-Mail and Text Messages (SMS)
Within the second category on the System Settings page, labeled E-Mail and Text Messages (SMS), all tasks related to messaging in the new environment, including outbound and inbound email to SharePoint, are displayed. For more detailed information on this area, including steps for enabling messaging functionality, see Chapter 16, “Configuring Email-Enabled Content, Site Mailboxes, and Exchange Server Integration.” This particular area includes the following links:
![]() Configure Outgoing Email Settings: Enable a Simple Mail Transfer Protocol (SMTP) server to be defined that will be used to forward alerts and other emails to end users. The SMTP server must be configured to accept connections and allow relaying from the SharePoint server.
Configure Outgoing Email Settings: Enable a Simple Mail Transfer Protocol (SMTP) server to be defined that will be used to forward alerts and other emails to end users. The SMTP server must be configured to accept connections and allow relaying from the SharePoint server.
![]() Configure Incoming Email Settings: Enables mail to be received directly by the SharePoint server and delivered into email-enabled distribution lists and email-enabled discussion groups. This powerful piece of functionality that integrates SharePoint with email platforms is also covered in detail in Chapter 16.
Configure Incoming Email Settings: Enables mail to be received directly by the SharePoint server and delivered into email-enabled distribution lists and email-enabled discussion groups. This powerful piece of functionality that integrates SharePoint with email platforms is also covered in detail in Chapter 16.
![]() Configure Mobile Account: If using a web-based text messaging service, it can be configured within this area of SPCA. This allows for monitoring alerts to be generated even if an outage in the email platform occurs.
Configure Mobile Account: If using a web-based text messaging service, it can be configured within this area of SPCA. This allows for monitoring alerts to be generated even if an outage in the email platform occurs.
Farm Management
Within the third category on the System Settings page, labeled Farm Management, tasks related to functions that apply to all servers in the farm are listed. These include the following:
![]() Configure Alternate Access Mappings: Link to the same AAM list that the Application Management area linked to. AAMs define how links are translated when users access SharePoint using a specific fully qualified domain name (FQDN), such as https://sharepoint.companyabc.com or http://sharepoint.
Configure Alternate Access Mappings: Link to the same AAM list that the Application Management area linked to. AAMs define how links are translated when users access SharePoint using a specific fully qualified domain name (FQDN), such as https://sharepoint.companyabc.com or http://sharepoint.
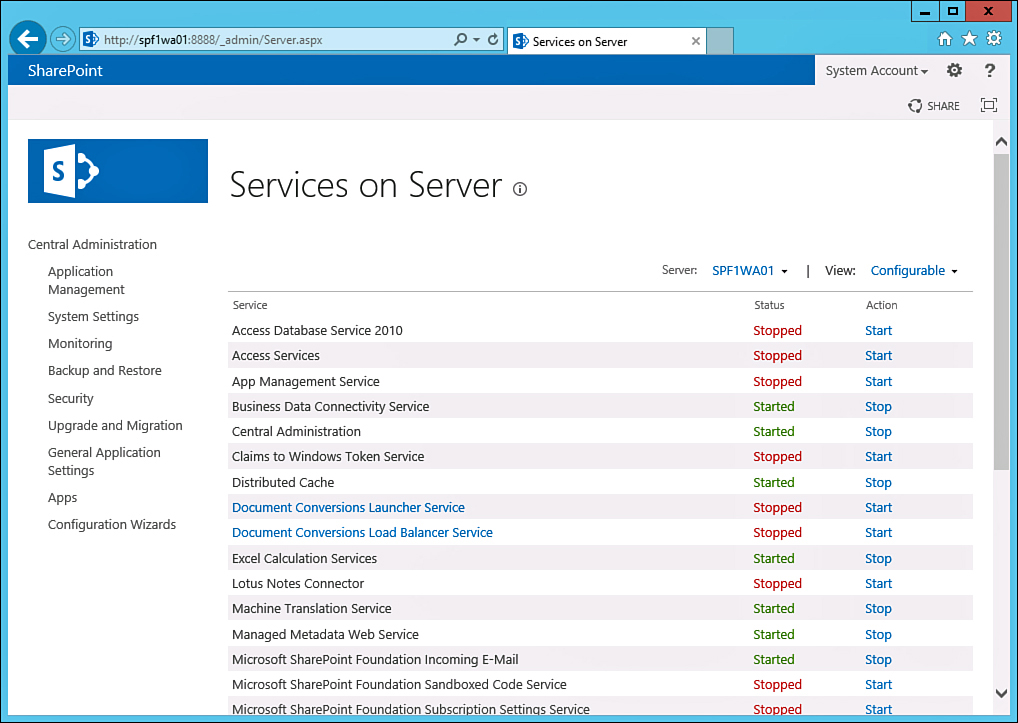
![]() Manage Farm Features: Enables specific farm features, such as the ones shown in Figure 6.11, to be turned on or off. It is the first area that should be referenced when trying to determine why a feature doesn’t show up as an available option within a SharePoint site.
Manage Farm Features: Enables specific farm features, such as the ones shown in Figure 6.11, to be turned on or off. It is the first area that should be referenced when trying to determine why a feature doesn’t show up as an available option within a SharePoint site.
![]() Manage Farm Solutions: List any custom solutions, such as third-party products, which are added into the farm.
Manage Farm Solutions: List any custom solutions, such as third-party products, which are added into the farm.
![]() Manage User Solutions: Although not obvious from the title of its link, this area allows management of sandbox solutions and enables administrators to define whether specific solutions are blocked for end users.
Manage User Solutions: Although not obvious from the title of its link, this area allows management of sandbox solutions and enables administrators to define whether specific solutions are blocked for end users.
![]() Configure Privacy Options: Private settings, such as whether to sign up for the Customer Experience Improvement Program (CEIP) or error reporting that is sent to Microsoft, are defined in this area of SPCA. This area also enables administrators to define whether external web-based help is available for users within sites.
Configure Privacy Options: Private settings, such as whether to sign up for the Customer Experience Improvement Program (CEIP) or error reporting that is sent to Microsoft, are defined in this area of SPCA. This area also enables administrators to define whether external web-based help is available for users within sites.
![]() Configure Cross-Firewall Access Zone: Defines which zone generates URLs that are generated when alerts and other messages are sent from the web application. For example, any administrator can define that all URLs are generated from the Internet zone settings, which have a URL of https://sharepoint.companyabc.com.
Configure Cross-Firewall Access Zone: Defines which zone generates URLs that are generated when alerts and other messages are sent from the web application. For example, any administrator can define that all URLs are generated from the Internet zone settings, which have a URL of https://sharepoint.companyabc.com.
Administering Monitoring Tasks in SPCA
The Monitoring page in SPCA, as shown in Figure 6.12, deals with all built-in monitoring tools and concepts in SharePoint 2013. For more detailed information on configuring monitoring with SharePoint 2013, see Chapter 11, “Monitoring a SharePoint 2013 Environment.”

Health Analyzer
The first category on the page deals specifically with the Health Analyzer, which determines the overall health of the SharePoint farm. This section includes the following links:
![]() Review Problems and Solutions: Takes the administrator directly to a list of configuration issues that exist in the farm based on the rules that are set up by the Health Analyzer.
Review Problems and Solutions: Takes the administrator directly to a list of configuration issues that exist in the farm based on the rules that are set up by the Health Analyzer.
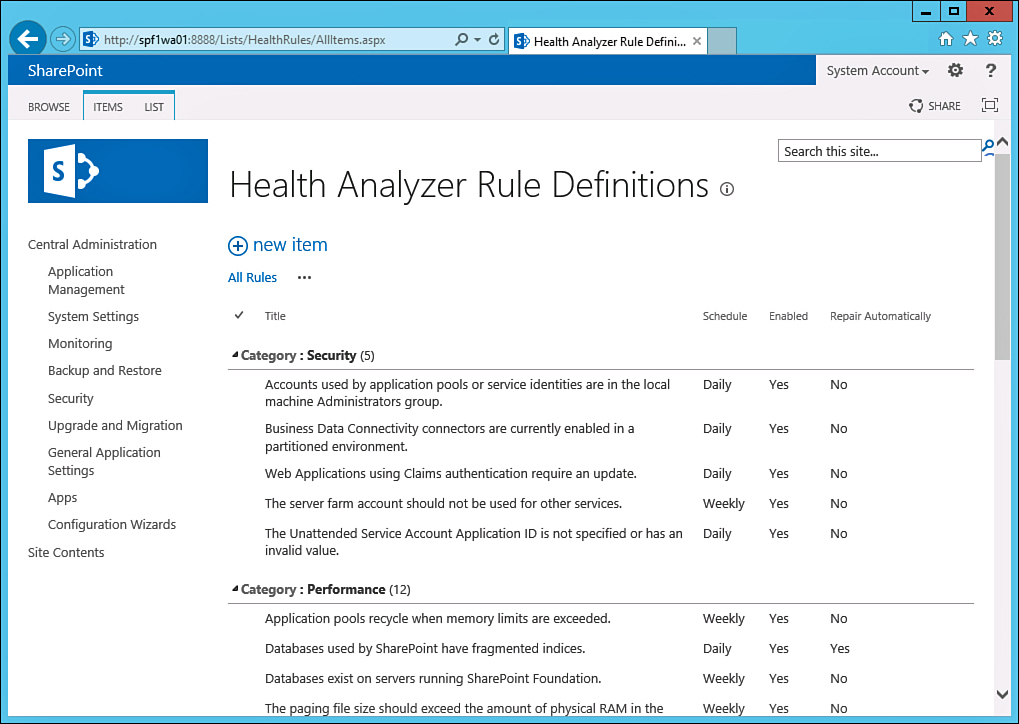
![]() Review Rule Definitions: The rules that are run by the Health Analyzer can be modified in this area, as shown in Figure 6.13.
Review Rule Definitions: The rules that are run by the Health Analyzer can be modified in this area, as shown in Figure 6.13.
Timer Jobs
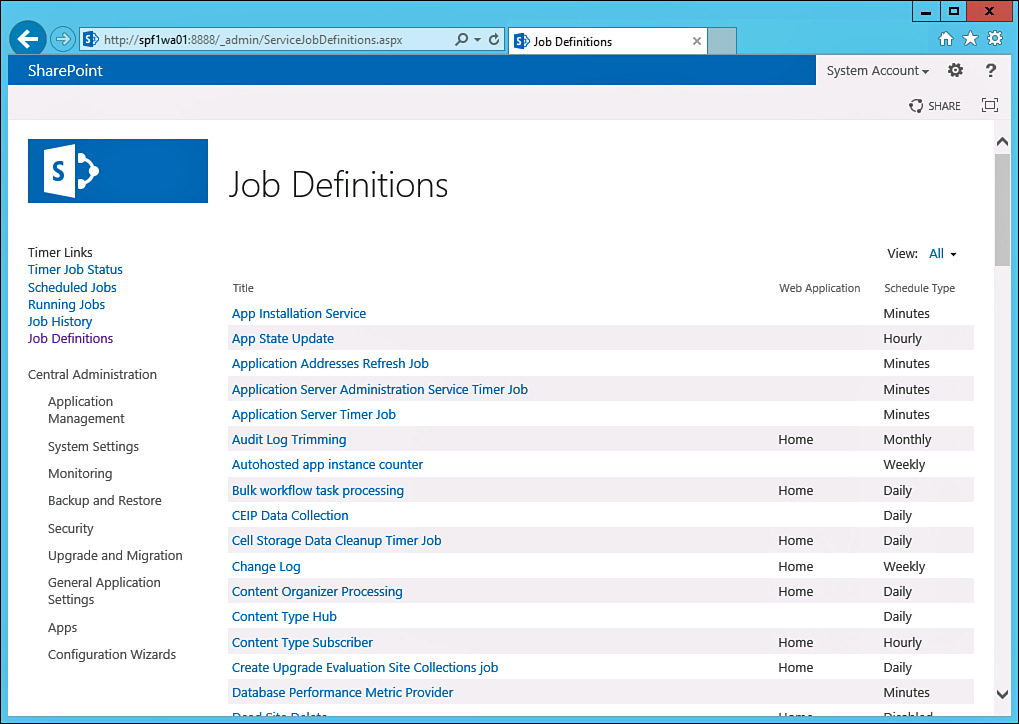
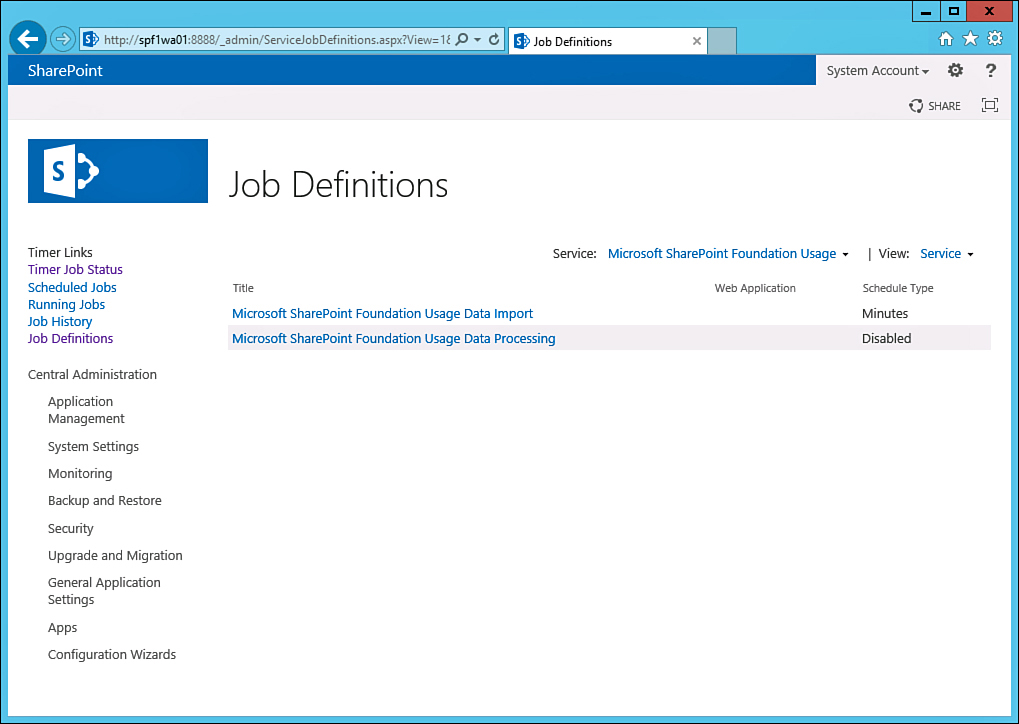
Within the second category on the System Settings page are the tasks related to timer jobs. Timer jobs, as shown in Figure 6.14, are extremely important services that run on a regularly scheduled basis to perform specific tasks, such as maintenance, analysis, synchronization, and other farm-critical tasks that must be performed on a regular basis. The links available within this field include the following:
![]() Review Job Definitions: This area of SPCA, as shown in Figure 6.14, enables the current timer job settings to be viewed and their schedules to be modified, if necessary.
Review Job Definitions: This area of SPCA, as shown in Figure 6.14, enables the current timer job settings to be viewed and their schedules to be modified, if necessary.
![]() Check Job Status: The job status area of SPCA, shown in Figure 6.15, is where administrators should go to check on the status of current timer jobs and see the next time they are scheduled to run.
Check Job Status: The job status area of SPCA, shown in Figure 6.15, is where administrators should go to check on the status of current timer jobs and see the next time they are scheduled to run.

Reporting
Within the third category on the Monitoring page, labeled Reporting, are links to all those administrative areas directly related to reporting, including diagnostic logs, usage reports, and health reports. The following key links are included in this area:
![]() View Administrative Reports: This area focuses on those reports that are related to administrative tasks.
View Administrative Reports: This area focuses on those reports that are related to administrative tasks.
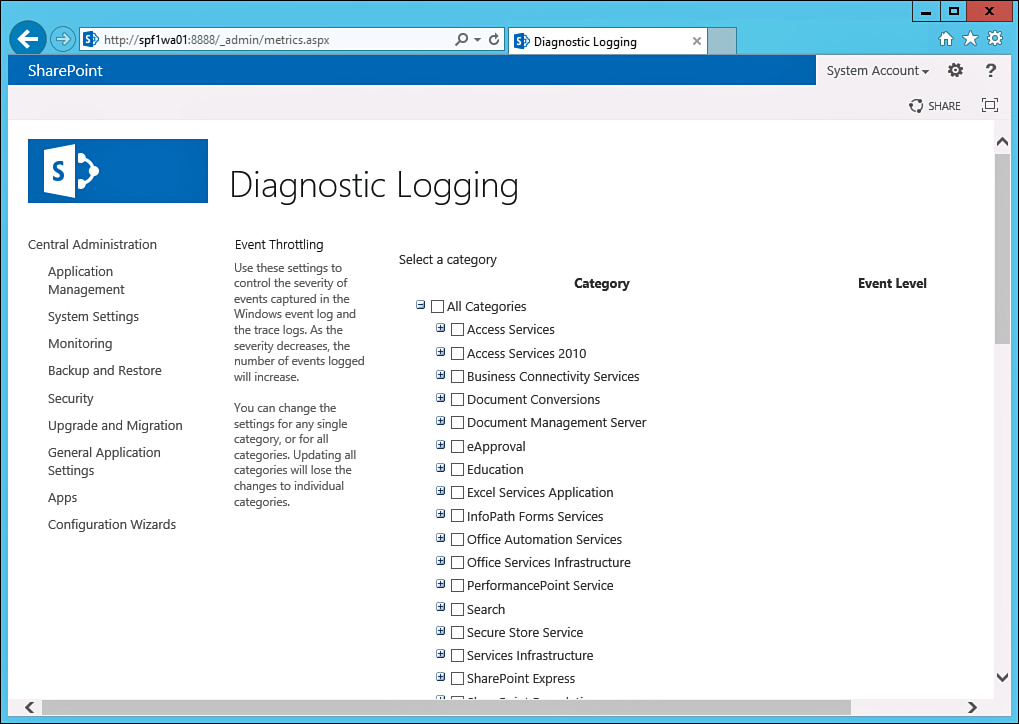
![]() Configure Diagnostic Logging: Diagnostic logs are not turned on by default in SharePoint 2013, but can be enabled from within this area of SPCA. Logs can be generated for each category of service, as shown in Figure 6.16. In addition, settings related to event log flood protection and trace logs can be modified in this area. It is highly recommended to place all logs on a separate volume from the drive where SharePoint installation files and the operating system (OS) are installed to avoid running out of disk space.
Configure Diagnostic Logging: Diagnostic logs are not turned on by default in SharePoint 2013, but can be enabled from within this area of SPCA. Logs can be generated for each category of service, as shown in Figure 6.16. In addition, settings related to event log flood protection and trace logs can be modified in this area. It is highly recommended to place all logs on a separate volume from the drive where SharePoint installation files and the operating system (OS) are installed to avoid running out of disk space.
![]() Review Information Management Policy Usage Reports: These types of reports are used for information management policy reports, which are related to Information Rights Management and Data Leak Prevention (DLP), concepts discussed in more detail in Chapter 17, “Safeguarding Confidential Data in SharePoint 2013.”
Review Information Management Policy Usage Reports: These types of reports are used for information management policy reports, which are related to Information Rights Management and Data Leak Prevention (DLP), concepts discussed in more detail in Chapter 17, “Safeguarding Confidential Data in SharePoint 2013.”
![]() View Health Reports: Health reports provide information such as what pages are the slowest, and who are the top active users in a site.
View Health Reports: Health reports provide information such as what pages are the slowest, and who are the top active users in a site.
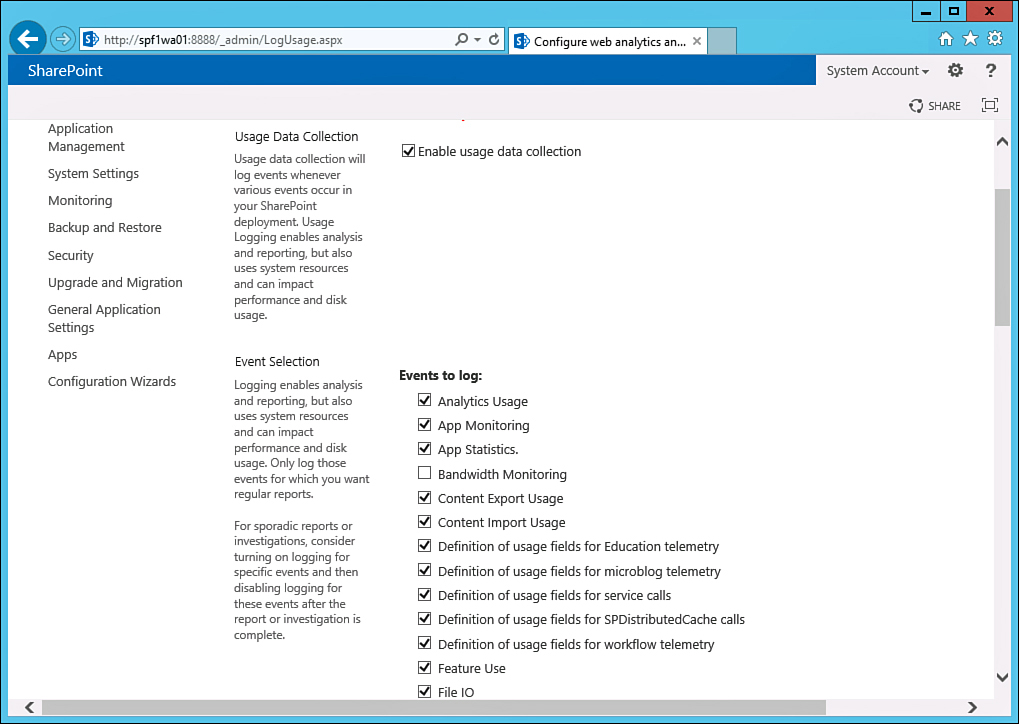
![]() Configure Usage and Health Data Collection: This area, shown in Figure 6.17, is critical because it allows for the configuration of the usage data logs, which can determine what areas of SharePoint are being used. It also enables the location of the usage logs to be set. As with all logs in SharePoint, it is highly recommended to store these on a separate data partition than SharePoint and the OS are installed on. Usage job definitions, shown in Figure 6.18, can also be modified from this area.
Configure Usage and Health Data Collection: This area, shown in Figure 6.17, is critical because it allows for the configuration of the usage data logs, which can determine what areas of SharePoint are being used. It also enables the location of the usage logs to be set. As with all logs in SharePoint, it is highly recommended to store these on a separate data partition than SharePoint and the OS are installed on. Usage job definitions, shown in Figure 6.18, can also be modified from this area.
![]() View Web Analytics Reports: Web analytics reports can determine top visitors to pages, number of page views, and other useful metrics in the SharePoint environment.
View Web Analytics Reports: Web analytics reports can determine top visitors to pages, number of page views, and other useful metrics in the SharePoint environment.
Reviewing Backup and Restore Settings in SPCA
The Backup and Restore page in SPCA, as shown in Figure 6.19, contains all relevant links that provide for integrated backup and restore functionality. This includes old options such as farm backup and restore, and new options such as granular backups. For detailed information on these options, see Chapter 10, “Backing Up and Restoring a SharePoint Environment.”

Farm Backup and Restore
Within the first category on the Backup and Restore page, labeled Farm Backup and Restore, the following links are included:
![]() Perform a Backup: Enables administrators to perform a full farm backup or a backup of individual components in a farm using the wizard shown in Figure 6.20. This can back up all components needed to restore a farm, including content databases and indexes.
Perform a Backup: Enables administrators to perform a full farm backup or a backup of individual components in a farm using the wizard shown in Figure 6.20. This can back up all components needed to restore a farm, including content databases and indexes.

![]() Restore from a Backup: Enables restores of the farm or farm components from the backups performed using the previous area of SPCA.
Restore from a Backup: Enables restores of the farm or farm components from the backups performed using the previous area of SPCA.
![]() Configure Backup Settings: Enables the number of backup and restore threads to be chosen and a default backup file location to be set.
Configure Backup Settings: Enables the number of backup and restore threads to be chosen and a default backup file location to be set.
![]() View Backup and Restore History: History of backup and restore jobs can be viewed in this area of SPCA.
View Backup and Restore History: History of backup and restore jobs can be viewed in this area of SPCA.
![]() Check Backup and Restore Job Status: Enables currently running backup and restore jobs to be viewed in real time.
Check Backup and Restore Job Status: Enables currently running backup and restore jobs to be viewed in real time.
Granular Backup
Within the second category on the Backup and Restore page, labeled Granular Backup, the options to back up individual site collections or subcomponents to site collections are provided:
![]() Perform a Site Collection Backup: Enables an entire site collection to be exported to a full-fidelity flat file copy that can be exported to a different location within the farm, to the same location, or to a new location in a different farm.
Perform a Site Collection Backup: Enables an entire site collection to be exported to a full-fidelity flat file copy that can be exported to a different location within the farm, to the same location, or to a new location in a different farm.
![]() Export a Site or List: Enables content within a site collection to be exported using the settings shown in Figure 6.21. Note that these types of exports are not full fidelity, and some settings such as individual document permissions can be lost using the export option.
Export a Site or List: Enables content within a site collection to be exported using the settings shown in Figure 6.21. Note that these types of exports are not full fidelity, and some settings such as individual document permissions can be lost using the export option.

![]() Recover Data from an Unattached Content Database: This option, new in SharePoint 2013, is powerful, because it enables content to be recovered out of databases that are not attached to a SharePoint farm, although they do need to be attached to an SQL Server.
Recover Data from an Unattached Content Database: This option, new in SharePoint 2013, is powerful, because it enables content to be recovered out of databases that are not attached to a SharePoint farm, although they do need to be attached to an SQL Server.
![]() Check Granular Backup Job Status: Enables administration to check on the status of an existing granular backup job.
Check Granular Backup Job Status: Enables administration to check on the status of an existing granular backup job.
Reviewing Security Settings in SPCA
The Security page in SPCA, as shown in Figure 6.22, contains all security-related items available for configuration in SPCA. For a detailed discussion on security in SharePoint 2013, see Chapter 15, “Implementing and Validating SharePoint Security.”
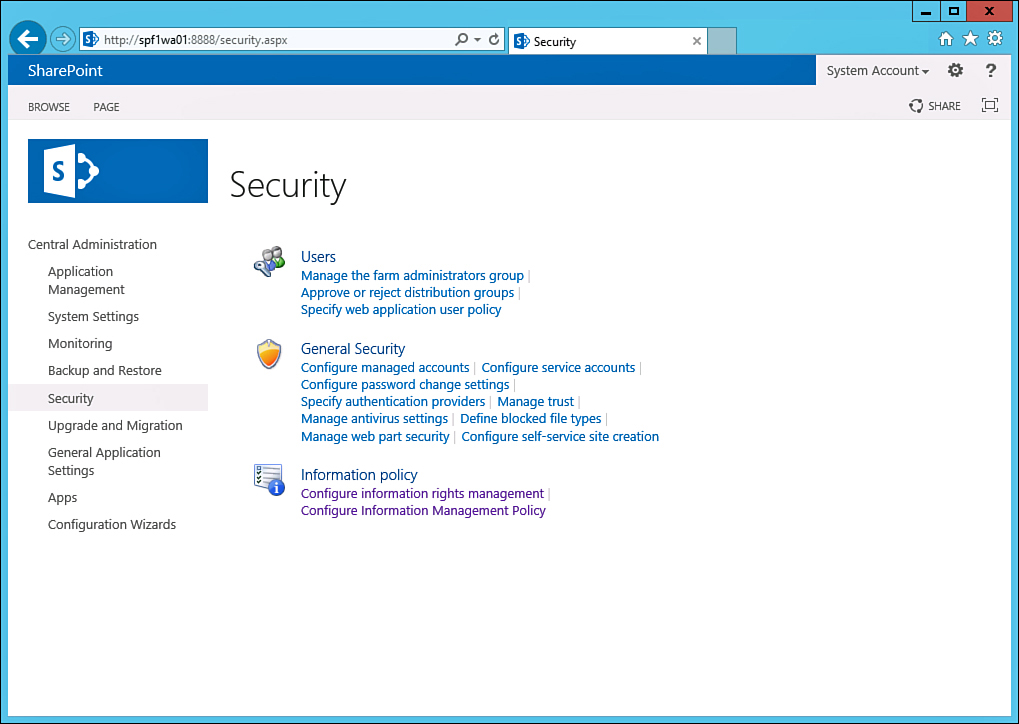
Users
Within the first category on the Security page, labeled Users, all security settings related to not only users, but also specific user groups, are listed. This includes the following:
![]() Manage the Farm Administrators Group: Enables full farm administrators to be defined.
Manage the Farm Administrators Group: Enables full farm administrators to be defined.
![]() Approve or Reject Distribution Groups: Distribution groups automatically added by the Directory Management Service are listed in this area if the farm is configured to require administrator approval for new distribution groups. The Directory Management Service is enabled from within the incoming email settings in SPCA.
Approve or Reject Distribution Groups: Distribution groups automatically added by the Directory Management Service are listed in this area if the farm is configured to require administrator approval for new distribution groups. The Directory Management Service is enabled from within the incoming email settings in SPCA.
![]() Specify Web Application User Policy: Permission for an individual user or group to override security within a web application can be set in this area. For example, the Search Crawling Account can be configured to have read access to all content within the entire web application to enable it to be crawled.
Specify Web Application User Policy: Permission for an individual user or group to override security within a web application can be set in this area. For example, the Search Crawling Account can be configured to have read access to all content within the entire web application to enable it to be crawled.
General Security
Within the second category on the Security page, labeled General Security, all other security settings that don’t fit into either the first or third category are listed, including the following:
![]() Configure Managed Accounts: This area is highly useful for SharePoint admins, because it allows for the concept of a managed account to be configured. A managed account is a service account that can be set to automatically have its password changed, as shown in Figure 6.23. Managed accounts can be set for all SharePoint service accounts, such as the Crawl account, Search account, accounts for service applications, and application pool identity accounts.
Configure Managed Accounts: This area is highly useful for SharePoint admins, because it allows for the concept of a managed account to be configured. A managed account is a service account that can be set to automatically have its password changed, as shown in Figure 6.23. Managed accounts can be set for all SharePoint service accounts, such as the Crawl account, Search account, accounts for service applications, and application pool identity accounts.

![]() Configure Service Accounts: Enables specific services in Windows Server to be updated with the credentials of a specific managed account used as the service account. This enables services that run with the credentials of a user to be automatically updated per best practices.
Configure Service Accounts: Enables specific services in Windows Server to be updated with the credentials of a specific managed account used as the service account. This enables services that run with the credentials of a user to be automatically updated per best practices.
![]() Configure Password Change Settings: Enables administrators to determine what the individual settings for password changes are, such as who is notified via email of the changes and how many seconds to wait before notifying services of the change.
Configure Password Change Settings: Enables administrators to determine what the individual settings for password changes are, such as who is notified via email of the changes and how many seconds to wait before notifying services of the change.
![]() Specify Authentication Providers: Enable administrators to define more than one authentication directory to use to gain access to SharePoint content, as shown in Figure 6.24. This complex topic is covered in great detail in Chapter 13, “Deploying SharePoint for Extranets and Alternative Authentication Scenarios.”
Specify Authentication Providers: Enable administrators to define more than one authentication directory to use to gain access to SharePoint content, as shown in Figure 6.24. This complex topic is covered in great detail in Chapter 13, “Deploying SharePoint for Extranets and Alternative Authentication Scenarios.”

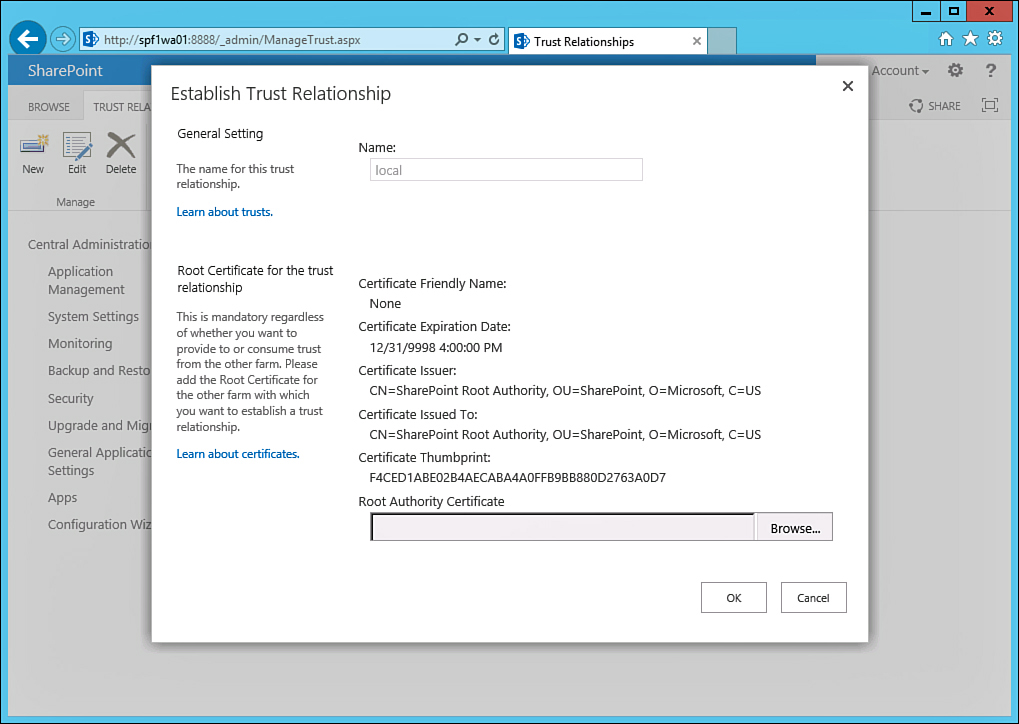
![]() Manage Trust: Within this area, different farms can be “trusted,” allowing for their content to be intermingled with the farm and allowing for sharing of information between the farms. The trust relationships to other farms must be set up using Public Key Infrastructure (PKI) certificates and requires a common trusted root certificate when creating the trust, as shown in Figure 6.25. Trusts are required to consume information from another farm.
Manage Trust: Within this area, different farms can be “trusted,” allowing for their content to be intermingled with the farm and allowing for sharing of information between the farms. The trust relationships to other farms must be set up using Public Key Infrastructure (PKI) certificates and requires a common trusted root certificate when creating the trust, as shown in Figure 6.25. Trusts are required to consume information from another farm.
![]() Manage Antivirus Settings: Antivirus settings are provided in SPCA as part of the built-in antivirus application programming interface (API). Note that just because the API is there does not mean that antivirus functionality is available out-of-the-box. To enable antivirus, a supported antivirus product must be installed. For more information on the antivirus settings in SharePoint and using antivirus products for SharePoint, see Chapter 14.
Manage Antivirus Settings: Antivirus settings are provided in SPCA as part of the built-in antivirus application programming interface (API). Note that just because the API is there does not mean that antivirus functionality is available out-of-the-box. To enable antivirus, a supported antivirus product must be installed. For more information on the antivirus settings in SharePoint and using antivirus products for SharePoint, see Chapter 14.
![]() Define Blocked File Types: The default list of file type extensions that are blocked in SharePoint is defined in this area. You can modify this as necessary.
Define Blocked File Types: The default list of file type extensions that are blocked in SharePoint is defined in this area. You can modify this as necessary.
![]() Manage Web Part Security: The security settings related to web parts, such as whether users can create connections between web parts, are listed in this area.
Manage Web Part Security: The security settings related to web parts, such as whether users can create connections between web parts, are listed in this area.
![]() Configure Self-Service Site Creation: Also linked to from the Application Management area of SPCA, this enables specific users with the proper rights to create their own subsites.
Configure Self-Service Site Creation: Also linked to from the Application Management area of SPCA, this enables specific users with the proper rights to create their own subsites.
Information Policy
Within the third category on the Security page, labeled Information Policy, information about enabling Information Rights Management (IRM) to enable document libraries to be secured using Active Directory Rights Management Services (AD RMS) is provided. For more information on IRM in SharePoint and AD RMS, see Chapter 17.
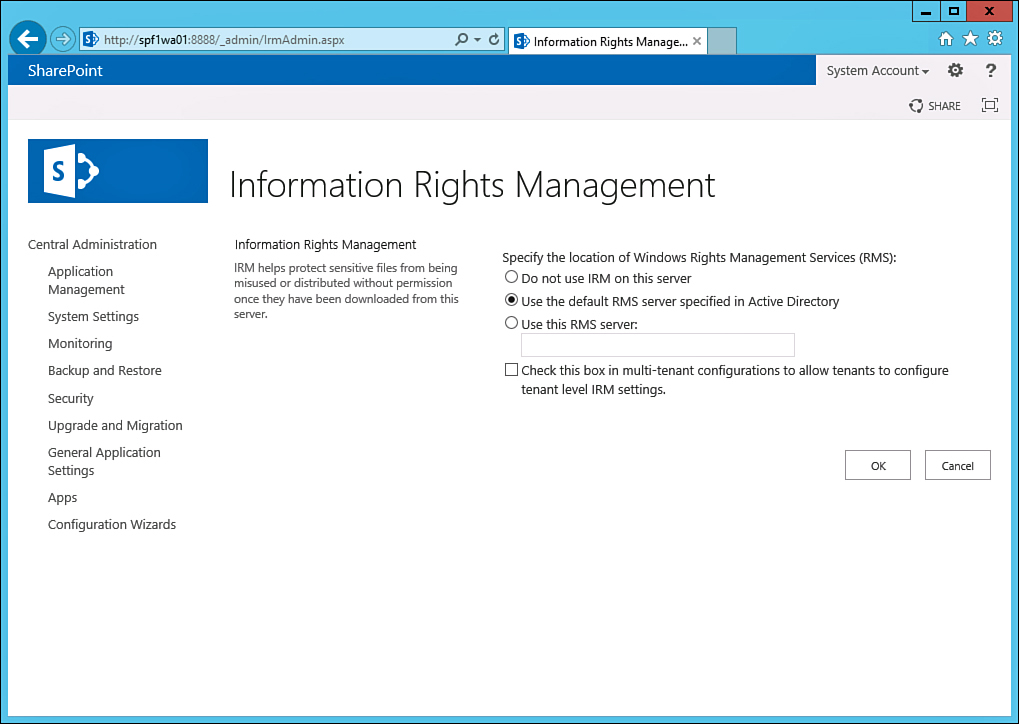
![]() Configure Information Rights Management: Enables IRM settings to be enabled or disabled within SharePoint, depending on whether AD RMS is already deployed within the AD forest or whether SharePoint should manually address the server or get the information from a published service connection point (SCP) in AD, as shown in Figure 6.26.
Configure Information Rights Management: Enables IRM settings to be enabled or disabled within SharePoint, depending on whether AD RMS is already deployed within the AD forest or whether SharePoint should manually address the server or get the information from a published service connection point (SCP) in AD, as shown in Figure 6.26.
![]() Configure Information Management Policy: You can define individual IRM policies for SharePoint, such as policies for labels, barcodes, auditing, and retention, within this area.
Configure Information Management Policy: You can define individual IRM policies for SharePoint, such as policies for labels, barcodes, auditing, and retention, within this area.
Reviewing Upgrade and Migration Settings in SPCA
The Upgrade and Migration page in SPCA, as shown in Figure 6.27, contains all settings related to an upgrade of SharePoint and also includes some links to useful information such as the patch status of systems in a farm. For detailed information on upgrading or migrating to SharePoint 2013, see Chapter 5, “Migrating from SharePoint 2010 to SharePoint 2013.”

Upgrade and Patch Management
Within the only category on the Upgrade and Migration page, labeled Upgrade and Patch Management, the following links are included:
![]() Convert Farm License Type: Enables sites to input a license key to upgrade them from a standard license key to an enterprise license key, which would give them access to enterprise features in SharePoint 2013.
Convert Farm License Type: Enables sites to input a license key to upgrade them from a standard license key to an enterprise license key, which would give them access to enterprise features in SharePoint 2013.
![]() Enable Enterprise Features: When an enterprise key has been enabled, enterprise features can be enabled from within this area. For a farm with an enterprise key enabled from the beginning, these settings are grayed out (dimmed).
Enable Enterprise Features: When an enterprise key has been enabled, enterprise features can be enabled from within this area. For a farm with an enterprise key enabled from the beginning, these settings are grayed out (dimmed).
![]() Enable Features on Existing Sites: For sites that were provisioned with standard edition features, the enterprise feature set can be enabled on them from within this area.
Enable Features on Existing Sites: For sites that were provisioned with standard edition features, the enterprise feature set can be enabled on them from within this area.
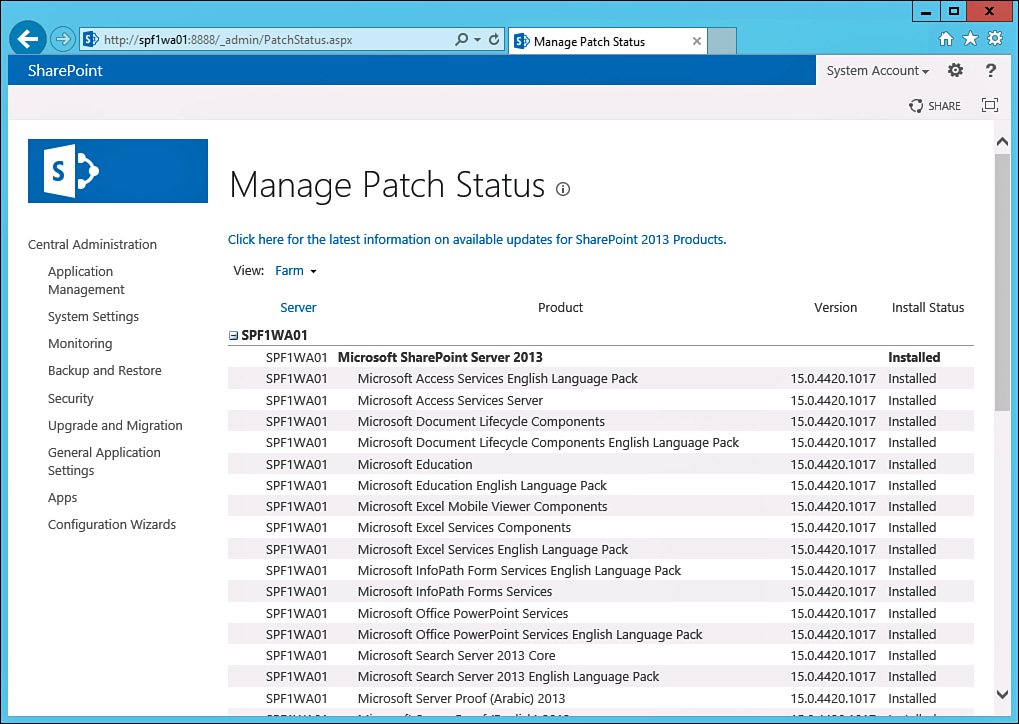
![]() Check Product and Patch Installation Status: This area, shown in Figure 6.28, provides useful information on the exact version number of all components on individual servers.
Check Product and Patch Installation Status: This area, shown in Figure 6.28, provides useful information on the exact version number of all components on individual servers.
![]() Review Database Status: This area, useful only during a database-attach upgrade, enables administrators to check on the upgrade status of individual databases.
Review Database Status: This area, useful only during a database-attach upgrade, enables administrators to check on the upgrade status of individual databases.
![]() Check Upgrade Status: This final area is only used during an upgrade and is used to monitor the status of existing upgrade sessions.
Check Upgrade Status: This final area is only used during an upgrade and is used to monitor the status of existing upgrade sessions.
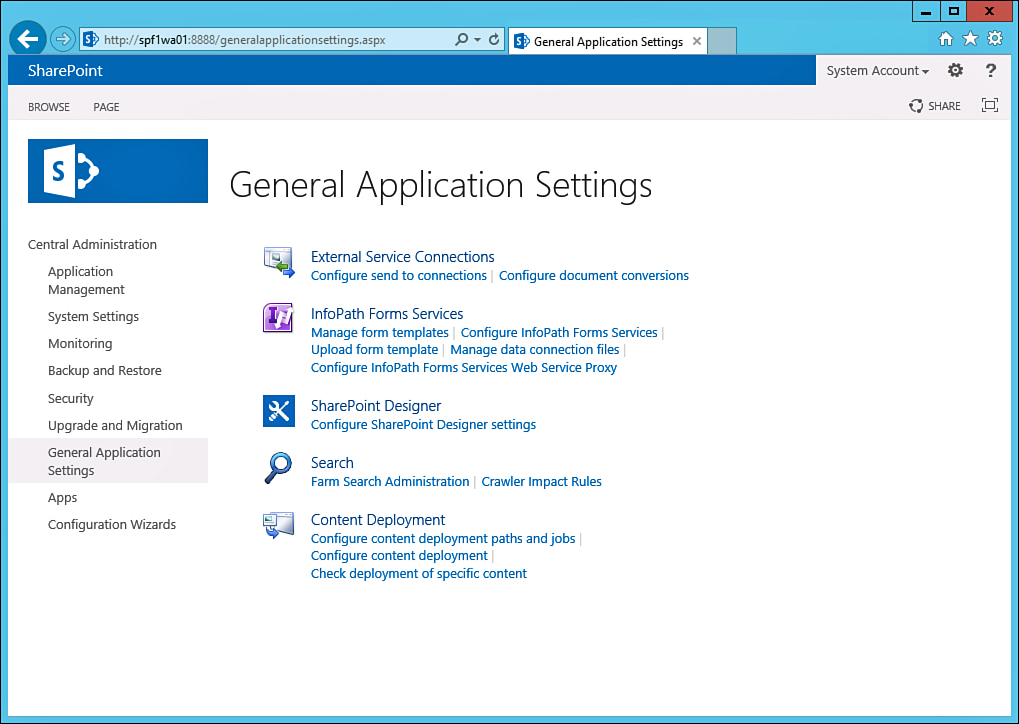
Reviewing General Application Settings in SPCA
The General Application Settings page in SPCA, as shown in Figure 6.29, is perhaps the most complex of the various areas within SPCA. It includes all other settings in SPCA that didn’t fit well into other categories, such as Content Deployment, Site Directory, InfoPath Forms Services, and others.
External Service Connections
Within the first category on the General Application Settings page, labeled External Service Connections, the following links are included:
![]() Configure Send to Connections: Enables administrators to choose whether to allow hosted site subscriptions to set up connections to sites outside their subscription. These settings are done on a per web application basis.
Configure Send to Connections: Enables administrators to choose whether to allow hosted site subscriptions to set up connections to sites outside their subscription. These settings are done on a per web application basis.
![]() Configure Document Conversions: As shown in Figure 6.30, enables administrators to define whether documents such as InfoPath forms, Word documents, or XML pages can be converted to HTML pages so that they can be viewed by browsers. A document conversions server must first be set up from within the Services on Servers area of SPCA for this to work properly.
Configure Document Conversions: As shown in Figure 6.30, enables administrators to define whether documents such as InfoPath forms, Word documents, or XML pages can be converted to HTML pages so that they can be viewed by browsers. A document conversions server must first be set up from within the Services on Servers area of SPCA for this to work properly.

InfoPath Forms Services
Within the second category on the General Application Settings page, labeled InfoPath Forms Services, all settings related to InfoPath Forms Services, a valuable tool that allows for custom forms to be created and used in SharePoint, are discussed. This includes the following settings:
![]() Manage Form Templates: Displays the default form templates used by InfoPath Forms Services, such as the ones shown in Figure 6.31.
Manage Form Templates: Displays the default form templates used by InfoPath Forms Services, such as the ones shown in Figure 6.31.

![]() Configure InfoPath Forms Services: Settings unique to InfoPath Forms Services can be configured from within this area of SPCA, including whether the service is enabled for use by users within the farm.
Configure InfoPath Forms Services: Settings unique to InfoPath Forms Services can be configured from within this area of SPCA, including whether the service is enabled for use by users within the farm.
![]() Upload Form Template: New form templates can be uploaded using this area of SPCA.
Upload Form Template: New form templates can be uploaded using this area of SPCA.
![]() Manage Data Connection Files: Data connection files used with InfoPath can be uploaded using this interface.
Manage Data Connection Files: Data connection files used with InfoPath can be uploaded using this interface.
![]() Configure InfoPath Forms Services Web Service Proxy: If a proxy is used between InfoPath Forms Services forms and web services, this functionality can be enabled in this area.
Configure InfoPath Forms Services Web Service Proxy: If a proxy is used between InfoPath Forms Services forms and web services, this functionality can be enabled in this area.
SharePoint Designer
Within the third category on the General Application Settings page, labeled SharePoint Designer, a single link is included, as follows:
![]() Configure SharePoint Designer Settings: This area, shown in Figure 6.32, allows for SharePoint Designer access to be turned on or off for an individual site collection. Because SharePoint Designer is quite powerful and can cause problems for the uninitiated, some administrators turn it off, at least initially.
Configure SharePoint Designer Settings: This area, shown in Figure 6.32, allows for SharePoint Designer access to be turned on or off for an individual site collection. Because SharePoint Designer is quite powerful and can cause problems for the uninitiated, some administrators turn it off, at least initially.

Search
Within the next category on the General Application Settings page, simply labeled Search, Search administration settings can be accessed, including the following:
![]() Farm Search Administration: Focuses on setting up the individual content deployment jobs and paths used by those jobs.
Farm Search Administration: Focuses on setting up the individual content deployment jobs and paths used by those jobs.
![]() Crawler Impact Rules: This setting takes administrators to a page shown in Figure 6.33, where content deployment can be enabled or disabled for the farm.
Crawler Impact Rules: This setting takes administrators to a page shown in Figure 6.33, where content deployment can be enabled or disabled for the farm.

Content Deployments
Within the fifth and final category on the General Application Settings page, labeled Content Deployment, all settings related to Microsoft’s concept of content deployment are listed. Content deployment is a one-way push of site content from one farm to another, usually done to publish content from internal farms to extranet farms or to push content out to remote locations. The settings related to content deployment in SPCA include the following:
![]() Configure Content Deployment Paths and Jobs: Focuses on setting up the individual content deployment jobs and paths used by those jobs.
Configure Content Deployment Paths and Jobs: Focuses on setting up the individual content deployment jobs and paths used by those jobs.
![]() Configure Content Deployment: This setting takes administrators to a page shown in Figure 6.33, where content deployment can be enabled or disabled for the farm.
Configure Content Deployment: This setting takes administrators to a page shown in Figure 6.33, where content deployment can be enabled or disabled for the farm.
![]() Check Deployment of Specific Content: Used to check on the status of content deployment jobs.
Check Deployment of Specific Content: Used to check on the status of content deployment jobs.
Managing SharePoint Apps in SPCA
A new administrative page that has been added in SharePoint 2013 is the Apps page; now administrators can allow for SharePoint apps to be installed into a site to provide for specific functionality, much in the way that mobile device app stores allow isolated apps to be installed on devices.
SharePoint apps in a farm rely on configuration and customization of both an App Management service application and the Subscription Settings service application, as well as creation of a dedicated app domain in domain name server (DNS). When provisioned, the SharePoint app settings can be administered from SharePoint Central Admin, as shown in Figure 6.34.

You can find the following settings related to SharePoint apps on this page:
![]() Purchase Apps: This setting allows for new apps to be purchased in the farm.
Purchase Apps: This setting allows for new apps to be purchased in the farm.
![]() Manage App Licenses: Takes administrators to a page that allows for management of the licenses for each app.
Manage App Licenses: Takes administrators to a page that allows for management of the licenses for each app.
![]() Configure Store Settings: This setting allows administrators to determine what apps users can purchase/request.
Configure Store Settings: This setting allows administrators to determine what apps users can purchase/request.
![]() Manage App Catalog: The App Catalog is a SharePoint site that can be created that allows users to browse the app store and request specific apps to be installed. It can be created from the Manage App Catalog link, as shown in Figure 6.35.
Manage App Catalog: The App Catalog is a SharePoint site that can be created that allows users to browse the app store and request specific apps to be installed. It can be created from the Manage App Catalog link, as shown in Figure 6.35.

![]() Monitor Apps: This area of SPCA relies on the Search service and allows for the SharePoint app store to be monitored.
Monitor Apps: This area of SPCA relies on the Search service and allows for the SharePoint app store to be monitored.
![]() Configure App URLs: This area allows for the URLs associated with the SharePoint app domain to be specified/modified.
Configure App URLs: This area allows for the URLs associated with the SharePoint app domain to be specified/modified.
![]() App Permissions: The App Permissions page allows administrators to define which users have rights to which SharePoint apps.
App Permissions: The App Permissions page allows administrators to define which users have rights to which SharePoint apps.
Using the Configuration Wizards’ Page in SPCA
The final page in SPCA, as shown in Figure 6.36, has one link, which takes administrators to the wizard they can use to configure the SharePoint farm for the first time or to enable individual service applications. This wizard is covered in more detail in Chapter 3, “Installing a Simple SharePoint Server 2013 Farm.”

Generally speaking, you should avoid the use of this Farm Configuration Wizard and instead use PowerShell scripting to create farm elements, a concept explored in more detail in Chapter 4, “Advanced SharePoint 2013 Installation and Scalability.”
Administering Site Collections and Sites
Administration of individual site collections differs from administration of the back end of SharePoint. Indeed, Microsoft broke these two administrative tasks into two areas to enable the site collections to be administered by the people “closer to the ground” with SharePoint, usually the ones who use it on a regular basis for document management and collaboration.
These administrators can perform their own set of administration tasks that affects only their specific site collections. The administrative tasks that they can perform are outlined in the next section of the chapter and apply to site collections created within SharePoint Foundation or full SharePoint Server 2013. These sets of administration options, as shown in Figure 6.37, are not visible to standard site members who do not have admin access to the site but are available to each site administrator, by clicking the Settings Gear and selecting Site Settings.
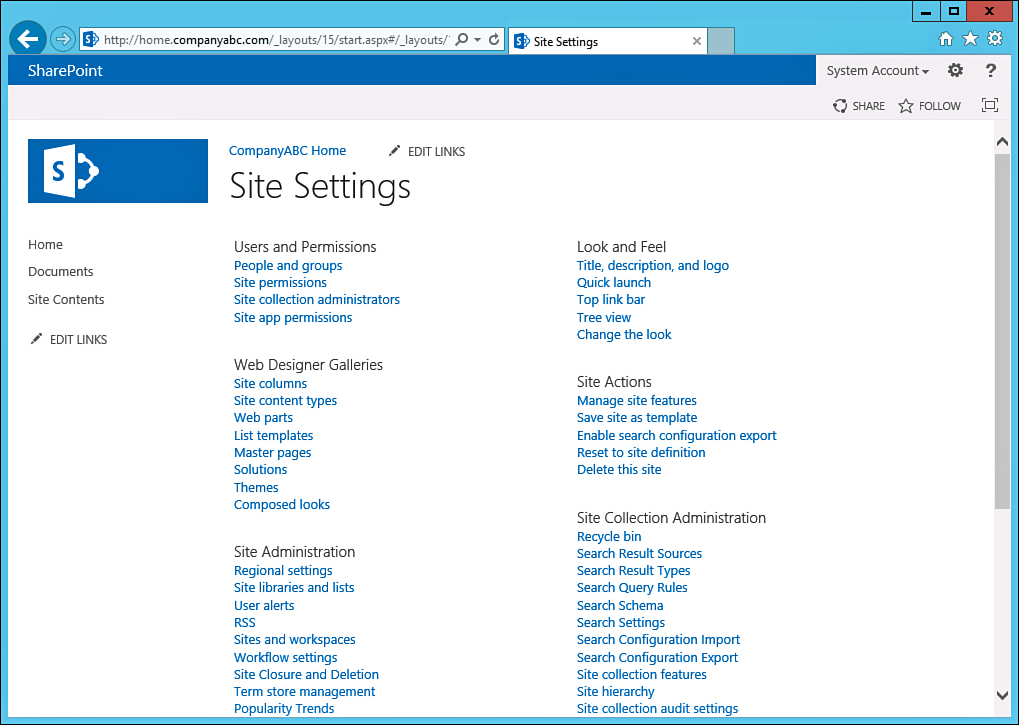
Each administrative task is organized within the Site Settings tool by category, with categories such as Users and Permissions and Look and Feel. For more information on administration of site collections and site settings, see Chapter 21, “Designing and Managing Pages and Sites for Knowledge Workers.”
Using Additional Administration Tools for SharePoint
Although the vast number of administrative tools are stored within either the SharePoint Central Admin tool or individual site settings administration, SharePoint administrators can use some additional tools to fully administer a SharePoint environment. These include the critical PowerShell scripting tool, the legacy command-line STSADM tool, and specialty admin tools such as the IIS Manager and SQL Server Management Studio.
Command-Line Administration of SharePoint Using the STSADM Tool
The STSADM tool has a long history with SharePoint products and technologies. Indeed, the acronym itself refers to SharePoint Team Services (STS) administration, which was the 1.0 version name of the SharePoint Foundation product, originally released with an older version of the FrontPage (now SharePoint Designer) web authoring tool.
With SharePoint 2013, the STSADM tool is still used and supported, but Microsoft is switching focus of command-line administration to its PowerShell tool, which now supports hundreds of commandlets specifically built just for SharePoint. Administrators should first learn how to use PowerShell before using STSADM because it is the preferred method of administering SharePoint. You can find more information on PowerShell administration for SharePoint in Chapter 7.
It’s not intuitive to find the STSADM tool, unfortunately, because it is buried in the C:Program FilesCommon FilesMicrosoft Sharedweb server extensions15BIN folder on a SharePoint server, where C: is the drive where SharePoint was installed.
Tip
It is convenient to add the C:Program FilesCommon FilesMicrosoft Sharedweb server extensions15BIN folder to the PATH statement on a SharePoint server so that STSADM can be run from any location in the command prompt window.
STSADM can create sites, delete sites, back up sites, restore sites, add users, remove users, change timer job intervals, change roles, and perform many other tasks. You should review the entire list of options available.
Working with the Internet Information Services Manager Tool
Occasionally, some administration of the IIS application is required that cannot be performed using the SharePoint Central Admin tool. This includes installing the SSL certificates and changing authentication settings. The IIS Manager tool, as shown in Figure 6.38, can be used for this functionality and can be invoked by clicking Start, All Programs, Administrative Tools, and Internet Information Services (IIS) Manager.

Some SharePoint administration tasks can be performed only from within IIS Manager, including IP address assignment for web applications, SSL certificates, bindings, and some authentication settings. Therefore, it is critical to become familiar with this tool for administration of a SharePoint 2013 environment.
SQL Server Administration for SharePoint
Administration of the SharePoint databases needs to be performed using SQL Server Management Studio with SQL Server 2008 R2 or SQL Server 2012. The SQL Server Management Studio, shown in Figure 6.39, is discussed in more detail in Chapter 9, “Managing and Maintaining SQL Server in a SharePoint Environment.”

Summary
Because administration of SharePoint products and technologies can be complex, Microsoft has centralized a vast number of administrative functions into a small number of highly powerful tools. Familiarity with these tools, and in particular with the SharePoint Central Administration tool, is therefore a must for a SharePoint administrator.
In addition to the SharePoint Central Administration tool, powerful command-line administration using PowerShell and the legacy STSADM tool is available, and database and IIS-specific administration tools provide for additional administrative functionality. Through the use of these tools, administration of a SharePoint environment becomes more streamlined and capable.
Best Practices
The following are best practices from this chapter:
![]() Become familiar with all the tasks in the SharePoint Central Administration tool.
Become familiar with all the tasks in the SharePoint Central Administration tool.
![]() Let individual site administrators become more aware of the site settings administration options available in each site.
Let individual site administrators become more aware of the site settings administration options available in each site.
![]() Become very familiar with PowerShell; many administrative tasks can only be performed with it.
Become very familiar with PowerShell; many administrative tasks can only be performed with it.
![]() Consider the use of auto-site deletion for stale sites to reduce the overhead on the environment generated by unused sites.
Consider the use of auto-site deletion for stale sites to reduce the overhead on the environment generated by unused sites.
![]() Use the IIS Manager tool for SSL certificate generation and to change authentication settings on individual IIS websites used by web applications in SharePoint.
Use the IIS Manager tool for SSL certificate generation and to change authentication settings on individual IIS websites used by web applications in SharePoint.
![]() Use PowerShell for command-line administration, and use the legacy STSADM tool only for specific scenarios when legacy command-line functionality is needed.
Use PowerShell for command-line administration, and use the legacy STSADM tool only for specific scenarios when legacy command-line functionality is needed.