Chapter 15. Implementing and Validating SharePoint Security
In This Chapter
![]() Understanding SharePoint Infrastructure Security
Understanding SharePoint Infrastructure Security
![]() Identifying Isolation Approaches to SharePoint Security
Identifying Isolation Approaches to SharePoint Security
![]() Physically Securing SharePoint Servers
Physically Securing SharePoint Servers
![]() Securing SharePoint’s SQL Server Installation
Securing SharePoint’s SQL Server Installation
![]() Utilizing Security Templates to Secure a SharePoint Server
Utilizing Security Templates to Secure a SharePoint Server
![]() Deploying Transport-Level Security for SharePoint
Deploying Transport-Level Security for SharePoint
![]() Examining Integration Points between SharePoint and Public Key Infrastructure
Examining Integration Points between SharePoint and Public Key Infrastructure
![]() Using IPsec for Internal SharePoint Encryption
Using IPsec for Internal SharePoint Encryption
Microsoft SharePoint Server 2013 was built to be a robust, capable, and scalable environment. Along with SharePoint’s capabilities comes the responsibility to secure its vital components, protecting them from attacks and data loss. Fortunately, SharePoint allows for a wide range of security functionality, features, and tools to properly secure a SharePoint farm. Knowledge of these capabilities is a must for a SharePoint administrator.
This chapter focuses on the aspects of information security that an organization can implement to protect information stored in a SharePoint environment. This includes server-level security from a network operating system (OS) and web services perspective, Active Directory integration, firewall and access to intranet and extranet information, file-level security for information stored and indexed on non-SharePoint-managed data stores, file-level security for information stored within a SharePoint-managed data store, user-level security for access to SharePoint data, and administrative controls to monitor and manage user and access security.
In addition, tools and services useful for securing SharePoint such as Internet Protocol Security (IPsec), Active Directory Rights Management Services (AD RMS), and others are covered to provide for enhanced security.
Understanding SharePoint Infrastructure Security
Security in a SharePoint environment goes well beyond the simple concept of configuring who has access to what document libraries and sharing a site with users. It encompasses other layers of security, including the security of the SharePoint traffic in transport, the physical security of the servers, the security of the Authentication used, and controlling what happens to data after it has been accessed. These areas encompass the various layers of SharePoint infrastructure security and are critical components in any deployment plan.
Physical Security
The first layer of SharePoint infrastructure security deals with the physical security of the SharePoint farm environment. Physically securing the servers that house the SharePoint data might seem obvious, but is often not taken seriously. This is unfortunate as SharePoint data stored on a stolen hard drive can be easily compromised. Therefore, physically locking and securing all components of a farm is critical.
Service Account Security
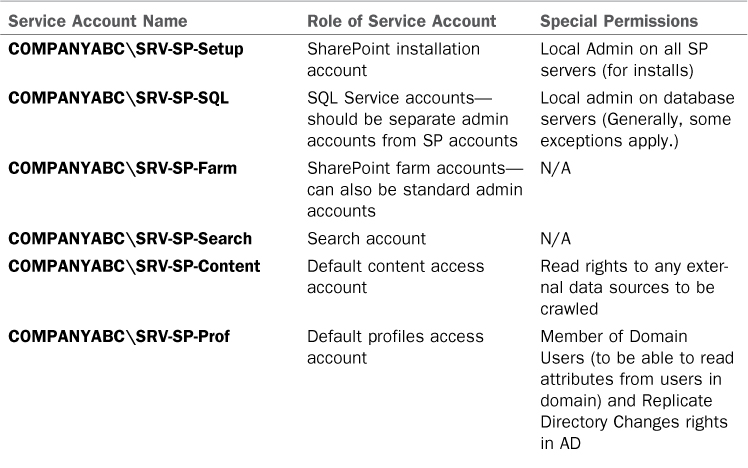
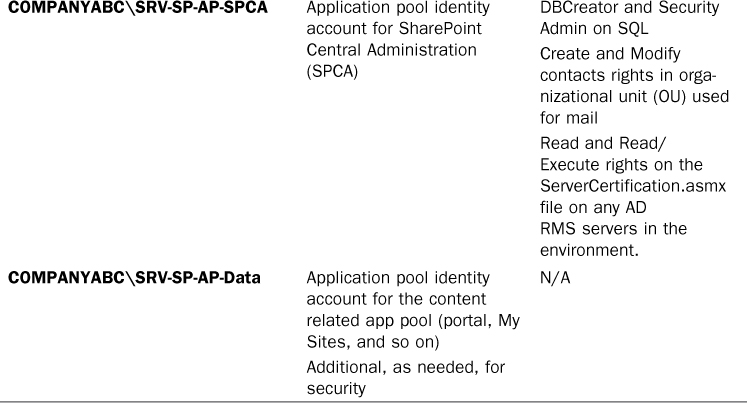
SharePoint is an application that has multiple running components that operate with different security requirements. It is critical to ensure that the proper number of service accounts are used because giving too many rights to SharePoint accounts can lead to major security breaches. Table 15.1 illustrates a service account setup for fictional CompanyABC, with the various rights requirements illustrated for each account.
Kerberos
By default, a SharePoint web application that is using integrated Windows authentication uses NT LAN Manager (NTLM) authentication, an inherently unsecure method of authentication that relies on a user’s password being encrypted in a “hash” that is sent across the wire. Kerberos uses a shared-secret approach, which is inherently more secure because it does not rely on the password being sent across the network.
Enabling Kerberos is not a complex task, but there is a great deal of confusion about how to set it up. In simple terms, the most critical step is in the creation of a service principal name (SPN) that is associated with the account that runs as the application pool identity account for the web application. That SPN should match the exact name that users use to connect to the site. For example, if your web application is home.companyabc.com and the application pool identity service account that is used for that web application is COMPANYABCSVC_SPWA_Home, the following syntax is used to log in as a domain admin and on a domain controller, as shown in Figure 15.1:
Setspn.exe -A HTTP/home.companyabc.com COMPANYABCSVC_SPWA_Home

Create additional SPNs for any other names that will be used for SharePoint. In Figure 15.1, the additional flat name of home is added as an SPN as well. This is by far the most critical step when enabling Kerberos.
The second, and often forgotten step when enabling Kerberos, is to ensure that Kerberos is also enabled between the SharePoint web role servers and the SQL instance that runs SharePoint. To do this, create an SPN associated with the SQL Service account. For example, if your SQL instance is MSSQLSvc/spsql:1433 (the default instance running on the default port on SQL Server SPSQL) and your SQL Service account is SVC_SQL, you run the following command on a domain controller while logged in as a domain admin:
Setspn.exe -A MSSQLSvc/spsql:1433 COMPANYABCSVC_SQL
These first two steps (along with the final step of actually enabling the web application for Kerberos) are all that you need to do to get base Kerberos functionality up and running. For scenarios that require delegation of Kerberos to other applications like Excel Services, however, you must complete an additional step. The application pool identity account must be set to allow delegation. You can do this from within the Active Directory Users and Computers tool by right-clicking the account, choosing Properties, selecting the Delegation tab, and choosing Trust This User/Computer for Delegation to Any Service (Kerberos only), as shown in Figure 15.2.

FIGURE 15.2 Enabling delegation on a service account to allow Kerberos delegation for services such as Excel Services.
If the web application is not already configured for Kerberos, you must now turn Kerberos on from within SharePoint Central Administration. To do so, go to Application Management, Manage Web Application, choose the web application, and then click Authentication Providers. Click the Default link under Zone, and then change to Integrated Windows Authentication—Negotiate / (Kerberos), as shown in Figure 15.3.

Role-Based Access Control
Another layer of SharePoint infrastructure security comes with role-based access control (RBAC), a concept that relies on the understanding that individual user accounts should never be given direct access to the data within an application. Rather, their specific “role” that they utilize, such as Marketing Analyst and/or Full Time Employee, should instead be given direct access. This is generally done through the creation of AD groups that correspond to the specific roles that users maintain. Those AD groups are then given rights to the data within SharePoint, rather than rights being given to the specific user accounts.
The advantage to RBAC security is that if a user changes roles, he just needs to be removed from one group and added to another. This also makes it easier to audit if someone has gone outside the boundaries of his or her role.
SQL Data Security
By default, SharePoint data is secured by access control lists (ACLs), but the data in the database itself is not encrypted in any form. If anyone were to gain access to either the SQL Server or the SQL database backups, they would be able to overwrite SharePoint security ACLs and gain access to the data in the database quite easily.
For security and compliance reasons, it may become necessary to enforce data encryption of the SQL databases. Within SQL Server 2008 R2 and SQL Server 2012 Enterprise Edition, Microsoft includes a new feature known as Transparent Data Encryption (TDE) that allows for this type of functionality.
Encryption of SharePoint databases using SQL TDE is covered in detail in Chapter 17, “Safeguarding Confidential Data in SharePoint 2013.”
Secure Sockets Layer Transport Security
Protecting the packets that are sent from users to SharePoint web servers is a critical priority, especially if the transmissions take place over an unsecure network such as the Internet. Securing this traffic can be easily accomplished with the use of Secure Sockets Layer (SSL) certificates that are bound to the Internet Information Services (IIS) website used for the SharePoint web application. If you use SSL certificates and packets are intercepted, it is excessively difficult to decrypt their content.
You can purchase SSL certificates from a third-party service or autogenerate them using Active Directory Certificate Services (AD CS), a concept discussed in more detail in later sections of this chapter.
IPsec Transport Security
Even when the transport security of SSL certificates is in place, only the traffic from the user to the SharePoint farm is secured. For high-security scenarios that require all farm traffic to be secured, you can use IPsec encryption to secure the channels between SharePoint farm members and the SQL servers.
Configuring IPsec is covered in step-by-step detail later in this chapter.
Edge Security
Any time SharePoint is directly exposed to an untrusted network like the Internet, you should protect the SharePoint farms using advanced intrusion protection and content filter devices that operate at Layer 7 of the Open Systems Interconnection (OSI) model. This includes devices such as Microsoft’s Forefront Unified Access Gateway (UAG) 2010 server.
Use of edge security solutions for SharePoint is covered in Chapter 14, “Protecting SharePoint with Advanced Edge Security Solutions.”
Data Leak Prevention
Securing the ability to access content within SharePoint is straightforward, but when content is accessed, it can be very difficult to control what happens to that content. It can be emailed out, copied out on a thumb drive, or printed. Controlling this leakage, a concept called Data Leak Prevention (DLP), is fairly easy to configure within SharePoint with the use of a technology called AD RMS.
Use of AD RMS in a SharePoint farm is covered in detail in Chapter 17.
Identifying Isolation Approaches to SharePoint Security
Various organizations have different security needs. Some organizations, for example, require strong security and cannot tolerate even the slightest risk to their business. Other organizations have a much higher tolerance for security risks and often choose to make a system more functional at the expense of security. SharePoint scales its security well to the needs of these different organizations and provides a wide spectrum of security options that can be suited to the needs of many different organizations.
Arising from these ideas is the concept of security through isolation. SharePoint servers running on an isolated network segment, for example, are highly secure compared to those directly located on the Internet. The following section deals with approaches to isolate users via security boundaries in SharePoint. Each option further isolates users and increases the security offered. With the increased security comes decreased functionality, however. The functional needs of an organization must be weighed against the security needs.
Isolating SharePoint Data with Separate SharePoint Lists
The simplest, most straightforward approach to security through user isolation comes through the application of security on the list level in SharePoint. This model involves the entire pool of users having access to the site but then being disallowed or allowed access to SharePoint content through security set at the list level.
This model, although the most functional, is also the weakest in security. Administrators in parent sites can seize access, and users are subject to potential cross-site script attacks in this design, which limits its security.
Isolating SharePoint Through Deployment of Separate Sites or Site Collections
Granting various groups of users access to SharePoint content by organizing them into sites is a more secure approach to SharePoint design. Users are limited in the types of access they receive to other sites, and searching can be limited to specific information. Administrative overhead is increased in this example, however, as separate groups of users and permissions need to be maintained. It is also more difficult to manage because all sites must use the same content database, reducing the scalability of the system.
Deploying users into separate site collections goes even further down the path of security and scalability. Separate site collections can be more easily scaled out than separate sites because each host can theoretically host millions of sites, if required. Both of these models are still vulnerable to cross-site scripting attacks, however. If a site is vulnerable to this type of activity, a more secure model may be needed.
Isolating SharePoint with Separate Web Applications
You can address the problem of cross-site scripting attacks through the creation of multiple host headers or virtual servers in SharePoint. Host headers allow for multiple domain names to correspond to different site collections in SharePoint. As a result, you can have a single SharePoint farm correspond to http://sharepoint.companyabc.com and http://sharepoint.cco.com and have them point to separate sets of data. This allows for an increased level of security between the sites because users cannot see the data from the other site collections. This, of course, reduces the amount of collaboration that can take place between the sites and is limited in scope.
If you do this, each site collection can be associated with a separate application pool. Each application pool is logically separate from the others and is theoretically not subject to failure if another one goes down or becomes corrupt. This setup also helps to further secure the SharePoint data because users are on separate physical processes from each other.
Isolating SharePoint with Separate Physical Farms
The last, most secure, and also most expensive option for SharePoint security through isolation is by deploying each site collection on separate servers or in separate networks. By deploying on separate servers, a great deal of independence is achieved as attacks and snoops from one site are physically removed from the resources of another. This can prove to be expensive, however, because individual servers need to be purchased, configured, and maintained.
The ultimate security boundary for interconnected networks is to simply disconnect them from each other. It goes without saying that the most secure SharePoint farm is the one connected to an isolated network. Some major disadvantages apply to this, however, because access from any other location becomes impossible.
Physically Securing SharePoint Servers
One of the most overlooked but perhaps most critical components of server security is the actual physical security of the server itself. The most secure, unbreakable web server is powerless if a malicious user can simply unplug it. Worse yet, someone logging in to a SharePoint SQL database role server could potentially copy critical data or sabotage the machine directly.
Physical security is a must for any organization because it is the most common cause of security breaches. Despite this fact, many organizations have loose levels, or no levels, of physical security for their mission-critical servers. An understanding of what is required to secure the physical and login access to a server is a must.
Restricting Physical Access to Servers
Servers should be physically secured behind locked doors in a controlled-access environment. Soft-felt cubicles do not provide much in the realm of physical security, so it is unwise to place mission-critical servers at the feet of administrators or in similar, unsecure locations. Rather, a dedicated server room or server closet that is locked at all times is the most ideal environment for the purposes of server security.
Most hardware manufacturers also include mechanisms for locking out some or all the components of a server. Depending on the other layers of security deployed, it may be wise to use these mechanisms to secure a server environment.
Restricting Login Access
You should configure all servers to allow only administrators to physically log in to the console. By default, such use is restricted on systems such as AD domain controllers, but other servers such as SharePoint servers and SQL servers must specifically forbid these types of logins. To restrict login access, follow these steps:
1. Choose Start, All Programs, Administrative Tools, Local Security Policy.
2. In the left pane, navigate to Security Settings, Local Policies, User Rights Assignment.
3. Double-click Allow Log On Locally.
4. Remove any users or groups that do not need access to the server, as shown in Figure 15.4. Click OK when finished.
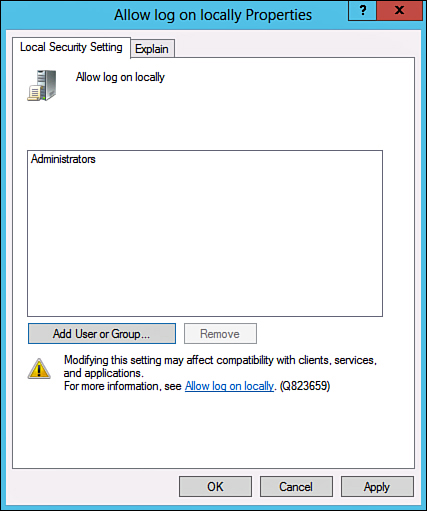
A group policy set on an OU level can be applied to all SharePoint servers, simplifying the application of policies and negating the need to perform it manually on every server.
Securing SharePoint’s SQL Server Installation
SQL Server has a strong relationship with SharePoint Server 2013 because it is the back-end database repository for SharePoint data. All of SharePoint configuration and content databases are stored within SQL Server, which makes it highly important and recommended to follow security best practices on SQL Server, just as one would when securing SharePoint to minimize vulnerabilities.
The enforcement of SQL Server security should be one of the most important tasks SQL Server database administrators commit themselves to. Furthermore, to properly ensure that vulnerabilities are minimized, SQL Server security should be a part of both the test and production SQL Server systems.
Equally important, as a result of continuous advancements made by Microsoft, SQL Server 2008 R2/2012 have significant enhancements to the security model of the database platform, which now provides more precise and flexible control resulting in tighter security. Some of the features that have been enhanced include the advanced security of surface area reduction, data encryption, native encryption, authentication, granular permissions, and user and schema separations. These advancements contribute to Microsoft’s Trustworthy Computing initiative that defines the steps necessary to help support secure computing.
At present, numerous SQL Server security best practices are applicable when deploying SharePoint. The following sections discuss some of these best practices.
Windows Versus SQL Server Authentication
Authentication is a security measure designed to establish the validity of a user or application based on criteria such as an account, password, security token, or certificate. When the validity has been verified, the user or application is usually granted authorization to the desired object.
SQL Server continues to support two modes for validating connections and authenticating access to database resources: Windows authentication and SQL Server authentication. Both authentication methods provide the SharePoint application access to SQL Server and its resources, such as the SharePoint farm and content databases.
Windows Authentication Mode
Windows authentication mode leverages AD user accounts or groups when granting access to SQL Server. This is the default and recommended authentication mode, and it allows IT professionals to grant domain users access to the database server without creating and managing separate SQL Server accounts. In addition, if you use Windows authentication mode, user accounts are subject to enterprise-wide policies enforced in the AD domain such as complex passwords, password history, account lockouts, minimum password length, and maximum password length.
SQL Server Authentication Mode
SQL Server authentication, also referred to as mixed-mode authentication, utilizes either AD user accounts or SQL Server accounts when validating access to SQL Server. Unless some reason exists for using mixed-mode authentication, it is highly recommended not to use this with SharePoint and to instead use Windows authentication mode.
Deciding Which Authentication Mode to Use
Windows authentication works best if the SQL server is accessed from within the organization and all user accounts needing access reside in AD. For example, you can use Windows authentication when deploying SharePoint if both the SharePoint and SQL server reside in the same domain or in separate domains that are trusted. However, SQL Server mixed-mode authentication works best if users or applications require access to SQL Server and are not associated with the domain that SQL Server resides in. For example, SQL Server authentication should be leveraged if the SharePoint server is not in the same domain as the SQL server and a trust does not exist between the two environments.
Even though SQL Server can now enforce policies such as SQL Server account password complexity, password expiration, and account lockouts, Windows authentication mode is still the recommended alternative for controlling access to SQL Server. The added advantage of Windows authentication is that AD provides an additional level of protection with the Kerberos protocol, and administration is reduced by leveraging AD groups when providing access to SQL Server.
Using SQL Server Security Logs
Enabling security auditing on SQL Server monitors and tracks activity to log files that can be viewed through Windows application logs or SQL Server Management Studio. SQL Server offers four security levels with regards to security auditing, as follows:
![]() None: Disables auditing so no events are logged
None: Disables auditing so no events are logged
![]() Successful Logins Only: Audits all successful login attempts
Successful Logins Only: Audits all successful login attempts
![]() Failed Logins Only: Audits all failed login attempts
Failed Logins Only: Audits all failed login attempts
![]() Both Failed and Successful Logins: Audits all login attempts
Both Failed and Successful Logins: Audits all login attempts
Security auditing is set to Failed Logins Only by default. It is a best practice to configure security auditing to capture both failed and successful logins. At the very least, security auditing should be set to Failed Logins Only. As a result, failed logins can be saved, viewed, and acted upon.
Utilizing Security Templates to Secure a SharePoint Server
Windows Server contains built-in support for security templates, which can help to standardize security settings across servers and aid in their deployment. A security template is simply a text file formatted in such a way that specific security settings are applied uniformly. For example, the security template could force a server to lockdown Windows firewall ports or not attempt to use down-level (and less-secure) methods of authentication across the network.
Application of a security template is straightforward and can be accomplished by applying a template directly to an OU, site, or domain via a Group Policy Object (GPO). Security templates can prove enormously useful in making sure that all servers have the proper security applied, but they come with a large caveat. Often, the settings defined in a template can be made too strict, and security templates that are too strong for a server can break application or network functionality. Therefore, you must test all security template settings before deploying them to production.
Deploying Transport-Level Security for SharePoint
The very nature of interconnected networks requires that all information be sent in a format that can easily be intercepted by any client on a physical network segment. The data must be organized in a structured, common way so that the destination server can translate it into the proper information. This is especially the case for SharePoint environments. This simplicity also gives rise to security problems, however, because intercepted data can easily be misused if it falls into the wrong hands.
The need to make information unusable if intercepted is the basis for all transport-level encryption. Considerable effort goes into both sides of this equation: Security specialists develop schemes to encrypt and disguise data, and hackers and other security specialists develop ways to forcefully decrypt and intercept data. The good news is that encryption technology has developed to the point that properly configured environments can secure their data with a great deal of success, as long as the proper tools are used. SharePoint’s operating system, Windows Server, offers much in the realm of transport-level security, and deploying some or many of the technologies available is highly recommended to properly secure important data. This is particularly true for SharePoint content, because without transport-level security, the data sent between critical SharePoint systems, such as the communications between SharePoint web role servers and SQL database role servers, is unencrypted and can be intercepted.
Realizing Security by Deploying Multiple Layers of Defense
Because even the most secure infrastructures are subject to vulnerabilities, deploying multiple layers of security on critical network data is recommended. If a single layer of security is compromised, the intruder has to bypass the second or even third level of security to gain access to the vital data. For example, relying on a complex 128-bit “unbreakable” encryption scheme is worthless if an intruder simply uses social engineering to acquire the password or PIN from a validated user. Putting in a second or third layer of security, in addition to the first one, makes it that much more difficult for intruders to break through all layers.
Transport-level security in Windows Server uses multiple levels of authentication, encryption, and authorization to provide an enhanced degree of security on a network. The configuration capabilities supplied with Windows Server allow for the establishment of several layers of transport-level security.
Understanding Encryption Basics
Encryption, simply defined, is the process of taking intelligible information and scrambling it so as to make it unintelligible for anyone except the user or computer that is the destination of this information. Without going into too much detail on the exact methods of encrypting data, the important point to understand is that proper encryption allows this data to travel across unsecured networks, such as the Internet, and be translated only by the designated destination. If packets of properly encrypted information are intercepted, they are worthless because the information is garbled. All mechanisms described in this chapter use some form of encryption to secure the contents of the data sent.
Examining Integration Points between SharePoint and Public Key Infrastructure
The term Public Key Infrastructure (PKI) is often loosely thrown around but is not often thoroughly explained. PKI, in a nutshell, is the collection of digital certificates, registration authorities, and certificate authorities that verify the validity of each participant in an encrypted network. Effectively, a PKI itself is simply a concept that defines the mechanisms that ensure that the user who is communicating with another user or computer on a network is who he says he is. PKI implementations are widespread and are becoming a critical component of modern network implementations.
PKI is a useful and often critical component of a SharePoint design. The PKI concepts can be used to create certificates to encrypt traffic to and from SharePoint virtual servers to the Internet. Using SSL, encryption is a vital method of securing access to a SharePoint site and should be considered as part of any SharePoint farm that enables access from the Internet.
Understanding Private Key Versus Public Key Encryption
Encryption techniques can primarily be classified as either symmetrical or asymmetrical. Symmetrical encryption requires that each party in an encryption scheme hold a copy of a private key, which is used to encrypt and decrypt information sent between the two parties. The problem with private key encryption is that the private key must somehow be transmitted to the other party without it being intercepted and used to decrypt the information.
Public key, or asymmetrical, encryption uses a combination of two keys mathematically related to each other. The first key, the public key, is widely available and can be used to encrypt the information. The second key, the private key, is kept closely guarded and is used to decrypt the information. The integrity of the public key is ensured through certificates. The asymmetric approach to encryption ensures that the private key does not fall into the wrong hands and only the intended recipient is able to decrypt the data.
Using SSL Certificates for SharePoint 2013
A certificate is essentially a digital document issued by a trusted central authority and used by the authority to validate a user’s identity. Central, trusted authorities such as VeriSign are widely used on the Internet to ensure that software from Microsoft, for example, is really from Microsoft and not from a rogue source.
Certificates are used for multiple functions, such as the following:
![]() Secured SharePoint site access
Secured SharePoint site access
![]() Secured email
Secured email
![]() Web-based authentication
Web-based authentication
![]() IPsec
IPsec
![]() Code signing
Code signing
![]() Certification hierarchies
Certification hierarchies
Certificates are signed using information from the subject’s public key, along with identifier information such as name, email address, and so on, and a digital signature of the certificate issuer, known as the certificate authority (CA).
Utilizing Active Directory Certificate Services for SharePoint Servers
Windows Server 2008, 2008 R2, and 2012 include a role that incorporates a PKI hierarchy. This role is known as AD CS. You can use AD CS to create and manage certificates; it is responsible for ensuring their validity. AD CS is often used to generate SSL certificates for SharePoint virtual servers if there is no particular need to have a third-party verify an organization’s certificates. It is common practice to set up a standalone CA for network encryption that issues certificates only for internal parties. Third-party CAs such as VeriSign are also extensively used but require an investment in individual certificates.
You can install certificate services for Windows Server as one of the following CA types:
![]() Enterprise root CA: The root of a certificate chain that is also incorporated into an AD domain and can be used to automatically enroll clients and systems with certificates.
Enterprise root CA: The root of a certificate chain that is also incorporated into an AD domain and can be used to automatically enroll clients and systems with certificates.
![]() Enterprise subordinate CA: Must get a CA certificate from an enterprise root CA but can then issue certificates to all users and computers in the enterprise.
Enterprise subordinate CA: Must get a CA certificate from an enterprise root CA but can then issue certificates to all users and computers in the enterprise.
![]() Standalone root CA: The root of a hierarchy that is not related to the enterprise domain information. Multiple standalone CAs can be established for particular purposes. An enterprise subordinate CA can be created from a standalone root CA, which is often the case in security situations where the root needs to be on a workgroup system, not a domain member.
Standalone root CA: The root of a hierarchy that is not related to the enterprise domain information. Multiple standalone CAs can be established for particular purposes. An enterprise subordinate CA can be created from a standalone root CA, which is often the case in security situations where the root needs to be on a workgroup system, not a domain member.
![]() Standalone subordinate CA: A standalone subordinate CA receives its certificate from a standalone root CA and can then be used to distribute certificates to users and computers associated with that standalone CA.
Standalone subordinate CA: A standalone subordinate CA receives its certificate from a standalone root CA and can then be used to distribute certificates to users and computers associated with that standalone CA.
Examining Smartcard PKI Authentication for SharePoint
A robust solution using a PKI network can be found in the introduction of smartcard authentication for users. Smartcards are plastic cards that have a microchip embedded in them; this chip allows them to store unique information in each card. User login information, as well as certificates installed from a CA server, can be placed on a smartcard. When a user needs to log in to a system, she places the smartcard in a smartcard reader or simply swipes it across the reader itself. The certificate is read, and the user is prompted only for a PIN, which is uniquely assigned to each user. After the PIN and the certificate are verified, the user can log in to the domain and access resources such as SharePoint.
Smartcards have obvious advantages over standard forms of authentication. It is no longer possible to simply steal or guess someone’s username and password in this scenario because the username that allows access to SharePoint can be entered only via the unique smartcard. If stolen or lost, the smartcard can be immediately deactivated and the certificate revoked. Even if a functioning smartcard were to fall into the wrong hands, the PIN would still need to be used to properly access the system. Layering security in this fashion is one reason why smartcards are fast becoming a more accepted way to integrate the security of certificates and PKI into organizations.
Using IPsec for Internal SharePoint Encryption
IPsec, mentioned briefly in previous sections, is a mechanism for establishing end-to-end encryption of all data packets sent between computers. IPsec operates at Layer 3 of the OSI model and uses encrypted packets for all traffic between members.
IPsec is often considered to be one of the best ways to secure the traffic generated in an environment and is useful for securing all SharePoint farm servers in high-risk Internet access scenarios and also in private network configurations for an enhanced layer of security. Without a technology such as IPsec, communications between farm members can be intercepted and their contents easily defined.
Reviewing the IPsec Principle
The basic principle of IPsec is as follows: All traffic between clients, whether initiated by applications, the operating system, services, and so on, is entirely encrypted by IPsec, which then puts its own header on each packet and sends the packets to the destination server to be decrypted. Because every piece of data is encrypted, this prevents electronic eavesdropping, or listening in on a network in an attempt to gain unauthorized access to data.
Several functional IPsec deployments are available, and some of the more promising ones are actually built in to the network interface cards (NICs) of each computer, performing encryption and decryption without the operating system knowing what is going on. Aside from these alternatives, Windows Server includes a robust IPsec implementation by default, which can be configured to use a PKI certificate network or the built-in Kerberos authentication provided by AD on Windows Server.
Detailing Key IPsec Functionality
IPsec in Windows Server provides for the following key functionality that, when combined, provides for one of the most secure solutions available for client/server encryption:
![]() Data privacy: All information sent from one SharePoint machine to another is thoroughly encrypted by such algorithms as 3DES, which effectively prevent the unauthorized viewing of sensitive data.
Data privacy: All information sent from one SharePoint machine to another is thoroughly encrypted by such algorithms as 3DES, which effectively prevent the unauthorized viewing of sensitive data.
![]() Data integrity: The integrity of IPsec packets is enforced through Encapsulating Security Payload (ESP) headers, which verify that the information contained within an IPsec packet has not been tampered with.
Data integrity: The integrity of IPsec packets is enforced through Encapsulating Security Payload (ESP) headers, which verify that the information contained within an IPsec packet has not been tampered with.
![]() Anti-replay capability: IPsec prevents streams of captured packets from being re-sent, known as a replay attack, blocking such methods of obtaining unauthorized access to a system by mimicking a valid user’s response to server requests.
Anti-replay capability: IPsec prevents streams of captured packets from being re-sent, known as a replay attack, blocking such methods of obtaining unauthorized access to a system by mimicking a valid user’s response to server requests.
![]() Per-packet authenticity: IPsec uses certificates or Kerberos authentication to ensure that the sender of an IPsec packet is actually an authorized user.
Per-packet authenticity: IPsec uses certificates or Kerberos authentication to ensure that the sender of an IPsec packet is actually an authorized user.
![]() NAT transversal: The Windows Server implementation of IPsec now allows for IPsec to be routed through current Network Address Translation (NAT) implementations, a concept defined more thoroughly in the following sections.
NAT transversal: The Windows Server implementation of IPsec now allows for IPsec to be routed through current Network Address Translation (NAT) implementations, a concept defined more thoroughly in the following sections.
![]() Diffie-Hellman 2048-bit key support: Nearly unbreakable, Diffie-Hellman 2048-bit key lengths are supported in the Windows Server IPsec implementation, essentially ensuring that the IPsec key cannot be cracked.
Diffie-Hellman 2048-bit key support: Nearly unbreakable, Diffie-Hellman 2048-bit key lengths are supported in the Windows Server IPsec implementation, essentially ensuring that the IPsec key cannot be cracked.
Setting Up the Monitoring Environment for IPsec Communications
IPsec is built in to all Windows Server machines and is also available for client systems. It is a straightforward process to install and configure IPsec between SharePoint servers and should be considered as a way to further implement additional security in a SharePoint environment.
Note
IPsec is highly recommended, although there is a performance penalty. Assume an approximately 10% overhead to use IPsec on network communications. That said, it is extremely easy to configure and highly useful for providing for transport-level security of data between SharePoint farm servers. Transport-level security from clients to web role servers should always take the form of SSL certificate encryption.
The procedure outlined in the following sections illustrates the setup of a simple IPsec policy between two SQL servers that hold SharePoint farm databases (SQL01 and SQL02.) The OS on both servers is Windows Server 2012, but the following steps are very similar for Windows Server 2008 R2.
To view the current status of any IPsec policies, including the ones that are created in this procedure, the IPsec Security Monitor Microsoft Management Console (MMC) snap-in on SQL01 needs to be opened. The MMC snap-in can be installed and configured as follows:
1. Open PowerShell and type mmc into the PowerShell dialog box. Click OK when complete.
2. In MMC, choose File, Add/Remove Snap-In.
3. Scroll down and select IP Security Policy Management and click Add.
4. Select Local Computer and click Finish.
5. Scroll down and select IP Security Monitor; then click the Add button, followed by the OK button.
6. Both the IP Security Policies and the IP Security Monitor MMC snap-in should now be visible, as shown in Figure 15.5. Click OK.

7. In MMC, expand to Console RootIP Security MonitorSQL01.
8. Right-click SQL01 and choose Properties.
9. Change the Auto Refresh setting from 45 seconds to 5 seconds or less. Click OK when finished. You can then use the MMC IP Security Monitor console to view IPsec data.
Establishing an IPsec Policy on the SharePoint Server
Default IPsec policies must be enabled on any server in the SharePoint farm that needs to communicate over IPsec. To enable a simple IPsec policy that uses AD Kerberos (as opposed to certificates-based IPsec), complete the following steps on each server:
1. From the MMC console set up in the previous section, as shown in Figure 15.6, right-click IP Security Policies on Local Computer, and then click Create IP Security Policy.

2. Click Next at the Welcome Wizard.
3. Give a name to the IP security policy, such as SharePoint IP Security Policy, and click Next to continue.
4. Do not check the box to activate the default response rule, but do click Next to continue. The default response rule is only used for down-level systems.
5. Leave the Edit Properties check box marked and click the Finish button.
6. In the Security Rules dialog box, click Add.
7. Click Next to continue.
8. At the Tunnel Endpoint dialog box, choose that the rule does not specify a tunnel, and click Next to continue.
9. In the Network Type dialog box, choose All Network Connections and click Next to continue.
10. In the IP Filter List dialog box, click Add to add an IP filter.
11. Give a name to the IP filter, and then click Add.
12. Click Next at the Welcome Wizard.
13. Leave the Mirrored check box checked and click Next to continue.
14. For Source Address, leave the default at Any IP Address and click Next.
15. For Destination Address, leave the default at Any IP Address and click Next.
16. For Protocol, leave the default at Any, shown in Figure 15.7, and click Next.
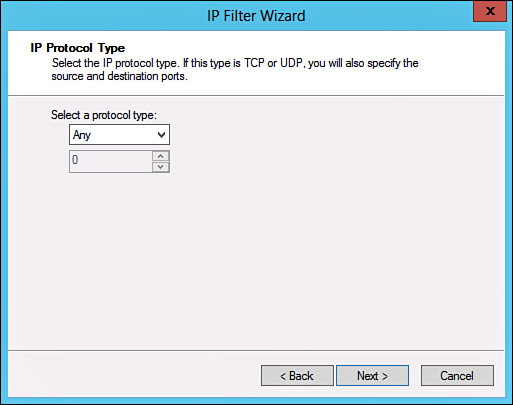
17. Click Finish at the Completion Wizard for the IP filter.
18. Tick the circle for the filter list just created, and then click Next to continue.
19. Under Filter Action, click Add to create a filter action.
20. At the Welcome Wizard, click Next to continue.
21. Enter a name and description for the filter action and click Next.
22. Choose Negotiate Security, shown in Figure 15.8, and click Next to continue.

23. Select Do Not Allow Unsecured Communication and click Next to continue. Note that if you have servers that do not support IPsec, you may have to choose the less-secure option to allow unsecured communications in some cases.
24. In the IP Traffic Security dialog box, choose the security method of Integrity and Encryption and click Next to continue.
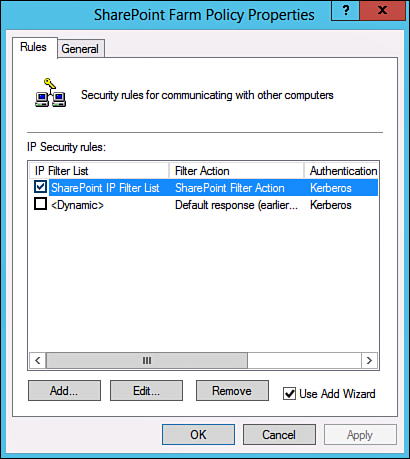
26. Tick the circle for the filter action just created, as shown in Figure 15.9, and click Next to continue.

27. Select Kerberos v5 authentication and click Next to continue.
28. Click Finish to complete the wizard.
29. The Security Policy Settings should look similar to what is shown in Figure 15.10. Click OK to close the dialog box.
30. From within the IP Security Policies MMC snap-in, choose the SharePoint security policy just created, right-click it, and choose Assign.
31. Repeat on additional SharePoint servers in the farm.
Verifying IPsec Functionality in Event Viewer
After the local IPsec policies are enabled on both SQL01 and SQL02, IPsec communications can take place. To test this, either ping the server from the client desktop or perform other network tests.
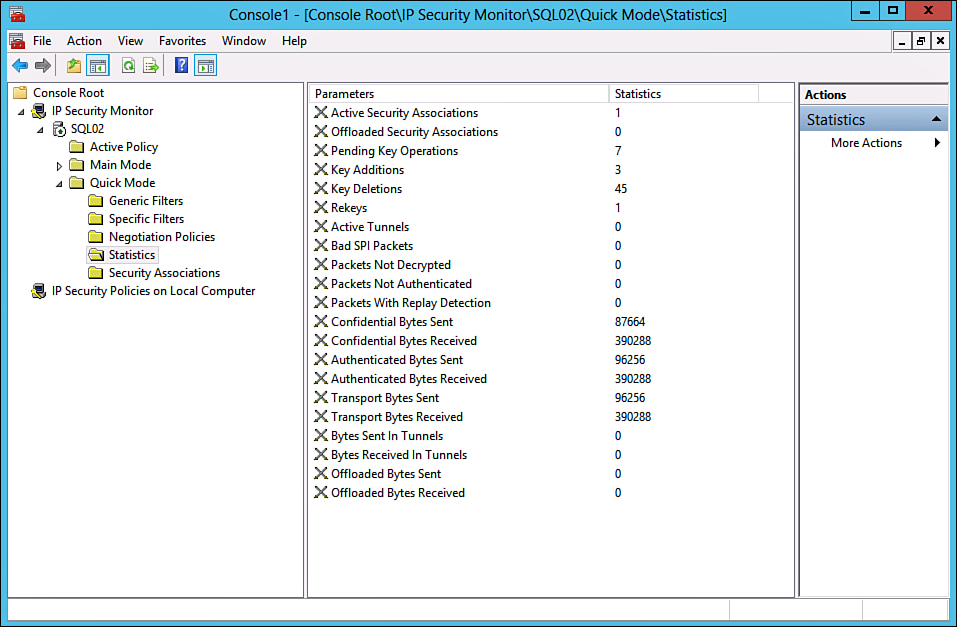
A quick look at the IP security monitor that was established in MMC on SQL01 shows that IPsec traffic has been initialized and is logging itself. Traffic statistics, such as those shown in Figure 15.11, should therefore be shown. All communications between the two servers are now highly encrypted and secured.
These default IPsec policies are useful in establishing ad hoc IPsec between SharePoint clients on a network but are limited in their scope. Enterprise-wide IPsec policies can be accomplished through the use of group policies, but proper planning of an enterprise IPsec implementation is necessary to effectively secure an entire environment using custom IPsec policies.
Summary
SharePoint comes fully loaded with a wide variety of security mechanisms, tools, and techniques to help protect and secure data within the environment. Without a full understanding of these tools, however, it can be difficult if not impossible to properly secure a SharePoint 2013 environment.
Using a layered approach to security with SharePoint, it becomes possible to deploy multiple lines of defense against hackers, scripts, or snoops. SharePoint combines its integrated security with the security capabilities of the Windows Server operating system and the lockdown capabilities of the Baseline Security Analyzer, allowing for robust file security and physical security. All these options make SharePoint a formidable product, ready-for-enterprise deployment.
In addition, transport-level security in the form of IPsec can greatly secure interserver communications between SharePoint farm members, reducing the risk of data being intercepted and exposed.
Best Practices
The following are best practices from this chapter:
![]() Use a layered approach to security, with more than one mechanism in place to deter attackers.
Use a layered approach to security, with more than one mechanism in place to deter attackers.
![]() After validating in a prototype environment, use the latest patches and updates on SharePoint servers to further protect the server against attack.
After validating in a prototype environment, use the latest patches and updates on SharePoint servers to further protect the server against attack.
![]() Use SSL certificates on any SharePoint traffic that traverses a public network such as the Internet.
Use SSL certificates on any SharePoint traffic that traverses a public network such as the Internet.
![]() Use an internal PKI deployment with AD CS to generate SSL certificates for SharePoint if third-party certificates are not being used.
Use an internal PKI deployment with AD CS to generate SSL certificates for SharePoint if third-party certificates are not being used.
![]() Physically secure SharePoint servers behind locked doors and in secure locations.
Physically secure SharePoint servers behind locked doors and in secure locations.
![]() Highly consider the use of IPsec to encrypt traffic between SharePoint servers.
Highly consider the use of IPsec to encrypt traffic between SharePoint servers.
![]() Design SharePoint with isolation approaches to security in mind.
Design SharePoint with isolation approaches to security in mind.
![]() Use Server Security templates to secure the Windows Server operating system that SharePoint runs on, but ensure that the security settings are tested in advance.
Use Server Security templates to secure the Windows Server operating system that SharePoint runs on, but ensure that the security settings are tested in advance.
![]() Restrict login access to SharePoint servers.
Restrict login access to SharePoint servers.
![]() Consider the use of PKI smartcards for user authentication to SharePoint.
Consider the use of PKI smartcards for user authentication to SharePoint.
![]() Limit anonymous access to SharePoint farms that do not contain any proprietary information.
Limit anonymous access to SharePoint farms that do not contain any proprietary information.
![]() Limit console logins on SharePoint servers to select administrators.
Limit console logins on SharePoint servers to select administrators.
![]() Enable password and account lockout policies on SharePoint servers.
Enable password and account lockout policies on SharePoint servers.