Chapter 17. Safeguarding Confidential Data in SharePoint 2013
In This Chapter
![]() Using SQL Transparent Data Encryption (TDE)
Using SQL Transparent Data Encryption (TDE)
![]() Enabling TDE for SharePoint Content Databases
Enabling TDE for SharePoint Content Databases
![]() Using AD RMS for SharePoint Document Libraries
Using AD RMS for SharePoint Document Libraries
Protecting SharePoint data goes beyond simple backup and restore. Protection involves managing what happens to data in the event of a site outage, in the event of a major disaster, or simply what happens if someone gains unauthorized access to that data.
In today’s complex data management world, administrators are increasingly being tasked with the management of the entire lifecycle of their data, from content creation, to content expiration, and the penalties for inadvertently leaking confidential data to unauthorized personnel can be substantial.
SharePoint 2013 and related database technologies using Microsoft SQL Server enable administrators to better control what happens to their data throughout its entire lifecycle. Disaster recovery (DR) and high availability (HA) of the data can be achieved through SQL Server 2012 AlwaysOn Availability Groups (AOAGs), and encryption of content in databases can be handled with SQL Transparent Data Encryption (TDE). In addition, rights protection of the content can be enabled by integration with Active Directory Rights Management Services (AD RMS).
This chapter covers these various data protection technologies related to SharePoint. With a fundamental grasp of these technologies, administrators can dramatically improve the security of their critical SharePoint data.
Understanding the Problem
A SharePoint document management and collaboration environment is a mission-critical service for many organizations. In many cases, a SharePoint environment contains the physical representation of the intellectual property of an organization, and it is therefore critical that the data in a SharePoint environment be secure and reliable.
Modern threats to SharePoint data integrity take many forms, and organizations cannot afford to ignore them. Some common issues are as follows:
![]() Data redundancy: The ability to have an up-to-date copy of data in more than one location is a critical requirement because it provides a data redundancy solution for hardware and site disaster scenarios or outages. This type of requirement is provided for SharePoint 2013 with SQL AOAGs.
Data redundancy: The ability to have an up-to-date copy of data in more than one location is a critical requirement because it provides a data redundancy solution for hardware and site disaster scenarios or outages. This type of requirement is provided for SharePoint 2013 with SQL AOAGs.
![]() Data high availability (HA): The ability to eliminate single points of failure in an environment that houses mission-critical data is key. HA in SharePoint can take multiple forms, but often includes network load balancing at the web tier used together with either SQL AlwaysOn Failover Cluster Instances (FCIs) or AOAGs.
Data high availability (HA): The ability to eliminate single points of failure in an environment that houses mission-critical data is key. HA in SharePoint can take multiple forms, but often includes network load balancing at the web tier used together with either SQL AlwaysOn Failover Cluster Instances (FCIs) or AOAGs.
![]() Data integrity: The ability to control the integrity and security of data (in transit, at rest, and when backed up) is critical. Technologies such as SQL TDE can help to secure data in storage and when backed up, providing better overall data integrity.
Data integrity: The ability to control the integrity and security of data (in transit, at rest, and when backed up) is critical. Technologies such as SQL TDE can help to secure data in storage and when backed up, providing better overall data integrity.
![]() Data leakage: The ability to control what happens to sensitive data after it has been accessed is becoming more and more critical. Technologies such as AD RMS can be used to provide for this much needed functionality, because they restrict the ability of users to print, copy/paste, or send data outside of a company.
Data leakage: The ability to control what happens to sensitive data after it has been accessed is becoming more and more critical. Technologies such as AD RMS can be used to provide for this much needed functionality, because they restrict the ability of users to print, copy/paste, or send data outside of a company.
Each of these technologies is covered in more detail in subsequent sections of this chapter and are all highly recommended components of a SharePoint 2013 environment.
SQL Server 2012 AOAGs for SharePoint Farms
Introduced in SQL Server 2012, AOAGs are a software solution that deliver HA and database redundancy of SQL databases, including SharePoint databases. SQL AOAGs are a combination of previous database mirroring technology with clustering to provide for both HA failover with no data loss together with the multiple replica capabilities that mirroring provides.
To understand AOAGs, you must first understand the difference between an AOAG and an AlwaysOn FCI. FCI is simply a new term for traditional shared-storage clustering, which was supported in earlier versions of SQL Server. With an FCI, multiple nodes share a single copy of the content, and that storage is failed over automatically between nodes if they go down. The downside to this approach, however, is that if the storage fails or if the databases become corrupt, there is no backup copy of the content to fail over to.
SQL 2012 AOAGs, however, differ in that they allow for up to five copies of a database to be maintained across multiple independent SQL instances. Failover is allowed automatically between two of the replicas, and synchronous copies can exist on up to three replicas. This technology is highly valuable for SharePoint environments because it provides the promise of having an always-available constant replica of SharePoint databases on multiple servers and being able to fail over to at least one of those servers automatically.
Figure 17.1 illustrates the extent to which you can use AOAGs in a SharePoint environment.

Note a few things about the scenario illustrated in Figure 17.1:
![]() SQL AOAGs require the Enterprise Edition of SQL Server 2012 to be installed on all nodes.
SQL AOAGs require the Enterprise Edition of SQL Server 2012 to be installed on all nodes.
![]() Each node is installed as a standalone install of SQL Server, not a clustered install. This is true despite the fact that an AOAG works within a Windows Server failover cluster (WSFC). The cluster is only used to fail over the name of the AOAG, however, and is not used to fail over disk or network, as a traditional FCI would do.
Each node is installed as a standalone install of SQL Server, not a clustered install. This is true despite the fact that an AOAG works within a Windows Server failover cluster (WSFC). The cluster is only used to fail over the name of the AOAG, however, and is not used to fail over disk or network, as a traditional FCI would do.
![]() SharePoint databases are divided into two AOAGs in this example, the first one for content databases, which are replicated to all members of the WSFC. The second AOAG is used for all noncontent databases, including the Config and the Service Application databases. This AOAG is replicated only to those replicas that are configured for synchronous replication. The reason for this is because only content databases in SharePoint support both asynchronous and synchronous replication, whereas the other databases support only synchronous replication.
SharePoint databases are divided into two AOAGs in this example, the first one for content databases, which are replicated to all members of the WSFC. The second AOAG is used for all noncontent databases, including the Config and the Service Application databases. This AOAG is replicated only to those replicas that are configured for synchronous replication. The reason for this is because only content databases in SharePoint support both asynchronous and synchronous replication, whereas the other databases support only synchronous replication.
![]() Because only the content databases are replicated to the external sites, separate SharePoint farms must be created to attach the content databases to in the event of an outage. This also means that other strategies must be used for service application failover if there is a need to fail over specific info such as the taxonomy definitions specified in the Managed Metadata Service.
Because only the content databases are replicated to the external sites, separate SharePoint farms must be created to attach the content databases to in the event of an outage. This also means that other strategies must be used for service application failover if there is a need to fail over specific info such as the taxonomy definitions specified in the Managed Metadata Service.
![]() All nodes that participate in an AOAG must be running the Enterprise Edition of SQL Server 2012; AOAGs are not supported in the Standard Edition.
All nodes that participate in an AOAG must be running the Enterprise Edition of SQL Server 2012; AOAGs are not supported in the Standard Edition.
The high-level steps required to create an AOAG are shown here and then explored in more detail in this chapter:
Step 1: Prepare nodes.
Step 2: Install Windows OS on both nodes.
Step 3: Patch and update with critical patches and AlwaysOn patches.
Step 4: Enable the WSFC cluster feature and .NET Framework.
Step 5: Create a WSFC cluster.
Step 6: Install SQL Server 2012 on both nodes.
Step 7: Enable AlwaysOn in SQL Configuration Manager.
Step 8: Create an AOAG.
Step 9: Test and validate.
Step 1: Prepare Nodes
Prepare servers that will act as the SQL hosts for the AOAG cluster. This includes racking the servers, cabling, and so on. Note that the storage does not need to be storage area network (SAN) storage, because SQL AOAGs do not need to utilize shared storage.
Step 2: Install Windows Server OS on Both Nodes
On all nodes, install Windows Server 2008 R2 w/SP1 Enterprise Edition or Windows Server 2012 Datacenter Edition. Following a basic installation of Windows Server, add the servers to an Active Directory (AD) domain and log in to the servers with an account that has local admin rights on all servers and that has the permission to add computer accounts to the domain.
Configure the disk locations to be identical across all servers. For example, if the data drive is D:, Logs are L:, and TempDB is T:, configure that to be identical drive letters on each server.
Step 3: Patch and Update with Critical Patches and AlwaysOn Patches
Ensure that Windows is set to use Microsoft Update as opposed to Windows Update. This will allow for SQL-specific patches to be included in updates. Following this, check for updates and install all critical patches.
In addition to the patches that are provided by Microsoft Update, install patches that are specific to SQL Server AOAGs. Note that you may find that some of these patches may be superseded by newer Windows patches or unnecessary for Windows Server 2012, but it is important to try to install them in any case:
http://support.microsoft.com/kb/976097 (Asymmetric Storage)
http://support.microsoft.com/kb/2494036 (Node Weight Fix)
http://support.microsoft.com/kb/2531907 (Small Computer System Interface [SCSI] Device Test Failure)
http://support.microsoft.com/kb/2616514 (Unnecessary Reg Key Change Notifications)
http://support.microsoft.com/kb/2654347 (Net 35 AlwaysOn Features)
Step 4: Enable the WSFC Cluster Feature and the .NET Framework
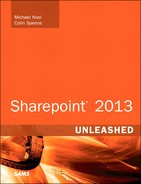
On each node, use Server Manager to install the Windows Failover Clustering component and the .NET 3.5 Framework, as shown in Figure 17.2.
Following installation, check for available patches for the .NET 3.5 Framework with Windows Update and patch if necessary.
Step 5: Create a WSFC Cluster
When all nodes have been patches and prepared, you can proceed with the creation of a WSFC that will encompass all nodes of the cluster. Create a WSFC by starting the Failover Cluster Wizard on one of the nodes.
Give the cluster a unique name that doesn’t exist in AD; this becomes a computer account in AD. Remember that this step fails if the account that is logged in while running the wizard does not have Read All Properties and Create Computer Accounts rights in AD. Alternatively, if these rights cannot be granted, the computer account can be precreated.
Grant the Cluster computer account that was just created Read All Properties and Create Computer Accounts, which allows it to add other computers to the domain later, a requirement for AOAGs. Add all nodes into the cluster.
If automatic failover is required, there must be sufficient voting members to create a quorum of votes. In a two-server configuration, this means that a third server must act as a file share witness (FSW), which is effectively just another vote that provides for quorum. For SharePoint environments, this FSW is usually one of the SharePoint Service Application role servers. Create a share on the server designated to be the FSW and give it a name (usually just FSW); then give the cluster computer account just created full rights to the share created.
Add an FSW (one of the SharePoint app servers) using the Configure Cluster Quorum Wizard, and choose Node and File Share Majority, as illustrated in Figure 17.3.

If it fails to add the FSW, it is usually because the cluster computer account (not service account) does not have full rights to the share. At this point, the cluster should be complete and it should not be necessary to do any more configuration within the Failover Cluster tool. All remaining cluster configuration will take place within SQL Server.
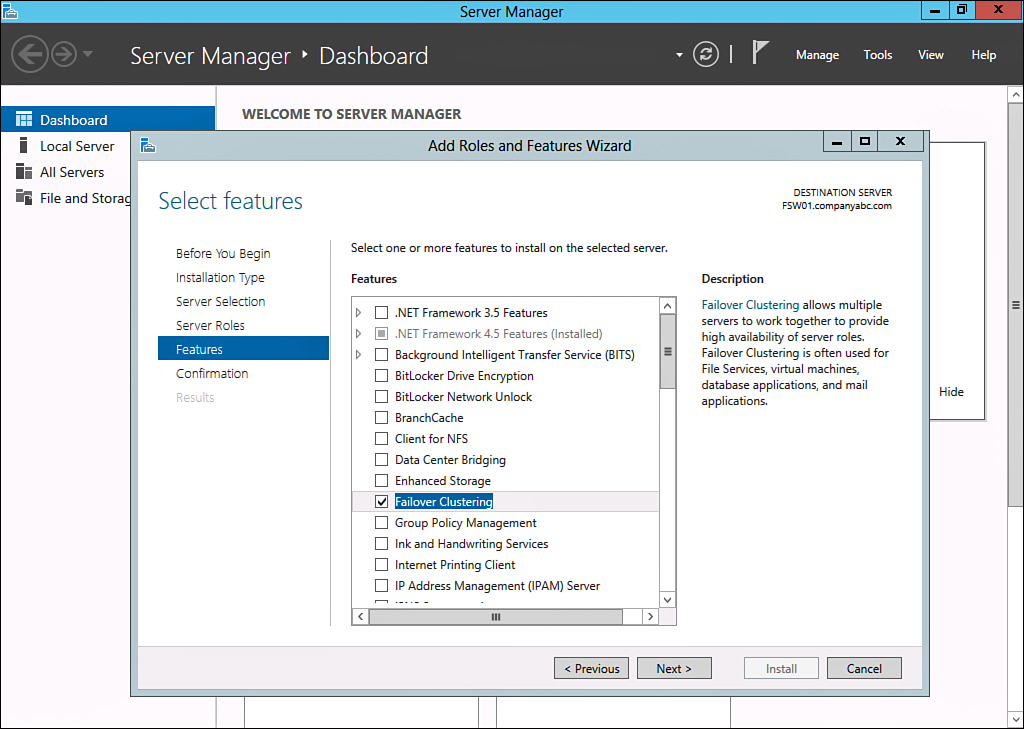
Step 6: Install SQL Server 2012 on Both Nodes
After the WSFC is in place, you can proceed to install SQL Server 2012 Enterprise Edition on all nodes. In most environments, select only Database Services, SQL Server Agent, and SQL Management Tools—Complete. In addition, be sure to select to install only a standalone instance, illustrated in Figure 17.4, and do not select a cluster, regardless of the fact that an AOAG resides within a cluster. Selecting a cluster proceeds to install SQL as an FCI and not as an AOAG.
Keep the following factors in mind when installing SQL Server on each node:
![]() Install all defaults, with the exception of drive locations for databases; change that one to the DB drive for Databases and the Logs drive for logs. Make sure that the drive paths are consistent across all servers.
Install all defaults, with the exception of drive locations for databases; change that one to the DB drive for Databases and the Logs drive for logs. Make sure that the drive paths are consistent across all servers.
![]() Select the SQL Server service account, make it the same on both nodes, and ensure that it has local admin rights to each server.
Select the SQL Server service account, make it the same on both nodes, and ensure that it has local admin rights to each server.
![]() Configure the default instance of SQL (using port 1433).
Configure the default instance of SQL (using port 1433).
![]() Configure the SQL Server agent using the defaults.
Configure the SQL Server agent using the defaults.
![]() Check for updates and patch SQL on each node.
Check for updates and patch SQL on each node.
![]() Add a firewall exception for port 1433 and port 5022 (if the Windows Firewall is enabled).
Add a firewall exception for port 1433 and port 5022 (if the Windows Firewall is enabled).
![]() If antivirus is enabled, put in the proper exclusions for SQL Server (http://support.microsoft.com/kb/309422). Follow the recommendations for SQL 2008 R2 in the guide listed because they also apply to SQL 2012. Follow the recommendations for a failover cluster, as well. You should contact your antivirus vendor for the proper exclusions for both a cluster node and an SQL server.
If antivirus is enabled, put in the proper exclusions for SQL Server (http://support.microsoft.com/kb/309422). Follow the recommendations for SQL 2008 R2 in the guide listed because they also apply to SQL 2012. Follow the recommendations for a failover cluster, as well. You should contact your antivirus vendor for the proper exclusions for both a cluster node and an SQL server.
Step 7: Enable AlwaysOn in SQL Configuration Manager
After SQL has been installed on all nodes, AOAG functionality can be enabled on all nodes. To do so, open SQL Server Configuration Manager and enable SQL AlwaysOn on each node, as illustrated in Figure 17.5.

Restart the SQL services on each node to finalize the configuration changes.
Step 8: Create an AOAG
To create an AOAG, there must be at least one available database to add to it. This can be an empty database that is created for the purposes of the AOAG, or it can be existing SharePoint databases. Because SharePoint would usually be pointed to the listener name, however, it’s best to wait until the AOAG is created before installing SharePoint.
In this example, because two AOAGs will be created, one for Content DBs and the other for Service Application DBs, it is necessary to create two empty databases on the first node. These databases can be deleted later.
All databases that enter into an AOAG must have a full backup performed first, so ensure that you back up the newly created empty databases first. When backed up, you can then use the Create AOAG Wizard in SQL Server Management Studio to start the AOAG creation process, as illustrated in Figure 17.6.

Give the AOAG a name such as SPSrvApp, and then select one of the blank databases to add to the AOAG.
When prompted, add all nodes to the AOAG, as illustrated in Figure 17.7.

Change the nodes to Automatic Failover and Synchronous Commit (check the boxes) for both nodes, assuming that you want to configure the AOAG for synchronous commit and autofailover, typical for a SharePoint scenario.
Leave the defaults for endpoints, backup preferences, and listener.
Select a common backup location that is accessible by both servers for the initial backup. This can be an existing file share or one you create, like what is shown in Figure 17.8.

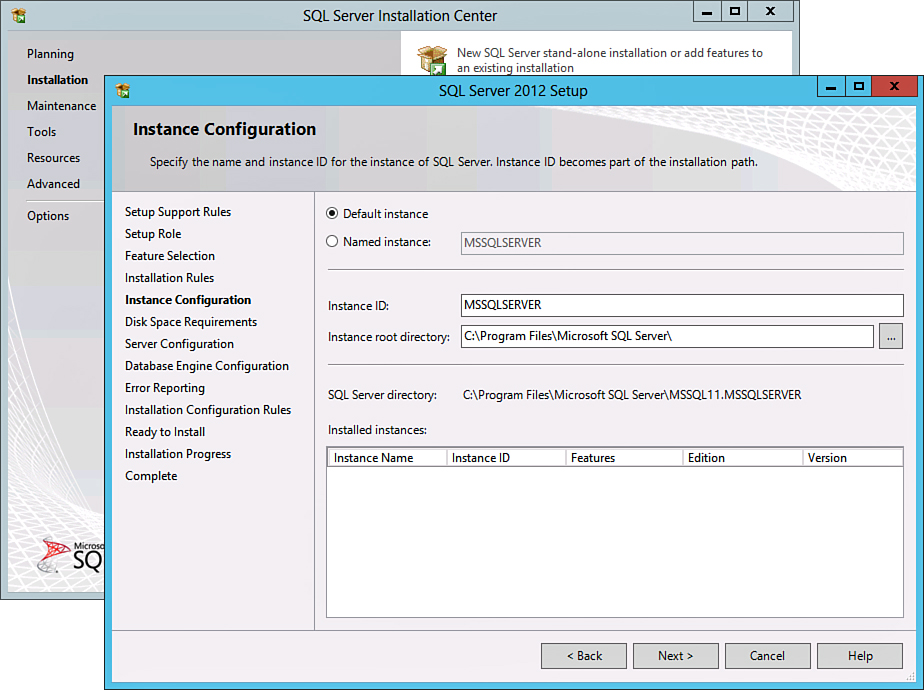
Review the settings created by the wizard, such as what is displayed in Figure 17.9. All steps should show up as green except for the listener, which is created in the next step.
After the AOAG has been created, a listener is required. This is the name that the AOAG corresponds to and the name that SharePoint connects to. To create the listener, right-click the Listener node in SQL Management Studio and select Create a New Listener.
Give it a common shared IP address and give it a name that will be used by the application connecting to the server (for example, SPSrvApp or SPContent).
The AOAG should be created at this point. Repeat the same steps for the second AOAG (the Content AOAG).
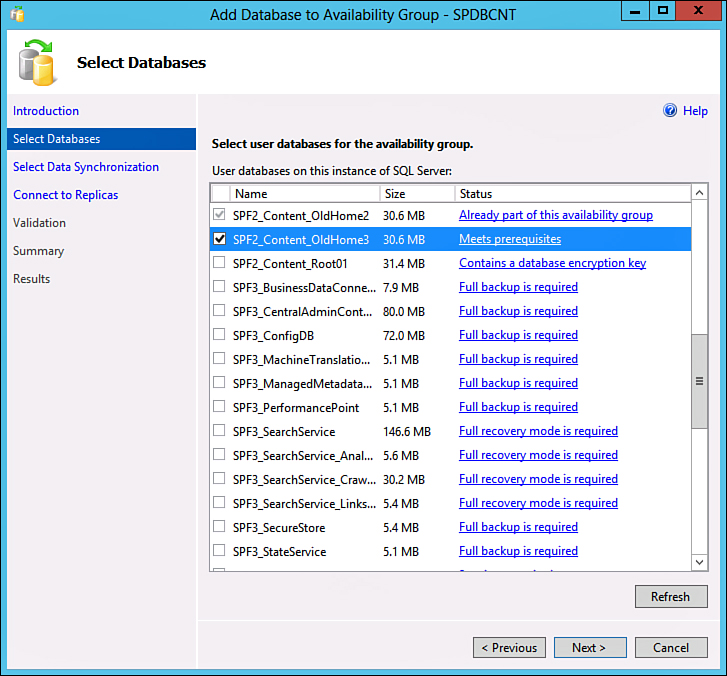
At this point, you can install SharePoint and point it to the listener name for its SQL server name. Note that by default, however, simply creating new databases in SharePoint does not add them to all AOAG nodes; the databases are created only on the primary replica SQL server. Add them to the AOAG by right-clicking the AOAG Databases node and selecting Add Databases, which allows you to choose additional SharePoint databases to add to the AOAG, as shown in Figure 17.10.
For a SharePoint environment, following these steps allows you to have automatic failover between two exact replicas of all SharePoint databases running on separate hardware and storage.
Step 9: Test and Validate
In autofailover scenarios, you can test failover of the AOAG by disconnecting the network cables on one server (or pressing the power button on the box). Failover should occur in 10 to 30 seconds, depending on the environment. You can also manually initiate failover by right-clicking the AOAG and selecting Failover. This should be performed when doing maintenance on one of the nodes.
Using SQL Transparent Data Encryption (TDE)
By default, SharePoint data is secured by access control lists (ACLs), but the data in the database itself is not encrypted in any form. If a rogue agent were to gain access to either the SQL Server or the SQL Database backups, that agent would be able to overwrite SharePoint security ACLs and gain access to the data in the database quite easily.
For security and compliance reasons, it may become necessary to enforce data encryption of the SQL databases. Within SQL Server 2008 R2 and SQL Server 2012 Enterprise Editions, Microsoft includes a new feature known as TDE that allows for this type of functionality.
Encryption Solutions
TDE is actually only one of several SQL Server encryption solutions that are available. Each encryption solution works in different ways, however, so it is important to understand first what the available encryption solutions are and how they can be utilized:
![]() Cell-level encryption: Cell-level encryption encrypts individual database cells, rather than the entire database. This type of encryption is not supported for SharePoint databases.
Cell-level encryption: Cell-level encryption encrypts individual database cells, rather than the entire database. This type of encryption is not supported for SharePoint databases.
![]() File-level encryption: File-level encryption includes technologies such as BitLocker and the Encrypting File System (EFS). These technologies encrypt the entire hard drive and can be used with SQL. They do not, however, encrypt backups of the SQL databases that are stored on these volumes.
File-level encryption: File-level encryption includes technologies such as BitLocker and the Encrypting File System (EFS). These technologies encrypt the entire hard drive and can be used with SQL. They do not, however, encrypt backups of the SQL databases that are stored on these volumes.
![]() Active Directory Rights Management Services (AD RMS): AD RMS is an encryption solution that uses encryption techniques to enforce rights protection on data, restricting what a user can and can’t do with the data (for example, can’t print or copy/paste content). AD RMS, covered in later sections of this chapter, do not encrypt the data at rest; it is encrypted only when it is viewed by the client.
Active Directory Rights Management Services (AD RMS): AD RMS is an encryption solution that uses encryption techniques to enforce rights protection on data, restricting what a user can and can’t do with the data (for example, can’t print or copy/paste content). AD RMS, covered in later sections of this chapter, do not encrypt the data at rest; it is encrypted only when it is viewed by the client.
![]() Transparent Data Encryption: TDE is the ideal solution for SharePoint content database encryption because it encrypts the entire database while in storage, while being used in the TempDB, and when backed up. In addition, the encryption is completely handled by SQL; SharePoint does not even know that the encryption is taking place.
Transparent Data Encryption: TDE is the ideal solution for SharePoint content database encryption because it encrypts the entire database while in storage, while being used in the TempDB, and when backed up. In addition, the encryption is completely handled by SQL; SharePoint does not even know that the encryption is taking place.
Note
The solutions listed in this chapter are storage-level encryption solutions. To encrypt SharePoint content at the transport layer, use Secure Sockets Layer (SSL) certificate encryption from the client to the server, and use Internet Protocol Security (IPsec) encryption for the traffic between the farm members. You can find more information on setting up and using transport layer encryption in Chapter 15, “Implementing and Validating SharePoint Security.”
![]() When enabled on a database, TDE encrypts the database and its associated log file, snapshots, backups, and mirrored database instances associated with that database, if applicable.
When enabled on a database, TDE encrypts the database and its associated log file, snapshots, backups, and mirrored database instances associated with that database, if applicable.
![]() The TempDB for the SQL instance is also encrypted. This can affect other databases on the same instance. It is therefore recommended to create a dedicated instance for encrypted databases so that they can have their own dedicated TempDB.
The TempDB for the SQL instance is also encrypted. This can affect other databases on the same instance. It is therefore recommended to create a dedicated instance for encrypted databases so that they can have their own dedicated TempDB.
![]() Backups cannot be restored to other servers if those servers do not have a copy of the private key used to encrypt. Stolen database files are therefore worthless to the thief.
Backups cannot be restored to other servers if those servers do not have a copy of the private key used to encrypt. Stolen database files are therefore worthless to the thief.
![]() The overhead associated with enabling TDE is only a 3% to 5% performance penalty on the box, so there are minimal server resources required to enable.
The overhead associated with enabling TDE is only a 3% to 5% performance penalty on the box, so there are minimal server resources required to enable.
The TDE Key Hierarchy
TDE works by establishing a hierarchy of keys. It is critical to understand what these keys are and how they are used to encrypt each other. Figure 17.11 illustrates the key hierarchy used by TDE.

At the root, the Windows Data Protection Application Programming Interface (DPAPI) is used to create and protect the service master key (SMK). The SMK is unique to each server and does not need to be backed up or recovered on any other systems. The SMK is then used to create and protect the database master key (DMK). The DMK is then used to create and protect the TDE certificate, which in turn is used to create a database encryption key (DEK), which encrypts the content DB itself.
TDE Requirements and Limitations
You need to be aware of a few requirements and limitations to TDE in advance of its deployment:
![]() The Enterprise Edition of SQL Server is required for TDE. This version of SQL Server is considerably more expensive than the Standard Edition.
The Enterprise Edition of SQL Server is required for TDE. This version of SQL Server is considerably more expensive than the Standard Edition.
![]() TDE does not encrypt the communication channel. IPsec is the solution for this.
TDE does not encrypt the communication channel. IPsec is the solution for this.
![]() TDE cannot take advantage of SQL 2008 RTM/R2 backup compression.
TDE cannot take advantage of SQL 2008 RTM/R2 backup compression.
![]() Replication or FILESTREAM data is not encrypted when TDE is enabled.
Replication or FILESTREAM data is not encrypted when TDE is enabled.
![]() The TempDB is encrypted for the entire instance, even if only one database is enabled for TDE.
The TempDB is encrypted for the entire instance, even if only one database is enabled for TDE.
Step 1: Create the DMK.
Step 2: Create the TDE certificate.
Step 3: Back up the TDE certificate.
Step 4: Create the DEK.
Step 5: Encrypt the database.
Step 6: Monitor the progress.
Step 1: Create the DMK
The first step in the TDE process is to create the DMK. None of the TDE steps can be done from the SQL graphical user interface (GUI); they must all be run as T-SQL scripts. You should create the scripts in advance and then run them one at a time, such as what is illustrated in Figure 17.12.

The T-SQL script for creating the DMK is as follows. Change the Password value to one specific to your organization and store the password in a safe place.
USE master;
GO
CREATE MASTER KEY ENCRYPTION BY PASSWORD = 'CrypticTDEpw4CompanyABC';
When the DMK is created, it can then be used to create the TDE cert.
Step 2: Create the TDE Certificate
Using T-SQL commands again, the TDE certificate can be generated from the DMK on the server. Replace the certificate name and subject with one relevant to your organization:
USE master;
GO
CREATE CERTIFICATE CompanyABCtdeCert WITH SUBJECT = 'CompanyABC TDE Certificate';
GO
Step 3: Back Up the TDE Certificate
Upon creation of the certificate, you want to immediately back it up and store it in a safe place, away from the SQL backups for SharePoint. If this key backup is lost, the SQL backups are worthless. To back up the certificate, use T-SQL syntax similar to the following:
USE master;
GO
BACKUP CERTIFICATE CompanyABCtdeCert TO FILE = 'C:BackupCompanyABCtdeCERT.cer'
WITH PRIVATE KEY (
FILE = 'C:BackupCompanyABCtdeCert.pvk',
ENCRYPTION BY PASSWORD = 'CrypticTDEpw4CompanyABC!'),
GO
Caution
It is extremely critical that this key is backed up and stored in a safe, fault-tolerant place. If it is lost, all SharePoint content in encrypted databases could be lost forever.
Note that the T-SQL script also specifies that the private key is backed up (CompanyABCtdeCert.pvk). This private key must be stored together with the certificate backup and restored with the TDE certificate if you want to recover TDE encrypted databases to another server. Also note that we are encrypting the certificate with a manual password. This needs to be used to restore the private key and certificate, so be sure to write it down and store it in a safe place.
Step 4: Create the DEK
The TDE certificate can then be used to create a DEK that will be used for the individual SharePoint content database that will be encrypted. Use syntax similar to the following, but substitute your SharePoint content database name for SharePointContentDB. A unique DEK needs to be created for each content database encrypted:
USE SharePointContentDB;
GO
CREATE DATABASE ENCRYPTION KEY
WITH ALGORITHM = AES_256
ENCRYPTION BY SERVER CERTIFICATE CompanyABCtdeCert
GO
Step 5: Encrypt the Database
Finally, use the DEK to encrypt the specific SharePoint content database. Replace the name of the database shown here with your own database. Repeat the previous step and this step for any remaining SharePoint content databases:
USE SharePointContentDB
GO
ALTER DATABASE SharePointContentDB
SET ENCRYPTION ON
GO
Step 6: Monitor the Progress
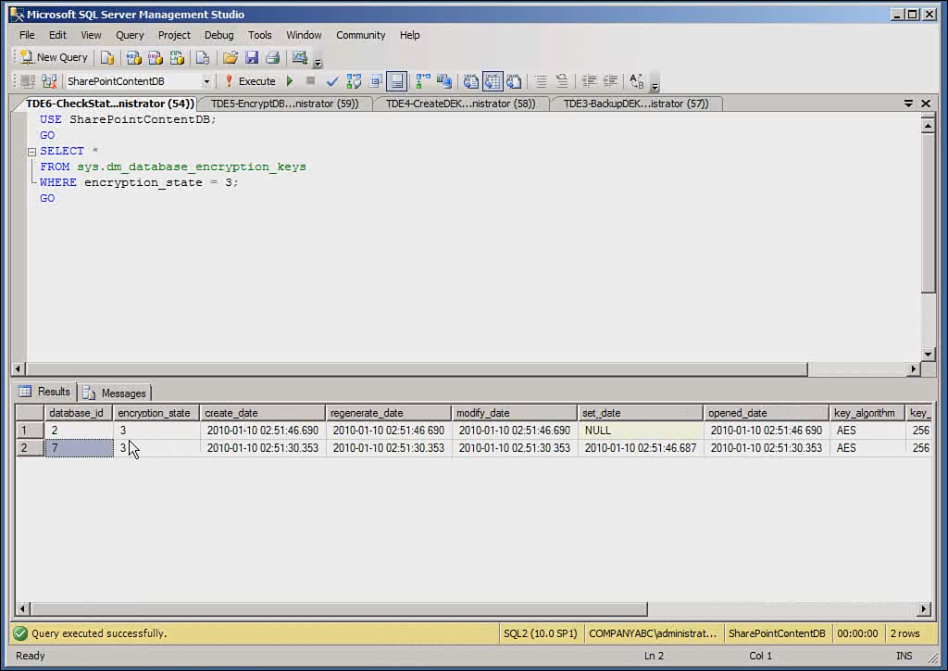
TDE immediately begins to encrypt the content database. It can do this on-the-fly as the database is being used. Depending on the size of the database, this might take a while. Progress of the encryption can be monitored with another script shown here, which returns all database with encryption state of 3. An encryption state of 1 means no encryption, and a state of 2 indicates that encryption has begun. A state of 3 means that encryption is complete. Run this command until the results show the database as having a state of 3, as shown in Figure 17.13. The TDE encryption process is then complete:
USE SharePointContentDB
GO
SELECT *
FROM sys.dm_database_encryption_keys
WHERE encryption_state = 3;
GO
Repeat for any remaining databases.
Restoring a TDE Encrypted Database to Another Server

FIGURE 17.14 Viewing an error generated when attempting to restore a TDE encrypted database from backup.
1. Create a new DMK on the target server. (Each DMK is unique, so simply create a new one using the T-SQL listed in previous steps. This DMK does not need to match the one from the source server.)
2. Back up the certificate and private key from the source using the T-SQL script shown previously.
3. Restore the TDE certificate and the private key onto the target. (No need to export the DEK as it is part of the backup file.) Use similar syntax to what is shown here:
USE master;
GO
CREATE CERTIFICATE CompanyABCtdeCert
FROM FILE = 'C:RestoreCompanyABCtdeCert.cer'
WITH PRIVATE KEY (
FILE = 'C:RestoreCompanyABCtdeCert.pvk'
, DECRYPTION BY PASSWORD = 'CrypticTDEpw4CompanyABC!')
4. Restore the database file from the backup.
Using AD RMS for SharePoint Document Libraries
AD RMS is a data leak prevention (DLP) technology that uses Digital Rights Management (DRM) concepts in an attempt to prevent critical data from easily being transferred outside a company. AD RMS works by encrypting documents, then allowing them to be unencrypted only if the client application agrees to the terms of the rights policy. For example, the rights policy may dictate that the document cannot be printed, that it can’t be saved in a different format, or that data from it cannot be copied/pasted. It can also dictate that the document expires after a certain period of time.
AD RMS is independent from SharePoint, and it runs as a service on a Windows Server 2008, 2008 R2, or 2012 server. Clients can encrypt files directly from their Office clients or via Outlook, with or without SharePoint. Where the SharePoint integration comes into place, however, is in SharePoint’s ability to define a rights policy on all documents within a document library and have those rights policies enforced by an AD RMS server in the domain.
Prerequisites and Limitations of AD RMS
It is important to understand first what AD RMS can and cannot do in a SharePoint environment. The following key facts are important:
![]() AD RMS does not encrypt files in storage. Instead, the AD RMS rights policies are enforced only when the document is pulled out of the document library. This allows SharePoint indexing to be able to index the documents. If storage-level encryption is required, a technology such as SQL TDE, covered earlier in this chapter, is required.
AD RMS does not encrypt files in storage. Instead, the AD RMS rights policies are enforced only when the document is pulled out of the document library. This allows SharePoint indexing to be able to index the documents. If storage-level encryption is required, a technology such as SQL TDE, covered earlier in this chapter, is required.
![]() You can only establish one rights policy per document library, and, when established, those policies apply to all documents, both existing and new, in the library.
You can only establish one rights policy per document library, and, when established, those policies apply to all documents, both existing and new, in the library.
![]() The rights policies in SharePoint document libraries only define whether a user can print or programmatically access data. Other rights restrictions on documents actually depend on the SharePoint rights that a user has to the document library. If they have full Contributor rights, they can do more with the content. If they simply have Reader rights, they are fully restricted in what they can do.
The rights policies in SharePoint document libraries only define whether a user can print or programmatically access data. Other rights restrictions on documents actually depend on the SharePoint rights that a user has to the document library. If they have full Contributor rights, they can do more with the content. If they simply have Reader rights, they are fully restricted in what they can do.
![]() The AD RMS fully qualified domain name (FQDN) cannot be changed for existing content. Give considerable thought to what the FQDN will be and enable SSL encryption immediately on RMS. If you choose a flat name such as http://rmsserver for your URL, you would have to first change the URL before you can enable external access to RMS, which would have a big impact on existing encrypted files. Instead, consider choosing something like https://rms.companyabc.com from the beginning, even if you don’t intend on turning on eternal access.
The AD RMS fully qualified domain name (FQDN) cannot be changed for existing content. Give considerable thought to what the FQDN will be and enable SSL encryption immediately on RMS. If you choose a flat name such as http://rmsserver for your URL, you would have to first change the URL before you can enable external access to RMS, which would have a big impact on existing encrypted files. Instead, consider choosing something like https://rms.companyabc.com from the beginning, even if you don’t intend on turning on eternal access.
![]() Users using rights-protected documents or document libraries must have web-based access to the AD RMS FQDN to be able to open documents. If SharePoint is published on the outside, for example, the users need to be able to access the FQDN of the AD RMS site. In the previous example, this means being able to get to rms.companyabc.com. This means that this must be published as a site if this type of functionality is required.
Users using rights-protected documents or document libraries must have web-based access to the AD RMS FQDN to be able to open documents. If SharePoint is published on the outside, for example, the users need to be able to access the FQDN of the AD RMS site. In the previous example, this means being able to get to rms.companyabc.com. This means that this must be published as a site if this type of functionality is required.
![]() When a service connection point (SCP) is published in AD, all users can immediately use it. Consider waiting to publish the SCP until the environment has been fully tested. You can test out AD RMS by modifying the client registry to point to the AD RMS server rather than using an SCP initially.
When a service connection point (SCP) is published in AD, all users can immediately use it. Consider waiting to publish the SCP until the environment has been fully tested. You can test out AD RMS by modifying the client registry to point to the AD RMS server rather than using an SCP initially.
![]() Add multiple AD RMS servers for redundancy and load balance them. This makes it even more critical to use an FQDN that can point to multiple servers or a load balanced virtual IP (VIP), such as rms.companyabc.com. You won’t be able to add a second AD RMS server into a cluster until the SCP has been published.
Add multiple AD RMS servers for redundancy and load balance them. This makes it even more critical to use an FQDN that can point to multiple servers or a load balanced virtual IP (VIP), such as rms.companyabc.com. You won’t be able to add a second AD RMS server into a cluster until the SCP has been published.
Installing AD RMS
For environments that don’t already have an AD RMS server in place (legacy Windows Server 2003 RMS work as well), a new Windows Server 2008 R2 AD RMS environment is required. Note that the RMS server requires a separate server from the SharePoint farm servers, and also requires a database for the AD RMS database. In many cases, the AD RMS database server is the same server as the SharePoint database server.
To install and configure AD RMS on a server, first install Windows Server 2008 R2 or Windows Server 2012 (Standard, Enterprise, or Datacenter will work) with the default installation options and then add it to the domain. Log in as an account with local admin access to the box and complete the following steps to install AD RMS:
1. On the RMS server, run the Add Roles Wizard from Server Manager.
2. Click Next to start the wizard.
3. Check the box for AD RMS.
4. Choose to add the required role services when prompted.
5. Ensure that AD RMS and Web Server are checked in the summary dialog box, shown in Figure 17.15, and choose Next to continue.

6. Click Next at the AD RMS Welcome dialog box.
7. Under Role Services, leave the default in place and click Next.
8. From the RMS Cluster dialog box, choose to create a new RMS cluster and click Next to continue.
9. From the Database dialog box, shown in Figure 17.16, choose to either use a local Windows Internal DB on the server or use a centralized SQL Server instance on another server. It is highly recommended to choose a separate SQL server for this, such as the SharePoint Database server.

10. Specify a domain user account in the subsequent dialog box that will be used for AD RMS. This account should not have any special rights other than Domain User rights in the domain. You need to create this account in advance before proceeding. Click Next to continue.
11. In the Cluster Key Storage dialog box, choose the default AD managed key storage and click next to continue.
12. Enter a password for the cluster. Be sure to save this password; you’ll need it to add additional RMS servers into the cluster in the future. Click Next to continue.
13. Use the default website and click Next to continue.
14. Select whether to use an SSL-encrypted connection to RMS or an HTTP connection, such as what is shown in Figure 17.17. It is highly recommended to use SSL now, because content will display this name at all times. In addition, do not use a server name for the FQDN; use a name that can be transferred to a VIP or another server in the future, such as rms.companyabc.com. Ideally, your RMS address will then always be https://rms.companyabc.com. Click Next to continue.

15. In the subsequent dialog box, choose the SSL certificate that matches the FQDN chosen (that is, rms.companyabc.com). If it is not created yet, choose to install it later. This certificate must be installed for RMS to work properly. It is not recommended to use a self-signed certificate. Click Next to continue.
16. Choose the name of the server licensor certificate (accept the default in most cases) and click Next to continue.
17. Select whether to register the SCP now or later. Typically, the SCP is registered immediately, but be sure to understand the implications of this. When registered, all Office clients in the domain will “see” the RMS server and will be able to start encrypting content.
18. Accept the default for the Web Role Wizard (Next, then Next).
19. Review the settings, such as those shown in Figure 17.18, and click Install.

20. Choose Close when the wizard completes.
Modifying the RMS Certification Pipeline
When an RMS server is installed, a file on the RMS server needs to be modified to allow the SharePoint server and a local RMS group to be able to access that file. If this step is not performed, SharePoint can’t make a connection to the RMS server to be able to RMS-protect document libraries. To configure this security, perform the steps while logged in as a local administrator on the RMS server:
1. On the RMS server, navigate to C:inetpubwwwroot\_wmcsCertification.
2. Right-click the ServerCertification.asmx file and choose Properties; then click the Security tab.
3. Click Add.
4. Click Object Types, select Computers, and then click OK.
5. Enter the name of all SharePoint web roles servers into the box, and then click OK.
6. Click Add again.
7. Select Object Types of Groups, and then click OK.
8. Type ’RMSServerAD RMS Service Group’ (where RMSServer is the name of your RMS server), and then click OK.
9. Review the security settings, which should be similar to what is shown in Figure 17.19.

10. Click OK to close the Security dialog box.
Enabling IRM Support in SharePoint Central Admin
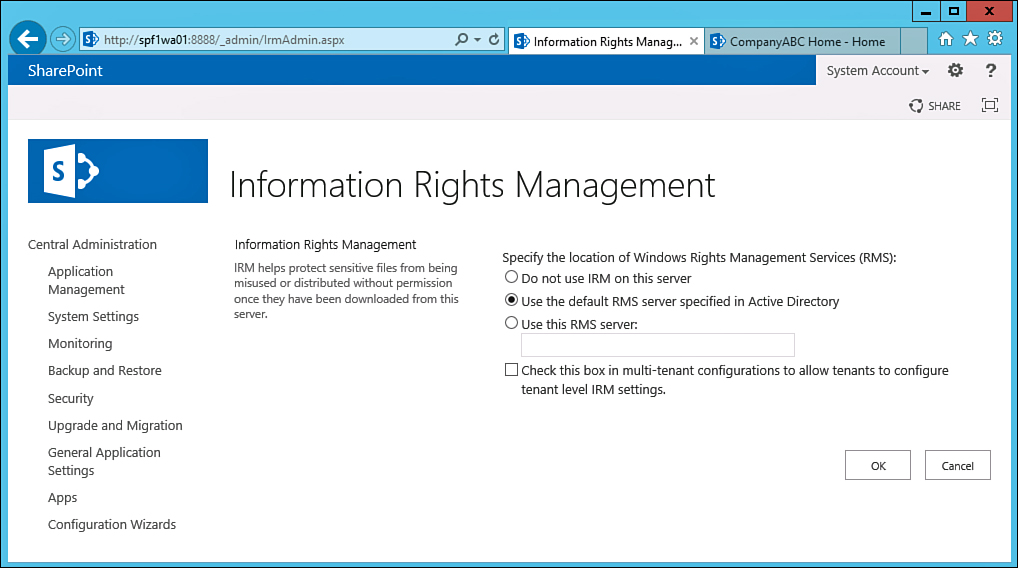
After the ServerCertification.asmx file has been modified on the RMS server, switch to the SharePoint server to be able to turn on Information Rights Management (IRM) support and integrate the SharePoint servers with the AD RMS environment. To turn on this functionality, follow these steps:
1. From SharePoint Central Administration, click the Security link in the navigation pane.
2. Under Information Policy, click Configure Information Rights Management.
3. If the SCP is published in AD, choose Use the Default RMS Server Specified in AD, as shown in Figure 17.20, and then click OK.
Enabling IRM Support on an Individual Document Library
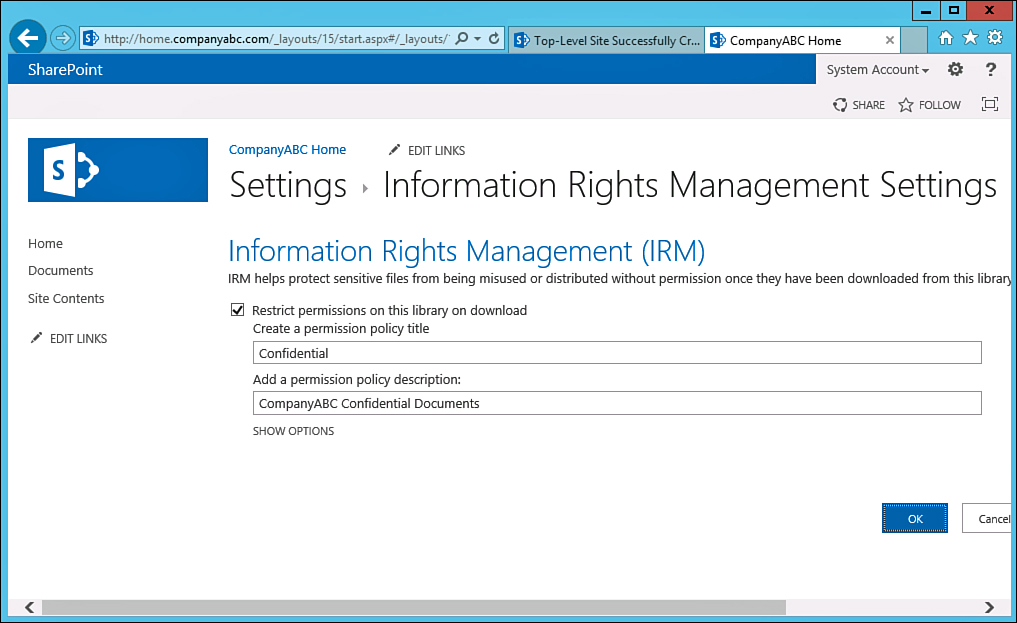
When enabled in SharePoint Central Administration, IRM protection can be enabled on individual document libraries within the farm by any site administrator who has full rights to the document library. To enable IRM protection on an individual document library, follow these steps:
1. Within a SharePoint site, select a document library.
2. From the ribbon, choose Library Tools, Library, and then click the Library Settings button.
3. Under Permissions and Management, choose IRM.
4. Check the Restrict Permission in This Library on Download check box, as shown in Figure 17.21. Enter the remaining fields depending on how the policy will be applied, whether there is expiration of policy, whether readers to the site can print or access content programmatically, and so on. Click OK.
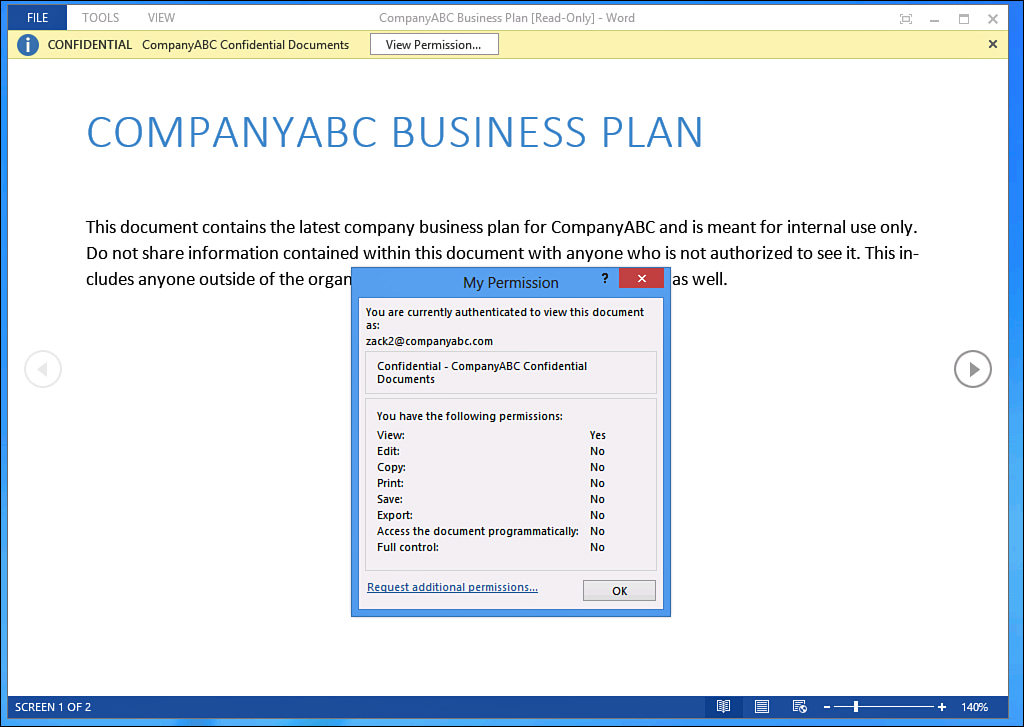
When enabled, all current documents and future documents in that document library have the rights protection policy chosen added to them as they are viewed or modified from within the SharePoint site, such as what is illustrated in Figure 17.22. Keep in mind that the permissions are directly granted to users based on their document library permissions. So, if the user has full control over the document library, that user can copy/paste, save as, and so forth. However, if that user has only Read rights, such as what is shown in Figure 17.22, all those options are unavailable to that user from his or her client.
To turn off rights protection, simply go back into the document library settings and uncheck the box for IRM. This removes IRM protection for all documents within the library.
Summary
Protecting critical SharePoint data goes well beyond making sure to change backup tapes on the weekend. It involves identifying how to make data redundant, protect the integrity of the data, and prevent it from leaking out of an organization. By using tools discussed in this chapter such as SQL Server database mirroring, SQL TDE, and AD RMS, administrators can provide for drastically improved control over the lifecycle of their data.
Best Practices
The following are best practices from this chapter:
![]() Highly consider SQL AOAGs for HA and disaster recovery.
Highly consider SQL AOAGs for HA and disaster recovery.
![]() Ensure that network links are at least 1Gb and have less than 1ms of latency if using synchronous AOAG replicas.
Ensure that network links are at least 1Gb and have less than 1ms of latency if using synchronous AOAG replicas.
![]() Be sure that the hardware of the SQL AOAG synchronous replica servers are equivalent and ideally identical.
Be sure that the hardware of the SQL AOAG synchronous replica servers are equivalent and ideally identical.
![]() For the best overall data security for a SharePoint environment, use SSL certificates for client traffic to SharePoint, use IPsec for communications between farm servers, and use SQL TDE for encryption in storage.
For the best overall data security for a SharePoint environment, use SSL certificates for client traffic to SharePoint, use IPsec for communications between farm servers, and use SQL TDE for encryption in storage.
![]() Use a separate SQL instance for TDE-encrypted databases so that the encrypted TempDB from that instance won’t affect the performance of other databases.
Use a separate SQL instance for TDE-encrypted databases so that the encrypted TempDB from that instance won’t affect the performance of other databases.
![]() Back up and store the TDE certificate and private key in a safe, fault-tolerant place, but ensure that that place is separate from the database backups themselves.
Back up and store the TDE certificate and private key in a safe, fault-tolerant place, but ensure that that place is separate from the database backups themselves.
![]() Publish the AD RMS SCP in AD only after it has been fully tested, because it will be made immediately available within Office clients for client use when published.
Publish the AD RMS SCP in AD only after it has been fully tested, because it will be made immediately available within Office clients for client use when published.