Chapter 16. Configuring Email-Enabled Content, Site Mailboxes, and Exchange Server Integration
In This Chapter
![]() Enabling Incoming Email Functionality in SharePoint
Enabling Incoming Email Functionality in SharePoint
![]() Working with Email-Enabled Content in SharePoint 2013
Working with Email-Enabled Content in SharePoint 2013
![]() Enabling Site Mailbox Functionality in SharePoint 2013
Enabling Site Mailbox Functionality in SharePoint 2013
![]() Enabling Presence Information in SharePoint with Lync Server 2013
Enabling Presence Information in SharePoint with Lync Server 2013
One of the most impressive improvements to SharePoint 2013 is the ability of the platform to directly accept email messages and place their contents into SharePoint content, such as document libraries, discussions groups, and lists. This type of functionality has been highly sought by those looking for an alternative to Exchange public folders and those who want to use SharePoint as a messaging records platform.
In addition to serving as an ideal replacement for Exchange public folders, SharePoint 2013 was built with integration with Exchange in mind, particularly with the latest version of Exchange, Exchange Server 2013. This chapter focuses on a discussion of the integration points between SharePoint 2013 and Exchange 2013, discussing in step-by-step fashion how to take advantage of email-enabled content, how to configure Site Mailbox functionality, and how to use Exchange as an outbound relay for SharePoint alerts.
In addition, this chapter focuses on how to integrate SharePoint with a Lync Server 2013 environment to provide for presence information for users in the platform.
Enabling Incoming Email Functionality in SharePoint
As previously mentioned, SharePoint 2013 can process inbound email messages and accept them and their attachments as content for SharePoint document libraries, lists, and discussion groups. Indeed, SharePoint technically does not require the use of Exchange for this component, as it utilizes its own Simple Mail Transfer Protocol (SMTP) virtual server that it can use to accept email from any SMTP server, including non-Exchange boxes.
Integration with Exchange, however, has significant advantages for SharePoint. Most notably, new email-enabled content within SharePoint can be configured to have contacts within Exchange automatically created within a specific organizational unit (OU) in Active Directory (AD). This makes it so that email administrators don’t need to maintain the email addresses associated with each SharePoint list or document library in the farm.
Installing the SMTP Server Service on the SharePoint Server
The first step to setting up a SharePoint server as an inbound email platform is to install the SMTP Server service on the SharePoint server. This service is usually installed on the server or servers running the web role. To install the SMTP Server service on the server, complete the following steps. (These steps assume Windows Server 2012, though they are nearly identical for Windows Server 2008 R2.)
1. Open Server Manager.
2. Under Configure This Local Server, click Add Roles and Features.
3. Click Next in the Before You Begin dialog box.
4. Choose Role-Based or Feature-Based Installation and click Next.
5. Select the server from the server pool and click Next.
6. Click Next at the Select Roles dialog box. (Do not select anything.)
7. At the Select Features dialog box, scroll down and select SMTP Server from the list of features.
8. From the dialog box shown in Figure 16.1, choose to add the required role services.

9. Click Next to continue.
10. In the Confirm Installation dialog box, shown in Figure 16.2, click Install to install the SMTP Server feature on the server.

11. Click Close when complete. Repeat for any remaining web front ends where the incoming email feature will be supported.
Configuring the Incoming Email Server Role on the SharePoint Server
After the SMTP Service has been installed on the server, inbound email can be enabled through the SharePoint Central Admin tool. Incoming email functionality can be configured in two ways: automatic mode or advanced mode. Automatic mode sets up inbound mail access using default settings, whereas advanced mode allows for more complex configuration to take place, but should only be used if the SMTP service is not used to receive incoming email, but rather the server is configured to point to a different SMTP server. To enable incoming email functionality in a SharePoint farm and configure it with the most ideal options, follow these steps:
1. Open the SharePoint Central Administration tool from the server console.
2. Click the System Settings link in the navigation bar.
3. Under E-Mail and Text Messages (SMS), click the Configure Incoming E-Mail Settings link.
4. In the Configure Incoming E-Mail Settings dialog box, shown in Figure 16.3, click Yes to enable sites on the server to receive email.

5. Set the Settings mode to Automatic.
6. Select Yes to use the SharePoint Directory Management Service.
7. Enter an AD OU where the new distribution groups and contact objects for SharePoint will be created. This OU must be created in AD in advance, and the user account that runs as the application pool identity account for the SharePoint Central Administration web application needs to be granted the rights to create and modify user/group objects within this OU. The OU must be listed in Lightweight Directory Access Protocol (LDAP) format (for example, OU=SharePoint, OU=Contacts, OU=Resources, DC=companyabc, DC=com).
8. Enter the SMTP mail server for incoming mail, which will be the SharePoint server name in this example. This could also be an alias name, such as spsmtpin.companyabc.com that points to a load-balanced IP address that is shared by multiple SharePoint web role servers that run the SMTP service.
9. Under the setting for accepting messages from authenticated users only, click Yes, so that only authenticated domain users can send email to the server. This setting can be changed to No if you want to accept anonymous email from the Internet into the site content.
10. Scroll down in the page, and examine the settings listed in Figure 16.4. Check to allow the creation of distribution groups from SharePoint sites.
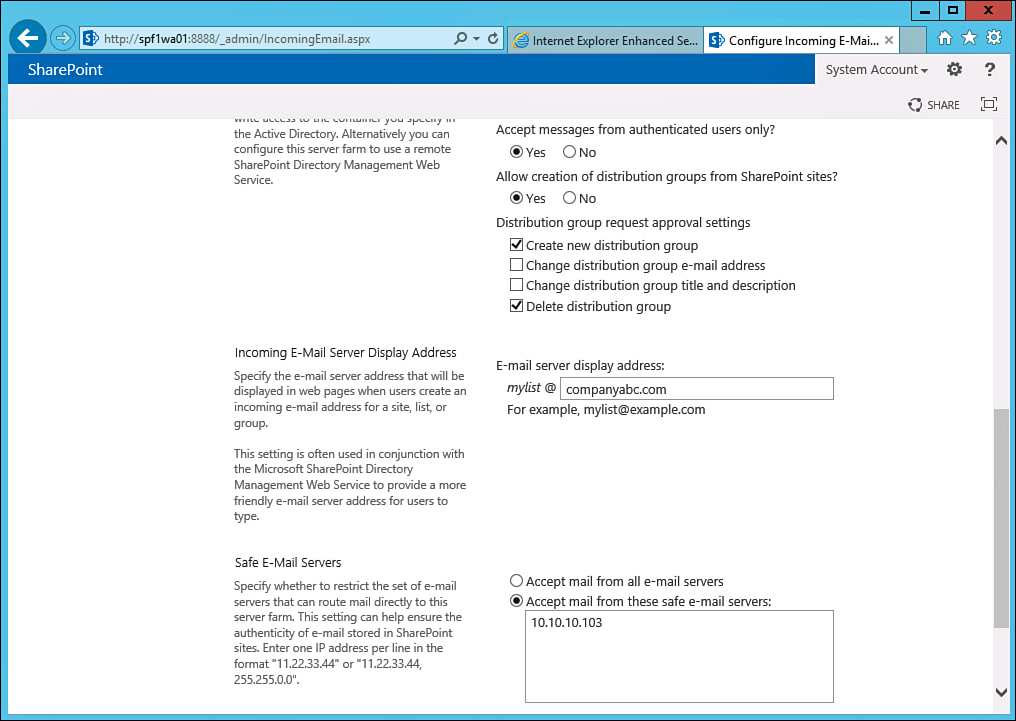
11. Enter a display address for the incoming email server; it should match the domain alias of the organization. An SMTP address policy must also be created in Exchange to match this domain name if it doesn’t already exist.
12. Finally, configure which email servers SharePoint will accept email from. Enter the IP address of any Exchange hub transport servers that will be relaying mail to SharePoint. In this example, 10.10.10.103 is the IP address of the Exchange hub transport server.
13. Click OK to save the changes.
Using the Directory Management Service
The Directory Management Service in SharePoint 2013 uses a timer job within SharePoint to automate the creation of contact objects. These contacts are automatically created to allow inbound mail to document libraries or lists within SharePoint to be automatically enabled.
For example, when a document library called Companyabc-doclib is created and selected to be email-enabled, the SharePoint Directory Management Service automatically creates a contact object in AD that has a primary SMTP address of [email protected], in this example. This contact then inherits a secondary SMTP address of [email protected] through Exchange policies. These policies need to be set up if they are not already in place.
After the contact is automatically created, users can send email to this address and have it flow through the Exchange server, which then forwards it to the SharePoint server (the primary SMTP address). It is then accepted into the SMTP virtual server on the SharePoint server, and then imported into SharePoint via a timer job that runs on the server. In this way, all emails sent to that address appear in the companyabc-doclib document library.
Note
For the Directory Management Service to work, the account that runs as the SharePoint Central Admin application pool identity account needs to have add and modify rights to the OU that is specified under the Incoming Email Settings page. If this account does not have rights to the OU, automation of these contacts fails.
Working with Email-Enabled Content in SharePoint 2013
After the SharePoint server has been set up to allow inbound SMTP messages, specific SharePoint lists and document libraries can be configured to store the contents of the email messages, the attachments in the messages, or both.
Using Email-Enabled Document Libraries
To email-enable a document library in a SharePoint site, follow these steps:
1. From the document library, click the Library tab; then select the Library Settings button from the ribbon.
2. Under the Communications category, click the Incoming E-Mail Settings link.
3. From the Incoming E-Mail Settings for the document library, check to allow the doc library to receive email, as shown in Figure 16.5.

4. Enter an email address. This email address will be added to the contact object that will be created in AD.
5. Select how to handle attachments, whether to save the original .eml file, and what type of security policy you will set on the document library. If messages can be received from any sender, this may open up the document library to spam.
6. Click OK. After the contact object is created, usually within a few minutes, the document library is ready to accept messages.
You can follow this same process for any document library or list within the SharePoint farm.
Using an Exchange Server as an Outgoing Email Server for SharePoint
SharePoint needs an external SMTP server to provide for relaying alerts and reports to farm users. This server needs to be configured to allow access and relaying from the SharePoint server. To set up an outgoing email source within a SharePoint farm, complete the following steps:
1. Open the SharePoint Central Administration tool from the server console.
2. Click the System Settings link in the navigation bar.
3. Under E-Mail and Text Messages (SMS), click the Configure Outgoing E-Mail Settings link.
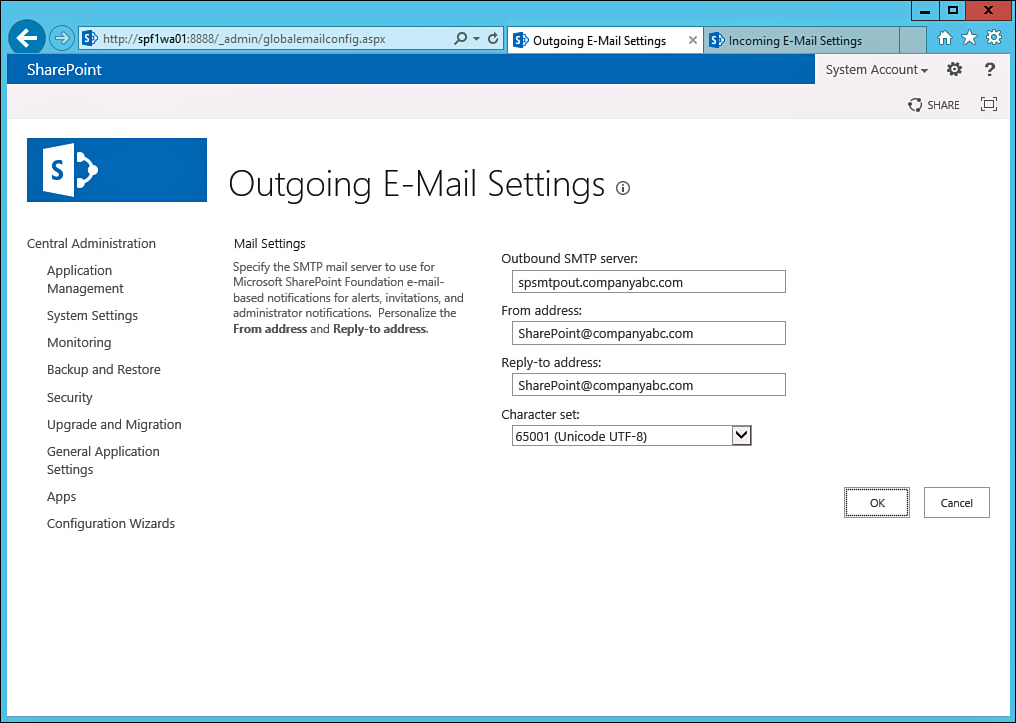
4. From the page shown in Figure 16.6, enter the fully qualified domain name (FQDN) of the Outbound SMTP Server (the Exchange server). Enter a From Address and a Reply-to Address, and leave the Character Set left at the defaults. Click OK to save the settings.
Enabling Site Mailbox Functionality in SharePoint 2013
The tightest integration between Exchange Server 2013 and SharePoint 2013 comes in the form of site mailboxes, a new feature that allows a SharePoint site to serve as a repository for Exchange emails and documents. Users can simply copy the site mailbox when corresponding about a project and have all the information within that email thread saved within the site and subject to the compliance policies set on the mailbox.
From Outlook 2013, users can also simply drag and drop documents and emails directly into the shared project space, at which point they are transferred within the SharePoint content databases. New emails and documents also show up directly within Outlook 2013 as new items, just as a new email message would in a user’s Inbox.
Site mailboxes can be part of eDiscovery search scopes within Exchange, and their contents can also be put under legal hold. Retention policies set on the mailbox itself are enforced on the SharePoint site itself as well.
Essentially, site mailboxes become the preferred method for a group of people that are working together on a shared set of deliverables. It allows for all messages and documents related to that project to be stored in one managed location that is subject to Exchange policies and legal requirements. In a sense, it is a replacement for common public folder usage scenarios that involve documents, as public folders do not support multi-authoring or version management like a full-blown document management platform such as SharePoint does.
Understanding the Prerequisites for Site Mailboxes
Enabling site mailbox functionality within an Exchange Server 2013 and SharePoint 2013 environment is no small task, and involves several steps around creating the trust relationship between the two environments. In addition, several prerequisites must be in place before site mailbox functionality can be enabled. This includes the following:
![]() Both the Exchange and SharePoint servers must be part of the same domain.
Both the Exchange and SharePoint servers must be part of the same domain.
![]() The user running the commands must be a local administrator on the Exchange server and must also be a member of the Organization Management role in Exchange.
The user running the commands must be a local administrator on the Exchange server and must also be a member of the Organization Management role in Exchange.
![]() There must be a root site collection setup on the SharePoint farm.
There must be a root site collection setup on the SharePoint farm.
![]() Both the SharePoint and Exchange sites need to be using Secure Sockets Layer (SSL) certificates that are fully trusted by each other. In other words, the SharePoint servers need to trust the root certificate authority (CA) that issues the Exchange certificates, and vice versa.
Both the SharePoint and Exchange sites need to be using Secure Sockets Layer (SSL) certificates that are fully trusted by each other. In other words, the SharePoint servers need to trust the root certificate authority (CA) that issues the Exchange certificates, and vice versa.
![]() The User Profile Service Application (UPA) in SharePoint needs to be configured and working properly.
The User Profile Service Application (UPA) in SharePoint needs to be configured and working properly.
![]() Autodiscover in Exchange needs to be configured and working properly.
Autodiscover in Exchange needs to be configured and working properly.
![]() Clients must access site mailboxes through either Outlook 2013 or through the SharePoint web interface. Outlook Web App (OWA) does not currently support site mailboxes.
Clients must access site mailboxes through either Outlook 2013 or through the SharePoint web interface. Outlook Web App (OWA) does not currently support site mailboxes.
Installing the Exchange Web Services Managed API on SharePoint Farm Members
The first step to enable site mailboxes is to install the Exchange Web Services (EWS) Managed Application Programming Interface (API) 2.0 on all SharePoint 2013 servers in your farm. To do that, complete the following steps:
1. Download the Exchange Web Services Managed API version 2.0 from Microsoft (EwsManagedApi.msi).
2. Run the Setup Wizard for the EWS Managed API 2.0 on the SharePoint server, which prompts you for a location to install the files. Alternatively, you can install the files from the command prompt by using the following syntax:
msiexec /i EwsManagedApi.msi
addlocal="ExchangeWebServicesApi_Feature,ExchangeWebServicesApi_Gac"
3. Run iisreset /noforce from the command prompt to reset Internet Information Services (IIS) on the SharePoint server after the installation.
Establishing SSL Trusts for Both SharePoint and Exchange
As mentioned earlier, both the SharePoint servers and the Exchange servers need to trust the root CA that issued both the Exchange SSL certificate and the SSL certificate for SharePoint (required for this configuration). If not, you need to complete the following steps on both the SharePoint and the Exchange servers:
1. Open Microsoft Internet Explorer and navigate to the SSL secured website on the other server. (That is, from SharePoint, navigate to https://e2013a.companyabc.com/owa, and from Exchange, navigate to https://sp2013a.companyabc.com, or whatever URL is used.)
2. On the Certificate Error: Navigation Blocked page, click Continue to This Website (Not Recommended), if prompted. If not prompted, the site is already trusted and the remaining steps in this list can be skipped.
3. In the Security Status bar (next to the Address bar), click Certificate Error.
4. In the Untrusted Certificate box, click View Certificates.
5. Select Install Certificate and then select Place All Certificates in the Following Store.
6. Select to show physical stores.
7. Install the certificate to Trusted Root Certification Authorities, Local Computer.
Configuring SharePoint User Profile Sync
As previously mentioned, the SharePoint UPA must be enabled for the Site Mailbox feature to work properly. Setting up UPA is a complex task and should be performed with care and with the aid of a SharePoint expert, as there are several different approaches to setting up UPA properly, and special rights such as “Replicating Directory Changes” rights are required in AD. If the UPA has already been set up, you can ignore the following steps. If not, the following process describes how to enable UPA.
To start the process of enabling UPA in SharePoint 2013 to support site mailboxes, first turn on the UPA by navigating to SharePoint Central Admin. Click System Settings, Manage Services on Server; click User Profile Synchronization Service Application, click Start Service, and then enter the service account username and password. An IIS reset will need to be performed on the server after this step is complete.
After enabling the UPA, start a full sync by navigating to SharePoint Central Administration, Application Management, Manage Service Application, User Profile Service Application, Start Profile Synchronization, Start Full Synchronization, as shown in Figure 16.7.

Once again, note that UPA setup is a complex thing, and this example only illustrates a sample, very simple UPA setup.
Configuring the Exchange Metadata Document as Trusted
The second step in the site mailbox process is to create a new Trusted Security Token Issuer for the Exchange Metadata document in SharePoint. To do this, type the following into the PowerShell prompt on the SharePoint server, as shown in Figure 16.8:
New-SPTrustedSecurityTokenIssuer -Name Exchange –MetadataEndPoint
https://e2013a.companyabc.com/autodiscover/metadata/json/1
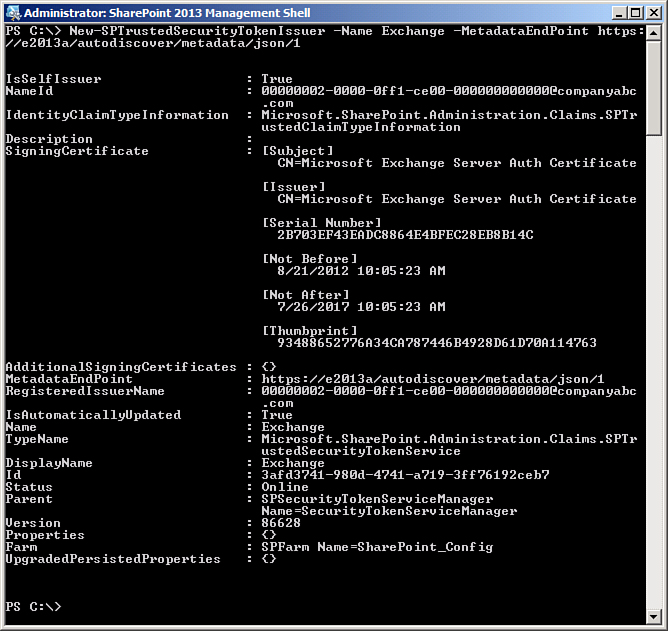
FIGURE 16.8 Configuring the Exchange Metadata document as trusted as part of a site mailbox configuration.
(Replace the e2013a.companyabc.com with the name of your Exchange Client Access Server [CAS] array.)
Granting the Exchange Service Principal Full Control to the SharePoint Site Subscription
The following PowerShell commands are required on the SharePoint server to allow the Exchange server to have full control over the SharePoint site subscription process. Perform them in order, as shown in Figure 16.9, and replace the sp2013a.companyabc.com parameter with the name of your SharePoint web application:
$exchange=Get-SPTrustedSecurityTokenIssuer
$app=Get-SPAppPrincipal -Site https://sp2013a.companyabc.com -NameIdentifier
$exchange.NameId
$site=Get-SPSite https://sp2013a.companyabc.com
Set-SPAppPrincipalPermission -AppPrincipal $app -Site $site.RootWeb -Scope
sitesubscription -Right fullcontrol –EnableAppOnlyPolicy

FIGURE 16.9 Granting the Exchange service principal full control to SharePoint site subscription as part of a site mailbox configuration.
Enabling the Site Mailbox Feature on a SharePoint Web Application
Before it shows up as an installable app in SharePoint 2013, the Site Mailbox feature must first be turned on in the web application. To do this, type the following from the PowerShell prompt of the SharePoint server. It can be typed immediately after the previous PowerShell steps are complete:
Enable-SPFeature CollaborationMailboxFarm
Setting the Exchange Site Mailbox Target Domain for the Farm
The next step in the site mailbox process is to configure the Exchange Autodiscover domain on the SharePoint farm. Run the following commands one at a time from the command prompt of the SharePoint server, as illustrated in Figure 16.10, to accomplish these steps, replacing sp2013a.companyabc.com with the name of your SharePoint web application and companyabc.com with the Autodiscover name of your domain:
$webAppUrl=https://sp2013a.companyabc.com
$exchangeDomain="companyabc.com"
$exchangeServerName="E2013A"
$webApp=Get-SPWebApplication $webAppUrl
$webApp.Properties["ExchangeTeamMailboxDomain"] = $exchangeDomain
$webApp.Properties["ExchangeAutodiscoverDomain"] = $exchangeServerName
$webApp.Update()
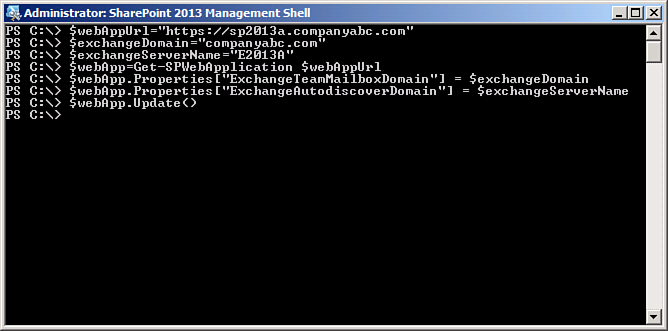
FIGURE 16.10 Setting the Exchange site mailbox target domain as part of a site mailbox configuration.
Establishing the OAuth Trust on Exchange
The final command that must be run when enabling site mailbox functionality is run on the Exchange server and involves having Exchange download a file from the SharePoint server to establish the trust relationship. Use the following syntax to enable this functionality (replacing sp2013a.companyabc.com with the name of your SharePoint web application). Ensure that you are in the C:Program FilesMicrosoftExchange ServerV15Script directory when running this PowerShell command, as shown in Figure 16.11:
.Configure-EnterprisePartnerApplication.ps1 -ApplicationType Sharepoint
-AuthMetadataUrl https://sp2013a.companyabc.com/layouts/15/metadata/json/1

Creating a Site Mailbox
After all the prerequisite steps have been performed, you can create the site mailboxes as follows:
1. Within a SharePoint site, install the Site Mailbox app by clicking the Quick Launch menu, selecting More, choosing Add an App, and selecting Site Mailbox, as shown in Figure 16.12.
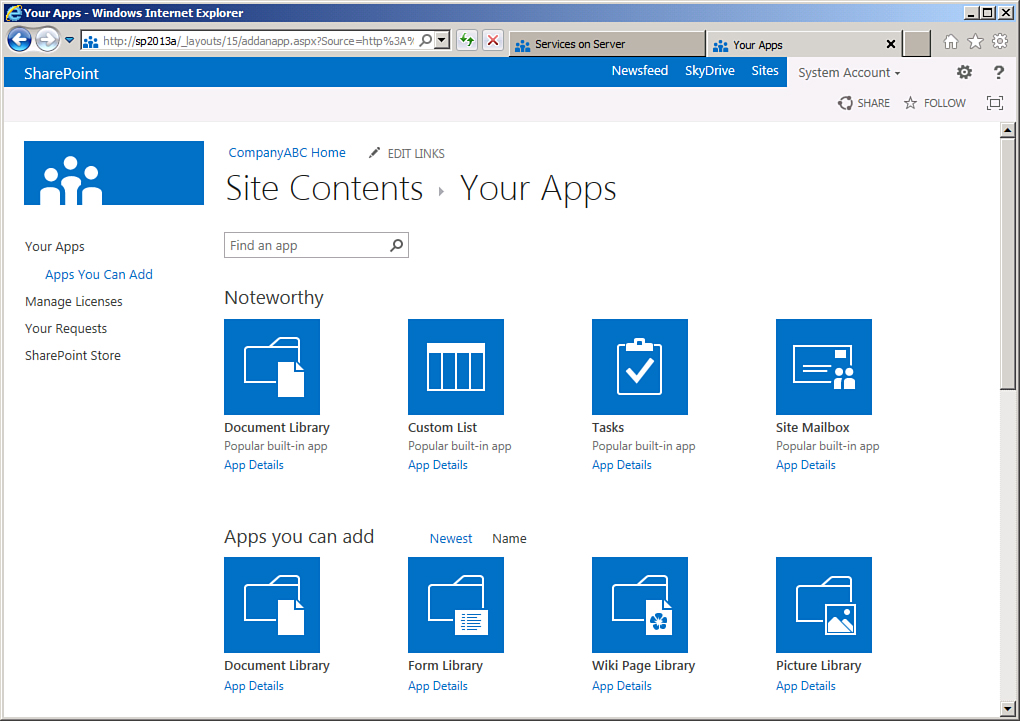
2. From the Quick Launch menu in SharePoint, click Site Mailbox.
3. Sign in to Outlook Web App (OWA) with the user’s credentials.
4. Enter an alias for the site mailbox and click Next.
5. Click Import to import the current users from the site.
6. Click Finish.
Enabling Presence Information in SharePoint with Lync Server 2013
SharePoint 2013 products and technologies give organizations unprecedented document management capabilities, allowing knowledge workers to collaborate more efficiently and share ideas more freely. In addition to its robust document management capabilities, SharePoint 2013 allows organizations to integrate with a presence management platform to help users of the platform to easily tell whether the author of a document is online and available, allowing for instant collaboration with that individual.
SharePoint integrates with this type of online presence information if used in collaboration with Microsoft’s presence platform, Lync Server 2010/2013 and its predecessor, Office Communications Server. Using one of these platforms, SharePoint users can more easily collaborate with knowledge workers in real time, using an instant messaging (IM) client such as the Lync 2010/2013 client.
Configuring Presence Within SharePoint
Microsoft SharePoint Server 2013 allows for the ability to readily determine the online status of fellow coworkers and other members of a SharePoint site through the concept of online presence information, displayed to the user through a construct known as a smart tag next to the user’s name.
The color of the smart tag enables a user to quickly identify if the user is available (green), busy (yellow), or not available (blank). Right-clicking these smart tags allows for a sequence of options to be displayed, such as sending an email to the user or instant messaging with them directly. This makes it easier for users to collaborate with the owners of documents, allowing for quick and easy communications.
Enabling and using presence information within a SharePoint environment requires presence to be enabled on the web application within SharePoint, and also requires the correct version of IM software on the client. In addition, for enterprise IM functionality, an enterprise IM solution such as Lync Server 2013 is required.
Enabling Presence Information on a Web Application
Online presence information is enabled by default on a SharePoint web application. In certain circumstances, however, it may be necessary to disable online presence information for troubleshooting. It is subsequently important to understand where in the SharePoint administrative hierarchy the presence information is stored and how it can be turned on and off.
To toggle online presence on or off an individual web application, follow these steps:
1. From the SharePoint Central Administration tool on a SharePoint server, navigate to the Application Management link in the navigation bar.
2. Under Web Applications, click the Manage Web Applications link.
3. Choose the web application to toggle the settings on, and then choose General Settings.
4. From the General Settings page, shown in Figure 16.13, select either Yes or No under the Enable Additional Actions and Online Status for Members, depending on whether you want to turn presence on or off.

5. Click OK to save the changes.
Note
Online presence info can only be turned either on or off for the entire web application. It is not possible to toggle the setting for any subcomponent of a web application.
Examining Presence Functionality Within a SharePoint Site Collection
By default, any time a user’s name appears within an Office application such as SharePoint, Exchange, Word, Excel, and so on, online presence information appears next to that user via the user’s smart tag. The status information must be fed to the application from an IM client, however, or else the smart tag is not able to display the status of the individual and appears blank.
The following IM clients are supported for viewing presence information in a SharePoint 2013 site:
![]() Lync 2010
Lync 2010
![]() Lync 2013
Lync 2013
By default, SharePoint 2013 shows presence only for users who are members of the user’s contacts within the IM client. If a user is a contributor to a SharePoint site but is not in the contact list of another user, that user’s presence information is not displayed by default. To display a user’s presence when he or she is not in the contact list of the other user, a centralized enterprise IM platform must be used in conjunction with SharePoint 2013.
Summary
SharePoint 2013 is the missing collaboration side of the Exchange 2013 platform, providing Exchange users with advanced document management and portal capabilities. With the ability to provide for email-enabled content, SharePoint allows administrators to receive inbound emails directly into document libraries and lists, further extending the capabilities of the platform.
In addition to email-enabled content capabilities, SharePoint 2013 has other strong integration points with Exchange 2013, including powerful Site Mailbox functionality. It is subsequently no small surprise why Exchange 2013 and SharePoint 2013 are often installed together in many environments.
Best Practices
The following are best practices from this chapter:
![]() Use the Directory Management Service to automate the creation of AD contacts that correspond to email-enabled content on the SharePoint server, but be cautious about allowing users to auto create groups, because this can lead to a major proliferation of distribution groups in AD.
Use the Directory Management Service to automate the creation of AD contacts that correspond to email-enabled content on the SharePoint server, but be cautious about allowing users to auto create groups, because this can lead to a major proliferation of distribution groups in AD.
![]() Enable recipient policies in Exchange to stamp the SharePoint-created contacts with secondary email addresses for the domain in which they will be accepted. If using Exchange 2010 or Exchange 2013, also configure an MX record for the SharePoint server.
Enable recipient policies in Exchange to stamp the SharePoint-created contacts with secondary email addresses for the domain in which they will be accepted. If using Exchange 2010 or Exchange 2013, also configure an MX record for the SharePoint server.
![]() Load balance the SMTP incoming email role on multiple SharePoint servers to provide for failover and high availability of this function. Use software network load balancing if a hardware load balancer is not available. Configure a VIP name for the contacts in this scenario, such as spsmtpin.companyabc.com, so that the emails will be sent to the load-balanced SMTP servers.
Load balance the SMTP incoming email role on multiple SharePoint servers to provide for failover and high availability of this function. Use software network load balancing if a hardware load balancer is not available. Configure a VIP name for the contacts in this scenario, such as spsmtpin.companyabc.com, so that the emails will be sent to the load-balanced SMTP servers.
![]() Restrict email messages to be received from only the IP addresses of Exchange servers to avoid having your SharePoint server used as a relay for spam.
Restrict email messages to be received from only the IP addresses of Exchange servers to avoid having your SharePoint server used as a relay for spam.
![]() Consider deploying an enterprise corporate IM application, such as Lync Server 2013, to provide for rich presence functionality in SharePoint sites.
Consider deploying an enterprise corporate IM application, such as Lync Server 2013, to provide for rich presence functionality in SharePoint sites.
![]() Incorporate SharePoint 2013 design concepts with Exchange 2013 so that both components can fit into an overall messaging and collaboration strategy.
Incorporate SharePoint 2013 design concepts with Exchange 2013 so that both components can fit into an overall messaging and collaboration strategy.