Chapter 21. Designing and Managing Pages and Sites for Knowledge Workers
In This Chapter
![]() Understanding Site Collection Options
Understanding Site Collection Options
![]() Reviewing the Scope of an Existing Site Collection
Reviewing the Scope of an Existing Site Collection
![]() Controlling Who Can Create Sites
Controlling Who Can Create Sites
![]() Reviewing the Users and Permissions Tools
Reviewing the Users and Permissions Tools
![]() Reviewing the Site Administration Tools
Reviewing the Site Administration Tools
![]() Understanding the Search Tools
Understanding the Search Tools
![]() Reviewing the Look and Feel Tools
Reviewing the Look and Feel Tools
![]() Reviewing the Site Actions Tools
Reviewing the Site Actions Tools
![]() An Overview of Site Collection Administration Tools
An Overview of Site Collection Administration Tools
![]() Reviewing Site Features and Site Collection Features
Reviewing Site Features and Site Collection Features
This chapter can be considered a “survival guide” and is aimed at the site collection administrator or site administrator who is charged with creating, customizing, or managing a new or existing site collection and making it meet the needs of the organization. Depending on the size of the company, the site collection might have been created for a variety of purposes, such as for the company intranet, for an extranet to handle trusted external partners, for Internet users, or for internal only use, perhaps just by one group such as IT.
This chapter concentrates on the processes involved in creating site collections, sites, and pages, and on the wealth of tools available for managing sites and site collections from the Site Settings page. Because of the sheer number of tools, specific tools are focused on that tend to be the most used by site collection and site administrators; others are just summarized. For example, understanding the Users and Permissions tools is critical to ensure that the site administrator has a tight grasp on “who can do what” in the site collection.
Understanding Site Collection Options
It is important for the farm administrator to be conversant with the different site collection templates available and to understand when it is appropriate to create a site collection and when a site will suffice. The range of site collection templates available in the different versions of SharePoint 2013 is provided in Chapter 18, “SharePoint Foundation Versus SharePoint Server 2013,” and summarized in Table 18.2 in that chapter.
This section reviews the different categories of site collections, and touches briefly on best practices for mapping out a site collection or group of site collections to meet the organization’s requirements. When a farm administrator wants to create a new site collection, the Create Site Collections tool can be found under the Site Collections section on the Application Management page. These tools are categorized as Collaboration, Enterprise, Publishing, and Custom. The following section describes these templates in more detail:
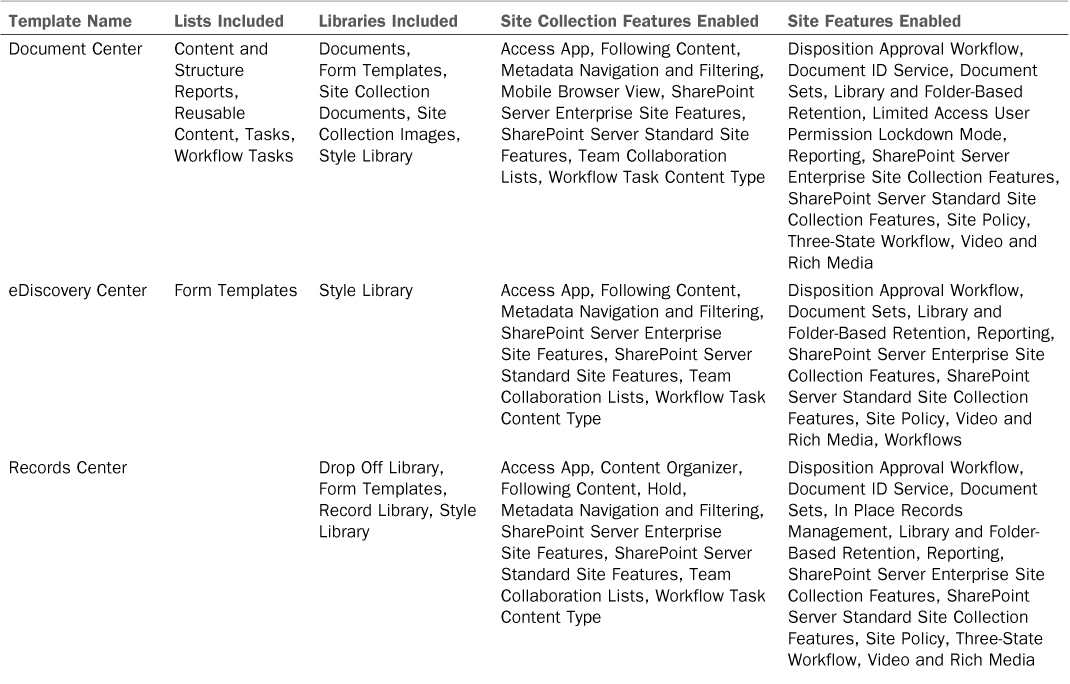
![]() Collaboration site collection templates: Table 21.1 shows the lists and libraries included in each site collection, along with site collection features and site features enabled when created from SharePoint Server 2013 Enterprise. These include Team Site, Blog, Developer Site, Project Site, and Community Site. Note that if SharePoint Server 2013 Standard is used, certain features vary, because the SharePoint Server Enterprise Site Collection Features is not available as a feature, nor is the Access App.
Collaboration site collection templates: Table 21.1 shows the lists and libraries included in each site collection, along with site collection features and site features enabled when created from SharePoint Server 2013 Enterprise. These include Team Site, Blog, Developer Site, Project Site, and Community Site. Note that if SharePoint Server 2013 Standard is used, certain features vary, because the SharePoint Server Enterprise Site Collection Features is not available as a feature, nor is the Access App.


Note
Users of earlier versions of SharePoint will notice that the Meetings site collection templates (Basic Meeting Workspace, Blank Meeting Workspace, Decision Meeting Workspace, Social Meeting Workspace, and Multipage Meeting Workspace) are no longer offered.
![]() Enterprise site collection templates: These include Document Center, eDiscovery Center, Records Center, Business Intelligence (BI) Center, Enterprise Search Center, My Site Host, Community Portal, Basic Search Center, and Visio Process Repository. Table 21.2 provides additional information on the lists and libraries included and notes on the purpose of each.
Enterprise site collection templates: These include Document Center, eDiscovery Center, Records Center, Business Intelligence (BI) Center, Enterprise Search Center, My Site Host, Community Portal, Basic Search Center, and Visio Process Repository. Table 21.2 provides additional information on the lists and libraries included and notes on the purpose of each.


![]() Publishing site collection templates: These templates include the Publishing Portal and Enterprise Wiki and Product Catalog, as shown in Table 21.3. Publishing sites are designed for sites that provide content to a large group of readers, and are better suited to that purpose. Limitations apply as to which sites can be created beneath publishing sites, so there are fewer options from a site collection design standpoint. A Publishing Portal, for example, would be a good choice for an intranet, but not if it will house departmental sites at the second level, unless they are created as site collections.
Publishing site collection templates: These templates include the Publishing Portal and Enterprise Wiki and Product Catalog, as shown in Table 21.3. Publishing sites are designed for sites that provide content to a large group of readers, and are better suited to that purpose. Limitations apply as to which sites can be created beneath publishing sites, so there are fewer options from a site collection design standpoint. A Publishing Portal, for example, would be a good choice for an intranet, but not if it will house departmental sites at the second level, unless they are created as site collections.


![]() Custom site collection templates: An empty site can be created and then a template assigned at a later time.
Custom site collection templates: An empty site can be created and then a template assigned at a later time.
Designing the Site and Site Collection Wireframe
A sample wireframe is provided in Figure 21.1, which is a simplified design often used for medium-sized companies (500 to 5,000 users) and includes a top-level site collection for intranet purposes, separate site collections for departments such as IT and HR, and a site collection for cross-departmental uses (such as projects).
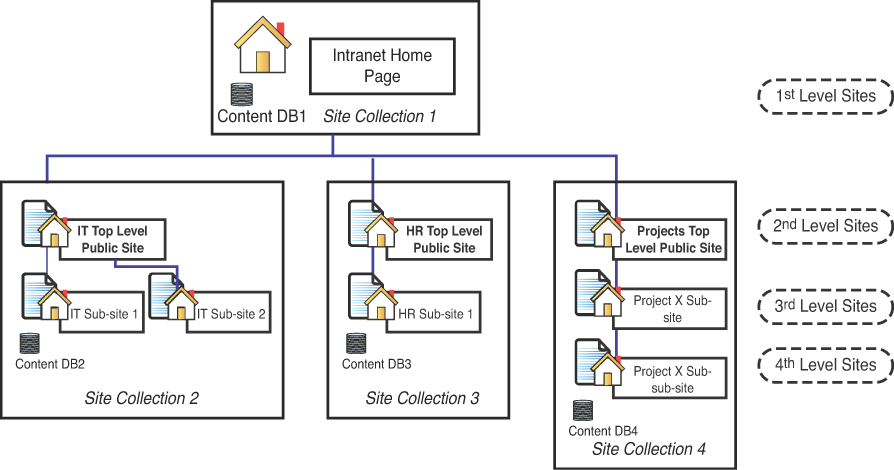
This simple example shows a ContentDB (short for content database) icon for the top-level site collection, which in this example contains intranet content, and ContentDB icons for three other site collections that are nested beneath the top-level site collection. Each organization needs to work on balancing the depth of the structure with its breadth because a structure that is too “deep” can be hard to navigate, as can a structure that is too wide. There are management complexities involved in creating too many site collections, whereas too few site collections may result in content databases that grow to “unwieldy” sizes (for example, hundreds of gigabytes or even a terabyte or more).
A tool such as this makes it easy for design committees to understand the logical design and can be expanded to include the lists and libraries that will be included in each site, and the permissions for each site, and thus become a useful management tool.
For very large organizations, a simple Visio or Excel spreadsheet most likely will not suffice, and more planning will be required in the areas of site collections and websites, along with content databases. Following are some guidelines for larger organizations from TechNet (http://technet.microsoft.com/en-us/library/cc262787(office.15).aspx):
![]() Number of content databases per farm: 500 per farm. Exceeding this limit may cause unexpected results, significant decrease in performance, or other harmful effects.
Number of content databases per farm: 500 per farm. Exceeding this limit may cause unexpected results, significant decrease in performance, or other harmful effects.
![]() Content database size: Up to 200GB per content database for “general-usage scenarios” and up to 4TB for “all-usage scenarios.” 200GB is Microsoft’s “strong recommendation,” but up to 4TB has been tested and is listed as “supported” by Microsoft with various caveats that the native SharePoint backup and recovery tools may not meet organizational requirements for content databases larger than 200GB. Note that there is no explicit content database limit published in this article.
Content database size: Up to 200GB per content database for “general-usage scenarios” and up to 4TB for “all-usage scenarios.” 200GB is Microsoft’s “strong recommendation,” but up to 4TB has been tested and is listed as “supported” by Microsoft with various caveats that the native SharePoint backup and recovery tools may not meet organizational requirements for content databases larger than 200GB. Note that there is no explicit content database limit published in this article.
![]() Site collections per content database: 10,000 maximum (2,500 nonpersonal site collections and 7,500 personal sites, or 10,000 personal sites alone). 5,000 is Microsoft’s strong recommendation as a limit.
Site collections per content database: 10,000 maximum (2,500 nonpersonal site collections and 7,500 personal sites, or 10,000 personal sites alone). 5,000 is Microsoft’s strong recommendation as a limit.
![]() Site collections per farm: 750,000 (500,000 personal sites and 250,000 other sites per farm) is Microsoft’s maximum recommendation. These can reside on one or more web applications.
Site collections per farm: 750,000 (500,000 personal sites and 250,000 other sites per farm) is Microsoft’s maximum recommendation. These can reside on one or more web applications.
![]() Websites: 250,000 is the maximum recommended per site collection.
Websites: 250,000 is the maximum recommended per site collection.
Of these recommendations, the one that will usually be of the most interest and impact on overall design is that of content database size. The 200GB soft limit recommended by Microsoft is a relatively small number for many organizations and can dramatically change the design of the SharePoint environment. As a result, most organizations end up with a large number of content databases which then need to be groomed through SQL Server maintenance plans on a regular basis as well as managed by IT and the SharePoint farm administrators.
Creating a Site Collection
In many environments, the site collection administrator is also a farm administrator and needs to know how to create site collections. Although some organizations use a single site collection for all their needs, a best practice is to create separate site collections for groups that save a large amount of data (50GB to 100GB or more) and creating a content database for each of those site collections (as discussed in the previous section). Although this is not a universal rule, by creating multiple content databases, SQL Server will be managing more databases that are smaller in size, which can be advantageous when designing disaster recovery strategies and service level agreements (SLAs).
In addition, as discussed in the following sections, a large number of tools are available for each site collection; these allow customization of one site collection that won’t affect other site collections. For example, Site Collection Features can be turned on for features such as Document Sets, Site Policy, or Video and Rich Media that will be available only to sites contained within the site collection.
To create a site collection from the Central Administration site, simply follow these steps:
1. From the Central Administration home page, click Create Site Collections in the Application Management section.
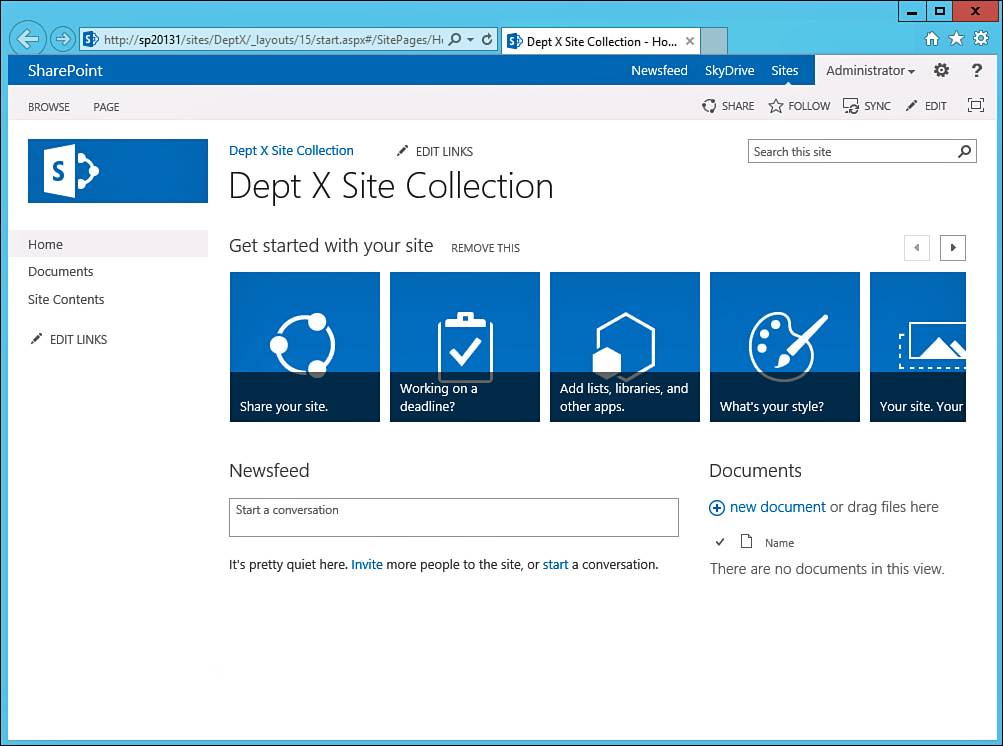
2. From the createsite.aspx page, enter a title for the site (Dept X Site Collection, for this example), optionally enter a description, and provide a URL for the site collection. (In this example, select /sites/ from the drop-down menu and enter DeptX for the site collection name.) Leave the Select Experience Version on 2013. Choose the Team Site template. Figure 21.2 shows an example.

3. Scroll down on the page and enter a primary site collection administrator and secondary site administrator (company123administrator and company123colin in this example). Click the Check Names icon next to the fields to make sure that the usernames were entered properly. Leave the quota template selection to No Quota. Click OK.
Note
Primary and secondary site collection administrators have additional capabilities above and beyond any site collection administrators added at a later date. The primary and secondary site collection administrators will receive administrative email alerts for the site collection. Primary and secondary site collection administrators need to be individual users, not Active Directory (AD) security groups.
These are defined during the initial site collection creation process but can be modified at a later date by visiting Central Administration, Application Management, Change Site Collection Administrators.
4. After the site has been created, a page loads indicating that the site has been created successfully. A link to the new site collection is included. Click the link to view the new site collection. Figure 21.3 shows the site created in this example.
5. Access the gear icon and click Site Settings. Figure 21.4 shows the Site Settings page for the new site collection. The various tools are covered in the following sections.

Reviewing the Scope of an Existing Site Collection
When a site collection administrator starts working with an existing site collection, it is important to determine whether additional subsites are under the existing site collection. If the site collection is new and hasn’t been configured, this will most likely be an easy task, but if the administrator is taking over a site collection that has been in use for several months or years, this can be more involved.
Site collection administrators charged with taking over an existing site collection can become familiar with the site collection by visiting the Site Settings page and clicking the Sites and Workspaces link in the Site Administration section, shown in Figure 21.4. This shows the administrator whether there are any subsites beneath the existing site. However, this might not tell the full story because there may be managed paths for the web application, which may contain additional site collections, each of which may contain additional sites.
For example, a new site collection administrator should check with the farm administrator to see whether there are any managed paths such as /sites/ that contain additional subsites. Figure 21.5 shows the Sites and Workspaces page from the Site Settings page on a sample site collection (http://SP20131/). It looks like there are only five sites located beneath the top level, so the administrator may think he has a relatively easy job ahead of him. However, Figure 21.6 shows the Site Collection List page for the web application that houses the root site collection (http://SP20131/), and there are managed paths /my and /sites that each contain site collections beneath them. Suddenly, the administrator realizes he needs to review each of the site collections located under /sites to see the number of sites under each. The sites listed under /my are personal site collections that may also pose administrative challenges, but won’t be addressed in this chapter.


Note also in Figure 21.6 that the Site Collection List page lists the URL for the site collection, the title, description, primary site collection administrator, his or her email, and the content database name on the right side.
Note
You can find the managed paths for a web application under Application Management, in the Web Applications section, by clicking Manage Web Applications and then locating the name of the web application that houses the site collection. Click the name of the web application, and then click Managed Paths from the Web Applications tab on the Ribbon. Figure 21.7 shows an example of the Default Managed Paths for a SharePoint 2013 Enterprise implementation. The Default Managed Paths should not be modified unless there are specific business requirements for doing so, and the farm administrator should understand the impacts of doing so.

Managed paths define the locations at which SharePoint tools should expect to find site collections. And these can be in the form of an Explicit Inclusion or Wildcard Inclusion. In Figure 21.7, the paths can be interpreted as follows: The root is explicitly included and is a site collection. Anything located under (root)/sites/ (http://sp20131/sites/ in this example) should be considered a site collection. The (root)/my/ site is a site collection, and anything located under (root)/my/personal/ is a site collection.
An additional tool is available from the Site Settings page for the top-level site of the site collection: the Site Hierarchy link in the Site Collection Administration section. This shows all websites created under the current site, as shown in Figure 21.8. This page (similar to the Sites and Workspaces page) shows the sites that exist directly below the current site, but also does not include the managed paths. The Site Hierarchy page provides the site URL, title of the site, and a Manage link that, when clicked, takes the administrator to the Site Settings page for that site.

Controlling Who Can Create Sites
Another recommended step to take for site administrators for new or existing site collections is to take a few minutes and review who has the ability to create sites. By default, only users with Full Control permissions in the site collection have the ability to create subsites (including document workspaces), which include only site collection administrators and members of the Owners group for the site collection. However, other permission levels may be able to create sites, which can be a good thing, if the organization wants to encourage the use of document workspaces and meeting workspaces and empower more users to build sites for collaboration purposes. Or it can be a bad thing and lead to an accumulation of sites and workspaces that users may abandon, or that may confuse users.
The Sites and Workspaces page discussed in the previous section (accessible from the Site Settings page) provides a link for Site Creation Permissions. By clicking this link, the administrator can provide Site and Workspace Creation Permissions to different permission levels, as shown in Figure 21.9. From this page, the administrator can check the boxes next to permission levels such as Design or Contribute, and by clicking OK adds the Create Subsites site permission for that permission level.

Another important tool to know about is the Self-Service Site Collection Management tool. This tool is accessed from the Central Administration site by clicking the Security link in the Quick Launch area and then clicking Configure Self-Service Site Creation in the General Security section. From this page, shown in Figure 21.10, a number of options are available, as follows:
![]() The web application under which the sites will be created can be chosen.
The web application under which the sites will be created can be chosen.
![]() Users can be given the ability to create site collections, and if allowed, a quota template can be applied.
Users can be given the ability to create site collections, and if allowed, a quota template can be applied.
![]() The Start a Site link can be hidden, a specific managed path can be provided, any managed path can be used, or a custom form can be provided for site creation. Figure 21.10 shows the option where new sites will be created under http://sp20131/sites/[%userid%], which means the user’s ID will precede the site name, making it easy to see who the originator of the site is at a later date.
The Start a Site link can be hidden, a specific managed path can be provided, any managed path can be used, or a custom form can be provided for site creation. Figure 21.10 shows the option where new sites will be created under http://sp20131/sites/[%userid%], which means the user’s ID will precede the site name, making it easy to see who the originator of the site is at a later date.
![]() Site classifications can be hidden from users, an optional choice, or a required choice.
Site classifications can be hidden from users, an optional choice, or a required choice.
![]() A secondary contact can be required or not, and if required, this person is also a site administrator.
A secondary contact can be required or not, and if required, this person is also a site administrator.

If user groups are given the ability to create sites via the Sites and Workspaces page, they will see the New Site link on the Site Contents page regardless of whether self-service site creation is enabled. The site created is a site, not a site collection. If self-service site creation is enabled, and a user visits the page specified by the farm administrator (for example [servername]/_layouts/15/scsignup.aspx) and creates a site, it is in fact a site collection. So it is very important to understand these differences and decide what is allowed in the environment.
Note
A general best practice is to control the number of individuals who can create sites and workspaces until users are trained about the pros and cons of site and workspace creation and the management of the sites they create. A common complaint of organizations using SharePoint products is the “sprawl” of sites, subsites, and workspaces that can grow over time if too many users are allowed to create sites and workspaces.
Creating Pages and Sites
This section provides an overview of the processes of creating pages and sites, as well as an overview of the options available for pages and sites. The previous section, “Controlling Who Can Create Sites,” gives some insight into some of the variables that determine which users can create sites, and this section discusses the topic in terms of who can create pages. In most organizations, IT chooses to limit the number of users who can create sites to site administrators or power users to ensure that those with this capability have been trained appropriately and understand the pros and cons of creating a new site as opposed to simply creating a new list or library.
The site administrator can create sites from several places. The primary tool to access is the Settings gear; then click Site Contents and scroll to the bottom and click New Subsite. Or the Site Contents link in the Quick Launch can be clicked (if available), and you can find the New Subsite link at the bottom of the page.
The Site Content and Structure link available on the Site Settings page, in the Site Administration section, also allows the administrator to create sites and lists as shown in Figure 21.11.

Follow these steps to create a site:
1. Using an account with sufficient permissions, access the Settings gear and click Site Contents.
2. Scroll to the bottom of the page and click New Subsite.
3. Enter a title, description (optional), and URL information. A general best practice is for the URL to not contain spaces and not be too long.
4. Select a template from the Template Selection section. For this example, choose the Team Site template from the Collaboration tab. Figure 21.12 shows an example of this interface.

5. For this example, select Use Unique Permissions in the Permissions section. In production environments, subsites often inherit from the parent site because this eases administration.
6. In this example, select Yes to Display this site on the quick launch of the parent site, and Yes to Display this site on the top link bar of the parent site.
7. Select Yes to Use the top link bar from the parent site.
8. Click Create.
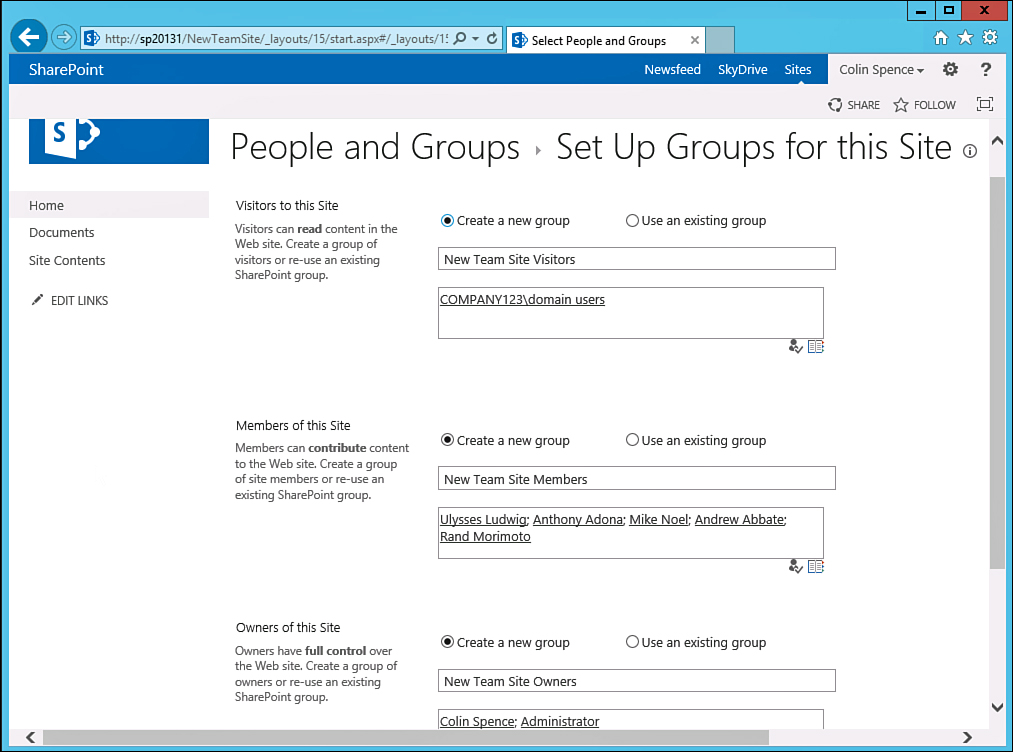
9. As shown in Figure 21.13, the Set Up Groups for this Site page displays. Leave the defaults, which in this example are Create a New Group for Visitors, Members, and Owners. Enter the domain users group (in this case, Company123domain users) in the Visitors to this Site group and an appropriate group in Members of this Site and Owners of this site. Click OK, and the new site renders.
Creating Pages
Another key tool for sharing and managing information on a site are pages. Pages can be created from a number of places, and the resulting options can be used for a variety of purposes. For example, the home page for a site is in fact a page that lives in the Site Pages library and can be edited and customized. Wiki page libraries contain pages that need to be edited to contain useful content and can contain hundreds or thousands of pages if heavily used.
In addition, if Allow Management of Content Types is enabled for a document library, a variety of page content types can be added to a normal document library. And, once again, a document library can quickly house hundreds of pages. Because pages can occur in such abundance, site administrators should be very familiar with the different types of pages and how they can be used and managed.
The process of creating pages is similar to that of creating sites, but generally simpler, and like a site, when the page is created, it needs to be customized. Most organizations limit the number of users who can create or modify pages because the modification of pages or addition of pages can have serious consequences on the site that affect all users of the site. However, by default, most users of a site will have access to create and modify pages! So, it is important to understand how to control this ability. This section addresses this topic and walks through the process of creating and modifying pages.
Site administrators should thoroughly test the capabilities of users with different permissions levels on the sites they are tasked with maintaining. For example, add a test user to the Visitors group and a test user to the Members group and then test that user’s access to different tools:
![]() Log in as a user with Visitor privileges and see what tools are available under the gear icon.
Log in as a user with Visitor privileges and see what tools are available under the gear icon.
![]() As a user with Visitor privileges, visit the Site Contents page and see which lists and libraries are visible.
As a user with Visitor privileges, visit the Site Contents page and see which lists and libraries are visible.
![]() As a user with Visitor privileges, visit the Pages or Site Pages library and see what tools are active.
As a user with Visitor privileges, visit the Pages or Site Pages library and see what tools are active.
![]() Next, log in as a user with Member privileges and see what tools are available under the gear icon.
Next, log in as a user with Member privileges and see what tools are available under the gear icon.
![]() As a user with Member privileges, access Site Settings and see which tools are available.
As a user with Member privileges, access Site Settings and see which tools are available.
![]() As a user with Visitor privileges, visit the Site Contents page and see which lists and libraries are visible.
As a user with Visitor privileges, visit the Site Contents page and see which lists and libraries are visible.
![]() As a user with Member privileges, visit the Pages or Site Pages library and see what tools are active.
As a user with Member privileges, visit the Pages or Site Pages library and see what tools are active.
And if other SharePoint groups are being used, test out site permissions in a similar fashion. It is typical that a site administrator will make changes to the capabilities of members of the Members group by modifying their permissions in specific libraries (such as the Pages or Site Pages library).
A good place to start when learning the options for creating pages is with the gear icon. Depending on the type of site or site collection template that has been used, and depending on the permissions of the account being used, the Add a Page tool might or might not be found here. If the user finds this tool and clicks it, a simple dialog appears that asks for a name for the page, and the URL for the library that will house the page is shown. Depending on whether the site has Publishing features enabled, the resulting page differs in properties as well.
Another way to create pages is to visit a library that has one or more page content types enabled. Most sites have a Site Pages or Pages library, which house the home page for that site (see Tables 21.1, 21.2, and 21.3 to see which site templates include them), and these libraries allow users with sufficient permissions to create new pages.
To create a new page from a Site Pages library on a default team site, follow these steps:
1. Access the Site Pages library on a team site by clicking the Site Contents link in the Quick Launch area and then click the Site Pages icon.
2. Click the New Document icon on the Files tab, and then click Web Part Page.
3. Give a name to the page. In this example, TestHomePage1 is used, as shown in Figure 21.14.

4. Select one of the options in the Layout section. In this example, Right Column, Header, Footer, Top Row, 3 Columns are selected.
5. Confirm the Save Location is set to Site Pages.
6. Click Create.
Figure 21.15 shows the page after it has been created and after the user clicks a web part zone (Header) to activate it. The Browse, Page, and Insert tabs are visible on the ribbon, and the Insert tab is selected in Figure 21.15. From the Insert tab, the user can insert Text (a content editor web part will be inserted in the selected zone), an Image (a URL needs to be provided for the image), Video and Audio (the media web part will be inserted in the selected zone), and an App Part or Web Part. If app part or web part icons are clicked, an interface loads that allows the user to choose from available app parts or web parts.

Reviewing the Pages Library on a Publishing Site Collection
One benefit of publishing sites and site collections is the inclusion of additional page types. For example, in the default Site Pages library in a nonpublishing site, such as a Team Site, the only options presented under the New Document icon are Wiki Page and Web Part Page. However, on a publishing site (such as a site created using the Publishing Portal template or other template shown in Table 21.3), additional options are provided under the New Document icon in the Pages library, as follows:
![]() Page
Page
![]() Article Page
Article Page
![]() Welcome Page
Welcome Page
![]() Error Page
Error Page
Each of these selections then allows the user to choose from the same list of page layouts, as follows:
![]() (Article Page) Body Only
(Article Page) Body Only
![]() (Article Page) Image on Left
(Article Page) Image on Left
![]() (Article Page) Image on Right
(Article Page) Image on Right
![]() (Catalog-Item Reuse) Blank Catalog Item
(Catalog-Item Reuse) Blank Catalog Item
![]() (Catalog-Item Reuse) Catalog Item Image on Left
(Catalog-Item Reuse) Catalog Item Image on Left
![]() (Enterprise Wiki Page) Basic Page
(Enterprise Wiki Page) Basic Page
![]() (Error Page) Error
(Error Page) Error
![]() (Project Page) Basic Project Page
(Project Page) Basic Project Page
![]() (Redirect Page) Redirect
(Redirect Page) Redirect
![]() (Welcome Page) Blank Web Part Page
(Welcome Page) Blank Web Part Page
![]() (Welcome Page) Splash
(Welcome Page) Splash
![]() (Welcome Page) Summary Links
(Welcome Page) Summary Links
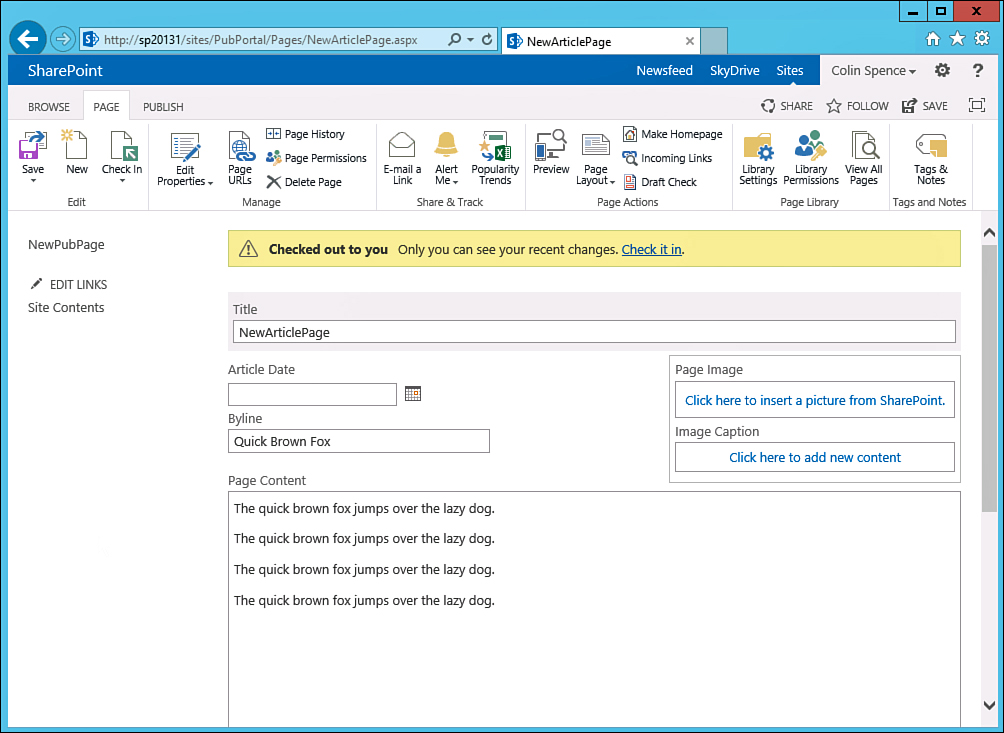
Follow these steps to create an Article page in a publishing-enabled site:
1. Access a site that was created by using the Publishing Portal template and then access the Pages library.
2. Click the New Document icon on the Files tab and select Article Page.
3. Provide a title for the page. NewArticlePage is used in this example.
4. Click the URL Name field; it should self-populate with the title provided.
5. Select (Article Page) Image on the right in the Page Layout section.
6. Click Create.
7. Click the name of the page just created to open it. A note should say that the page is checked out to you and that only you can see recent changes.
8. Click the Page tab, and then click the Edit icon.
9. Note that there are a number of fields that are displayed, including the Title already given to the page, Article Date, Byline, Page Image, Image Caption, Page Content, and Rollup Image at the bottom. Add some text into Byline and Page content, as shown in Figure 21.16, and click Save on the Page tab.
You should experiment with the wide range of different pages that you can create and with the almost limitless combinations of page layouts, web parts, and other items that you can add to pages.
Reviewing the Users and Permissions Tools
Becoming comfortable with the users and groups that have access to the site, lists, and libraries and what level of permissions they have is one of the most important tasks for a site administrator. This section covers the tools used to do so and the best practices as to how you should use them.
When you are at the root of a site collection and using an account with Owner-level permissions, four links should be available in the Users and Permissions section on the Site Settings page:
![]() People and Groups
People and Groups
![]() Site Permissions
Site Permissions
![]() Site Collection Administrators
Site Collection Administrators
![]() Site App Permissions
Site App Permissions
If you are on a lower-level site (subsite), you will see three options:
![]() People and Groups
People and Groups
![]() Site Permissions
Site Permissions
![]() Site App Permissions
Site App Permissions
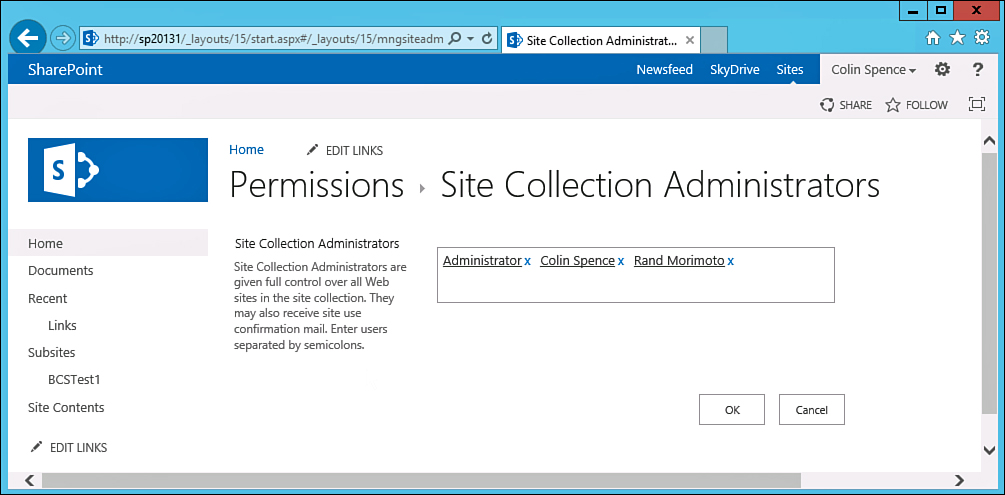
From the root of the site collection, it is important to review the Site Collection Administrators link to see who has been granted Full Control over the site collection and all its contents. Figure 21.17 shows an example where three individual users are present (Administrator, Colin Spence, Rand Morimoto). Although you can add AD security groups here, that is generally not recommended unless the AD group is very restrictive (to avoid giving too great a number of users complete control over the site collection). In addition, recall that during the site collection creation process, a primary site collection administrator and secondary site collection administrator were defined, and they receive email alerts pertaining to the site collection, so it is generally not recommended to remove accounts from this role without getting approval from the farm administrators.
Next, click the Site Permissions link from the Site Settings page, in the Users and Permissions section, to review the groups that exist for the site collection and any individual users or AD groups that have been granted direct permissions. Figure 21.18 shows the Site Permissions page (user.aspx) for a site collection. The groups that appear on this page vary based on the site collection template used, the service applications enabled, and any modifications made since it was created. This page provides a number of tools on the Permissions tab and displays information about the different groups and users that have permissions to the site collection.
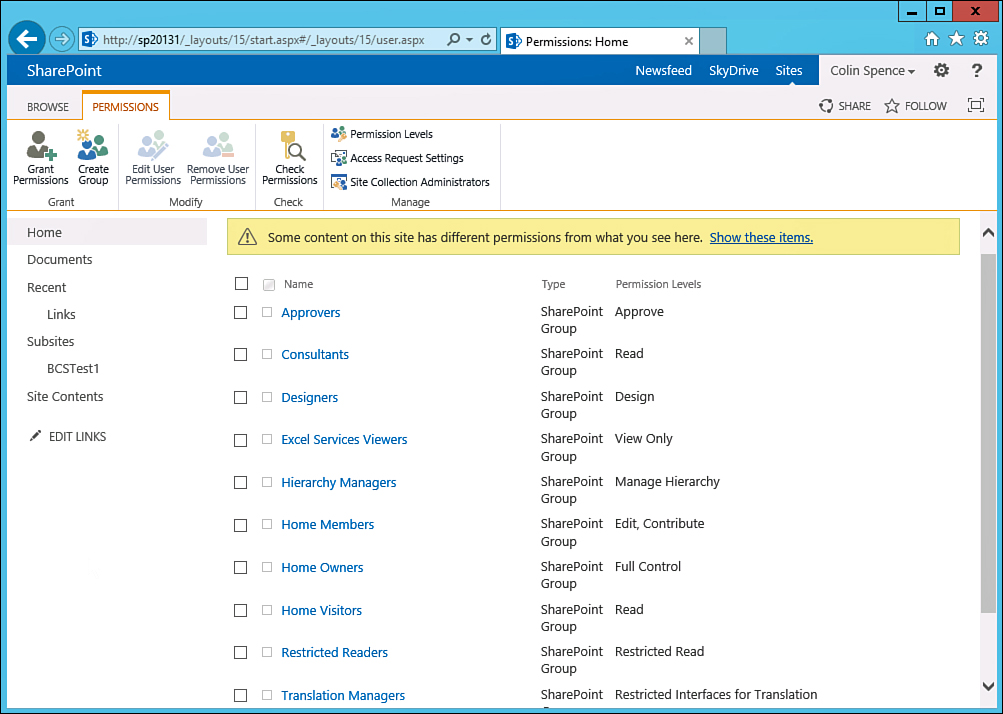
The Permissions tab provides a number of tools:
![]() Grant Permissions: Add users or AD groups and grant permissions by adding to an existing SharePoint group or give direct permissions. A welcome email can be sent to the users added. Note that by default, any users or groups added here are added to the Members group (in Figure 21.18, this group is titled Home Members), and you need to click the Show Options link at the bottom of the Share window to more granularly assign permissions.
Grant Permissions: Add users or AD groups and grant permissions by adding to an existing SharePoint group or give direct permissions. A welcome email can be sent to the users added. Note that by default, any users or groups added here are added to the Members group (in Figure 21.18, this group is titled Home Members), and you need to click the Show Options link at the bottom of the Share window to more granularly assign permissions.
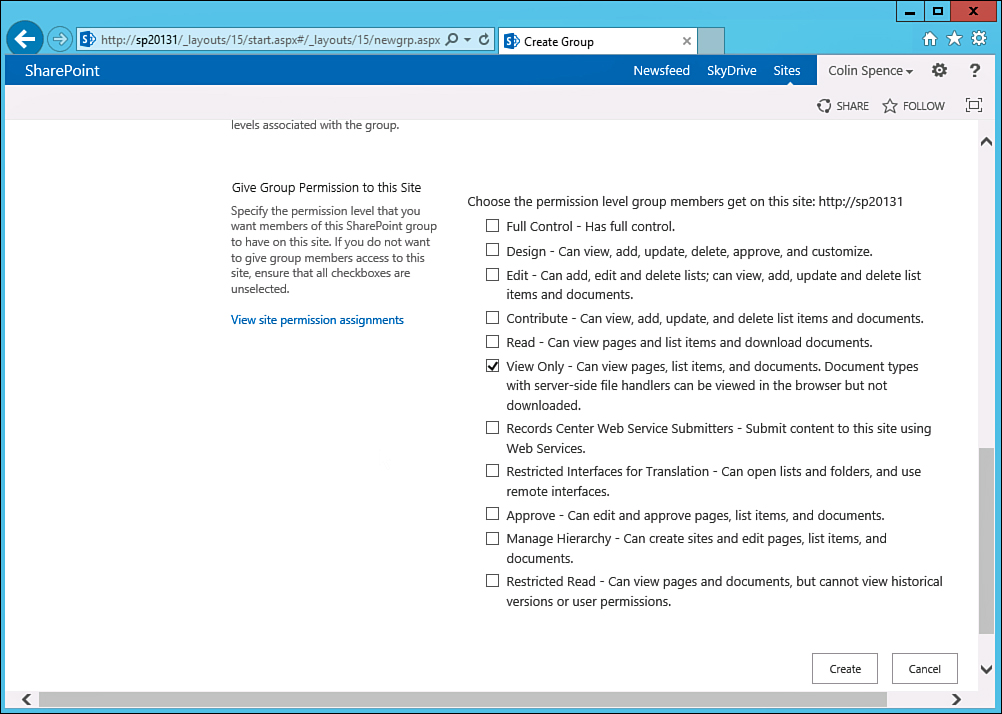
![]() Create Group: Define a new SharePoint group and description, define the group owner, and define who can view the membership of the group (Group Members, Everyone) and who can edit the membership of the group (Group Owner, Group Members). Also choose whether to allow requests to join/leave the group, auto-accept requests, and define the email address that membership requests go to. Most important, select the permission level for group members on the site, as shown in Figure 21.19.
Create Group: Define a new SharePoint group and description, define the group owner, and define who can view the membership of the group (Group Members, Everyone) and who can edit the membership of the group (Group Owner, Group Members). Also choose whether to allow requests to join/leave the group, auto-accept requests, and define the email address that membership requests go to. Most important, select the permission level for group members on the site, as shown in Figure 21.19.
![]() Edit User Permissions: If a group or user is selected, allows the permission level to be modified.
Edit User Permissions: If a group or user is selected, allows the permission level to be modified.
![]() Remove User Permissions: If a group or user is selected, clicking this button removes all permissions for the user or group to the site. A window opens asking for confirmation that you do in fact want to remove all the permissions for the user or group.
Remove User Permissions: If a group or user is selected, clicking this button removes all permissions for the user or group to the site. A window opens asking for confirmation that you do in fact want to remove all the permissions for the user or group.
![]() Check Permissions: Allows the entry of a user or group name, and when the Check Now button is clicked, provides a summary of the permission levels given to the group or user and whether they were given directly or via a specific group.
Check Permissions: Allows the entry of a user or group name, and when the Check Now button is clicked, provides a summary of the permission levels given to the group or user and whether they were given directly or via a specific group.
![]() Permission Levels: Clicking this icon opens the Permission Levels page that allows the addition of a permission level, deletion of a permission level, or modification of a permission level.
Permission Levels: Clicking this icon opens the Permission Levels page that allows the addition of a permission level, deletion of a permission level, or modification of a permission level.
![]() Access Request Settings: Either allows or denies requests for access and defines the email address these requests will go to.
Access Request Settings: Either allows or denies requests for access and defines the email address these requests will go to.
Note
Double-check the email address that is defined if allowing requests for access is enabled. Often, the email is for an administration account that may not be monitored.
![]() Site Collection Administrators: This is available only when accessing this page for the root site of a site collection. Provides access to the list of users defined as site collection administrators and allows the addition of new site collection administrators or the removal of existing ones.
Site Collection Administrators: This is available only when accessing this page for the root site of a site collection. Provides access to the list of users defined as site collection administrators and allows the addition of new site collection administrators or the removal of existing ones.
Clicking the name of the group from the Permissions page shows the users or AD groups that are part of the group. The administrator can also add users to the group and perform other actions, including the following:
![]() Add users or AD groups to the SharePoint group.
Add users or AD groups to the SharePoint group.
![]() Email users in the group.
Email users in the group.
![]() Call/message selected users based on the tools available (such as if Microsoft Lync is configured).
Call/message selected users based on the tools available (such as if Microsoft Lync is configured).
![]() Remove users from the group.
Remove users from the group.
![]() Access group settings.
Access group settings.
![]() View group permissions by listing the URLs to sites, lists, or items that inherit permissions from these URLs.
View group permissions by listing the URLs to sites, lists, or items that inherit permissions from these URLs.
![]() Make the group the default group for the site.
Make the group the default group for the site.
![]() Provide access to the list settings for the User Information List.
Provide access to the list settings for the User Information List.
Table 21.4 provides an overview of the permissions that Approvers, Owners, Members, Visitors, and Designers groups receive by default in a SharePoint Server 2013 Enterprise site and summarizes the privileges for each group. Table 21.5 continues to provide an overview of the privileges of Hierarchy Managers, Records Center Web Service Submitters, Restricted Readers, Style Resource Readers, and Viewers.

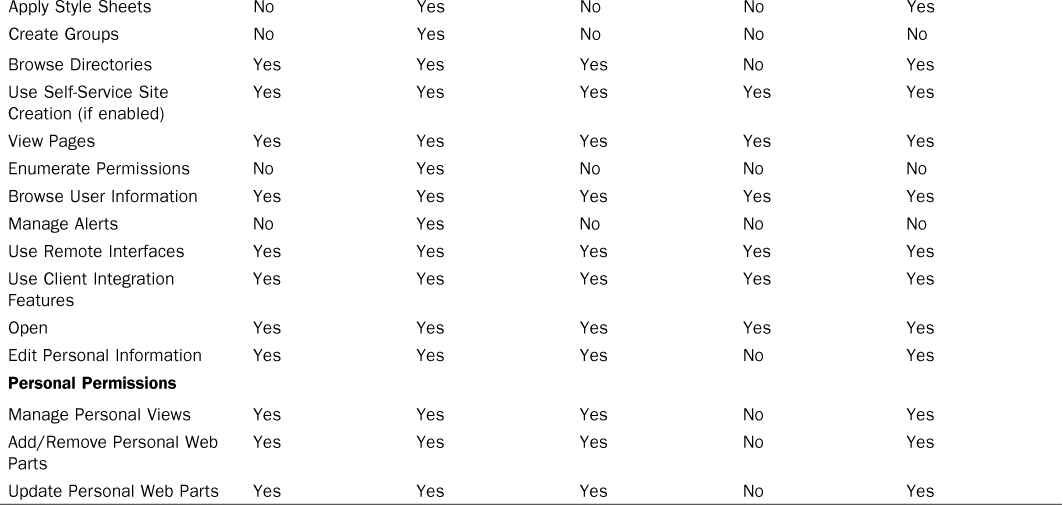
TABLE 21.4 Default Permissions for Approvers, Members, Owners, Visitors, and Designers Groups in SharePoint Server 2013 Enterprise


TABLE 21.5 Default Permissions for Hierarchy Managers, Records Center Web Service Submitters, Restricted Readers, Style Resource Readers, and Viewers in SharePoint Server 2013 Enterprise
Note
A best practice recommendation is to not change the settings for these default Owners, Members, and Visitors groups. In fact, the Owners group permissions can’t be changed. Although it might seem like a good idea to modify the permissions of the Members or Visitors groups to meet specific requirements (for example, to remove the ability of the Visitors group to View Versions in a list and to Create Alerts), this can lead to confusion from an administrative and end-user standpoint. Other administrators might not know about these customizations, and users may not know either and may think that, for example, their inability to create alerts is due to a SharePoint error and file a help desk ticket. The best practice is to create one or more new groups, such as Members Customized or Visitors Customized, and use those instead. This will clearly call out that the default settings have been customized. There is a Copy Permission Level button at the bottom of the Edit Permission Level page that makes it easy, for example, to copy the permissions for the standard Members group and then give it a name and add or remove permissions.
For Table 21.4 and Table 21.5, all site and site collection features have been enabled, to ensure that the full list of groups is provided.
Reviewing the Galleries Tools
Beneath the Users and Permissions section on the Site Settings page is the Web Designer Galleries section, which contains links to all the galleries available for the current site, including the Site Columns, Site Content Types, Web Parts, List Templates, Master Pages, Themes, Solutions, and Composed Looks.
In general, the Site Columns and Site Content Types galleries are actively used by an organization that is seeking to leverage the metadata capabilities provided by SharePoint 2013, while the other galleries are used less often for specific purposes. Site administrators or farm administrators might want to carefully review the web parts included in the Web Parts gallery to familiarize themselves with which tools power users and administrators have access to.
Site designers will be interested in the Master Pages and Page Layout gallery and the Themes gallery. The administrator should review the List Templates gallery periodically to make sure that there aren’t too many List templates accumulating, because they can clutter up the Create page that is accessed when creating new lists and libraries.
Site columns and site content types are covered in Chapter 22, “Managing Metadata and Content Types in SharePoint 2013.”
Note
Although site galleries allow administrators to delete items from the gallery, this should be done only if the administrator is confident of what the impact will be to base site functionality. A general best practice is to leave the default items in these galleries unless there is a specific business reason to delete items.
High-level descriptions are as follows:
![]() Site Columns: A number of predefined site columns already exist and are useful to peruse and test when creating a taxonomy for the organization. Types of site columns include some or all of the following, based on the type of site and features enabled: Base Columns, Content Feedback, Core Contact and Calendar Columns, Core Document Columns, Core Task and Issue Columns, Custom Columns, Display Template Columns, Document and Record Management Columns, Enterprise Keywords Group, Extended Columns, JavaScript Display Template Columns, Page Layout Columns, Publishing Columns, Reports, Status Indicators, and Translation Columns. New site columns can be created from this gallery as well.
Site Columns: A number of predefined site columns already exist and are useful to peruse and test when creating a taxonomy for the organization. Types of site columns include some or all of the following, based on the type of site and features enabled: Base Columns, Content Feedback, Core Contact and Calendar Columns, Core Document Columns, Core Task and Issue Columns, Custom Columns, Display Template Columns, Document and Record Management Columns, Enterprise Keywords Group, Extended Columns, JavaScript Display Template Columns, Page Layout Columns, Publishing Columns, Reports, Status Indicators, and Translation Columns. New site columns can be created from this gallery as well.
![]() Site Content Types: A number of content types are in this gallery by default, which should be reviewed and tested so that the administrator becomes familiar with their use and capabilities. Types of content types include some or all of the following, based on the type of site and features enabled: Business Intelligence (BI), Community Content Types, Digital Asset Content Types, Display Template Content Types, Document Content Types, Document Set Content Types, Folder Content Types, Group Work Content Types, List Content Types, Page Layout Content Types, Publishing Content Types, and Special Content Types.
Site Content Types: A number of content types are in this gallery by default, which should be reviewed and tested so that the administrator becomes familiar with their use and capabilities. Types of content types include some or all of the following, based on the type of site and features enabled: Business Intelligence (BI), Community Content Types, Digital Asset Content Types, Display Template Content Types, Document Content Types, Document Set Content Types, Folder Content Types, Group Work Content Types, List Content Types, Page Layout Content Types, Publishing Content Types, and Special Content Types.
![]() Web Parts: This gallery contains the web parts available to administrators and designers on this site. There can be 75 or more web parts in this gallery with .webpart and .dwp extensions. The names tend to be explanatory, but it is not always easy to know the capabilities of different web parts, so the Recommendation Settings column provides information on recommended usage. If you click the Edit icon next to a web part, more information about that web part displays, as shown in Figure 21.20. Note that the tools available include an Export tool that allows a copy of the web part to be downloaded and then edited with a tool such as SharePoint Designer or Visual Studio. Also, recommendations can be added or modified that help users understand where the web part should be used.
Web Parts: This gallery contains the web parts available to administrators and designers on this site. There can be 75 or more web parts in this gallery with .webpart and .dwp extensions. The names tend to be explanatory, but it is not always easy to know the capabilities of different web parts, so the Recommendation Settings column provides information on recommended usage. If you click the Edit icon next to a web part, more information about that web part displays, as shown in Figure 21.20. Note that the tools available include an Export tool that allows a copy of the web part to be downloaded and then edited with a tool such as SharePoint Designer or Visual Studio. Also, recommendations can be added or modified that help users understand where the web part should be used.

![]() List Templates: This gallery is empty for new sites and site collections, but shows any List templates created for the site collection. These List templates (with the .stp extension) are available to use for creating new lists and libraries within the site collection. Note that if selected, an .stp file can be downloaded from this gallery (by clicking Download a Copy from the Files tab on the ribbon) or uploaded to the gallery (by clicking Upload Document on the Files tab on the ribbon). This makes it possible to “export” and then “import” templates in other site collections.
List Templates: This gallery is empty for new sites and site collections, but shows any List templates created for the site collection. These List templates (with the .stp extension) are available to use for creating new lists and libraries within the site collection. Note that if selected, an .stp file can be downloaded from this gallery (by clicking Download a Copy from the Files tab on the ribbon) or uploaded to the gallery (by clicking Upload Document on the Files tab on the ribbon). This makes it possible to “export” and then “import” templates in other site collections.
![]() Master Pages and Page Layouts: This gallery contains a variety of .xml, .aspx, and .master files and pages. SharePoint Designer 2013 is the tool of choice for editing the .aspx page layouts and the .master pages. A column lists the Compatible User Interface (UI) versions, usually 15 (the current SharePoint 2013 products) or four (SharePoint 2010 products). It is definitely not recommended to experiment with master pages and page layouts on production environments; instead, create a development environment. You should also make copies of existing files rather than alter the originals.
Master Pages and Page Layouts: This gallery contains a variety of .xml, .aspx, and .master files and pages. SharePoint Designer 2013 is the tool of choice for editing the .aspx page layouts and the .master pages. A column lists the Compatible User Interface (UI) versions, usually 15 (the current SharePoint 2013 products) or four (SharePoint 2010 products). It is definitely not recommended to experiment with master pages and page layouts on production environments; instead, create a development environment. You should also make copies of existing files rather than alter the originals.
![]() Themes: A number of themes (which consist of .spfont and .spcolor file types) are provided that can be applied to the site to change the basic look and feel of the site. Custom themes can be added by creating additional color palettes and font schemes and uploading them to the Theme Gallery.
Themes: A number of themes (which consist of .spfont and .spcolor file types) are provided that can be applied to the site to change the basic look and feel of the site. Custom themes can be added by creating additional color palettes and font schemes and uploading them to the Theme Gallery.
![]() Solutions: If any solutions have been deployed to the site collection by third-party providers or developers, they appear here. By default, a quota of 300 server resources are allowed for solutions, and this page shows Current Usage and Average Usage.
Solutions: If any solutions have been deployed to the site collection by third-party providers or developers, they appear here. By default, a quota of 300 server resources are allowed for solutions, and this page shows Current Usage and Average Usage.
![]() Composed Looks: Composed looks are collections of Master Pages, Themes, Images, and Font Schemes and can be accessed by using the Change the Look tool on the Site Settings page in the Look and Feel section. URLs are provided for these different elements, which can be seen stored in the following locations:
Composed Looks: Composed looks are collections of Master Pages, Themes, Images, and Font Schemes and can be accessed by using the Change the Look tool on the Site Settings page in the Look and Feel section. URLs are provided for these different elements, which can be seen stored in the following locations:
Masterpages: /_catalogs/masterpage/
Themes: /_catalogs/theme/15/
Images: /_layouts/15/images
Font Scheme: /_catalogs/theme/15/
Note
With the introduction of apps, some confusion can occur between apps and solutions. A solution has a .wsp extension (but is really a .cab file) and can be created as either a farm solution (deploys to the farm’s solution store) or a sandboxed solution (deploys to a site collection solution store). Farm solutions generally run with “full trust,” whereas sandboxed solutions have code-execution and resource-access restrictions. Apps are the next iteration of sandboxed solutions in SharePoint 2013, and although sandboxed solutions are deprecated, they can, in most cases, still be installed in SharePoint 2013. Therefore, apps are really lightweight solutions, with a variety of restrictions, and a key functionality of apps is that they can be hosted in SharePoint 2013 on premises or in the cloud. This functionality is provided by SharePoint REST/OData services to access SharePoint sites, lists, and other data, and SharePoint data can be accessed through the SharePoint JavaScript, Silverlight, or .NET Framework client object models.
Reviewing the Site Administration Tools
On the Site Settings page in the Site Administration section are a number of links to additional tools that the site collection administrator should be familiar with. The links that show vary based on the version of SharePoint 2013 in use and on the features enabled for the site and site collection. The tools in the Site Administration section allow site collection and site administrators to gain a thorough understanding of the settings that apply to a specific site, view and manage libraries and lists, see workflows that are available, access managed metadata through the term store (without having to go to Central Administration), and manage content and the overall structure of the site.
Logically, these tools should be thoroughly investigated and understood for effective site management. These tools are available to site administrators that are “downstream” and have Owner-level privileges on lower level sites but aren’t site collection administrators, so IT usually needs to provide training to lower-level site administrators, or power users, on this set of tools.
A summary of these tools is as follows:
![]() Regional Settings: Allows the administrator to set locale, sort order (for lists and libraries), time zone, calendar type, alternate calendar, days in the work week, first day of the week (which affects how calendars in that site display the week), start time, first week of the year, end time, and time format (12 versus 24 hour).
Regional Settings: Allows the administrator to set locale, sort order (for lists and libraries), time zone, calendar type, alternate calendar, days in the work week, first day of the week (which affects how calendars in that site display the week), start time, first week of the year, end time, and time format (12 versus 24 hour).
![]() Site Libraries and Lists: Shows all lists and libraries in the current site. Clicking a link opens the Settings page for the list or library. Allows creation of new lists and libraries, apps, and sites.
Site Libraries and Lists: Shows all lists and libraries in the current site. Clicking a link opens the Settings page for the list or library. Allows creation of new lists and libraries, apps, and sites.
![]() User Alerts: Shows any existing alerts on the site and allows their deletion. This can be useful to simply see whether users are taking advantage of alerts, but also to delete alerts after a user changes roles or positions or leaves the company.
User Alerts: Shows any existing alerts on the site and allows their deletion. This can be useful to simply see whether users are taking advantage of alerts, but also to delete alerts after a user changes roles or positions or leaves the company.
![]() RSS: Defines whether RSS feeds are allowed in this site collection, and whether they are allowed in the site itself, and if copyright information is attached to RSS feeds, who the managing editor and webmaster are, and defines the time to live in minutes.
RSS: Defines whether RSS feeds are allowed in this site collection, and whether they are allowed in the site itself, and if copyright information is attached to RSS feeds, who the managing editor and webmaster are, and defines the time to live in minutes.
![]() Sites and Workspaces: Shows sites, document workspaces, and meeting workspaces that exist below the current site. Clicking a link opens the home page for the site or workspace. This was discussed earlier in the chapter in the section “Reviewing the Scope of an Existing Site Collection.”
Sites and Workspaces: Shows sites, document workspaces, and meeting workspaces that exist below the current site. Clicking a link opens the home page for the site or workspace. This was discussed earlier in the chapter in the section “Reviewing the Scope of an Existing Site Collection.”
Note
Meeting workspaces have been deprecated in SharePoint 2013, so the list for Meeting Workspaces on the Site and Workspaces page is most likely to show Meeting Workspaces that may have been migrated from an earlier version of SharePoint to SharePoint 2013.
![]() Workflow Settings: Lists workflows associated with the site.
Workflow Settings: Lists workflows associated with the site.
![]() Site Output Cache: This page provides several options for the use of caching page output for anonymous and authenticated users. For the Anonymous Cache Profile, the options are to Inherit or Select a page output cache profile. (The options are Public Internet, Extranet, or Intranet.) For the Authenticated Cache Profile, the options are Inherit or Select a page output cache profile. (The options are Extranet or Intranet.) There is also the option to apply these settings to all subsites.
Site Output Cache: This page provides several options for the use of caching page output for anonymous and authenticated users. For the Anonymous Cache Profile, the options are to Inherit or Select a page output cache profile. (The options are Public Internet, Extranet, or Intranet.) For the Authenticated Cache Profile, the options are Inherit or Select a page output cache profile. (The options are Extranet or Intranet.) There is also the option to apply these settings to all subsites.
![]() Site Closure and Deletion: Offers tools for Site Closure, Site Deletion, and allows the selection of a site policy if any have been defined.
Site Closure and Deletion: Offers tools for Site Closure, Site Deletion, and allows the selection of a site policy if any have been defined.
![]() Popularity Trends: Provides access to a usage report (Excel format) that downloads and opens when clicked, as shown in Figure 21.21, if Excel is loaded on the local machine.
Popularity Trends: Provides access to a usage report (Excel format) that downloads and opens when clicked, as shown in Figure 21.21, if Excel is loaded on the local machine.

![]() Term Store Management: Allows the administrator to review the keywords available to use for tagging items in the site collection and to add or remove keywords. Giving site administrators access to this tool from the Site Settings tools instead of having to access it from Central Administration allows site collection and site administrators to more effectively leverage these tools. Note that the individuals need to be given appropriate permissions in Central Administration to the Managed Metadata service application to manage term sets. This is covered in more detail in Chapter 22, in the “Creating and Using Managed Metadata” section.
Term Store Management: Allows the administrator to review the keywords available to use for tagging items in the site collection and to add or remove keywords. Giving site administrators access to this tool from the Site Settings tools instead of having to access it from Central Administration allows site collection and site administrators to more effectively leverage these tools. Note that the individuals need to be given appropriate permissions in Central Administration to the Managed Metadata service application to manage term sets. This is covered in more detail in Chapter 22, in the “Creating and Using Managed Metadata” section.
![]() Manage Catalog Connections: Allows the connection of a publishing site collection to a library or list that is shared as a catalog.
Manage Catalog Connections: Allows the connection of a publishing site collection to a library or list that is shared as a catalog.
![]() Content and Structure: This page provides a tree view of all lists, libraries, and sites underneath the current site collection and allows a wide range of interaction with these entities (as discussed earlier in this chapter and shown in Figure 21.11). New sites, lists, or pages can be created beneath the top-level site, new items can be created in lists or libraries, list settings can be modified, and individual items can be edited, copied, deleted, and managed.
Content and Structure: This page provides a tree view of all lists, libraries, and sites underneath the current site collection and allows a wide range of interaction with these entities (as discussed earlier in this chapter and shown in Figure 21.11). New sites, lists, or pages can be created beneath the top-level site, new items can be created in lists or libraries, list settings can be modified, and individual items can be edited, copied, deleted, and managed.
![]() Content and Structure Logs: Active if the site is a publishing site or if publishing features are enabled, these logs provide information about final status, source and target, errors, and recovery instructions.
Content and Structure Logs: Active if the site is a publishing site or if publishing features are enabled, these logs provide information about final status, source and target, errors, and recovery instructions.
![]() Translation Status: If publishing sites are using variations, this list tracks the progress of these activities.
Translation Status: If publishing sites are using variations, this list tracks the progress of these activities.
Understanding the Search Tools
Chapter 8, “Leveraging and Optimizing Search in SharePoint 2013,” discusses the capabilities of the search tools in SharePoint 2013, which combine some of the capabilities of SharePoint Search in the 2010 version with capabilities from the FAST Search add-on to SharePoint 2010. This section summarizes the basic tools provided to an administrator on the Site Settings page in the Search section, to clarify what can be managed from a site collection and site perspective without resorting to Central Administration tools.
As will be evident, these are not tools that you will master quickly. In general, you should experiment with them in a development environment before modifying default settings in a production environment. But if the organization truly wants to optimize the use of the search tools, it is important for IT to have a good understanding of the capabilities of the tool set.
The tools offered in SharePoint 2013 Foundation, Standard, or Enterprise in Site Settings are as follows:
![]() Result Sources: In SharePoint 2010, these were referred to as search scopes, which are now deprecated and are now called result sources. A number of built-in result sources are included: Documents, Items Matching a Content Type, Items Related to Current User, Local People Results, Pages, Pictures, and Wiki. New result sources can be defined in this tool and provide a choice of protocols that can be used, including Local SharePoint, Remote SharePoint, OpenSearch 1.0/1.1, or Exchange. A query builder is also available that provides a wide range of keyword filters and property filters and enables you to test the query immediately and see what results are returned.
Result Sources: In SharePoint 2010, these were referred to as search scopes, which are now deprecated and are now called result sources. A number of built-in result sources are included: Documents, Items Matching a Content Type, Items Related to Current User, Local People Results, Pages, Pictures, and Wiki. New result sources can be defined in this tool and provide a choice of protocols that can be used, including Local SharePoint, Remote SharePoint, OpenSearch 1.0/1.1, or Exchange. A query builder is also available that provides a wide range of keyword filters and property filters and enables you to test the query immediately and see what results are returned.
![]() Result Types: SharePoint 2013 provides a much more granular set of tools to dictate how certain results are rendered. Figure 21.22 shows the Manage Results Type page, which lists the standard result types. As shown in Figure 21.22, these include Person, Microsoft Access, Microsoft Excel, Microsoft OneNote, and more. Copies can be made of existing default result types and then modified. Result Conditions are shown, along with Result Actions, as shown in Figure 21.22. New result types can be created from this page, and if the links to the display template is clicked, the admin is taken to the Design Manager: Edit Display Templates page (covered in the “Reviewing the Look and Feel Tools” section).
Result Types: SharePoint 2013 provides a much more granular set of tools to dictate how certain results are rendered. Figure 21.22 shows the Manage Results Type page, which lists the standard result types. As shown in Figure 21.22, these include Person, Microsoft Access, Microsoft Excel, Microsoft OneNote, and more. Copies can be made of existing default result types and then modified. Result Conditions are shown, along with Result Actions, as shown in Figure 21.22. New result types can be created from this page, and if the links to the display template is clicked, the admin is taken to the Design Manager: Edit Display Templates page (covered in the “Reviewing the Look and Feel Tools” section).

![]() Query Rules: These can be defined to conditionally promote specific results, show blocks of additional results, and tune rankings. Query rules can be created for a site, a site collection from the Site Settings interface, or for a Search service application via the Search service application in Central Administration. Query rules allow administrators to define conditions and actions. Several conditions are provided, including Query Matches Keyword Exactly, Query Contains Action Keyword, Query Matches Dictionary Exactly, and several others. The actions provided are Add Promoted Result (and URL needs to be provided), Add Result Block (complex queries can be created), and Change Ranked Results by Changing the Query.
Query Rules: These can be defined to conditionally promote specific results, show blocks of additional results, and tune rankings. Query rules can be created for a site, a site collection from the Site Settings interface, or for a Search service application via the Search service application in Central Administration. Query rules allow administrators to define conditions and actions. Several conditions are provided, including Query Matches Keyword Exactly, Query Contains Action Keyword, Query Matches Dictionary Exactly, and several others. The actions provided are Add Promoted Result (and URL needs to be provided), Add Result Block (complex queries can be created), and Change Ranked Results by Changing the Query.
![]() Schema: This page allows the administrator to view the managed properties, crawled properties, and categories. The search schema is essentially the detailed mapping of “how SharePoint search works.” For example, the Managed Properties view shows the roughly 650 different property names in batches of 50. It also defines the mapping between crawled properties and managed properties; only managed properties are written to the search index. In addition, it defines the type of property (text, integer, decimal, date and time, and other choices); whether the items are queryable, searchable, retrievable, refinable, and sortable; and whether multiple values are allowed. Note that new managed properties need to be defined from the Search Service Application: Search Administration page in Central Administration.
Schema: This page allows the administrator to view the managed properties, crawled properties, and categories. The search schema is essentially the detailed mapping of “how SharePoint search works.” For example, the Managed Properties view shows the roughly 650 different property names in batches of 50. It also defines the mapping between crawled properties and managed properties; only managed properties are written to the search index. In addition, it defines the type of property (text, integer, decimal, date and time, and other choices); whether the items are queryable, searchable, retrievable, refinable, and sortable; and whether multiple values are allowed. Note that new managed properties need to be defined from the Search Service Application: Search Administration page in Central Administration.
![]() Search Settings: This page allows the configuration of the Search Center URL, which adds a message to all users offering them the ability to try their search again from that Search Center. In addition, the results page can be configured to be the same as the parent or a custom results page, or a search navigation node can be used as the destination results page.
Search Settings: This page allows the configuration of the Search Center URL, which adds a message to all users offering them the ability to try their search again from that Search Center. In addition, the results page can be configured to be the same as the parent or a custom results page, or a search navigation node can be used as the destination results page.
![]() Searchable Columns: Columns can be selected here that will be excluded from search indexing so that their contents do not appear in search results.
Searchable Columns: Columns can be selected here that will be excluded from search indexing so that their contents do not appear in search results.
![]() Search and Offline Availability: This page allows the administrator to determine whether the site will appear in search results and whether items from the site can be downloaded to offline clients and enables the administrator to mark the site for re-indexing. An important option also available on this page is the treatment of .aspx pages if the site contains fine-grained permissions. This simply means that if the site does not inherit permissions from the parent, and the permissions have been further customized, the site will be treated differently in terms of what is indexed on the .aspx page. The options are Do Not Index Web Parts If This Site Contains Fine-Grained Permissions, Always Index All Web Parts on This Site, and Never Index Any Web Parts on This Site.
Search and Offline Availability: This page allows the administrator to determine whether the site will appear in search results and whether items from the site can be downloaded to offline clients and enables the administrator to mark the site for re-indexing. An important option also available on this page is the treatment of .aspx pages if the site contains fine-grained permissions. This simply means that if the site does not inherit permissions from the parent, and the permissions have been further customized, the site will be treated differently in terms of what is indexed on the .aspx page. The options are Do Not Index Web Parts If This Site Contains Fine-Grained Permissions, Always Index All Web Parts on This Site, and Never Index Any Web Parts on This Site.
![]() Configuration Import: Allows the import of an exported search configuration Extensible Markup Language (XML) file. This can be a great time saver due to the possible complexity of search customizations.
Configuration Import: Allows the import of an exported search configuration Extensible Markup Language (XML) file. This can be a great time saver due to the possible complexity of search customizations.
![]() Configuration Export: Allows the administrator to save the current search configuration to an XML file. This can then be imported using the Configuration Import tool.
Configuration Export: Allows the administrator to save the current search configuration to an XML file. This can then be imported using the Configuration Import tool.
Reviewing the Look and Feel Tools
The tools that appear in this section of the Site Settings page vary based on the version of SharePoint 2013 in use and the type of site collection created. For example, the Design Manager and Welcome Page links are available only in publishing sites.
This section of tools is a mixture of “harmless” and easy-to-use tools and “dangerous” tools, so the farm administrators should be aware of the capabilities of the different tools and train site collection and site administrators accordingly. For example, the Title, Description, and Logo tools allow the user to change the title of the site, provide a description, and add or modify the logo being used, which are all “safe” changes. Tree view allows an administrator to display or hide the quick launch and display or hide the tree view, again very simple and safe changes. But other tools allow the administrator to change master pages, specify a custom Cascading Style Sheet (CSS) file that should be used, import design packages, or make other changes that could cause dramatic changes or actually stop the site from rendering. Of special interest is the Design Manager “tool,” which is actually more of a collection of tools that provide access to some new master page and page layout editing tools that will be very valuable to organizations wanting to customize the look, feel, and functionality of SharePoint 2013.
Following is a summary of the tools provided:
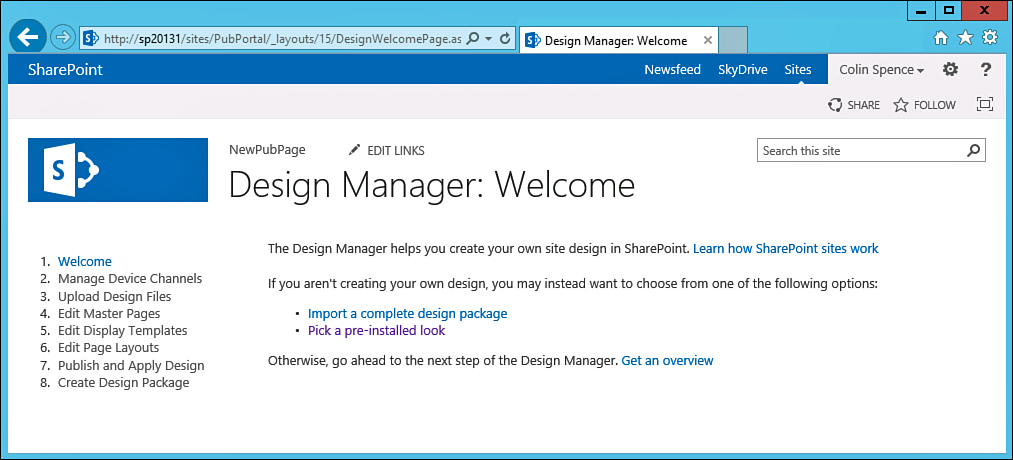
![]() Design Manager: Design Manager is a publishing feature available in publishing sites in SharePoint Server 2013 and provides access to a selection of eight pages, or a wizard of sorts, as shown in Figure 21.23. The user can choose any of the options desired and learn more about the particular component of SharePoint branding: Device Channels, Design Files, Master Pages, Display Templates, Page Layouts, and other components. These tools allow the user to create new device channels from the Manage Device Channels link or create new master pages (or edit existing ones) using the Edit Master Pages link. Likewise, new page layouts can be created, and a design package can be created containing multiple elements.
Design Manager: Design Manager is a publishing feature available in publishing sites in SharePoint Server 2013 and provides access to a selection of eight pages, or a wizard of sorts, as shown in Figure 21.23. The user can choose any of the options desired and learn more about the particular component of SharePoint branding: Device Channels, Design Files, Master Pages, Display Templates, Page Layouts, and other components. These tools allow the user to create new device channels from the Manage Device Channels link or create new master pages (or edit existing ones) using the Edit Master Pages link. Likewise, new page layouts can be created, and a design package can be created containing multiple elements.
Note
Design Manager is also available from the gear icon to users with sufficient permissions.
Note
SharePoint branding is a complex process, and although the Design Manager may be of some value to experienced or novice branding resources, there are still many risks involved with attempting to dramatically alter the look and feel of the SharePoint environment. Microsoft has put a lot of effort into making SharePoint branding easier, and SharePoint Designer is no longer the only tool that is recommended. Tools such as Visual Studio, Dreamweaver, and others can now be used. By accessing the Snippet Gallery, as shown in Figure 21.24, different master page components (such as Top Navigation, Vertical Navigation, and Search Box) can be customized in the Customization section on the right of the screen. The Hypertext Markup Language (HTML) snippet and the preview image are updated accordingly, and this makes the testing process easy to experiment with. You can see the results immediately; they are often not as expected. The HTML snippets can then be pasted into a different editing tool set, such as Dreamweaver. Figure 21.24 shows an example of where the search box component was edited by accessing the Appearance section in the Customization area.

![]() Master Page: This page allows the administrator to determine site master page settings, system master page settings, theme, and alternate CSS URL. The site master page and system master page can be inherited from the parent (assuming the site is not the top level site, in which case there is no parent), or a master page can be chosen from the drop-down list (which provides choices from the master page and Page Layout gallery). The default master pages available are Seattle and Oslo. Under the Theme section, a check box allows the administrator to determine whether the site inherits the theme from the parent of this site (if there is a parent). Under the Alternate CSS URL section, the administrator can choose to Inherit Alternate CSS URL from Parent of This Site, Use Default Styles and Any CSS Files Associated with Your Master Page, or to Specify a CSS File to Be Used by This Site and All Sites That Inherit from It. If the third option is chosen, a Browse button allows the administrator to select from the Style library.
Master Page: This page allows the administrator to determine site master page settings, system master page settings, theme, and alternate CSS URL. The site master page and system master page can be inherited from the parent (assuming the site is not the top level site, in which case there is no parent), or a master page can be chosen from the drop-down list (which provides choices from the master page and Page Layout gallery). The default master pages available are Seattle and Oslo. Under the Theme section, a check box allows the administrator to determine whether the site inherits the theme from the parent of this site (if there is a parent). Under the Alternate CSS URL section, the administrator can choose to Inherit Alternate CSS URL from Parent of This Site, Use Default Styles and Any CSS Files Associated with Your Master Page, or to Specify a CSS File to Be Used by This Site and All Sites That Inherit from It. If the third option is chosen, a Browse button allows the administrator to select from the Style library.
Note
Specifying a CSS file is a relatively “safe” way to overwrite settings determined by the current master page and page layouts, because they can easily be managed as separate entities and attached or removed very simply, making it easy to undo any undesirable effects on the site.
![]() Title, Description, and Logo: Allows the administrator to quickly change the title of the site (no effect on the actual URL) and add comments (that appear if the i button next to the name of the site is clicked). Also, if a custom logo is desired (which it will be in every instance except perhaps in basic development labs), it can be modified by uploading a graphic image from the user’s computer or a SharePoint library. The image is uploaded to the Site Assets library.
Title, Description, and Logo: Allows the administrator to quickly change the title of the site (no effect on the actual URL) and add comments (that appear if the i button next to the name of the site is clicked). Also, if a custom logo is desired (which it will be in every instance except perhaps in basic development labs), it can be modified by uploading a graphic image from the user’s computer or a SharePoint library. The image is uploaded to the Site Assets library.
![]() Page Layouts and Site Templates: This tool allows administrator to determine which site templates, page layouts, and default page layout for new pages will be used when administrators or users create subsites and pages. This can be very useful in limiting the range of site templates and page layouts that can be used, which can make training and support easier for IT. Note there is now an option to convert blank spaces in the page name to –; so, instead of %20, a dash is used to represent a space in page names, which shortens the URL and makes it easier to read.
Page Layouts and Site Templates: This tool allows administrator to determine which site templates, page layouts, and default page layout for new pages will be used when administrators or users create subsites and pages. This can be very useful in limiting the range of site templates and page layouts that can be used, which can make training and support easier for IT. Note there is now an option to convert blank spaces in the page name to –; so, instead of %20, a dash is used to represent a space in page names, which shortens the URL and makes it easier to read.
![]() Welcome Page: In publishing-enabled sites, this allows the administrator to select a different page that is presented when a user navigates to the site. In a publishing site, the default page is titled default.aspx and is located in the Pages library.
Welcome Page: In publishing-enabled sites, this allows the administrator to select a different page that is presented when a user navigates to the site. In a publishing site, the default page is titled default.aspx and is located in the Pages library.
![]() Device Channels: In SharePoint 2010, there was only one default mobile page, but device channels in SharePoint 2013 can be used to provide different renditions of content for multiple different types of devices. Device channels are available only on publishing sites, and there is only one (titled default) to start with, but others can be created from this page by clicking the New Item link. Organizations that are tasked with supporting multiple devices such as Windows phones, iPhones, and tablets will find this useful. There can be a maximum of 10 device channels (including the default).
Device Channels: In SharePoint 2010, there was only one default mobile page, but device channels in SharePoint 2013 can be used to provide different renditions of content for multiple different types of devices. Device channels are available only on publishing sites, and there is only one (titled default) to start with, but others can be created from this page by clicking the New Item link. Organizations that are tasked with supporting multiple devices such as Windows phones, iPhones, and tablets will find this useful. There can be a maximum of 10 device channels (including the default).
![]() Tree View: This page allows the administrator to enable quick launch and enable tree view, or disable either. Note that some organizations feel that the quick launch takes up valuable real estate on the screen or is simply distracting and not useful and choose to hide it. However, the Site Contents link will still be on the left side of the screen, so the horizontal space will still be taken up. Figure 21.25 shows an example where the tree view is enabled, and it appears underneath the quick launch content in the lower-left part of the screen.
Tree View: This page allows the administrator to enable quick launch and enable tree view, or disable either. Note that some organizations feel that the quick launch takes up valuable real estate on the screen or is simply distracting and not useful and choose to hide it. However, the Site Contents link will still be on the left side of the screen, so the horizontal space will still be taken up. Figure 21.25 shows an example where the tree view is enabled, and it appears underneath the quick launch content in the lower-left part of the screen.

![]() Change the Look: A number of predesigned themes can be selected from this page. You can find the details of each theme by accessing the Composed Looks link in the Web Designer Galleries section of the Site Settings page.
Change the Look: A number of predesigned themes can be selected from this page. You can find the details of each theme by accessing the Composed Looks link in the Web Designer Galleries section of the Site Settings page.
![]() Import Design Package: Design Packages can be created in the Design Manager or in tools that can create .wsp files (SharePoint solution files). When imported, the .wsp is stored in the Solutions gallery and automatically activated.
Import Design Package: Design Packages can be created in the Design Manager or in tools that can create .wsp files (SharePoint solution files). When imported, the .wsp is stored in the Solutions gallery and automatically activated.
![]() Navigation: These tools allow the administrator to define how the global navigation works (which is shown near the top of the page on most pages) and the local navigation works (shown in the quick launch on most pages). For global and current navigation, if the site is a lower-level (not top-level) subsite, the option Display the Same Navigation Items as the Parent Site is provided. In addition, for global and current navigation, the options Managed Navigation (navigation items are represented using a managed metadata term set) and Structural Navigation (displays the navigation items below the current site) are provided. There is an additional option for current navigation, which is Structural Navigation (displays the current site, the navigation items below the current site, and the current site’s siblings). New to SharePoint 2013 is the ability to connect to a term set for navigation items. In addition, options are provided to add new pages to navigation automatically, to create friendly URLs for new pages automatically, and to make Show Ribbon and Hide Ribbon commands available.
Navigation: These tools allow the administrator to define how the global navigation works (which is shown near the top of the page on most pages) and the local navigation works (shown in the quick launch on most pages). For global and current navigation, if the site is a lower-level (not top-level) subsite, the option Display the Same Navigation Items as the Parent Site is provided. In addition, for global and current navigation, the options Managed Navigation (navigation items are represented using a managed metadata term set) and Structural Navigation (displays the navigation items below the current site) are provided. There is an additional option for current navigation, which is Structural Navigation (displays the current site, the navigation items below the current site, and the current site’s siblings). New to SharePoint 2013 is the ability to connect to a term set for navigation items. In addition, options are provided to add new pages to navigation automatically, to create friendly URLs for new pages automatically, and to make Show Ribbon and Hide Ribbon commands available.
Note
Figure 21.26 shows the Managed Navigation: Term Set section, which is a powerful new tool that enables administrators to define the key navigation items as part of a managed metadata term set. This makes it easier to enforce a standard navigation structure, and if changes are made to the term set, they are propagated to any navigation elements that connect to the term set. Note that there is a link to Open the Term Store Management Tool to Edit Term Sets for complete access to the members of the term set.

Reviewing the Site Actions Tools
The Site Actions section of the Site Settings page provides tools that enable the administrator to manage site features, enable search configuration export, reset to a site definition, or delete the site. On a subsite, the Site Collection Administration tools are not available, so site administrators and site collection administrators want to be comfortable with the Site Actions tools.
Site features are reviewed in more detail later in this section, but (in brief) enable the site collection administrator to control which tool sets are available to site collection and site users.
The Site Actions section contains the following tools:
![]() Manage Site Features: These are discussed in more detail in the “Reviewing Site Features and Site Collection Features” section in this chapter.
Manage Site Features: These are discussed in more detail in the “Reviewing Site Features and Site Collection Features” section in this chapter.
![]() Save Site as Template: Not available for publishing sites, this tool is very useful for saving sites that have been customized for specific uses, such as for specific types of groups of users such as Departmental Public site, Departmental Private site, Project X site, and so on. A check box is available that enables the saving of content with the template.
Save Site as Template: Not available for publishing sites, this tool is very useful for saving sites that have been customized for specific uses, such as for specific types of groups of users such as Departmental Public site, Departmental Private site, Project X site, and so on. A check box is available that enables the saving of content with the template.
![]() Enable Search Configuration Export: If this is clicked, Search Configuration Export is enabled. This can be valuable if the search customization tools are going to be used, because the search configuration details can be very intricate and can be time-consuming to reproduce.
Enable Search Configuration Export: If this is clicked, Search Configuration Export is enabled. This can be valuable if the search customization tools are going to be used, because the search configuration details can be very intricate and can be time-consuming to reproduce.
![]() Reset to Site Definition: This tool is generally used only when the site or a page on the site is damaged. Using this tool removes all customizations from a page or all pages on the site, including web part zones, custom controls, and inline text. The options include Make “Show Ribbon” and “Hide Ribbon” Commands Available and Reset All Pages in this Site to Site Definition Version.
Reset to Site Definition: This tool is generally used only when the site or a page on the site is damaged. Using this tool removes all customizations from a page or all pages on the site, including web part zones, custom controls, and inline text. The options include Make “Show Ribbon” and “Hide Ribbon” Commands Available and Reset All Pages in this Site to Site Definition Version.
![]() Delete This Site: If the link is clicked, additional information is provided on the items that will be deleted and sent to the Recycle Bin. The administrator then needs to confirm the action by again clicking the Delete button.
Delete This Site: If the link is clicked, additional information is provided on the items that will be deleted and sent to the Recycle Bin. The administrator then needs to confirm the action by again clicking the Delete button.
An Overview of Site Collection Administration Tools
These tools are visible only to a site collection administrator and only from the top-level site of the site collection. Lower-level sites have a link in this section of the page labeled Go to Top Level Site Settings. These tools affect the full range of sites in the site collection and can affect search settings, site collection features, auditing, policies, content types, the use of SharePoint Designer, and numerous other features.
The tools included in this section vary based on the type of site in use, so this section covers the most common tools, as follows:
![]() Recycle Bin: Displays the End User Recycle Bin and gives a link to Deleted from End User Recycle Bin (otherwise known as the Second-Level Recycle Bin). The administrator can restore sites, lists, libraries, or individual items that have been deleted. Individual items can be deleted from the First- or Second-Level Recycle Bins, or the First-Level Recycle Bin can be emptied.
Recycle Bin: Displays the End User Recycle Bin and gives a link to Deleted from End User Recycle Bin (otherwise known as the Second-Level Recycle Bin). The administrator can restore sites, lists, libraries, or individual items that have been deleted. Individual items can be deleted from the First- or Second-Level Recycle Bins, or the First-Level Recycle Bin can be emptied.
![]() Search Result Sources: This provides the same capabilities as the Result Sources link under the Search heading on the Site Settings page, with the exception that these apply to the full site collection, not just to a specific site. This is covered earlier in this chapter in the “Understanding the Search Tools” section.
Search Result Sources: This provides the same capabilities as the Result Sources link under the Search heading on the Site Settings page, with the exception that these apply to the full site collection, not just to a specific site. This is covered earlier in this chapter in the “Understanding the Search Tools” section.
![]() Search Result Types: This provides the same capabilities as the Result Types link under the Search heading on the Site Settings page, with the exception that these apply to the full site collection, not just to a specific site. This is covered earlier in this chapter in the “Understanding the Search Tools” section.
Search Result Types: This provides the same capabilities as the Result Types link under the Search heading on the Site Settings page, with the exception that these apply to the full site collection, not just to a specific site. This is covered earlier in this chapter in the “Understanding the Search Tools” section.
![]() Search Query Rules: This provides the same capabilities as the Query Rules link under the Search heading on the Site Settings page, with the exception that these apply to the full site collection, not just to a specific site. This is covered earlier in this chapter in the “Understanding the Search Tools” section.
Search Query Rules: This provides the same capabilities as the Query Rules link under the Search heading on the Site Settings page, with the exception that these apply to the full site collection, not just to a specific site. This is covered earlier in this chapter in the “Understanding the Search Tools” section.
![]() Search Schema: This provides the same capabilities as the Schema link under the Search heading on the Site Settings page, with the exception that these apply to the full site collection, not just to a specific site. This is covered earlier in this chapter in the “Understanding the Search Tools” section.
Search Schema: This provides the same capabilities as the Schema link under the Search heading on the Site Settings page, with the exception that these apply to the full site collection, not just to a specific site. This is covered earlier in this chapter in the “Understanding the Search Tools” section.
![]() Search Settings: This provides the same capabilities as the Search Settings link under the Search heading on the Site Settings page, with the exception that these apply to the full site collection, not just to a specific site. This is covered earlier in this chapter in the “Understanding the Search Tools” section.
Search Settings: This provides the same capabilities as the Search Settings link under the Search heading on the Site Settings page, with the exception that these apply to the full site collection, not just to a specific site. This is covered earlier in this chapter in the “Understanding the Search Tools” section.
![]() Search Configuration Import: This provides the same capabilities as the Configuration Import link under the Search heading on the Site Settings page, with the exception that these apply to the full site collection, not just to a specific site. This is covered earlier in this chapter in the “Understanding the Search Tools” section.
Search Configuration Import: This provides the same capabilities as the Configuration Import link under the Search heading on the Site Settings page, with the exception that these apply to the full site collection, not just to a specific site. This is covered earlier in this chapter in the “Understanding the Search Tools” section.
![]() Search Configuration Export: This provides the same capabilities as the Configuration Export link under the Search heading on the Site Settings page, as covered earlier in this chapter in the “Understanding the Search Tools” section.
Search Configuration Export: This provides the same capabilities as the Configuration Export link under the Search heading on the Site Settings page, as covered earlier in this chapter in the “Understanding the Search Tools” section.
![]() Site Collection Features: These are discussed later in this chapter in the “Reviewing Site Features and Site Collection Features” section.
Site Collection Features: These are discussed later in this chapter in the “Reviewing Site Features and Site Collection Features” section.
![]() Site Hierarchy: Shows all websites that have been created under the current site. This was discussed earlier in this chapter in the “Reviewing the Scope of an Existing Site Collection” section.
Site Hierarchy: Shows all websites that have been created under the current site. This was discussed earlier in this chapter in the “Reviewing the Scope of an Existing Site Collection” section.
![]() Search Engine Optimization Settings: This page provides the ability to include meta tags on pages that verify ownership of the site, and to provide filter link parameters for search engines that track link popularity for multiple URLs separately.
Search Engine Optimization Settings: This page provides the ability to include meta tags on pages that verify ownership of the site, and to provide filter link parameters for search engines that track link popularity for multiple URLs separately.
![]() Site Collection Navigation: Enabled by default, navigation links can be disabled from this page. If this is disabled, the navigations are hidden. Security trimming on navigation is also on by default, but you can turn it off. If this is turned off, users will see links even if they don’t have permissions to access the URLs the links connect to. Audience targeting, also on by default, can be turned off for navigation links.
Site Collection Navigation: Enabled by default, navigation links can be disabled from this page. If this is disabled, the navigations are hidden. Security trimming on navigation is also on by default, but you can turn it off. If this is turned off, users will see links even if they don’t have permissions to access the URLs the links connect to. Audience targeting, also on by default, can be turned off for navigation links.
![]() Site Collection Audit Settings: Provides access to a number of settings pertaining to audit logs, such as automatic trimming of audit logs and specifying the events that will be audited on documents and items, as well as on lists, libraries, and sites. Figure 21.27 shows a configuration example where the site collection administrator wants to track certain events that apply to documents or items (Moving or Copying Items to Another Location in the Site and Deleting or Restoring Items) as well as certain events that apply to lists, libraries, and sites (Editing Content Types and Columns, Searching Site Content, and Editing Users and Permissions).
Site Collection Audit Settings: Provides access to a number of settings pertaining to audit logs, such as automatic trimming of audit logs and specifying the events that will be audited on documents and items, as well as on lists, libraries, and sites. Figure 21.27 shows a configuration example where the site collection administrator wants to track certain events that apply to documents or items (Moving or Copying Items to Another Location in the Site and Deleting or Restoring Items) as well as certain events that apply to lists, libraries, and sites (Editing Content Types and Columns, Searching Site Content, and Editing Users and Permissions).
![]() Audit Log Reports: This page provides access to several categories of reports: Content Activity Reports, Custom Reports, Information Management Policy Reports, and Security and Site Settings Reports. The Run a Custom Report link allows the administrator to define the specific events to report on such as deleting or restoring items or searching site content for the entire site collection or a particular site or list in the site collection. These reports are generated when selected, and the administrator simply needs to enter a destination for the report and it is generated and can be opened immediately. A people picker field is available to specify which user this report should be restricted to. Figure 21.28 shows a custom report that was generated to show any Editing Users and Permissions activities that took place for an entire site collection. The first tab (not shown) provides a summary of total activities, and the second (shown in Figure 21.28) provides the details of the activity, including the item type, user ID who made the change, date and time, and type of event. Because the report is in Excel format, it is easy for most users to filter, sort, or format the information as needed.
Audit Log Reports: This page provides access to several categories of reports: Content Activity Reports, Custom Reports, Information Management Policy Reports, and Security and Site Settings Reports. The Run a Custom Report link allows the administrator to define the specific events to report on such as deleting or restoring items or searching site content for the entire site collection or a particular site or list in the site collection. These reports are generated when selected, and the administrator simply needs to enter a destination for the report and it is generated and can be opened immediately. A people picker field is available to specify which user this report should be restricted to. Figure 21.28 shows a custom report that was generated to show any Editing Users and Permissions activities that took place for an entire site collection. The first tab (not shown) provides a summary of total activities, and the second (shown in Figure 21.28) provides the details of the activity, including the item type, user ID who made the change, date and time, and type of event. Because the report is in Excel format, it is easy for most users to filter, sort, or format the information as needed.

FIGURE 21.28 A custom report for a site collection that shows editing users and permissions activities.
![]() Portal Site Connection: A portal site connection can be used to link one site collection to another site collection. For example, if you have a main site collection that you want to provide a link to, you can configure a portal site connection that points to the main site collection. The portal site is added to the global breadcrumb navigation for the current site collection. When site collection users click the up folder, the portal site is listed as the parent of the site collection. This enables users to navigate to the portal site more easily.
Portal Site Connection: A portal site connection can be used to link one site collection to another site collection. For example, if you have a main site collection that you want to provide a link to, you can configure a portal site connection that points to the main site collection. The portal site is added to the global breadcrumb navigation for the current site collection. When site collection users click the up folder, the portal site is listed as the parent of the site collection. This enables users to navigate to the portal site more easily.
![]() Content Type Policy Templates: This tool provides the ability to create policies for the site collection. Policies can include policy statements that display to end users when an item subject to this policy is opened; then retention, auditing, barcodes, and labels can be enabled. Only certain events can be audited in this tool, and those are opening or downloading documents, viewing items in a list, viewing item properties, editing items, checking out or checking in items, moving or copying items to another location in the site, and deleting or restoring items. Figure 21.29 shows the Stage Properties window that appears when the Add a Retention Stage link is clicked. This allows the administrator to determine what date property of the item triggers a specific retention activity, as follows: Move to Recycle Bin, Permanently Delete, Transfer to Another Location, Start a Workflow, Skip to Next Stage, Declare Record, Delete Previous Drafts, and Delete All Previous Versions. When defined, these can be applied from lists and libraries in the List Settings page, under the Information Management Policy Settings link.
Content Type Policy Templates: This tool provides the ability to create policies for the site collection. Policies can include policy statements that display to end users when an item subject to this policy is opened; then retention, auditing, barcodes, and labels can be enabled. Only certain events can be audited in this tool, and those are opening or downloading documents, viewing items in a list, viewing item properties, editing items, checking out or checking in items, moving or copying items to another location in the site, and deleting or restoring items. Figure 21.29 shows the Stage Properties window that appears when the Add a Retention Stage link is clicked. This allows the administrator to determine what date property of the item triggers a specific retention activity, as follows: Move to Recycle Bin, Permanently Delete, Transfer to Another Location, Start a Workflow, Skip to Next Stage, Declare Record, Delete Previous Drafts, and Delete All Previous Versions. When defined, these can be applied from lists and libraries in the List Settings page, under the Information Management Policy Settings link.
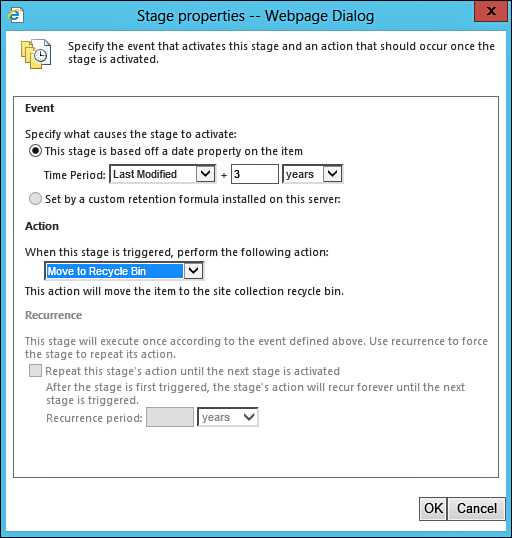
![]() Storage Metrics: Provides a list of SharePoint objects, including lists, libraries, .aspx pages, and sites and documents, as well as the total size of the object, % of parent, and last modified date. An administrator can drill down into lists, libraries, or subsites to investigate the contents in more detail. There is no built-in export capability, however.
Storage Metrics: Provides a list of SharePoint objects, including lists, libraries, .aspx pages, and sites and documents, as well as the total size of the object, % of parent, and last modified date. An administrator can drill down into lists, libraries, or subsites to investigate the contents in more detail. There is no built-in export capability, however.
![]() Site Collection App Permissions: This page shows apps that have access to the content within the site collection.
Site Collection App Permissions: This page shows apps that have access to the content within the site collection.
![]() Site Policies: This allows the administrator to configure how sites under the policy are closed/deleted automatically. “Closing” a site simply removes the site from places that aggregate sites (Outlook, Office Web Apps [OWA], project server), but users with access to the sites can still access and modify content. There is also an option to set the site collection to read only after it is closed. Administrators can define after what period of time the site is deleted, can schedule email notifications to be sent, and can even allow owners to postpone deletion for a period of days, months, or years.
Site Policies: This allows the administrator to configure how sites under the policy are closed/deleted automatically. “Closing” a site simply removes the site from places that aggregate sites (Outlook, Office Web Apps [OWA], project server), but users with access to the sites can still access and modify content. There is also an option to set the site collection to read only after it is closed. Administrators can define after what period of time the site is deleted, can schedule email notifications to be sent, and can even allow owners to postpone deletion for a period of days, months, or years.
![]() Content Type Publishing: The first entry on the page allows the administrator to refresh all published content types on next update. A link to the content type publishing error log is provided. The Managed Metadata Service hub, if one is defined, is displayed, along with any subscribed content types.
Content Type Publishing: The first entry on the page allows the administrator to refresh all published content types on next update. A link to the content type publishing error log is provided. The Managed Metadata Service hub, if one is defined, is displayed, along with any subscribed content types.
![]() Popularity and Search Reports: This link provides access to a wide variety of reports, including Usage, Top Queries by Month, Abandoned Queries by Day, Query Rules Usage by Day, and others. By regularly reviewing these reports, an administrator can get a sense for how well search is configured to meet end-user requirements and whether modifications or changes are needed.
Popularity and Search Reports: This link provides access to a wide variety of reports, including Usage, Top Queries by Month, Abandoned Queries by Day, Query Rules Usage by Day, and others. By regularly reviewing these reports, an administrator can get a sense for how well search is configured to meet end-user requirements and whether modifications or changes are needed.
![]() HTML Field Security: Allows the administrator to specify whether users can insert external iframes in HTML fields on pages or not, and if allowed, whether iframes from any external domain can be inserted or only iframes from certain domains (such as youtube.com, bing.com, and so on).
HTML Field Security: Allows the administrator to specify whether users can insert external iframes in HTML fields on pages or not, and if allowed, whether iframes from any external domain can be inserted or only iframes from certain domains (such as youtube.com, bing.com, and so on).
![]() Help Settings: The administrator can enable any or all available help collections; for example, Central Administration, SharePoint Help, Student Help, and Teacher Help.
Help Settings: The administrator can enable any or all available help collections; for example, Central Administration, SharePoint Help, Student Help, and Teacher Help.
![]() SharePoint Designer Settings: This link allows the administrator to enable or disable the following settings: Enable SharePoint Designer, Enable Detaching Pages from the Site Definition, Enable Customizing Master Pages and Page Layouts, and Enable Managing of the Web Site URL Structure.
SharePoint Designer Settings: This link allows the administrator to enable or disable the following settings: Enable SharePoint Designer, Enable Detaching Pages from the Site Definition, Enable Customizing Master Pages and Page Layouts, and Enable Managing of the Web Site URL Structure.
![]() Site Collection Health Checks: This allows the administrator to run an automated site collection health check by clicking the Start Checks button. A report then shows whether any issues exist in a number of categories, such as conflicting content types, customized files, missing galleries, missing parent content types, missing site templates, and others. This is designed to be used if the site collection is from a SharePoint 2010 farm or has been migrated to a 2013 farm but is running in SharePoint 2010 mode. It can also prove useful for a basic health check to be run on a regular basis, especially for customized site collections.
Site Collection Health Checks: This allows the administrator to run an automated site collection health check by clicking the Start Checks button. A report then shows whether any issues exist in a number of categories, such as conflicting content types, customized files, missing galleries, missing parent content types, missing site templates, and others. This is designed to be used if the site collection is from a SharePoint 2010 farm or has been migrated to a 2013 farm but is running in SharePoint 2010 mode. It can also prove useful for a basic health check to be run on a regular basis, especially for customized site collections.
![]() Site Collection Upgrade: This applies if the site collection was migrated from a SharePoint 2010 farm and was then upgraded to 2013 mode. To see whether a site has been migrated, simply click the Review Site Collection Upgrade Status link.
Site Collection Upgrade: This applies if the site collection was migrated from a SharePoint 2010 farm and was then upgraded to 2013 mode. To see whether a site has been migrated, simply click the Review Site Collection Upgrade Status link.
Note
Site variations are designed for organizations that support users who speak a number of different languages and expect to see sites in the language they use on their computer. More specifically, when site variations are defined, users are redirected based on the language their browser is set to, assuming a site is defined and the prerequisites are configured.
SharePoint 2013, unfortunately, does not do any translation, so the organization will be responsible for performing the translations of the content. The Translatable Columns link from the Site Settings page provides access to the full list of columns used in the site collection and allows the site administrator to select columns that are “translatable” and will be flagged as requiring translation.
Note also that variations can be used only on sites that are created with one of the Publishing site templates, or on sites for where the SharePoint Server Publishing Infrastructure feature has been enabled. Also, it is important to point out that by default the variations feature copies only publishing pages from the Pages library of the source variation site and does not copy content from lists or document libraries.
Reviewing Site Features and Site Collection Features
Site features and site collection features allow the site collection administrator to turn on and off a wide variety of features that enable different combinations of tools to be used on the site or site collection. Tables 21.1, 21.2, and 21.3 provided earlier in this chapter list the site features and site collection features in the standard templates that are provided out-of-the-box. These tables can help an architect or farm administrator get a sense for which site and site collection features are required for certain templates, and it is a good idea to not turn off features that are on by default.
These pages are fairly intimidating if SharePoint Server 2013 Enterprise is installed, so the site collection administrator should carefully consider which, if any, of these features to enable above and beyond the features that are enabled by default when the site collection is created. Some site features require that site collection features are enabled, and error messages will indicate when a prerequisite has not been met.
This section provides a high-level overview of site features provided by SharePoint Server 2013 Enterprise. You can access these by clicking the Manage Site Features link in the Site Actions section on the Site Settings page.
Standard site features in SharePoint Foundation 2013 are as follows:
![]() External System Events: This feature enables Alerts and Event Receivers on the External List and External Content Types. This is a new feature in SharePoint 2013 Business Data Connectivity Services (BCS) that enables SharePoint to receive events from external systems, to let a SharePoint REST endpoint know that an event has occurred.
External System Events: This feature enables Alerts and Event Receivers on the External List and External Content Types. This is a new feature in SharePoint 2013 Business Data Connectivity Services (BCS) that enables SharePoint to receive events from external systems, to let a SharePoint REST endpoint know that an event has occurred.
![]() Getting Started: Provides a tile view experience for common SharePoint site actions. This is enabled by default in most SharePoint sites, but administrators may want to turn it off for more advanced user groups.
Getting Started: Provides a tile view experience for common SharePoint site actions. This is enabled by default in most SharePoint sites, but administrators may want to turn it off for more advanced user groups.
![]() Minimal Download Strategy (MDS): MDS delivers a faster page-rendering experience and is enabled by default on a number of sites. When MDS is enabled, pages are rendered through the /_layouts/15/start.aspx page. Essentially, it downloads and renders only those portions of a page that are changing. Publishing site templates do not use MDS by default, and it is recommended that it be left inactive on publishing sites.
Minimal Download Strategy (MDS): MDS delivers a faster page-rendering experience and is enabled by default on a number of sites. When MDS is enabled, pages are rendered through the /_layouts/15/start.aspx page. Essentially, it downloads and renders only those portions of a page that are changing. Publishing site templates do not use MDS by default, and it is recommended that it be left inactive on publishing sites.
![]() Mobile Browser View: Provides the document library and other lists in the team site with a mobile view optimized for smartphone browsers that is accessible by accessing a /mobile version of the site. Figure 21.30 shows a view of a document library accessed under the /mobile path. (In this example, the path is http://sp201302/_layouts/15/mobile/viewa.aspx?List=e87f9fc5%2Db181%2D4567%2D845b%2Dd62288b50c9e&View=37302d80%2D319e%2D42bd%2D83c8%2Dbf3f698681ea.) The gear icon for a mobile page gives the user access to a very limited set of tools, such as Site Contents, Details View, Switch to PC View, and Sign Out.
Mobile Browser View: Provides the document library and other lists in the team site with a mobile view optimized for smartphone browsers that is accessible by accessing a /mobile version of the site. Figure 21.30 shows a view of a document library accessed under the /mobile path. (In this example, the path is http://sp201302/_layouts/15/mobile/viewa.aspx?List=e87f9fc5%2Db181%2D4567%2D845b%2Dd62288b50c9e&View=37302d80%2D319e%2D42bd%2D83c8%2Dbf3f698681ea.) The gear icon for a mobile page gives the user access to a very limited set of tools, such as Site Contents, Details View, Switch to PC View, and Sign Out.
![]() Offline Synchronization for External Lists: Enables offline synchronization between external lists and Outlook. This enables the use of the Connect to Outlook button on the Library tab on the Ribbon; it also enables the configuration of certain external content types.
Offline Synchronization for External Lists: Enables offline synchronization between external lists and Outlook. This enables the use of the Connect to Outlook button on the Library tab on the Ribbon; it also enables the configuration of certain external content types.
![]() Search Config Data Content Types: Installs content types designed to manage search configuration. Note that this must be enabled before you export a design package from the Design Manager.
Search Config Data Content Types: Installs content types designed to manage search configuration. Note that this must be enabled before you export a design package from the Design Manager.
![]() Search Config Data Site Columns: Installs columns designed to manage information about search configurations. Note that this must be enabled before you export a design package from the Design Manager.
Search Config Data Site Columns: Installs columns designed to manage information about search configurations. Note that this must be enabled before you export a design package from the Design Manager.
![]() Search Config List Instance Feature: Provisions a list to enable the import and export of search configurations. Note that this must be enabled before you export a design package from the Design Manager.
Search Config List Instance Feature: Provisions a list to enable the import and export of search configurations. Note that this must be enabled before you export a design package from the Design Manager.
![]() Search Config Template Feature: Creates a Search Config Template for the Search Config List to enable the import and export of search configurations. Note that this must be enabled before you export a design package from the Design Manager.
Search Config Template Feature: Creates a Search Config Template for the Search Config List to enable the import and export of search configurations. Note that this must be enabled before you export a design package from the Design Manager.
![]() Site Notebook: Creates a Microsoft OneNote 2010 notebook in the Shared Documents library and places a link to it on the quick launch. This feature requires a properly configured WOPI (Web Application Open Platform Interface) application server (such as OWA Server 2013) to create OneNote 2010 notebooks.
Site Notebook: Creates a Microsoft OneNote 2010 notebook in the Shared Documents library and places a link to it on the quick launch. This feature requires a properly configured WOPI (Web Application Open Platform Interface) application server (such as OWA Server 2013) to create OneNote 2010 notebooks.
![]() Team Collaboration Lists: Provides team collaboration capabilities for a site by making standard lists, such as document libraries and issues, available.
Team Collaboration Lists: Provides team collaboration capabilities for a site by making standard lists, such as document libraries and issues, available.
![]() Wiki Page Home Page: This site feature will create a wiki page and set it as your site home page.
Wiki Page Home Page: This site feature will create a wiki page and set it as your site home page.
Standard site features in a SharePoint Enterprise 2013 team site add the following to the previous list:
![]() Access App: Adds the Access web application.
Access App: Adds the Access web application.
![]() BI Center Data Connections Feature: One of the features required for full BI functionality in SharePoint 2013 Enterprise.
BI Center Data Connections Feature: One of the features required for full BI functionality in SharePoint 2013 Enterprise.
![]() Class My Site Host Content: Adds class and group content to SharePoint My Site Host site collection.
Class My Site Host Content: Adds class and group content to SharePoint My Site Host site collection.
![]() Class Web Types: Adds required content types to the SharePoint Class web.
Class Web Types: Adds required content types to the SharePoint Class web.
![]() Community Site Feature: This feature adds community functionality such as discussion categories, content and people reputation, and the members list. It also provisions community site pages, which contain these lists and features. This is on by default in site collections created using the Community Site template.
Community Site Feature: This feature adds community functionality such as discussion categories, content and people reputation, and the members list. It also provisions community site pages, which contain these lists and features. This is on by default in site collections created using the Community Site template.
![]() Content Management Interoperability (CMIS) Producer: Makes the data stored in the SharePoint site available using the CMIS standard. This connector was originally available in SharePoint 2010 Administration Toolkit and has been redesigned for SharePoint 2013. It allows users to interact with content that is stored in any repository that has implemented the CMIS standard and makes SharePoint content available to any application that has implemented the CMIS standard. Basic document-management operations are supported, such as creating, updating, deleting, checking in and checking out, and managing the versions of documents and document metadata.
Content Management Interoperability (CMIS) Producer: Makes the data stored in the SharePoint site available using the CMIS standard. This connector was originally available in SharePoint 2010 Administration Toolkit and has been redesigned for SharePoint 2013. It allows users to interact with content that is stored in any repository that has implemented the CMIS standard and makes SharePoint content available to any application that has implemented the CMIS standard. Basic document-management operations are supported, such as creating, updating, deleting, checking in and checking out, and managing the versions of documents and document metadata.
![]() Content Organizer: Enabling the Content Organizer feature will add the Content Organizer Settings and Content Organizer Rules that were covered in Chapter 20, “Customizing and Managing Libraries and Lists to Meet Business Requirements.”
Content Organizer: Enabling the Content Organizer feature will add the Content Organizer Settings and Content Organizer Rules that were covered in Chapter 20, “Customizing and Managing Libraries and Lists to Meet Business Requirements.”
![]() Following Content: Enables users to follow documents or sites. If users choose to follow documents, sites, or tags, conversations on sites, notifications of tag use, and other information will show up in their newsfeeds.
Following Content: Enables users to follow documents or sites. If users choose to follow documents, sites, or tags, conversations on sites, notifications of tag use, and other information will show up in their newsfeeds.
![]() Hold: This enhanced eDiscovery feature is used to track external actions like litigations, investigations, or audits that require the suspension of the disposition of documents. In-place holds can be placed on SharePoint sites or mailboxes, and if content is modified or deleted, a copy of the unmodified data is made and moved to a library that is invisible to end users.
Hold: This enhanced eDiscovery feature is used to track external actions like litigations, investigations, or audits that require the suspension of the disposition of documents. In-place holds can be placed on SharePoint sites or mailboxes, and if content is modified or deleted, a copy of the unmodified data is made and moved to a library that is invisible to end users.
![]() Metadata Navigation and Filtering: This allows the use of metadata tree view hierarchies and filter controls to enhance navigation within lists and libraries. This topic is covered in Chapter 22.
Metadata Navigation and Filtering: This allows the use of metadata tree view hierarchies and filter controls to enhance navigation within lists and libraries. This topic is covered in Chapter 22.
![]() Performance Point Services Site Features: This site feature depends on the Site Collection feature. If both are active, the PerformancePoint Services list and document library templates are enabled. These include the Dashboards Library, DataConnections Library for PerformancePoint, and PerformancePoint Content list.
Performance Point Services Site Features: This site feature depends on the Site Collection feature. If both are active, the PerformancePoint Services list and document library templates are enabled. These include the Dashboards Library, DataConnections Library for PerformancePoint, and PerformancePoint Content list.
![]() Project Functionality: This feature adds project management functionality to a site. It includes tasks, a calendar, and web parts on the home page of the site (such as the Project Summary timeline).
Project Functionality: This feature adds project management functionality to a site. It includes tasks, a calendar, and web parts on the home page of the site (such as the Project Summary timeline).
![]() SharePoint Server Enterprise Site Features: Features included only in the Enterprise license are enabled via this feature for the site, including Visio Services, Access Services, and Excel Services Application.
SharePoint Server Enterprise Site Features: Features included only in the Enterprise license are enabled via this feature for the site, including Visio Services, Access Services, and Excel Services Application.
![]() SharePoint Server Publishing: This powerful feature is simplistically described on the Site Features page as providing the ability to create a web page library and supporting libraries to create and publish pages based on page layouts. This is only the tip of the iceberg, because a publishing site is very different, in many ways, from a “nonpublishing” site. Publishing sites are created using Publishing Portal, Enterprise Wiki, or Product Catalog site collection templates, or a nonpublishing site can have the SharePoint Server Publishing feature enabled. It is strongly recommended that the organization evaluate whether publishing site collections or nonpublishing site collections (or a combination) best meet the goals for the SharePoint implementation.
SharePoint Server Publishing: This powerful feature is simplistically described on the Site Features page as providing the ability to create a web page library and supporting libraries to create and publish pages based on page layouts. This is only the tip of the iceberg, because a publishing site is very different, in many ways, from a “nonpublishing” site. Publishing sites are created using Publishing Portal, Enterprise Wiki, or Product Catalog site collection templates, or a nonpublishing site can have the SharePoint Server Publishing feature enabled. It is strongly recommended that the organization evaluate whether publishing site collections or nonpublishing site collections (or a combination) best meet the goals for the SharePoint implementation.
![]() SharePoint Server Standard Site Features: Features such as user profiles and search, included in the SharePoint Server Standard License. Note that this feature is not part of SharePoint Foundation 2013, so it includes features that are added on top of SharePoint Foundation 2013.
SharePoint Server Standard Site Features: Features such as user profiles and search, included in the SharePoint Server Standard License. Note that this feature is not part of SharePoint Foundation 2013, so it includes features that are added on top of SharePoint Foundation 2013.
![]() Site Feed: Enables the use of site feeds, which provide newsfeed functionality to a specific group of users and are available on a variety of sites by default. The sites must consume the same User Profile Service application as My Sites.
Site Feed: Enables the use of site feeds, which provide newsfeed functionality to a specific group of users and are available on a variety of sites by default. The sites must consume the same User Profile Service application as My Sites.
![]() Site Mailbox: The Site Mailbox app connects the site to an Exchange mailbox. This enables users to view their email on SharePoint and view site documents in Outlook. A number of prerequisites are required, however: Exchange Server 2013 is required, the Exchange Web Services application programming interface (API) must be installed on the SharePoint server, user profile synchronization must be configured in the farm, the app management service application must be configured in the farm, and Secure Sockets Layer (SSL) must be configured for the default zone.
Site Mailbox: The Site Mailbox app connects the site to an Exchange mailbox. This enables users to view their email on SharePoint and view site documents in Outlook. A number of prerequisites are required, however: Exchange Server 2013 is required, the Exchange Web Services application programming interface (API) must be installed on the SharePoint server, user profile synchronization must be configured in the farm, the app management service application must be configured in the farm, and Secure Sockets Layer (SSL) must be configured for the default zone.
![]() Workflow Task Content Type: Adds the SharePoint 2013 Workflow Task content type to the site.
Workflow Task Content Type: Adds the SharePoint 2013 Workflow Task content type to the site.
![]() Workflows can use app permissions: Allow workflows to read from and to write to all items in this site. This feature does not activate unless the SharePoint 2013 Workflow platform and apps for SharePoint are properly configured.
Workflows can use app permissions: Allow workflows to read from and to write to all items in this site. This feature does not activate unless the SharePoint 2013 Workflow platform and apps for SharePoint are properly configured.
The following are the standard site collection features provided with SharePoint Foundation 2013:
![]() Custom Site Collection Help: Creates a Help library that can be used to store custom help for this site collection.
Custom Site Collection Help: Creates a Help library that can be used to store custom help for this site collection.
![]() Open Documents in Client Application: Configures links to documents so that they open in client applications instead of web applications, by default.
Open Documents in Client Application: Configures links to documents so that they open in client applications instead of web applications, by default.
![]() Search Server Web Parts and Templates: This feature adds the Search Server Web Parts and Display Templates to your site. Search works on most sites without this feature being activated. If a message about missing templates when searching appears, activating this feature may resolve the issue.
Search Server Web Parts and Templates: This feature adds the Search Server Web Parts and Display Templates to your site. Search works on most sites without this feature being activated. If a message about missing templates when searching appears, activating this feature may resolve the issue.
![]() Three-State Workflow: When active, enables the three-state workflow for use in the site collection. A list must have a column that has at least three different “states” (such as Active, Ready for Review, Complete) for the workflow to function properly.
Three-State Workflow: When active, enables the three-state workflow for use in the site collection. A list must have a column that has at least three different “states” (such as Active, Ready for Review, Complete) for the workflow to function properly.
The following are the standard site collection features added with SharePoint Enterprise 2013:
![]() Content Deployment Source Feature: Enables content deployment specific checks on source site collection and enables setting up content deployment from the site collection to a target site collection. When enabled, a link for Content Deployment Source Status is added in the Site Collection Administration section on the Site Settings page. Clicking this link shows the errors that will prevent successful content deployment from the site collection, as shown in Figure 21.31. These errors must be rectified to ensure a successful content deployment.
Content Deployment Source Feature: Enables content deployment specific checks on source site collection and enables setting up content deployment from the site collection to a target site collection. When enabled, a link for Content Deployment Source Status is added in the Site Collection Administration section on the Site Settings page. Clicking this link shows the errors that will prevent successful content deployment from the site collection, as shown in Figure 21.31. These errors must be rectified to ensure a successful content deployment.

![]() Content Type Syndication Hub: Provisions a site to be an enterprise metadata hub site, as covered in Chapter 22.
Content Type Syndication Hub: Provisions a site to be an enterprise metadata hub site, as covered in Chapter 22.
![]() Cross-Farm Site Permissions: Allows internal SharePoint applications to access websites across farms.
Cross-Farm Site Permissions: Allows internal SharePoint applications to access websites across farms.
![]() Cross-Site Collection Publishing: Enables site collection to designate lists and document libraries as catalog sources for cross-site collection publishing. Because content will be reused across site collections, there must be at least two site collections (one for authoring content and one for publishing content). The Cross-Site Collection Publishing feature must be enabled on the authoring site collection. If the Product Catalog Site Collection template is used to create the site collection, the Cross-Site Collection Publishing feature will already be active.
Cross-Site Collection Publishing: Enables site collection to designate lists and document libraries as catalog sources for cross-site collection publishing. Because content will be reused across site collections, there must be at least two site collections (one for authoring content and one for publishing content). The Cross-Site Collection Publishing feature must be enabled on the authoring site collection. If the Product Catalog Site Collection template is used to create the site collection, the Cross-Site Collection Publishing feature will already be active.
![]() Disposition Approval Workflow: Enables the disposition approval workflow, which manages document expiration and retention by allowing participants to decide whether to retain or delete expired documents.
Disposition Approval Workflow: Enables the disposition approval workflow, which manages document expiration and retention by allowing participants to decide whether to retain or delete expired documents.
![]() Document ID Service: Assigns IDs to documents in the site collection, which can be used to retrieve items independent of their current location. When enabled, this adds a Document ID Settings link under the Site Collection Administration section. This provides access to several settings, where assign document IDs can be turned on or off, and a field lets the administrator define the prefix (4–12 characters) that will be used for document IDs in the site collection. A check box allows administrators to reset all document IDs in this site collection to begin with these characters. It is generally recommended that the document ID prefix be linked to the name or the site collection to enable tracking of documents that might be moved in the future.
Document ID Service: Assigns IDs to documents in the site collection, which can be used to retrieve items independent of their current location. When enabled, this adds a Document ID Settings link under the Site Collection Administration section. This provides access to several settings, where assign document IDs can be turned on or off, and a field lets the administrator define the prefix (4–12 characters) that will be used for document IDs in the site collection. A check box allows administrators to reset all document IDs in this site collection to begin with these characters. It is generally recommended that the document ID prefix be linked to the name or the site collection to enable tracking of documents that might be moved in the future.
![]() Document Sets: When active, this enables document sets to be used, as covered in Chapter 20, in the “Document Sets Compared to Folders as Organizational Tools in Document Libraries” section.
Document Sets: When active, this enables document sets to be used, as covered in Chapter 20, in the “Document Sets Compared to Folders as Organizational Tools in Document Libraries” section.
![]() In Place Records Management: Enables the definition and declaration of records in place. When configured, a link for Record Declaration Settings is added in the Site Collection Administration section of the Site Settings page. This provides settings in the areas of Record Restrictions, Record Declaration Availability, and Declaration Roles, as shown in Figure 21.32. For example, the administrator may choose the option where records Cannot Be Edited or Deleted and that record declaration is Available in All Locations by Default.
In Place Records Management: Enables the definition and declaration of records in place. When configured, a link for Record Declaration Settings is added in the Site Collection Administration section of the Site Settings page. This provides settings in the areas of Record Restrictions, Record Declaration Availability, and Declaration Roles, as shown in Figure 21.32. For example, the administrator may choose the option where records Cannot Be Edited or Deleted and that record declaration is Available in All Locations by Default.

![]() Library and Folder-Based Retention: Allows list administrators to override content type retention schedules and set schedules on libraries and folders.
Library and Folder-Based Retention: Allows list administrators to override content type retention schedules and set schedules on libraries and folders.
![]() Limited-Access User Permission Lockdown Mode: When this feature is enabled, permissions for users in the “limited access” permissions level (such as anonymous users) are reduced, preventing access to application pages.
Limited-Access User Permission Lockdown Mode: When this feature is enabled, permissions for users in the “limited access” permissions level (such as anonymous users) are reduced, preventing access to application pages.
![]() PerformancePoint Services Site Collection Features: Enables the PerformancePoint Services site, including content types and site definitions for this site collection.
PerformancePoint Services Site Collection Features: Enables the PerformancePoint Services site, including content types and site definitions for this site collection.
![]() Publishing Approval Workflow: A key component of a publishing site collection, this workflow routes pages for approval. Approvers can approve or reject the page, reassign the approval task, or request changes to the page. This is enabled by default on the publishing site collection templates as well as BI Center, Enterprise Search, and Visio Process Repository.
Publishing Approval Workflow: A key component of a publishing site collection, this workflow routes pages for approval. Approvers can approve or reject the page, reassign the approval task, or request changes to the page. This is enabled by default on the publishing site collection templates as well as BI Center, Enterprise Search, and Visio Process Repository.
![]() Reporting: Creates reports about information in Microsoft SharePoint Foundation.
Reporting: Creates reports about information in Microsoft SharePoint Foundation.
![]() Reports and Data Search Support: Provides content types, site columns, and library templates required to support Reports and Data Search in the Enterprise Search Center.
Reports and Data Search Support: Provides content types, site columns, and library templates required to support Reports and Data Search in the Enterprise Search Center.
![]() Search Engine Sitemap: This feature automatically generates a search engine sitemap on a recurring basis that contains all valid URLs in a SharePoint website. Anonymous access must be enabled to use this feature.
Search Engine Sitemap: This feature automatically generates a search engine sitemap on a recurring basis that contains all valid URLs in a SharePoint website. Anonymous access must be enabled to use this feature.
![]() SharePoint 2007 Workflows: This enables a set of out-of-the-box workflow features provided by SharePoint 2007, which is usually only needed for backward compatibility purposes.
SharePoint 2007 Workflows: This enables a set of out-of-the-box workflow features provided by SharePoint 2007, which is usually only needed for backward compatibility purposes.
![]() SharePoint Server Enterprise Site Collection Features: Features only included in the Enterprise license are enabled via this feature for the site collection, including Visio Services, Access Services, and Excel Services Application.
SharePoint Server Enterprise Site Collection Features: Features only included in the Enterprise license are enabled via this feature for the site collection, including Visio Services, Access Services, and Excel Services Application.
![]() SharePoint Server Publishing Infrastructure: Provides centralized libraries, content types, master pages, and page layouts, and enables page scheduling and other publishing functionality for a site collection. See the description earlier for SharePoint Server Publishing under Site Features.
SharePoint Server Publishing Infrastructure: Provides centralized libraries, content types, master pages, and page layouts, and enables page scheduling and other publishing functionality for a site collection. See the description earlier for SharePoint Server Publishing under Site Features.
![]() SharePoint Server Standard Site Collection features: See the description earlier for SharePoint Server Standard Site Features under Site Features.
SharePoint Server Standard Site Collection features: See the description earlier for SharePoint Server Standard Site Features under Site Features.
![]() Site Policy: Allows site collection administrators to define retention schedules that apply to a site and all its content. See the Site Policies bullet earlier in the “An Overview of Site Collection Administration Tools” section.
Site Policy: Allows site collection administrators to define retention schedules that apply to a site and all its content. See the Site Policies bullet earlier in the “An Overview of Site Collection Administration Tools” section.
![]() Video and Rich Media: Provides libraries, content types, and web parts for storing, managing, and viewing rich media assets such as images, sound clips, and videos.
Video and Rich Media: Provides libraries, content types, and web parts for storing, managing, and viewing rich media assets such as images, sound clips, and videos.
![]() Workflows: Aggregated set of out-of-the-box workflow features provided by SharePoint.
Workflows: Aggregated set of out-of-the-box workflow features provided by SharePoint.
Summary
This chapter took on the challenging task of covering the tools that site collection administrators and site administrators need to be comfortable with if they are to effectively plan, design, build, and support site collections. The process of creating a site collection was reviewed briefly, and recommendations were given on how the administrator can review the scope of the site collection to thoroughly understand the scope of the administrative challenge. One of these challenges involves controlling who can create sites within the site collection. Then the process of creating pages and sites was discussed and demonstrated, and a full list of the site template options in the full range of the SharePoint 2013 product was provided; this included notes on the functionality and distinguishing features of each item. The wide range of tools available on the Site Settings page was reviewed; but because of the sheer number of items, in many cases, only high-level descriptions were given. Site features and site collection features were covered, as well, once again from a high level.
Best Practices
The following are best practices from this chapter:
![]() The site collection administrator needs to understand the differences between creating a site collection, which is done from the Central Administration site, creating sites, which can be done in a variety of ways from within the site collection, and creating pages, which can also be done in a variety of ways from within sites and libraries.
The site collection administrator needs to understand the differences between creating a site collection, which is done from the Central Administration site, creating sites, which can be done in a variety of ways from within the site collection, and creating pages, which can also be done in a variety of ways from within sites and libraries.
![]() The Site Settings page contains myriad tools that the site collection and site administrators should be conversant with. The tools shown vary based on the site collection features, site features enabled, and the version of SharePoint 2013 installed.
The Site Settings page contains myriad tools that the site collection and site administrators should be conversant with. The tools shown vary based on the site collection features, site features enabled, and the version of SharePoint 2013 installed.
![]() A site collection administrator taking over an existing site collection should thoroughly review the subsites that exist in the site collection and any managed paths that contain additional site collections. The Site Settings page offers the Sites and Workspaces link that shows subsites, document workspaces, and meeting workspaces; it also provides the Site Hierarchy link that shows all subsites. However, the Site Collection List should be visited from the Central Administration site to see whether managed paths exist, which can contain additional site collections, each of which can have any number of subsites.
A site collection administrator taking over an existing site collection should thoroughly review the subsites that exist in the site collection and any managed paths that contain additional site collections. The Site Settings page offers the Sites and Workspaces link that shows subsites, document workspaces, and meeting workspaces; it also provides the Site Hierarchy link that shows all subsites. However, the Site Collection List should be visited from the Central Administration site to see whether managed paths exist, which can contain additional site collections, each of which can have any number of subsites.
![]() Administrators should review which permission levels have the ability to create sites and workspaces in the environment. This is done by accessing Site Settings, Sites and Workspaces, and then clicking Site Creation Permissions. Also, Self-Service Site Creation settings should be checked from the Central Administration site, Security page, by clicking Configure Self-Service Site Creation.
Administrators should review which permission levels have the ability to create sites and workspaces in the environment. This is done by accessing Site Settings, Sites and Workspaces, and then clicking Site Creation Permissions. Also, Self-Service Site Creation settings should be checked from the Central Administration site, Security page, by clicking Configure Self-Service Site Creation.
![]() Another area a site collection administrator needs to be familiar with is the Users and Permissions section in the Site Settings page, and especially the Site Permissions interface and the permissions that are granted by default to the standard SharePoint Groups, especially Owners, Members, and Visitors, because these are the most widely used groups.
Another area a site collection administrator needs to be familiar with is the Users and Permissions section in the Site Settings page, and especially the Site Permissions interface and the permissions that are granted by default to the standard SharePoint Groups, especially Owners, Members, and Visitors, because these are the most widely used groups.