Chapter 22. Managing Metadata and Content Types in SharePoint 2013
In This Chapter
![]() Effectively Using Metadata in Lists and Libraries
Effectively Using Metadata in Lists and Libraries
![]() Working with Metadata in a Word Document and Document Libraries
Working with Metadata in a Word Document and Document Libraries
![]() Reviewing the Column Choices in SharePoint 2013
Reviewing the Column Choices in SharePoint 2013
![]() Differences in Multiple Lines of Text Columns in Libraries and Lists
Differences in Multiple Lines of Text Columns in Libraries and Lists
![]() Working with Lookup Columns in Document Libraries
Working with Lookup Columns in Document Libraries
![]() Setting Metadata Standards with Default Values
Setting Metadata Standards with Default Values
![]() Site Columns Practical Applications
Site Columns Practical Applications
![]() Content Types Practical Applications
Content Types Practical Applications
![]() Creating and Using Managed Metadata
Creating and Using Managed Metadata
Metadata has been mentioned many times in this book in previous chapters. This chapter provides a thorough overview of the different ways that metadata can be created and managed, starting with the creation of columns in lists and libraries and then to site columns and content types. Finally, managed metadata is discussed, along with ways in which it facilitates the metadata management process.
Instead of spending a lot of time on the theory of metadata and creating taxonomies that involve metadata, a hands-on approach is taken in this chapter. A number of step-by-step exercises are provided, and going through these steps is a key component in the learning process. The sections in this chapter build upon each other, so it is strongly recommended that the exercises be done in order for the latter exercises to make sense for new SharePoint administrators.
Effectively Using Metadata in Lists and Libraries
Essentially, metadata is “data about data,” and even users who don’t use SharePoint have experience with it every day. Any file created has some metadata associated with it. For example, a simple Microsoft Word document needs to have a filename, which is a key piece of metadata. In addition, it has a creation date and last modified date, and then Microsoft Word allows users to add additional metadata to the document. SharePoint 2013 exposes this basic metadata that is embedded in the document and allows administrators to add new metadata columns in document libraries that store the files.
Lists are essentially nothing but metadata, unless one or more attachments are added to an item in a list. Administrators and power users will very quickly become accustomed to adding metadata columns when working with lists.
This section starts with an investigation into the interaction between metadata stored in a Word 2010 document and the library that ends up housing that document. Following this, a high-level walkthrough is provided, covering the column choices included in SharePoint 2013. The chapter then provides tips and notes on certain column types, and then a number of exercises help administrators and power users gain hands-on experience with metadata.
Working with Metadata in a Word Document and Document Libraries
The following section and step-by-step exercises provide a thought-provoking introduction to the functionality of metadata in SharePoint 2013 and the interaction of SharePoint with the embedded metadata in a Word document. By following these steps, an administrator will gain a better understanding of the interaction between SharePoint 2013 document libraries and the documents that will be stored in them, and will probably want to perform additional testing to further master the topic.
This exercise walks an administrator through the process of creating two different document libraries that contain different metadata columns and the process of accessing the properties for a Word 2010 document, populating metadata within the document, and then uploading the document and adding additional metadata. The document is then moved to the second document library, where some of the metadata appears to be lost but is, in fact, still contained within the Word document.
Note
Microsoft Word 2010 was used for this example since more organizations use the Office 2010 products than the Office 2013 products at the time this was written. Other versions of Word may be used for this exercise, whether older or newer, but the steps will vary slightly.
To complete the exercise, follow these steps:
1. Create a new document library on a SharePoint 2013 site. Leave the settings at their defaults. Title it Metadata Test 1. Steps for creating a new document library are provided in Chapter 20, “Customizing and Managing Libraries and Lists to Meet Business Requirements,” in the “Creating Lists and Libraries” section.
2. Click the Library tab, and click the Create Column icon.
3. Name the column Subject, choose Single Line of Text, leave the rest of the settings at their defaults, and click OK.
4. Click the Library tab, and click the Create Column icon again.
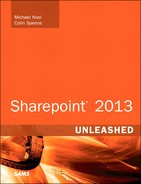
5. This time, name the column Project Name, and choose Choice (menu to choose from) as the column type. In the Type Each Choice on a Separate Line box, delete the default entries and add Project ABC, Project DEF, and Project GHI, as shown in Figure 22.1. Clear the Default Value field, leave the other fields at their defaults, and click OK.
6. Create a second document library, title it Metadata Test 2, and add the column titled Subject to it, as well, but do not add the Project Name column.
7. Next, create a new Word 2010 document and enter some sample text.
8. Click the File tab, click the Info link on the left side, and then click the Properties drop-down menu on the right side and select Show Document Panel.
9. The Document Panel now appears for the document. Enter a value into the Subject field (for example, Mission Statement), and the results will look like Figure 22.2.

10. Now click the Save icon, save the document locally to My Documents, and close the document. For this example, the document is saved as Mission_Statement_for_Project_ABC.
11. Navigate to the Metadata Test 1 document library and upload the document by clicking the Upload Document button on the File tab of the ribbon, then the Browse button, and locating the document, click Open, and then click OK. Alternatively, the New Document link underneath the ribbon can be used.
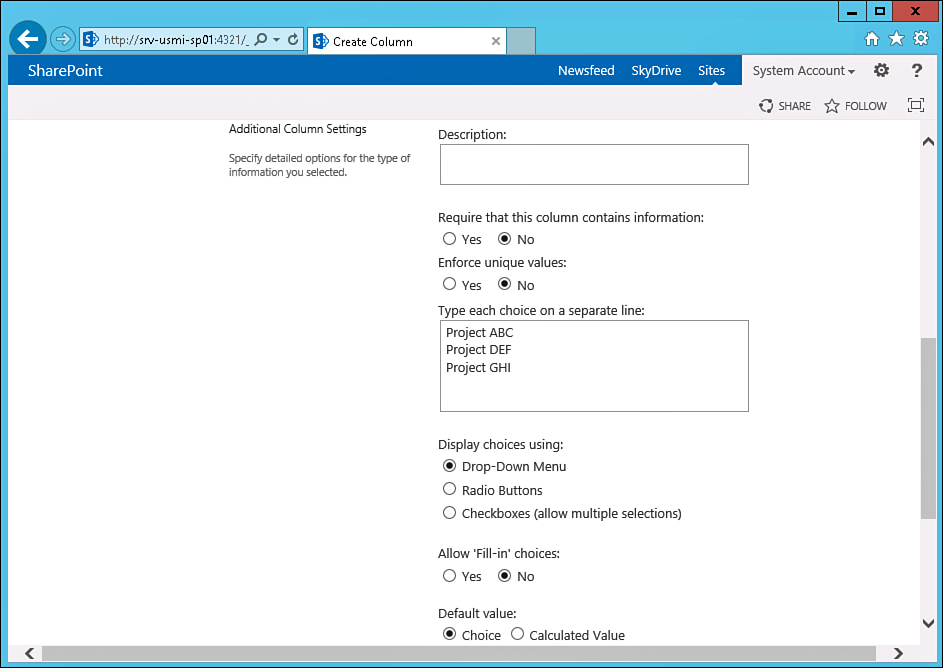
12. As shown in Figure 22.3, the upload window prompts for additional metadata, including the Title field, Subject field, and Project Name drop-down list. Recall that Subject and Project Name were added in steps 3 to 5. Note that content is already populated in the Subject field. This is because the Word document has a metadata field defined within the document named Subject in which text was entered from Word in step 9. Select Project ABC in the drop-down menu next to Project Name. Click Save.
13. The document now appears in the document library Metadata Test 1 with several metadata columns populated: the Name column, which contains the filename of the document; the Modified column, which contains the date and time the file was last modified (the date and time it was uploaded to the document library) and modified by information; and the Subject and Project Name metadata columns that were added in this exercise.
14. Next, the document is moved to the second document library that was created. To accomplish this, click the Library tab, click the Open with Explorer button, and a new window opens, showing the contents of Metadata Test 1 document library.
Note
The Open with Explorer button might be grayed out if a 64-bit version of Internet Explorer (IE) is being used. The control might also be unavailable in non-IE browsers.
15. Return to SharePoint and navigate to Metadata Test 2 library that was created in step 6, click the Library tab, and click the Open with Explorer button.
16. Click the document in the Explorer window for Metadata Test 1 and drag it to the Explorer window for Metadata Test 2. This moves the document from Metadata Test 1 library to Metadata Test 2.
17. Navigate to the Metadata Test 2 library and the document appears as shown in Figure 22.4. The Subject column is populated, but there is no Project Name column. A valid question to ask at this point is this: What happened to the metadata in the Project Name column?

18. To answer this question, select the document from the Metadata Test 2 library and click the ellipsis to open the menu, click Edit, and it opens in Word.
19. Click the File tab, click the Info link on the left side, and then click the Properties drop-down menu on the right side and select Show Document Panel.
20. This time, the Document Panel displays the Server properties information by default because the document is being opened from a SharePoint document library. Notice that the Subject field is populated, but there is no Project Name field visible because that metadata column does not exist in the document library (Metadata Test 2) it was opened from.
21. To find the Project Name metadata, click the drop-down menu next to Document Properties – Server and choose Advanced Properties from the list. The Advanced Properties window opens.
22. Click the Custom tab, and note that Project Name appears in the Properties window, with the value Company ABC (as shown in Figure 22.5), which was added to the document in step 12.

A natural question at this point is this: How do non-Microsoft Office documents behave in similar tests? The administrator should experiment with different types of files, such as a PDF file, for example.
Reviewing the Column Choices in SharePoint 2013
A powerful feature of SharePoint 2013 lists and libraries is the ability for an administrator to customize the list or library in many ways, one of which is to add columns, similar to the process of adding a column in Excel. This is accomplished from the Document Library Settings page, which is reached by entering the document library, clicking the Library tab on the ribbon, and then clicking the Library Settings icon on the right side of the toolbar. Only users with the manage lists permission are able to click the Library Settings icon; it is grayed out for other users. By default, members of the Owners, Designers, and Hierarchy Managers groups have the “manage lists” permissions.
On the document library Settings page, the Columns section is found midway down the page, and provides the options of Create Column, Add from Existing Site Columns, Column Ordering, and Indexed Columns. If Create Column is clicked, the administrator has a selection of columns to choose from, which vary slightly based on the version of SharePoint 2013 in use because SharePoint Foundation 2013 does not offer the Managed Metadata option. Descriptions of these columns are as follows:
![]() Single line of text: Has the following options: Description (text), Require That This Column Contains Information (Yes or No), Enforce Unique Values (Yes or No), Maximum Number of Characters, Default Value (Text or Calculated Value), Add to All Content Types (Yes or No), and Add to Default View (Yes or No).
Single line of text: Has the following options: Description (text), Require That This Column Contains Information (Yes or No), Enforce Unique Values (Yes or No), Maximum Number of Characters, Default Value (Text or Calculated Value), Add to All Content Types (Yes or No), and Add to Default View (Yes or No).
![]() Multiple lines of text: Has the following options: Description (text), Require That This Column Contains Information (Yes or No), Allow Unlimited Length in Document Libraries (Yes or No), Number of Lines for Editing (Integer), Add to All Content Types (Yes or No), and Add to Default View (Yes or No).
Multiple lines of text: Has the following options: Description (text), Require That This Column Contains Information (Yes or No), Allow Unlimited Length in Document Libraries (Yes or No), Number of Lines for Editing (Integer), Add to All Content Types (Yes or No), and Add to Default View (Yes or No).
![]() Choice (menu to choose from): Has the following options: Description (text), Require That This Column Contains Information (Yes or No), Enforce Unique Values (Yes or No), Type Each Choice on a Separate Line, Display Choices Using (Drop-Down Menu, Radio Buttons, Checkboxes [Allow Multiple Selections]), Allow Fill-in Choices (Yes or No), Default Value (Text or Calculated Value), Add to All Content Types (Yes or No), and Add to Default View (Yes or No).
Choice (menu to choose from): Has the following options: Description (text), Require That This Column Contains Information (Yes or No), Enforce Unique Values (Yes or No), Type Each Choice on a Separate Line, Display Choices Using (Drop-Down Menu, Radio Buttons, Checkboxes [Allow Multiple Selections]), Allow Fill-in Choices (Yes or No), Default Value (Text or Calculated Value), Add to All Content Types (Yes or No), and Add to Default View (Yes or No).
![]() Number: Has the following options: Description (text), Require That This Column Contains Information (Yes or No), Enforce Unique Values (Yes or No), Specify a Minimum and Maximum Allowed Value (Two Integers), Number of Decimal Places (Integer), Default Value (Number or Calculated Value), Show as a Percentage (for example, 50%), Add to All Content Types (Yes or No), and Add to Default View (Yes or No).
Number: Has the following options: Description (text), Require That This Column Contains Information (Yes or No), Enforce Unique Values (Yes or No), Specify a Minimum and Maximum Allowed Value (Two Integers), Number of Decimal Places (Integer), Default Value (Number or Calculated Value), Show as a Percentage (for example, 50%), Add to All Content Types (Yes or No), and Add to Default View (Yes or No).
![]() Currency: Has the following options: Description (text), Require That This Column Contains Information (Yes or No), Enforce Unique Values (Yes or No), Specify a Minimum and Maximum Allowed Value (Two Integers), Number of Decimal Places (Integer), Default Value (Currency or Calculated Value), Currency Format (for example, United States), Add to All Content Types (Yes or No), and Add to Default View (Yes or No).
Currency: Has the following options: Description (text), Require That This Column Contains Information (Yes or No), Enforce Unique Values (Yes or No), Specify a Minimum and Maximum Allowed Value (Two Integers), Number of Decimal Places (Integer), Default Value (Currency or Calculated Value), Currency Format (for example, United States), Add to All Content Types (Yes or No), and Add to Default View (Yes or No).
![]() Date and Time: Has the following options: Description (text), Require That This Column Contains Information (Yes or No), Enforce Unique Values (Yes or No), Date and Time Format (Date Only, Date & Time), Default Value (None, Today’s Date, Date in M/D/YYYY format) or Calculated Value, Add to All Content Types (Yes or No), and Add to Default View (Yes or No).
Date and Time: Has the following options: Description (text), Require That This Column Contains Information (Yes or No), Enforce Unique Values (Yes or No), Date and Time Format (Date Only, Date & Time), Default Value (None, Today’s Date, Date in M/D/YYYY format) or Calculated Value, Add to All Content Types (Yes or No), and Add to Default View (Yes or No).
![]() Lookup (information already on this site): Has the following options: Description (text), Require That This Column Contains Information (Yes or No), Enforce Unique Values (Yes or No), Get Information From (drop-down menu to select list or library), In This Column (drop-down menu to select the column), Allow Multiple Values (Yes, No), Allow Unlimited Length in Document Libraries (Yes, No), Add a Column to Show Each of These Additional Fields (Title, Expires, ID, Modified, Created, Version, Title [linked to item]), Add to All Content Types (Yes or No), Add to Default View (Yes or No), and Enforce Relationship Behavior (Restrict Delete, Cascade Delete).
Lookup (information already on this site): Has the following options: Description (text), Require That This Column Contains Information (Yes or No), Enforce Unique Values (Yes or No), Get Information From (drop-down menu to select list or library), In This Column (drop-down menu to select the column), Allow Multiple Values (Yes, No), Allow Unlimited Length in Document Libraries (Yes, No), Add a Column to Show Each of These Additional Fields (Title, Expires, ID, Modified, Created, Version, Title [linked to item]), Add to All Content Types (Yes or No), Add to Default View (Yes or No), and Enforce Relationship Behavior (Restrict Delete, Cascade Delete).
![]() Yes/No (check box): Has the following options: Description (text), Default Value (Yes or No), Add to All Content Types (Yes or No), and Add to Default View (Yes or No).
Yes/No (check box): Has the following options: Description (text), Default Value (Yes or No), Add to All Content Types (Yes or No), and Add to Default View (Yes or No).
![]() Person or Group: Has the following options: Description (text), Default Value (Yes or No), Require That This Column Contains Information (Yes or No), Allow Multiple Selections (Yes or No), Allow Selection Of (People Only, People, and Groups), Choose From (All Users, SharePoint Group), Show Field (ID, Name, Modified, Created, Account, Email, Mobile Number, SIP Address, Department, Job Title, Name [with Presence], Name [with Picture], Name [with Picture and Details], Content Type), Add to All Content Types (Yes or No), and Add to Default View (Yes or No).
Person or Group: Has the following options: Description (text), Default Value (Yes or No), Require That This Column Contains Information (Yes or No), Allow Multiple Selections (Yes or No), Allow Selection Of (People Only, People, and Groups), Choose From (All Users, SharePoint Group), Show Field (ID, Name, Modified, Created, Account, Email, Mobile Number, SIP Address, Department, Job Title, Name [with Presence], Name [with Picture], Name [with Picture and Details], Content Type), Add to All Content Types (Yes or No), and Add to Default View (Yes or No).
![]() Hyperlink or Picture: Has the following options: Description (text), Require That This Column Contains Information (Yes or No), Format URL As (Hyperlink, Picture), Add to All Content Types (Yes or No), and Add to Default View (Yes or No).
Hyperlink or Picture: Has the following options: Description (text), Require That This Column Contains Information (Yes or No), Format URL As (Hyperlink, Picture), Add to All Content Types (Yes or No), and Add to Default View (Yes or No).
![]() Calculated (calculation based on other columns): Has the following options: Description (text), Formula, Insert Column (shows valid columns to add to the formula), The Data Returned from This Formula Is (Single Line of Text, Number, Currency, Date and Time, Yes/No), Add to All Content Types (Yes or No), and Add to Default View (Yes or No).
Calculated (calculation based on other columns): Has the following options: Description (text), Formula, Insert Column (shows valid columns to add to the formula), The Data Returned from This Formula Is (Single Line of Text, Number, Currency, Date and Time, Yes/No), Add to All Content Types (Yes or No), and Add to Default View (Yes or No).
![]() Task Outcome: Has the following options: Description (text), Require That This Column Contains Information (Yes or No), Enforce Unique Values (Yes or No), Type Each Choice on a Separate Line, Default Value (Text or Calculated Value), and Add to Default View (Yes or No).
Task Outcome: Has the following options: Description (text), Require That This Column Contains Information (Yes or No), Enforce Unique Values (Yes or No), Type Each Choice on a Separate Line, Default Value (Text or Calculated Value), and Add to Default View (Yes or No).
![]() External Data: Has the following options: Description (text), Require That This Column Contains Information (Yes or No), External Content Type, Select the Field to Be Shown on This Column, Display the Actions Menu (Yes or No), Link This Column to the Default Action of the External Content Type (Yes or No), Add to All Content Types (Yes or No), and Add to Default View (Yes or No).
External Data: Has the following options: Description (text), Require That This Column Contains Information (Yes or No), External Content Type, Select the Field to Be Shown on This Column, Display the Actions Menu (Yes or No), Link This Column to the Default Action of the External Content Type (Yes or No), Add to All Content Types (Yes or No), and Add to Default View (Yes or No).
Note
External data is discussed in Chapter 31, “Business Intelligence in SharePoint 2013 with Business Connectivity Services,” and an example is given of creating an External Content type to connect to an AdventureWorks database using SharePoint Designer 2013 as well as using the External Data column type. After the External Content type is created, it can be selected from the External Data column settings. Note that a number of steps are required that are also discussed in Chapter 31, including installing the AdventureWorks database. The main difference between an external list and a regular SharePoint list is that the actual contents of the external list live outside SharePoint lists or libraries.
![]() Managed Metadata: Has the following options: Description (text), Require That This Column Contains Information (Yes or No), Enforce Unique Values (Yes or No), Add to All Content Types (Yes or No), Add to Default View (Yes or No), Allow Multiple Values (Yes or No), Display Value (Display Term Label in the Field or Display the Entire Path to the Term in the Field), Use a Managed Term Set (Find and Reset buttons) or Customize Your Term Set, Allow Fill-in Choices (Yes or No), and Default Value (Browse button). (Managed metadata is covered later in this chapter in more depth.)
Managed Metadata: Has the following options: Description (text), Require That This Column Contains Information (Yes or No), Enforce Unique Values (Yes or No), Add to All Content Types (Yes or No), Add to Default View (Yes or No), Allow Multiple Values (Yes or No), Display Value (Display Term Label in the Field or Display the Entire Path to the Term in the Field), Use a Managed Term Set (Find and Reset buttons) or Customize Your Term Set, Allow Fill-in Choices (Yes or No), and Default Value (Browse button). (Managed metadata is covered later in this chapter in more depth.)
With this wide range of choices, it should be obvious that an incredible number of combinations can be created to meet business needs. This chapter provides examples of several different column types, but an administrator should become familiar with the capabilities of the different columns through personal experience, trial and error, and by taking the effort to meet specific end-user and business requirements through lists and libraries.
Note
Restraint should be used when creating more complex lists and libraries that involve dozens or even hundreds of columns as SharePoint lists and libraries have limits on how many of each type of column can be supported in any given list or library. TechNet offers an overview of column limits in the article titled “Software Boundaries and Limits for SharePoint 2013” in the “Column Limits” section (http://technet.microsoft.com/en-us/library/cc262787.aspx#Column). A table clearly lists the type of column (such as Single Line of Text), the maximum value (for example, 276 for number of Single Line of Text columns), and provides additional descriptive information.
For example, it is not unusual for an organization to want to move away from a very complex Excel spreadsheet and leverage a SharePoint 2013 list instead. Some spreadsheets have hundreds of columns in one worksheet, and although a SharePoint 2013 list can replicate this design, this can result in the SQL database requiring multiple rows to store the data and a slowdown in performance.
An Introduction and Practical Application of Calculated Columns
Calculated columns are enticing and powerful, but can be frustrating to use without some background. A starting rule of thumb is this: If it works in Excel, it probably works in SharePoint. SharePoint, unfortunately, has a wide range of restrictions when compared to Excel, so this rule should be understood with a dose of healthy skepticism.
Some important rules and guidelines are as follows:
![]() Arithmetic operators supported include + (addition), – (subtraction), * (multiplication), / (division), % (percent), and ^ (exponentiation).
Arithmetic operators supported include + (addition), – (subtraction), * (multiplication), / (division), % (percent), and ^ (exponentiation).
![]() Parentheses are supported in equations.
Parentheses are supported in equations.
![]() Comparison operators supported include = (equal to), > (greater than), < (less than), >= (greater than or equal to), <= (less than or equal to), and <> (not equal to).
Comparison operators supported include = (equal to), > (greater than), < (less than), >= (greater than or equal to), <= (less than or equal to), and <> (not equal to).
![]() & (ampersand) connects two values to produce one continuous text value.
& (ampersand) connects two values to produce one continuous text value.
![]() Lists and libraries do not support the RAND and NOW functions.
Lists and libraries do not support the RAND and NOW functions.
![]() The TODAY and ME functions are not supported in calculated columns but are supported in the default value setting of a column.
The TODAY and ME functions are not supported in calculated columns but are supported in the default value setting of a column.
![]() You cannot reference a value in a row other than the current row.
You cannot reference a value in a row other than the current row.
![]() You cannot reference a value in another list or library.
You cannot reference a value in another list or library.
![]() Many Excel functions are supported in SharePoint calculated columns, but testing should be performed to verify functionality.
Many Excel functions are supported in SharePoint calculated columns, but testing should be performed to verify functionality.
This is an example that adds a calculated column to see whether the profit on an item exceeds the goal of a 10% profit. A new list is created and several columns added to it, one of which is a calculated column. Then some sample items are added to the list and the calculated column works its magic to determine whether the Sell Price exceeds a 10% profit:
1. Create a new list using the Custom List template and name it CalculatedColumnTest. Steps for creating a new list are provided in Chapter 20, in the “Creating Lists and Libraries” section.
2. From the CalculatedColumnTest list, click the List tab, and then click List Settings.
3. Scroll down and click the Create Column link.
4. Name the new column Cost and check Currency; leave the other settings and click OK.
5. Scroll down and click the Create Column link once more.
6. Name the new column Sell Price and check Currency; leave the other settings and click OK.
7. Scroll down and click the Create Column link a third time.
8. Name the new column Meets Profit Goal and check Calculated.
9. Scroll down to the Additional Column Settings section, and enter the following formula:
=IF(Cost>([Sell Price]-(Cost*(10/100))),"No","Yes")
The IF function is described in more detail in Excel 2010 Help, and the syntax is the same in a SharePoint 2013 calculated column. A translation of the syntax is “IF(logical_test, [value_if_true], [value_if_false]).” In the case of the formula used in this example, this translates to “If the cost is greater than the sell price minus 10% of the cost, display the value No; if not, display the value Yes.”
10. Verify that Single Line of Text is checked below the formula; then leave the other settings at their defaults. Click OK.
11. Click CalculatedColumnTest from the breadcrumb to return to the All Items view of the list.
12. Click the New Item link on the Items tab of the ribbon.
13. Enter a title for the entry, such as Widget, enter 20 in the Cost field, enter 22 in the Sell Price field, and click OK.
14. Click the New Item link a second time.
15. Enter a title for the entry, such as Gadget, enter 40 in the Cost field, enter 43.99 in the Sell Price field, and click OK.
16. Click the New Item link a third time.
17. Enter a title for the entry, such as Mousetrap, enter 60 in the Cost field, enter 66 in the Sell Price field, and click OK.
18. The results will look like Figure 22.6. This makes it easy for a manager to glance at the list and see whether items are being sold at an acceptable level of profit.

FIGURE 22.6 Example of a list with a calculated column to determine whether a Sell Price meets a profit goal.
Tip
Additional guidance and information is available by accessing SharePoint Help, then entering introduction to data calculations in the Search field, and then clicking the Introduction to Data Calculations article title.
Leveraging Validation Settings
Another means of ensuring that the correct data is entered into columns in a list and library is through the use of validation settings, which can be added to the list or library on the List Settings or Library Settings page, or to an individual column. The equations that can be used are more limited, as the result of the equation must equal the value True or the user won’t be able to save the entry.
A simple example is as follows:
=[ColumnA]>[ColumnB]
Assuming the value in ColumnA is greater than ColumnB, the formula generates the value True and therefore passes the validation test.
Building on the list created in the previous section, follow these steps to add validation to the CalculatedColumnTest list:
1. Navigate to the CalculatedColumnTest list created in the previous section that contains the columns Title, Cost, and Sell Price, as described in the example, as well as sample data, as shown in Figure 22.6.
2. Click the List tab on the ribbon, and then click Create Column.
3. Enter Invoice Number as the column name, and then choose Single Line of Text.
4. Scroll down to the Description field and enter Enter a valid invoice number starting with “2010-” and then up to 4 digits.
5. Click “Yes” for Enforce Unique Values.
6. Enter 9 for Maximum Number of Characters.
7. Expand the Column Validation section by clicking the + and enter the following in the Formula field:
=FIND("2010-",[Invoice Number], 1)
The FIND function is also defined in Excel 2010 Help, and the syntax translates to “FIND(find_text, within_text, [start_num]),” or in this example to “Find the string 2010- in the column Invoice Number, starting with the first character in the string and the value is True.” This logic is pretty hard for a careless or even malicious user to beat because there is a limit of nine characters that can be entered in the field and it must include the string 2010-. Furthermore, the entry must be unique.
8. Finally, enter the following in the User Message field: Enter a valid invoice number starting with “2010-” and then up to 4 digits (see Figure 22.7). Click OK to save.

9. Click OK to the message stating, “This column must be indexed to enforce unique values. Do you want to index this column?”
10. Click the New Item link and enter the title as Whoozit, the Cost as 100, the Sell Price as 150, and Invoice Number as 123456789. Click Save. A red error message displays stating, “The validation formula has evaluated to an error,” and then gives additional information as shown in Figure 22.8, because this invoice number doesn’t meet the validation.

11. Re-enter the invoice number as 2010-123 and click Save; this time the entry succeeds because it meets the validation requirements.
Enforcing Unique Values in Columns
Certain column types offer the option to Enforce Unique Values for the column (in the Additional Column Settings portion of the Create Column page). This is a capability that has been requested by many clients over the years, and various workarounds were developed using workflows or leveraging the ID value of the list item. For example, a list that tracks serial numbers, employee IDs, invoices, or many other values is less valuable if data entry errors can lead to nonunique numbers.
Table 22.1 summarizes what column types can and cannot be used to create unique columns.

If Content Approval is enabled for a document library and then unique values are enabled, a warning note displays: “This list or document library has content approval enabled. A column that enforces unique values may let users determine information about a list item or document even if they do not have permission to view it.” This is logical because when a user sees an error about the item not being a unique value, she can deduce that there already exists a list item with that value.
Differences in Multiple Lines of Text Columns in Libraries and Lists
An interesting difference exists in the capabilities of the Multiple Lines of Text column when it is used in a library as opposed to when it is used in a list. When a Multiple Lines of Text column is added to a document library, there is an option to Allow Unlimited Length in Document Libraries. If this option is selected, a message displays that states, “Columns with long text are not supported by most applications for editing documents and could result in loss of data. Only remove this limit if users will be uploading documents through the website, and not saving directly from the application.” Otherwise, the column configuration is straightforward.
Tip
A major irritation, if unlimited length is not allowed in a document library, is that the end user doesn’t know how many characters have been entered because SharePoint does not provide a character counter. Nor is any warning provided until the user clicks Save. So, a user could type his life’s story in the text box and click Save only to be told, “This field can have no more than 255 characters.” So, a best practice is to add a note about the limitation of 255 characters in the Description field when a Multiple Lines of Text column is added to a document library, and in addition, provide a second Multiple Lines of Text column for document libraries where it is expected that more lengthy descriptions might be needed.
If a Multiple Lines of Text column is created in a list, however, the options are quite different. As shown in Figure 22.9, a Multiple Lines of Text column in a list offers additional options:
![]() Plain Text
Plain Text
![]() Enhanced Rich Text (rich text with pictures, tables, and hyperlinks)
Enhanced Rich Text (rich text with pictures, tables, and hyperlinks)
![]() Append Changes to Existing Text
Append Changes to Existing Text

The options for Multiple Lines of Text columns in lists, which are not available in libraries, clarify a key difference between the two. The metadata attached to documents added to document libraries is meant to be purely informational and textual, whereas the metadata added to lists can be rich text and include pictures, tables, and hyperlinks and therefore is well suited for providing visually complex information and images on a SharePoint page. It is recommended for administrators and power users to experiment with the differences between these different types of Multiple Lines of Text columns, especially to determine the differences between rich text and enhanced rich text.
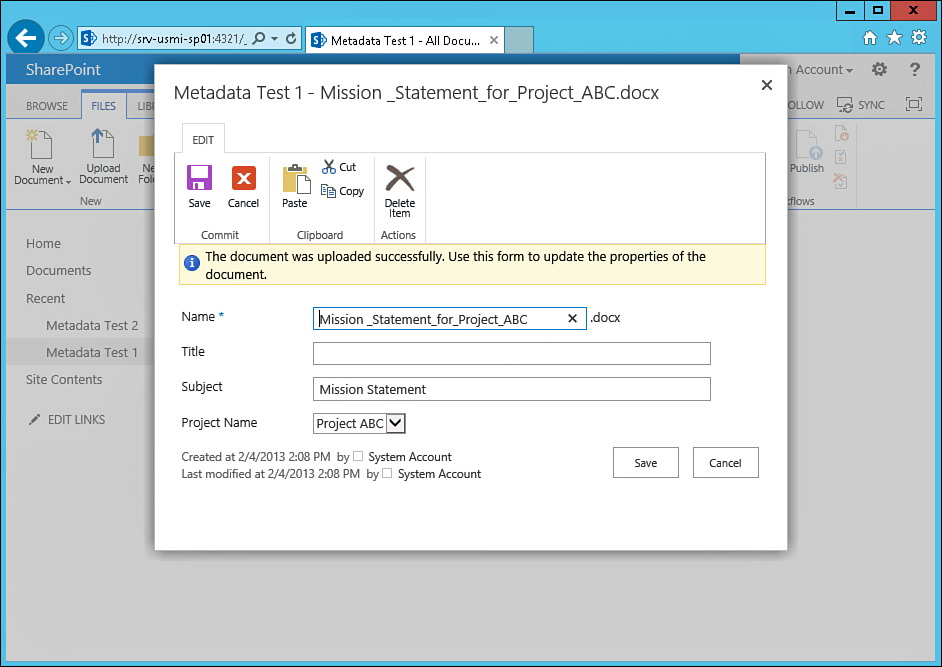
With regards to the Append Changes to Existing Text option for a Multiple Lines of Text column, versioning must be turned on for the list before it can be enabled. After it is enabled, the changes to the content are tracked and visible to users who view the list item. Figure 22.10 shows an example of an item in an Announcements list (which has versioning enabled) that has been edited by two users. Most likely, this is not the best setting to apply to an Announcements list because what most likely should be behind the scenes editing will become visible to readers.
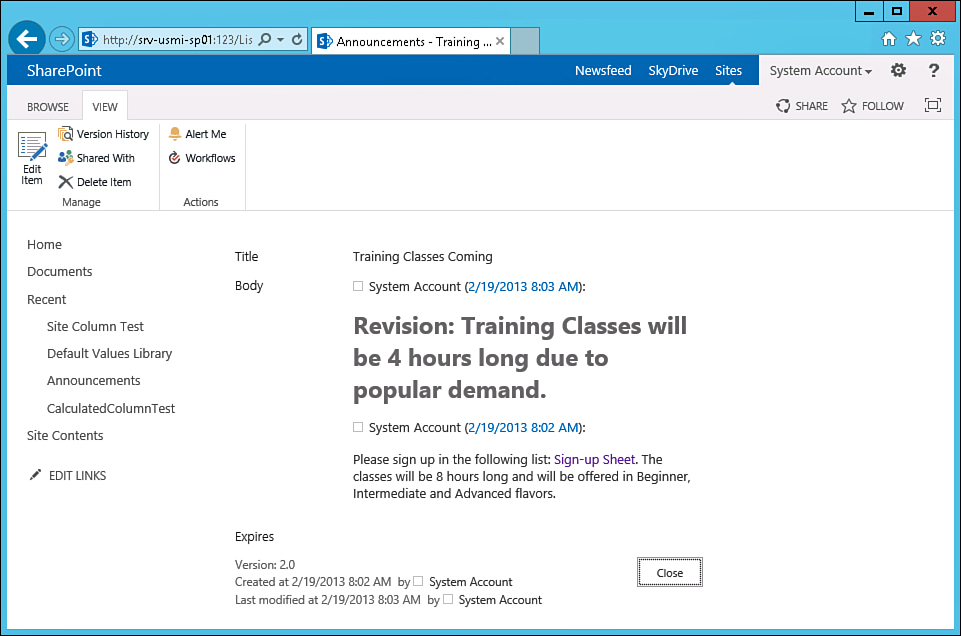
FIGURE 22.10 Example of Append Changes to Existing Text setting for a Multiple Lines of Text column in a list.
Working with Lookup Columns in Document Libraries
This next exercise uses two standard lists in a SharePoint 2013 team site: the Calendar list and the Tasks list. The goal of this example is to show the basic capabilities of the lookup column using a business example where a department tracks tasks using a Tasks list, and has weekly meetings that are managed in the Calendar list. The manager wants to use SharePoint to make the meeting more productive and wants to use the lookup column to pull additional information from the Tasks list into the Calendar list.
Consider the possibility that the Tasks list might have different permissions configured than the Calendar list. For example, on this site, the administrator may only allow project managers to edit the Calendar list, whereas all departmental employees can add to the Tasks list.
Before jumping into the example, some information about the functionality and limitations of the lookup column should be provided. To begin with, only certain column types are available to lookup columns. The following list shows the supported column types:
![]() Choice (single value)
Choice (single value)
![]() Currency
Currency
![]() Date and Time
Date and Time
![]() Lookup (single value)
Lookup (single value)
![]() Number
Number
![]() Single Line of Text
Single Line of Text
If other column types exist in the list that is being connected to with the lookup column, they are not available for selection. This limitation should be kept in mind when planning for the use of lookup columns.
Caution
Exceeding eight lookup columns per list view consumes a large amount of SQL resources, which can result in performance degradation when the view is rendered. Although there can be more than eight lookup columns in the list, make sure to limit the number that are included in specific views.
Follow these steps to learn more about the lookup column’s functionality:
1. Create a new site using the Team Site template. Instructions for creating a site are provided in Chapter 21, “Designing and Managing Pages and Sites for Knowledge Workers,” in the “Creating Pages and Sites” section.
2. Click the Tasks tile with the text Working on a deadline? and this will bring up a window stating that a Tasks list and a Calendar list will be added. Click the Add Them button.
3. Click the Edit link on the new Project Summary web part that has been added to the site home page.
4. Click the List tab on the ribbon, and click the Create Column icon.
5. Title the column Flags, and select Single Line of Text as the column type. Leave the other fields on their default values and click OK to save.
6. From the Tasks tab on the ribbon, click New Item. On the New Item page, click the Show More link at the bottom to display all columns where you can enter information, then enter the following content in the appropriate fields:
Task Name: Enter the text Lookup Task 1.
Start Date: Enter a sample start date in the future.
End Date: Enter a sample end date that is after the start date.
Assigned To: Enter a sample username.
% Complete: Enter 0%.
Task Status: Not Started.
Flags: Enter the text Scope of work not clear.
Leave the other fields with the default values. Click Save when the data has been entered.
7. After the task is added, click New Item again. Click Show More, and then enter the following content in the appropriate fields:
Title: Enter the text Lookup Task 2.
Start Date: Enter a sample start date in the past.
End Date: Enter a sample end date in the future.
Assigned To: Enter a sample username.
% Complete: Enter the text 10%.
Task Status: In Progress.
Flags: Enter the text Team lead is on vacation.
Leave the other fields with the default values. Click Save when the data has been entered.
8. The task list should look similar to Figure 22.11.

9. Now click the link to Calendar from the quick launch.
10. Click the Calendar tab on the ribbon, and then click List Settings.
11. Scroll down until the link to Create Column appears, and then click Create Column.
12. Enter Task Lookup as the title of the column, and then click Lookup (information already on this site).
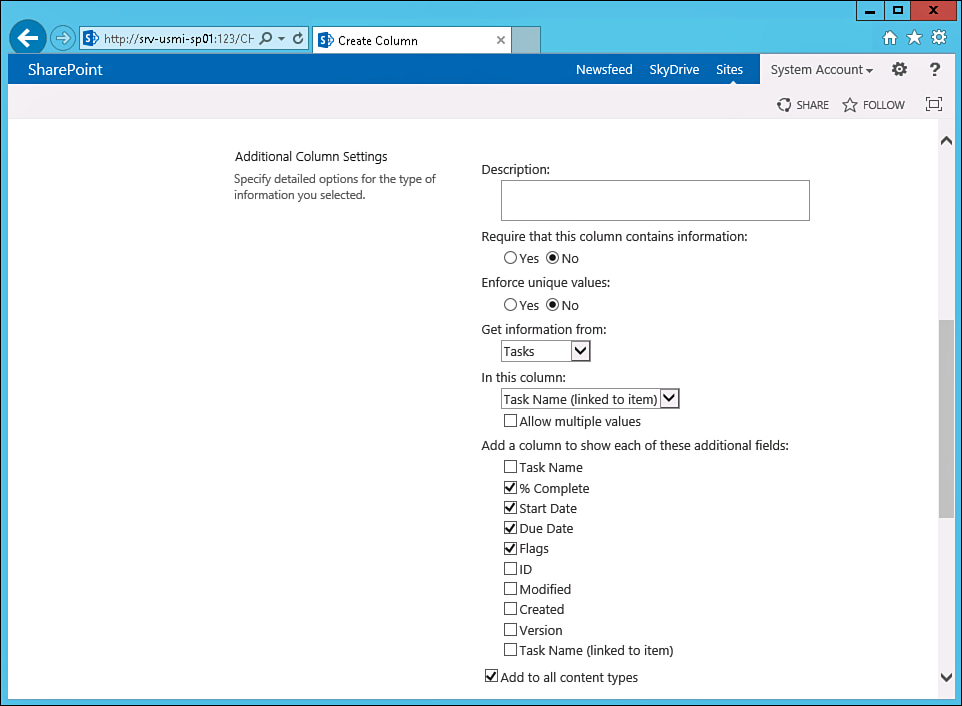
13. Scroll down to the Additional Column Settings section, click the drop-down menu under Get Information From, and select Tasks. The page updates to now show the columns that are valid lookup columns.
14. Select Task Name (linked to item) from the list.
15. Check the box next to Allow Multiple Values.
16. Then check the boxes next to % Complete, Start Date, Due Date, and Flags. Leave the other values at their defaults, as shown in Figure 22.12, and click OK.
17. Click Calendar from the breadcrumb trail to return to the Calendar list.
18. Click the Events tab, and then click New Event from the ribbon.
19. Enter the following values in the new event:
Title: Enter the text Status Meeting.
Location: Enter the text Meeting Room A.
Start Time: Enter a date and time in the next week.
End Time: Enter a date and time 1 hour after the start time.
Task Lookup: Click Lookup Task 1 and click the Add button; then click Lookup Task 2 and click the Add button.
Leave the other fields at their defaults and click Save.
20. The event now appears on the calendar on the date specified. Click the name of the event to see the event details; it should be similar to Figure 22.13. Note that even though only the tasks names were selected, the list item is populated with additional values from the Tasks list: % Complete, Start Date, Due Date, and Flags information is populated. The links to Lookup Task 1 and Lookup Task 2 can be clicked on from this screen to open the tasks to see additional information.

21. Close the Calendar item window by clicking Close.
22. From the Calendar, click the Calendar tab, and then click List Settings.
23. Locate the Task Lookup:% Complete column and click it. Change the column name to Task % Complete and click OK. Note that the name of the column is now changed without breaking the functionality of the column. So, the administrator can make these lookup column titles more user-friendly than the default names that are assigned.
An additional option provided in a lookup column is Enforce Relationship Behavior. While experimenting with this functionality, it is not unusual to see a message display that states, “This lookup field cannot enforce a relationship behavior because this list contains incompatible fields.” The following example provides a case where Enforce Relationship Behavior can be tested.
Testing Enforce Relationship Behavior
To continue the process of understanding lookup columns, the Enforce Relationship Behavior setting needs to be experienced. The example provided in this section leverages an Announcements list and a lookup column to connect to a list of donated items, which makes it easy for an organization to create an announcement when someone offers an item of value to other employees. The Restrict Delete setting is applied to ensure that when the announcement has gone out, the details of the donated item are still available. Restrict Delete means that the child item cannot be deleted because it is related to an item in the “parent” list. Following that configuration, the Cascade Delete option is configured, and in that case, the deletion of the child item causes a deletion of the parent item.
This example scratches the surface of what’s possible in enforced relationships between lists but provides a real-world example that can be leveraged in numerous ways within the organization. Database developers will immediately see the similarities between this capability and the types of joins and other interactions possible between database tables and will no doubt be able to leverage lookup columns in many creative ways.
Follow these steps to create two lists and leverage the Enforce Relationship Behavior setting:
1. Create a new site using the Team Site template. Instructions for creating a site are provided in Chapter 21, in the section titled “Creating Pages and Sites.”
2. Create a new list using the Custom List template and name it Donations. Steps for creating a new list are provided in Chapter 20, in the “Creating Lists and Libraries” section.
3. From the Donations list, click the List tab, and then click List Settings.
4. Scroll down and click the Create Column link.
5. Name the new column Item Description and check Single Line of Text; leave the other settings as default and click OK.
6. Return to the list all items view by clicking the list name in the breadcrumb.
7. Click New Item on the Item tab on the ribbon.
8. Enter a title for the entry, such as Kodak z7590 Camera, and enter text in the Item Description field such as 5.0 Megapixels, 10x zoom, very portable, works great.
9. Click Site Contents from the quick launch, and click add an app in the Lists, Libraries, and other Apps section of the page.
10. Select the Announcements tile and then Name the list, Announcements.
11. Navigate to the Announcements list, click the List tab, and then click List Settings.
12. Scroll down and click Create Column.
13. Title the column Donation Lookup and select the Lookup type of column.
14. In the Additional Column Settings section of the screen, click the drop-down menu under Get Information From, and select Donations. Verify that Title appears in the drop-down menu under In This Column. Check the box next to Item Description in the next section down, as shown in Figure 22.14.

15. Check the box next to Enforce Relationship Behavior, and then select the radio button next to Restrict Delete, as is also shown in Figure 22.14.
16. Click OK. Click OK for the message, “This column must be indexed to enforce a relationship behavior. Do you want to index this column?”
17. Click the Announcements link from the breadcrumb to return to the list.
18. Click the New Announcement link.
19. Enter a title for the announcement (for example, Generous Donation). Click the drop-down list in the Donations Lookup field and select Kodak z7590 Camera. Click OK. The result should look like Figure 22.15.

20. Return to the Donation list by clicking its link in the quick launch.
21. Select the list item entered in steps 7 and 8, and then click Delete Item on the ribbon. Click OK to confirm the deletion. An error message appears stating, “Sorry, something went wrong... This item cannot be deleted because an item in the ‘Announcements’ list is related to an item in the ‘Donations’ list.”
Use lookup columns with the Enforce Relationship Behavior option and Restrict Delete to ensure that the target item of the lookup can’t be deleted if it is referenced by an item in the “parent” list.
22. Next, the lookup column is set to Cascade Delete. Navigate back to the Announcements list.
23. Click the List tab, and then click List Settings.
24. Scroll down to the Columns section and click Donations Lookup column.
25. Scroll down to the Relationship section, and this time select Cascade Delete. Click OK.
26. Navigate to the Donations list.
27. Select the list item entered in steps 7 and 8, and then click Delete Item on the ribbon. Click OK to confirm the deletion. An error message appears stating, “Sending this item to the site Recycle Bin will also send any related items in the following lists to the site Recycle Bin: [Announcements]. Are you sure you want to send the item(s) to the site Recycle Bin?” Click OK.
28. Navigate to the Announcement list to verify that the announcement is also deleted.
Tip
When related items are deleted in a Cascade Delete enforced relationship, restoring the child item from the Recycle Bin also restores the related item.
Setting Metadata Standards with Default Values
For the metadata entered to be useful in searches and filters, it is important that it be accurate. List and library administrators can use a variety of methods to control the entries that users provide.
List or library administrators can set default values for metadata when the column is being created, or can return to the list settings page at a later date to change the default values. Setting a default value may not be advisable in some cases because end users who are in a rush, or feeling lazy, may simply leave the default setting when uploading a document. So, consideration should be given to the pros and cons of using default values.
Figure 22.16 shows a section of the settings available for a choice column in a document library. In the Default Value section, the administrator can choose to set one of the choices in the list above as the default value, or can have a Calculated Value. In this figure, the default value is Enter Choice #1. If the field is cleared of text, the default value is left empty. If Calculated Value is chosen, the administrator needs to enter an equation in the field provided.

Note also that there is the option to Allow Fill-In Choices for the choice column, which may be a good option if strict control over the metadata entries is not critical for this column and library.
Setting Default Values from the Settings Page
By accessing the Column Default Value Settings link from the Document Library Settings page, the administrator can set values based on folders, which can be a much more powerful and useful ability than setting default values on a column basis. The following section provides an example of using the Column Default Value Settings for folders within a document library:
1. Create a new document library, create two or more folders in it, and add two or more new columns. In this example, the document library contains folders titled Folder 1 and Folder 2, a column titled Subject (single line of text column), and one titled Choice Column (choice menu to choose from column). It is important to include these items for the following steps.
2. From the document library, click the Library tab on the ribbon, and then click Library Settings.
3. Click Column Default Value Settings link in the General Settings section.
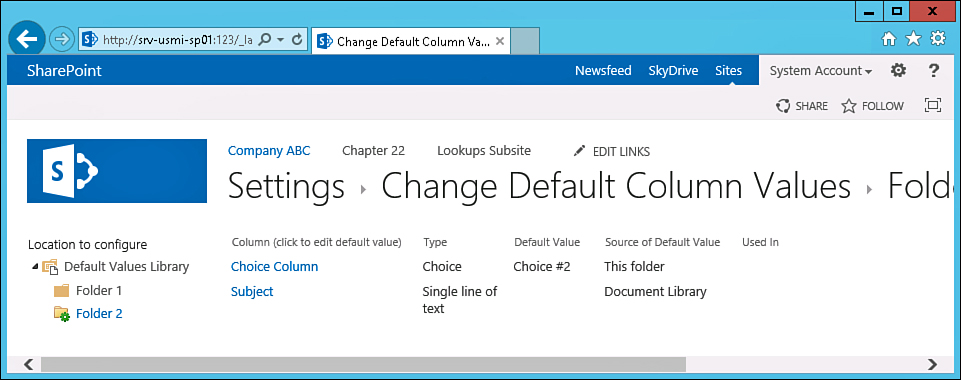
4. From the Change Default Column Values page, click one of the folders in the left pane. In this example, Folder 2 is selected.
5. Click the column name to change. In this example, the Choice Column link was selected.
6. In the Edit Default Value window, select the radio button next to Use This Default Value and enter the desired default value in the field. An error message displays if you enter an invalid choice. In this example, Choice #2 is entered, as shown in Figure 22.17. Click OK.

7. As shown in Figure 22.18, the Change Default Column Values page now shows what the default value is by column and by folder. A folder with a gear icon on it has a default value assigned to it. Other folders without specific default values assigned and documents not stored in a folder are assigned the document library default.
While at first glance this feature seems of limited use, if the document library uses folders or is designed to hold a specific type of document that shares default settings, the default values can be a great time saver and help ensure that the proper values are set for documents. This is especially true for organizations where end users are “addicted” to folder structures and are reluctant to give them up. The administrator can create a column titled Folder Name and then assign default values to this column on a folder-by-folder basis that mirrors the names of the folders. Then views can be created that ignore the folder structure for more advanced users, but the documents will be tagged with the folder name so that information is still captured. This also solves the problem of users knowing which folder items “live” in when they are using a view that is set to ignore the folder structure.
Note
If the default column value is changed, it does not affect documents already uploaded to the document library; only documents that are uploaded after the default value are changed.
Site Columns Practical Applications
Previously in this chapter, a variety of columns have been created for the examples. Each of these columns exists in only one place: inside the list where they were created. For example, in one example, a column was created that was named Project Name and used the Choice variety of column, and had several values added to it: Project ABC, Project DEF, and Project GHI. This is fine if that column needs to be used in only one list or library, but if the administrator suddenly finds that this column needs to be used in multiple lists and libraries by the project managers, for example, several things can be done:
![]() The administrator can manually create the same column in the other lists and libraries that need it. If changes are needed to the settings of the column, the administrator needs to manually make the changes in each list and library.
The administrator can manually create the same column in the other lists and libraries that need it. If changes are needed to the settings of the column, the administrator needs to manually make the changes in each list and library.
![]() The administrator can create a template of the entire document library or list and then use that template to create a new list or library and it will contain the Project Name column and choice values. If changes are needed to the settings of the column, the administrator needs to manually make the changes in each list and library.
The administrator can create a template of the entire document library or list and then use that template to create a new list or library and it will contain the Project Name column and choice values. If changes are needed to the settings of the column, the administrator needs to manually make the changes in each list and library.
![]() The administrator can create a site column that can be referenced by different lists and libraries and even different sites within the site collection. Changes can be made to the site column that are immediately reflected in the locations where this column is used. The column can also be modified from the libraries and lists where it is used.
The administrator can create a site column that can be referenced by different lists and libraries and even different sites within the site collection. Changes can be made to the site column that are immediately reflected in the locations where this column is used. The column can also be modified from the libraries and lists where it is used.
![]() The administrator can create a site column, and also create a content type that uses the site column. This allows the benefits of the site column’s capabilities and leverages the content type’s capabilities.
The administrator can create a site column, and also create a content type that uses the site column. This allows the benefits of the site column’s capabilities and leverages the content type’s capabilities.
Follow these steps to create a site column called Project Name, then add it to a list, and then experiment with making changes to the site column from the list to verify these changes do not go “upstream”:
1. Access the Site Settings page for the top-level site of a site collection where the site column will be used using an account that is a member of the Site Collection Owners group.
2. Click Site Columns in the Web Designer Galleries section.
3. The Site Columns page displays. Note that there are a large number of site columns already in existence for the site collection, many of which are self-explanatory. Click the Create link.
4. Enter the title Project Name and choose the Choice column type. Note that there are several columns types that may be new to the administrator. These include Full Hypertext Markup Language (HTML) Content with Formatting and Constraints for Publishing, Image with Formatting and Constraints for Publishing, Hyperlink with Formatting and Constraints for Publishing, Summary Links Data, and Rich Media Data for Publishing.
5. Scroll down to the Group section, click the circle next to New Group, and enter the name Company ABC Columns.
6. Scroll down to the Additional Column Settings section and enter in several choices for the project names in the box under Type Each Choice on a Separate Line. In this example, enter Project ABC, Project DEF, Project GHI. Select Yes under Allow Fill-In Choices, and clear the text in the Default Value field.
7. Expand the Column Validation section, and enter the following formula, as shown in Figure 22.19:
=FIND("Project",[Project Name], 1)

8. Enter text in the User Message section: Value must include the word “Project.”
9. Click OK to save. The Site Columns page now shows the new site column in a section titled Company ABC Columns. If needed, the name of the site column can be clicked and the settings modified.
Now that the site column has been created, it can be used in a list or library. Follow these steps to use the site column in a list and to test the addition of values:
1. Create a Tasks list and title it Site Column Test. Steps for creating a new list are provided in Chapter 20, in the “Creating Lists and Libraries” section.
2. Click List Settings from the List tab on the ribbon.
3. Click Add from Existing Site Columns in the Columns section.
4. On the Add Columns from Site Columns page, select Company ABC Columns from the Select Site Columns From drop-down menu. Click Project Name in the Available Site Columns pane and click the Add button. Leave the Add to All Content Types and Add to Default View selected as shown in Figure 22.20. Click OK to save.

5. Click the name of the list in the breadcrumb to return to the list and click the new task link.
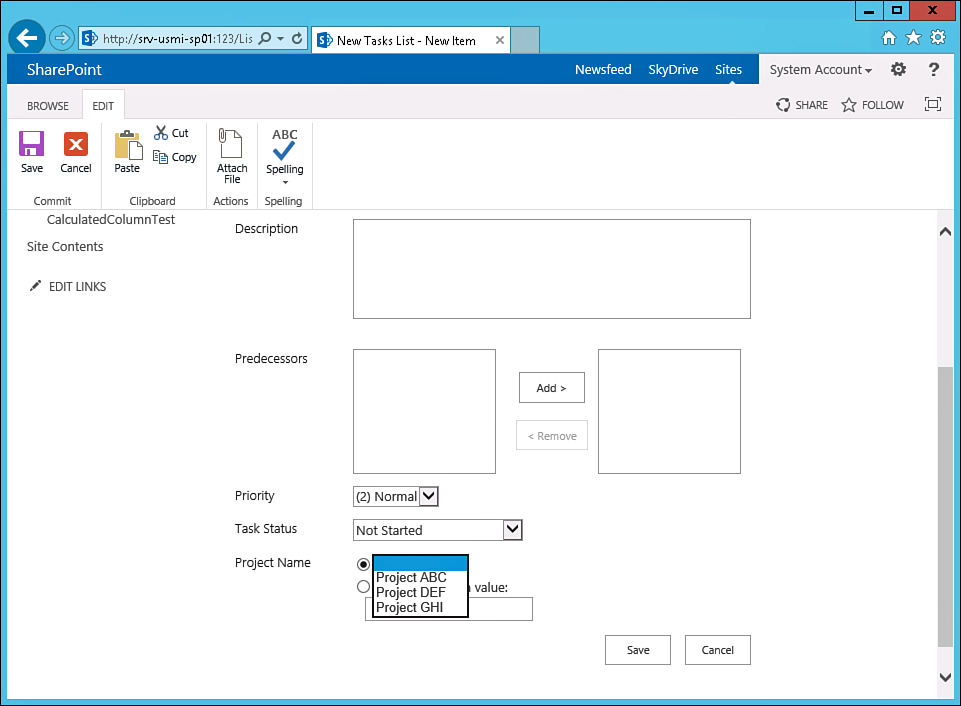
6. Create a new task with the title of Task 1. Click the Show More tool. Leave the default values and scroll down to where the field Project Name is visible. Note that there is a drop-down list with the field values defined in the previous exercise. Verify that Project ABC, Project DEF, and Project GHI appear.
7. Click the circle next to Specify Your Own Value, enter the text Project JKLMNOP, and click Save.
8. Now see whether the new value added modifies the site column by navigating to the Site Settings page by accessing Site Settings from the Settings gear drop-down menu. Click Site Columns in the Web Designer Galleries section.
9. Click Project Name in the Company ABC Columns section and verify that the new project name was not added to the site column. Project ABC, Project DEF, and Project GHI should be the only entries. The value Project JKLMNOP was not added.
Now that the site column has been created and it is referenced in a list, the administrator can experiment with further modifications to get a better sense for the connectivity between the site column and the list. For example, the following tests will be revealing:
![]() Modify the title of the column in the list where it is used. Note that this doesn’t change the site column settings in the Site Column Gallery.
Modify the title of the column in the list where it is used. Note that this doesn’t change the site column settings in the Site Column Gallery.
![]() Modify the type of column (for example, change it from Choice to Single Line of Text) and verify this doesn’t change the site column settings in the Site Column Gallery.
Modify the type of column (for example, change it from Choice to Single Line of Text) and verify this doesn’t change the site column settings in the Site Column Gallery.
![]() Add a new value to the site column in the Site Column Gallery and verify that it populates to the instance of the site column in the test list.
Add a new value to the site column in the Site Column Gallery and verify that it populates to the instance of the site column in the test list.
![]() Remove a value from the site column choice fields that is actually used in the list, and verify that the value in the list still remains even after the site column has been modified.
Remove a value from the site column choice fields that is actually used in the list, and verify that the value in the list still remains even after the site column has been modified.
Note
When pushing down site column changes, the entire list column definition is overwritten with the current site column definition. Therefore, any changes you make to the list column are overwritten. If errors are encountered, the process moves on to the next use of the site column and report errors.
Content Types Practical Applications
Now that metadata has been reviewed in detail, the initially confusing concept of content types should make more sense. Just as site columns were accessed from the Site Settings page, Site Column link in the Web Designer Galleries section, Content Types are accessed from the Site Content Types link in the same section of the page. Each content type can contain the following settings and components:
![]() Name, description, and group.
Name, description, and group.
![]() Advanced settings, including the URL of an existing document template or a new document template that can be uploaded. The option to set the content type as Read Only is provided, and the option to update all content types inheriting from this content type is provided.
Advanced settings, including the URL of an existing document template or a new document template that can be uploaded. The option to set the content type as Read Only is provided, and the option to update all content types inheriting from this content type is provided.
![]() Workflow settings allow the addition of a workflow to the content type. Workflows available in SharePoint Server 2013 are affected by site collection features enabled, but can include Disposition Approval, Three-State, Approval, Collect Signatures, Publishing Approval, and Collect Feedback.
Workflow settings allow the addition of a workflow to the content type. Workflows available in SharePoint Server 2013 are affected by site collection features enabled, but can include Disposition Approval, Three-State, Approval, Collect Signatures, Publishing Approval, and Collect Feedback.
![]() Information management policy settings provide options including the following: policy statement that displays when the item is opened, enabling retention and definition of retention stage, enabling auditing of interactions between end users and the documents, enabling barcodes, and enabling labels.
Information management policy settings provide options including the following: policy statement that displays when the item is opened, enabling retention and definition of retention stage, enabling auditing of interactions between end users and the documents, enabling barcodes, and enabling labels.
![]() Document Information panel settings: These settings allow the administrator to use the existing template, point to an existing .xsn template to use (which can be created in InfoPath), or upload a new .xsn template. In addition, the Document Information panel can be set to always show on document open and initial save.
Document Information panel settings: These settings allow the administrator to use the existing template, point to an existing .xsn template to use (which can be created in InfoPath), or upload a new .xsn template. In addition, the Document Information panel can be set to always show on document open and initial save.
![]() The Columns section shows the columns currently associated with the content type, the type of column, whether the column is Required or Optional, and the source, if any, of the column from another content type.
The Columns section shows the columns currently associated with the content type, the type of column, whether the column is Required or Optional, and the source, if any, of the column from another content type.
![]() Columns can be added from existing site columns, or a new site column can be created for the content type. And Column order can be modified if needed.
Columns can be added from existing site columns, or a new site column can be created for the content type. And Column order can be modified if needed.
![]() When creating a new content type, a parent content type can be defined to which additions or changes are made.
When creating a new content type, a parent content type can be defined to which additions or changes are made.
As with site columns, there are a large number of content types already in place to include the following groupings:
![]() Business Intelligence
Business Intelligence
![]() Community Content Types
Community Content Types
![]() Digital Asset Content Types
Digital Asset Content Types
![]() Display Template Content Types
Display Template Content Types
![]() Document Content Types
Document Content Types
![]() Document Set Content Types
Document Set Content Types
![]() Folder Content Types
Folder Content Types
![]() Group Work Content Types
Group Work Content Types
![]() List Content Types
List Content Types
![]() Special Content Types
Special Content Types
This list may vary based on the version of SharePoint 2013 in place and the site collection features enabled.
These content types can be associated with lists or libraries, and when this has taken place, the content type is available for selection from the New menu. If a content type is added after content already exists in the list or library, it can then be assigned to items.
Follow these steps to add the site column created in the previous section to an existing content type:
1. Navigate to the Site Content Types page by accessing Site Settings for the top-level site of the site collection as a site collection administrator and clicking Site Content Types in the Web Designer Galleries section.
2. Click Create.
3. Enter a name for the content type (in this example, Company ABC Task), select List Content Types from the Select Parent Content Type From drop-down, and select Task from the Parent Content Type drop-down menu.
4. Select Custom Content Types from the Put This Site Content Type into the Existing Group drop-down menu, as shown in Figure 22.21. Click OK to save.

5. The Site Content Type page then opens for the new content type. This page shows the settings inherited from the parent and allows the administrator to make changes that only affect this new content type and future content types that inherit from it. In this example, the administrator wants to add the site column Project Name created previously.
6. Click Add from Existing Site Columns under the Columns list. The Add Columns page opens.
7. In the Select Columns From drop-down, select Company ABC Columns, then select Project Name from the Available Columns pane, and click the Add button. Click OK to save.
8. As shown in Figure 22.22, the Site Content Type page now shows the new column in the Columns table, and unlike the other columns, it has no listing under Source, indicating that it was added directly to this content type.

9. To validate that this content type is functional, create a new Tasks list titled New Tasks List.
10. From the new Tasks list, access List Settings for the list and click Add from Existing Site Content Types in the Content Types section.
If there is no Content Types section, click the Advanced Settings link on the List Settings page, then select Yes in the Content Types section under Allow Management of Content Types, and then click OK to save the changes.
11. Select Custom Content Types from the drop-down menu under Select Site Content Types From, and then click Company ABC Task in the Available Site Content Types section and click the Add button. Now the Company ABC Task content type should appear in the Content Types list.
12. Return to the list by clicking the list name in the breadcrumb. Click the New Item drop-down from the Tasks tab and click Company ABC Task.
13. Give the item a title such as Task Testing New Content Type and click the Show More link to show the Project Name field and verify that the expected choices from the site column are shown (in this example, Project ABC, Project DEF, and Project GHI), as shown in Figure 22.23. Select one of these values and click OK.
14. Note that in the main view of the list, the Project Name column isn’t shown since it hasn’t been added to the default view, so click the List tab and then the Modify View button.
15. From the Edit View page, find the Project Name entry in the Columns section, and check the box in the Display column. Click OK, and now the Project Name column should display in the default view, on the right-hand side.
Considering the Dublin Core Content for Taxonomy Inspiration
Neatly tucked away in the Site Content Types gallery, in the Document Content Types section, is an entry titled the Dublin Core Columns. Spending some time with this content type is a great way to gain insight into a full set of columns that can be used to describe the elements of a document to enable it to fit into an overall taxonomy or structure.
The Dublin Core metadata element set contains descriptors designed to make it easy for users to easily understand the content described by the metadata elements regardless of the type of content managed. This element set has been widely accepted as documented by the National Information Standards Organization (NISO) in their document titled “The Dublin Core Metadata Element Set” (ISSN: 1041-5653).
The elements are as follows and some description of the value of the fields is given where appropriate:
![]() Name: This is the standard filename field.
Name: This is the standard filename field.
![]() Contributor: One or more people or organizations that contributed to the resource.
Contributor: One or more people or organizations that contributed to the resource.
![]() Coverage: The extent or scope of the document.
Coverage: The extent or scope of the document.
![]() Creator: The primary author who may be different from the individual or account uploading the document.
Creator: The primary author who may be different from the individual or account uploading the document.
![]() Date Created: This is different from the automatic metadata value tracked by the system. A date and time for when the item was actually created can be entered.
Date Created: This is different from the automatic metadata value tracked by the system. A date and time for when the item was actually created can be entered.
![]() Date Modified: Also different from the system tracked modified value; a date and time can be added here.
Date Modified: Also different from the system tracked modified value; a date and time can be added here.
![]() Description: A standard multiple lines of text column where descriptive text can be entered.
Description: A standard multiple lines of text column where descriptive text can be entered.
![]() Format: Media type, file format, or dimensions can be entered as appropriate.
Format: Media type, file format, or dimensions can be entered as appropriate.
![]() Resource Identifier: An identifying string or number, usually conforming to a formal identification system.
Resource Identifier: An identifying string or number, usually conforming to a formal identification system.
![]() Language: Language in which the item is recorded or written.
Language: Language in which the item is recorded or written.
![]() Publisher: The person, organization, or service that published this resource.
Publisher: The person, organization, or service that published this resource.
![]() Relation: References to related resources.
Relation: References to related resources.
![]() Rights Management: Information about rights held in or over this resource.
Rights Management: Information about rights held in or over this resource.
![]() Source: References to resources from which this resource was derived.
Source: References to resources from which this resource was derived.
![]() Keywords: Standard multiple lines of text to enter in keywords.
Keywords: Standard multiple lines of text to enter in keywords.
![]() Subject: Single line of text field for the subject.
Subject: Single line of text field for the subject.
![]() Title: Single line of text.
Title: Single line of text.
![]() Resource Type: A set of categories, functions, genres, or aggregation levels.
Resource Type: A set of categories, functions, genres, or aggregation levels.
This may be “overkill” in terms of complexity for most organizations, but there may be items in this content type that can be adopted for the organization. For example, the concept of adding the creator information to an item is a powerful one, because the person who created the document might be different from the person who uploaded it. Tagging the item with format metadata is also helpful in many cases because SharePoint can make it hard to see the file extension, and adding paper sizes for Visio or computer-aided design (CAD) documents can be useful.
Creating and Using Managed Metadata
Managed metadata was described from a high level in Chapter 18, “SharePoint Foundation Versus SharePoint Server 2013,” in the section titled “Service Applications Available in the Different Versions of SharePoint 2013.” This section builds on the basic concepts presented in that section and gives an example of creating managed metadata and how it can be used to make centrally managed metadata available to multiple site collections.
Managed Metadata Service is a service application managed and accessed from the Central Administration site. For testing purposes, it is generally a good idea to create a new service application, by completing the following steps. The first step is to set a content type, then create the service application, and then define the term sets:
1. Access a site collection that will be used as the content type syndication hub and access site settings from the top-level site. Click Site Collection Features in the Site Collection Administration section.
2. Locate the Content Type Syndication Hub and click Activate. Make sure the Active box shows up before proceeding to the next step.
3. Next, access the Central Administrator site and click Manage Service Applications under the Application Management section.
4. Click the New drop-down menu on the ribbon and select Managed Metadata Service.
5. Give a title to the service application (for example, Test Managed Metadata Service App).
6. Scroll down and verify that the Database server name is correct and provide a name for the database that will be created (for example, TestManagedMetadataServiceApp).
7. In the Application Pool section, click Use Existing Application Pool, and select SharePoint Web Services Default.
8. In the Content Type Hub field, enter the URL for the site collection that was activated in step 2, as shown in Figure 22.24.
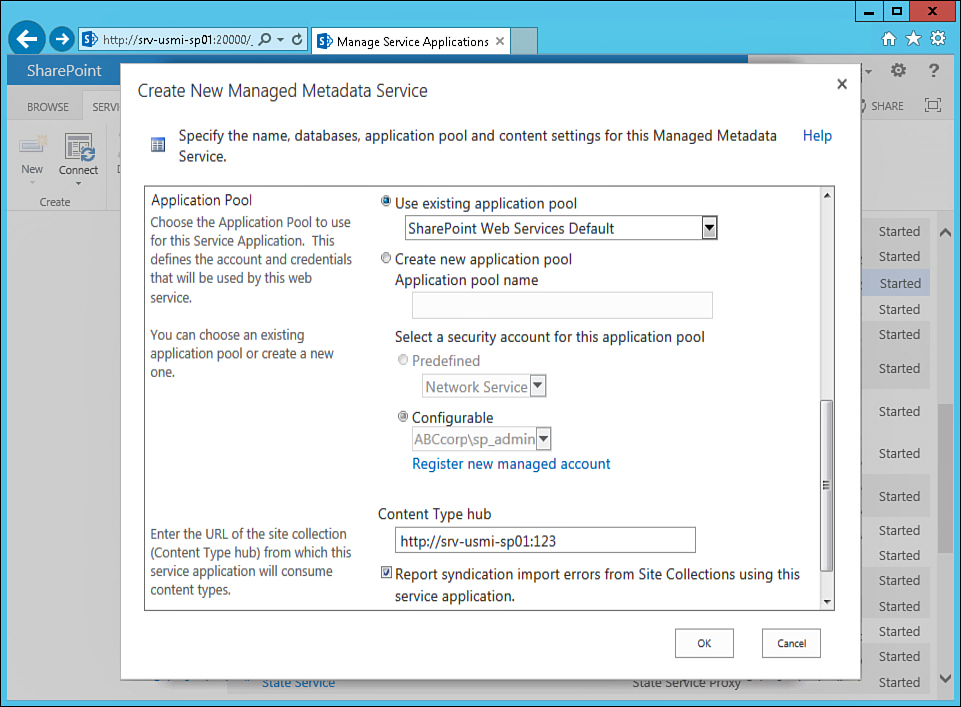
9. Leave the other settings at their defaults and click OK. The service application is created along with the database, and it then shows on the ServiceApplications.aspx page.
10. Click the top line of the new service application so that the line is selected (do not click the active hyperlink), and then click the Properties button on the ribbon. This page lists the settings that were just entered. Click Cancel to return to the ServiceApplications.aspx page.
11. Now click the actual link to the service application in the top line (Test Managed Metadata Service App, in this example); the Term Store Management Tool page opens.
12. Click the top-level node in the left Taxonomy Term Store area and then select New Group from the drop-down menu on the right side of the top-level node.
13. A new node appears. Click the new node, give it a title such as Company ABC Terms, and press Enter.
Note
Enterprise keywords can also be added to the Managed Metadata Service application, as shown in Figure 22.25. After being added, these words or phrases can then be used by tagging tools in SharePoint 2013 site collections. Enterprise keywords are part of a single, nonhierarchical term set called the keyword set.

14. Click New Term Set from the drop-down menu on the new node (Company ABC Terms in this example), as shown in Figure 22.25. Title this node Client Codes and press Enter.
15. Next access the drop-down menu for Client Codes node and click Create Term.
16. Title the term Company DEF Codes and press Enter.
17. Click the node for Company DEF, access the drop-down menu for it, and click Create Term.
18. Title the term below as Company DEF USA, which would correspond to a division of Company DEF with offices in the United States, and then press Enter.
Tip
When creating a term, the option exists to provide other labels to the term, which are also called synonyms. For example, when the term Company DEF USA is defined, a synonym might be DEFCo New York, which is another way to refer to Company DEF USA branch. Another might be DEFCo LA (if there is also an office in Los Angeles). The farm administrator did not want to create individual terms underneath the Company DEF USA term because that is “too granular,” and for the organization’s requirements, having end users differentiate between the different international branches of Company DEF is sufficient.
19. Repeat step 17 to create additional nodes under Company DEF (Company DEF EMEA, Company DEF Asia), as shown in Figure 22.26.

20. Click the node Company DEF Codes, and the right pane should show additional settings for the term. Uncheck the box next to Available for Tagging because this is an organizational term rather than a term the administrator wants end users to use as metadata. Click Save to save the changes to the term.
21. Click the node Client Codes and review the settings in the right pane. Note that there are fields for Description, Owner, Contact, Stakeholders, a choice to leave the term set Open or Closed, and a check box to allow the term set to be used for tagging or not.
These terms are now available for use from SharePoint lists and libraries. As briefly reviewed earlier, a number of configuration options are available for each term. In the following section, this managed metadata is accessed from a list to show the power of the tool.
Note
A term is a word or phrase that can be associated with an item in SharePoint Server 2013. A term set is a collection of related terms. Local term sets are created within the context of a site collection. For example, if you add a column to a list in a document library, and create a new term set to bind the column to, the new term set is local to the site collection that contains the document library. Global term sets are created outside the context of a site collection.
Adding Managed Metadata in a List
After the managed metadata term set has been created, as demonstrated in the previous section, it can be used in lists and libraries, as shown in the following steps:
1. Access the site collection used in the previous exercise, where the content type syndication hub site collection feature was enabled. Create a new list using the Discussion Board List template. Title the list ManagedMetadataTestDiscussion and click Create.
2. From the list, click List Settings from the List tab.
3. Click Create Column in the Columns section.
4. Title the column Client Codes and check the circle next to Managed Metadata.
5. Scroll down to the Term Set Settings section, enter the text Company DEF in the field under Find Term Sets that Include the Following Terms, and click the binoculars button. As shown in Figure 22.27, the term set created in the previous section should be returned.

6. Click the Client Codes node in the results from the search. This will be the “anchor point” for the options that are shown to users of this list. Leave the other settings at their defaults. Click OK to save the settings. Note in the Columns section of the Settings page that this column is listed as managed metadata in the Type column.
7. Return to the discussions list view by clicking the list name in the breadcrumb and click the new discussion link.
8. Provide a title for the discussion item (for example, Company DEF not paying bills!), then scroll down to the Client Codes field, and click the Browse for a Valid Choice icon to the right of the field.
9. The Select: Client Codes window opens. Drill down under Company DEF codes and select Company DEF USA, as shown in Figure 22.28. Then click the Select button to select the term. Click OK.

10. Click Save to save the list item and return to the AllItems.aspx page.
Content Type Syndication Hubs
A site collection feature that can be enabled is the Content Type Syndication Hub; this provisions a site to be an enterprise metadata hub site. When a content type is created in a content type hub, the content type is available to other site collections that are part of web applications associated with that Managed Metadata Service instance. The Content Type Hub and Content Type Subscriber jobs need to run for the content type to be synchronized and logs to be updated. Note that in Site Settings for the Content Type Syndication Hub site collection, the tool Content Type Publishing provides a check box to Refresh All Published Content Types on Next Update.
Metadata as a Navigation Aid
One of the primary reasons that organizations put time and effort into creating taxonomies and enforcing their use is to help knowledge workers quickly and precisely locate the documents they are looking for.
Metadata navigation is a powerful tool available in SharePoint Server 2013 Standard or Enterprise, and involves the configuration of hierarchy fields, key filters, and the management of column indices to facilitate browsing for specific types of content within a document library and creating filters to limit the results.
The terminology is a bit confusing, so the best way to understand how it works is to experiment with it. The following example walks through the process of creating a new document library, enabling content types, adding a content type to a document library, and then configuring the metadata navigation settings:
Note
The Metadata Navigation and Filtering feature must be active in order to see the Metadata Navigation Settings on the Settings page. To verify that this is active for the site being used, navigate to site settings, click Manage Site Features link in the Site Actions section, and then click Activate next to the Metadata Navigation and Filtering feature.
1. Create a new document library by accessing the Site Actions drop-down menu and clicking New Document Library. Title the library Metadata Navigation Library.
2. After the document library is created, navigate to the library and click Library Settings from the Library tab on the ribbon.
3. Next click Advanced Settings in the General Settings section. Click Yes under Allow Management of Content Types. Click OK to save this setting and return to the Document Library Settings page.
4. Scroll down to the Content Types section and click Add from Existing Site Content Types.
5. From the Add Content Types page, as shown in Figure 22.29, change the content types to Document Content Types in the Select Site Content Types From drop-down menu. Select Basic Page and click the Add button. Click OK to add this content type and return to the Document Library Settings page.

6. Click the Metadata Navigation Settings link in the General Settings section. See the note at the beginning of this section if the Metadata Navigation Settings links isn’t there.
7. Content Type should be highlighted in the Available Hierarchy Fields area, so click the Add button to add it to selected hierarchy fields.
Note
Other fields can be selected in the Available Hierarchy Fields section. Besides Content Type, Single-Value Choice Field and Managed Metadata Field can also be selected.
8. In the Configure Key Filters section, in the Available Key Filter fields, click Modified By, and then click the Add button. The screen should now match Figure 22.30.

Note
A variety of fields can be used as key filters. These include Content Type, Choice field, Managed Metadata field, Person or Group field, Date and Time field, and Number field.
9. Leave Automatically Manage Column Indices on This List checked. Click OK to save the changes and return to the Document Library Settings page.
Note
Leaving Automatically Manage Column Indices on This List selected will improve the performance of queries when the Navigation Hierarchy and Key Filter tools are used. There are a maximum of 20 columns that can be indexed in a list or library, so on rare occasions, the administrator might need to decide which 20 are indexed.
10. Click the name of the document library in the breadcrumb to return to the default view of the library. The library should now have the hierarchy fields in the quick launch area on the left, and below it the key filter fields. (You might need to scroll down to see the key filter fields.) Test these tools by creating several folders and uploading several documents to the library and assigning them to the Document and Basic Page content types during the upload process.
Figure 22.31 shows the navigation hierarchy after several folders have been created, and where the user has clicked the Basic Page content type, as well as the key filter section where the user has entered Alex Kirchmann and the filtering criteria for the Modified By field of metadata. This very intuitive navigation tool enables users to quickly navigate to folders and subfolders and to see only certain content types or other fields, such as managed metadata fields.

Summary
This chapter provided a thorough overview of the wide range of applications of metadata in SharePoint 2013 by using hands-on exercises as well as feature discussions and examples. Because of the ways that metadata is enmeshed with SharePoint 2013, administrators must “get their hands dirty” to set standards for how metadata will be used and which SharePoint 2013 metadata-related features will be used.
In this chapter, a summary of the different types of columns available from lists and libraries was provided, along with examples of how metadata is populated to documents. Exercises involving the calculated column and lookup column types were provided, and features such as validation settings and enforcing unique values in columns were discussed and practical applications were covered. Default values and the enforce relationship behavior were also discussed. The chapter then moved on to cover site columns and content types when the “basics” of metadata had been covered, because effective use of site columns and content types requires a familiarity with the capabilities of metadata columns used in lists and libraries. Finally, managed metadata and using metadata as a navigation aid was discussed and exercises were provided.
Best Practices
The following are best practices from this chapter:
![]() A recommended best practice for a farm or site collection administrator is to become familiar with the process of creating metadata columns in lists and libraries and the range and options available for the different column types.
A recommended best practice for a farm or site collection administrator is to become familiar with the process of creating metadata columns in lists and libraries and the range and options available for the different column types.
![]() Set standards for document libraries and lists in terms of the standard metadata columns added to ensure consistency across libraries in one site or across multiple sites.
Set standards for document libraries and lists in terms of the standard metadata columns added to ensure consistency across libraries in one site or across multiple sites.
![]() Calculated columns support a wide range of mathematical functions, and Excel users can leverage their skills creating complex formulas in SharePoint 2013. Be sure to test the Excel formulae in SharePoint because not all Excel functions are supported and there are other restrictions, some of which are pointed out in this chapter.
Calculated columns support a wide range of mathematical functions, and Excel users can leverage their skills creating complex formulas in SharePoint 2013. Be sure to test the Excel formulae in SharePoint because not all Excel functions are supported and there are other restrictions, some of which are pointed out in this chapter.
![]() Column validations and validation settings for a list or library help IT ensure that users are entering valid values in lists and libraries, and also leverage Excel equations, which generate the results of true or false.
Column validations and validation settings for a list or library help IT ensure that users are entering valid values in lists and libraries, and also leverage Excel equations, which generate the results of true or false.
![]() Lookup columns are very powerful, but also have limitations in terms of which columns can be connected to. Also understanding the capabilities of the Restrict Delete and Cascade Delete options in the Enforce Relationship Behavior section for a lookup column is important and can lead to powerful applications built on relationships between lists.
Lookup columns are very powerful, but also have limitations in terms of which columns can be connected to. Also understanding the capabilities of the Restrict Delete and Cascade Delete options in the Enforce Relationship Behavior section for a lookup column is important and can lead to powerful applications built on relationships between lists.
![]() Site columns allow an administrator to create a column once that can be added to any list or library in the site collection. Changes push down only, so changes to the site column from the list level do not affect the site column itself, which is stored in the Site Column gallery.
Site columns allow an administrator to create a column once that can be added to any list or library in the site collection. Changes push down only, so changes to the site column from the list level do not affect the site column itself, which is stored in the Site Column gallery.
![]() Content types provide additional features and settings that make them effective and powerful tools, and can leverage site columns. They are defined in content type galleries.
Content types provide additional features and settings that make them effective and powerful tools, and can leverage site columns. They are defined in content type galleries.
![]() Managed metadata is defined at the Central Administrator site level, and multiple Managed Metadata Service applications can be created. The term sets created within the service applications can then be managed centrally and made available to lists and libraries throughout the farm.
Managed metadata is defined at the Central Administrator site level, and multiple Managed Metadata Service applications can be created. The term sets created within the service applications can then be managed centrally and made available to lists and libraries throughout the farm.
![]() Not only does metadata allow for effective management of documents and list items, but it can also be used to facilitate navigation within lists and libraries.
Not only does metadata allow for effective management of documents and list items, but it can also be used to facilitate navigation within lists and libraries.