Chapter 31. Business Intelligence in SharePoint 2013 with Business Connectivity Services
In This Chapter
![]() A Brief Introduction to BCS Development
A Brief Introduction to BCS Development
![]() Defining the External Content Type
Defining the External Content Type
![]() Consuming External Content Types
Consuming External Content Types
![]() Writing to External Content Types
Writing to External Content Types
![]() Business Connectivity Services Web Parts
Business Connectivity Services Web Parts
Business Connectivity Services (BCS) provides an interface for surfacing detailed information about an entity in SharePoint. As noted in Chapter 30, “Business Intelligence in SharePoint 2013 with PerformancePoint Services,” business intelligence (BI) in SharePoint is about bringing the right information to the right people at the right time. Chapter 30 focused on PerformancePoint Services, which emphasizes the presentation of analytical data—numbers that can be totaled, averaged, or analyzed in other mathematical ways. With BCS, the information that is being surfaced is usually more anecdotal, presenting detailed information about a specific entity, such as a customer, a product, or an individual sale.
Consider, for example, a customer service department for an online retailer. The company receives an average of 200 calls and online chats per hour. With recent staff cuts, the customer service agents are under increasing pressure to address calls as quickly as possible, without sacrificing the quality of the customer service. For the various types of customer interactions, the customer service representative needs to quickly and easily access information about the customer, the order, and the products included in the order.
The company has a variety of applications that serve various business functions. There is an order-fulfillment system based on an SQL Server database. A customer database, owned by the marketing department, contains information about previous customers and is used for direct marketing initiatives. Lastly, the customer service department has started using a SharePoint team site and a SharePoint issues list to track customer service issues.
Using the BCS features of SharePoint 2013, the company can tie all this information together so that their customer service representatives can quickly and easily be able to access key information about orders and customers when handling calls. The department’s goal is to provide one single, seamless user interface. The vision is to create a “customer service dashboard,” where anyone in the department can quickly record, view, and address customer service issues in the shortest amount of time.
A Brief Introduction to BCS Development
SharePoint 2007 introduced the Business Data Catalog (BDC), which then evolved in SharePoint 2010 to be known as the Business Connectivity Services (BCS) and is still known as BCS with SharePoint 2013. The BDC in SharePoint 2007 was designed to provide a set of services and features that provided a way to connect solutions based on SharePoint Server to sources of external data. In the SharePoint 2007 BDC, definitions of entities required third-party tools. A few competing tools were available, but they only provided functionality for building BDC entities. Two such products that were commonly used were BDC Metaman from Lightning Tools and MOSS BDC Design Studio from Simego.
Now with SharePoint 2013 BCS, Visual Studio 2012 and SharePoint Designer 2013, both of which provide functionality for developing a wide range of other SharePoint features, introduce built-in BCS design and development tools. This enables easy definition of external content types for later consumption in SharePoint. The ability to build BCS functionality using the SharePoint tools that are already used for other SharePoint extensions is one improvement in the capabilities offered by the 2013 suite of products.
Key components to the BCS tools include the following:
![]() The Business Data Connectivity (BDC) Service: This service application stores BCS entities including BDC models, external systems, and external content types.
The Business Data Connectivity (BDC) Service: This service application stores BCS entities including BDC models, external systems, and external content types.
![]() Secure Store Service: The Secure Store Service provides the capability of securely storing credential sets and associating them to identities or groups of identities.
Secure Store Service: The Secure Store Service provides the capability of securely storing credential sets and associating them to identities or groups of identities.
Developing external content types in Visual Studio 2012 requires a machine running SharePoint 2013. This can be either a Windows Server machine running SharePoint 2013 or a Windows 7 machine capable of running a development version of SharePoint. It is generally recommended that Windows Server be used, and the basic server options are as follows:
![]() The 64-bit edition of Windows Server 2008 R2 Service Pack 1 (SP1) Standard, Enterprise, or Datacenter.
The 64-bit edition of Windows Server 2008 R2 Service Pack 1 (SP1) Standard, Enterprise, or Datacenter.
![]() Or, the 64-bit edition of Windows Server 2012 Standard or Datacenter.
Or, the 64-bit edition of Windows Server 2012 Standard or Datacenter.
![]() Other standard prerequisites as covered previously in this book are also required for SharePoint 2013 installation.
Other standard prerequisites as covered previously in this book are also required for SharePoint 2013 installation.
Changes in BCS 2013
![]() Performance improvements in external lists
Performance improvements in external lists
![]() Limiting number of records returned by the external system
Limiting number of records returned by the external system
![]() Data source filtering
Data source filtering
![]() Sorting external lists
Sorting external lists
![]() Export external lists to Excel
Export external lists to Excel
External Content Types
SharePoint 2010 added the notion of external content types, and these are key components in developing BCS solutions. The content type, first introduced in SharePoint 2007, is a way of describing an entity of information stored in SharePoint. Document content types can be items like contracts, policies, and forms. Non-document content types can be items like announcements, tasks, or contacts. All of these are content types whose information is physically stored within the SharePoint taxonomy. Each would have its respective set of attributes, also known as columns, properties, or metadata.
An external content type is just what it sounds like—an entity whose underlying data exists external to SharePoint. Just like a SharePoint content type, an external content type also has its set of attributes or columns. Using BCS, external content types can be defined and made available for consumption within SharePoint.
Installing SharePoint Designer
SharePoint Designer 2013 also includes built-in capabilities for developing external content types. SharePoint Designer 2013 is a free tool that can be used to extend and customize SharePoint sites.
At the time of this writing, SharePoint Designer 2013 encountered errors when used with SharePoint 2013; so in some cases, SharePoint Designer 2010 was used instead in this chapter. Make sure to download any updates of patches to SharePoint Designer 2013 when using it with SharePoint 2013.
To download and install SharePoint Designer 2013, follow these steps:
1. In Internet Explorer, go to www.microsoft.com/downloads.
2. In the Search box on the Downloads page, enter the phrase SharePoint Designer 2013.
3. Select either Microsoft SharePoint Designer 2013 (32-bit) or Microsoft SharePoint Designer 2013 (64-bit), depending on your desktop operating system.
4. On the following page, click the Download button. When prompted with “Do you want to run or save this file?” select Save, and save the file to your Desktop.
5. When the download is complete, double-click the SharePointDesigner.exe file on your desktop. This begins the installation process.
6. After the file extraction process completes, read the Microsoft software license terms, accept the terms of the agreement, and click OK. Click the Install Now button. When the installation completes, you are ready to start using SharePoint Designer.
Preparing to Build External Content Types
Prior to building external content types in SharePoint Designer, a few preparation steps are necessary. First, the SharePoint farm needs to be configured to receive connections, as follows:
1. On the SharePoint 2013 server, select Start and SharePoint 2013 Central Administration.
2. Under Application Management, click Manage Service Applications.
3. On the Service Application ribbon, click New and select Business Data Connectivity Service.
4. Give the service application a name, such as Business Data Connectivity Service.
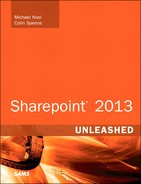
5. Input the database server and remove or replace the globally unique identifier (GUID) that is appended to the database name. In this example, the database server name is spsql, as shown in Figure 31.1.
6. Select a preexisting application pool or create a new application pool for the service application, keeping in mind that running too many application pools simultaneously can result in diminished server performance. In this example, a new application pool, BDCAppPool, was created. Choose to use an existing managed account or to register a new managed account.
8. After the service application has successfully created, hover over the service application name until it turns into a hyperlink. In this example, the name Business Data Connectivity Service turned into a hyperlink. Click the link to manage the service application.
9. On the Edit ribbon, click Set Metadata Store Permissions.
10. Grant the necessary service accounts access permissions.
11. Click OK to finish.
Next, the appropriate services and features should be started on in the farm, on the site collection, and on the site itself. Follow these steps to start the services and features on the farm:
1. In Central Administration, under Application Management, click Manage Services on Server.
2. Start the BDC service.
3. Navigate to the BCSSample site collection and click the gear icon in the upper right. Select Site Settings. In this example, the site collection URL is http://sp2013-02/sites/BCSSample/.
4. On the Site Settings page for the site collection, under Site Collection Administration, click Site Collection Features.
5. Locate PerformancePoint Site Collection Features and click Activate.
6. Navigate back to Site Settings, and under the Site Actions heading, click Manage Site Features.
7. Locate the BICenter Data Connections Feature and click Activate.
Finally, a SharePoint site collection or site is required. In general, creating a new site collection is preferable for testing of this nature. To create a new SharePoint site collection, follow these steps:
1. In Central Administration, under Application Management, click Create Site Collections.
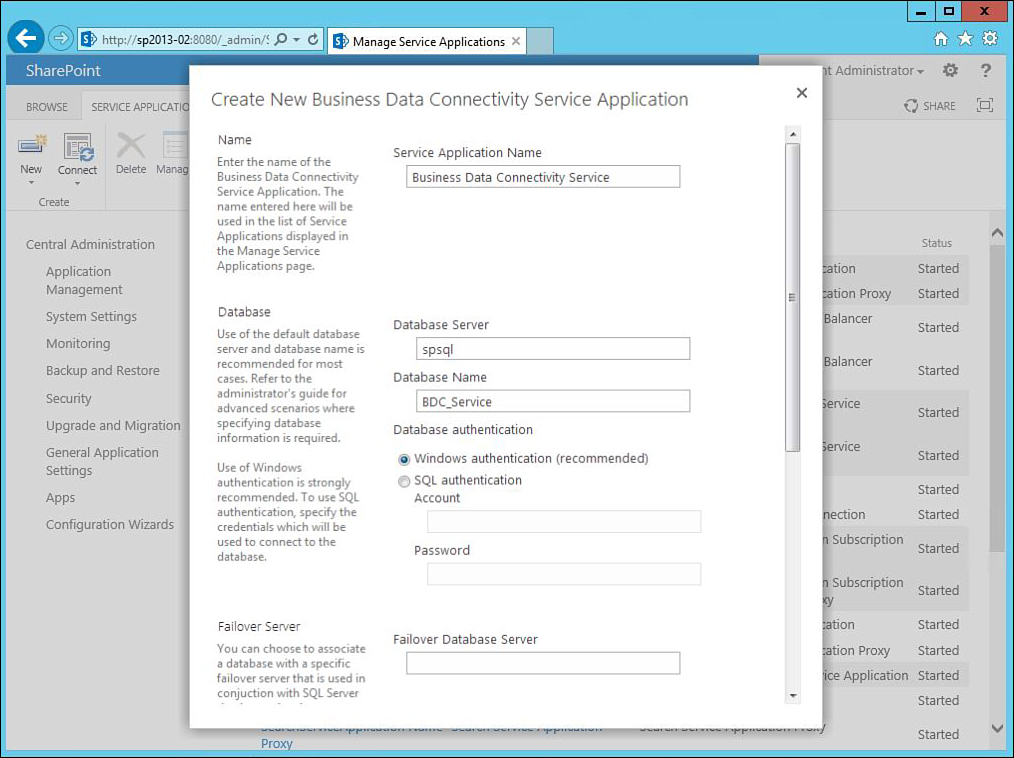
2. In the Title box of the Create Site Collection page, enter BCS Sample Site.
3. In the URL section, select the /sites/ option in the drop-down box, and enter BCSSample in the text box.
4. In the Template Selection section, choose Team Site.
5. Enter one or two login accounts to serve as the site collection administrators, as shown in Figure 31.2. In this example, the SharePoint Administrator (SPAdmin) account was set as the primary administrator. Click OK.
In addition, external content types require an SQL Server database to connect to. Chapter 30 includes a set of steps to install the AdventureWorksLT database. If you completed those steps in the previous chapter, you do not have to do so again. If not, here are the steps:
Note
You need a server running SQL Server 2012 and SQL Analysis Services to proceed with this exercise.
1. Download and install the AdventureWorks samples databases by visiting http://msftdbprodsamples.codeplex.com/.
2. Click the link to the SQL Server 2012 product sample databases (http://msftdbprodsamples.codeplex.com/releases/view/55330), and then click the AdventureWorksLT2012_Data link to download. Save the installation file to a machine running SQL Server 2012. To avoid hassle in later steps, save the file to C:Program FilesMicrosoft SQL ServerMSSQL11.MSSQLSERVERMSSQLDATA or copy the file to that location when it finishes downloading.
3. When the file (AdventureWorksLT2012_Data.mdf) has finished downloading, the database needs to be attached to the SQL Server 2012 database engine instance. Open SQL Server Management Studio from the Start menu.
4. Connect to the database engine on the appropriate database server.
5. Right-click Databases and select Attach.
6. Click the Add button and navigate to the Save location. Select the database file and click OK to finish.
7. In the Database Details pane, select the LOG file type and click Remove.
8. Click OK to attach the database.
Defining the External Content Type
The next set of exercises step through the example of creating a basic external content type. The example utilizes the Customers table of the AdventureWorks database.
There are several operations available for an external content type; however, two specific ones—Read List and Read Item—are required before it can be consumed by SharePoint.
A Read List operation provides all the rows of the table that meet the criteria defined in the operation. In the Customer example, a Read List operation enables viewing of all the records from the Customers table in one SharePoint list, with it looking and acting like a SharePoint list. Although the data continues to live in the AdventureWorksLT database on SQL Server, it can be consumed in SharePoint, with the benefit of SharePoint views, as well as column sorting and filtering.
A Read Item operation allows for the isolation of an individual record from the list, based on some unique identifier, such as a Customer ID. The Read Item operation also allows you to join together a regular SharePoint list with the records of the Customer table. In the forthcoming examples, a Customer Service Issues list, stored in SharePoint, captures data about calls fielded by the Customer Service department. The list contains a mixture of SharePoint data and external data.
There are other operations available as well for external content types, including the following:
![]() Create: Add a new record to a table.
Create: Add a new record to a table.
![]() Update: Modify an existing record.
Update: Modify an existing record.
![]() Delete: Remove a record from a table.
Delete: Remove a record from a table.
![]() Association: Define a relationship between two related tables.
Association: Define a relationship between two related tables.
Each of these operations is discussed in later sections of this chapter.
To begin building the external content types, follow these steps:
1. Open SharePoint Designer 2013. Following installation, the application should be added to a SharePoint grouping on your computer’s Programs menu.
2. In SharePoint Designer 2013, click the Open Site button from the File menu. Enter the web address for the site created in the previous section. For example, enter http://sp2013-02/sites/BCSSample/.
3. Open the navigation pane on the left side if it is not already expanded.
4. In the Site Objects pane, shown on the left sidebar in Figure 31.3, select External Content Types.

5. In the External Content Types ribbon at the top of the screen, select External Content Type.
6. In the External Content Type Information section, click the link next to Name that says New External Content Type. The link is replaced with a text box to enter the name. Enter BCS Customer. Repeat with the Display Name field.
7. Next to the External System header, click the Click Here to Discover New External Data Sources and Define External Content Types link.
8. In the data source explorer view, click the Add Connection button.
9. In the External Data Source Type Selection dialog box, select SQL Server as the data source type and click the OK button.
10. In the SQL Server Connection dialog box, enter the SQL Server connection information. The Database Server should be the name of the SQL Server name and instance where you installed the AdventureWorks LT database. For example, enter sp2013-02. For the Database Name, enter AdventureWorksLT2012. For the connection options, select Connect with User’s Identity, as shown in Figure 31.3. Click the OK button.
11. After a connection to the AdventureWorksLT database is established, the database schema loads under the Data Source Explorer. Expand the AdventureWorksLT node. Note that tables, views, and routines (SQL Server stored procedures) are all available for use. Expand the Tables node, as well.
12. Right-click the Customer table, and a list of available operations loads. Begin by selecting New Read Item Operation.
13. The Read Item Wizard is divided into three parts. In the first part—Operation Properties—enter Customer Read Item as both the operation name and the operation display name. Click the Next button.
14. In the Input Parameters, the CustomerID field, by virtue of it being defined as a unique identifier for the table in the database, is automatically recognized as the identifier for the external content type. Notice when the CustomerID field is selected, the Map to Identifier box is selected. No changes are necessary on this screen. Click the Next button.
15. The last portion of the wizard—Return Parameters—defines which columns from the database will be available for consumption and is shown in Figure 31.4. No changes are necessary on this screen. Click the Finish button.

16. In the Data Source Explorer of SharePoint Designer, right-click the Customer table and select New Read List Operation.
17. In the Operation Properties portion of the wizard, enter Customer Read List as the operation name and the operation display name. Click Next.
18. In the Filter Parameters section, no changes are necessary. Click Next.
19. In the Return Parameters section, select CustomerID field in the Data Source Elements section, and select the Show in Picker box in the Properties section. Repeat this for the FirstName, LastName, EmailAddress, and Phone fields. Click Finish.
20. Click the Save icon in the upper-left corner of SharePoint Designer (or press Ctrl+S) to save the external content type.
Note
Saving the external content type uploads the information to the BDC service application in SharePoint Central Administration. The external content type can later be removed or modified by going to Central Administration, Application Management, Manage Service Applications, Business Data Connectivity.
Creating an External Content Type for a Related Item
Most normalized databases have several tables with relationships to other tables, which are models for real-world information. A customer, for example, will place one or more orders with a company. An order will contain one or more products. And a single order might be delivered in one or more shipments.
A normalized database, to accurately model this information, will define relationships between these tables. A one-to-many relationship would exist between a Customers table and an Orders table. Both tables would contain a field called CustomerID. In the Customers table, each individual record would have a unique CustomerID. In the Orders table, there might be several records with the same CustomerID. This represents that one customer has placed multiple orders.
The AdventureWorksLT database contains this exact relationship between the Customers and Orders tables. With BDC, an extra step is involved with defining an external content type with this type of relationship.
The following exercise addresses how to create an external content type for orders, where a relationship to another content type exists:
1. In SharePoint Designer, in the Site Objects pane on the left side, click the External Content Types option.
2. On the External Content Types ribbon, click the External Content Type button.
3. In the External Content Type Information section, enter BCS Order for both the name and the display name.
4. In the External System field, click the Click Here to Discover External Data Sources and Define External Content Types link.
5. The AdventureWorksLT data source should already be available from having completed the previous set of exercises. Expand the AdventureWorksLT node, and then the Tables node. Expand the SalesOrderHeader node and the Columns node to view the columns in the SalesOrderHeader table. Notice the CustomerID column.
6. Right-click SalesOrderHeader, and select New Read Item Operation.
7. In the first part of the Read Item wizard—Operation Properties—enter Sales Order Read Item as both the operation name and the operation display name. Click the Next button.
8. As with the CustomerID field for the Customer external content type, the SalesOrderID field is automatically recognized as the identifier for the external content type. No changes are necessary on this screen. Click the Next button.
9. The last portion of the wizard—Return Parameters—defines which columns from the database will be available for consumption. No changes are necessary on this screen. Click the Finish button.
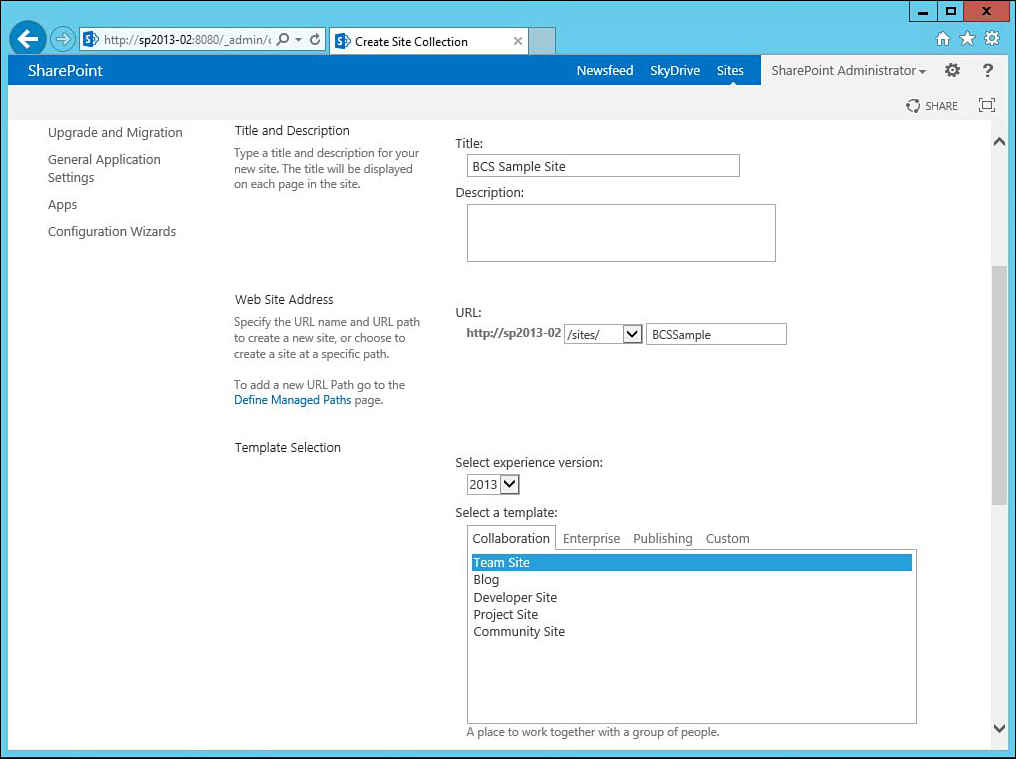
10. Right-click SalesOrderHeader, and select New Association. This is the operation necessary to establish the relationship between a customer and an order.
11. The Association Creation Wizard is divided into four sections, as shown in Figure 31.5. In the first—Association Properties—enter SalesOrder Customer Association as both the name and the display name.
12. Next to Related External Content Type, click the Browse button. The BCS Order (the current one) and BCS Customer (created earlier) external content types should both be available. Select BCS Customer and click the OK button. Below, the field CustomerID is automatically selected because both tables have the field with the same name. SharePoint Designer recognizes that this is the likely field on which to establish the relationship. Click Next.
13. In the second part of the wizard—Input Parameters—click the CustomerID field under Data Source Elements. Then check the box to the right labeled Map to Identifier and click Next.
14. In the Filter Parameters section, no changes are necessary. Click Next.
15. In the Return Parameters section, no changes are necessary. Click Finish.
16. In the Data Source Explorer of SharePoint Designer, right-click the SalesOrderHeader table and select New Read List Operation.
17. In the Operation Properties portion of the wizard, enter SalesOrder Read List as the operation name and the operation display name. Click Next.
18. In the Filter Parameters section, click the Add Filter Parameter button. In the Properties section for the new filter, change the Data Source Element to CustomerID. For the Filter parameter, click the Click to Add link. Make no changes in the Filter Configuration dialog box, and click OK. For the Default Value property, enter 1. Click Next.
19. In the Return Parameters section, select SalesOrderID field in the Data Source Elements section, and select the box in the Properties section labeled Show in Picker. Repeat this for the OrderDate, ShipDate, and TotalDue fields. Click Finish.
20. Click the Save icon in the upper-left corner of SharePoint Designer (or press Ctrl+S) to save the external content type.
At this point, there are now two external content types in the BDC Metadata Store in SharePoint Central Administration. These external content types are now available for use in the SharePoint sites.
Consuming External Content Types
After all the heavy lifting is complete, and the external content type has been built and saved into SharePoint, it is ready for consumption. There are three main ways that you can leverage the external content type in SharePoint: external lists, external data, and BCS web parts.
Creating an External List
An external list looks and acts just like a SharePoint list. Contents are displayed in rows and columns. You can also leverage the columns by sorting and filtering on them, as well as by creating custom views. The main difference between an external list and a regular SharePoint list is that the actual contents of the external list live outside of SharePoint, hence the name.
To create an external list, follow these steps:
1. In Internet Explorer, open the SharePoint site created earlier in the chapter. The URL will be something like http://sp2013-02/sites/BCSSample/.
2. Click the gear icon in the upper right and select Add an App.
3. In the Find an App search box, enter External List and click the search icon.
4. In the search results, click the External List app icon.
5. In the Adding External List dialog box, enter Customers as the list name.
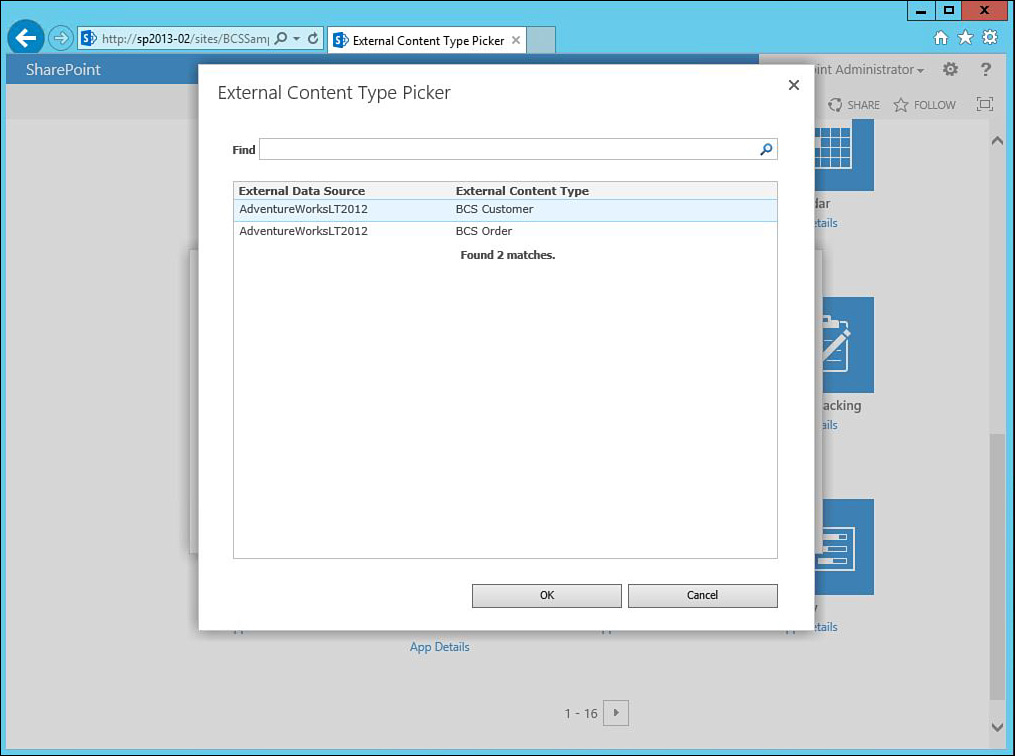
6. For the External Content Type field, an External Content Type picker is available. Click the icon for Select External Content Type. Select BCS Customer, as shown in Figure 31.6, and click OK. BCS Customer (AdventureWorksLT2012) should display as underlined. Click the Create button.
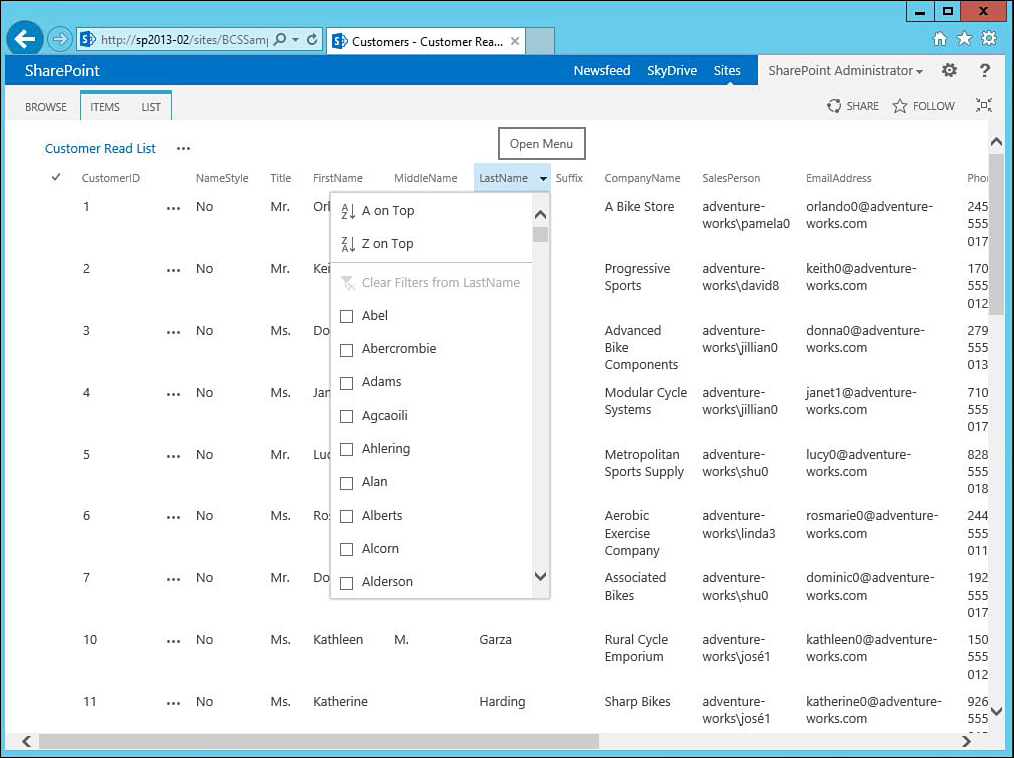
The resulting display is the entire Customers table from the AdventureWorksLT database, looking and acting like a standard SharePoint list as shown in Figure 31.7. Notice that the following capabilities are available on the list:
![]() Sorting: Hover over any of the column headers to sort the list in either ascending or descending order.
Sorting: Hover over any of the column headers to sort the list in either ascending or descending order.
![]() Filtering: Any column (for instance, SalesPerson) can be used for refining the number of records shown in the list.
Filtering: Any column (for instance, SalesPerson) can be used for refining the number of records shown in the list.
![]() Views: As with any other SharePoint list, site owners can create custom views.
Views: As with any other SharePoint list, site owners can create custom views.
Leveraging External Data
The second means by which external content types can be consumed in SharePoint sites is through external data columns. An external data column basically provides a hybrid between a SharePoint list and an external list. External data starts with any basic SharePoint list. The example that follows uses the SharePoint issues list with an external column to connect each issue to one of Adventure Works’ customers:
1. In the SharePoint site, select the Add an App option from the Settings gear icon.
2. In the Find an App search box, enter Issue and click the search icon.
3. Click the Issue Tracking icon. In the Name box, enter Customer Complaints and click the Create button.
4. When the list is created, click the Customer Complaints list in the navigation on the left side of the page.
5. In the List ribbon, click Create Column.
6. Enter Customer as the column name, and select External Data as the column type.
7. In the External Content Type picker, type the word Customer into the text box and click the checkmark icon for Check If External Content Type Exists. BCS Customer (AdventureWorksLT2012) should display as underlined, as shown in Figure 31.8.

8. Select CustomerID from the Select the Field to be Shown on This Column drop-down menu.
9. Under Add a Column to Show Each of These Additional Fields, select CompanyName, EmailAddress, FirstName, LastName, Phone, and SalesPerson. After you make these selections, all the fields selected are dynamically added to the custom SharePoint list. Click OK.
When all of this is complete, you can begin entering data into the Customer Complaints list, as follows:
1. In the Customer Complaints list, click the New Item link.
2. Enter Order received was incomplete as the title.
3. The Customer field, displayed at the bottom of the New Item form, provides an External Item picker utility. Click the icon for Select External Item (the second icon). Select the record with CustomerID of 3, Donna Carreras, and click OK.
Note
Recall that, earlier in the chapter, when creating the Read List operation on the Customers table, the Return Parameters portion of the wizard included a Show in Picker check box for each field listed. The exercise called for checking this box for the CustomerID, FirstName, LastName, EmailAddress, and Phone fields. These are the fields that are displayed in the Choose BCS Customer lookup.
4. Click Save to commit the new item to the Customer Complaints list.
5. Repeat steps 1–4 to add a second record. Enter Order included broken parts as the title. Select the record with a CustomerID of 4, Janet Gates.
6. Repeat steps 1–4 to add a third record. Enter Order is three weeks overdue as the title. Select the record with a CustomerID of 2, Keith Harris.
Figure 31.9 shows a view of the Customer Complaints list that has the three records entered in the preceding exercises. Notice that in addition to the traditional issue tracking columns there is also the Customer (external data) column.

The view also includes several additional columns relating to the customer. These columns are prefixed with Customer:, which indicates that they are columns based on the Customer external content type.
Periodically, data in the source SQL Server database might change. The BCS database contains cached versions of this data. In Figure 31.9, the Customer column header is highlighted, the result of hovering the mouse over this header. The column includes a double-arrow icon next to it. Clicking this arrow initiates a refresh of the data stored in SQL Server. If using external data columns, periodically click this icon to ensure that the most current data is displayed in your SharePoint lists.
Writing to External Content Types
Just like in SharePoint 2010, with BCS in SharePoint 2013, external content types can be defined with full CRUD (create, read, update, and delete) capabilities.
For many scenarios, writing to an external content type is going to be beyond the scope of what you can do within the confines of SharePoint Designer. It’s likely that the database to which you are connecting will have columns with more sophisticated data requirements. For example, many database tables will have some internal fields whose values are generated by the code in whatever application the database connects to.
The following examples walk through the process of creating these operations, and subsequently demonstrate why there are limitations to using SharePoint Designer for write-back operations:
1. Open SharePoint Designer 2013 from the SharePoint grouping on your computer’s Programs menu.
2. In SharePoint Designer 2013, click the Open Site button from the File menu. Enter the web address for the site created in the early parts of this chapter. For example, enter http://sp2013-02/sites/BCSSample/.
3. In the Site Objects window, select External Content Types.
4. BCS Customer and BCS Order should be listed in the External Content Types pane in the bottom-left corner of SharePoint Designer. Click BCS Customer.
5. On the External Content Types ribbon, click the Operations Design View icon.
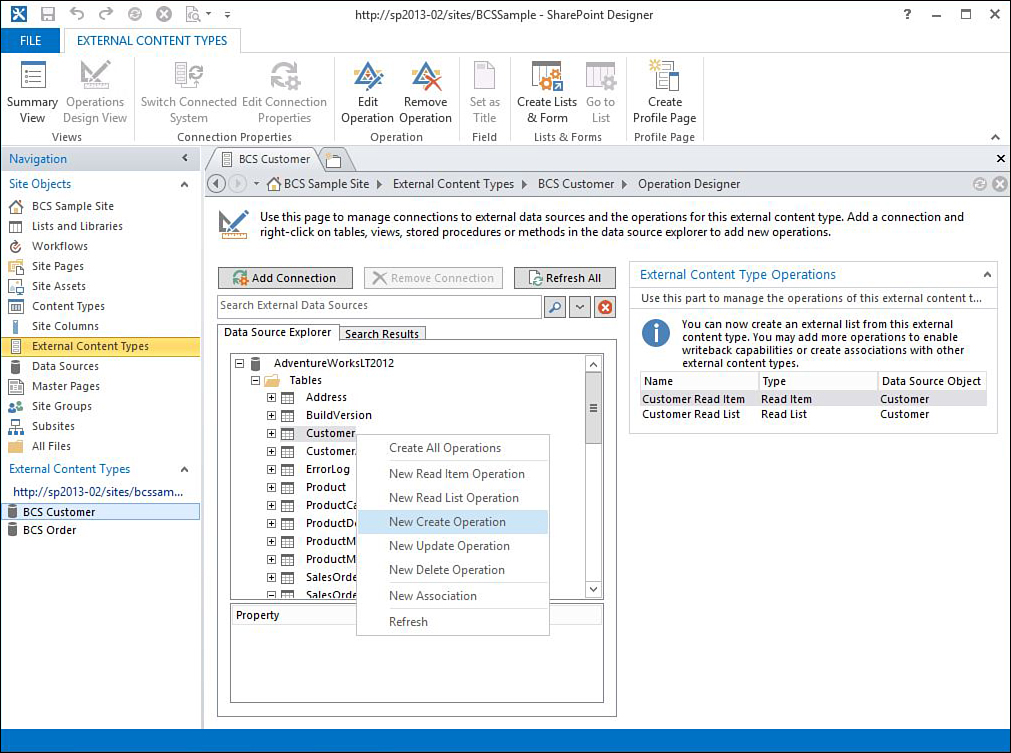
6. In the Data Source Explorer, right-click the Customer table and select New Create Operation, as shown in Figure 31.10.
7. In the Operation Properties section of the Create Wizard, enter Create Customer as both the operation name and the operation display name. Click Next.
8. In the Input Parameters section, no changes are necessary. However, notice that there are several fields—PasswordHash, PasswordSalt, and ModifiedDate, which are discussed in more detail shortly. Also, notice the opportunity to enter a default value for each of the fields below. Lastly, observe that each field can be unchecked; however, doing so results in an error message being added to Errors and Warnings, which will block instantiation of the create operation. Click Next.
9. In the Return Parameter portion of the wizard, no changes are necessary. Click Next.
10. Click the Save icon, or press Ctrl+S, to save the changes.
While this exercise provided a simple set of steps to build a create operation on the Customers table, some of the fields mentioned—PasswordHash, PasswordSalt, and ModifiedDate—present specific problems.
These fields are all ones that perform important functions on the database. Yet, at the same time, they aren’t the types of fields that are meant to be provided by end users. The PasswordHash and PasswordSalt fields, for example, are managed by other applications and provide encryption on the actual password entered by a system user. Lastly, the ModifiedDate field, also intended to be system-generated, is used to capture when the field was actually entered.
For fields such as these, SharePoint Designer is only sophisticated enough to allow you the following options: ignore the fields on write operations, specify a default value, or leave it up to the user to enter a value. The resulting outcomes of these options would be that a) the field was left blank on the new entry, b) useless data was entered, or c) an invalid entry resulted in an error that prevented the entire record from being added.
So, while BCS provides the capability to write back to SQL Server from SharePoint, and although this can be a very powerful business tool, it is only realistic for small, simple databases. For most line-of-business database systems, this is most likely going to be a practice best left to a more advanced BCS authoring tool, such as Visual Studio 2013.
Delete operations can pose similar problems on many database applications. A well-designed normalized database is likely going to have records in one table that depend on records in another table. An Orders table, for example, might have a CustomerID foreign key field, which depends on a related record in the Customers table. On the database, if you try to delete a Customer record when there are dependent records in the Orders table, SQL Server might issue an error message and block the deletion. The error message would be returned to the user and indicate the existence of such a dependency.
A simple delete operation, however, can be created with the following steps:
1. In the Data Source Explorer of SharePoint Designer, right-click the Customer table and select New Delete Operation.
2. In the Operation Properties section of the Create Wizard, enter Delete Customer as both the operation name and the operation display name. Click Next.
3. In the Input Parameters section, no changes are necessary. Note that the CustomerID field is automatically selected, with the Map to Identifier check box automatically checked. Click Finish.
4. Click the Save icon, or press Ctrl+S, to save the changes.
To see how these additional operations would be used in SharePoint, as well as how the problems previously described manifest themselves, follow these steps:
1. In Internet Explorer, open the SharePoint site used by all previous examples in this chapter. The URL, for example, would be http://sp2013-02/sites/BCSSample/.
2. Click the Customers list from the Quick Launch bar on the left side.
3. Click the List ribbon, and click the List Settings icon.
4. Click Delete this List, and confirm the deletion.
Note
When including create or update operations on an external content type, it is important to create these operations before creating the external list in SharePoint. The reason the operations need to be defined first is that, when SharePoint creates a new list, it creates the form pages as needed for Edit Item and New Item. If no operation is defined, no corresponding form pages are created when the list is instantiated. If the list is created first, and operations for create or update are then retroactively defined, the Add/Edit options show up on the item’s actions menu. However, selecting one of these options on the external list results in an error message. This is corrected by deleting and re-creating the external list.
5. Select Settings, Add an App.
6. In the Find an App search box, enter External List and click the search icon.
7. In the app search results, click the External List icon.
8. In the new list page, enter Customers as the list name.
9. For the External Content Type field, an External Content Type picker is available. Click the icon for Select External Content Type. Select BCS Customer, and click OK. BCS Customer (AdventureWorksLT2012) should display as underlined. Click the Create button.
10. After the list is re-created, click the Item ribbon, and click the New Item link.
11. Fill in the New Item record as shown in Figure 31.11 and click Save.
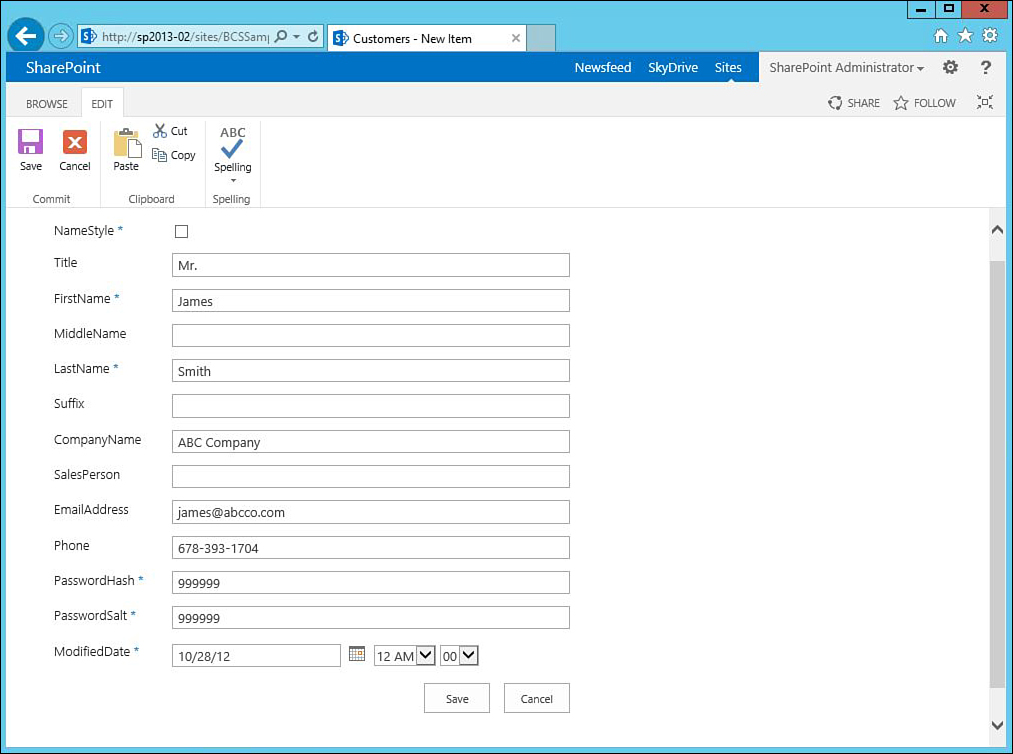
Notice a few things about the New Item screen. First, the PasswordHash and PasswordSalt fields provide no guidance to the user completing the form on how to fill in the fields. In addition, the fields are required because they are required in the AdventureWorksLT2012 database. Therefore, leaving the fields blank is not an option for the user. Also, the ModifiedDate field allows the user to directly input a date, even though it is intended to be controlled by the system.
Business Connectivity Services Web Parts
Up until this point, all the functionality covered in this chapter is available with SharePoint Foundation 2013, the nonlicensed version of SharePoint. The Enterprise version of Microsoft SharePoint Server offers some additional functionality.
Specifically, a set of Business Data web parts are available. These web parts provide a third way that BCS external content can be consumed in SharePoint and can be useful for building dashboard pages.
Consider, for example, a Customer Details page which would show profile information—Name, Phone Number, Company, and Email Address—about the customer in one web part. Another web part could show recent orders—including Order Date, Total Amount, and Order Status. A last one would list a set of recent customer service calls. Having all this information available in one screen would make it easier for a Customer Service Representative to quickly access all relevant information, without having to go from one application to another. It doesn’t even matter that all this information would live in a series of different SharePoint lists and database tables, or even in separate databases. The power of BCS is the ability to pull it all together into one location.
Before using these web parts, however, SharePoint Server Enterprise Site Collection Features needs to be activated. Activating this feature adds the web parts described previously to the site collection’s web part gallery. Follow these steps:
1. In Internet Explorer, open the SharePoint site used throughout this chapter. The URL will be something like http://sp2013-02/sites/BCSSample/.
2. From the Settings gear icon, select Site Settings.
3. Under the Site Collection Administration heading, click the Site Collection Features link.
4. Locate the feature labeled SharePoint Server Enterprise Site Collection Features, and then click the corresponding Activate button.
Note
If this feature is not listed, navigate to Central Administration. Under Upgrade and Migration, verify that Enable Enterprise Features is available. This feature should already be enabled if SharePoint 2013 Enterprise is installed. Then, click the link for Enable Features on Existing Sites, check the box to enable features, click OK, and wait for the features to propagate. After completing this, SharePoint Server Enterprise Site Collection features should be visible in Site Collection Features.
The following sets of examples show how to use three main web parts to build this dashboard: the Business Data Item, Business Data Related List, and the Query String (URL) Filter web parts.
Business Data Item Web Part
The first web part of interest is the Business Data Item web part, which can be used to show the details of a single BCS record. The example that follows uses this web part to show the main profile information about a customer—Name, Phone Number, Email Address, and so on:
1. In Internet Explorer, return to the home page of the SharePoint site used throughout this chapter.
2. From the Page ribbon, select Edit Page. The web page should show Left and Right web part zones.
3. In the Left Zone, click the Web Part button in the Insert ribbon.
4. In the Categories section, select the Business Data category. In the Web Parts section, select the Business Data Item web part. Click the Add button.
5. The Business Data Item web part should display in the Left web part zone. Click the link Open the Tool Pane in the web part to modify the web part settings.
6. For the Business Data Item section of the settings, enter the word Customer in the Type field, and check the checkmark icon to locate the BCS Customer external content type. After the external content type is located, it should display in the Type box as underlined.
7. In the View list box, select Default (Customer Read Item).
8. In the Item field, enter the number 2, and click the checkmark icon to locate the record with CustomerID of 2. When the record is located, it should also display in the box as underlined.
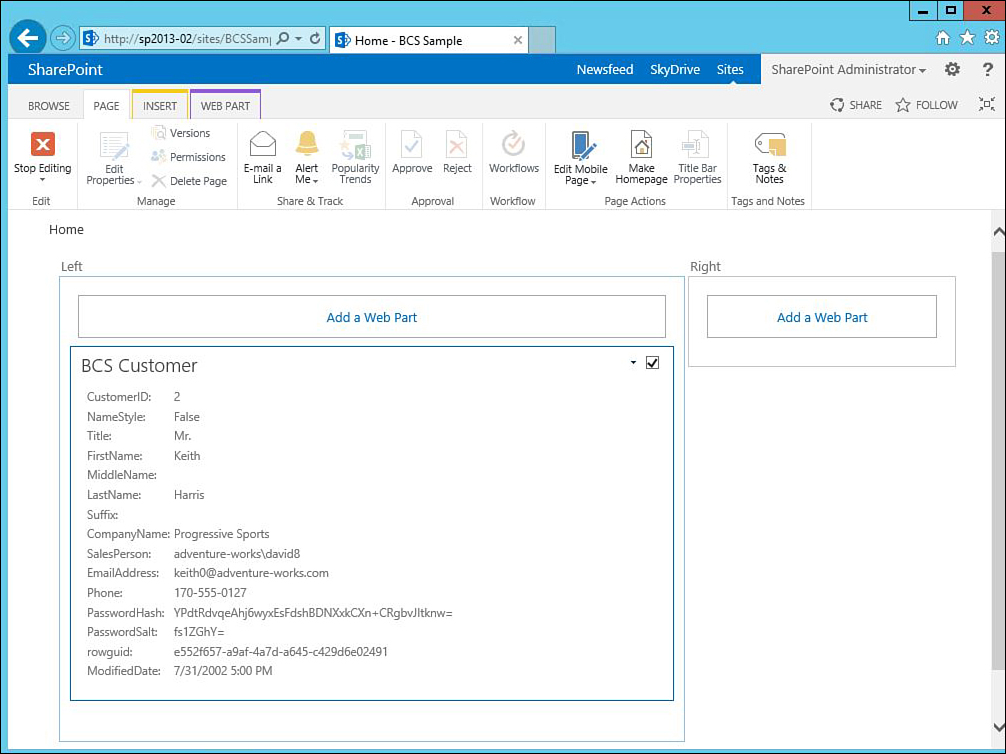
9. Click the OK button in the web part settings to save the changes to the web part. When the page reloads, the record for Keith Harris should be displayed, as shown in Figure 31.12.
Business Data Related List Web Part
Another important component of the Customer dashboard page is the Recent Orders web part. As the name implies, this web part shows recent orders associated with the given customer. This web part utilizes the Business Data Related List web part.
The Business Data Related List web part utilizes associations defined between two external content types. Recall the earlier set of exercises to create the BCS Order external content type, which included an association to the BCS Customer external content type. The Business Data Related List web part leverages this association to display only the orders that relate to a selected customer:
1. From the Page ribbon, select Edit Page.
2. In the left zone, click the Add a Web Part link.
3. In the Categories section, select the Business Data category. In the Web Parts section, select the Business Data Related List web part. Click the Add button.
4. The Business Data Related List web part should display in the Left web part zone, just above the BCS Customer web part. Move the new web part below the BCS Customer web part by clicking on the Business Data Related List header, holding the mouse button down, and dragging it beneath the BCS Customer web part. Release the left mouse button.
5. Click the link Open the Tool Pane in the web part to modify the web part settings.
6. In the Type box, click the Select an External Content Type icon. Notice that only the BCS Order content type appears in the selection list. This is because BCS Order was the only external content type for which an association was defined. Select BCS Order and click OK.
7. In the Relationship list box, select Default (Sales Order Customer Association), which should be the only option in the list. Click the OK button to save the web part settings.
8. All the columns from the Sales Order table should display. To reduce the columns displayed, use Internet Explorer’s horizontal scrollbar to move to the right. Click the Edit View link, which appears just above the rightmost column.
9. In the Columns section of the view settings page, deselect all except the following columns: OrderDate, ShipDate, SalesOrderNumber, CustomerID, SubTotal, TaxAmt, and TotalDue. Click OK.
10. Next, a connection must be established between the two web parts, so that the value used in the BCS Customer web part (Business Data Item web part) is passed to the Sales Orders List web part (Business Data Related list web part).
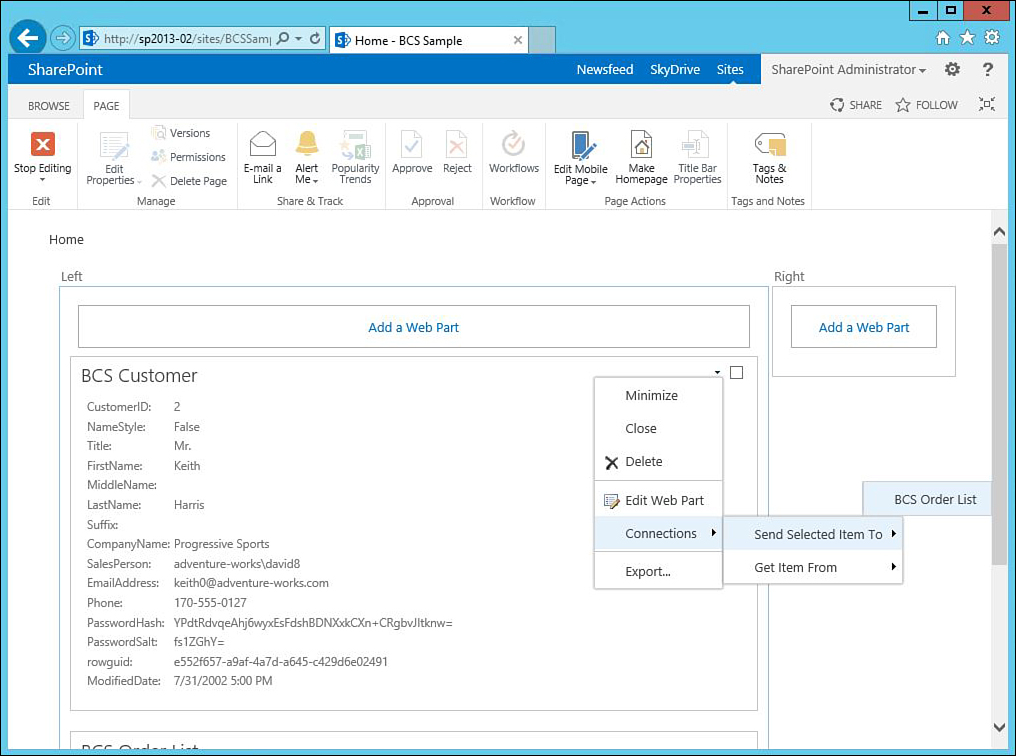
11. From the Page ribbon, select Edit Page.
12. Hover over the BCS Customer web part header. Click the down arrow that appears at the right of the web part header. Click Connections, select Send Selected Item To, and then select BCS Order List, as shown in Figure 31.13.
Query String Filter Web Part
Recall that the operations assigned to both the Customer and SalesOrderHeader operations contain filters for CustomerID. Rather than try to view all customers and all sales orders on one web page, the orders information is most usable when viewing it one customer at a time. To isolate the records to just those for a single customer, a filter can be used.
Furthermore, it would be very inefficient to create a separate page for every single customer in the database and have to design it the exact same way each time, changing only the CustomerID in each web part. Instead, it obviously makes much more sense to create a single page and simply differentiate between customers via a single parameter.
A query string parameter provides this very capability. A query string parameter is the portion of a website address that appears after the question mark. For example, a query string parameter might be something like CustomerID. The web address to a page might look something like http://mss2010.abcco.com/Pages/CustomerDashboard.aspx?CustomerID=227. This URL will pull up the page called CustomerDashboard.aspx and will reference the customer whose ID is 227.
The Query String Filter web part is designed to read the designated query string parameter and then send that value to connected web parts. To see this web part in action, follow these steps:
1. From the Page ribbon, select Edit Page.
2. In the left zone, click the Add a Web Part link.
3. Select the Filters category and the Query String (URL) Filter web part. Click the Add button.
4. Click the Open the Tool Pane link to edit the web part settings.
5. In the Filter Name property, enter CustomerID.
6. For the query string parameter name, enter CustomerID.
7. Lastly, assign 2 as the default value. This last parameter is not critical, but will assign an ID to be used if the user lands on the page without the CustomerID being specified.
8. Under the Appearance heading, change the web part title to CustomerID Query String Filter.
9. Click OK to save the web part settings.
10. Finally, connect the web part to the BCS Customer web part. To do so, hover over the CustomerID Query String Filter web part header. To the right, click the arrow, select Connections, select Send Filter Values To, and select BCS Customer.
11. In the Configure Connection dialog box, select BCS Customer and click the Finish button.
12. In the Page ribbon at the top of the SharePoint page, click the Stop Editing button to complete all changes.
13. In the address bar of Internet Explorer, change the address, removing everything that appears after default.aspx. In its place, type ?CustomerID=2 and press the Enter key. Notice that the page shows the default data for Keith Harris and any related orders.
14. Repeat step 13, but use 61 for the CustomerID. Notice that the data changes to show the customer details and orders for Jeffrey Kurtz, as shown in Figure 31.14.

15. Repeat step 13, and instead use 151. Observe how the data changes again, this time showing the records for Walter Brian.
Summary
BCS provides a unique way of making information available for widespread consumption. A successful implementation is all about the data. However, assuming that the proper data repositories are available, the tool provides a means of quickly and easily presenting the data for consumers to access the information.
For years, powerful tools have made it possible to generate reports based on large volumes of data. Nevertheless, the traditional problems have been related to making the reports available to the right people and having the reports available at the time that they were most useful.
Like PerformancePoint Services in the previous chapter, BCS solves these problems in several ways. First, the ability to publish information to pages in SharePoint brings the information to the fingertips of anyone who might need it. Second, the client tools in SharePoint Designer make it possible for nondevelopers to build relevant, meaningful reports and to establish their own connections to the data. Lastly, having a single location to where the information is published means that only one version of the truth is available for consumption.
For all these reasons, SharePoint 2013’s enhanced BCS functionality helps make the right information available to the right people at the right time.
Best Practices
The following are best practices from this chapter:
![]() Although there are a number of changes, improvements, and updates in SharePoint BCS 2013, the underlying architecture has remained largely the same, so the changes will be of most interest to more experienced BCS developers.
Although there are a number of changes, improvements, and updates in SharePoint BCS 2013, the underlying architecture has remained largely the same, so the changes will be of most interest to more experienced BCS developers.
![]() External content types are one of the key components in SharePoint 2013 BCS, and this chapter reviews the process of creating these by connecting to the Microsoft AdventureWorksLT database.
External content types are one of the key components in SharePoint 2013 BCS, and this chapter reviews the process of creating these by connecting to the Microsoft AdventureWorksLT database.
![]() There are three main ways that you can leverage the external content type in SharePoint: external lists, external data, and BCS web parts.
There are three main ways that you can leverage the external content type in SharePoint: external lists, external data, and BCS web parts.
![]() Define associations for external content types that have relationships with others, such as the relationship between customers and orders.
Define associations for external content types that have relationships with others, such as the relationship between customers and orders.
![]() If using external data columns in SharePoint lists, periodically click the refresh icon to ensure that the most current data is displayed in your SharePoint lists.
If using external data columns in SharePoint lists, periodically click the refresh icon to ensure that the most current data is displayed in your SharePoint lists.
![]() For simple databases with little or no logic on various columns or tables, SharePoint Designer may be a useful tool for creating write-back operations. However, for larger or more complex databases, use a more advanced tool, such as Visual Studio 2013.
For simple databases with little or no logic on various columns or tables, SharePoint Designer may be a useful tool for creating write-back operations. However, for larger or more complex databases, use a more advanced tool, such as Visual Studio 2013.
![]() When including create or update operations on an external content type, it is important to create these operations before creating the external list in SharePoint.
When including create or update operations on an external content type, it is important to create these operations before creating the external list in SharePoint.